Plasticine is a material for modeling. It is made from purified and crushed clay powder with the addition of wax, fat and other substances that prevent drying. Painted in various colors.
Plasticine remains soft and practically does not harden or dry out. It has a wide range of colors and does not stick to your hands. Plasticine acquires different degrees of softness depending on the temperature, which allows you to work with it after any period of time. If the plasticine is hard, you need to knead it in your hands until it becomes softer.
The purpose of plasticine modeling classes:
■ Arouse a child’s interest in modeling.
■ Introduce the child to the properties of plasticine. Plasticine has the properties of crumpling, rolling, flattening, tearing, and acquiring varying degrees of softness depending on the temperature. Rolling a ball from plasticine is more difficult than from dough.
■ Teach your child to sculpt different shapes, combine them into compositions, etc.
■Develop fine motor skills.
■ Stimulate the child's imagination and fantasy.
■ Develop finger coordination.
■ Teach your child to work with plasticine independently, without constant adult supervision.
■ Teach accuracy in working with plasticine.
Materials and tools that will be useful in the work: modeling board, stack (stick for working with plasticine), plasticine.
You can, if desired, put armbands and an apron on your child.
Where to begin?
Since working with plasticine is a little more difficult than working with salt dough, the tasks for working with plasticine will be slightly different.
LESSONS IN MODELING FROM PLASTICINE
Lesson 1. “Strawberry meadow” (flat crafts)
You will need: album sheet, plasticine, modeling board, green felt-tip pen, stack, pictures of berries.
Stages of the lesson:
■ Draw strawberry branches on a landscape sheet, but do not draw a berry at the end of the branch. This is what you will sculpt with your baby. Try not to place the branches too close to each other.
■ Show your child a picture of strawberries or wild strawberries.
Story
Just as with dough modeling, tell your child a story that fits the theme.
In the forest, in a large clearing, a small berry grows. It's called strawberry. All forest animals love it because it is sweet and tasty.
■ Then the adult asks questions. Tell me: “What color is this berry?” (Red.) And the leaves? (Green.) What shape does a strawberry look like? Where does this berry grow? What is it called? What other berry do you know?”
■ Place a prepared sheet with twigs and plasticine in front of the child. Let him choose the right color himself.
■ Cut a narrow strip of plasticine - it’s convenient to pinch off small pieces from such a piece. Show him how to do it correctly and how to roll a ball correctly on his palm.
■ The child glues the resulting ball to the drawn twig, pressing lightly. No glue is needed - the plasticine will stick perfectly to the paper. Don't forget to praise your child for the work done. Attach the craft in a visible place so that the child knows he likes his work. So he's great!
This is the kind of strawberry meadow you can get
.jpg)
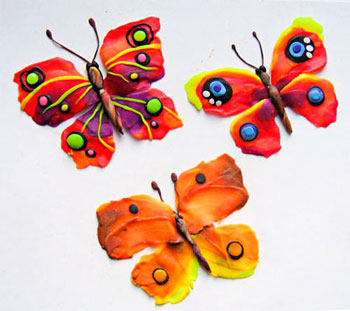
Lesson 2. “Butterfly”
You will need: cardboard, plasticine, modeling board, pencil, scissors, stack.
Prepare a butterfly template in advance by cutting out a figure from cardboard (approximately 10x10 cm).
Show your child a picture of a butterfly, tell him why the butterfly is so beautiful, and pay attention to the fact that thanks to its elegant wings, it manages to hide from birds among the flowers (fig.).
.jpg)
Stages of work:
■ Cut thin strips of plasticine different colors. Invite your child to roll out flagella from each color of plasticine and cut them into small pieces using a stack.
■ The child chooses the piece he likes and smears it over the butterfly pattern, “painting” it with plasticine.
■ The butterfly is ready.
Lesson 3. “Painting”
You will need: half cardboard sheet, plasticine, modeling board, stack, pencil.
Stages of work:
■ Together with your child, come up with the composition of your painting. It could be a chamomile, a house, a fish, a tree, or just an abstract composition.
■ Draw a sketch of the future painting with a pencil.
■ Help your child cut small pieces of plasticine desired color and roll out long flagella.
■ Now, flagellum by flagellum, lay out the composition. Flagella can be rolled up like a snail, laid out like a snake, made into petal loops, etc.
■ Make a frame using plasticine strands and apply a pattern to it using a stack.
■ Help your child experiment by showing individual elements and explaining what can come of it.
.jpg)
Lesson 4. “New Year tree” (craft decorated with beads)
You will need: cardboard, pencil, scissors, plasticine, modeling board, multi-colored beads, stack.
This activity is best done immediately before New Year holidays. Prepare a Christmas tree template by cutting it out of cardboard in advance.
Sing a New Year's song about the Christmas tree with your child and read the poem. Now you can get to work.
Stages of work:
■ Cover the Christmas tree with green plasticine, applying it in small pieces to the template and lightly smearing it.
■ Then decorate your Christmas tree with beads by pressing the beads into the plasticine with your finger.
You can hang beaded “toys” in a chaotic order throughout the Christmas tree or lay out patterns: snowflakes and diamonds. Small buttons, sequins, and bugles are suitable for decorating your Christmas tree.
.jpg)
Lesson 5. “Printing” drawings on a plasticine base
You will need: cardboard or board for plasticine (you can take metal or plastic caps with raised edges), plasticine, pencils of various shapes, felt-tip pens, rods, caps from different bottles and toothpaste, toothpicks (in general, any objects that can leave an imprint on plasticine ).
Stages of work:
■ Apply a thin layer of plasticine to the base.
■ Create your own drawing and complete it using “typing”.
It is easier to make impressions on plasticine than on dough.
Lesson 6. “Cup for pencils”
You will need: low glass jar or a plastic cup from under the soup instant cooking(wash the glass in warm water and soap to wash off all remaining fat), plasticine, modeling board, various cereals (peas, rice, buckwheat, millet), a stack for working with plasticine, a board.
First way.
Stages of work:
■ Knead the plasticine before work, help your child roll out several ropes (8-9) about half a centimeter thick.
■ Show your child how to glue the ropes onto the jar, encircling it with rings, starting from the bottom. (A similar technique is described in the lesson “Pyramid”.)
Second way.
Stages of work:
■ Cut thin strips of different colors.
■ Help your child roll out multi-colored flagella from plasticine and cut them into small pieces in a stack.
■ Now the child will only have to “paint over” the pencil holder with plasticine, lightly smearing it over the surface of the jar.
When the base is ready, you can start decorating. This is where the child will need your help. Take the cereals and stick them on so that you get some kind of ornament: for example, lay out flowers, circles, diamonds.
The pencil holder is ready.
.jpg)
Lesson 7. “Caterpillar” (modeling from individual forms)
Purpose of the task: concept of form. Ball.
You will need: plasticine of different colors, modeling board, stack.
Stages of work:
■ Decide what kind of caterpillar you will have. Ask your child what shapes it can be made from?
■ Roll into balls different sizes and connect them, sticking to each other. Collect the caterpillar.
■ Make horns and eyes from small balls, and use a stack to make a mouth.
The plasticine caterpillar is ready.
.jpg)
The following lessons of this type can be devoted to the cube, cone, and cylinder. You can make a bird out of cones, different sizes cubes - a funny cat, etc.
Lesson 8. “Picking mushrooms” (volume crafts)
Purpose of the lesson: in addition to the main purposes of plasticine modeling, this activity introduces the child to mushrooms and their types: White mushroom, little fox, don’t forget to tell us about the insidious fly agaric. Explain to your child what edible and inedible mushrooms are.
You will need: plasticine, modeling board, stack, cards with images of mushrooms.
Stages of work:
■ Show your child cards with pictures of mushrooms.
■ Let the child choose which mushroom to make.
■ Teach your child how to make mushrooms.
.jpg)
Lesson 9. “Pyramid”
You will need: modeling board, plasticine different color and a stack (a stick for working with plasticine).
Stages of work:
■ First, sculpt the rod - the base of the pyramid. Mash about half a block of plasticine of any color and roll it out into a cylinder or cone for the rod.
■ Then make the rings. Take brightly colored plasticine, cut a piece from the block and knead it. Show your child how to roll a ball: in the palm of your hand and on a board. Then roll out the ball to the desired thickness.
■ Prepare five or six strands of different colors.
■ Place the rod on the board. Secure it by wrapping the first tourniquet at the base of the rod (help your child by showing how this is done). The first ring was made.
■ The child turns the rest of the strands into rings on his own.
■ Ask your child what is missing from your pyramid? That's right, we need to make another top. Decide with your child what shape it will be. It could be a ball, a cone, a cockerel's head, etc.
■ Help your child make the top of the pyramid correctly.
Do not limit the child’s imagination, allow him to sculpt what he wants, just for the soul. You will be surprised how developed your child's imagination is.
.jpg)
Based on materials from the book by N.V. Aleshina “Mommy’s Work”
Modeling classes are very useful for the development of a child. They develop fine motor skills, color perception, artistic taste, and perseverance. All advantages. Let's add here the fact that when working with plasticine, clay or salt dough You cannot get burned, cut or injured. And you'll have the perfect creative activity with kids. preschool age.
You can add variety to your modeling classes and expand their capabilities using the publications in this informative section. The positive experience of colleagues in working with plasticine, salt dough, clay, and modern modeling compounds is presented here in the form of step-by-step master classes, illustrated with photographs of reports.
Modeling: lesson notes, programs, clubs, planning
Contained in sections:Includes sections:
By groups:
Showing publications 1-10 of 7817.
All sections | Modeling. Lesson notes, projects
Class"Gift for doll Varya" Target: familiarization with technology salt dough moldings. Tasks: 1.Develop fine motor skills. 2.Develop coordination of finger movements. 3.Improve children’s ability to transmit sculpting images of familiar objects. 4.Create interest...
Summary of the modeling lesson “Treats for the dog” in the nursery group Summary of a modeling lesson in a nursery group. Subject: "A treat for the dog." Target: teach children how to roll plasticine into shapes "sausage". Develop interest in the process sculpting, to its result, to create conditions for the development of fine motor skills of the hands (we continue to teach children...
Modeling. Lesson notes, projects - Lesson notes on modeling “Let's treat the dolls with candy” in the first junior group
Publication “Summary of the modeling lesson “Let’s treat the dolls with candy” in the first junior...”  Summary of a modeling lesson in the first junior group “Let's treat the dolls with sweets” Modeling. Topic: “Let's treat the dolls with sweets” Objectives: To develop children's interest in the process and result of modeling. Introduce the properties of plasticine. Create a desire to create something. Develop the ability to carefully...
 Image library "MAAM-pictures"
Summary of organized educational activities on modeling in the senior group “Autumn Fair” Program objectives: Develop the ability to compose a composition using the plasticine mosaic technique; Technical tasks: Practice sculpting techniques: pinching, rolling balls. Educational objectives: To instill in children respect for work. Reinforce the techniques of careful sculpting....
 Abstract of the OOD on artistic and aesthetic development (modeling) in the preparatory group for school Topic: “Teddy Bear”. Objectives: - give an idea of lifestyle brown bears about how they are adapted to life in natural conditions; - develop children's ability to portray...
Summary of a lesson on speech development and modeling in the junior group “Ryaba Hen” Program content: by dramatizing a fairy tale familiar to children, make them want to repeat individual words and phrases after the characters in the fairy tale; contribute to the formation of intonation expressiveness of speech; consolidate the technique of rolling plasticine between your palms....
Modeling. Lesson notes, projects - Leapbook passport for mathematics in the preparatory school group “Orientation in space”
Passport for a laptop computer in mathematics in a preparatory school group on the topic: “Orientation in space” was compiled by: Eliseeva N.N. 1. Graphic dictation The goal is to develop fine motor skills of the hands; development of the concepts “left / right”, “top / bottom”; strengthening numeracy skills; development...
Summary of the modeling lesson “Fruits for the Bunny” for children of middle preschool age Goal: to develop children’s ability to sculpt fruits using different sculpting techniques. Objectives: Educational: teach children to sculpt an apple and a pear, passing them around characteristic features and shape; apply techniques of rolling plasticine into a ball and pulling it out to give the desired shape, decorate the craft...
Summary of an integrated educational activity on speech development and modeling in the second junior group “Kolobok - ruddy side” teacher: Nor M.E. Summary of an integrated educational activity on speech development and modeling in the second junior group on the topic: “Kolobok - ruddy side.” Goal: Systematize children’s knowledge about spring, Russians folk tales. Objectives: Strengthen the ability to name the signs of spring. Develop a coherent...
 Abstract of OOD on modeling 2 junior group. Topic: "Centipede." Objectives: - to arouse interest in the depiction of living beings; - learn to sculpt expressive images of living beings (centipede) based on a roller (cylinder); - learn to roll out columns with straight movements of the palms “back and forth”...
Well, if there is a problem in finding ideas for creating compositions or crafts for modeling classes with children, our section will come to the rescue. In which dozens of ideas, techniques and photo reports are painstakingly collected and neatly laid out. Teachers and educators throughout Russia spent a long time inventing, discussing and creating precisely so that you could glean useful information.
There are even step-by-step instruction How to make a delightful lilac branch. It turns out that everything is not as simple as it really seems. The teacher shares little secrets on how to breathe life into an ordinary bush, how to play with colors and shapes. Children will definitely enjoy these creative lessons. Teachers also suggest using any available materials to make funny compositions - kinder surprise eggs, toothpicks and thread. Everything comes into play when your imagination, head and desire to create are turned on!
One of the most effective classes for the development of fine motor skills is modeling. According to experts, sculpting should begin as early as possible. In this article I will present our favorite exercises.
When reading materials about how interesting modeling is for children, do not forget that most children aged 1 year are conservative and love established order. They have only recently gotten used to the idea that all toys are soft or hard. Plasticine is a completely new consistency for a baby, which threatens the existence of everything familiar. At least go and check all the items again, in case some of them have the consistency of plasticine.
In addition, any creative activity requires not only the formation of a skill, but also enjoyment of the result. This requires awareness of the results and one’s capabilities, which manifests itself very weakly in the second year of life. Therefore, if you decide to take up modeling with a child under two years old, do not expect much jubilation and joy.
The simplest element, “sticks” (cylinders), is mastered by most children in the third year of life. Some cope with the cylinder only at three years. After mastering the cylinders, you can start working on the balls.
 The book “Plasticine Beads” contains 8 pages of exercises for gluing balls. A one-year-old baby can handle them quite well. For a two-year-old, you can make the tasks more difficult by offering regular plasticine. It is more elastic and sculpting with it will be more useful for the development of finger motor skills. Classic plasticine produced by Luch (Chemical Plant) is considered one of the best.
 “Plasticine Oranges” contains 8 pages of exercises for creating all kinds of balls:
Happy sculpting!
More publications
Modeling is a great activity for developing fine motor skills, imagination, hand coordination and sensory experience (feeling material, shape, weight). Start off educational games You can work with a child from 7-8 months, when the baby is already sitting confidently and is able to pick up anything. Plasticine is suitable for modeling, but if you are afraid that it will quickly end up in your mouth, you can replace it with salted dough, which is easy to prepare with your own hands.
Modeling classes not only help develop fine motor skills, but also provide an excellent stimulus for speech development. In this regard, it is important to regularly engage with your baby for about 5-10 minutes a day. This is no longer necessary, since long-term activities are still difficult for a one-year-old child; they can overexcite him or, conversely, greatly upset him, which will lead to negative consequences, for example, to a refusal to engage in such activities in the future. It is important not to overload the baby. As in everything, so in educational games you need to know when to stop.
The process is also important, not the result. Don’t try to make a house, a dog or a car right away. This is not necessary. At the very beginning, you teach your child how to handle plasticine (dough), and you can approach creative implementation after two years, when the child has already sufficiently developed imagination and the desire to create.
What is needed for sculpting?
Modeling tools:
- Soft plasticine bright colors. The brightness of the material is very important, which will increase the baby’s interest in the game.
- Play dough. You can do it yourself.
- Multi-colored matte cardboard. Glossy will not work, as the plasticine will not attach well to it.
- Boards, stacks, and other tools that can be used to work with dough.
- Educational pictures for working with plasticine. You can buy a special magazine or print the drawings on a printer.
- Toys that are suitable for role-playing games. For example, animal figures, cars, spatulas, molds, etc.
Basic techniques for sculpting: kneading, pinching, spanking, flattening. These actions can be performed either on their own or as part of a game.
The second option is preferable, since the baby may simply refuse to fulfill your requests; it is advisable to stimulate him with something more interesting.
It is important to prepare dough or plasticine in advance. The play dough should be warm and not sticky to your hands, but also soft enough for your baby to crush it easily. Choose softer plasticine. If you bought a regular one, remember it well before teaching your child.
- Spend about 5-10 on classes. If you notice that your child has lost interest or is tired, stop playing immediately.
- Don't insist. If your baby doesn't want to do something, don't force him. Play yourself, gradually the child will connect to you. Visual perception of actions is also useful.
- No negative emotions. Don't scold, don't force, don't make him tired, let the baby do what he wants and guide him gently.
- If your child's interest in plasticine or dough has waned, remove it for a few days.
Lesson 1. Introduction to plasticine (test)
Your goal is to introduce your child to plastic material. During the first lesson, it is important to interest the baby, so show more of what can be done with modeling dough (plasticine). Crinkle, tear off pieces, roll tubes and balls. Tear off a small piece for your baby and let him get to know it. Let the child play with it as much as he wants, but be careful not to put it in his mouth.
Talk, talk and talk again! This is very important rule in activities with a child. No matter what you do, always comment on your actions. This promotes speech development, stimulating speech activity and imitation. Soon you will notice how the child will begin to follow your lips and silently (and maybe out loud) will try to repeat after you.
This is what a dating session would look like:
- What is this in my hands? (show the plasticine to the baby)
- That's right, it's plasticine.
- What is he like? (remember, let your child touch).
- Soft.
- You can crush it (show how).
Lesson 2. Preparing play dough together
You can involve your child in preparing dough for sculpting. This activity is suitable for children after a year, when the child is already familiar with materials such as flour and water. Otherwise, a disaster awaits you - the baby will either get himself and everything around dirty, or get upset, not understanding what is happening.
Lesson 3. Spanking, flatbreads
Place plasticine or dough on the board in front of the child. Knead it to soften it and smack it with your palm on top. Invite your child to repeat after you. If he doesn't understand your request, then help him, but don't insist.
When performing spankings, say: “Slap, spank, spank, spank!” And we get a flatbread!” Or anything else in the same spirit. Watch the child’s reaction, choose words that will captivate him.
Lesson 4. Hiding and finding the ball
You will need small balls that the baby can easily hold in his hands, and a handkerchief. It is best if the color of the ball differs from the color of the dough or plasticine.
First, get your child interested. Show one ball and offer to hide it. Cover the ball with a handkerchief: “Oh, where did the ball go? No ball. Let’s look for him!” Together, “find” the ball under the handkerchief.
Now take the plasticine, knead it and, repeating the spankings as in the previous lesson, make a cake. Help your child with this. After this, hide the ball (pre-lubricate it with oil so that the dough does not stick) in a flat cake made of dough or plasticine. Now invite your child to find the ball by freeing it from plasticine or dough. In the future, you can hide other objects with plasticine in different forms and surface types.
This activity can be divided into two. In the first one, master “hide and seek”, in the second – getting an object made of plasticine.
Ladybug, wasp and caterpillar.
Lesson 5. Plasticine mosaic
Teach your child to pinch off plasticine or play dough small pieces and attach them to a flat surface. Show him how it's done, then let him try it himself. Don't worry if you don't succeed the first time. Then put off this activity, and for now do what the baby already knows how to do.
The next lesson, start again with pinching off until you achieve success.
After the child has learned to pinch off, move on to the next stage - attaching a piece of plasticine to the surface. To begin with, you can give him some dough yourself and ask him to stick it somewhere. Then let him do everything himself - pinch it off and stick it on.

Butterfly made of plasticine.
This activity for developing fine motor skills is best done as a game:
- form a mosaic from multi-colored plasticine;
- feeding toy animals “grain/feed”;
- decorate a painted Christmas tree;
- attach to ladybug black dots;
- and much more.

How to make a giraffe.
Lesson 6. Prints
This activity will require a variety of items that can be used to play with plasticine. These are scallops, parts from a designer, beads, a rolling pin, cars, balls with pimples, etc. Use your imagination, the main thing is that this object is comfortable for the child to hold in his hand, it leaves some kind of mark on the plasticine.
Make a cake with your child from play dough or plasticine. This can be done with your hands or, for example, with a rolling pin. Well, then experiment. Using an example, we offer illustrative modeling lessons: how to make a hippopotamus and fabulous, kind, gray plasticine wolf .
Especially for the website Handicraft Lessons Catherinka.
A good option to spend time with your family and pay attention to your child is to do something common cause. For example, teach a child to work with plasticine. It doesn’t matter if parents don’t know where to start and what to sculpt, for this there are video tutorials on quick and high-quality sculpting from plasticine.
We analyze video lessons on modeling from plasticine with a child
Safety precautions when working with plasticine:
- Before you start working with plasticine, you need to cover the table with film so as not to spoil the surface on which you will work.
- Prepare in advance all the materials needed for work. And a container (box or bag) for finished products.
- Take a rag or napkins to dry your hands with.
- Make sure that the child does not put the material in his mouth, scatter it or mold it anywhere.
- Do not rub your eyes when working with plasticine.
We understand the main types of plasticine for the whole family
Nowadays, the variety of plasticine is very large, which allows everyone to choose a material according to their taste and capabilities.
- Paraffin. This is domestic plasticine, which our grandparents used. Its only advantage is the price. It consists of paraffin and chalk, and is hard, so it is difficult to soften it.
- Floating. Children love the fact that products made from this plasticine float on the surface of the water, since the material from which it is made is two times lighter than usual.
- Sculptural (not for small children). This is professional, hard plasticine.
- Wax. Soft, bright, flexible (does not require kneading), mixes well, forming new colors and shades. One of the most popular types plasticine.
- Solidifying. Hardens within 24 hours after making the figurine. Subsequently, this product can be played like a toy.
- Ball. Sold in jars in the form of small balls connected together with glue threads.
- Plant based. This plasticine is very soft, for the little ones to taste.
- Fluorescent. This type of material glows.
- Pearl. It has a pearlescent sheen, but otherwise is no different from the others.
- "Smart". It can be liquid and solid, changes color and shape, tears and stretches, and is magnetic.
Modeling is one of the types of creativity for activities with children even of the youngest age. Simply by playing and entertaining your baby, you can develop sensitivity, fine motor skills, the child’s imagination and thinking, hand synchronization, perseverance, teach how to change a figure and analyze what happened.
Before you start working, you need to explain and show your child how to work with plasticine, using your own example.
Photo of step-by-step work with plasticine
Knead the material. Knead like dough, just with your fingers.

Pinch off a little at a time and form pieces of different sizes.
Slap your palm and fingers on the plasticine.
Squeeze in your hand to shape the material into different shapes.

Roll into a ball with your palms. Roll into a sausage.
Thanks to these actions, the baby will learn to knead plasticine and make the most basic figures from it.
There is a very interesting plasticine Play Doh, it can be stored for 4 years, is inexpensive, and the crafts made from it are very beautiful. You can also make “pasochki”, and then mix and sculpt something else.

Here is an example of a video where Masha and the Bear make Play Do Sushi from plasticine.
Play Do is so easy to use that you can even sculpt animals without any difficulty. And then you can take the product apart into parts and hide it back in the jar.
We study a simple MK "Modeling animals from purchased plasticine"
Any child can be taught to sculpt animals from plasticine; you just need a little time, effort and patience. The main thing is that the plasticine is soft and elastic, so that children’s hands can handle it.
Cow

Cat
 All children, from young to old, watch cartoons and ask to buy this or that toy. Why not make your own favorite hero? For example, from the same plasticine? It’s not difficult at all, and it will be doubly enjoyable for the child to play knowing that he did it himself.
 For example, Smeshariki, bright, original, amusing and funny cartoon characters. They look so beautiful on TV screens that sculpting them is a pleasure, and not difficult at all.
To do this you need:
- plasticine;
- toothpicks;
- plastic knife;
- board for working with plasticine.
Make Nyusha, the only young girl in the cartoon.
Step-by-step modeling:
- First you need to take plasticine pale Pink colour. Often this is not available in sets, so you have to mix red and white. A little red and white separately.
- Roll a round ball of the pink color you need. Make eyes from white plasticine, hair, eyelids, nose and pigtail from red. You will also need a little black for the eyelashes and pupils.
- Having made all the parts separately, connect them, and secure the arms and legs with toothpicks.
Happy crafting!