Homemade trailer cottage made from car trailer: photo of the camper being built with detailed description, also a video showing a mobile home.
We decided to build a small residential house on wheels so that we could travel to nature in our car. Since we didn’t have drawings of the camper, we decided to make a removable module for the factory trailer (so that there would be no problems with re-registration of the vehicle).
This is why it was purchased boat trailer from Kurgan plant(only in their title they don’t specify what kind of trailer it is. It’s just a trailer; other manufacturers indicate that it’s a boat trailer and you can’t put a house on it).
The dimensions of the module corresponded to the dimensions of the trailer - 1400 x 2400 mm. Naturally, the removable module must be durable, and even for our roads plywood house It definitely won’t work, I had to weld a steel frame.
The base is welded from a 60 x 30 mm profile, the walls and ceiling are made from a 20 x 20 mm profile. 2 identical arcs were bent on a pipe bender.
The most difficult thing was to think through the doors; it took us 1/3 of the total time spent on the doors. Anyone interested in this topic has seen factory doors, ventilation hatches, gas stoves, sinks, heaters, etc. and so on. There is only one problem: cost. one factory door costs about 700-800 bucks (and you need 2 of them), a sunroof with an exhaust hood costs about 300-400 bucks, I didn’t even look at the sinks and stoves, and so it became clear that we would choose from what we found in hardware stores .
As a result, we made the doors ourselves, because with our course the budget for the doors alone came out to more than 100 thousand (on Alika, Ebay, in Europe, America, Russian online stores - the prices are approximately the same).
We decided to make the doors with power windows, because... This is the easiest way in our opinion. There is no point in describing the whole process, I will only say that making the doors was very tedious. but at cost they came out to 5 rubles per door, taking into account everything. the savings were worth it)
The outside of the body was sheathed with 0.8 mm aluminum sheets, we looked for it specifically large sheets so that you can cover it with one sheet without joints. As a result, we found AMC2 sheets measuring 1500 x 3000 mm, which suited us quite well.
Now I would choose a composite material for cladding buildings, 4 mm thick (for those who don’t know, these are 2 sheets of 0.4 mm aluminum, and between them a special composite that ideally withstands all weather conditions).
We stuck aluminum onto a plywood backing, riveted it around the perimeter and sealed all the joints. It was possible to leave the trailer aluminum, but initially we wanted blue on the outside, so we ordered vinyl film for covering the vehicle from a printing house and covered it on top.
Many people ask about the refrigerator. There is no refrigerator, and there cannot be one, because... The module is removable and has its own car battery. The module wiring is completely autonomous and is not connected to the wiring of the car or trailer in any way. Therefore, there is no way to connect a refrigerator here. Although I don’t understand the problem if it can be placed in the trunk of a car.
We also made 2 220V sockets in the living area, a 400W inverter, enough for both chargers and a TV. LED lighting everywhere.
Water is supplied from a canister by a fountain pump, not very powerful, but economical.
We made a niche for the countertop under the kitchen, it seemed very convenient, but in fact the ribs on top and bottom were from a 15 x 15 profile, very flexible and not reliable profile. As a result, the niche bent a little and the chipboard table did not fit there, so we had to make it out of plywood.
After assembly, the trailer was tested by Karcher at all joints, cracks, etc. 100% tightness.


Costs for building a caravan trailer.
We started building the camper in May 2015, and finished it in June 2016. My friend and I work in shifts, i.e. per week 2-3-4 days could be devoted to the trailer. We were very stuck with the kitchen decoration and doors. If you expect to collect it in 3 months, add triple the deadline.
In terms of finances: everything was bought new, nothing used was used. The trailer itself cost 44 thousand, and about 110 thousand was spent on materials. Everything was fixed, right down to the gloves, so the price is close to the real one. You can do it cheaper, but you should know in advance.
By weight: the trailer + module weighs about 600 kg, the module itself is about 460-480 kg. Increased severity a large number of Chipboard, who will do it - look for more lightweight material for partitions.
The 1.4 Octavia passenger car pulls the trailer with a bang. On the highway I accelerated to 130 km/h, the trailer is not felt at all, the streamlined shape practically does not slow down. consumption increases by 1-2 liters. It’s difficult to drive on a bad road above 90, after all, the weight is not small, it jerks the car. But 80-90 is quite acceptable for such a trailer. I drove through fields, along dirt roads, and the trailer never hit anywhere.

Video that explains in detail makeshift house on wheels.
Today we will tell you how to build a teardrop trailer with your own hands. This type of residential module is common among caravaners - lovers of road trips with a motor home. You can see an example in the photo below.
Why a teardrop trailer?
Let’s not be unfounded - a teardrop trailer is not a full-fledged trailer with all the amenities; it has its pros and cons. Each traveler decides for himself which mobile module to choose. We will note the advantages according to which the decision was made to build a teardrop trailer:
weight and shape;
compact dimensions;
ease of manufacture, low costs for building materials;
the ability to limit yourself to rights with category “B” (we wrote about categories for trailers);
no re-registration with the traffic police is required.
The first two points are very important for us - the tractor will be a Chevrolet Niva with a low-power 79 hp engine. Of course, with such an engine you can haul a large trailer, but on the very first trip all the joy of traveling will end after the next uphill climb. The teardrop trailer can be easily assembled in the garage with low ceilings(190 cm) s budget 50 thousand rubles, which can't be said about a big trailer.
Choosing a trailer for the base
We purchased the Soviet “trolley” VOEARZ 81011 in good condition, having bargained for a decent amount of money. You can choose another option; now the factory can make almost any size to order.
Requirements for trailer dimensions:
width – at least 150 cm;
length – at least 190 cm (preferably 240 cm);
The height of the platform from the ground is approximately 50 cm.
Important! The trailer should not be high! Otherwise, you will not be able to normally drive more than 50-60 km/h! Optimal - 50 cm.
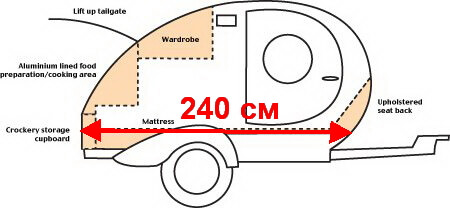 A teardrop trailer is a kind of “bed on wheels,” so these sizes are quite sufficient. We will place a removable residential module with the following dimensions on the trailer:
length 240 cm - 190 cm is the “bed” and 50 cm is the kitchen;
width – 150 cm, optimally for two people.
Why is a removable module better? – does not require registration with the traffic police, since the design of the trailer has not been changed, and the booth is considered to be transported cargo.
Preparing the workplace for building a trailer
So, we have decided on the dimensions and are ready to start construction. Prepare basic tools:
a jigsaw or grinder with a saw wheel for wood;
screwdriver and/or drill with adjustable speed;
screwdriver;
hammer;
pliers;
awl;
marker and chalk.
Sometimes during the construction process additional tools are required - as they say, whatever is more convenient for you. It is better to purchase additional materials gradually, since the sizes may vary slightly. We will list only the main components:
moisture-resistant polished plywood 12 mm (for floors), 10 mm (for sides), 3 mm (for ceilings);
timber 50*50 (main), 40*40 mm (for the door);
steel construction angles;
polystyrene foam 50 mm;
plastic windows 400*500;
galvanized sheet 0.35 mm;
wood screws 4*40;
In the process, sealant, door hinges, handles, bolts, cigarette lighters, wires, light bulbs, etc. are purchased.
Start of construction
The main rule of assembling a campsite is to assemble the van from the inside out. It’s not the other way around, otherwise you won’t be able to get the inner trim through the door.
We make the base of the van from timber. Its dimensions are 150*240 mm, fastening is carried out with corners. Then we screw moisture-resistant plywood (12 mm) to the bottom with self-tapping screws in increments of every 10-15 cm.

Don't rush to lay the floor - treat the plywood special means from rotting and insects. We used “Senezh Aquadecor”, color “Mahogany” (No. 113), average price 340 rubles. You can buy other brands cheaper, but they are liquid and cost 1.5 times more.
Then cover the bottom with galvanization and paint it, let it dry (in the future the structure will become much heavier and this will be problematic). You can use regular metal enamel “PF-115”, it’s still not visible below. Attach the base to the trailer with reliable, powerful bolts and wide washers; holes are drilled in the timber, which coincides with the iron beams.
Important! Do not make holes in the trailer's sheet metal or just in the plywood - it will vomit! Do not use Chinese “plastic” fasteners! We asked the car service center for used hardened bolts from the cylinder head cover (they are disposable and they throw them away anyway).
Then we cut out the inner sides from 10 mm plywood of the required shape, make openings for the doors - the width is at your discretion, but not less than 55 cm. We selected a ceiling height of 120 cm for ourselves - it allows a person 190 cm tall to sit fully.

We screw a 50 mm beam along the periphery, level it with a grinder in places where it is rounded and polish it. Don’t worry that the design “plays” - the outer skin will give rigidity to the van.
Then we adjust the plywood for the floor (12 mm) to inner dimensions, cover with impregnation. We lay the foam tightly.

We fasten the floor with self-tapping screws, drill holes from below for fastening bolts, which will be accessible from the camping interior. We fix the base to the trailer until the end of construction. Then we treat it with impregnation interior walls at both sides.

Next, we lay the wiring, install cigarette lighters, lamps, and insulate the walls with foam plastic. We bought a lampshade from Niva; it is an external type and easily attaches to plywood. The remaining components were purchased at a radio parts store. We draw the conclusion to the trailer socket; in the future there will be an additional wire from the car battery.
You can run a second wire and make a spare battery compartment in the trailer itself so that you can detach it from the car and use the light.
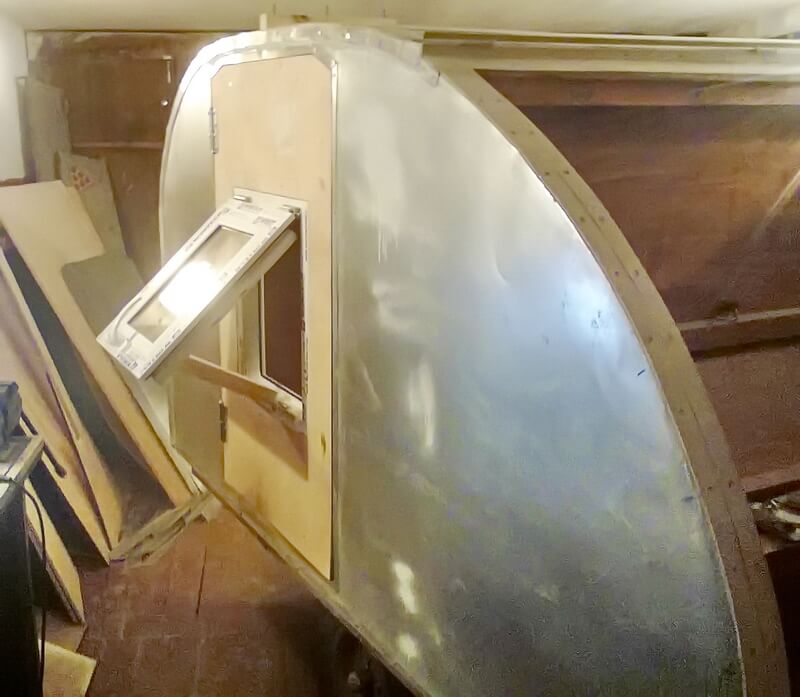
We cut 3 mm thick plywood onto the ceiling, gradually bend it, and screw the beam to the sides from the outside. At the back we separate the kitchen. Take into account the two distances circled in the oval in the figure - you must lie down at full height and not reach top shelf when bending your knees.

We insulate everything with polystyrene foam, then cover the outside with plywood (sides 10 mm, ceiling 3 mm), which is pre-treated with impregnation.


Then we make a frame for the large back door (it will open upwards), we begin assembling the kitchen - there is room for your imagination, as you wish.

According to the plan, wiring, lamp for lighting, cabinets, washbasin tank and drain. In any country store you can buy a tank and a faucet, a set of double-sided nuts, and plumbing sealant. We won’t describe the little things, just work them out locally.

You can put the kitchen aside for later and get busy external cladding made of galvanized steel. The joints are degreased and generously coated silicone sealant, we used "Moment". The metal overlaps and is painstakingly stitched with an aluminum strip.

Modify latches and handles locally. Let's move on to the side doors - here it is better to use 40 mm timber. We cut in plastic windows, fill everything with polystyrene foam, and insulate it.
Please note that the windows should open to the street - this is more convenient, since there is too little space inside. Here a problem arose: such “devices” are not produced. We cheated: we remove the handle from the outside and install a plug. We drill a hole on the back side, attach a homemade “grab” and make a support from a beam. A special “key” is obtained from the handle using a grinder. It is better that the window opens upward - this will protect you from side rain.

Be sure to provide minimal ventilation in the doors. In such a small room, even in the cold season, after a couple of hours there will be nothing to breathe. Air ducts (from sewer pipe) it is better to mount it at an angle of at least 30º, so that side rain does not make a puddle on you on the first day. We degrease all joints from the street and coat them with silicone sealant.

We cover the outside with galvanization, install handles and latches. Then painting. We used Chinese KUDO spray cans, pre-primed by the same company. After the coating has dried, be sure to seal all three doors with rubber insulation (you can buy it at a building materials store).

After six months of hard work, we are enjoying the result! The car behaves perfectly on the road, such a trailer does not sway, fuel consumption has not changed much. At temperatures up to +8ºC, you can sleep inside like at home.

Traffic inspectors looked at the presence of documents for the trailer, license plates and the operation of the rear lights - they did not ask any other questions.


Denis Filin, for the Avtoclub78 website http://site
P.S. The manufacturer of this trailer is ready to answer questions from our readers. Ask them by e-mail or (even better) in the comments!
A decision was made to conduct a global cleanup of the company. But, if you take it all and throw it away, somehow you can’t raise your hand. What to do? Why not build another trailer? And who said that it must be “off-road”?
The decision was made to build a vintage tie-drop trailer.
An example of what can happen is taken from the Internet:

So where to start? From the wheels - the tires were left from some kind of Kruzak, but with white letters. The wheel arch will be made of iron - I bought it in reserve - it wasn’t needed (it was too small). The wheel will be cast with thick spokes - old ones from my 80 cruiser.

Springs from Bukhanka (new model), just right for a waste trailer. A battery I had lying around from Jim would also work.

Shock absorbers 4 pcs. left over from an unsuccessful experiment with pneumonia - put it into action.

There is a wheel axle. No brakes. At one time I made it as a spare tire for Mochalov Lesha’s “Venin” project - it wasn’t needed. I’m also thinking of lowering it by about 10 centimeters.

Lock for the back door from the Volga. Was lost during the move, but now found in time
A removable and even rotating support stand - that's it. So far it hasn't been needed either, because... it doesn't have a wheel.

Stainless steel sink. Somewhat cut, but with a drain at 90g. - into action

A watering can from some old boiler. Submersible pump for water left over from my ancient Hobby. For water from the dacha, I will bring simple plastic cans of 80 and 60 liters.

Cuttings from countertops will also find their use.

The remains of bamboo fabric will create comfort in the children's compartment.
Trimmings different types insulation will find its home in the walls/floor/ceiling.

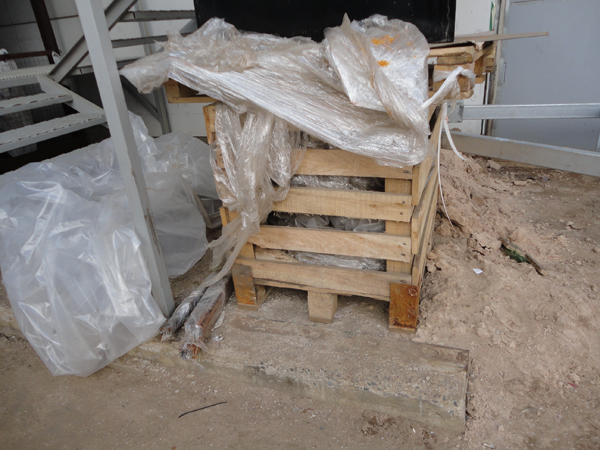
We will use composite scraps and wood from shipping boxes and broken pallets on the body.
The interior layout will be as follows:

The body size will be decent!!! Preliminary dimensions: width 1800/height 1200/length 3300mm
The width of the trailer itself is almost 2.5 meters!!! :)
The wheel axle is too small. But still nag her. It is planned to lower it by 100-150 mm.
.JPG)
Nice little thing for street lighting when parked. I came across lanterns with candle lighting in the store! :) I think it will be on topic. Gas burner galvanizing. Let it rust. .JPG)
Here's what happened:
.JPG)