In order for bath procedures to bring only benefit and pleasure, two conditions are necessary:
- high level of temperature and humidity in the steam room;
- the presence of sufficient oxygen.
These seemingly mutually exclusive tasks are solved by ventilation in the bathhouse in general and in the steam room in particular. Despite the fact that high humidity and temperature must be maintained in the steam room of a Russian bath, it is impossible to do without access to fresh (cold) air: oxygen is processed by our lungs, partially burned out by the stove, and carbon monoxide (CO) gradually accumulates in the steam room. chemical formula carbon monoxide).
How to properly ventilate a bathhouse. In the figure, red arrows show the movement of hot air, blue arrows show cold air.
If you do not organize the replacement of “waste” air with fresh air, instead of improving your health and increasing your performance (this is what we go to the bathhouse for), you can get, at best, lethargy, weakness and headaches, and at worst, a hospital bed or even a place in the cemetery.
Properly arranged ventilation ensures air circulation, while oxygen is supplied in sufficient quantities, and carbon monoxide and carbon monoxide are released into the atmosphere. After completing the bath procedures, with good ventilation, the vapor is actively removed outside the building, and the rooms that previously had high humidity dry out. If this aspect has not been given enough attention, after a couple of years in the steam room, and then in other rooms, the lining rots, the smell of mustiness and sweat appears and gradually intensifies, and the wood turns into dust. Now, I hope, it is clear whether ventilation is needed in the bathhouse...
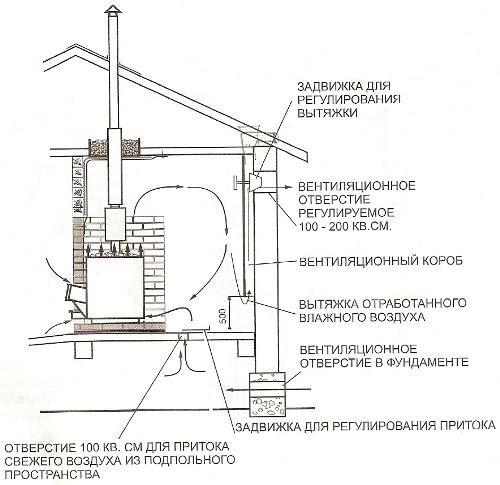
 Warming up and ventilating the bath. Please note that the exhaust vent is located at a small height from the floor - usually no higher than 50 cm. With this scheme, exhaust steam is released into the atmosphere. Moreover, the floor in the steam room warms up well
 Ventilation in a bathhouse is not needed only in one case: if it is all built of wood and has not been insulated anywhere - neither from the inside nor from the outside. In this case, air exchange occurs due to the fact that the wood “breathes”. Also in this case they talk about the presence natural ventilation in a bathhouse: any wood has pores and crevices through which air flows out/flows and temperature and humidity are regulated. But if the bathhouse is made of rounded logs or has insulation or moisture/steam insulation, then the creation of additional ventilation holes is necessary.
There are three types of ventilation:
- Mechanical ventilation. In this case, the inflow and outflow of air masses occurs due to artificially created air movement. Air parameters are controlled by technical means.
- Natural ventilation: circulation occurs due to the difference in pressure inside and outside the room. This method is only possible if there are “breathing” walls or thoughtfully arranged ventilation vents.
- Combined ventilation: simultaneous use of the natural movement of air masses and technical devices(in the simplest case - fans).
The video below shows the combined ventilation option.
In a specific case, aluminum foil with a thickness of 100 microns was used in the construction of the ventilation duct.
Ventilation device in baths
In the very simple version, the ventilation system of a steam room or bathhouse consists of two (sometimes more) openings in the walls and/or foundation: supply and exhaust. The trick is in choosing the location of these holes and their sizes. Sometimes, to ensure more active air exchange, fans can be installed.
 Warming up and ventilating the bath. In the simplest case, the exhaust vent is located near the ceiling
 There is no single ventilation scheme for a bathhouse: they are too different both in design features and in the materials from which they are made. But there are general rules and several of the most common schemes, following which you can choose the optimal ventilation specifically for your case.
The size of the ventilation holes is calculated based on the volume of the steam room: per cubic meter of ventilated area, the size of the holes should be 24 cm 2.
Despite the fact that the main task in the bathhouse is to maintain high humidity in the steam room and a sufficient temperature level, it is impossible to make the ventilation holes too small: they will not provide the necessary level of air exchange. Exhaust ventilation openings must correspond to the size of the supply ventilation openings: if the proportions are not correct, the air exchange will also be insufficient. In some cases, to speed up the removal of exhaust air and speed up the drying of the bath, you can make two exhaust holes.

To ensure the required air conditions when heating the steam room, special covers/plugs are made on the ventilation ducts, which can be opened/closed from the steam room, thereby regulating the humidity/temperature/air exchange. Generally speaking, the presence of plugs or covers on any ventilation hole facing the street is mandatory: in winter, cold air actively strives into a warm room and the presence of covers or regulators to block it is necessary.
Where can there be supply and exhaust openings?
Most often, it is at least partially located in the steam room. In this case, the supply hole is made near the stove at a distance no higher than 30 cm from the floor. The incoming cold air quickly heats up from the stove and rises. It's quite popular, but not the most The best way organizing ventilation for the bathhouse. Ventilation is much more effective when the supply openings are located in the foundation under the floor (to prevent rodents from entering through them, the openings are equipped with metal gratings). This option solves two problems at once: it delivers fresh air to the bathhouse, and also effectively dries the floors and walls after completing the procedures. The floor boards, in this case, are not laid closely, but with a small gap for free passage of air. If you don’t want to leave gaps in the floor (although this is very good for a bathhouse), you can make several ventilation holes in the floor, closed wooden gratings. In this case, the air movement will not be so active; more powerful fans, but the circuit will remain operational.

When planning supply ventilation holes in the foundation, keep in mind that air into the bathhouse must come from the street, and not from the underground, otherwise it will have musty smell. To organize air intake from the street, a box made of wood (often homemade), plastic or metal (ready-made) is placed in the hole, and it is also taken out near the stove. Typically, the inlet openings are located in an area that is protected by a metal or asbestos sheet from coals and firebrands.
Ventilation holes in the foundation are provided at the planning stage. If the foundation is already ready, but there are no holes for ventilation, you can ventilate the floor in the steam room differently: lay the floor boards on the joists, but not close to each other, but with a gap of 0.5-1 cm. In the gap between the rough (earth/concrete) floor and the finishing floor, an outlet is arranged, which goes into a ventilation pipe that discharges exhaust air to the roof (but not to the attic). This option provides for the presence of only one supply hole, which is usually located below the heater. The exhaust pipe under the floor is installed with opposite side premises (but not opposite, but diagonally).
It is impossible to make an exhaust pipe in a steam room from plastic boxes for ventilation - they cannot withstand high temperatures, but it is permissible to use them in a locker room or washing department.
With this ventilation scheme in the steam room, cold air warms up near the stove, rises, then, cooling, falls down, seeps under the floor through cracks in the floor and is discharged through the outlet pipe. These two options effectively remove moisture after a bath; they can also be considered floor ventilation schemes in a bath.

Exhaust openings can be located on the wall opposite the supply opening (if both of these walls face the street) or on the same wall, but in the opposite corner. There is a scheme in which they are located at the top on the opposite wall (30 cm from the ceiling), sometimes they are located at the bottom (30 cm from the floor). If the exhaust vent is located below or on the same wall as the supply vent, a fan is needed to create air flow.
To ensure that ventilation in the bathhouse remains effective, you must not:
- make ventilation vents smaller than the calculated ones;
- Place the supply and exhaust openings one opposite the other - this way the incoming air is removed almost immediately without releasing oxygen, a draft is formed, which is contraindicated for a bath.
Steam room ventilation schemes
Let's consider several of the most common ventilation options in a steam room:


These are the most commonly used ventilation schemes for steam rooms in a bath; there are many more variations and combinations of them. Based on these four options for organizing ventilation, you can develop a scheme for your steam room.
Ventilation in the washing compartment of the bathhouse
In a washing room, high humidity is common, and to prevent the lining from rotting or bad smell, it is necessary to provide floor ventilation. It is arranged similarly to floor ventilation in a steam room: an exhaust hole is made between the rough and finished floors, which can be equipped with a fan. The exhaust pipe leads to the roof.
With this floor ventilation scheme in the washing compartment, the coldest exhaust air is removed, and the warmer air is lowered in its place. upper layers. In this way, an increase in the comfort of the people staying here is also achieved.

The principle of ventilation in all other rooms of the bathhouse is the same. You need to decide on the optimal ventilation system specifically for your conditions and select/develop the most suitable scheme. Ventilation in the washing compartment differs only in that due to more low temperatures air, you can use plastic ventilation ducts here (which you cannot do in a steam room) and you can install fans that are not heat-resistant, but only those that can withstand high humidity (moisture-proof).
Ventilation of brick and Turkish baths
When planning a ventilation system for brick bath It must be taken into account that its efficiency should be several times higher than that of wood. Indeed, in this case, you will have to dry not only the inner lining of the steam room/washing room/locker room, but also the walls: brick is a very hygroscopic material. To remove all moisture, it is necessary that the inflow/outflow of air during drying be very active, and the vents have reliable dampers that allow you to regulate the intensity of air movement.
When installing ventilation with its 100% humidity, exhaust ventilation must also be very effective: in an hour of operation it is necessary to ensure a six-fold change of air in the room. In addition, it is necessary to provide for the possibility of removing condensate, which forms during cooling in large quantities. This problem can be solved in two ways: install an air dryer in the pipe, which discharges condensate into the sewer system, or provide a channel in the ventilation pipe for discharging condensate (it also goes into the sewer).
Conclusion: it is necessary to plan ventilation at the bathhouse design stage, placing inlet vents in the foundation. If necessary, you can make vents in finished walls, but this is quite troublesome and complicated.
A well-equipped ventilation system, all other things being equal, guarantees, firstly, a long service life of the building and finishing materials used in the arrangement of the serviced premises, and secondly, the comfort and safety of visiting the latter for the user. The issue of arranging complete and sufficiently effective ventilation is especially relevant in the bathhouse, due to the characteristic temperature and humidity conditions and additional requirements for buildings of this kind.


Prices for bath fans
bath fan
Video - Requirements for ventilation in the bathhouse
Choosing the optimal variety ventilation system for bathhouse maintenance is a topic for many hours of discussion. For example, there is natural ventilation. The expenditure of money, time and effort on its arrangement is minimal - the work literally comes down to drilling holes in the walls, installing boxes/pipes and valves/grids.

 Ventilation valve and grille
  Ventilation grilles for baths and saunas

However, it is impossible to use natural ventilation to service all rooms of the bathhouse. Of course, it would be possible to save money, but the disadvantage of such a solution will become obvious with the arrival of the first winter: along with the influx fresh air The cold will come in from the street, and everyone knows the combination of frosty air and humidity - everything around will simply freeze. Therefore, natural ventilation in some rooms must be combined with others. existing options in other rooms of the bathhouse.
If the bathhouse is equipped with a washing room or even its own swimming pool, natural ventilation will definitely not cope with the maintenance of such premises - it will have to be equipped exhaust system. And in general, the presence of a forced inflow/outflow of fresh air will be useful both for visitors to the bathhouse and for its premises. Recommendations regarding optimal composition air exchange systems are given in the table.
Table. Choosing a ventilation system for different rooms
| Room | Recommended ventilation type | Scheme | Description |
|---|---|---|---|
| Steam room, dressing room or relaxation room | Aeration should be understood as organized natural air exchange. The option is most optimally suited for use in a bathhouse: air enters from the bottom of the stove (for other rooms - 25-30 cm above the floor), exhaust is discharged through an opening in the upper part of the room. The work of air exchange is based on elementary physical laws: cold air from the street displaces warm air masses, which have less weight, to the top of the room. Aeration is ideal for use in rooms with high heat output. The presence of additional humidity contributes to an even more pronounced increase in the efficiency of the system. |
||
| Wash room, bathroom, room with swimming pool | The system is equipped with a fan and, if necessary, cleaning filters. Mechanical exhaust ventilation is ideal for use in the washroom, pool room and other wet and frequently visited areas of the bathhouse. Mechanical exhaust ensures effective removal of unpleasant odors and excess moisture, which makes the air in the serviced area safe and clean. It is impossible to use exhaust ventilation alone - air rarefaction is formed. To compensate for the vacuum, an air flow from the street or other rooms is arranged. Along with this, the presence of supply ventilation will eliminate the likelihood of drafts. The supply ventilation system can be either natural or mechanical. In combination with mechanical exhaust ventilation It is more expedient to use a mechanical supply system, because the possibilities of natural inflow may ultimately be insufficient to compensate for the resulting rarefaction. Mechanical supply ventilation is based on a blower fan. Additionally, it can be equipped with an air heater, which will eliminate inconvenience and solve the problems of ventilation of serviced premises during the cold season. Additionally, the supplied air can be humidified or purified using appropriate devices. A mechanical system is more complex in arrangement compared to its counterpart, which operates according to the laws of physics: in addition to fans and air ducts, the system may include additional equipment and devices (diffusers, air distribution grilles, automation equipment, noise suppressors, etc.). This provides an excellent opportunity to design an air exchange system that fully meets the user’s wishes. |
Natural ventilation is provided in vestibules, warehouses and other similar premises.
Regardless of the type of ventilation system chosen, the bathhouse must have conditions for simple ventilation. Install adjustable windows in all rooms whose location allows for this.
Video - Types of ventilation systems
Instructions for self-calculation of air exchange
An elementary formula is used for calculation:
W (required volume of fresh/exhaust air) = k (coefficient indicating the frequency of air exchange) x V (volume of the room served, determined by multiplying the width of the room by the length and height).
That is, first you must calculate the volume of each room and find for it the required indicator of the volume of clean air (in calculations it is usually denoted Wpr, i.e. inflow) and a similar indicator of exhaust air (denoted as Wout, outflow). In this case, multiplicity factors must be taken into account. The calculated values are rounded upward - the last digit in the number must be 0 or 5.
Next, the summation of all Wpr is performed. A similar action is carried out for the found Ww. The resulting amounts are compared. If the total value of Wpr exceeds the total value of Wpr, you need to increase the exhaust volume for rooms with a minimum air exchange value, if, on the contrary, increase the inflow by the missing value. That is, at the output, the sum of all Wpr should be equal to the total value of the found Wt.
The results of the calculations will allow us to determine the optimal cross-sections of the installed air ducts and select suitable look ventilation system. Thus, there will not be any special problems with calculating the volume of premises and other related data. For greater convenience of subsequent processing, enter the found values into a simple table, as in the example presented.
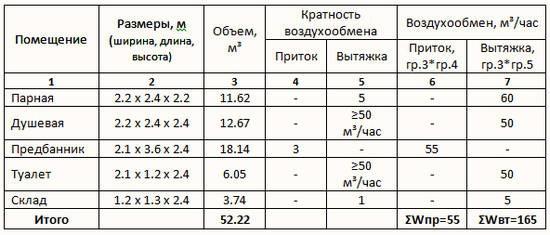
In the example given, the total value of Wpr is less than the sum of all found Wt by an indicator equal to 110 m3. In order for the balance to be maintained, it is necessary to ensure an influx of clean air in the missing quantity. This can only be done in the waiting room. Thus, the value of 55 m3 for the dressing room given in the table must be replaced with an indicator of 165 m3. Then the balance will be maintained.
Start calculating the air ducts to be installed and drawing up the structure of the ventilation system being installed.
The ventilation system is designed in such a way that the air moves through the installed air ducts at the following speeds:
- ≤ 5 m/s in main ducts and ≤3 m/s in existing branches – for mechanical ventilation systems;
- ≤ 1 m/sec – for air exchanges operating on a natural principle;
- 2 m/sec – for natural air exchange directly in the steam room.

When choosing the cross-section of air ducts, take into account the above indicators. As for the profile of the duct/pipe, this point is determined by the design features of the air exchange and the bath itself. For example, air ducts with round are easier to install compared to their rectangular “counterparts”, and it is much easier to select the required connecting fittings for round air ducts.
The relationship between the diameter of the air ducts and other significant indicators is demonstrated in the following tables.


For example, we will work with round air ducts. We select the required sections according to the appropriate table, focusing on the indicators in the table Example of ventilation calculation.
The calculated air flow was 165 m3/hour. Air flow at such a flow rate it should move no faster than 5 m/sec. In accordance with the table above for round air ducts, we select the cross-section according to the specified data. The table value closest to ours is 221 m3/hour. The air duct cross-section is 125 mm.
 Air duct with insulation
  Flexible ducts
In the same order, we determine the optimal sections for all branches of the system in the serviced premises, remembering that the air flow in them should move at a speed not exceeding 3 m/sec (in vestibules and storage rooms - 1 m/sec, in the steam room - 2 m/sec sec):
- steam room: calculated Ww is 60 m3/hour, which requires the installation of an air duct with a cross-section of 125 mm;
- shower room - Ww is 50 m3/hour, air moves at a speed of 3 m/sec, a 100 mm air duct is suitable;
- toilet – indicators are similar to the shower room;
- pantry, vestibule, etc. – indicators (except for air speed) are similar to shower and toilet.
Important! In the shower room (wash room, room with a swimming pool) there is an increased level of humidity. When determining the cross-section of the air duct for this room, it is necessary to make an adjustment upward (in in this example– 125 mm).
For greater convenience, enter all the information received into the table. You can use the template below as an example.
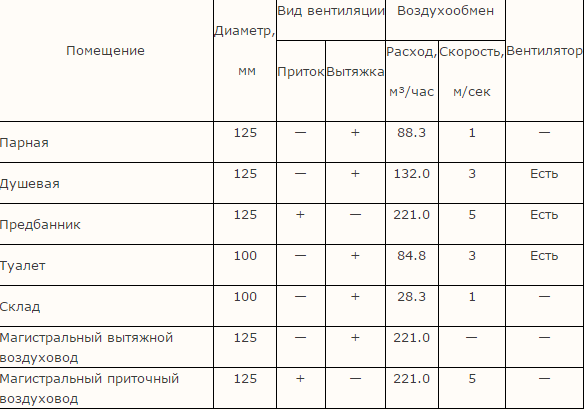
Important note! In the table above, the exhaust volume exceeds the volume of incoming clean air. This happened for the reason that the sections were determined by the nearest flow rate, and the diameter of the air duct in the washing room was intentionally increased. In practice, such an approach will only be beneficial - the margin for outflow and inflow will not be superfluous.
SNiP 2.08.01-89. Residential buildings. File for download
Sanitary and epidemiological requirements for residential buildings and premises. Sanitary and epidemiological rules and regulations SanPiN 2.1.2.1002-00. File for download
Construction norms and rules of the Russian Federation heating, ventilation and conditioning SNiP 41-01-2003. File for download
The cross-sectional area of the ventilation window is determined in accordance with the volume of the room served: 24 cm2 for every 1 m3.
All that remains is to deal with optimal height Ventilation hole locations:
- for the flow of fresh air - on average 25-30 cm above the floor (in the steam room - near the stove);
- for exhaust air outflow - approximately 15-20 cm below the ceiling, usually on the opposite wall to the supply wall.
Popular bath ventilation schemes
Only options for arranging ventilation in the steam room deserve special consideration - in the remaining rooms everything is done according to standard scheme, for example, like this:

Air exchange in the steam room can be organized in accordance with 4 main schemes presented in the following image.
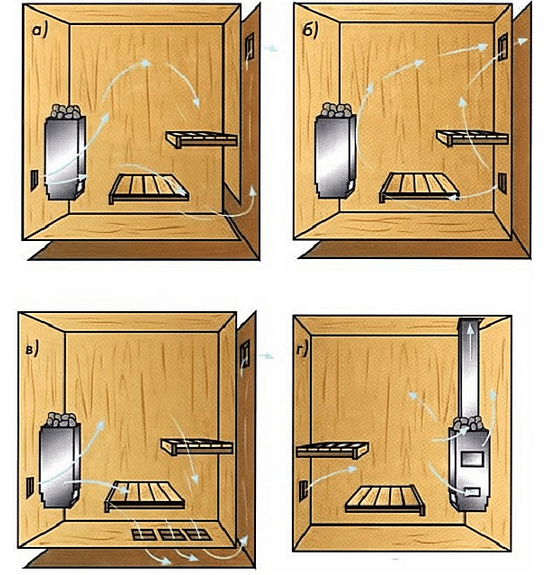
Scheme "a". The most popular option. The window for air flow is next to the stove, at a distance of about 25-30 cm from the floor. Incoming fresh air gradually displaces the waste heat upward to the opposite wall. There is an exhaust hole on it, approximately 15-25 cm below the ceiling.
Scheme "b". Both holes are on the same wall. The circuit will only work if you install an exhaust fan. Fresh air enters through the lower hole, located in the wall opposite to the stove. The air will rush in the direction of the stove, and then, covering the space of the steam room in an arc, move to the hood and be discharged outside the bathhouse.
Scheme "c". This option is suitable for steam rooms with leaking floors. The inlet hole is located as in diagram “a”. Having warmed up in the upper part of the steam room, the air descends to the floor, passes through the gaps in the plank flooring, facilitating more efficient drying of the boards, and is then discharged through an exhaust vent, usually located in another room. Exhaust can also be carried out through a separate isolated channel.
Scheme "g". Option for baths with a constantly running stove. In this case, the exhaust function is performed by the furnace ash hole. The supply window is located under the shelf, in the wall opposite to the stove. The height of the inlet opening must correspond to the height of the furnace vent. Fresh air rushes towards the stove, displacing the air masses heated by it to the ceiling. Cooling there, the air descends and is removed from the bathhouse through the ash pan.
To ensure that the air exchange system operates as efficiently and as efficiently as possible, before starting its installation, study and remember a few simple tips.
If your bathhouse has a bathroom or even a kitchen, equip them only with exhaust ventilation - this solution will eliminate the possibility of unpleasant odors spreading to other rooms. As an alternative, you can install fresh ventilation in other rooms, and equip the bathrooms with natural exhaust - in this case, the air will move towards the bathrooms.

When calculating the performance of fans, it is recommended to reduce the total power of the supply units by 5-10% of the total capacity of the exhaust units. In this case, the exhaust air will be completely replaced by incoming air masses, and a reserve of 5-10% will compensate for the influx of air entering through windows, cracks, etc., which will allow a balance to be maintained.

In rooms with only natural ventilation, it is recommended to make opening windows - this will increase the efficiency of fresh air supply and reduce the risk of fungi, mold, rot, etc.

Important! If your bathhouse does not have typical configuration, the design of the ventilation system will also be individual. When compiling it, the features of the composition of the premises, their design, design features and so on.
The main stages of independent installation of a ventilation system
Any ventilation system in any room is installed in approximately the same sequence. The differences are present only in the characteristics of the air duct openings and their locations, as well as the configuration of the system (mechanical, unlike natural, are supplemented with various types of devices).
For example, the following arrangement of ventilation elements can be used.

Or its slightly modified analogue, shown in the following image.
Recommendations regarding the choice of the location of each opening, the type of air exchange system for different rooms of the bath, as well as the procedure for determining the characteristics of ventilation elements, were discussed earlier.
Along with this, the procedure for arranging ventilation may vary depending on which design option you prefer. There are few solutions available:
- independent ventilation in each room. A simpler option. Work is limited to the installation of transoms, windows, fans and other necessary elements, if provided for by the project. Fans can be mounted both in windows and in separate ducts led outside through the wall;
- centralized system. A more complex option. Requires installation of ventilation ducts. It is used mainly in private homes - in the case of a bathhouse, this option will be too expensive and labor-intensive;
- "hybrid" option. Some rooms are ventilated individually, others are combined into a joint system.
An appropriate option for use in a bathhouse is independent ventilation - the owner can choose the optimal characteristics of fans and other elements for each room, saving money, time and effort on carrying out the activities necessary to combine the channels into a single system.
Important! The location of some bathhouse rooms may not allow for independent supply and exhaust ventilation. In this case, it will not be possible to avoid laying ventilation ducts. Alternatively, the box can be placed on attic, and install the ventilation holes in the ceiling or connect them with channels installed in the walls (the option is more complicated if the installation of such channels was not provided for by the project at the construction stage of the bathhouse).
In most cases, the first option is used: ventilation pipes of the required length are taken out through holes in the ceilings of the serviced premises and are either equipped with their own fan, if necessary (easier to implement for an untrained user, the procedure is similar to that shown in the following table), or they are connected into a single circuit and connected to a common hood (may require the involvement of specialists).
Remember: maximum efficiency The operation of the ventilation system is ensured by using the shortest and straightest air ducts possible - up to 3 m when arranging natural air exchange and up to 6 m when using electric fans.


The procedure for installing an independent ventilation system is given in the following table.
Important! The example describes instructions for arranging a mechanical ventilation system using fans. The installation procedure for natural air exchange remains almost the same: only the stages of laying wires and installing fans are excluded.
Table. Ventilation arrangement
| Work stage | Explanations |
|---|---|
| The operating procedure remains the same for the supply and exhaust openings. Only the height of their arrangement and location changes ( possible options discussed earlier), as well as the type of fans used (supply or exhaust). The characteristics of the latter are selected individually, taking into account the volume of the room served, the required speed of air movement in the air ducts, the required air exchange rate, etc. – all these points were covered in the theoretical part. We arrange the holes in the following order: - outline the center and contours. We make the markings so that the resulting hole diameter slightly (usually a 2-3 mm gap is made) exceeds the diameter of the pipe being installed (recommendations for choosing air duct diameters were given earlier); - using a puncher we make a hole in accordance with the markings. We hold the working tool horizontally, but with a slight downward tilt; - carefully take out the cut material (a hammer and chisel will help us with this), after which we carefully clean the finished hole from dirt and dust. |
| The ventilation pipe (ventilation duct body) is placed in the prepared hole, but before that it (if mechanical/forced ventilation is planned) must be equipped with a fan. Useful recommendation! Buy initially ready-made kits for arranging ventilation, including, in addition to related additions, a ventilation duct/pipe and a fan with a housing of the appropriate size - this way you will avoid difficulties at the assembly stage. The pipe with the fan is placed in the prepared hole, and the remaining cracks are filled with foam. |
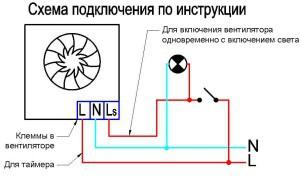
| The fan is an electrical device, therefore, it must be connected to the network. Let's do this while the mounting foam dries (at least 10-12 hours). The procedure is standard: - the contours of the groove for the cable are cut out in the wall using a grinder. Excess material is removed using a bumper; - a hole is prepared in the wall for installing the switch box (for example, you can use a hammer drill). The box is installed (pre-read the instructions specific to your switch). The switch itself will be mounted after finishing; - the wire is laid in the groove. To fix the cable we use alabaster; - connect the wire to the switch and the fan. First, be sure to study the connection diagram recommended by the fan manufacturer in the attached instructions, because For different devices it may differ. As an example, one of the most commonly used schemes is given. |
| All that remains is to bring the entire structure into proper form. To do this we do the following: - get rid of excess dried polyurethane foam using a knife; - putty the grooves; - we install adjustable ventilation grilles on both sides of the pipe. For fastening we use self-tapping screws. If provided, at the appropriate stages of work we install additional elements(for example, air heater, filter, etc.). Each of these devices is installed individually - we first clarify these points in the manufacturer’s instructions. |


Video - Arrangement of ventilation holes
Video - Ventilation in a bathhouse with your own hands - diagram
It is impossible to answer the question of whether plastic ventilation is possible in a bathhouse. Such systems have proven their practicality and performance in home and industrial environments, but the bath environment has its own specifics, which to a certain extent limits the use of plastic. When choosing plastic products for a bathhouse in each specific case, you should take into account all the influencing factors and possible consequences.
Can be used in the bath plastic pipes for ventilation in the bath
Reasons for the popularity of plastic
Ventilation structures made of plastic elements have gained wide popularity in various areas of human life. This is facilitated by their attractive appearance and numerous advantages over traditional metal competitors.
Note! The most widely used parts are made of polyvinyl chloride (PVC), polyurethane and polypropylene.
The following stand out: positive sides plastic ventilation:
- No corrosion. This advantage most often determines the choice of plastic. Any metal (even stainless steel) in ventilation systems where steam condensation occurs and the aggressive effects of various substances that pollute the air are susceptible to corrosion. Plastic is absolutely resistant in this regard.
- Low cost. Plastic systems have a significantly lower price compared to metal, which provides increased resistance to corrosion.
- Simplicity and quality of installation. When installing metal boxes and pipes, problems always arise in places where there are knocks, requiring rolling, welding, and other operations. Cutting and joining plastic elements is not difficult, and the ends are easy to process and align. Thus, sealing plastic boxes is much easier to ensure.
- Light weight. This advantage is ensured by ease of installation at the installation site and transportation when delivering the goods.
- Plastic elements are resistant to water, steam, aggressive environments, ultraviolet rays. They match everything sanitary standards under normal conditions.
 Device PVC pipes for ventilation
 Features of use in the bath
In order to decide whether plastic ventilation is suitable for a bathhouse, it is necessary to note the disadvantages of such systems:
- Low heat resistance of plastic. Already at temperatures above 80-85 degrees, the release of harmful components from the substance begins, which poisons the human body. When heated, plastic loses its strength and rigidity, which leads to deformation.
- Low resistance to open fire. Despite the fact that PVC does not support combustion, it easily melts, and its drops, falling on other structures, cause a fire. In general, plastic elements belong to the group of flammable materials, which requires great care when placing them near sauna stove and chimney. Even with a small fire, a large amount of acrid smoke is released, which is very dangerous for humans.
- Reduced resistance to cutting, abrasion, scratching. Under impact and cutting loads, plastic is easily damaged or deformed.

Taking into account the above problems, we can conclude whether plastic ventilation is suitable for a bathhouse. The most extreme conditions are observed in the steam room. In the Russian bath, the temperature is maintained at about 60-65 degrees with saturated water vapor. Such temperatures seem to be lower than permissible, but they are close to critical values, and at the slightest excess they lead to the decomposition of plastic. Thus, the use of plastic ventilation in the steam room of a Russian bath is dangerous to human health. It is completely unacceptable to use it in a sauna steam room, where the temperature can reach 100 degrees.
 Smoke from burning plastic is very corrosive and can lead to poisoning.
 In other bath rooms (washing area, dressing room, rest room), the air temperature is not high, and extreme conditions are associated with high humidity, which is not at all dangerous for plastic. Therefore, we can conclude that ventilation in a bathhouse made of plastic pipes is quite acceptable in all rooms except the steam room.

Important! Particular attention should be paid to the location of the stove and its chimney, near which the air temperature may be critical. In addition, fire hazardous conditions arise here.
 Particular care must be taken when placing the plastic pipe for ventilation in the bathhouse. It is better to place it behind a brick lining if it is located near the stove.
 Design features
IN standard kit Bath forced ventilation includes the following main elements: fan (exhaust and supply); ventilation pipes and ducts; vents with plugs; connecting and component elements. Among the important components, the following stand out:
- turns: designed to change the direction of the ventilation duct;
- adapters: necessary when connecting route elements of different sizes;
- forks and tees: installed when it is necessary to divide the incoming air flow into several rooms;
- couplings: connecting and holding elements;
- flanges and gearboxes.

The basis of forced ventilation is made up of exhaust type fans installed on the outlet vent, or the supply type, designed to suck in fresh air from outside and form an air flow. Most commonly used supply system, and the fan can be installed alone to serve all rooms or several devices separately in each room. In the first case, a fairly powerful mechanism is installed, usually with metal blades, and the flow distribution then proceeds through plastic ventilation channels. Small fans in a plastic case with plastic blades can be installed in each room.
 Plastic fans are used for exhaustion in the sauna.
 Plastic air ducts for ventilation of the type of bath in question are an important part of the system. They distribute the incoming air flow and direct it to the desired area.

Another option is to install an exhaust fan not in the outlet vent, but directly in the most stagnant area. In this case, it is mounted at the end of the exhaust ventilation duct, through which contaminated air is directed outside.
Plastic boxes and pipes are produced various shapes and sizes. They can be round or rectangular in cross-section, and smooth or corrugated in design. Most often, the incoming powerful air flow is directed into rectangular boxes and then distributed through round pipes.
Nuance! Corrugated construction is used in places where pipe movement in different directions is required, or to adjust elements to length.
 Types of composite connecting elements of the ventilation system
 Air ducts have different sizes, which are selected depending on the required power of the system and the volume of incoming air. Round pipes for a bath they have a standard diameter in the range of 56-160 mm. Among rectangular ducts, the most common are air ducts measuring 6x12 and 6x20.5 cm. Corrugated elements usually have a round shape, and the diameter of such a pipe ranges from 15-55 cm.
 Plastic air ducts for ventilation come in round and rectangular shapes
 Additional items
In addition to the indicated elements used when installing a ventilation system in a bathhouse, plastic parts are used that perform protective and regulatory functions. These include various dampers, hatches and grilles.

Plastic grilles may have different purposes. The following main varieties are distinguished:
- inertial type: for flow separation without pressurization;
- adjustable grilles: allow you to change the volume of incoming air and distribution in one direction while blocking air movement in the other;
- unregulated type: distribution or flow restrictions without the possibility of regulation;
- external protective grilles: to prevent foreign bodies from entering the channel.
 Hood grates can be of an adjustable type
 Plastic hatches can be installed in powerful, branched systems to allow access to the ventilation line for inspection, cleaning, and repair. They can be mounted on the ceiling or walls of the bathhouse. Door-style flaps are designed to allow access to natural flow. They can be mounted on natural ventilation vents in a window or door. Standard sizes– 10x10, 15x30 and 25x60 cm.
Features of the arrangement
You can install plastic ventilation in a bathhouse yourself. Main stages of work: production of vents; installation of fans; installation and fastening of the entrance box; installation and fastening of the incoming air flow branching system; arrangement of an outlet vent; installation of dampers and hatches.

When carrying out work, the following recommendations should be taken into account:
- The plastic elements are connected to each other by soldering. If there are threaded elements, sockets, flanges, adapters, and couplings are used, which makes it possible to provide a dismountable system.
- A special sealant is used to seal the joints.
- Cutting elements or changing their shape is done using a knife or a special hacksaw.
 Connection diagram of the fan section in a forced ventilation system
 To carry out installation work, you will need the following tools: electric drill, screwdriver, grinder, knife, hacksaw, pliers and side cutters, screwdriver, paint brush, tape measure, metal ruler.
 Before use, it is necessary to check the ventilation system in the bathhouse
 Plastic ventilation in the bathhouse can be installed in all rooms except the steam room. Plastic cannot be used in it due to the risk of harmful emissions when heated. You can easily install the system yourself.
Ventilation in a bathhouse with your own hands? - easily, the event can be carried out by a man without professional skills. Why do you even need to pay attention to how to properly ventilate a bathhouse? The answer is obvious. Properly arranged ventilation in the bathhouse affects the maintenance of the temperature in the locker room, washing room, steam room, or relaxation room. The second, but no less significant impact, the movement of air masses has on safety wooden structure and the service life of its parts.
When designing a bath complex and its structure, it is necessary to take into account that the ventilation of the bath complex must be carried out taking into account the established rules, supplemented by subtle nuances. Information on how to make ventilation in a bathhouse with your own hands, with detailed instructions, photographs and videos abound. We will outline the main stages of installing air exchange inside the bath space and steam room below.
Properly arranged ventilation in the bathhouse is guaranteed to maintain the temperature at a comfortable level inside the steam room. Extending the service life of wooden structures.
The operation of the ventilation system based on the known laws of physics, as well as the ventilation scheme, is clear and does not raise questions. To fulfill the condition of air circulation in a constant mode, we need only a couple of holes of two types:
- exhaust;
- supply
The supply of fresh air into the room will be provided by the supply opening. The best location for the supply ventilation in the bathhouse is near the stove, at a height as close as possible to the floor. This arrangement will ensure rapid heating of the incoming air, preventing it from cooling the room, maintaining a constant temperature.
Diagram of air movement inside the steam room.
Hood slots are necessary to remove superheated humid air and carbon monoxide (carbon monoxide) from the steam room. Exhaust openings should be located opposite, as high as possible, slightly below the edge of the ceiling. It is advisable to place both lugs opposite each other to effectively create and maintain continuous air exchange.
Attention! Do not plan to locate the exhaust vent directly in the ceiling! The hole for the exit of air masses in the ceiling leads to a sharp cooling of the bath, preventing hot masses from lingering.
With the concept of locating the supply and exhaust openings, everything is clear and there are no problems in organizing work on installing ventilation in the bathhouse with your own hands. But the task of maintaining high temperature in the steam room and at the same time effectively removing exhaust air and carbon monoxide remains open.
You should also pay attention that the ventilation in the bathhouse should work to maintain an acceptable temperature in the rooms for hygiene procedures, in the dressing room, and other parts of the room: in the dressing room, in the washroom and in the rest room. And if you are faced with the task of implementing a ventilation scheme in a steam room with your own hands, you should think about doing the job correctly.

Correct air circulation scheme in the bathhouse
Basic types of ventilation
There are two main types of ventilation:
- natural;
- forced.
Which one to choose is determined depending on the design of the bathhouse and the volume of its premises.
 Ventilation using an electronic control unit
 Natural ventilation of the bath
It starts up on its own due to the difference in temperature and pressure inside the room and outside. The effectiveness of natural flows depends on the placement of air inlet and outlet openings. It is better and more optimal when the supply holes are located near the floor. Place them at a height of 200-350 mm, next to the stove. It is better to place the exhaust pipes of the hood on the opposite wall, 150-200 mm below the ceiling level.
Ventilation systems with natural air movement are not suitable for ventilating a steam room or sauna, since the cold air in this room accumulates at the bottom of the floor, and the hot air at the top. We need the hot streams to linger in the steam room as long as possible.
Adjusting the air flow movement is accompanied by difficulties, but with the correct arrangement of the components of the ventilation system with your own hands, you can cope with this problem.
 Natural ventilation is not desirable for a steam room; it is advisable to organize it in a recreation area
 Forced ventilation
This kind of air recirculation in a steam room of a Russian bath or Finnish sauna can be divided into two subspecies:
- Ventilation controls temperature and humidity using electronic system automation, by automatically adjusting flow and filtration. Similar systems expensive, and their use often does not correspond to the allocated budget.
- Combined ventilation system involves sharing conventional natural air exchange in combination with a forced fan.
 Diagram of internal ventilation ducts in the bathhouse wall
 Ventilation in the bath depends on the type of construction
Natural air movement with the correct location of the ventilation holes and their sizes corresponding to the volume of the premises works well in a Russian bathhouse assembled from round logs or timber.
The design of the steam room frame must be airtight. Suitable for frame baths made of timber, use forced ventilation. Vents for supply are arranged in external wall steam rooms and must be additionally equipped with a blower fan. In bath structures made of brick or concrete blocks, it is possible to achieve high-quality air movement only through forced ventilation.
 Depending on the material from which the bathhouse is constructed, the ventilation system is selected.
 Planning ventilation in the bathhouse: subtleties and nuances
Before you move on to choosing a ventilation scheme in the bathhouse and arranging its design with your own hands, you need to understand the subtleties and nuances of the design.
Carefully! Even a slight error in the location of the air supply and exhaust holes leads to unpleasant consequences. In the steam room or go down needed hot temperature or the concentration of carbon monoxide (carbon monoxide) increases.
The ventilation system is laid out at the design stage of structures - the necessary channels are planned and the location of the intake and exhaust windows is determined. During the construction of a bathhouse, adjustable windows are installed after the decorative cladding of the room. The organization of air mass exchange in the room and the question “How to make ventilation in a bathhouse” must be resolved at the design stage.

Ventilation ducts for a dressing room, bathroom, steam room, rest room, as well as openings for the supply of fresh air and removal of a mixture of carbon monoxide, including moist air masses, must be installed at the appropriate stages of construction. On the stage final finishing In the premises, valves and grilles are installed to control the dimensions of the supply and exhaust openings and the cross sections of the ventilation ducts.
Basically, the effective functioning of bath ventilation is influenced by two factors:
- ventilation window size. Both supply and exhaust air openings are determined by the amount of space, be it a dressing room, washing room, steam room or rest room;
- location of slots relative to each other.
1. Ventilation hole size
The dimensions of the cracks depend on the number and volume of rooms: dressing room, steam room, bath room or relaxation room. It is necessary to select the optimal size of these holes, as well as to ensure the possibility of its adjustment. To adjust the gaps in the holes, install a door flap and grille. The exhaust opening is made with approximately the same dimensions as the dimensions of the supply opening. In any case, the “exhaust” should not be less than the “supply”, otherwise it is impossible to ensure a complete outflow of moist and carbon dioxide air from the steam room.
In the photo on the left. ventilation hole with a slider to regulate the amount of fresh air. Please keep in mind that when large quantities ventilation windows make it more difficult to heat the sauna room to the correct temperature.
Large ventilation windows lead to excessive fuel or electricity consumption. In addition, problems arise with adjusting the cross-section of ventilation ducts. It is difficult to relax if you constantly have to change the position of each valve.
IMPORTANT! The dimensions of the ventilation hole are calculated as 24 cm2 per 1 m3 of the volume of the ventilated area. For a good flow of fresh air from outside, the outlet lug should be larger than the inlet lug.
If the area of the ventilation lugs is insufficient, the temperature, humidity and carbon monoxide concentrations in the room may rise to critical levels.
 The required size of the ventilation opening is designed at the rate of 24 sq.cm per 1 cubic meter of bathhouse volume
 2. Position of ventilation holes relative to each other
The functioning of any ventilation system is based on replacing a mass of hot air with cold air. The movement occurs under the pressure of cold air from outside, since it is heavier. It remains only to provide for the possibility of adjusting the direction of the flow of hot air coming from the stove installed in the bathhouse.
For this reason, ventilation in the steam room is not limited to equipping one supply hole. It is necessary to plan two windows. To optimize the heat flow, it is enough to use a valve to adjust the gaps in the holes to a certain width.
 Schematic representation of the placement of ventilation holes in a steam room. Influx of fresh air and removal of contaminated air masses.
 Ventilation in a Russian bath
Assemble ventilation in the bathhouse with my own hands, it’s easier if you follow a simple rule. The quality indicators of the ventilation system in the bathhouse are based on initial stage design work. In the bathhouse, the circulating air flows in the rooms have a pronounced temperature difference, level discomfort from this mixture is the main task.
IMPORTANT! Comfortable atmosphere in the bathhouse depends not only on the absence of sudden changes in temperature “horizontally,” that is, when moving from one room to another: from the relaxation room to the locker room or from the steam room to the wash room. Synchronous mixing of air masses in the vertical plane is necessary: the air temperature near the floor should not be significantly lower than the temperature at the level of human height.
 The microclimate in the bathhouse is directly influenced by the number, size and location of ventilation windows.
 The uniformity of supply, mixing and removal of air masses depends on the number of supply and exhaust openings, their size and location relative to each other, as well as heating devices and equipment of additional devices.
Block diagram of a ventilation device in a bathhouse
Any ventilation system in a bathhouse is designed with one purpose - maintaining temperature, humidity and freshness of the air in the steam room. The bathhouse premises, especially the steam room, are exposed to water and steam, so periodic ventilation and drying are required. But ventilation and drying will be ineffective if proper ventilation in the bathhouse is not organized. Proper and continuous ventilation of the steam room significantly reduces the effects of wood absorbing moisture.
 Ventilation in the bathhouse controls the temperature, humidity and freshness of the air in the steam room.
 Do-it-yourself floor ventilation in a bathhouse
Air exchange in baths and saunas is also ensured by a ventilated floor.
in constant contact with water they lose their appearance and become unusable after 4 years. Ventilation requirements organized by flooring:
- it is necessary to create a flow and make a small vent in the foundation part of the building;
- The floor should be laid leaving a gap of 1 cm between the boards;
- place the supply air openings in parallel walls (remembering to protect the control grilles from rodents);
- it is advisable to make the stove work as an additional hood; to do this, you need to plan the level of the finished floor above the vent;
- necessary after completion water procedures, leave the door to the steam room open until the floor in the room is dry.
 Ventilation in the bathhouse - general system diagram
 Ventilation in the sauna dressing room
There is no direct contact with water in the dressing room. That is why, making ventilation with your own hands in the wardrobe room, armed with photographs and videos with instructions, will not be difficult.
Use natural or hybrid ventilation. Use a fan to supply fresh air. Install vents with ventilators that require direct access to the street and a power cable connection to the power supply.
 Natural and combined ventilation is allowed in the dressing room.
 Ventilation in the washing area
To optimize air exchange in the washing room, a forced ventilation system is used. It is driven by an electric motor. The air flow is removed in the direction of the vestibule (vestibule). The air supply and exhaust ducts are installed with the same cross-section. section. The inlet openings are located above ground level (2 m) and the outlet pipes are led to the roof.

Ventilation in a steam bath
Special requirements are imposed on the microclimate of the steam room. The steam room must be warmed up quickly, while maintaining optimal level humidity and draft-free. Thus, for a steam room, the actual position and dimensions of the inlet and outlet channels that are used in the construction of the bath are very important.
To regulate the inflow and outflow of air, valves in the ventilated openings are sufficient. A large volume of space will most likely require the use of a blower or exhaust fan.
 Scheme: ventilation in the steam room
 We have given typical circuit diagrams designing ventilation in the bathhouse. Videos and images, attached instructions, will definitely help those who want to build a bathhouse complex on their own. We wish you a speedy embodiment of your dreams into concrete forms!
In the process of arranging a bathhouse, special attention should be paid to the issue of organizing high-quality ventilation. Without proper air exchange, it will simply be impossible to use the steam room normally. If desired, all work on installing the necessary systems can be done with your own hands. You just need to understand the order of installation and connection of the main units and do everything in accordance with the instructions.

Ventilation in the bathhouse is very important. To avoid lengthy and not very interesting explanations, you can consider everything using a specific example.
The bathhouse visitor is in a room filled with a large amount of hot steam. A person inhales this vapor. It is known that people breathe oxygen and exhale carbon dioxide. In the absence of sufficient air exchange, after some time a person will simply burn out.
That is why ventilation in the bathhouse should be as efficient as possible and made in full accordance with technology. There are several types of ventilation systems. Study the features of each option and choose the method that is most suitable for your case.

Ventilation systems are installed to solve two main problems, namely:
- ensuring the flow of clean air into the bathhouse;
- removal of exhaust air from the steam room.
Additionally, ventilation ensures faster and better drying of the steam room. It is necessary to study the features of existing ventilation systems and understand the order of their installation in order to obtain the most efficient and high-quality air exchange.
It is important that during operation of the ventilation system the characteristic characteristics of a bathhouse are not disturbed. temperature regime. Air exchange must be organized in such a way that there are no disturbances in the distribution of temperature flows in the bathhouse. Cool air in the steam room can only be located near the floor. And the higher you go to the ceiling, the higher the air temperature should be.
Ventilation should not remove clean air from the bathhouse. A properly equipped system supplies fresh air to the room and removes exhaust air. Errors during installation of the system will lead to extremely unfavorable consequences for both the bathhouse and its visitors.

Main types of ventilation systems
There are several types of air exchange systems suitable for use in a bathhouse, namely:

Exhaust air is removed from the bathhouse through a special ventilation duct. The air exchange installation technology requires that the box be installed diagonally to the supply opening through which fresh air enters the bathhouse.
Take care of ventilation in all areas of the bathhouse, and not just in the steam room. The dressing room, rest room and other areas of the bath should also be well ventilated.
What you need to know about floor ventilation?

Quite often, bathhouse owners forget that the floor of the steam room must also be well ventilated. Such forgetfulness leads to very rapid deterioration of floor structural elements and a general deterioration in the characteristics of the bathhouse.
Floors are constantly in contact with water. Without properly organized air exchange, the floor will collapse very quickly, and the floor covering will have to be replaced after 2-3 years.
You need to think about floor ventilation at the bathhouse construction stage, because... In a ready-made room, it will be much more difficult to create high-quality air exchange.
First stage. Make small vents in the opposite walls of the basement. It is best to provide these vents at the construction stage concrete base baths Creating any holes in an already finished structure will lead to some reduction in the strength of the building.

Second phase. Make one ventilation hole in opposite walls of the room being served. Through them, clean air will flow into the room. The holes must be through. It is recommended to close the finished channels with special ventilation grilles. Such protection will not allow all kinds of rodents and other pests to enter the bathhouse.

Third stage. When building a stove, make sure that its vent is slightly below the level of the finished floor. Thanks to this placement, the oven will also start working in exhaust mode.
Fourth stage. Lay it down floor boards. When laying them, you need to leave gaps about 7-10 mm wide. Water can flow down through these gaps. If the liquid lingers on the floor every time, the boards will rot very quickly.
Quite often, floor ventilation is arranged “according to Bast”. According to this technology, fresh air comes from under the stove, and waste oxygen is removed through an opening under the ceiling.
According to requirements fire safety should lie near the sauna stove a metal sheet. It is near this sheet that a hole is created to supply fresh air to the bathhouse.
To provide such air exchange, a special exhaust duct is required. You can buy a box at finished form or assemble it yourself from boards. The inner surface of the exhaust duct must be covered with foil. The size of the box should be approximately 15-20% larger than the diameter of the chimney.
Ventilation “according to Bast” is the best option for those cases when the stove is located directly in the steam room. In such a situation, ventilation ducts can even be installed directly in the brick podium.
Pay attention to the installation location of the sauna stove. If the stove is located directly in the steam room, it means that natural air exchange is present initially. You just don’t need to rely solely on it - such ventilation only works when the stove is running.

Most best option installation of ventilation - arrangement of air exchange channels on opposite walls of the bathhouse. They should be at different heights.
It is not recommended to place ventilation holes too high. Although in most other cases it is recommended to make an exhaust hole directly under the ceiling, slightly different rules apply in bathhouses. If you place the hood directly under the ceiling, hot air will leave the room very quickly.
For baths, the optimal height for placing ventilation holes is a level of 1-1.5 m.
Installation guide for ventilation in a bathhouse
There are several simple ways organizing effective air exchange in the bathhouse. Study each of them and choose the best one for your steam room.
First way. Create a hole to supply fresh air. It should be behind the stove, about half a meter from the floor. Make a hole for exhaust air exhaust on the side opposite to the inlet hole, at a height of approximately 30 cm from the floor level. Install the fan into the outlet.

The lower you place the exhaust ventilation duct, the more intense the air exchange will be.
However, there is no need to be too zealous either. Try to make holes at the recommended height, because... such values are the most optimal. It is recommended to close the holes with ventilation grilles.
Second way. With this air exchange, both ventilation holes will be on the same wall. Work will be carried out with a wall located parallel to the stove. The exhaust duct is created at a level of about 30 cm from the floor, the exhaust duct is created at the same distance from the ceiling of the bathhouse. The exhaust vent is equipped with a fan. Close open channels with ventilation grilles.

Third way. Make a hole behind the sauna stove for air intake. Place the suction duct at a level of about 20 cm from the floor surface. The exhaust duct is made at approximately the same height, but in the opposite wall. The exhaust vent is equipped with a fan. Close open channels with ventilation grilles.
Fourth way. This air exchange option is perfect for baths, the flooring of which is laid with slots for water drainage. Make an inlet hole behind the stove unit at a distance of about 30 cm from the floor surface. In the case of such ventilation, an exhaust hole is not made - the exhaust air will leave the bathhouse through the cracks of the floor covering, and then be vented outside through a common ventilation pipe.

Fifth way. This ventilation is ideal for baths with a constantly running stove unit. Install the inlet channel opposite the stove, about 30 cm away from the floor. The hood function will be performed by the oven.
Thus, the procedure for arranging ventilation is practically the same in all the considered methods. Each of them involves the creation of one or two holes; only the location and height of their placement change.
You can also make the holes yourself. Brick walls they can be easily passed through with a hammer drill, and logs with any suitable tool for this purpose, for example, a wood drill. It is recommended to insert plastic pipes into the finished holes. Don't forget about protective ventilation grilles. You won't be happy in the future uninvited guests in the form of rodents.
Good luck!
Video - Do-it-yourself ventilation in the bathhouse