Almost all cars produced today have bumpers made from plastic. No matter how thrifty and careful the driver is, there comes a time when he will be interested in the question of how to paint over scratches on a plastic bumper.
Most drivers prefer to contact specialized workshops in such cases. But Many types of deformations of plastic products can be removed independently. Most often, they are damaged and “suffer” from small stones flying out from under the wheels of oncoming cars, collisions with curbs and other obstacles.
Advice! Before you run in retail chains For repair materials, you should carefully inspect the damaged areas.
The first thing to do is to wash the damaged area of the plastic well, using shampoo. Next, after drying, the product being repaired is degreased. White spirit works well for this. After these operations, you may see the following types of defects:
- The presence of small, sometimes barely noticeable scratches and abrasions. This is one of the simplest cases of damage. To remove such a flaw, you do not need to remove the bumper from the car; you also do not have to paint it. It is simply polished directly on the machine.
- The appearance of large scratches and cracks is usually the result of unsuccessful parking or collisions. In such cases, painting will be required to remove the damage.
- Dents are more serious damage. They can be obtained by impact and heating. In order to remove them, various suction cups are used, and small dents can be removed by heating the damaged areas.
- Getting rips or breaks is one of the most serious types of damage that is difficult to remove. In most cases, the bumper is damaged, ruptured, or damaged. In some cases, it is possible to “cure” the part by welding, soldering or other methods, but most often the owners buy a new product.
Removing scratches
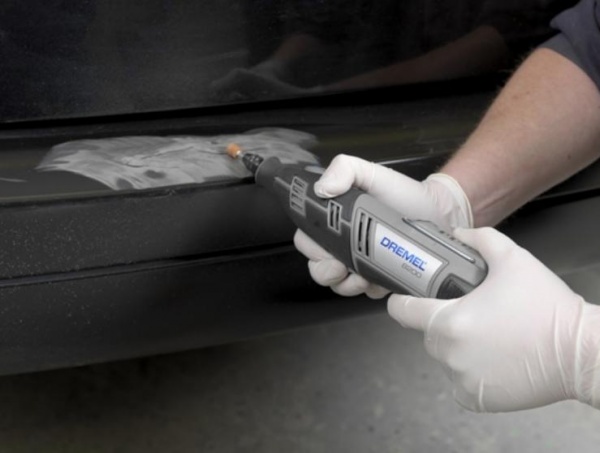
If you are polishing the plastic of the bumper from scratches, you cannot do without purchasing special products and tools. Depending on the type of scratches received, their depth and nature, in order to remove the defect, you may need to use a polishing machine, drill, special nozzles for sandpaper. Wool wheels for applying abrasive compounds, abrasive compounds, as well as a spray gun and polish. If you have all this, but the desire to remove a plastic scratch with your own hands has not disappeared, let’s talk about how to polish a scratch on the plastic of a bumper.
You can perform this operation directly on the car, but it is more convenient to do all this with the product removed. Before you start polishing, remove any existing damage.
Advice! Before starting polishing work, you should carefully prepare the surface to be repaired for work.
Work always begins with degreasing the plastic surface to be repaired. Various solvents are used, but before using them you should carefully read the instructions. After this, you can begin removing scratches.
They use a polishing machine; you will also need a hard wheel and abrasive pastes. The product should be applied to damaged areas of the bumper. Distribute the paste over the surface with a polishing machine in such a way that in the first period it operates at low speeds, and then gradually increases them.
While working, carefully monitor the area being treated so as not to miss a small scratch somewhere on the bumper. In addition to paying attention during operation, caution is required. Overdoing it can cause damage paint coating plastic. When the damaged area has been completely processed, it is necessary to remove the abrasive material remaining on the part with a clean rag.
How the final processing is carried out
This stage of work is much easier than the previous one, but you will first have to purchase a product that contains wax and Teflon. They are needed to give the plastic of the bumper shine, and they will also increase it water repellent property, protection will improve. The work will involve a foam rubber attachment and a polishing machine. If the area is not very large, it is quite possible to polish it by hand.

The plastic of the bumper is carefully polished and the work is observed. Once the surface being treated becomes shiny, work can be stopped. They told us how to remove scratches from the plastic of a car bumper, but this is far from the only way to eliminate the damage. Wax pencils, or wax markers as they are also called, are also used.
Removing scratches using the painting method will be more thorough, but also difficult. Very deep scratches and dents can be removed with putty and then sanded. This method will require a lot of time. It will be necessary to apply a layer of primer to the plastic surface to be repaired, followed by painting.
We hope that we have answered the question of how to remove scratches on the plastic of the bumper. If you still have questions, watch the video:
Hello, dear readers and blog visitors Autoguide.ru. Today, the article will tell you exactly how to polish a car bumper from scratches with your own hands. Everyone in their driving practice has encountered the mechanism of scratches appearing on the surface of a car’s bumper. Of course, this is not fatal, but it is unpleasant and hurts the driver’s pride.
Most of the scratches on the surface of the bumper are the fault of the drivers themselves. Inattention coupled with inexperience often leads to damage to the bumper. The number of scratches does not affect the safety of driving a vehicle, but reduces the attractiveness of the car. If you have to sell the car a large number of scratches on the bumper will reduce the cost vehicle.
The first cars that saw the light did not have a bumper. At the end of the 19th and beginning of the 20th century, the number road transport there were very few on the streets of most major cities in the world. There were no accidents or parking problems.

The situation changed dramatically after the start of mass production of cars. Rules traffic were in their infancy, which gave rise to great amount accidents The body of the car almost always suffered and required expensive repairs to remove dents and paint.
The increase in the number of accidents became the starting point for the creation of the first bumper. The first bumper models were made of thin-walled metal material. They took the blow when the car collided with an obstacle or another vehicle. If translated from English bumper means buffer, shock absorber.
Their task was to maintain the integrity of the car body and prevent it from being damaged. That is why they were issued in front and behind the car. In the 70s of the last century, lightweight aluminum bumpers replaced steel bumpers. Only in the early 80s of the last century did car manufacturers begin to use plastic bumpers familiar to modern drivers.
The appearance of the plastic bumper provided a wide field for the activities of automotive designers. Many craftsmen began to use bumpers to diversify the design of the car. At the same time, the emergence of a lot of advantages with the introduction of a plastic bumper revealed its disadvantages. The overall ability to protect the car body from impact has decreased.
Do-it-yourself car bumper polishing from scratches

Restorative polishing of bumper from scratches on our own requires preliminary preparation. The quality of work performed depends on preparatory activities. Purchase necessary tools not necessarily they can always be rented. The rest of the materials can be purchased at any automotive store.
To polish a car bumper with your own hands, you will need the following tools and materials:
- Fine abrasive polishing paste;
- Coarse abrasive polishing paste;
- Fine-grained sandpaper;
- Polishing machine;
- Polishing wheels;
- Rags;
- Wax-based polish;
- Wax pencil.
All scratches on a car bumper can be divided into 2 groups:
Superficial damage.

Minor damage to the car bumper in terms of penetration depth. If it does not reach the ground, and the integrity of the paintwork is damaged, you can get by with cosmetic measures.
To remove scratches on the bumper, a special wax pencil is used. Its cost is low and is available to any driver, regardless of his financial income.
It will take no more than 15 minutes to remove the scratch. Even a child can use a wax pencil. Time and material costs are minimal.
The procedure is as follows:
- the damaged area is washed to remove dirt and determine the size of the scratch;
- additional lighting is installed to visualize the damage (electric carrying can be used);
- The scratch itself is degreased with white spirit;
- Lightly pressing on the pencil, carefully fill the scratch with wax;
- excess wax is removed with a rag;
- To enhance the effect, apply polish to the damaged area of the bumper and rub it in.
It must be recognized that the method is not designed for a long-term positive effect. Wax, even fixed with polish after several dozen washes, tends to wash out. It is best to use a wax pencil if the car is being prepared for sale and you need to hide defects to create a positive impression on the buyer.
Deep damage.

If the primer layer of the bumper is damaged, you cannot do without using a special tool for polishing yourself. There is no point in buying it unless, of course, you repair bumpers on a professional basis.
A special polishing machine with replaceable attachments is used. It significantly speeds up the progress of work and saves the car enthusiast a lot of time and effort.
The procedure for removing deep scratches on the surface of a car bumper is as follows:
- the car is driven into a well-lit garage or box;
- the front or rear bumper is dismantled;
- the bumper is washed using car shampoo;
- dry using a hair dryer;
- Abrasive paste is applied to the polishing wheel for rough processing;
- a polishing machine is used to treat the damaged area of the bumper;
- remove the remaining abrasive paste with a rag;
- apply fine abrasive paste to the polishing wheel;
- the entire surface of the bumper is polished;
- to consolidate the effect, a special polish for bumpers is applied to the bumper;
- the bumper is mounted in its original place.
This is the process do-it-yourself bumper polishing from scratches can be considered completed. If the tools and materials were prepared in advance, everything will take no more than 2-3 hours. Work can be performed in garage conditions over a glass of tea.
Applying polish will make it possible to create a protective film invisible to the human eye. This will enhance its water-repellent properties.
It must be remembered that only scratches can be removed in this way. Dents and damage to the integrity of the bumper resulting from an accident cannot be repaired. This requires special equipment and training. In any case, the bumper will have to be repainted.
Causes of scratches on the bumper

A large number of scratches on a car bumper does not decorate it at all and spoils it. appearance. Often, seemingly harmless scratches become a catalyst for subsequent destruction of the bumper surface. It is very important to understand the mechanism of damage formation and take measures to minimize its occurrence.
The following are the main reasons for scratches on the bumper:
Wrong parking.

When parking a car, inattentive drivers will almost always find a way to damage the bumper. This could be a stone, curb, tree, bush, parapet or other vehicle.
Very high risk the appearance of scratches persists in the courtyards of multi-storey buildings and parking lots of large shopping centers. If you don’t have enough experience driving a car, you shouldn’t risk trying to park your car on a narrow spot of asphalt.
Minor accidents.

In second place in terms of frequency of scratches on the bumper are minor accidents. Collisions between two vehicles do not always result in major body damage. Often they remain on cars minor damage, requiring cosmetic repairs.
Tree branches.

Fans of fishing, hunting and mushroom pickers probably damaged the bumper with tree branches approaching the forest road. As a rule, the depth of the scratch left by a branch is insignificant and can be eliminated using a wax pencil.
Incorrect washing.

Often, the active use of mini-car washers with high pressure leads to minor damage to the bumper. Excessive force during hand washing can result in scratches on the paintwork of the bumper.
Small stones and gravel.

Driving on dirt roads not only creates additional load on the car’s suspension, but is also often the cause of minor scratches and chips on the surface of the car bumper.
Types of pencils for removing scratches on bumpers
Fix it Pro, cost 7-8$ US dollars.

An easy-to-use wax pencil for removing scratches on your car bumper with your own hands. Takes up little free space and is compact in size.
Allows you to quickly and safely remove small scratches on the bumper. Completely fills the surface of the damage. Resistant to water and does not contain substances harmful or dangerous to the human body.
ASTROhim COLOR WAX, cost 5-6$ US dollars.

You can choose a pencil to match any color of your car bumper. Quickly removes scratches and chips on the surface of the bumper. Resistant to moisture and changes temperature regime. Over a significant period of time it does not require re-processing.
Turtle Wax COLOR MAGIC PLUS, cost 10-15$ US dollars.

A special tinting polish complete with a pencil provides effective removal scratches on the bumper. One treatment is enough for 1 year of use. No application required to use special tools and materials. Convenient and practical. Capable of withstanding more than 50 washes.
Conclusion
You can polish scratches on the bumper yourself without outside help. The most important thing is to use quality materials and don’t give in to haste.
Why repair the bumper if it doesn't interfere with your driving? If you decide to sell the car, an unkempt appearance will lower the price. We will give advice on how to repair a car bumper (we repair cracks, chips, abrasions) + a video on how to do it yourself.
The vast majority of cars are equipped with plastic bumpers. This was done to lighten the weight and quick replacement damaged part to a new one. Some damaged plastic bumpers can be repaired. The latest developments in special materials make it possible to repair even small chips or cracks.
Small scratches, dents, and holes can be repaired yourself by first purchasing a special repair kit. More serious damage is best done at a car service center. Bumpers with numerous cracks, big holes and a severely distorted shape should be replaced with a new one.
How to fix scratches
- Sand out any scratches on the bumper with coarse sandpaper. Just don't overdo it. If you sand hard, a small depression may form at the sanding site. Sanding must be done carefully until the surface becomes smooth.
- Spray the sanded area with plastic primer. Apply two thin coats. Give each layer 30 minutes to dry.
- Sand the painted area with fine-grit sandpaper (1000 grit). Then wipe with a damp cloth to remove dust.
- Next, apply 3-4 thin layers car paint suitable color. Each layer must dry for at least 30 minutes. Keep the can of paint at a distance of 15-20 cm from the surface.
- Finally, apply 2 coats of varnish. Let the paint dry for 24-48 hours.

How to repair chips, dents and cracks
- Clean the damaged surface with plastic care product or white spirit (degreaser).
- Rub the damaged area with sandpaper. Needs to be completely removed old paint at the site of damage.
- Apply fiberglass tape to the inside of the bumper. Mix the putty and thickener. Apply the resulting mixture onto the tape.
- Next, clean and sand the surface. Liquid plastic is applied to this place.
- After the plastic has hardened, you need to sand the surface.
- The final stage is painting the car bumper.
Personal experience
My front bumper was all cracked and chipped. Set aside a whole day for work. I removed the bumper from the car and started repairing the large cracks. On the back side I strengthened the damaged areas. For this I used fiberglass (it is the strongest). Where there were large cracks, I soldered metal wire using a soldering iron. It's like cross stitching, the wire needs to connect the two pieces. All this is needed to give rigidity to the damaged bumper and prevent the formation of new cracks in the future.From the front using glue gun with plastic tubes I applied plastic glue into large cracks. Do it carefully so that there are no lumps left. Next we take grinder and sand the entire bumper. At this stage, skins with a large grain size are suitable - from 40. Then we look at where the unevenness and dents remain. We seal it using automotive putty. First coarse, then fine-grained. Then we sand it (take smoother skins) and so on until the bumper is perfectly smooth.
The last stage is wet sanding. You need sandpaper from P1000 to P2000. We do it by hand. We soak the skin in water and sand it. We constantly wet the bumper and the skin with water to prevent sand from getting in. When everything is dry you can start painting. In addition to paint, you will need a special primer for plastic. Without it, the paint will peel off over time. I painted from aerosol can, but it’s better to give it to specialists for painting if you need a good result.
Video - everything from soldering to painting
If this repair technology is difficult, it is better to contact the service. The cost of painting will be approximately 5 - 7 thousand rubles, excluding the bumper itself or its restoration. It is better to trust a proven service, where they provide a guarantee for the work performed.
The bumper most often becomes the target of small emergency situations. A slightly higher curb, a mistake when parking, and the shiny surface becomes covered with scuffs and scratches. Both beginners and confident motorists face similar troubles. You can eliminate superficial and deep defects on the bumper yourself, without the help of specialists.
Before you begin directly removing scratches, you need to diagnose the damage. Thoroughly clean the bumper from dirt with car shampoo. Use solvent if necessary. On a clean surface from which traces of rubber have also been removed, the depth of the scratches will be clearly visible. The extent of the damage will determine how to eliminate it. Minor abrasions can be easily removed with a wax pencil. This corrector will successfully cope with small scratches, completely masking them. Thanks to the balanced chemical composition The corrector will not only fill in chips, but also prevent metal corrosion. Subsequently, the coating created by the pencil withstands the action of natural factors (moisture, sun, hail), as well as chemical treatment when washing a car. You can purchase pencils at almost any automotive supply store. They are quite inexpensive, especially if one corrector is enough for you long years. Remember that wax can only fill thin and shallow scratches.


When painting a bumper, follow the same rules that apply when painting the entire car. Make sure that the surface is degreased and free of dust. With proper attention to detail, you can easily repair damage to your car bumper yourself.
During the operation of the vehicle, the owner will certainly have to face a situation where the car’s bumper is damaged. Often we're talking about about minor defects in the form of scratches or chips. The situation is worse with cracks, which compromise the integrity of the part and make the operation of the machine dangerous. Many drivers are interested in the question of how to remove scratches on a car bumper.
If the owner scratches the bumper, even the smallest marks will be visible during the day. As practice shows, owners have to deal with the following types of damage:
- complete destruction of the bumper when it broke into several pieces. Often such damage occurs when involved in an accident. What to do in this case? The most preferable option is to carry out complete replacement. Although if you have all the pieces on hand, you can try to solder it with special equipment;
- cracks. They arise as a result of strong mechanical impact on vulnerable areas - for example, when driving along a curb. A special soldering iron or fiberglass with a special resin can solve the problem. Repairing cracks on a car is quite simple, the main thing is to understand the technology;
- chips. As practice shows, a chip on the bumper is a common occurrence. Chips appear as a result of small stones hitting the surface, flying out from under the wheels of cars in front. It will not be possible to eliminate deep abrasions without painting, since the paintwork in this case has received serious damage. Local painting is carried out;
- scratches. The most common type of defect. If the owner left a small scratch, it can be removed without the use of specialized equipment. The defect can be eliminated in a garage, provided that the appropriate repair tools are purchased in advance.

As you can see, there are quite a large number of types of bumper defects. Often it is he who suffers, since its surface has to reflect crushed stone, tree branches, sand, and so on.
How to remove a scratch from a bumper
Have you noticed that a new scratch has appeared on the surface? Do not rush to go to the service center for help. First, we recommend going to the car market. To repair your car, you will need special remedy to remove scratches. It looks like a regular marker, or a small container with a brush inside. In other words, it looks exactly the same as office corrector or PVA glue. More modern models have a nozzle with paint on the surface.
After purchasing this product, you need to go to the garage and clean the surface to be treated in advance. To consolidate the positive effect, you should additionally degrease the surface with alcohol. Make sure that there are no traces of dust or dirt on the paint layer.
To repair a scratch on a bumper, you need to lightly press the marker over the surface and then check the result. If the shade of the marker is not expressive enough, run the tip over the scratch again. Do this until the defect is completely hidden.
The advantage of this method is that the owner does not have to spend additional time and money on removing the old paint layer and applying a new one. Almost immediately after the procedure is completed, you can use the vehicle.
DIY methods for removing small scratches
As practice shows, small scratches can cause the most problems. The reason is simple - there are a lot of them, but at the same time they are clearly visible in direct sunlight. To remove minor scratches yourself, you can use several methods.

- Mask the damaged areas with a marker. We discussed this method above, so we won’t talk again about how to paint over a scratch on a bumper.
- Treat the surface with a special polish. There is a special restoring polish on the domestic market that can be used to hide traces of scratches on the surface. Chemical substance penetrates into the structure of the scratch and forms a thin film that is very difficult to wash even when using a sink high pressure. To improve the quality of the result, additionally polish the surface with a soft cloth.
- Polish using special equipment. Protective polishing of the bumper against scratches helps prevent their occurrence in the future. Practice shows that in the case of protective polishing, plastic bumpers get their original appearance. The bottom line is that scratches are not covered up, but literally abraded. After the owner has been able to sand the surface, he must definitely use special car cosmetics to protect the coating from reappearance scratches
What to do with deep scratches
Often you have to deal with deep scratches. To eliminate them, more serious work is required. To repair the bumper yourself, you can resort to a radical option - painting it. The paint should be selected in accordance with the shade of the paintwork of the remaining body parts. This is quite difficult to do, but if there are deep scratches, this is the most acceptable option.
When painting, the paint is applied as evenly as possible to prevent streaks from appearing on the surface.
When restoring a car yourself, you may also need putty. It is required when scratches have led to the appearance of sharp contours to which cobwebs, dust, and so on constantly stick.

The next stage of restoration consists of applying several layers of varnish with the additional use of a special protective polish. After completing the procedure, removing scratches on the bumper can be considered complete.
After painting the bumper, refrain from using the car for 1-2 days. This is required so that the new layer of paint and varnish is completely cured. Failure to comply with this requirement will result in the surface becoming wavy, folds appearing on it, or new paint will disappear. Storing the car at a temperature slightly above room temperature – from 25 to 30 degrees Celsius – can reduce the waiting time. Places where the bumper is painted should be illuminated with regular lighting. table lamp. Direct Sun rays have a positive effect on the drying time of the paint.

Repairing chips
To get rid of chips on the bumper yourself, it is highly recommended to sand the surface down to the plastic base. Local painting will be required here, so you should take care of your choice in advance paint and varnish material. The selection of paints and varnish is carried out in accordance with the service book - often the name of the shade according to the RAL palette is indicated here. Already on the Internet you can find instructions for preparing paint, familiarize yourself with the proportions, recommendations regarding the choice of manufacturers, and so on.

If you want to properly fix the surface of the bumper, eliminating chips from it, you should do the work only in direct sunlight to see exactly where the defects are located. To sand the surface, you will need fine-grit sanding paper. Never use coarse sandpaper as it can create a large number of small scratches on the surface.
conclusions
Removing scratches and chips on the surface of the bumper yourself is not a difficult task. The vehicle owner needs to select everything correctly necessary materials and familiarize yourself with the technology of performing the work in advance.
If you learn how to repair the front and rear bumpers on your own, in the future you will be able to save more than one thousand rubles on specialized services service centers. The choice of materials, including paint, varnish, repair marker, and so on, should be made only in time-tested stores. If you buy cheap Chinese paint, you will not achieve the desired result.