Excess moisture and odors create an unhealthy atmosphere and even cause disease. The quality of ventilation in a home, office or workplace directly affects the level of comfort, do you agree with that?
That is why well-arranged ventilation is the most important condition for the commissioning of construction projects. A turbo deflector for ventilation helps to establish high-quality air exchange. But which one to choose and install correctly so as not to call specialists?
We will try to answer all questions in detail - this material discusses the principle of operation, the existing varieties of turbo deflectors, installation features. Also paid attention to maintenance and repair.
For a better understanding of the information presented, illustrative photos and diagrams of the rotational deflectors have been selected, and video recommendations for troubleshooting are given. The information is structured and even for an inexperienced home craftsman it will be easy to figure out the intricacies of choosing, installing and repairing a rotary deflector.
The operation of the turbodeflector is based on the following principles: using wind energy, the device creates a rarefaction of air in the ventilation shaft, increases draft and draws polluted air from the room, ventilation duct, under-roof space.
No matter how the direction and strength of the wind change, the rotating head (impeller) always rotates in one direction and creates a partial vacuum in the ventilation shaft.
Image Gallery
Turbine installation rules
Ventilation turbines can be installed directly on a pitched or straight roof, on a chimney outlet or a ventilation shaft. The location depends on the application of the turbine.
The most common problem in ventilation and chimney systems is weak draft. Due to insufficient circulation, polluted air cannot be removed outside, and the smoke from the boiler enters the room altogether. A turbo deflector for ventilation of a private house and other buildings will help to fix all these problems.
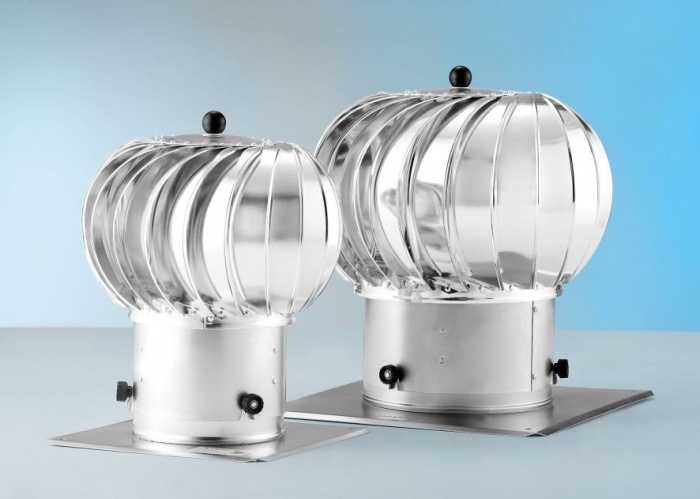
Device and how it works
The rotary turbine is used in systems with natural ventilation. Consists of an active deflector head with vanes mounted on a base with zero drag bearings. Thanks to the latter, the turbine rotates at the same speed even in gusty wind conditions.
The principle of operation is as follows: the wind, falling into the blades, makes the head of the device move, thereby discharging the air in the system and improving traction. In order for the turbine to start working, a wind speed of 0.5 m / s is enough, since all parts are made of thin and light material. The stronger the wind, the higher the power of the turbo deflector. Compared with conventional deflectors, the efficiency of this device is 2 times higher.
 Principle of operation
 Note! The head always rotates only in one direction, regardless of the direction of the wind, which is extremely important for systems connected to geysers. In the event of a strong gust of wind, the flame will not go out.
Rotary turbines are produced with three different types of bases:
- round;
- square;
- flat square.
Available with nozzle sizes from 10 to 68 cm.
Application area
You can use a turbo deflector not only for private houses and other residential premises, but also for industrial and agricultural ones. In livestock complexes, turbines are installed to remove gases and moisture, and in processing plants to save electricity in order to reduce production costs. Rotary deflectors are also suitable for swimming pools, sports complexes and other public places.

Turbo deflectors with a base size of 11 to 19.5 cm are recommended for ventilation of cellars, garages and rooms. From 20 to 31.5 cm are used for rooms with an area of up to 50 m2, from 35 to 68 cm are used for apartment buildings and buildings with a large area, including livestock farms, warehouses and so on.
Advantages and disadvantages
Advantages of the turbo deflector compared to other similar devices:
- does not consume electricity - the rotary turbine operates due to the force of the wind, so its operation does not require electric current;
- the possibility of atmospheric precipitation entering the ventilation or chimney system is excluded, and also, due to the closed and movable upper part, debris cannot get inside or a bird can fly in;
- turbine parts are made of high quality aluminum or stainless and galvanized steel;
- the movable head discharges air more efficiently than fixed devices, preventing the room from overheating in hot weather, thereby reducing the cost of electricity for air conditioning;
- removes excess moisture, preventing condensation on the walls and under the roof of the building, as well as accumulating in insulation and other materials, thereby extending their service life;
- the amount of ice build-up in the ventilation ducts with a rotating turbine is noticeably less than that of fixed deflectors;
- all parts of the rotary turbo deflector are securely fastened, even with a strong gust of wind the device will not be torn off the pipe or skewed;
- has an aesthetic appearance, so it can be used on residential buildings;
- environmentally friendly device and easy maintenance;
- the service life of the turbo deflector is 15 years.
 Advantages of the turbo deflector
 The main drawback is that in the event of a complete absence of wind, the active head of the rotary turbine will stop moving. If it stopped during a period of frost with precipitation, then there is a possibility of freezing, due to which the device will not be able to start rotating again.
DIY selection and installation rules
To install a turbo deflector, you do not need to have special skills and equipment. Due to its low weight and robust design, it can be easily installed by one person. The average installation time is no more than two hours. The installation of the device is carried out at the highest point of the roof and along the ridge (at a distance of 4 to 6 m to the next deflector). If you put the turbine high, then this will eliminate the possibility of snow getting inside the ventilation duct, when sediments form near it. Valves can be used in ducts to control ventilation.
When installing a rotary turbine on a chimney, it should be taken into account that the temperature in it should not exceed +100°C. For systems with high temperatures, high temperature nozzles must be used.
 Scheme of installing the deflector on a part of the ventilation ducts with a transition
 Recommendation! There are a lot of manufacturers who claim that their products are the best. But before you buy a turbo deflector, you should carefully study the market and choose the device that has certificates of quality and safety checks, as well as a warranty period and a long service life.
You can make a turbo deflector with your own hands, but compared to simpler fixed models, this one will take more time, and you will need to cut out many identical petals. Accurate calculations and drawing are also important. Before you start cutting metal, it is recommended to make patterns from cardboard.
Price
The cost of a rotary turbine directly depends on the size of the connecting channel and the material from which it is made. Turbo deflectors made of galvanized steel are cheaper than models made from stainless steel. The average price of a galvanized rotary turbine TD-110 starts from 2200 rubles, and stainless steel from 3400 rubles.

The turbo deflector saves a significant amount of electricity and helps to keep a comfortable temperature in the premises. A rotary turbine solves the problem of excessive dampness and mustiness of the air even in large multi-storey buildings, removes dust and vapors of harmful substances. Due to the constant movement of the active head, the possibility of capsizing the thrust is completely eliminated. Already in the first year of use, the turbo deflector pays for itself due to energy savings.
- A vertical axis turbine is a waste of time, and everything spins in the wind, it only spins and generates energy - two different things, in this video the turbine was spinning without load, and with load it will be a sad sight :)
- A sad sight is people who know everything about everything and are categorical in their judgment. Did you yourself try to compare the vertical and the propeller live?
- The point is not so much what design of the turbine everyone chooses for himself, but how to make a good and powerful generator for any of the turbines is the key to success.
- There are a lot of varieties of turbines and generators, but each of the varieties has its drawbacks, ranging from rotating parts to repair and maintenance costs, since there are no "perpetual" engines of the 1st kind. 2nd hearth generators are currently invented, but are not produced by the industry, as they are also maintained by people, although it is as simple as making a conventional device. I completely agree that a wind generator without load is not under load. I didn’t watch the video, because, as you can see from the splash screen, there are a lot of shortcomings in this design. With this design, the device will fall to the floor due to windage, the cavities are installed without knowledge of this issue. http://abrakadabra.xp3.biz/?p=1
- The device will not fail, the gyroscopic moment will not give. To this wing, you can cling the engine from the flop. One merit. more smoothed in relation to Savonius torsional vibrations. But less KIEV. Best regards 0013
- Verticals really work, I saw it myself on discovery, due to the design and simplicity of energy removal, regardless of the direction of the wind, they behave well in the city, the roofs covered with them were shown ... What I observed, by the way, it’s a pity that I didn’t write down the program, looked something like this: A plane is taken, bent with the letter S, where the center of the letter is the vertical axis, then, holding the lower letter, we turn the upper one by 180g (???), in general, something like a corkscrew, the nonlinearity is complete, and due to this it enters the hook with the wind in any position. I apologize for the unscientific description, I just tried the design in the topic, the resistance of the opposing blade must be subtracted from the efficiency of the raking blade, but if it were somehow folded, when moving against the wind, something might have happened.
- Spinning and actually working are different concepts.
- Don't mind if it works. Now let's think, a tall mast, the force of the wind is allowable on the sail, where is the force of gravity. Now remember the carousel. If it’s easier, we turn the bolt by hand or take a meter-long knob on the carousel. everything else is the same. Although there are a large number of other designs, an expansion in a pipe, a pipe of a smaller section, a bunch of fans in the pipe on 1 shaft, and then everything is the same.
- This refers to urban conditions, where there is no clearly defined direction, and few will agree when a monster rotates overhead, from which a piece can fall off at any moment, plus the noise that the ends of the blades make around the clock, and reserve a place under the weather vane, it turns out that without no verticals in the city ... And for the option I described, different types of layout are possible ..
- In the city, yes, we still need to think about competition for a place with solar panels, there are not enough roofs for everyone. Gaps between houses are very promising in this regard, and if we “modernize” there will be a shortage of electricity, the lines will not increase in power, it’s good if they change even at substations. So low-speed verticals, and specifically the Savonius propeller, are out of competition. something like that 0013
- I agree with you. Therefore, to be honest, I am not a supporter of windmills, I am interested in more stable structures. As far as your windmill is concerned, it's a common idea, but the center of gravity is way too high given the strength of the wind. As for small structures in volume. We go to the private sector, in some places we see an airplane on the roofs of houses, the tail catches the direction of the wind and the propeller, which can be replaced with a turbine, and after a couple of centimeters we put additional blades on the shaft to increase the power of the generator, and so even and odd blades with a crank on the angle of movement of the air flow, as in a multistage water pump. In practice, we get an involute.
- With such an increase in the number of blades, the power will drop. In general, it depends on the area of the swept surface.
- If you drive the flow into the pipe with a large bell, it will work out fine, also an option, plus you can adjust the direction and strength of the flow a little with dampers, but then again, who wants to live at the airport around the clock? You need something slow, even to the detriment of performance ...
- Intricate statement :D! If you were taught "normally" at school, you would have seen how you are being robbed, I think there would be no such statement. When this amount is 2-3% of the salary. fees are tolerable, but not when more than 50%, although in fact even in the USSR the percentage was not lower than 50%, and today some smart people are catching up to 200% of 100% or more. To understand what was written, watch the video, you can read it if the link remains. Sincerely. Vladimir. http://abrakadabra.xp3.biz/?p=1
- The flow is not in the pipe, but free, so the sockets are not driven anywhere. Do you really think that the idea of a concentrator has never occurred to anyone before you?
- Why didn't you come. If you look through this project, you will find a similar home power plant, it seems to be produced by manufacturers. The only thing that I didn’t come up with myself, on other projects there are ideas how 1 and the same air flow is used to increase useful work. And the conversation began, in my opinion, with the idea of \u200b\u200ba vertical device. I answered why I personally do not like this option. If desired, this device will work. For example, a top-loading washing machine also works and is not bad, but I prefer top-loading for a number of reasons.
- There was a video on YouTube with a corrugated hub, they lied that it tripled the efficiency, I'll check it in the spring.
- This is far from the best version of a vertical rotor. I am now experiencing this http://nikolamaster.rf/wind/%D0%B2%D0%B5%D1%82%D1%80%D1%8F%D0%BA3.jpg http://nikolamaster.rf/wind/ gener2.jpg Quite traction.
A properly designed ventilation system provides clean and fresh indoor air. The main condition for its effective operation is the presence of traction. Unfortunately, debris and dust entering the channels can disrupt the normal operation of the equipment. To prevent this from happening, a deflector must be installed on the ventilation pipe.
If there is no deflector on the ventilation pipe, then its diameter will gradually decrease. To the greatest extent, this is facilitated by fat, which accumulates on the walls of the duct. It's where dust and debris sticks to.
The ventilation deflector is mounted on the pipe head. At first glance, this protects the channels from debris that may enter from the outside. But not everything is so simple. The device performs a number of functions, each of which is important.
Peculiarities
Installing a deflector on the ventilation pipe greatly increases the draft. The device deflects air currents. As a result, a zone of low pressure is formed at the outlet of the ventilation shaft. Due to this, the air inside the pipe rises. Thus, pressure compensation occurs.
There are many designs of deflectors, but they all work according to the principle described above. Interestingly, in most modern devices there is a narrowing of the channel. This allows you to achieve an increase in the speed with which the air flows over the pipe head. As a result, traction increases. This effect is called the airbrush principle.

If you use the deflector on the ventilation pipe correctly, you can achieve a significant increase in the efficiency of the entire system. With the right choice of device and its optimal installation, the increase in power can reach 20 percent.
Attention! The ventilation deflector shows the highest efficiency when installed on ventilation ducts with bends and large horizontal sections.
But the main purpose of the deflector is still to protect the duct from getting inside debris, insects, small birds and precipitation. Since the device is installed outside, the body material is stainless steel or ceramic. In some cases, you can also see ordinary plastic.
Pros and cons

Before you assemble the unit with your own hands, you need to find out not only its positive aspects, but also negative ones. First, let's focus on the positive. The umbrella structure effectively protects the pipe from precipitation and dirt, and an increase in traction can also be observed.
The main disadvantage of the deflector on the ventilation pipe is that when the wind blows from below, the flow hits the upper part of the structure and prevents the air from escaping normally. Therefore, sometimes there may be problems with the operation of the system. Fortunately, this happens quite rarely.
In addition, effective countermeasures were devised. Simply put, the structures began to be equipped with two cones, which are connected by bases. Therefore, if you want to get a truly reliable unit, this is best taken into account when creating a drawing.

Attention! The stronger the downward wind flow, the higher the pressure inside the ventilation deflector, which is installed on the pipe.
Kinds
There are many types of deflectors for ventilation pipes:
- The Tsagi deflector is very popular. The device has gained high popularity due to its simple design and high efficiency.
- The Grigorovich deflector is very popular.
- The H-shaped apparatus is most effective when installed on chimneys.
It is also quite common to find open structures. Since there are quite a lot of various designs on the market, they are classified according to the following parameters:
- pommel shape,
- rotary or turbine principle of operation,
- weathervane type.
A special role is played by the material from which the deflector is made. For example, plastic products have a relatively low price, but their service life is not very long. You can also note the sophisticated appearance.
It is because of the aesthetics that plastic deflectors can be seen on most pipes in private homes. Unfortunately, plastic does not tolerate high temperatures, so it cannot be installed on chimneys.
The rotating vent deflector enhances draft and effectively protects the channels from getting inside a variety of debris. The main feature of the device is a spherical shape.
A rotary vent deflector for a pipe can also be called a turbine. The device is capable of using wind energy to ensure the movement of the turbine. Inside, the air swirls like a tornado. This, in turn, increases the draft in the duct. As a result, good traction can be observed even in summer.
Grigorovich deflector

There are many varieties of ventilation deflectors for pipes. If we take into account the design, which combines simplicity and efficiency, then this is, of course, the Grigorovich unit.
This pipe vent deflector has a truncated cone. It is also called a diffuser. The ventilation pipe itself should go into it a little. A protective umbrella is mounted on top. Under it, a structure is installed that provides reduced pressure even with a side wind. It has the shape of a cone. Of course, such a design feature increases the traction force.
We make a deflector with our own hands
Preparatory work

To make a ventilation deflector with your own hands and install it on a pipe, you first need to perform certain preparatory work. The device consists of the following main elements:
- inlet pipe,
- diffuser,
- cap.
The best material to use is stainless steel. Its high anti-corrosion properties will ensure a long service life of the deflector on the ventilation pipe.

Before you start assembling with your own hands, you need to take care of the availability of the necessary tools, it includes:
- Bulgarian,
- drill,
- clamps,
- a hammer,
- roulette,
- metal scissors,
- bolts and nuts,
- rivets.
You also need to think about finding suitable sheets of metal for the unit. Particular attention should be paid to protective equipment. Do not start work without gloves and goggles.
The preparatory process also includes the creation of a drawing for a do-it-yourself ventilation deflector. It is worth recognizing that this is a rather difficult task. Of course, the design itself cannot be called super-complex, however, in order to get a unit suitable for long-term operation, everything must be carefully calculated.

It would be best to take a ready-made drawing, for example, one from this article. But you must take into account that your pipe sizes may be completely different. Therefore, during the implementation of the project, additional adjustments may need to be made. The best option would be to contact the design bureau, where they will make you a finished project that you can bring to life with your own hands.
Assembly
After you prepare all the necessary tools and take care of personal protection, you can begin the process itself. First you need to transfer the contours from the drawing to the metal. In doing so, special attention is paid to the following elements:
- cap,
- diffuser
- outer cylinder,
- racks.
The final result in the form of a ready-to-work unit depends on how carefully you draw everything. Once the marks are made, you can start cutting out the desired shapes, of course, for this you will need metal scissors.

To connect the cut elements together, use a rivet gun. At the same time, racks will act as peculiar bridges between the two parts of the main structure.
Attention! The posts must be cut from the same metal as the two main parts of the unit.
After the unit is assembled, it can be installed on the head of the pipe. In this case, the structure itself is fastened with clamps. On this, the manufacturing and installation process can be considered completed.
Results
The ventilation deflector is an important element in the ventilation system. It allows you to increase system performance by 20 percent and at the same time protects internal channels from debris, dust and precipitation. Most often, units of this class are made of stainless steel sheets, but other options are possible.
The issues of energy independence disturb the minds not only of heads of states and enterprises, but also of individual citizens, owners of private houses. With increasing monopoly and tariffs by electricity producers, people are looking for efficient alternative power sources. One of these sources is the wind generator.
The main elements in the wind generator system
There are many models, options from different manufacturers, but as practical experience shows, they are not always affordable in terms of price and quality for a wide range of consumers. If you have information, certain knowledge of electrical engineering and practical skills, it is possible to make a wind generator with your own hands.
Principle of operation and main elements
The work of a home-made wind generator is no different from industrial models, the principles of operation are the same. Wind energy is converted into mechanical energy by rotating the generator rotor, which generates electricity.
The main structural elements (fig. above):
- propeller with blades;
- a rotation shaft through which torque is transmitted to the generator rotor;
- generator;
- generator fastening design at the installation site;
- if necessary, to increase the rotational speed of the rotor, a gearbox or belt drive can be installed between the propeller shaft and the generator shaft;
- to convert the alternating current of the generator into a direct current, a converter is used, a rectifier diode bridge, the current from which is supplied to recharge the battery;
- battery, from which electricity is supplied through the inverter to the load;
- The inverter converts the DC battery voltage of 12V or 24V to AC 220V.
The designs of propellers, generators, gearboxes and other elements may differ, have different characteristics, additional devices, but the listed components are always present at the heart of the system.
Choosing and making your own hands
According to the design, there are two types of axis that rotate the generator rotor:
- generators with a horizontal axis of rotation;

Horizontal axis generator
- generators with a vertical axis of rotation.

Rotary wind generator with a vertical axis of rotation
Horizontal axes of rotation
Each design has its own advantages and disadvantages. The most common option is with a horizontal axis. These models have a high efficiency of converting wind energy into rotational movements of the axis, but there are certain difficulties in calculating and making the blades with your own hands. The usual flat shape of the blade, which was used in ancient windmills, is ineffective.
To use the maximum wind energy when the axis rotates, the blades must be wing-shaped. On airplanes, the shape of the wing, due to the force of the headwind, provides lifting flows. In the case under consideration, the forces of these flows will be directed to the rotation of the generator shaft. Propellers can be with two, three, or more blades, the most common designs with three blades. This is quite enough to provide the required rotation speed.
Wind generators with a horizontal axis of rotation must be constantly turned by the plane of the propeller to the front of the oncoming wind flow. This requires the use of a vane-type tail unit, which, under the influence of the wind, like a sail, deploys the entire structure with a propeller to the headwind.
Vertical axes of rotation
The main disadvantage of this option is low efficiency, but this is offset by a simpler design that does not require the manufacture of additional elements to turn the blades to the wind. The vertical arrangement of the axis and blades allows you to use wind energy to rotate from any direction, this design is easier to do with your own hands. The rotation of the shaft is more stable, without sudden jumps in speed.
The average annual wind speeds in Russia are not the same. The most favorable conditions for the operation of wind turbines are 6-10 m/s. There are few such areas, mainly winds of 4-6 m/s prevail. To increase the rotation speed, it is necessary to use gearboxes and take into account the height, the wind rose in the area where the generator is installed.
An example of the manufacture of a wind generator
A variant with a vertical axis of rotation is being considered.
DIY wind turbine
The easiest option for the production of blades is to use a metal barrel of 50-200 liters. Depending on the number of blades required, the barrel is sawn by a grinder from top to bottom into 4 or 3 equal parts.

Vertical blades from a metal barrel
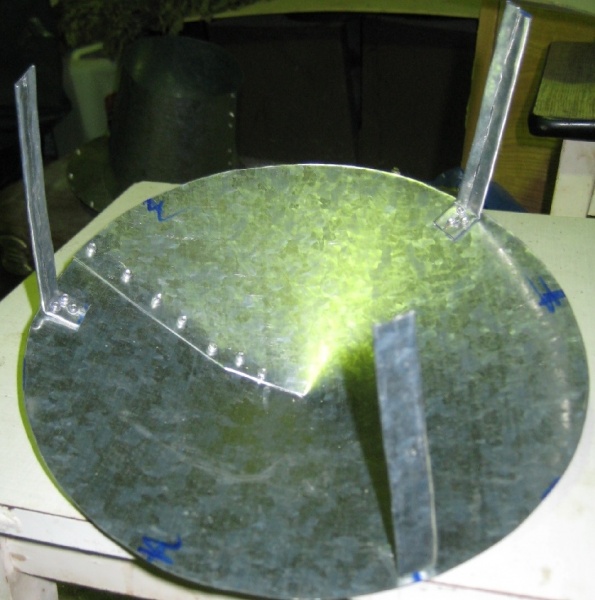
You can simply use sheets of galvanized roofing iron, which are easy to cut into the desired shape with your own hands using metal scissors.

Vertical blades made of sheet metal
In the future, the blades are mounted on the upper part of the axis of rotation. The basis for their fastening can be wooden disks made of six-layer plywood.
It is more reliable to use a metal frame made of a rectangular profile, to which the blades are bolted.

An example of the placement of vertical blades

An example of attaching the blades to the platform
The frame or discs are rigidly attached to the axis of rotation, the axis itself is inserted into couplings with bearings that are securely installed in the frame of the tower or roof of the building on which the generator is located.

Installing the axle with blades on the tower

Visual representation of the installation of a vertical axis of rotation on the roof of a building
- Turbine with vertical blades.
- Axle stabilization platform with double row ball bearing.
- Stretching steel cable Ø 5mm.
- Vertical axis, steel pipe Ø 40-50mm, wall thickness not less than 2mm.
- Speed control lever.
- The blades of the aerodynamic regulator are made of plywood or plastic 3-4 mm thick.
- Rods that regulate the speed of rotation, the number of revolutions.
- A weight whose weight determines the speed of rotation.
- Vertical axle pulley for belt transmission, widely used bicycle rim from wheel, without tube and tire.
- Support bearing.
- Pulley on the axis of the generator rotor.
A pulley for a belt drive or a gear for a gearbox is attached to the lower end of the axle, this is necessary to increase the speed of rotation of the rotor. Practice shows that at a wind speed of 5 m / s, the rotation of the shaft with horizontal blades from the barrel will be no more than 100 rpm. At a wind speed of 8-10 m/s, the rotation reaches up to 200 m/s. This is very little for the generator to produce the necessary power to charge the battery.
Reducer ratio 1:10 allows you to achieve the required speed.

Installation of belt pulleys
Low speed generator
To convert mechanical rotational energy into electricity, the easiest way is to use automotive generators. But ordinary generators from cars for windmills are not recommended due to the presence of brushes in their design. Graphite brushes remove the current induced on the rotor, during operation they are erased and require replacement. In addition, such generators are high-speed, 2000 or more revolutions are required to generate a voltage of 14 V with a current of up to 50A.
More efficient generators for windmills from tractors and buses Г.964.3701 with magnetic winding excitation. They do not have brushes, they work at lower speeds. The G288A.3701 generator has three phases and is used to power vehicles in conjunction with a battery. It has good characteristics for use in wind turbine systems:
- generates a voltage of 28 V;
- built-in rectifier delivers direct current up to 47 A;
- output power up to 1.3 kW;
- idle rotation 1200 rpm;
- with a current load of 30A, 2100 rpm is required.
The generator has suitable dimensions and weight:
- total weight 10 kg;
- diameter 174 mm;
- length 230 mm.

Generator with MAZ - 24V
Generators of this type are used in KAMAZ, Ural, KRAZ, MAZ vehicles with engines from the Yaroslavl plant YaMZ 236, 238, 841, 842 and ZMZ 73. In order to save money, you can buy a used generator at dismantling points. To generate more power at low speeds, you can make a generator with your own hands on neodymium magnets, but this is a separate issue and requires a more detailed description.
Assembly sequence
- First of all, a tower or generator mounting structure is mounted on the roof of the building. The vertical axis is attached to the bushings with bearings, the blades are installed.
- After installing the axle with blades, a pulley for a belt drive is fixed on the lower part.
- At the level of the axle pulley, to a specially prepared platform, a generator is attached with a pulley for a belt on the rotor shaft. Alternator pulleys and vane axles must be installed at the same level.
The diameter of the pulley on the axle should be approximately 10 times the diameter of the pulley on the alternator shaft. Based on the conditions that the calculated wind speed is approximately 10 m / s, it will give an axis rotation speed of up to 200 rpm.
The formula used is:
Wr = Wos x Dosd, where
- Wr is the rotation speed of the generator pulley;
- Dos is the pulley diameter on the vertical axis;
- d is the diameter of the pulley on the generator rotor shaft;
- Wos is the rotation speed of the vertical axis pulley.
Wr \u003d 200 rpm x 500mm / 50 mm \u003d 2000 rpm - sufficient rotation speed for the generator of the selected type to produce the required power.
- The belt is tensioned; for this, there should be slots in the generator mounting platform, as on a car mount.
- The output wires of the generator are connected to the battery terminals.
These generators have built-in rectifiers, the output is direct current, so the positive red wire is attached to the “+” terminal, and the negative wire is attached to the “minus” terminal.
- The 24V/220V inverter input is connected to the battery, also with polarity.
- The inverter output is connected to the load circuit.
Video. Wind generator with your own hands.
Having the necessary materials, practical locksmith skills, using ready-made car generators with magnetic winding excitation, it is easy to install a wind generator with your own hands. For the manufacture of a generator of greater power on neodymium magnets, deeper knowledge in electrical engineering and skills in assembling electrical equipment will be required. This is one of the easiest ways to assemble a wind generator with your own hands.