In time immemorial, fencing a home was carried out exclusively protective function, protecting a person from uninvited guests and ferocious animals. Today, this building element has more extensive functions, and in addition to the main task, fences are able to solve aesthetic issues, being a real design addition to any structure.
That is why today the market construction services literally teeming with proposals for the installation of enclosing structures made from concrete, metal, wood, and other building materials. But, perhaps, the most durable and high-quality fence is considered to be a brick fence. And since its only drawback is high price, an advisable action is to combine bricks with less expensive products. Therefore, taking into account the above, it is advisable to consider in detail the methodology of how to make a fence from brick and corrugated board with your own hands.
Choosing a composite fence design
First of all, when constructing a fence from bricks and corrugated sheets, you should decide on the design features of the element and find out exactly where it will be located. For which the most justified action would be to draw up a preliminary design, with detailed description the specified parameters.
Moreover, when drawing up this plan, it is advisable to adhere to the basic recommendations:
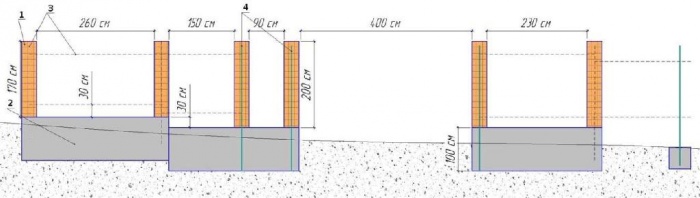
- The width of one span (the distance between adjacent elements) should be taken to be at least three meters;
- Select the location of the fence based on the plan of the land plot;
- When building a fence on sloping soils, divide individual sections of the fence into sections with differences in height.
In addition, when drawing up a detailed sketch, you should take into account the installation location and design of the entrance gates and gates.

Carrying out marking operations during the manufacture of a fence
Due to the fact that a fence with brick pillars has an impressive mass, it is very important to timely and correctly mark the future structure. For these purposes, the installation locations of the outer supports are first determined, and then a tapping cord is stretched between these points, which indicates the installation line of the future fence.
Concreting the foundation for self-production of a fence from bricks and corrugated sheets
And although this may seem strange to many people, making a foundation for a fence with brick pillars one of the most important procedures. This circumstance is due to the fact that structures of this type have a significant impact on the soil cavity and long-term and high-quality operation of such a fence can only be guaranteed if there is a solid foundation.
Before concreting the foundation for the fence, it is necessary to plan (level) the area. Then, in the marking areas, recesses should be prepared that correspond to the dimensions of future structures. Moreover, the depth of the pits in the places where brick columns are installed should reach 1 meter, and at the points where intermediate metal supports are installed, it should be 60 cm. This will prevent deformation of the foundation during periods of temperature fluctuations.

Additional reliability of a brick fence can be achieved through the use of a strip-type foundation, which is installed between the support pillars of each span. Therefore, in addition to the recesses for installing supports, it is immediately advisable to dig a trench to fill the intermediate horizontal base. The depth of this trench is usually dug to 30 - 40 cm, and its width is selected depending on the personal preferences of the performer, and varies in the range of 100 - 250 mm.
At the next stage, the formwork should be prepared - wooden fence, into the cavity of which will subsequently be poured concrete composition. In principle, it is advisable to construct formwork only for strip foundation, and in areas where installation is expected support pillars, concrete can be poured directly into an existing hole in the ground.
In order to make formwork with your own hands, you should use wooden panels, which are installed above the ground level by at least 100 mm and with the same size are immersed in the trench cavity.
The fastening of the formwork panels is best achieved using perpendicular wooden jumpers, which are first driven into the ground and to which the wooden panels are subsequently fixed using self-tapping screws (a screwdriver is used).
When constructing formwork for a fence with brick columns, it is necessary to ensure that the upper edges of the boards are horizontal, which can be checked using a building level.
At the next stage, a reinforcing frame should be made to give the foundation strength and performance characteristics. For these purposes, a prefabricated structure is made from metal rods with a diameter of 8-12 mm in the following sequence:
- With a step of 0.5 - 0.8 meters, scraps of reinforcement are driven into the recess of the trench in two rows, and this is done in such a way that the metal elements are removed from the extreme planes of the future foundation by at least 30 mm;
- Horizontal rods are fixed to the resulting vertical supports at the top and bottom points (by welding or tightening with annealed wire);
- Using shorts, cross-links are made in the same way, forming a rigid frame.
In the future, before concreting the foundation with your own hands, the bottom of the recesses should be covered with a layer of crushed stone and sand (each 10 cm), which are moistened and compacted well.

The technology of concreting the base itself boils down to the fact that building mixture is poured into the formwork cavity, into which support pillars are pre-installed, leveled and fixed:
- Pipe 40x20x2mm - for intermediate support posts;
- Pipe 40x40x2mm - for brick columns;
- Channel 100x50mm (2 pieces welded into a square) - for load-bearing posts for fastening gates and gates.
- Water (0.75 parts);
- Cement grade M400 or M500 (1 part);
- Sand (3 parts);
- Crushed stone of medium fraction (6 – 7 parts);
- Plasticizer (liquid soap) 0.1% by weight of cement.
When the composition acquires a homogeneous structure, the concrete mixer is turned off and concrete is poured. If required, you can make a concrete mixer yourself (you can get acquainted with the technology at the address).
When performing this process, you should ensure that the material fits into the formwork cavity as tightly as possible (for which the bayonet method is used), and when the entire free cavity is filled, the concrete is leveled and the structure is covered with plastic film for high-quality maturation.
Subsequent work should begin no earlier than 20 days later, and the best option To strengthen the foundation, the concrete will be wetted daily with water.
Construction of a frame for a fence with brick posts
To make it possible to fix the corrugated sheets, jumpers are mounted between the support posts. For these purposes, a square pipe 40x20x2mm is used, which is cut to a given size, and the resulting elements are welded to vertical posts (an inverter welding machine can be used). Moreover, at least two jumpers must be installed between adjacent columns, which are located at a distance of 20 - 25 cm from the upper and lower support points. After completing the welding work, it is recommended to open the entire frame with paint and varnish.
Laying fence posts
At this stage, it is better to trust a professional, since, without having experience in stone work, making a fence post will be very problematic. The best materials to use for the manufacture of such supports are: decorative brick Bassoon, with straight or beveled corners. Moreover, during the manufacture of columns, cement-sand mortar should be used (in a ratio of 1 to 3), and each new row should be tied metal mesh. In addition, the free cavities of the brick column should be filled with mortar, and the top of the element should be provided with a concrete or metal covering (cap).

Installation of corrugated sheets to the frame of a fence made of bricks and panels
The final stage of fencing manufacturing is the fastening of the corrugated sheet. However, before installing the corrugated sheeting, marks are made on the material indicating the locations of the screws, and the surface of the strip foundation is covered with cardboard or rags, which prevent damage to the material during installation.
Next, the sheets are set in a given position, and they are fastened to the frame elements, for which galvanized self-tapping screws with a 4.8x30mm rubberized head are used. To screw in the fasteners, you should use a drill or screwdriver, and fasteners should only be made to the lower corrugation of the corrugated sheet through the wave. All remaining materials are fixed in a similar way, with the sheets overlapped.

Construction of a fence made of brick and corrugated board: basic recommendations
In order for a self-made fence with brick posts to have higher performance characteristics, during its manufacture you should adhere to certain recommendations:
- In the places where gates and gates are fastened, provide for the installation of embedded elements in the post structure;
- Traumatic operations (cutting corrugated sheets, bricks) should be performed only with the use of protective equipment (glasses, gloves);
- It is advisable to equip the end faces of the sheets with a decorative profile for mechanical protection of the flooring.
Video instructions about self-production brick fence posts:
If you liked the material, I will be grateful if you recommend it to friends or leave a useful comment.
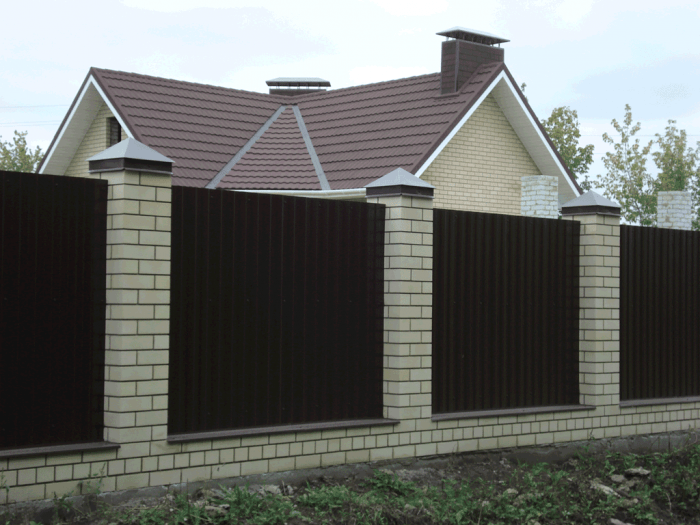
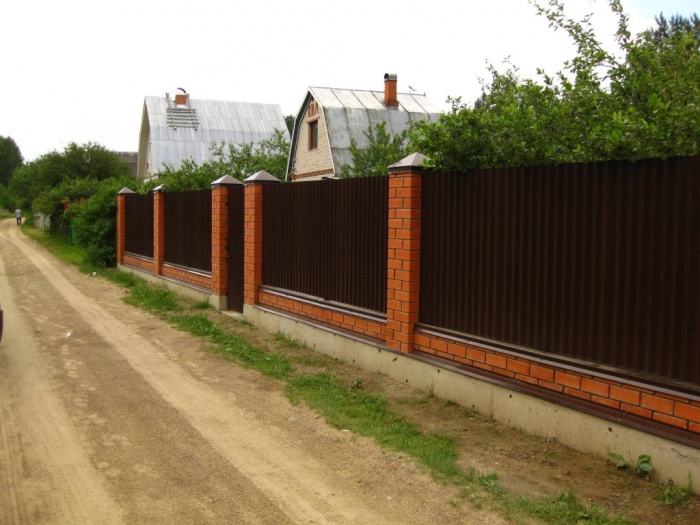
A brick fence looks luxurious and respectable; it will reliably protect the territory of a personal or suburban area from the penetration of strangers. Such fences these days belong to the elite segment and immediately indicate high social status owner of the fenced area.
But the very significant costs that the construction of a brick fence will require are not always justified. Such fences look massive and somewhat monotonous and gloomy. They do not always fit into the architectural ensemble of a relatively small suburban or dacha plot. Combined fences with brick pillars and sections of corrugated board look much more attractive. This option is not only much cheaper than a brick fence, but also looks lighter and more elegant.
In combined fences, brick pillars have a dual purpose. In addition to their visual appeal, they significantly strengthen the structure of the fence. Fences with brick pillars are more durable and reliable than lightweight fences made of profiled metal sheets with supports made of metal pipes.
A brick fence with corrugated board looks elegant and presentable, complementing and decorating the architectural ensemble of the development of a personal plot, especially in cases where the facade of a suburban or country house made of the same brick.
But this is by no means prerequisite. Brick goes well with almost all modern materials used for finishing facades. A fence made of corrugated board with brick pillars can be as diverse as the choice of types of modern facing bricks.
Successfully performing an aesthetic function, brick pillars serve as stiffening ribs for the fence, ensuring its stability under the influence of any overturning forces.
An important decorative detail of such a fence is the profiled sheet from which the fencing sections are made. In addition to the fact that a modern profiled sheet can be of almost any color and shade, you can also use corrugated sheeting for a brick fence, made using modern photo offset printing technologies.
Thanks to the advantages listed above, a fence made of brick and corrugated sheets is today one of the most common options used for fencing suburban and summer cottage areas. This is despite the fact that the materials used, e.g. facing brick, are quite expensive, and the process of erecting brick pillars is quite lengthy and requires high qualifications.

However, the result obtained will justify all the effort and money spent. Neat brick pillars will decorate any structure, emphasizing the taste of the owners of the site, and in terms of strength and durability, a combined fence can easily compete with a brick fence.
Installation of brick pillars for a combined fence
The height of brick pillars made of brick and corrugated board can be very different. It is chosen depending on the planned height of the fencing sections, and the post should be 100-150 mm higher than the top of the profiled sheet.
Very important characteristic a fence post is its cross-section. Most often, the cross-section of the pillar is made equal to 380x380mm, that is, one and a half bricks. This section provides sufficient strength and stability of the pillar with the least consumption of materials.
It is better to lay steel reinforcement inside the brickwork of the pillar. This will increase the resistance of the pillars to bending loads. It is advisable to connect embedded parts with reinforcing bars using electric welding, to which longitudinal guides will subsequently be attached for installing the profiled sheet of fencing sections.

Fence made of corrugated sheets - brick pillars (click to view in full
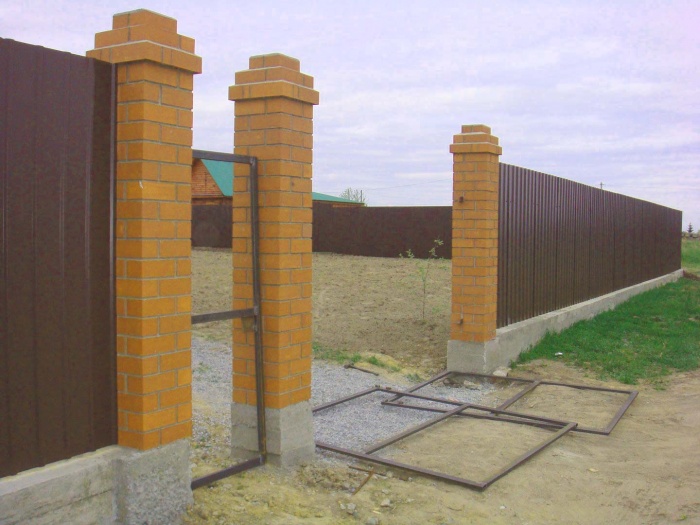
The brickwork of the pillars on which the gate and wicket will be installed is reinforced with steel or profile pipe. This is necessary so that they can withstand a fairly large weight of metal gate leaves and wickets.
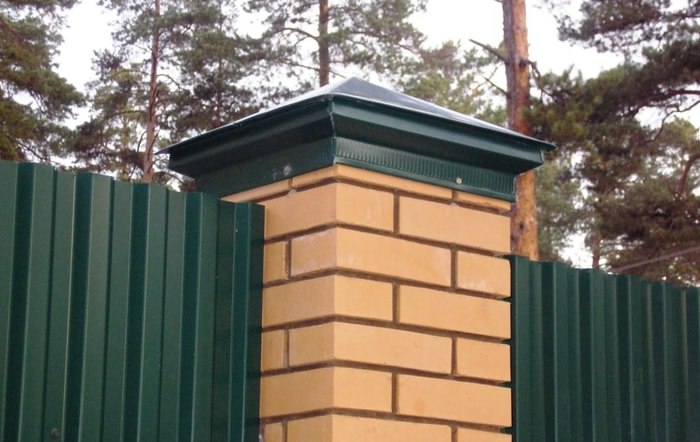
On top, the brick fence posts are covered with special metal or concrete caps, which protect the brickwork from destruction, which is possible when the moisture that gets inside freezes.
In addition, these elements make the design of the pillars more complete.
It is very important to choose the correct spacing of the fence posts, that is, the distance between them. If you make it too small, the cost of the fence will increase significantly and its appearance will deteriorate, too long distance will increase the load acting on the fence posts. Typically, the fencing pitch is chosen in the range from 2.5 to 3.5 m.
Today, on the market of enclosing structures there are many proposals using the most different materials(wood, metal, concrete, PVC), but perhaps the most durable of them is a brick fence.
Despite all its advantages, this type of fencing has only one drawback - its high price. Therefore, experts recommend combining brick with less expensive materials. The best example Such a union can be called a fence made of corrugated sheets with brick pillars. Detailed instructions with photos and videos about installing such a fence with your own hands are presented in this article.
The construction of a fence made of corrugated sheets with brick pillars with your own hands should begin with drawing up a project. At this stage, it is important to take into account the location of gates and entrance gates, as well as technological recommendations:
- The step between spans should be 2.5-3m;
- The fence must be placed strictly along the perimeter of the site;
- Monitor the level of soil slope; if necessary, divide the fence into segments according to height differences.
Construction stages
I. Marking the area for the future fence.
Before you begin, it's important to check the site plan and then lay out pegs around the perimeter. The cord is stretched tightly between the marks, perpendicularity is checked (using the diagonal method), and then, using a level, the absolute “0” of the structure being built is found.
II. Manufacturing of metal-concrete structures.
As the strings are stretched and leveled, depressions are formed in the ground. The recommended depth of concreted pits for pillars should exceed 1 m, which in the cold season should prevent deformation of the enclosing structure (usually buried to a soil freezing depth of 1.5 m).
If you want to strengthen the fence or add some structural originality, you can place a strip foundation between the pillars (to a depth of 50 cm). In this case, you should take care of durable formwork. For its walls, you can use both wood and OSB with a thickness of more than 100 mm. For formwork fastenings, use cross beam, which is dug into the ground at one end and nailed to the shield itself at the other.
At the next stage, you need to take care of tying and installing the reinforcing frame into the formwork. For the manufacture of this frame, reinforcement made of fiberglass (diameter 10 mm) and knitting wire is best suited. We form the frame of the parallelepiped according to the dimensions of the recess.
Next, metal stiffening ribs are installed at the base of the future pillars. After that, fastenings are fixed between them, creating a fencing frame. We complete this work by directly pouring cement mortar (grade no lower than M200) into the existing recesses.
III. Laying bricks for fence posts.
To carry out this work, you can use any moisture-resistant brick, but ideally you should select beautiful decorative samples. It is recommended to tie each layer of brick with a metal mesh, applying an even layer of mortar on top. Be sure to use the level! Either a cement or metal cap should be installed at the top of the support post.
IV. Fastening metal profile sheets to the fence frame.
Sheets of corrugated sheets are mounted on the fastenings protruding between the support posts (logs made from a 40x20 mm profile pipe) using galvanized self-tapping screws 5x30 mm or steel rivets 3.2x10 mm.
Upon completion, all metal elements and welding areas should be coated with a primer to prevent corrosion.
Photos of corrugated fences with brick pillars
See photos of fences made of corrugated sheets with brick pillars, made by yourself:
Video of installation of a corrugated sheet fence with brick pillars
Watch the video of installing a fence made of metal profiles with brick pillars with your own hands:
BUILDING A FENCE Laying brick pillars for a fence 
 A brick fence is the most solid and high-quality structure, the only drawback of which is its high cost.
To reduce the cost of the project, it is advisable to combine bricks with inexpensive, but no less durable materials.
Let's look at the construction of a fence made of brick and corrugated sheets with our own hands in detail and in stages.
Selection of design and materials
Before making a fence from brick and corrugated board, it is necessary to draw up a project describing the design features and location of the fence.
When drawing up a plan, you should adhere to the following recommendations:
- The distance between brick pillars of a corrugated fence (span width) should be at least 3 meters.
- The fence is placed strictly in accordance with the land plan.
- On sloping terrain, individual sections are divided into sections with differences in height.
- Concrete mixer,
- Welding machine,
- Crowbar and shovel,
- Drill, electric drill and screwdriver,
- Screwdrivers,
- Metal scissors.
Profiled sheets of polyvinyl chloride create a durable fence that is not subject to corrosion and wear.
this article
Painted modern paint and varnish materials brick-like corrugated board does not lose color for a long time, which can be matched to the building.
Construction of corrugated fences with brick pillars happens in stages:
- The perimeter of the area is measured,
- The foundation is being prepared
- Columns are made
- Profiled sheets are fixed.

Click to enlarge
The construction of a fence made of corrugated sheets with brick columns begins with marking the exact location of the elements.
At the future corners of the fence, you need to place pegs and stretch a nylon thread along them.
The narrowest corrugated fence with brick pillars is built one brick thick, and a profile pipe is installed for reinforcement.
Every second row of brickwork is reinforced with steel mesh.
A fence made of brick and corrugated sheets is installed on a strip foundation.
To save on transport, the top layer of soil can be poured back and used as fertilizer on the site.
The volume of soil will be only about three cubic meters, so an expensive excavator will not be needed to carry out excavation work. Handmade are carried out with shovels and bayonet shovels; a crowbar is also useful.
If the soil is not rocky, a trench with a volume of about 4 cubic meters will be dug by two workers in 5 hours, taking into account smoke breaks.
When the trench for a brick fence with corrugated sheets has already been dug, you can immediately begin formwork. It is assembled only for the base part and is installed 10-20 cm below ground level. A durable and inexpensive semi-edged board is suitable.
Assembly of the formwork begins before pouring the foundation with additional fastening of the boards with wooden lintels and brick supports. The shields are assembled directly in the trench, starting from the top board.

10mm reinforcing bars
For further reinforcement of the foundation, 10 mm reinforcing rods are needed, which are installed in the trench every 1.5 meters.
The assembled frame, fastened with 1 mm thick wire, is lowered into the formwork.
To strengthen the brick pillars, a corner or pipes are installed into the formwork when the rod frame and formwork are completely ready. They are leveled and secured with boards.
The thickness of the foundation may vary: under the pillars the width can be as planned, but under the corrugated sheet it can narrow. This way you can reduce the amount of excavation work and save concrete. True, then it is much more difficult to assemble the formwork.
Optimal depth of base under fence posts is the depth of soil freezing, that is, about a meter.
Under corrugated sheets, where the fence will experience less load, the depth of the foundation is reduced to half a meter.
Depending on the terrain, the foundation for the fence is poured differently. The most difficult thing is installing a fence on an uneven area.
To build a fence you will need to use a concrete mixer:

After pouring, the concrete is covered with polyethylene so that the surface dries evenly with the base. In warm weather, complete stripping is carried out after 7 - 10 days.
The brick is laid with cement-sand mortar in a ratio of 1 to 3, and a little liquid soap is added to make it plastic.

Type of brickwork
Every day they lay no more than 0.5 meters in height, simultaneously filling the gap between the metal column and the brick.
For strength, each row is reinforced with a special mesh.
When erecting a fence made of brick and corrugated sheets with your own hands, you need to remember that the distance between the brick supports should not exceed 3 meters.
The height of the fence depends on the design of the site, wind load and the height of the profiled sheets.
When securing the fence, brick pillars and corrugated sheets, use embedded plates and corners in the center, top and bottom of each post.
As an alternative, you can make a fence with concrete pillars. This design will be much more reliable and will last longer.
For reliable fastening of a 3-meter sheet, 3 lags are enough.
More detailed instructions and a description of all types of foundations for corrugated fences can be found here.

Galvanized steel covers are installed on top of a fence made of corrugated sheets with brick pillars, which will give the pillars a finished look and protect them from water. They are attached from below with dowels to the brick.
When choosing concrete caps, pay attention to those painted with mineral pigment.
This paint does not wash off, and the color does not fade over time. They are laid on columns with cement-sand mortar.
After 2 days of settling the concrete in the formwork, a frame is assembled from a profile pipe, to which the corrugated sheet will be attached.
The pipe is cut into pieces of the required length, on which marks are placed at the places where the horizontal pipes are attached. The correct position of the pipe is checked using a level.
The frame is assembled by 2 workers. After welding, the frame is painted with alkyd enamel.
- The installation of a fence made of corrugated board and brick is completed with the installation of a profiled sheet.
- The foundation is first covered with cardboard so as not to damage the bottom edge of the sheet.
- Places for screwing in self-tapping screws are marked at a rate of 6 pieces per meter.
- The corrugated sheet is attached with a drill at low speeds to the profile pipe in the lower part through each wave using rubber gaskets. The sheets are overlapped.
A 15-meter brick fence with corrugated sheeting can be erected in about 2 weeks. Beautiful fence It is quite possible to install bricks and corrugated sheets with your own hands, and hire a specialist only to install brick pillars and construct the frame.
Now you know how to build a fence from brick and corrugated board. Such a fence is not as affordable as a fence made from one corrugated sheet, but the installation of fences made of corrugated sheets with brick pillars is done for beautiful design with a combination of reliability and long service life.
The times of earthen ditches, high walls and drawbridges to protect their possessions have long since sunk into oblivion. For a modern person, it is enough to have a beautiful, durable fence, and his cozy home world will be securely closed from the winds and uninvited guests. How can you make a worthy choice from the variety of designs offered by the existing market?
In our opinion, a fence made of corrugated board has a good price-quality ratio. The procedure for building a fence from corrugated board with your own hands with brick pillars and step by step photos brought to your attention today.
Such structures are light, easy to install and have a decent appearance. For successful construction we will need:
- pegs
- light sledgehammer
- construction tape
- level
- bayonet shovel
- shovel
- hammer
- screwdriver
- nails
- board and timber for formwork
- fittings
- knitting wire
- welding machine
- hinges for gates and wickets
- primer for painting the frame
- concrete mixer
- profile pipe 60x60 mm n=2.8 m
- profile pipe 40x20 mm
- corrugated sheet S-8
- gate and wicket frames.
A step-by-step diagram for constructing a fence from corrugated sheets will look like this
Removing the old fence
If it is made of brick or stone, you can carefully disassemble it and get a completely usable construction material for the future. A wooden fence can be moved deeper into the yard, maintaining its perimeter if possible. It can still serve as a temporary fence while our construction continues.

Brick left over from dismantling old gate posts and moving a wooden fence.
Choosing a fence design
First of all, you need to decide on its exact location, the width and level of the foundation, as well as the place for the gate and wicket. To do this, we hammer pegs in the corners of the proposed fence and stretch a nylon cord between them. Then, based on the width and number of profiled sheets per span, taking into account their overlap, we mark the spacing of the support posts.
The width of the corrugated sheets is 119 cm. pure form excluding the overlap in one wave of 115 cm. We take measurements using a tape measure, draw up a plan for the fence in our heads and transfer it to paper. It is necessary to do this, since as the excavation work progresses, our pegs will be removed.
The example considers a fence option with posts made of facing bricks reinforced with a 60x2 mm pipe. For wicket and gate posts, increased reinforcement with an 88x2.8 mm pipe is used.
We design the foundation
We will perform it in the form of a continuous strip of reinforced concrete. Simply put, we will make a strip foundation. The advantages of such a foundation are obvious:
- solid appearance;
- protecting the area from rainwater from the street and stray animals.
We select the width of the foundation according to the size of the side of the brick column, the design of which will be discussed later. If you have differences in the height of the relief on your site, then making the foundation at one level will lead to a very large consumption of concrete. In this case, the future structure is divided along its length into separate sections. Each of them will have its own level of foundation. In this case, the height of the fence can be left the same. Corrugated sheets are sold in any length upon request.
To prevent dirt from accumulating on the foundation during rain, it should be raised above the ground level by at least 10 cm. You can also reduce concrete consumption by making the tape width unequal. For example, under brick columns there is one, and under profiled flooring there is another. On the other hand, this complicates the assembly of the formwork. Decide for yourself here.
The foundation for brick columns must be laid below the freezing mark of the soil, this guarantees the immobility of the entire concrete structure. As a result, we get normal operation of the gates, which are attached to the posts through embedded parts welded to the reinforcing pipe. In less critical places that do not bear a large load, metal racks can be buried 0.5 m into the ground to save concrete.
We carry out excavation work
This process is performed with ordinary shovels. It is advisable to have two of them. A bayonet shovel is used for digging a trench, and a shovel is used for cleaning it. We carry out the trench for the foundation exactly according to the planned plan, with the exception of its width. We make this size a little larger for ease of installation of the formwork. Most of the excavated soil will have to be packaged in 50 kg bags and removed. Approximately 30 bags will be needed per 1 m3 of soil. A smaller part of the soil is needed for backfilling the cavities of the finished foundation. For 1 m3 of soil sampling performed by two workers, it takes a little more than an hour.
Assembling the formwork
We assemble it for the base of the future foundation and its part located 10-20 cm below the ground level. We use a semi-edged board, pieces of timber, an electric drill and wood screws. The topmost board of the formwork panels is installed along a cord marking the level of intended concreting.
Poured concrete exerts quite a lot of pressure on the walls of the formwork. Therefore, wooden panels must be reinforced with jumpers made from scraps of timber and fastened together at the top. Brick supports will also not be superfluous.
We assemble the reinforcement frame for our formwork on the ground, it’s more convenient. For work, rods D = 10 mm are used. The horizontal component of the frame is made of 4 rods. The bottom two rods are located at a distance of 10 cm from the bottom of the trench, and the remaining two are located on top, 5 cm below the concrete surface. As vertical reinforcement, cut rods are used, which are knitted with wire in increments of 1.5 m along the entire length and perimeter of the frame. The gap between the side formwork and the reinforcement is made at least 3 cm. This is necessary to protect the metal of the product from corrosion.
All. We lower the assembled frames into the formwork and connect them together with a 20 cm overlap along the longitudinal rods with knitting wire.
Now we need to install pipes to strengthen the strength of the brick pillars. We perform this operation like this. We lower the pipe vertically into the formwork and fix its position using a level with scraps of board or timber. It's not difficult, you can do it alone without help. All other pipes, having previously leveled them, can simply be lightly concreted in holes 50 cm deep. Solid concrete tape the foundation will finally secure all the racks.
In our case, after dismantling the old gate posts, a powerful foundation of the gate part with huge embedded parts remained.

We have shortened them. Using a hammer drill, we made small pits nearby, into which we installed support posts with eyes for hinges, welding them to cut-off mortgages.

Installation of a gate post to the embedded part of an old foundation
Using the same hammer drill, we made a shallow trench between the gate posts and connected them together with a 40*40 angle using welding.

The gate posts are installed. The trench is ready for installation of formwork. The posts are exposed and lightly concreted.
We carry out concrete work
Kneading concrete mixture can be done with or without a concrete mixer. Let's consider both cases.
You have a concrete mixer.
We install our unit closer to the formwork to make it easier to carry heavy concrete. Before filling the dry mixture components, the working container of the concrete mixer must be tilted at an angle of 45 degrees. The composition of the concrete mixture will be as follows:
- cement (PTs-400) – 1 part
- sand - 3 parts
- crushed stone – 6 parts
- water – 0.7 parts
- air-entraining additive – 0.1% by weight of cement (liquid soap).
To reduce concrete preparation time, the mixer should be loaded to ½ its volume. Then we proceed as follows. First, pour all the crushed stone into the concrete mixer. This is the largest filler. Therefore, it will wash away the remaining mixture from the previous batch and prevent wet sand and cement from sticking to the walls of the container. Then fill in half the required amount of water with liquid soap. Mix crushed stone with water and add half of the sand.
Mix everything again for a minute and set the mixer at an angle of 70 degrees so that dry sand and cement do not stick to its wet walls. At the penultimate stage, all the cement and the rest of the sand are poured. After mixing, lower the concrete mixer again to 45 degrees and fill in the rest of the water. 2-3 minutes of mixing and you can unload the finished concrete.

Installed concrete mixer
You don't have a concrete mixer
In this case, you need to find a trough with a capacity of 100 liters, or a sheet of metal 1.5 x 1.5 m. But it is more convenient to prepare concrete in a special tub.
- fill three buckets of sand and one bucket of cement
- We make a dry mixture from these components using a garden rake.
- 10 grams liquid soap foam in a bucket from a hose filled with water.
In a full bucket, abundant foam should form on the surface of the water. It is needed for plasticization, convenient mixing and laying of concrete.
- add this water to the dry mixture and mix everything again
- pour 6 buckets of crushed stone onto the moving solution
- after the last shoveling we get ready-made concrete.
Manually kneading the material will reduce its future strength by 20% due to the increased amount of added water. You can’t do without this - the mixture will be difficult to mix. But there is no need to worry. For a foundation for a fence, a slight decrease in the strength of concrete will not play much of a role.
After pouring the mixture into the formwork, the future foundation must be covered with a polyethylene film. This is due to the fact that when it dries quickly, cracks may form on its surface. We don't need this at all.

Concrete poured formwork
After a week of warm weather, the formwork can be removed.
We assemble the frame of our fence from corrugated sheets
Welding of the frame can begin a couple of days after pouring the formwork with concrete. The frame is made of 20x40x2 mm pipes, which in the fence design are transverse logs for attaching profiled sheets to them. It is more convenient to assemble the frame with two people. The order of our further actions is as follows:
- we measure the actual distance between the vertical posts along their axes;
- using a grinder, we cut the profile pipes into sections according to the measurements;
- on the posts, we mark with a marker the location of rows of horizontal logs 30 cm from the upper and lower edges of the fence;
- We apply sections of profile pipes one by one to the vertical posts along the marks and lightly secure them by welding;
- we check the horizontal position of the pipes with a building level;
- We perform final welding of the lags.

Welding a fence frame made of corrugated sheets
During the welding phase, a small problem may arise with the home circuit breaker. This is due to the fact that maximum power welding machine 6.5 kW, and in everyday life 15 ampere switches are usually used. It is possible that they will need to be replaced with machines of higher power.
After completing the welding work, the racks and joists must be cleaned of rust and painted with PF-115 alkyd enamel.
Laying brick pillars
For a fence 2-3 m high, the usual cross-section of the pillars is 380x380 mm, i.e., one and a half bricks. In the example, they are performed only on the front side of the house facing the main street. This is usually done for reasons of cost savings. If you do not have God’s gift in construction, then for laying brick columns it would be better to hire an adequate mason - a veneerer.

First row, beginning of the construction of brick columns
For masonry, you need facing bricks to suit your taste and color (fortunately, there are a great variety of them), cement-sand mortar, masonry reinforcing mesh and tools.
The solution is prepared in a parts ratio of 1:3 with the addition of liquid soap for its plasticity. Bandaging and horizontal seams, strict vertical angles in the process of working on the pillar must be strictly observed. When laying bricks, it is important not to forget about the embedded parts for the gates, wickets and spans of our fence. They are welded to a metal gate post, 2 pieces on each side of the post, and then carefully lined with trimmed bricks. Brick rows It is advisable to reinforce the gate pillars with steel mesh.
The laying of all pillars is carried out in turn, 0.5 m of their height per working day. During this process, the empty spaces between the brick and the metal stud are filled with masonry mortar.

We raise the columns.
At the same time, using a nylon cord, the coincidence of the brickwork seams along the entire length of the spans is monitored. To emphasize the beauty and correct geometry of the forms of our finishing material it would be appropriate to perform decorative cutting of brick joints special tool. The color of the seams can be adjusted to your taste using various pigments.

The brick pillars are almost ready.
For guard upper parts pillars are covered from rain and snow with caps made of concrete, metal or plastic. High-quality concrete caps will serve you for more than 15 years. They are installed on the mortar intended for masonry.

A protective cover is installed on one of the posts. Protection made from other materials is secured at the bottom to the finished posts using dowels.
To make it even more important, you can mount lighting or an alarm system on the poles. That's it, the brick columns are laid out. And it doesn’t matter so much whether you did it yourself or with the help of a hired specialist. The main thing is that we are finally moving on to the last stage of construction of our corrugated fence.
We mount profiled sheets on a metal frame
It is more convenient to install corrugated sheets together. Before fastening begins, cardboard should be placed on the foundation in the span between fence posts or posts. This is necessary to avoid scratching the bottom ends of the sheets. There is no need to screw in screws at random. They should be arranged in even rows. Therefore, before installation on the sheets, it is necessary to make appropriate marks using a marker. For fastening you need galvanized roofing screws with rubber gaskets 4.8x30 mm and an electric drill with an attachment. The sheets are attached to horizontal logs made of pipe 20x40x2 mm, and overlapped with each other.

Fastening corrugated sheets to the fence sheathing.
To attach a profiled sheet, you need to screw the self-tapping screw connecting it to the pipe into bottom part sheet corrugations. And so on, through one wave. Thus, to fasten 1 m of corrugated sheet we will need 6 self-tapping screws.
One important detail. It is better to tighten the fasteners at low speeds of the drill. Otherwise, the edge of the screw will grind off when heated.

View of the side part of a fence made of corrugated board.
After installing the last sheet, you can quite rub your hands together. The construction is finished, there is a beautiful fence in front of my eyes, you can do it general cleaning territories.

View of a fence made of corrugated board with brick posts without protective covers. The gate was raised at the owner's request.
If desired, the foundation strip of the new fence can be plastered, painted or tiled.
The rems-info.ru project wishes everyone good luck in construction!
Related materials:
The task before you is to create a good fence for your country house...
Buying suburban area, you need to take care of a lot, at least start with the fact that you need to build a fence, isolate yourself from the outside world. Many people prefer to overpay and hire workers for this process, doubting their abilities - not entirely correct option. After all, it is unknown how the workers will do it, how long such a fence will last, and the amount will be quite considerable.

Corrugated sheeting is perfect for building fences
We build it ourselves
That is why we suggest that you build a fence made of corrugated sheets with brick columns with your own hands. To make it easier to study this process, all stages will be divided into several sections. Don't skip any of them, even if you know what they are about.
Purchasing tools
To build a fence from corrugated sheets, first of all, you need to prepare all the materials and tools that are required for the work process:
- Capacity for cement mortar. A great option An electric concrete mixer will serve.
- Drill with mixer attachment.
- Master OK.
- Putty knife.
- Hammer or mallet.
- Screwdriver.
- Building level.
Note! A string will also come in handy, with which you can easily check the horizontal and vertical lines of the fence.
- Cement with sand for preparing mortar.
- Facing bricks.

You will have to choose from several dozen different options
- Metal corner for fastening corrugated sheets.
- Metal pipe for vertical posts.
- Sheets of corrugated sheets.
- Metal rods with a diameter of no more than 10 mm.
- Self-tapping screws for metal.

It is best when the screws have a rubberized washer
For your information! Metallic profile can be replaced wooden blocks, their price is much lower. However, wood also has a drawback - fragility. It easily deteriorates due to abundant moisture: rain and snow.
Preparing the area
How to build a fence from corrugated sheets with your own hands? So, everything in order.
Before erecting brick pillars for a corrugated fence, it is necessary to make indentations in the ground.
- The first step is to measure the span distance. To do this, you need to measure the corrugated sheet, as dimensions may vary.
- Stretch the string from one corner of the site to the other so that there is a straight line.
- Mark on the ground the places where the posts will be installed.
- Dig holes in the ground about 1 meter.
Note! If the spans are 3 meters or more, then be sure to install an additional metal support in the center. In these places it is enough to dig 50-60 cm.
To increase reliability, you can lay a strip foundation between the pillars:
- To do this, you need to dig a trench about 40 cm deep and no more than 20 cm wide.
- Then install the formwork using old boards. Best fit Chipboard panels or plywood, which is the easiest to cut to size.
- Small pieces of reinforcement are driven into the dug trench. The distance between vertical pins should be no more than 800 mm.
- Using welding or wire, all rods are connected with horizontal reinforcement.
- Now all that remains is to pour sand and crushed stone into the recesses, compacting it thoroughly.
Do not forget about the possibility of erosion of the base; it should be made as strong as possible, because the durability of the future fence depends on this.
Fill the solution
Don’t know how to prepare high-quality concrete for building a corrugated fence? This instruction will help you with this:
- First of all, pour water into the container.
- Then add cement (it is better to use the M400 or M500 brand). The ratio is approximately this: for one kg of cement, about 700 ml of water.
- Now add sand in a ratio of 3 to 1.
- Crushed stone is laid at a ratio of 6 to 1.
Advice! Use a plasticizer; not much of it is required (less than 1% of the total mass), but it significantly increases the strength of concrete.
- Now mix everything until the contents turn into a homogeneous mass.
- Using a bucket or any other means, fill the dug holes with liquid concrete.
Process Features:
- The trenches are not filled to the very top so that they can be hidden underground.
- The solution dries in about 15-20 days. To be safe, wet the concrete surface with water every few days.
We erect pillars
Work starts from the corner, this makes it easier to measure the vertical level of the structure.
- In the place where the pillar will be (hardened concrete), a cement-sand mixture is laid out using a trowel.
- After which the brick is laid and tapped with a mallet.
- Cement is also poured into the cavity between the blocks.
- For the second row, all actions are similar, with the exception of the brick positions. For reliability, use staggered masonry.
Important! Monitor the vertical level of the column and be sure to fill all voids with solution.

Any vertical post must be measured by level
Auxiliary metal poles are much easier to install:
- First, two metal corners must be attached to the pole.
- Install the pipe into the recess of the trench and secure the dowels to the concrete.
- Fill a circle around the post with a diameter of 10-15 cm with cement for reliability.

Without additional cementing, the reliability of the fence is in question
At the same time, do not forget to check the vertical plane.
Installation of horizontal jumpers
Fences made of corrugated sheets with brick pillars will last a long time if the sequence and step-by-step process is followed:
- Metal corners are attached to the finished brick pillars. Dowels are best used at 70 mm.
- The spans are connected to each other by pipes or channels.
Note! There is another option for installing crossbars. To do this, during bricklaying, metal plates are laid between the rows, to which pipes are welded after the work is completed.
Installation of corrugated sheets
- Applies a sheet of material to the fixed metal jumpers.
- Using a screwdriver and a hex socket, we screw the metal screws into the places where there is support. Look how it looks in the photo.

Please note - the self-tapping screw must be screwed in without any bending
- The height from the ground is selected arbitrarily, the main thing is not to forget about the possible shrinkage of the pillars.
- Self-tapping screws should be screwed in every 5-10 cm to avoid loosening of the fastenings due to strong winds.
- The optimal height between the corrugated sheet and the ground is at least 5 cm. If necessary, you can cover the space with a plastic mesh.
- Vertical metal poles It is better to fasten by welding; this method is considered the most reliable.
- Use only galvanized stainless steel fasteners.

The joint of two sheets of corrugated sheets is fastened using the above method.
Conclusion
We tried to tell you what you will need to build a fence. As you can see, the main difficulty lies only in acquiring materials and tools. All stages were sequentially placed in sections. If you have any questions, be sure to watch the video: construction of corrugated fences with brick pillars. There you will find some more tips and a lot of useful additional information.
For brick houses, it can sometimes be difficult to choose a material for a fence. A solid brick fence will look too massive, and a wooden one may simply not fit into the architecture of the building. In such cases, combined structures come to the rescue.
A fence made of brick and corrugated sheets will harmoniously fit into the architecture of brick and block buildings. This type of fencing is considered one of the most durable. The popularity of fences made of brick and corrugated board is ensured by the good compatibility of these materials. Quality fencing is worth the money you have to invest in it.

Fencing design and material
To facilitate construction, it is necessary to draw up a detailed plan further work. The project must take into account all the design, material and landscape features of the site. Among other things, the following features must be taken into account:
- the fence should not extend beyond the boundaries of the land;
- in areas with a slope, individual sectors of the fence are mounted in pieces to maintain one structure;
- the length of the spans between the brick supports where the corrugated sheeting is mounted should be from 3 meters.
After drawing up a work plan, it is necessary to prepare everything for the construction of the fence. Minimum set tools includes:
- welding equipment;
- drill,
- concrete mixer
- shovel;
- crowbar and set of screwdrivers;
- construction scissors.
For spans between brick racks, polyvinyl chloride sheets are used. The material does not corrode and is designed for long-term use. There are several dimensional lines of corrugated sheets; C10 and 8 are most often used for fences. Minimum thickness sheets 0.5 mm.

Currently released great amount corrugated sheets with various patterns and colors, including brick patterns. You can order corrugated board with imitation wood or to match brick house on your site.

Start of construction
The construction of a fence from corrugated sheets begins with markings. You also need to do detailed drawing fence In addition, it is worth calculating the number of pillars and the length of the spans between them.
A brief plan for building a fence made of brick and corrugated board includes:
- site measurements;
- foundation preparation;
- installation of brick supports;
- corrugated sheet fastening.
After studying the features of the site and leveling the soil, a place for future columns is marked. Pegs and string are used as guides. At the site of future brick supports, small wooden pegs are driven in and a thread is pulled over them.
For simple fence A masonry thickness of one brick is sufficient. Such pillars are reinforced with reinforcement and a pipe, which is installed with inside fence

Soil preparation
Brick in combination with corrugated sheets have considerable weight. Therefore, a fence made of such materials requires a strip foundation. A shallow (from 30 cm) trench is dug under it. Its width and height depend on the weight and thickness of the future fence.

To prepare the site for the foundation of the fence, the top layer of soil is removed from the soil. For such work, you should not hire special transport. It’s easier to do it yourself or hire a couple of workers. Workers will dig a small trench with a volume of 4 cubic meters or more in 6 hours with breaks.
At self-construction All work on the fence can be completed in several approaches.
Note! Upper layer soil removed under the foundation of the fence may be needed for fertilization or further improvement of the site.

Formwork
The formwork for the foundation of the fence is assembled for the base 15-20 cm below ground level. For this, a slab or any other recyclable wood is used. Assembling the formwork begins with the top board.

For strength, reinforcing rods with a cross-section of 1 cm and a pitch of 1 to 1.5 m are mounted in the formwork. When fastening the rods with reinforcing wire 1 mm thick, a frame is obtained. It is lowered to the bottom of the formwork.

In order for the brick fence posts to sit firmly in the foundation, metal pipes or corners are installed in the formwork in place of the future posts. They are also attached to the reinforcing mesh. They are secured with boards and leveled.
The distance between the vertical rods is 1 m, and the horizontal ones - 10 cm from the bottom and 5 from the top of the foundation. The reinforcement bars are overlapped.
Pouring the foundation
The solution for pouring the foundation of the fence is kneaded in a concrete mixer. The installation must be located next to the formwork. It is best to dilute only half the solution from the volume of the concrete mixer. This speeds up the process and reduces installation workload.
Note! To improve the frost-resistant qualities of concrete at the mixing stage, it is recommended to add household liquid soap (10 ml per bucket of solution).

The solution can be made without the use of a concrete mixer. To do this, you will need a container with a volume of 100 liters and a sheet of steel. 3 buckets of cement and a bucket of sand are poured into the container and mixed with a rake. At this time, they pour into the bucket clean water and add liquid soap until dense, abundant foam is formed. When a lot of foam forms, water is poured into sand and cement. Immediately pour 6 buckets of crushed stone into the resulting mixture and mix.

Concrete made in this way has lower strength. But for the foundation for a fence, these indicators are suitable. The preparation time for this recipe takes about 30 minutes.
After pouring the solution into the formwork, it is covered with polyethylene. The film is removed after about 7-10 days. This is necessary to prevent the concrete from cracking from dry air. The film will also protect the concrete from rain.
Construction of pillars
To fasten bricks for fence posts, use a cement-sand mortar (1:3). To make the mixture more viscous and elastic, add a small amount of liquid soap. Every day the masonry can be erected to a height of no more than half a meter. Each row of brick is laid with reinforcing mesh.
The height of the fence posts is individual - it depends on the thickness and load of the corrugated sheet, the design and height of the fence. To attach the corrugated sheeting to the posts, use a special plate and corners at three points: in the center, at the bottom and at the very top.

The height of the fence depends on the design of the site, wind load and the height of the profiled sheets.
Installation of covers
A fence with rectangular brick posts looks unfinished. Once the installation of the pillars is complete, galvanized covers are mounted on them. Besides aesthetic function, the element performs a protective function. The cover is attached to the fence post using dowels.
If the fence supports are built of concrete, then concrete covers are used. When choosing them, you should pay attention to the pigment - it should be mineral. This paint does not lose saturation from contact with environment. Concrete covers are attached to fence posts using a mortar of sand and cement.
Frame
After the foundation of the future fence has dried, they begin to assemble the frame for the corrugated sheet. A metal pipe is used for this. It is cut with a grinder and rectangular frames are welded using a welding machine. The finished frame of the fence spans is painted with alkyd enamel.

After installing the frames on the fence posts, corrugated sheeting is attached to them. For this purpose, special fasteners are used to prevent metal corrosion.
Before starting work on the construction of the fence, the foundation should be covered with cardboard. This measure will avoid damage to the profiled panels. Mark the places where the screws are screwed in using a felt-tip pen. Fastening is carried out through one wave using galvanized self-tapping screws 4.8x30 mm. The sheets on the fence are joined together with an overlap.

During the work, certain difficulties may arise. The following tricks will help you avoid many installation mistakes:
- the strip foundation is covered with cardboard while the corrugated sheet is being installed so as not to bend the metal sheets;
- self-tapping screws are used approximately 6 pieces per 1 m2;
- sheets of corrugated sheets are laid overlapping;
- corrugated sheeting is installed with a drill at low power;
- Through one wave, rubber gaskets are used on the fasteners.
Installation of an average fence, up to 20 meters long, takes approximately 12-15 days. The construction of such a fence involves many subtleties, so it is better to entrust such work as installing brick pillars to a professional. But you can handle the installation of corrugated sheets yourself. This will require the ability to work with a drill. Connecting structural elements is not difficult.

Results
Before starting work, it is necessary to decide on the design of the fence. Then work is carried out on the construction of the foundation and the erection of brick supports. Only at the last stage of work is a frame constructed to which the corrugated sheet is screwed.

When performing work, it is important to consider a few tips experienced builders. For example, you should not tighten screws with a drill set at high speed. It is also worth remembering that it is better to entrust brick laying to an experienced specialist. If there is a mistake, the strength of the entire fence will be in question.
A fence made of brick and corrugated board is one of the most durable types of fences. Clients have the opportunity to choose different color solutions barriers and combinations of the fence with the general landscape of the site and architectural buildings on it.

Fans choose it for its ease of maintenance, durability and laconic design. Caring for a combined brick and corrugated fence is simple – just wash it with a garden hose. No coating with any anti-corrosion mixtures is required. Thanks to special assembly technology, in case of damage, structural elements The fences are very easy to replace. Galvanized corrugated sheeting compound element fence allows you to confidently declare that the fence is resistant to high and low temperatures.


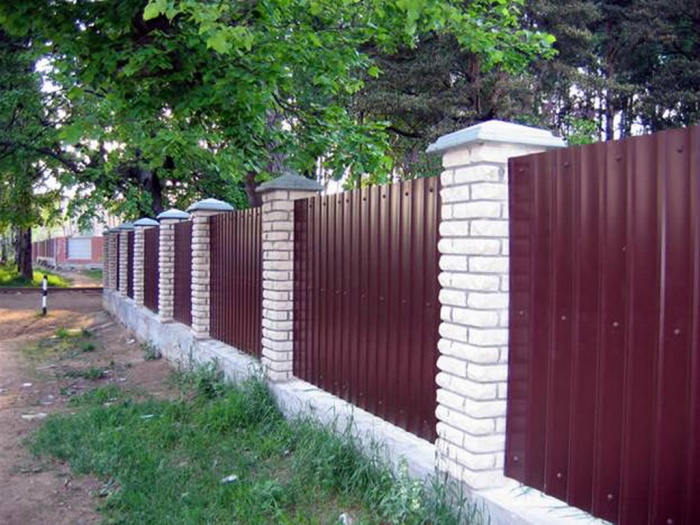
A fence made of brick and corrugated board looks very elegant, although in operation it does not cause much trouble for the owners. The most popular shades of corrugated sheets are dark green, cherry and brown. These colors combine well with brickwork; fencing gives the landscape a unique charm.
You can choose corrugated sheeting with one-sided or two-sided painting. On small ones summer cottages One-sided material looks good, as it visually makes the space larger. And if the profiled sheet is stylized as wood or stone, then it turns out classic fence, capable of decorating any landscape design.
Main design elements
A corrugated fence consists of the following structural elements:
- Metal support posts round or square section. Choose different sizes - from 60*60 to 80*80 mm. The pillars are equipped with special plugs on top so that snow or rainwater did not get inside the pipe.
- Profile pipes of standard section 40*20 mm.
- Profiled metal sheets made of galvanized steel with polymer coating.
- Fastening elements. Usually self-tapping screws are used, the color of which is matched to the color of the corrugated sheets.
Brick pillars are installed on a pre-prepared strip or strip-column foundation. A profile pipe is placed at the base of the brick pillar. At the proposed installation locations of the pillars, holes are drilled at a distance of approximately 2.5 m. Using the foundation, the fence is combined into a rigid monolithic structure.
Prices for fences made of brick and corrugated board
The price of a fence made of brick and corrugated board may vary depending on its design and external characteristics.
Fence cost made of corrugated sheet S-20, brick pillars on a strip foundation Price per 1 m.p. with material and work (rub.) |
||
| Height (meters) | Smooth brick | Brick RUST |
| one-sided polymer coating | ||
| 1,8 | 9 100 | 9 250 |
| 2,0 | 9 650 | 9 820 |
| 2,5 | 11 600 | 11 750 |
| 3,0 | 14 850 | 15 000 |
| double-sided polymer coating | ||
| 1,8 | 9 170 | 9 350 |
| 2,0 | 9 740 | 9 890 |
| 2,5 | 11 680 | 11 870 |
| 3,0 | 15 000 | 15 350 |
|
||
Cost of one brick pillar with a cap with materials and labor (rub.) |
||
| Height (meters) | Smooth brick | Brick RUST |
| 1,5 | 9 000 | 10 000 |
| 1,8 | 10 000 | 12 000 |
| 2,0 | 11 000 | 13 000 |
| 2,5 | 13 500 | 15 500 |
| 3,0 | 16 000 | 18 000 |
|
||
Prices may change due to ongoing promotions and market volatility.