The frame for a greenhouse can be made of metal, wood and even PVC pipes. In this article we will describe step by step the process of building a greenhouse made of wood with your own hands. Such a frame will cost much less than a metal one, and correct operation will last much longer than PVC construction.
Greenhouse size and shape
To place two beds and create a path between them, it will be enough to build a greenhouse width 2.4-3 m. Length building depends on the area land plot and the planned number of plants. The optimal length is 6 m. A greenhouse of this size is quite enough to provide fresh vegetables to a family of 4-6 people. Since cucumbers and tomatoes require different humidity and temperature regime, each crop will require a separate greenhouse.Most often for greenhouses they use a trapezoid shape with gable roof. Wherein height structures for placing shelving and climbing plants should be 1.8-2 m.
Do you need a foundation?
A stationary glazed greenhouse or a structure made of heavy window frames better install on shallow or pile foundation 40-60 cm high, made of brick or concrete with a sand cushion. It should rise 30 centimeters above the soil level. The lower load-bearing bars of the greenhouse in it are attached to metal corners cast into the base of the foundation. A greenhouse on such a foundation will be warmer and suitable even for the earliest planting of vegetables. If necessary, install it stove heating with a chimney running under the shelving.When building a lightweight greenhouse covered with film, the foundation can be replaced timber strapping. Such a structure can be easily moved to another place or even transported to another site.
You should not lay the timber frame directly on the ground - the wood will rot too quickly. Therefore, the distance from the soil to the beam should be 4-5 cm. To fasten the strapping around the perimeter of the frame, pointed cuttings are hammered into tightly compacted soil metal corners 800-900 mm long. To prevent the metal in the ground from rusting, it is advisable to coat the corners with a primer. A layer of roofing material can be laid under the timber to protect it from moisture.

Timber foundation
Then wooden strapping screwed to the metal corners on anchor bolts, and the structure is driven into the ground. Subsequently, the gap between it and the soil is filled with earth and compacted. You can also install the harness on bricks, but such a structure will be less durable.
The harness must be positioned strictly horizontally. Indeed, if the structure is skewed, there is a high probability of its collapse. Therefore, we check the horizontal laying of the strapping using a building level.
Required materials
To build a greenhouse, it is better to use pine or larch. These tree species are the most resistant to moisture and fungi. Birch or aspen beams will warp in a couple of years. To ensure that the structure lasts as long as possible and the wood does not rot, before assembling the frame, it is better to cover the bars with used machine oil, antiseptic or primer.For the frame we will need:
A block for strapping (the base of the greenhouse) with a section of 100x100;
Beam 50x100: we will use it for racks;
Film or glass for covering;
Boards or slate for arranging the sides of beds.
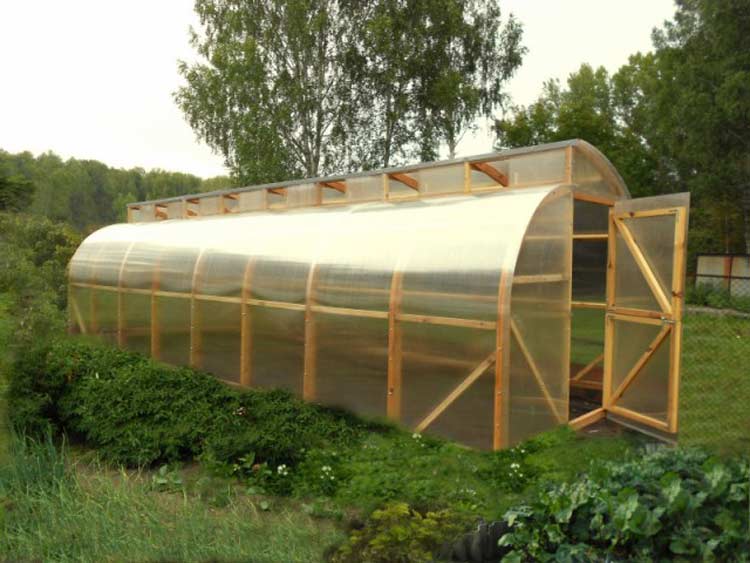
It is also advisable to cover the greenhouse itself at the level of the beds with boards - this will make it stronger and allow you to save on glass or film. Polycarbonate greenhouses are made arched. It is irrational to make a trapezoidal structure from this material - there will be too many scraps left.
Advice. If you use undried wood, the greenhouse may fail. This can be avoided by replacing the 100x100 beams with paired 100x50 beams, fastened together with self-tapping screws. This option will also be more durable.
Frame assembly. Step-by-step instruction
For the greenhouse large sizes better prepare detailed drawing(see photo).

Greenhouse drawing
1. Minimum angle greenhouse roof slope 30°. In areas where there is a lot of snowfall, the roof slope should be steeper. Of course, this will require more materials, but the likelihood that a snow coat will push through the roof will be minimal.
2. The greenhouse can also be assembled from separate frames. In this case, it will be easier to repair it. And the frames from the roof can be removed for the winter.
3. We make markings: we stick 4 pegs into the ground and stretch twine between them. We level all sides with a building level. You can also check the horizontal and vertical position of the bars using diagonal strings stretched between the corners.
4. We attach the corner posts to the base with metal corners or dowels (wooden pins).

Fastening the beams
5. Vertical cross braces are located in increments of 50-70 cm. They are also attached to the harness using metal corners. If you are familiar with carpentry firsthand, you can also use a notch for connections.

6. To prevent the frame from becoming loose during assembly, all racks are additionally reinforced with bevels (see photo). After complete installation greenhouses remove them.

7. For a greenhouse 6 m long, it is necessary to provide two intermediate posts at a distance of 2 m from each other in the center of the structure. Spacers will be placed on them under the upper joists.

Intermediate posts in the center of the greenhouse
8. To give the greenhouse strength between the side posts, it is better to provide stiffeners (diagonal crossbars).

You can strengthen the structure using diagonal crossbars
9. Rafters - a system of inclined beams (legs), racks and struts for the roof - are assembled on the ground on a flat base. In order to assemble them perfectly evenly, a cord is pulled between the outer rafters. To strengthen it, it is better to immediately connect the trusses cross beams. (Trans are called supports assembled from bars on which rafter legs are laid).

Rafter system
10. Using metal corners, ready truss structure mounted on racks.

Attaching the rafters to the frame

Rafter connection
11. Install in the greenhouse 2 doors V end walls kah. The distance between the door supports is 80 cm. They are reinforced with additional strips. door handle It is better to attach it to an additional board attached to the main beam.
12. Ceiling joists and vents are mounted with clamps or self-tapping screws.
Wooden greenhouse on personal plot will help you reap a wonderful harvest, regardless of weather conditions. Industrially produced greenhouses and modern building materials, it would seem, should displace “outdated” buildings. Numerous benefits of wood combined with various facing materials allow the construction of reliable and durable structures.
This article will tell you how to build a greenhouse with your own hands from wood, provide optimal drawings and provide step-by-step instructions.


Advantages and disadvantages of wooden greenhouses
Wood like construction material, has certain advantages compared to metal and plastic:
- Environmental cleanliness - under the influence of elevated temperature in combination with high humidity wood does not emit carcinogenic substances that can be absorbed by plants;
- The cost of wood is slightly lower than that of profiled metal of comparable strength and significantly lower than that of PVC materials which can be used for supporting structures;
- Easy installation - to build a greenhouse with your own hands from wood, you do not need special expensive power tools. With basic woodworking skills, you can get by quite well. minimum set hand tools: saw, hammer/screwdriver, tape measure, Consumables in the form of nails/screws.
- Long service life – properly protected and assembled wooden frame DIY greenhouses can last 5-7 years.

Homemade greenhouse made of wood, in the photo there is a model with a classic “house” with gable roof, and glazing, on a concrete foundation
Operation in extreme conditions of high temperature and humidity, combined with the intense influence of aggressive chemical (fertilizers and pesticides) and biological (pests, mold, rot, fungus) factors can significantly reduce the life of the structure. However, modern chemical industry produces a sufficient quantity paint and varnish materials and primers with bactericidal and preservative properties. Treating wood with these substances completely eliminates the problem of rotting.
Advice! A replacement for expensive construction chemicals is ordinary recycled machine oil or drying oil, which must be used to impregnate the wooden frame twice a year in spring and autumn.Another disadvantage that is attributed to the construction of greenhouses made of wood is too much shading of the internal space, which is caused by thick frames. Proper orientation of the greenhouse on a summer cottage can help with this problem.
Choosing wood for a greenhouse
The durability and ease of constructing a wooden greenhouse with your own hands depends on the material from which the frame is assembled. The best option is larch. The combination of high density and strength of wood with resistance to decay, which is characteristic of coniferous species, produces excellent results. Spruce and pine are also quite resistant to adverse effects external environment, however, their mechanical strength somewhat lower. Frames and supporting structures made of these rocks should be more massive.
The most suitable deciduous varieties are: oak, hornbeam, beech, teak. The use of such wood is quite acceptable, but is not recommended for inexperienced builders, since it is very dense and difficult to process. Without special carpentry machines and power tools, building a greenhouse from hardwood is quite problematic.
Regardless of the type of wood chosen, it must meet a certain level of quality. An attempt to save money will quickly damage the greenhouse structure:
- The permissible moisture content of the bars is no more than 20-22%;
- Rot and blue stains caused by wood-boring beetles should be avoided;
- The timber should not contain an excessive number of knots, chips or cracks.
Recommended dimensions of blanks for frames 50x50, for supports load-bearing structures small greenhouses(up to 3m wide) the same size is allowed. For models with a slope width of more than 6 m, additional reinforcement is required or the use of rounded logs with a diameter of 60-70 mm or timber 80x80 mm for the central posts.

Device rafter system DIY wooden greenhouse, photo of frame attachment
Project and drawings
The prerequisites for creating a do-it-yourself wooden greenhouse project, drawings and diagrams is the choice of location for the building. It is recommended to use two placement methods:
- Meridional - the ridge is oriented along the meridian from north to south, and the translucent slopes are oriented from west to east. This setup would be better suited for arched and 2-slope greenhouses;
- Latitudinal orientation - ridge from east to west is more suitable for lean-to greenhouses, in which the roof plane faces south.
On the site, the greenhouse should be located so that the shadow of nearby buildings does not fall on it, taking into account the seasonal height of the sun above the horizon.

Diagram of zones for optimal placement of a greenhouse on a personal plot
There are several types of structures that are most suitable for wooden buildings. These are mainly classic houses with a single or gable roof. They can be free-standing or attached to a permanent structure - a barn or a house.

Construction of a wall-mounted wooden greenhouse made of polycarbonate with your own hands, drawings of the structure and main components with specifications Construction of a wall-mounted wooden greenhouse made of polycarbonate with your own hands, drawings of the structure and main components with specifications
- Stand – log with a diameter of 110-120 mm, height 220 mm, 9 pcs;
- Bearing beam – monolithic or laminated veneer lumber rectangular section 60x100 mm length 580 mm quantity 3 pcs.;
- Upper frame 2740x4500 mm 2 pcs. with left and right fastening;
- Facade frame 2630x1800 mm, 2 pcs.;
- Side (end) frame 4076x1800mm, 2 pcs.
- Elements bottom trim– timber square section 60x60 mm, length 2630 mm, 2 pcs., length 4076 mm, 2 pcs.
- Asbestos cement pipe 120-130 mm in diameter:
- length 1200 mm, 3 pcs.;
- Length 800 mm. 3 pcs.;
- Length 500 mm 3 pcs.;
- Filling with concrete - a cushion under the pile foundation;
- Wall overlay.

Making a greenhouse made of wood with your own hands, the photo shows the process of assembling frame elements


Sequence of assembly steps
- The preliminary stage of constructing a greenhouse made of wood and polycarbonate with your own hands is the selection and leveling of the land where the structure will be installed. Installation can be carried out on a base: tape or columnar foundation or wooden frame. For small greenhouses, it is permissible to install supporting pillars directly into the ground on metal angles. This installation method provides a strong spatial frame reinforced with additional jibs at the corners.
Video of installation of a wooden greenhouse with your own hands - step-by-step instructions:
If you install a wooden greenhouse with your own hands from half-carbonate on a wooden base, then it should be reliably protected from moisture. To do this, used engine oil and molten resin (tar) are mixed in a 1:1 ratio, and the resulting mixture is impregnated with the base wood 2-3 times.

Sequence of assembling a wooden greenhouse frame with your own hands, step-by-step instructions
- Assembly of the frame begins with the end walls. Racks are installed on the base beams doorways, which are connected by crossbars (1). The arches are assembled separately on a flat base. The wall studs are attached to the rafter beams with a plywood triangular plate (knit).

Additional elements for strengthening the frame when constructing a greenhouse from 50x50 timber with your own hands
Important! Special attention must be given to the ridge corner of the frames. The rafter connection angle must be the same and accurate for all frames.- After installing the two end frames (2), the remaining frames are connected in place (3). The accuracy of the angle and height is checked using a rope stretched between the already installed frames.
- All installed structural elements are connected by two ridge boards (4).
- After assembling the structure, it should be sheathed with sheets cellular polycarbonate or films
Skeptics voice many counterarguments regarding the advisability of using wood for the construction of a greenhouse. They relate mainly to problems such as the gradual destruction of the material (it has enough “enemies” - moisture, temperature changes, biological pests) and its regular deformation during its service life.
And, nevertheless, greenhouses made of wood are most often built on house and garden plots. The main thing is to organize everything correctly and follow the technology. What to consider when designing, how to correctly draw up a drawing and build such a specific object - this article will tell you in detail about the nuances of designing and constructing a greenhouse.
The author will not tell the reader about all the advantages of wooden greenhouses. Once the choice has been made, it means that all the pros and cons have already been analyzed. But something still needs to be noted.
Firstly, there are no standard greenhouse drawings. It is designed based on the size of the site allocated for construction, the type of crops that are planned to be grown, and the “volume of production.” This is what is primarily taken into account when determining the optimal dimensions and internal structure, including the degree of automation.Eat standard schemes greenhouses, which should be adhered to. A full-fledged drawing, indicating the exact linear dimensions, is compiled individually in each specific case.
It makes no sense to explain that not every breed is suitable for building a greenhouse. Even if “experts” say that it doesn’t matter, you shouldn’t listen to such advice. The best material, taking into account the specifics of the object’s use (first of all, high humidity inside), is considered larch. It differs from many other conifers by containing a special type of resin in its structure. It is its composition that gives wood its strength, especially when the material absorbs moisture. For a greenhouse this is an invaluable property.
Perhaps, of the species growing in our country, only oak can compare with it. No wonder it makes high-quality barrels, but larch experienced craftsmen always used for assembly lower crown log house The only disadvantage of these trees is high price lumber. But if the price doesn’t bother you, this is the best option for a greenhouse.
Of the cheaper products, only pine can be distinguished. This is what is purchased in most cases for individual construction. You can save some money if you focus on spruce. You just need to take into account that the structure of this tree is less dense, and greenhouses can only be built from it small sizes. Although for a house (garden) area within 3.5 x 4.5 m, as a rule, it is enough.

Preparation of materials for construction
Essentially, it all comes down to pre-processing the wood. It is up to the owner to decide what type of wood to purchase. But a number of points need to be taken into account.
- SNiP prohibits use in construction industry material with moisture< 22%. Но такая древесина будет все равно давать усушку, поэтому лучше потратиться и купить более качественную, обработанную промышленным способом. Можно организовать снижение содержания влаги самостоятельно, но это процесс не одного дня, да и правильно выполнить все операции вряд ли получится.
- Since the concept of do-it-yourself implies some savings, including on materials, it is advisable to use waste machine oil rather than store-bought preparations to impregnate wood. You can negotiate at any car service center. Perhaps they will give it away anyway, especially since they won’t need much. The effect is the same, but much cheaper.
- The fact that each workpiece is processed (for example, with a plane) before use is not worth explaining. Remaining dirt should be removed with an abrasive. It is better not to practice the “wash with water” method. Then you will have to dry it again, and it is not a fact that the finished part will not work.

Some may think that the author is a bit “spirited” if he is distracted by such nuances. Does it really matter, as long as the tree is free of defects? It should be clarified that the peculiarity of the greenhouse is its transparent cladding. Whether it is a cheap film or more expensive polycarbonate or glass, even with a slight deformation of the frame they will give cracks, tears, and gaps.
Consequently, there is no longer any need to talk about tightness. With this attitude towards the greenhouse, you can do it easier - plant the seedlings in boxes, put them outside and cover them with polyethylene film. This is why you need to pay attention to the moisture content of the wood.
Calculator for calculating materials for a rectangular greenhouse
Features of greenhouse construction
For individual plots optimal sizes– 6 x 4 or 4.5 x 3.5. But as already stated, there is no standard.

Foundation
The choice is large, but if you focus on an already developed and planted area, then there are not so many options. The author considers timber support to be optimal. Such a foundation does not require large-scale construction, which gives this solution a great advantage.

What to do:
- Dig a ditch around the perimeter of the greenhouse. The depth is about 10 - 15 cm. You just need to see if the roots of garden plants will be damaged.
- Compact the soil, add a little clay (oily) and compact it again. This will form the primary waterproofing layer.
- Set up a “pillow”. You will need sand of large fractions (river) or ASG.
- Line the bottom with polyethylene film (thick). It is better not to use roofing material. It will last 2-3 years in the ground, and then it will have to be replaced.
- Prepare the timber. In this case, it is necessary to drill 2–3 holes in each workpiece.
- Place the timber in the resulting “gutter” and fasten the individual parts (staples, plates, corners).
- Check that the entire assembly is level. If necessary, level it.
- Drive pins into the holes. They will prevent (together with the “cushion”) the beam from shifting when the soil moves. It is easy to make from a 10-12 gauge reinforcing bar. If you think about durability, it is advisable to first immerse the pins in molten tar, and only then install them in the mounting sockets. This surface protection will protect the metal from corrosion.

Any man, even one who is not particularly versed in the nuances of construction, can perform all of these operations with his own hands.
Greenhouse frame
Another advantage of such a foundation is that you don’t have to do any piping, that is, install a support frame. This function will be performed by the laid timber. It is easy to attach vertical racks from the same blanks to it. Depending on the size of the greenhouse, you can use timber of a smaller cross-section. Here you should focus on the type of glazing. If film or polycarbonate is chosen, then the load on the “skeleton” will be small.

In regions with snowy winters, glass is not advisable, and here's why. The film can be removed and the polycarbonate on the roof can be bent, thereby ensuring natural snow melting. This won't work with glass. You will either have to dismantle the top for the winter, or take thicker samples. And this is a significant weight, requiring reinforcement of the entire structure, and increased construction costs. One of the advantages of doing it yourself - efficiency - is lost.
Surface treatment of the frame
Simple - not entirely practical. An aluminum primer should be applied, which should be applied in one layer. And only then – paint. Preferably, water-repellent category. It will cost more, but it will last a couple of years. When using cheaper compositions, it will be necessary to paint annually, or even twice. Overall the price is about the same.
Everything else - doors, windows, shelves, water supply, light - is at the discretion of the owner. Basically, internal organization greenhouses are a topic that requires separate consideration. You can do it yourself as convenient as possible. The main thing is to ensure normal conditions for cultivated plants.
The specific use of the structure is also taken into account - whether only for growing seedlings, or for year-round harvesting. In the latter case, you need to consider the option of insulating the structure. For example, install another layer of film inside the greenhouse, “fastening it” to the frame. The same goes for automation. If the owner permanently lives on the site, then it may not be needed.
The general instructions are more than detailed. And which drawing (diagram) to choose is at your discretion, dear reader. The main thing is that everything works out with your own hands, without outside help.
Dacha these days is a fashionable pastime that provides its owners with fresh and pickled vegetables for every taste. Many of them require greenhouses to grow. You can, of course, purchase it already ready product in a specialty store, but why? You can build such a structure yourself. It's cheaper and more interesting. In addition, you don’t need to adapt to the design features of a purchased greenhouse; let the bed itself adapt to you! So, why is a wooden greenhouse the most reliable, does it have any disadvantages and how to build such a structure with your own hands?
Have you decided to build a wooden greenhouse? Weigh the pros and cons. The benefits include:
- Availability of material (can also be made from timber). Suitable tree can be bought at any hardware store, and at an affordable price.
- Possibility of using not the most quality wood. It is enough to choose materials without obvious defects and well dried, the rest does not matter much.
- Ecologically clean wood. Additional pest control does not count.
- Ease of installation. You can do everything yourself, and quite quickly.
- Durability of the structure. With proper care, such a greenhouse can last 5 years.
There is nothing ideal in our world; this statement also applies to greenhouses, as well as greenhouses made of wood:
- there is a certain fire hazard;
- wood can be damaged due to mechanical stress;
- quite complicated dismantling.
But these disadvantages, in fact, are insignificant, the advantages “defeat” them, and the choice of the summer resident remains with wooden greenhouses and hotbeds!
Some gardeners believe that wooden greenhouses transfer some of their natural strength to vegetables. Whether this is true or not is difficult to say, but why not try?
Types of wooden greenhouses and greenhouses
They forgot to say the most important thing - the tree in this design only plays the role of a skeleton onto which the covering material is stretched:
- PVC film;
- reinforced film;
- cellophane (rare, as the material is unreliable and breaks easily).
Do you trust companies that produce and install greenhouses?
YesNo
For classification wooden materials(from boards or timber) should be divided possible options buildings for greenhouses and greenhouses. The difference between them is significant, details below.
Greenhouses
These are real giants summer cottage. They are installed on concrete foundation and are not dismantled. This design allows you to cover large beds and produce large yields. By type of materials we divide them into:
- timber greenhouses;
- greenhouses made of boards.
In fact, there is not much difference between these two types. Moreover, when using boards as the main material (component of the frame), timber will still have to be used. It will be used to strengthen the foundation and the lower row of wooden floors.
Greenhouses
These are small garden structures designed to warm and protect small beds from the external environment. The greenhouse is mobile, easy to dismantle, and does not take up much space. It can be made like a greenhouse - from boards and timber. Only here the difference is greater. The fact is that the gaps for covering material in a greenhouse are smaller than in a greenhouse. Accordingly, less light and heat penetrates into the garden bed. If you use boards to build the frame, these gaps will become even smaller.

But you still can’t do without boards - they are suitable as a basis for crossbars and “risers” made of timber. The fact is that the greenhouse design does not provide a foundation, without reliable support at the bottom the structure will become too fragile and unstable.
Expert opinion
Kazimov Azhar Askhatovich, summer resident-designer
A greenhouse made of wood is difficult to dismantle in the fall. The greenhouse simply needs to be covered with waterproof material, for example, roofing felt or rubber.
Designing a greenhouse made of wood
The durability of the greenhouse, as well as the quality of heating and protection of the beds, largely depend on the accuracy of the calculations before the start of construction. Therefore, you shouldn’t build it at random; you need to draw up a project. Before doing this, be sure to decide on a place that:
- should be located on a hill or at least not in a lowland;
- protected from the wind;
- is not in the shade.
Take the calculation of dimensions (especially drawings of a greenhouse made of 50x50 timber) with maximum responsibility. The amount of materials purchased, as well as the ease of use of the future greenhouse, depends on this.
After drawing up the project and purchasing materials:
- Let's start building the foundation. The site of the future greenhouse is surrounded by a rectangle made of timber. The ground inside it is leveled, a small depression is made in the soil. Next, the future foundation is poured with concrete, cement or special screed and carefully leveled. Until complete hardening, which lasts from a day to a week depending on weather conditions and the type of concrete, we leave our construction site alone.

- Next, we attach the supporting beam to the foundation. Remember the rectangle that represents the shape of the base of the greenhouse? So, it didn’t run away anywhere and will become the basis for the load-bearing beams. The beams or boards are leveled and placed at the design points of the foundation straight up, without tilting or angles. Then fastening is done using metal corners and self-tapping screws. To speed up the process, it is recommended to use a screwdriver. Please note that the corners need to be attached to the base at the stage of foundation construction - they will become excellent markers for future load-bearing beams.
- The next stage is creating walls. These works cannot be done without grooves. The process is labor-intensive and long. Those summer residents who are doing this for the first time will be especially impressed. Do not forget to prepare in advance additional grooves for vents and other elements provided by the greenhouse design on beams perpendicular to the base. At the same stage, we begin to form the roof (example photo at the end of the article). Pre-prepared rafters with the help of corners (if you can figure out how, you can use grooves) are fixed to the supporting beams. This is a less labor-intensive process and can be completed quickly.

In order for a standard 6 by 6 meter covering film to lay flat and without residue, make the rafter pitch length from 1.27 meters to 1.35. The taller the people who will work in the greenhouse, the longer the step should be.
- The final stage is the installation of covering material. Option two:
- inserting film into each opening between the beams;
- the material is stretched over a wooden frame, like skin over a skeleton.
The first option is difficult to implement and causes significant difficulties during dismantling. True, the aesthetic appearance of the greenhouse will be excellent, and repairing a torn film will not require replacing the entire canvas. The second option is simpler to implement and can be easily dismantled. In this case, the film is fixed either directly to the ground, which breaks the tightness of the greenhouse, or to the base with special pegs or rivets.
You won't forget to make the door at the end, will you?
That's all, our wooden greenhouse is ready! All that remains is to plant your favorite vegetables and wait for the harvest. With such a garden miracle, your favorite cucumbers will become the envy of all your neighbors!
Check out what a do-it-yourself wooden greenhouse should look like step by step: drawings.


Video
You can also watch a video where they will tell you how to build wooden greenhouse from timber yourself.
Fresh early vegetables Many people love them, but their prices sometimes go through the roof. One of the solutions this issue– a greenhouse made of timber and polycarbonate with your own hands. Although they are stationary structures, experts say that they should be periodically moved from place to place, allowing the soil to rest.
In this case, they do not do stationary concrete base even for a heavy structure, as this is impractical. The ideal solution for collapsible buildings, a foundation for a greenhouse made of timber is used. Then it becomes possible to restore the soil and maintain the correct planting cycles for various crops.
Calculation and creation
If you don’t go into details, all you need to do is knock down a frame from beams that fits the size of the greenhouse.
But after a while she may:
- swell from moisture;
- to warp;
- spoiled by insects.
The service life of this wooden base will not exceed two years.
General information
The foundation for a greenhouse made of timber is a lightweight foundation for structures with a total weight of 70-120 kg, which can be easily moved to another location with an assistant. Just remember to provide fastenings for the frame.
If you decide to install, be prepared for the fact that it will sag over time. How quickly will this happen?
Depends on the stability of the soil excess moisture. But installing a greenhouse on a beam will make it possible to prevent this trouble.

The advantage of a light foundation:
- Provides structural rigidity.
- The treated wooden foundation will protect the soil from erosion inside the greenhouse.
- Will protect metal carcass from corrosion, due to the fact that the upper part of the foundation will be located above the surface of the earth. In addition, it will help increase the useful volume of the building and provide additional air space.
- Serves as an “anchor” for lightweight construction, providing resistance to wind and snow loads.
- The price of the structure will not make a hole in the budget.
- Installing a polycarbonate greenhouse on a beam is not difficult; you just need to screw it on with self-tapping screws.
Advice: before installing a foundation made of timber, regardless of wood, the material must be treated with modern impregnating antiseptics, which will prevent rotting and save from insects and rodents. The wood must be processed in a separate area, preventing impregnation from getting into the ground.
Technology
Assembling a frame from beams is not a difficult task; even a schoolchild can cope with it. You can easily do without tongue-and-groove connections, since this is not essential. The main point of the process will be installation wooden foundation into the ground.
If you install it on supports, for example, made of brick, you will then have to carry additional amounts of fertile soil inside the building.
- Mark the area along the future foundation and dig a small trench along the marked contour. Its depth should be based on half a beam plus 50 mm for a sand cushion. For example, for a beam with a cross-section of 150x150 mm, the depth will be: 150/2 + 50 mm = 125 mm. The width of the trench should be equal to the width of the beam.
- Level the bottom of the trench and compact it.
- Fill the finished trench with sand of the smallest fraction possible. Tamp it down.
- Pour water over the sand cushion, this will give 1-2 cm of shrinkage.
- Place a layer of waterproofing material on the sand bed. To do this, you can use roofing felt. The best option- lay the sheets in a “trough”, lining the bottom and walls of the trench at the same time.

- Prepare the bars, which have been pre-treated with an antiseptic.
- Assemble a frame from them according to the dimensions and shape of the future greenhouse. Don't forget to protect all attachment points with antiseptic. Use self-tapping screws, anchors, long nails, wire or bolts for connections.
- Install the finished structure in the trench. It is better to do this with an assistant so as not to break the walls of the latter.
- Level the foundation using a building level. Make sure that its upper part is raised above the surface by 5 cm. Use a layer of soil for leveling, which must be compacted.
- Cover top part timber foundation with waterproofing and secure it so that it does not move.
Advice: treat all timber joints and cuts with antiseptics. Make sure that chemicals do not get on the ground, as the process will take place at the assembly site. Use, for example, a greenhouse film bedding.
Greenhouse made of wood
It is not necessary to purchase a ready-made greenhouse or metal greenhouse. You can make it yourself from the very available material – wooden beam. The cheapest wood is spruce; larch is the best wood to resist rot; pine is the “golden mean.”

Products for processing timber
Pine and spruce timber for a greenhouse are treated with an antiseptic to protect the wood from rot and insects. There are two types - chemical and biological. So, how to treat timber for a greenhouse?
Antiseptics can be:
- water soluble;
- water-repellent;
- combined.
The wood can also be varnished by first priming it.
They often use folk remedies protecting wooden beams from rot.
- Take used car engine oil. Before use, preheat it to 70˚C, and then apply it to the timber.
- Use blowtorch, which burn the surface of the wood.
- Use bitumen by preheating it and pouring it in a thin stream into a bucket of diesel fuel. After it dissolves, the composition can be used as protection for wood.
Tip: pour hot bitumen into cold diesel fuel, and not vice versa.
Tools
You can't do your job without measuring instruments. So prepare them in advance.
Water level
Allows you to control the height of the foundation. It is easy to use and does not require any qualifications.
Consists of two plastic cylinders with markings and a connecting tube. For better visibility, the liquid is tinted, for example, with ink.
Building level
It makes it possible to control the verticality and horizontality of surfaces. If it has a special rotating bubble with marks in degrees, it can be used to control the angles.
Design
Very often, greenhouses made of wooden beams are made collapsible, so it is worth marking the parts and components. Then on next year It won't be difficult to assemble.
Prepare materials:
- Wooden beams with a section of 30x40 mm and 40x60 mm;
- Screws, screws;
- Greenhouse film 0.3 mm thick;
- Twine, tape measure, pegs;
- Metal pipes approximately 40 cm long and 1 1/2″ in diameter;
- Thin lath, short nails.

Have you ever tried to make greenhouses from timber with your own hands? If not, don't despair.
Below simple instructions This will allow you to do this without much difficulty:
- Calculate the dimensions of the greenhouse, which will depend on the width of the film. For example: the width is 2 m, the length will require two sections, with a slope of 30° it will be about 1.7 m, the height will be 1.4 m.
- Take a tape measure, twine and pegs. Mark the site.
- Drive into the corners and perimeter of the greenhouse at a distance of 80 cm from each other. water pipes so that 50 mm remains above the ground surface.
- Insert racks of wooden blocks into them.
- Cut down with outside all the bars are about a quarter and attach longitudinal side slats to them. In this case, the joint should be on the stand.
- Install 2 B-pillars. Align their tops and attach a ridge strip to them.
- Secure the rafters by sawing them in place.
- Install horizontal cross slats at the end of the frame. When the length of the greenhouse exceeds 3 m, install an additional vertical stand, as well as a crossbar.

Film stretching
- Nail two sheets of film to the ridge strip using thin strips and small nails.
- Attach the film with north side structures to all adjacent bars and slats.
- Cover the bottom of the film with soil.
- Make pockets on the side edges of the panel and pass twine through them so that south side it was possible to lift it.
- Attach a block measuring 30 by 30 mm to the bottom of the film sheet. The film will be wrapped around it when the greenhouse is opened.
- Fix the cord to seal the windows with small nails on the bars and slats. When closing the greenhouse, the film sheet will tightly fit the bars and slats on the rafters.
- Use three pegs from below to secure the reel, driving them into the middle and outer posts.
- Cover the ends of the greenhouse with film.
Conclusion
A greenhouse made of wood is reliable, lightweight and inexpensive construction, which can be installed anywhere on the site and moved from place to place independently. In the video presented in this article you will find additional information on this topic.