Furniture not only decorates the room, but also fulfills its functional duties. In order to add some variety to the interior, you can make a coffee table with your own hands. Eat different ideas for the manufacture of this piece of furniture.
Making a coffee table yourself: calculating the height, drawings, choosing materials
The coffee table can be made of any material while maintaining the overall style. The interior will look luxurious if decorated with a stone wooden table. It can have a classic shape. No additional decorations are needed here. Decorative carvings and decorations may be used.
The standard version of the table is made of wood. The lid and two horizontal shelves are connected by four vertical walls with a complex profile and four decorated parts, also with a complex profile. Due to the ball support, the product can be easily moved. The table is covered with a transparent or opaque protective and decorative coating.
- GOST wood for the product – 19414-90. In order to connect the table cover and the vertical wall, use a 2.16 D tie.
- The lower horizontal shelf is attached with 9.2A ball joints.
- To fasten the ball joints, use 2-4 screws.
- Each panel element is made with glued slats. They are glued together with PVA Lux glue, which has low toxicity and fast setting.
- Each part must be sanded with sandpaper.
- Finishing is done with self-priming varnish and a sanding sponge.
A cheaper option is made of metal and glass. With this solution, the interior looks more sophisticated and light compared to a stone product. The tabletop is made of high-strength glass, the legs are made of metal. The result is a strong, durable structure that does not require much maintenance.
A product made from cork wood is light, strong and durable. It will not rot or catch fire. The style solution may be different.
If you need a table for one season, you can make it out of plastic. This is an inexpensive and short-lived option.
Quirky carnival interior country house: photo review
How to make a coffee table with your own hands (video)
Each interior style has its own table
It is also important to maintain a consistent style in each item used in the interior. Before choosing a specific design for the table, it is necessary to determine the general composition of the objects in the room. First of all, the style is determined, then the material with different details for decoration is selected.
- When choosing a classic style, it is necessary to maintain a balance of luxury and simplicity. This goal is achieved using simple materials. Precious glass beads and artistic painting can be used to decorate a wooden table.
- Luxury and environmental friendliness are combined in an ecological style, for the design of which natural materials are used. It is possible to use rattan, which is durable and flexible.
- The latest modern technologies are used in high-tech style. The shape of the table for this style solution should resemble space. The product is decorated with luminous elements. This could be neon or small light bulbs. The furniture should look fantastic.
- In a room decorated in a rustic style, they use more natural materials. These can be solid logs or bars. Unnecessary things will turn into unusual objects.
DIY coffee table ideas
By general style room, you can determine what shape the table will be. This piece of furniture is used not only for storing magazines and newspapers. It can be decorated with a lamp. You can drink tea on it. In addition, it can be used as an aquarium stand.

Due to this, important so that the standard shape of this piece of furniture meets all requirements. For a classic interior, you can stop at geometric shape. Tables of square, rectangular, oval and round shapes are often found in apartments.
Small apartments with creative layouts: photo ideas for organizing space
How to make a transforming coffee table from wood
Owners small apartment This solution will help solve the space problem. Such folding models They have a special mechanism made of springs or gas lift. You can make a transformer according to drawings with dimensions. There are special computer programs that can be used to visually represent the product, but paper and pencil can also be useful.
For a reliable, high-quality transformer, it is necessary to have plywood (2.2 thickness) capable of supporting a mechanical element. The parts are cut out with utmost care in compliance with the established dimensions.
Each part is attached without haste. If desired, a retractable and rotating mechanism can be made. As a result, the product can combine two tables and perform two functions. During the day you can conduct negotiations on it, and in the evening you can have dinner with a company. It is convenient to use a product with wheels. You can do it yourself. The wheels should be soft so that they do not damage the floor.
How to make a table with an infinity effect (video)
Making a small coffee table on wheels
Without having any specific experience in the furniture industry, you can start making a wooden coffee table. To do this, prepare the necessary materials and tools:
- Beam 9/3.5 cm, length 12 m;
- Clamps;
- Wood glue;
- Sandpaper;
- Chisels and hacksaws;
- Tape measures, pencils;
- Varnish.

Cutting parts should be done taking into account allowances and finishing. The length of the allowance is 2.5, the width is 0.6, and the thickness is 0.15 cm. In carpentry shops they can immediately cut parts to the required sizes.
The work is performed in the following sequence:
- The drawing is being prepared. It can be presented in the form of a drawing-plan on which all the necessary dimensions are applied.
- Using a hacksaw, cut out the timber. 14 pieces of parts 70 cm long for the tabletop and 4 pieces 35 cm for the legs.
- Then, on two long parts, an indentation is made from the edge on each side (5 cm). A hacksaw is used for this.
- To smooth out uneven bars, sandpaper is used. Produce tight joining of parts. Refinishing can be done using a chisel or sanding sheet.
- Each adjacent side of the bar is treated with glue and glued together. You need to ensure that the tabletop lies level. There should be no displacement of parts.
- After waiting for the glue to dry, remove the clamps.
- The surface is polished with a grinding device.
- Glue is applied to the ends of each leg and along the grooves.
- Each leg is inserted into a groove. They are then sanded until the glue is completely dry.
- After this, they are varnished, dried and the wheels are screwed in.
For better penetration of the varnish into the wood material, you should add a solvent to it. This method too simple. Even a beginner can handle it. The material used in production can be the most non-standard, depending on what idea the master wants to bring to life.

Original unusual ideas for homemade coffee tables
- Wooden pallets can help realize the idea of creating unique furniture. The pallet is sanded. To add brightness, use varnish. The product will become more practical if it is supplemented with wheels.
- With ready-made decorative boxes it can work out original design. Self-tapping screws and nails are used to connect boxes. Ready product sanded and brightened with stain or varnish. This table can be supplemented with a base frame and wheels.
- On top of a pallet, stump or box, plastic or metal pipes, you can put a glass tabletop. To attach it, use transparent glue, special suction cups or bolts.
- A cast iron battery can also become a reliable and mobile invention if you place a glass tabletop on top of the polished radiator and install wheels on the bottom. It depends on what type of radiator it is.
- An original piece can be made from old windows. You can use old books to make the legs, and the tabletop will be a window. The same thing can be done from the door.
- Tire is an excellent raw material for designer fantasies. From it you can make a small book table in different options. The tire can be placed at the bottom. It will act as legs, a support for glass or wooden table top. A large wicker basket will also make original solution, if you attach wheels to it and add a plastic table top to the top.
- Industrial cable is produced in large reels. When they are released from the coils, an ideal blank can be made. The reel must be thoroughly cleaned and painted. It can be ideally used as a small coffee table.
- A sanded, stained and varnished stump looks amazing indoors. You can leave it in the same form as it is or add additional elements to it in the form of wheels and a table top. Any material can be used for this.
Making furniture with your own hands is not only a great way to save money, but also an opportunity to put your creative potential into practice!
We will talk about making coffee tables with your own hands. There is no such thing as too many side tables. They can be placed next to the sofa to place a vase of flowers or a mug of tea, used as a bedside table or as a stand for potted indoor plants. However, monotonous wooden tables are unlikely to liven up a dull interior. I want something stylish and unexpected...
Stylish table made of wooden slats with your own hands
This bench can serve as a coffee table, extra seating, or a place to place indoor plants. This piece of furniture will “fit” well into almost any interior!

DIY coffee table photo
Materials:

Tools:

Step one: Using a hacksaw, cut the ends of two 2.5 x 7.5 cm boards at a 45 degree angle. Cut out fragments from 2.5x5 cm bars, the length of which will correspond to the internal length of 2.5x7.5 cm blanks.

how to make a coffee table with your own hands. Photo
Step two: Place 2.5x5 cm of the workpiece in the middle, and 2.5x7.5 cm on the edges. Make sure the ends of the inner slats are aligned.

Step three: Measure the distance between the outermost 2.5x7.5 cm bars and cut two pieces of this length from 2.5x10 cm boards. They will serve as lower supports for the bench. Secure them by screwing self-tapping screws into each longitudinal rail.
Step four: Using a Kreg Jig, drill two pocket holes at each end of the support crossbars. These holes will be used to connect to the 2.5 x 7.5 cm edge bars.
Tip: It is difficult to give specific recommendations regarding how far from the edge to attach a Kreg Jig. This depends on the length of the screws used, the exact thickness of the board, etc. We advise you to first practice on unnecessary scraps of boards.

unusual coffee table with your own hands. Photo
Step five: Place 2.5x7.5 cm blanks along the edges of the structure. After making sure that their ends are at the same level, secure them with clamps.
Tip: If you use soft wood (for example, pine) to make the table, place unnecessary scraps of boards under the clamp supports. Otherwise, marks from the clamps will remain on the wood.
Step six: Securely attach the outer 2.5x7.5 cm bars to the base of the bench by screwing 3.5 cm screws into the countersunk holes that you made a little earlier at the ends of the support crossbars.

coffee table made of wood. Master Class
Step seven: Measure the width of the fabricated base to determine how long you need to cut the 2.5 x 7.5 cm blank for the ends of the bench. We recommend that you make a cut with a small margin in length, and then slowly grind off the excess until you achieve the perfect fit.

Step eight: Wet the ends of all slats with water and apply a small amount of Gorilla Glue.
Step nine: Place the end boards in their intended place and secure the entire structure with a belt so that it does not fall apart while the glue is wet. For reliability, you can additionally secure the ends with several finishing nails.
Step ten: Sand the surface of the bench sandpaper 120 grit to eliminate all unevenness at the joints. Fill all gaps in the seams and recesses from nail heads (the latter must be recessed into the wood) with putty. Once the putty is dry, sand the surface again, this time with 220 grit sandpaper.
Step eleven: Paint the bench. We recommend that you sand the surface again using 400 grit sandpaper and water before painting.

Step twelve: Install special mounting plates for attaching legs. When attaching them, make sure that you drill holes in places where there are no screws already screwed in. The distance from the fastening to the edge of the base of the bench should be about 2.5 cm. Screw the legs themselves into the fastenings.


Coffee table made of copper pipes. Master Class
The material for making the next table can perhaps be called the most unexpected. This time we decided to tell you how to make a table with your own hands from... copper pipes OK.

Materials and tools:

The figure below shows all the parts (pipes (A-E) and various connecting elements (F-H)) with their sizes and quantities. All that remains for you is to take it in your hands pipe cutter and sit in front of the TV, which will brighten up the tedious cutting process a little. It's not difficult, just a little boring. 😉


When all the pieces are ready, you can begin assembling the lower part of the table. How to do this is shown in the figure.

Having assembled the lower tier, you can proceed to the upper one. The only parts not listed in the parts list are the four 2.5cm pieces of pipe that fit into the tees at the top of the corner posts. Without these inserts you will not be able to put on decorative caps, because... the latter have the same diameter as the tees.

Reliable connection of the tubes with each other will ensure glue, but we recommend applying it only after preliminary assembly of the structure, i.e. after you make sure that all cut tubes have desired length and fit well together.

Wooden shelves, which you can pre-paint if you wish, are secured using special clamps that are placed on the underside of each board. Now you're ready to decorate your home with a new, handmade table!


DIY lightweight cement table

Countertops and other interior elements made from concrete have become increasingly popular recently. However, for all their attractiveness, they are not without a number of disadvantages. Firstly, pouring large quantities of concrete can sometimes be quite an expensive undertaking. Secondly, when it comes to small side tables, another serious problem- such furniture turns out to be too heavy. On the one hand, there is a desire to get a good, solid thing, on the other hand, you want to be able to move a table you made with your own hands without the help of professional movers. The solution found can be considered an insight.

Materials and tools:

Step one: Mark and cut out the foam sheet. From a 120x240 cm piece you can cut 18 squares of 40x40 cm. By stacking them on top of each other, you will get a parallelepiped 40x40x45 cm.

DIY foam table. Photo
Step two: Glue the cut pieces together. 3M Super 77 aerosol adhesive is ideal for this. It is better to perform this stage of work outdoors. Don't forget to wear gloves and a long sleeve shirt. Apply an even layer of glue to one side of the first square, then do the same with the second. Wait ~15 seconds, then connect the squares, making sure their edges meet. Repeat this until all the square pieces are joined into one piece. Wait about 30 minutes before moving on to step 3.

Step three: Now the most interesting thing... giving the resulting parallelepiped the outline of the future table. We decided to make a table in the shape of a cylinder. You can come up with something more original or, on the contrary, keep the original block with right angles. Cutting foam is easy and fun. Your design will have a rough, angular appearance at first, but don't worry! Once the table has been given the desired shape, it is time for sanding. Using 36 grit sandpaper will quickly smooth out any rough edges. As you get closer to the ideal, gradually move on to sandpaper with a finer grain size. Do not strive to achieve a super smooth surface; at this stage it is important for you to achieve only the required shape.

Step four: The surface of the future table has been sanded, it’s time to cement it. The first layer, applied over the entire foam mold, will fill in the voids and texture of the foam. You only have ~20 minutes, so work quickly so you have time to smooth out any rough edges. Once the applied cement mortar has dried, you can apply the next layer. The number of coats depends on how smooth and even the final surface you want (usually four to five coats are required). It should be remembered that the smoother the surface of the final layer before it dries, the less sanding it will have to do!
Tip: When cooking cement mortar follow the manufacturer's instructions. You should not prepare more mortar than you need to apply one layer (for example, we used 220 ml of water and 450 g of cement). Make sure you don't forget to cover the surface of your workbench or workshop floor, because this job is quite dirty.

Step five: After the last cement layer has dried, you can sand the surface if desired. We wanted to achieve a glossy finish on at least the top of the table, so we sanded it using varying grit sandpaper ranging from 100 to 2000 grit.
Advice: If you are planning this operation, purchase a protective mask that will help you protect your lungs from cement dust
(Made in this project the table turned out to be very durable and strong, but at the same time it weighed no more than a kilogram.)

DIY stump table
The material for the next table is sometimes literally lying under your feet. Even residents of megacities will be able to find a suitable stump if they wish.

log table. Photo
Materials and tools:
- wooden block;
- white acrylic paint;
- hand grinder;
- chisel;
- hammer;
- decorative upholstery nails;
- molar tape.
Step one: Find a table base! This should not be an old rotten stump, but a freshly cut log. Allow it to dry for at least 6 months (nothing is worse than waiting, but it must be done) until the bark begins to separate from the trunk.
Step two: Using a chisel, use a downward motion to carefully scrape away the bark from the log. If the stump is dry enough, you won't have to use too much force to do this.
Step three: Using a sander with medium-grit sandpaper, sand the surface, removing any remaining bark and smoothing out any rough edges. Don't forget to sand the surfaces of the lower and upper cuts. Wipe the wood with a damp cloth.

Step four: It's time for painting. We used white semi-gloss paint that included a primer (we needed three coats for full coverage). You can choose a different type and color of paint, focusing solely on your taste. Don't forget to prime the surface of the wood first. Make sure you don't forget to trim the bottom cut.
Step five: Prepare decorative nails. Place a strip of masking tape along the top edge of the side surface of the block, thereby marking the place where the first row of nails will be located.

Step six: Use a hammer to hammer in the first row of decorative nails. To ensure that the distance from them to the top edge is the same throughout the entire “line” of nails, use the strip of masking tape you previously glued as a guide. Once the first row is completed, repeat with the second and third row of nails (we needed almost 150 nails for three rows).
Tip: Cover the bottom surface of the stump with furniture felt so that you can move the table around the room without damaging the flooring.
The work is done. You can enjoy your new piece of furniture and be proud that you made this charming coffee table yourself.


Coffee tables: do it yourself
Wooden table: how to make?
Many people are interested in how to make a wooden table with their own hands to get a model with an original appearance. Let's consider one of the options.

To make an original coffee table with your own hands, you should take timber with a section of 5x10cm. It is cut into pieces of the following lengths: 130cm - 9 pieces, 21cm - 12 pieces, 34cm - 2 pieces.
The prepared timber is placed in three rows, leaving space for attaching the legs.

The top two rows are removed. The timber in the third row is moved slightly to create an interesting appearance. Next, mark the places for attaching the transverse parts.
Lay the outer bars of the second row and mark the places of cuts. Then the cuts are made circular saw or a hacksaw with a chisel.

The bars of the second row are secured with screws.

Lay the third row, move the parts and secure them.
An empty space is formed under the tabletop, in which they fix legs.
The wood is processed protective composition, preserving the wood texture.


Original model of a wooden coffee table with your own hands

First, to make a table with your own hands, prepare planks: 6pcs - 22.5x45cm, 2pcs - 22.5x41cm, 8pcs - 20x4cm, 8pcs - 40x4cm.

Planks 20x4 and 40x4 are glued in pairs. To ensure they stick together securely, they are clampedclamps.

While the leg blanks are drying, assemble box from the remaining parts. They are connected with wood glue and nailer.

Legs They are attached to the box with countersunk screws. Crossbars are placed between the legs at the bottom.

cover for a wooden table they are also made using 22.5x45cm planks. They are glued together, and then the resulting square is sawn into two triangles.

One triangle is secured with screws, and the second triangle is secured with slats so that it is removable.

All parts are sanded and painted.


Stylish coffee table. Master Class

Start making a stylish table with your own hands by marking the sheet Chipboard 16mm thick. The center is found on the sheet at the intersection of two diagonals.

A nail is driven into the center, to which a thin rope or harsh thread is tied.

A pencil is tied to the free end. This allows you to draw a circle.

If you want to make a table with your own hands that is not round, but of a more interesting shape, then the shape of the circle is changed by drawing curves.

The table top is cut out jigsaw or a reciprocating saw.

Edges are processed sandpaper.
Legs secured with screws. If they are located obliquely, then the slope should be outward.

Table surface paint in the desired color.

Simple coffee table

To make a coffee table with your own hands, take boards 40x15cm - 2 pieces and 50x19cm - 2 pieces. In addition, you will need legs and mounting plates.

A larger one is fixed on one of the boards plates for attaching legs. You should step back a little from the edges.

The sides and top of the table are secured with wood glue.

It dries in about half an hour.


DIY log table

A hand-made coffee table with this appearance will decorate a cottage or country house. Work begins by assembling the frame. To do this, take sheets plywood two centimeters thick. A base with dimensions of 60x80cm is cut out of them. A box 68cm long, 45cm wide and 40cm high is attached to the base.

DIY log table. Photo
After this, thirty round pieces are cut logs 45 cm long and twenty-four round cuts, the thickness of which is 3 cm.
The prepared logs are secured around the perimeter of the box. Fixed from below to the base rollers. They are installed at a distance of three centimeters from the edge.

In addition to glue, it would be useful to secure the logs with screws from below.

Installed on the box plywood cover. Round circles are glued onto it. The space between them is filled with wood putty, which does not shrink when dried. Apply it in stages so that the previous layer has time to dry.

After the putty has dried, the surface polished. For this, a surface grinder is used. After this, the log table can be used.
Country style table

If you are interested in how to make a table from wood cuts with your own hands, then you should read the instructions.

They begin making such a coffee table with their own hands by choosing the appropriate material.


Selected slept We inspect for any interesting parts or parts that need to be removed.


Excessively rough, protruding parts are cut off. On the side where the tabletop will be, the surface level.


Used for work cleaver, which moves at an angle of forty-five degrees.

The sides also need to be leveled.

All surfaces polished, using ever-decreasing grain sizes.


Glossy varnish mixed with resin in equal parts.

The resulting composition is applied to the wood in a thick layer. It will take a long time to dry. If cracks appear during the drying process, they must be filled.


Bottom side clearing out. If there are voids in the tree, they are filled with resin gradually until the hole is filled.


If there are air bubbles in the dried resin, the surface is heated with a heat gun or burner.

A second layer of resin is applied and again left to dry for two days. The entire surface of the tabletop should be glossy.

The part of the ax handles is cut off at an angle of 22 degrees. The surface is sanded and painted in the desired color.


Mark places for legs and make holes.


Glue is poured into the holes and the legs are installed. Special pads are attached to each.


White coffee table

Make such a coffee table with your own hands from plywood And glass First, prepare a drawing and determine the dimensions. Then they proceed directly to production.


DIY coffee table. Blueprints
Plywood acts as a tabletop box with partitions, covered with glass on top. Triangular legs are attached to it.


You can make a door at the box to access what's inside, or you can lift the glass.


LegsFor a table with your own hands, it is better to cut it out of fairly thick plywood. It should be remembered that double legs are easier to make than more single ones.


When all the parts are ready, they are assembled together and fastened. The table is painted or varnished.


DIY table made from pallets
If you know how to make a table from pallets with your own hands, you can get an interesting version of furniture for your home. Pallets must first be sanded, sawn into pieces and primed.


table made from pallets. Instructions
A table is assembled from the prepared material. To do this, attach legs or wheels. A pallet directly or a surface assembled from individual planks can be used as a table cover.


After all the parts are connected, the structure needs to be painted or varnished. After this, the table made from pallets is ready.
Second version of a table made from pallets
To make such a table with your own hands, you will need one or two pallets. You should first draw a sketch of the future product, taking into account all dimensions.


The table will have a shelf for small things under the table top. The structure is assembled from prepared parts.


The surface is painted black, but this is not the only possible option. There are many other decorating possibilities.


Coffee table stand
Option on how to make a table from copper pipes with your own hands, may be of interest to many craftsmen.

The pipes are first marked and cut. Then they are coated epoxy glue and assemble the base for the table.


This base is applied to the board and the fastening points are outlined. In these places you will need to drill holes by pipe diameter.

Four holes are drilled, but not all the way through.

The board is impregnated polyurethane and cover stain.


The remaining one is collected from the pipes frame.


Legs and base cover paint in the color of the tabletop.

Made from a piece of cloth pocket, which is hung on the transverse parts of the legs.


All parts are assembled together, adding epoxy glue for reliability.


DIY marine style table
This table is from an old one window frame looks very romantic. The frame is cleaned of dust. If necessary, replace the glass.

Wooden surface paint white acrylic paint. After drying, the paint layer is sanded so that the wood appears. An option is also available in blue and white.

To make the legs, take stalk and sawed into pieces of 34 cm. After this, it is treated with sandpaper to remove roughness.
The blanks are drilled in four places. Next, each leg is attached to the base, and the base with legs is attached to the frame. All this is done with self-tapping screws.

The legs are covered with coarse rope.
For peeled and low-fat glass glue sea souvenirs and seafood. They must be covered with glass on top, which is cut in the workshop to the size of the frame.

A loop is made at one end of the rope. The rope is glued around the perimeter of the frame, leaving the loop free. When the other end reaches it, an interesting sea knot is tied.

 .
.

Anyone who is not particularly concerned about mobility may be delighted to see a durable table made in a rustic style in their living room. Such a craftsman can be offered to create a table from powerful boards. This table option will fit perfectly into the interior of any country house.

Unobtrusive, thoughtful laziness, coupled with a thirst for creativity, can often lead to quite interesting discoveries. And one of these discoveries is a soft table made from an exhausted tire.

It won't be difficult to assemble:
- It is necessary to cut out two round segments in the chipboard, the diameter of which is 3-4 cm smaller than the diameter of the tire chosen for the table.
- Four legs, preferably metal, should be screwed to one of the round segments, since the table will be quite weighty.
- The bottom segment and table top are attached to the sides of the wheel using self-tapping screws.
- Afterwards, all that remains is to decorate the sides with the tabletop with jute edging.
 Ultimately the jute construction is made from old tire looks great
 You can use random items. After just a few hours of working with this material, consisting of 4 boxes and pallets, you can get a completely original and noteworthy design.


You can also use planed bars and strips of a regular fence picket to make a table.

The frame is a base made of picket fence that can be tinted with black stain to give the structure a unique contrast.
Wood can also be combined well with metal parts. Here is a model of a table made from pieces of tongue-and-groove boards framed by a cornice strip on metal legs.
 Legs made of smooth reinforcing rod look very elegant
 According to the manufactured template, rods with a cross-section of 10-14 mm are bent, welding machine corners with a thickness of 1.5 to 2 mm are welded. The tabletop is made from tongue-and-groove boards. After the legs are screwed to the tabletop, it should be cleaned, tinted and varnished. The legs can be painted black.
An excellent solution for making a frame for a coffee table would be a profile pipe. Having welded two identical squares from it, painted them and provided them with a tabletop made of strong boards, a good example of country furniture came out.

For stability, the squares under the tabletop should also be connected to each other by welding and a profile pipe.
A cut of wood will also look very original as a table top.

Electric planer, sander, varnish, a couple of hours and the tabletop is ready. Legs made from reinforcing rod will look great under such a massive tabletop.

A good option is a combination of glass and wood. Here is one of the options for such a community.
 Light glass combines in an original way with a solid wooden base
 Looks very modern and stylish mobile table, made from an ordinary wooden pallet and glass covered on top.
For lovers functional models a transforming table may be suitable. A few manipulations and the table radically changes its appearance.

The basis of the next transforming model is a pair of metal frames-pedestals, hinged to the tabletop. When the lid is turned, the horizontal structure rises to a vertical position.

The cover of this table is made up of two plates that slide horizontally. One plate rotates around its own axis. If desired, this transformer can be easily turned into a dining table for 4 people.
 Transformable table “three in one”
 After a successful experiment with plywood scraps, such a miracle may appear

The master had to tinker with measurements and calculations for a long time.
In theory, everything is simple, but in appearance, you can’t tell.

Otherwise, for the calculation it was necessary to use a three-dimensional modeling program.
Some home craftsmen do not bother with the complexities of the design and simply love to play with blocks. And this is what comes of it.

The cracks are just begging to be covered with a glass tabletop.
Clear optical adhesive is best for joining glass to wood. Drill ordinary glass at home without special devices will be impossible.
Eurolining may be best suited for making countertops. The spacers with legs and sides also come out well.
 Tabletop made of eurolining
 You can make a tabletop of any shape from eurolining. It is easy to cut with a jigsaw.
Before making a coffee table, you should prepare some tools:
- screwdriver;
- belt sander;
- jigsaw;
- roulette;
- hacksaw.
Also, before starting production, you should make a drawing that will show the entire structure and diagrams of the docking units.

The finishing of the table should be done in two stages. Before assembly, sand the lid itself, legs and bottom with sandpaper. After the table is assembled, the product is coated with stain and varnish.
It’s even easier to make a table from chipboard. This material can perform two functions simultaneously: form a surface and carry a load. It is better to use veneered sheets, since no varnish can hide the wood-shaving texture.

Upon completion of assembly, all edges of both the table top and the legs with the bottom must be sealed with a special furniture tape made of plastic, warming it with a hair dryer before gluing.
Video: Homemade coffee table
An alternative to purchasing furniture is the opportunity to create it yourself from scrap materials. You can make an original coffee table with your own hands in a couple of hours. The process is simple and exciting even for a beginner. It requires initial skills in handling carpentry tools, ingenuity and a certain amount of aesthetic flair.
The coffee table comes in countless varieties.
Advantages of creating home furniture yourself:
- minimum financial costs;
- exclusivity of the model;
- individual convenience.

It’s easy to make: if drawings are required, they’re not at all complicated.
You can place a sample you created yourself in the living room, bedroom or children's room. Products created independently look great in city apartments and country cottages, delighting hosts and guests with its unusualness and style.

A coffee table in an interior is like a business suit for a man or makeup for a lady.
Which ones exactly? necessary materials will come in handy, depends on the basis of the item being collected. To make a coffee table with your own hands, you will need a variety of auxiliary things.

The appearance of the table is primarily given by the decor, so it would be appropriate to start from the end: with decoration and finishing.
It will be difficult to assemble an accurate and durable table structure without glue, varnish and sandpaper. Permanent paint will also come in handy - choose convenient sprays, they can quickly and without getting dirty to cover the entire surface of the tabletop. A good quality primer may be needed to cover the base and supports. You can buy it at a hardware store. Don’t forget the materials for decoration – fabrics of various textures and densities, lace, colored plastic or glass, etc.

It will no longer be difficult to select a design from ready-made ones or to develop your own: the load on the object is small, and if a flaw occurs, it is not difficult to redo it or do it again.
It won't be amiss auxiliary material- ordinary newspapers, large cardboard, plastic sheeting so that “production” waste does not spread around the room.

The cost of labor and money is nothing at all.
To assemble the planned model, you need to prepare the necessary tools.
First of all, these are a hammer, scissors, and pliers. You will need different fasteners, furniture nails (regular and rivets) or screws of different sizes.

You can decorate the table in different ways, see fig.
To quickly cut wood parts, you need a hacksaw. If there carpenter's table, and you have skills in such work, then having a chisel, cutter and plane will be a plus to process the wooden base with professional precision. To decorate the elements you will need a sharp chisel or a set of carpenter's knives.

With the help of the most regular wallpaper You can quickly and inexpensively decorate the most ancient, shabby table, as long as it is strong.
What the coffee table will be like is up to you to decide. Next, we decide on the design and construction.
DIY coffee table made from pallets
To quickly make beautiful furniture, wood is often used as a basis. It can be made from a regular pallet. One product without gaps and four wooden supports is enough for self-creation beautiful table.
- We start making an original table from pallets with markings.
- Having decided on the dimensions and made all the necessary marks, we cut out the middle of the pallet: a flat surface should be on the front side, a raised surface - with symmetrically located bars - on the bottom.
- Treat the legs chosen for work (preferably carved) with a primer and let them dry.
- At this time, start tinting the top and sides of the tabletop.
- When all the elements have dried, you can begin to secure them. Use nails (or screws) and hardware to connect.

Each layer, except the finishing one, is sanded after drying, but for this you need velvet sandpaper, which you can’t always find on sale.
Such models look good if they are low. An interesting coffee table can be made from an already unnecessary radiator central heating. To do this, it must be painted evenly. Instead of a tabletop, you can take glass or a wide board that fits the size.

You can bring back a pile of empty shells and sea pebbles from your vacation at sea.
For mobility, wheels from an old baby stroller are often used. The construction of a furniture masterpiece will take a minimum of time and money.
DIY coffee table from window and books
You can find a new use for an outdated window - use it to create a table with your own hands. If necessary, sand the frames and coat them with paint. Not only can they be used as supports wooden legs(bars), but also old books that do not fit on the shelves.

If you changed houses regular windows on metal-plastic ones, then you can make an interesting coffee table from one old window.
A coffee table will be convenient in the country if you spend a lot of time there. Like this on glass original table top You can apply a pattern or a thin layer of matting paint.
Coffee table from the front door
An unwanted front door can also serve as a base for your desk. To do this, take its central part, and the rest go to the supporting sides, since the coffee table will not be very high. For greater stability, you can make the bottom shelf from chipboard.

Well, if you replaced the input or interior doors, That old door use as material for a new table.
Cover the surfaces of the product - tabletops and supports - with tinting. Matte varnish will look good.
Often, outdated doors have embossed zoning; when using a table, this is convenient, since you can safely place a tray with dishes without fear that it will slip off.
A table made from old furniture - a wardrobe or chest of drawers
Sometimes it’s a pity to throw away good pieces of furniture that have gone out of fashion. They can serve as the basis for new products. Smooth cabinet doors, especially if they are varnished, are an excellent preparation. Legs are also useful - straight or carved, if the product is planned to be low. You can use two doors, connecting them with cut pieces from the side panels of the cabinet. This option requires very little time and is practically free.

Wooden boxes for fruits, vegetables or other items are a universal material for creating furniture with your own hands.
Chest drawers are suitable for a composite or solid table. Fitting is carried out by sawing off the protruding parts. The assembled tabletop is installed on any supports - for example, elements of the same chest of drawers, bars treated with a primer, books, etc.
DIY stump table
An unusual coffee table is made from whole piece tree - a stump left from a cut pine, birch or poplar. It should be wide enough and even, with beautiful rings. Depending on the height of the stump, you can choose from the following:
- with a low tabletop on thin metal legs;
- medium height without supports (the base of the stump serves as support);
- low table on wheels.

A sanded stump or log can be placed directly on the floor or wheels can be attached.
If desired, you can leave the natural appearance of the stump - with bark (leaving it as is or varnishing it) or paint it in any color, after first removing the bark. White and beige tones look best.
Suitcase table for travel lovers
You can also use vintage voluminous suitcases as a tabletop. This original handmade coffee table will appeal to romantic people who like to frequently spend time on educational trips.

Nowadays, coffee tables have finally gotten rid of the hypocrisy of their owners.
The basis is an old suitcase, preferably made of thin wooden planes. Leave the locks in place; they serve as fasteners. You can also leave the straps. The suitcase can be tinted or left in natural form, depending on the condition of the surface. For legs can be used as wooden blocks(or carved furniture supports), and wheels.

This kind of furniture is made from a wide variety of materials: wood, glass, steel, aluminum, plastic, chipboard and plywood.
To make the surface more resistant to moisture, you can coat it with varnish. The fasteners here can be both bolts and hardware. You can drill holes for the legs in the bottom of the suitcase itself and secure them using iron rims with spacers.

The edge of a table top made of solid wood or laminated furniture board should be processed with a router to give it beautiful shape and then sand it with sandpaper.
Table made of logs for nature lovers
Wood is a material that can be easily processed. Sand half a wide log and thinner logs. The bark on the sides and bottom of the countertop can be left or removed. For fastening, use nails and metal angles. Instead of legs made from logs, you can take metal ones or legs from old furniture.

It seems as if this coffee table is made entirely of birch logs, but this is not the case.
Making an exclusive coffee table from wood is quite simple. Ordinary logs will serve as both the base and supports.
Reels as the basis of the product
A coffee table made from a large cable reel looks very interesting. Firstly, the round shape looks harmonious. Secondly, it can be made rotating. Thirdly, the side cavity can be used for the most various items– magazines, books, writing instruments, disks, additional cutlery (if they are not needed on the table during tea drinking).

Large spools of industrial cable are a rare but ideal stock for coffee tables.
Its side flat sides will serve as a table top.
The coffee table can be made with or without supports, simply by placing the coil on its side. You can use the “Health” disk as a torque element.
The cavities on the sides look more interesting if they are zoned symmetrically using wooden boards secured with glue.
Making a glass table
A DIY glass coffee table is very easy to make. As a tabletop, ordinary thick glass (square, rectangular, round) is used, preferably tempered, since the material is quite fragile and can crack from impact or temperature changes.

Glass – you can only use tempered glass, otherwise the reliability of the table will be in doubt.
The coffee table can rest on wooden carved legs with a wide base, books, hemp and other elements. It is advisable to do for him and central support. The elements are attached with a special durable glue.
The final stage is decoration
A variety of ideas are used in decorating a hand-made sample. Smooth surfaces hold a pattern or ornament around the perimeter well, while non-uniform surfaces hold appliques and other elements well.

When making a table with your own hands, you can use additional decorative inserts. If you're using a cable reel as a base, it often has a center hole. You can put it in tall vase with dry plants or flowers.
The material you choose for decoration should be abrasion resistant. The exception is elements designed to create the impression of a vintage product.

The main thing here will be strict adherence to the proportions indicated in the drawing.
Tinting with paint can also act as a decorative design. You can create patterned surfaces, add natural streaks to wooden surfaces, shade parts of the elements, creating the most advantageous look for your product.
If the coffee table is unstable, then objects may slide off it, so you need to carefully adjust all the supports to the height. An embossed finish can also be used as an anti-slip measure.

The finished product is treated with stain, painted, varnished or “aged” - as desired.
To make such models, completely different materials are used - your imagination will not allow you to limit your ideas. Try it out, come up with options for furnishings, this will make it look not only stylish, but also completely new.

Wood is the easiest material to process and the most pliable.
VIDEO: DIY coffee table
50 photo ideas for DIY coffee table design


A coffee table is an optional piece of furniture. Moreover, its presence makes any living room more comfortable. You can put a newspaper on the table, put a cup of tea or coffee. We will make this piece of furniture ourselves, making it truly original and comfortable.
Low table - practical interior decoration
The very first coffee table was created in the mid-19th century in England. Within a couple of decades, this furniture adorned the living rooms of all European houses. In the 20th century, fashion came to our country. True, in Russia the tables we are interested in are called coffee tables, not coffee tables. But this does not change the essence of the matter. This piece of furniture is understood as a small table with a height of no more than 40–50 cm, which can have any ergonomics, appearance and design. It all depends on consumer preferences.
In furniture stores, low tables are sold in a wide range. You can also find inexpensive design, and a designer item that can make any interior chic and unusual. But many home craftsmen want to make an original table themselves, using a variety of available materials. We put a piece of our soul into homemade furniture. This means that it will turn out to be really comfortable and will be able to fill your home with comfort and warmth.
Coffee tables are made of wood and glass. Also unusual and beautiful designs can actually be assembled from:
- old window and ordinary books;
- unused heating radiator;
- wooden pallets or boxes;
- dismantled interior or entrance door;
- car tire;
- wicker basket;
- reels from electrical cables.
There are a lot of options for making a table for tea parties. You just need to show your imagination and listen to the advice of experienced craftsmen who are engaged in decorating their homes on their own. Next we will describe the most popular construction methods coffee tables. And you stop your choice on the very suitable option.
Making furniture from chipboard is as easy as shelling pears!
Chipboards are the most available material for creating . Chipboards can be easily processed, easily cut to required sizes, and have an affordable price. For assembly low tables It is recommended to use laminated boards, as they are characterized by an attractive appearance, and the products made from them are durable. There are many sites on the Internet where it is not difficult to find various drawings with dimensions for making furniture from chipboard. We suggest making a table based on the sketches below.
.jpg)
Our planned design consists of the following elements:
- shelf dimensions 500x700 mm;
- table top 736x736;
- 4 strips 100x464;
- 4 plastic corners and the same number of legs (or wheels);
- 2 bottoms (dimensions of each of them are 500x700);
- 4 strips 100x464.
We will fasten the indicated elements with cofirmats; you will need 8 of them, and 16 3.5x16 mm.
We make the table step by step. First (position 1 in the diagram) we make a shelf from chipboard (preferably, as mentioned, laminated) board. We do cutting electric jigsaw, using a file with small steps. Such a tool will eliminate the possibility of chipping. Then (position 2) we attach the planks to the tabletop (we place them on plastic corners). We mount a shelf in the center of the vertically installed slats (item 3). We make holes in it with a cross section of 4.5 mm (you will need a drill with an appropriate drill bit). We fix the shelf with confirmations. Without them, our tea table may not be very stable and reliable in use. Using confirmations, we screw the bottom of the structure (item 4).
After this, screw on the legs (item 5). They are attached not from the very edges of the table, but at a distance of about 15 mm from them. Instead of legs, it is allowed to install small wheels (fixed with self-tapping screws). Then we will have a mobile coffee table that can be moved throughout the home. All that remains is to bring home-made furniture to mind. We glue all the visible joints of our table with melamine edge. Visual design from laminated chipboard will look perfect! By the way, instead of wood chips, you can use MDF (wood fiber products). The result will be approximately the same.
Glass table - stylish and elegant
The interiors, designed in a modern theme, are perfectly complemented by compact tables from glass. They are installed on wooden or chrome-plated legs. It is advisable to use frosted glass. It usually has a special film that protects the tabletop from mechanical damage. In addition, on frosted glass, stains from carelessly spilled tea, coffee, other drinks and fingerprints will not be so noticeable.
The recommended tabletop width is up to 120 cm. There is no need to build a table with large parameters. It will be difficult to fit into the interior of a standard apartment or small private house. Choose any design shape. But if you are making a glass coffee table with your own hands for the first time, it is better to choose a rectangular configuration. We will purchase chrome legs from furniture store. And it’s easy to make components from wood yourself. Table drawing with standard sizes presented below.
.jpg)
Let's get to work. First, we cut out the glass according to the specified geometric parameters. This operation must be performed slowly. Place the glass on a flat surface. We outline the cutting lines with a simple pencil. Wet the glass cutter sunflower oil(or other lubricant). Apply a metal ruler to the marked line. Carefully (without strong pressure) we go through the markings with a glass cutter. Then we move the glass from the surface, ensuring that the excess pieces of material are suspended. We tap our fingers along the marking line and press lightly. After these steps, unnecessary parts of the glass are broken strictly along the lines made.
The cut material must be processed. First, we clean the edges of the glass with a file, then with a grinder equipped with a diamond tool. Additionally, it is recommended to sand potentially unsafe parts of the glass with sandpaper (fine grain). Then we take thin felt, mount it on the edges of the tabletop and press it against it. This way we will protect our furniture from scratches. Turn the table face down. We make marks for mounting the legs. It is advisable to install them at a distance of at least 50 mm from the edges of the tabletop.

We drill holes at the top of the bases of all legs. They will be needed to attach the suction cup. Everything is simple here. We treat the suction cups with adhesive, install them in the prepared holes, and press the elements as tightly as possible. After the glue has set, we turn the homemade structure over to its normal position and wait about two days. After 48 hours, the coffee table will be ready for use.
We will build a structure from wood - a win-win option
Wooden tea tables are suitable for any living space, no matter what type of decor is implemented in them. Wood products look great in classic interiors, and in the most modern ones. Making wooden furniture with your own hands is really simple. Moreover, we can build a table of any design - the simplest one, with many additional drawers, stands, shelves. At the right approach To get to the point, we will end up with a piece of furniture that is no different from expensive store-bought tables.
We will not offer a drawing of a wooden structure. Any craftsman is able to draw up a simple sketch of such a structure with the right sizes. But let’s say a few words about the materials and tools that will be needed to complete the work. Stocking up:
- blocks or scraps of wooden boards (from which we will make table legs and crossbars);
- two thick boards;
- varnish and stain;
- grinder, sandpaper;
- wood saw;
- glue;
- electric drill.
Let's start creating. We cut thick boards to the required sizes to make a tabletop. We connect them together with glue. We are waiting for the structure to stick together firmly. At this time, we make crossbars and legs from scraps of boards or bars. Give the tabletop the selected shape. It can be rectangular or square (it’s easier), but tables with various roundnesses and curves look better. Wood is easy to process. Using a hacksaw, we can easily create a tabletop of the configuration we need. After this, using grinder, we carefully process the finished elements. Additionally, we rub their surface with sandpaper.
We apply stain to the tabletop, legs, and crossbars. This composition gives the wood a noble appearance, providing the effect of antiquity. These elements are completely treated with stain. We need to apply it not only to the surfaces, but also to the end parts of the coffee table parts. Nuance. The ends of wood products can be covered with decorative materials, for example, butterflies, often used for these purposes.

Next, we attach the crossbars to the tabletop, assembled from two boards. The operation is performed using glue and round spikes inserted into pre-made holes. The latter are drilled in the right places with an electric drill. We fasten the legs in the same way: we make holes, lubricate the tenons with glue, and insert them into the grooves. The tea table is ready. Let's coat it with varnish to make the structure look perfect, and we'll enjoy the new piece of furniture in the house.
Books, waste paper and an old window - you can even make a table out of them!
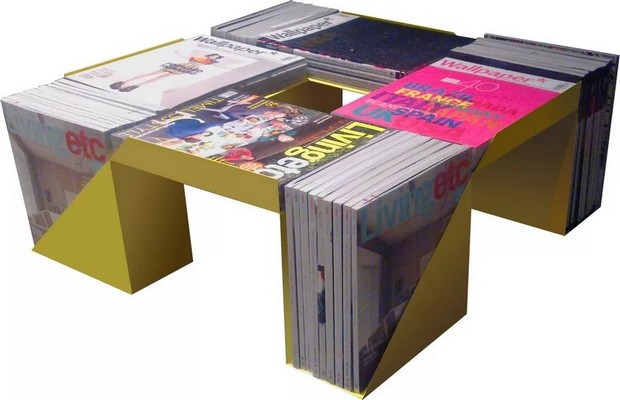
As we have already noted, it is possible to make an original coffee table from various available materials. If you have a lot of old magazines and newspapers, you don’t have to throw them away. Let's make them unusual table according to the following scheme:
- 1. Roll waste paper into tight tubes.
- 2. Secure the resulting blanks with rubber bands.
- 3. Immerse the prepared tubes in a bucket filled with a water-polymer based emulsion.
- 4. Wait for 5-7 minutes.
- 5. We take out the soaked paper blanks and hang them on a rope on wire hooks. Drying should be done in a dust-free room. Don't forget to put plastic film under the rope. Streams of water from waste paper will flow onto it.
- 6. From the dried tubes we form a cabinet for a coffee table - we simply glue them together (as tightly as possible) with PVA glue.
The created cabinet is usually secured with strong threads and left to dry. Then we cut off our homemade table at the top and bottom. We get a neat bedside table. We glue regular or mirror glass on top of it using silicone, which is used for repairing aquariums. Advice. The glass should have a thickness of 1.2–1.5 cm. Thin countertops will be unreliable in use. One careless movement and they will crack.
In cases where the old window structure in a home is replaced with a new one (for example, a plastic one), the dismantled product can also be used as a coffee table. A minimum of difficulties awaits us. We remove the hinges, handles, and other fittings from the window and wash the canvas well. If necessary, we tear off old layer paints, polish the surface and paint fresh composition. We have a finished tabletop in front of us. It can be installed on any legs. A great option is to make them from volumes that have been gathering dust on bookshelves in your home for decades.
We fasten the books to each other, forming them into legs of the required height.
We carry out the procedure using superglue. Another option is to drill neat holes in the books and thread a steel rod through them. Installing the updated window frame on homemade legs and rejoice in our ingenuity. These coffee tables are good for interiors in retro, vintage, and Provence styles. Instead of a window, by the way, it is allowed to use old doors, a mirror, or simply a large board that did not have a place in the household.
Furniture for tea parties made from pallets and boxes - simple and original
Wooden pallets are products used for transporting and storing a variety of goods and cargo. Pallets perform the same function. But they are considered more modern designs. Both the first and second are ready-made countertops. They make great low tables. Moreover, the entire process of making homemade furniture from such products requires a minimum of time and labor from the home craftsman.
We just need to thoroughly clean and wash the tray, treat it with a grinder and sandpaper, and paint it in the chosen color. It is not necessary to apply a single color paint. Color the table to your taste. Apply any ornaments and symbols to the pallet. And if you wish, you can not paint the workpiece at all, leaving the wood in its natural form. Small chips, scratches, cracks will highlight the natural texture of the structure.

We install the prepared tabletop on low wooden blocks or on wheels. Here you need to understand that the weight of the pallets is quite serious - up to 15–25 kg. Therefore, wheels and legs for a pallet table should be selected wisely. They must withstand a given load. However, a pallet of sufficient height may not be equipped with legs. The design will be comfortable and reliable without them.
If there are no pallets at hand, you can actually make a table from any empty wooden boxes. Containers for wine, vegetables, and fruits are suitable. From two drawers you can build a small coffee table, and from four drawers you can make a spacious structure for gatherings with friends. We assemble the boxes into square or rectangular furniture. We fasten them together with nails, and putty the places where the hardware is installed with a mixture of glue and sawdust. We decorate the structure and cover it with varnish. We get a chic table.
.jpg)
IN free space Between the boxes we place a vase or pot of flowers. You can also cover it with a suitable sheet product. Nuance. Design experts advise covering the tabletop with plastic if the interior of the home is made in the style of minimalism and modernism. For high-tech and art deco decors, it is better to use a sheet of polished steel. Country style interiors are perfectly complemented wooden coverings. And glass placed on a table made of drawers will harmoniously fit into any room decor.
Other ideas for assembling structures - a little more creativity
You can actually build a massive coffee table from an old cast-iron radiator. It is enough to tint it a little, install it on strong wheels, and cover it with glass on top (if possible, with rounded edges). The functionality of such a design is, of course, in question. She, however, weighs 60–80 kilograms. But she is not lacking in originality. Not a single guest of your home can ignore this unusual item interior
And car lovers have the opportunity to make a comfortable table from an old tire from their iron horse. Very often, tires are used for garden decoration. But even in the house they are proper preparation will look appropriate. To create a table from a tire in the now popular eco-style, you need to stock up on:

Table made from an old tire
- two circles cut from a plywood sheet (we take their cross-section slightly smaller than the diameter of the tire used);
- superglue;
- cord, braid or decorative rope;
- varnish;
- self-tapping screws, electric drill;
- wheels.
We attach plywood circles to the tire on both sides. Products can be attached to superglue or (which is more reliable) to self-tapping screws. If you want the homemade plywood lid to open, one of the circles should be installed on small hinges. Then you can store a variety of household items in the tire niche.
After that, we proceed to decorating the coffee table. We make a small circle out of a rope (bundle). Coat the middle of the plywood table top with glue. Carefully secure the rope element to it. In the same way, going from the center to the edges, we decorate the rest of the surface. Then we turn the tire over and continue braiding it on the sides. The bottom of the structure does not need to be decorated. We will attach the legs to the bottom sheet (as an option - wheels). The table is ready. All that remains is to cover it with varnish or a special wax composition.
Fantasize boldly! Original tables for tea parties can be made from other available materials. The more creative the craft looks, the more positive emotions you will experience looking at it. Decorate your home with something unusual homemade furniture, forming unique interiors. Good luck.