One of the best ways do house plot truly cozy - make a table for the garden with your own hands. There are several types of country tables, but the most popular are designs made from natural wood. They are distinguished by aesthetics, environmental friendliness and reliability. Products made from combined materials(wood and metal). Collect outdoor table you can do it yourself. To do this you will need boards, carpentry tools and drawings.
Choosing materials for an outdoor table
To make a garden table with your own hands, you need to select suitable materials. Special attention should be given to wood:
- Coniferous species (spruce, pine) are characterized by pliability and ease of processing, but are characterized by increased flammability.
- Hardwoods (aspen, birch, oak, larch, ash) are more difficult to process, but are quite strong, durable and attractive.
For a country table, it is recommended to take a board at least 3 cm thick, as it can withstand serious loads. The optimal length of the table is 150-200 cm, this must be taken into account when choosing boards or furniture panels for the table top. To make legs from timber, you must select boards with a cross-section of at least 5x5 cm. Optimal height table is 75 cm.
Convenient picnic table
You can make a table for your garden with your own hands using the simplest drawings. However, such a product will be bulky and it will be quite difficult to move it. But the folding structure can not only be easily moved from place to place, but also taken with you on a picnic. At the same time, even a novice craftsman can make an outdoor table of this type according to ready-made drawings.

This table is not only compact and attractive in appearance, but also durable (the product can withstand weight up to 100 kg). At the first stage of work, you need to cut out the structural elements in accordance with the drawing. The dimensions of the folding product can be changed, the main thing is to maintain the proportions.

The edges of the legs and footrests need to be rounded. If you are just learning the craft of a furniture maker, it is better to cut the corners of the elements at right angles, and then smooth them using a sanding machine. It's easier than rounding the edges with a jigsaw.
To connect the structural parts in accordance with the drawings, you need to use bolts of any diameter (preferably 6 mm), 35 mm long and with a thread for a screwdriver. If the bolts are longer than 35 mm, they will create obstacles in the operation of the future mechanism. When all the elements are prepared, you can pre-assemble the folding table. The legs should be connected to each other in the central part, and then screwed to the supports as shown in the drawing: the left leg to the front support, the right leg to the rear.

If everything is done correctly, you can attach the supports to the tabletop using self-tapping screws 50 mm long. But first you need to make markings on the tabletop and drill holes for the screws. Then you should check the functionality of the structure; it should fold and unfold without difficulty. Folded foldable country table ik looks like this:
If you are convinced that everything was done without errors, then the structure can be disassembled, signing each part so as not to get confused when reassembling. After this, all elements must be thoroughly sanded, coated twice with an antiseptic, and then varnished. This is necessary in order to protect the folding table from impact environment when used outdoors. When everything is done, the structure needs to be assembled. Now it is ready to use!
Porridge made from an ax... or rather, a table made from a stump
Another one great idea for the garden - this is a table made of a stump; you don’t even need a drawing to make it. But you will need to find a stump of the appropriate size. You can search for a stump on your own personal plot, with neighbors or in the nearest forest. To make a tabletop, you can take boards or furniture board thickness from 20 mm.

The stump for the future table should be dried, with intact, not rotten or damp wood. You can dry fresh stump on outdoors or in a warm, dry room. Drying time is at least 2 months. Determining whether a stump is dry is quite simple: if the bark is easily separated from the wood, then the stump is ready for use.
For assembly you will also need a building level, tape measure, wood varnish, sandpaper, sanding machine, chisel, hammer, nails, screwdriver, self-tapping screws.
Stages of work on assembling a table from a stump
First, the dried workpiece must be cleared of bark using a chisel or chisel. This must be done carefully so as not to damage the wood or cause cracks to appear. All soft and rotten areas are removed. Recesses and cracks in the barrel are cleaned of dirt using a chisel, and then processed from the inside with a double folded sandpaper(grainy layers out).

Then the stump needs to be leveled from the bottom side so that its bottom becomes even. Protruding parts are removed using a plane. This is necessary so that the table can be installed on a horizontal surface. By means of a plane, other defects of the hemp are also removed, in particular, large rhizomes.
After this, all cuts are carefully sanded. Handle grinder you also need the rest of the surface of the workpiece. Hard-to-reach areas are sanded using coarse sandpaper. When the treatment is completed, the stump is covered with an antiseptic and then with varnish. To make the table easily move from place to place, metal or wooden legs, wheels or rubberized stands.
Then you need to make a tabletop. To do this, the boards are fastened to each other using glue, screws or strips nailed to the bottom. If you want to make the tabletop round or oval, then you should apply the corresponding drawing to the fastened boards, and then cut out the product.

To attach the tabletop to the stump, you need to make a frame. To do this, two parallel strips are placed on the sides of the hemp, and two more rows of holders are placed on top. The result is 6 planks connected to each other with nails. The tabletop is attached to them with screws or nails.
Then the finished structure is processed again grinder and is covered with two layers of varnish. To prevent the varnish from peeling off, it is recommended to treat the intermediate layers with fine-grained sandpaper after complete drying. The table is ready!
If you have your own land plot, then it can be furnished with beautiful furniture so that it is convenient not only for gardening work, but also for relaxation with the whole family or a large company. High-quality garden accessories can be quite expensive. Thrifty owners would like to offer a scheme according to which it is quite possible to make a garden table with your own hands, in order to ultimately get strong and reliable furniture. Please read the information provided below carefully. She will help you understand how to make a table in your country house with your own hands.
1
2
3
To construct a country table with your own hands, you need to take a minimum amount of materials and tools; moreover, most of them are quite affordable and can be found in almost every home. So, what should you prepare in advance:
- material to be used as a base. Many modern craftsmen prefer wood. The main advantage of wooden benches is that they are completely safe from an environmental point of view. In addition, their appearance is very aesthetic. To make things easier for yourself, you can take new boards. When purchasing lumber, make sure that it is sufficiently dry; wet wood should not be used for work. You need to keep it for several months in a well-ventilated room, and only then start working. If you follow this advice, then a table made of timber with your own hands, made and installed, will serve for a long time. Of course, you can make a table from stone or metal, but this will require a lot of investment and effort, time and money. Stone, as the main material, is durable and reliable, however, it is much more difficult to process;
- fasteners (nails and screws);
- blueprints garden benches and a table for the dacha with the indicated proportions. Can be found ready-made options or create furniture diagrams yourself. Choose a project or make an original layout based on the options presented on our website. If you are planning to create a high-quality and aesthetically pleasing table in your country house with your own hands, then the drawings will definitely be useful to you;
1
2
3
4
5
6
- sandpaper. If you have a grinding machine, this will significantly speed up the work process and help make the garden table perfectly smooth;
- varnishes and antiseptics for wood processing. They are needed so that a table made of boards can be used for a long time. If you use the products presented according to the instructions, you will receive a wooden outdoor furniture piece that will not lose its functionality due to moisture or insects.
How to make a table for a garden?
1
2
3
4
If you are planning to design wooden table for a do-it-yourself dacha, then you can suggest the following scheme of actions:
- Cut boards 140 cm long, make a frame out of them, fastening individual elements self-tapping screws. Make sure that the boards are positioned at right angles to each other. In order to check the correctness, measure the diagonals: if there was no error, then they should be completely identical. The finished frame is needed to ensure the strength and reliability of the entire structure.
- If you are planning to create round table, then make the legs. To do this, cut 4 boards 80 cm long and sand them with a sander to give them an aesthetic appearance. Chamfer the ribs using a suitable tool. Attach the blanks to the frame from the inside. For each leg, select 4 fasteners to ensure the most secure connection.
- Attach the crossbars to the middle of the legs. They will act as a frame for a shelf, which can be used for its intended purpose for arranging some things or dishes. On the other hand, this detail will make the furniture more rigid. Fix the crossbars at an angle of 90º. To avoid making mistakes, check the accuracy with a square.
- Place the base on a flat surface and check how stable it is. If the structure does not wobble and you have no doubt about its reliability, bring the surfaces into proper condition by grinding. For this type of work, it is recommended to use sandpaper or a special machine. Using the device will help simplify the task and complete the task faster.
- Assemble the tabletop. To create it, it is recommended to use boards of various types of wood. If you are planning to construct a round table, then you will need to cut the tabletop to the appropriate dimensions from a solid piece of wood. This will allow you to create a table with your own hands that will look stylish and unconventional. Treat the material with stain in advance. Secure the boards with nails, and secure the shelf with self-tapping screws. Level the surface with a special machine and apply paint to it (alternatively, you can use clear varnish). You can significantly simplify your work if you purchase or order ready-made wooden stands. You won't have to waste any time or effort on processing it.
- Place the prepared tabletop on the frame and fasten the individual elements. Metal corner for these purposes will suit best way. At this point the assembly process can be considered complete.
- As soon as the country table has been built, cover its surface with several layers of a substance with antiseptic properties, and after it is completely absorbed into the surface, with two layers of varnish. Thanks to these simple manipulations, you can make your garden table more resistant to impact. external environment. As a result, you will receive economical garden accessories that will last for a long time. for long years without losing all its presentability. You can place them in the garden without worrying about the wooden table cracking after the first rainstorm.
If you have some material left, you can use it to construct wooden benches with your own hands.
When not in use, they can be placed under a table or under an awning to extend their service life. You can decorate finished furniture based on your wishes and skills. You can decorate a homemade garden table with carvings (photos on our website will help you catch inspiration).
How to make a table from logs?
1
2
3
If you wish, you can make a table for your garden with your own hands using another type of material - logs. It is also environmentally friendly and easy to process. Using it, an outdoor table for a summer house will be created according to the following scheme:
- Prepare the log house for further work: plan the surface of the logs with a plane, cut into separate parts, and sand with sandpaper to remove all burrs. Make the joints perfectly even, make holes, making sure that their diameter matches the diameter of the reinforcement. It is important that the individual holes are spaced 30 cm apart from each other.
- Assemble the elements that form the log table. When connecting parts “into a bowl,” cutting should begin by filing in the center. Make sure that the cutting is exactly at the specified depth. To perform this work, it is more convenient to use a chisel or an ax.
- There is another option for fastening parts: in the places where one part is connected to another, holes are made, and reinforcement is inserted into it. To make your own garden table more durable and reliable, use epoxy glue. All parts are folded according to the drawing. If the reinforcement is too long, it is shortened. The result is to create a split table from logs with your own hands, which is very convenient to use.
Specialists make high-quality objects from wood with their own hands, connecting individual parts with self-tapping screws. This option is also acceptable; if you are going to make a wooden table for your garden, take note of it. Benches can also be constructed from logs when you have lumber left over.
To top it off, I would like to note: in order for garden tables not to lose their attractiveness over the years, they need to be properly cared for, in particular, protected from precipitation and hidden under a canopy.
By the way, setting up the canopy itself is quite simple; just use the most primitive means at hand, for example, shower curtains. They need to be fastened together so that they form a dense canopy, under which precipitation does not penetrate. If it is not possible to arrange a shed, it is better to move the furniture into the house.
A garden table is an integral part of any country interior. On modern market This product is presented in a wide range - these are products made of metal, plastic, natural stone and, of course, classic version, wooden garden tables. In this article we will talk about positive qualities common options and we will give accessible instructions on assembling a table with your own hands.
Wood is always relevant
Majority garden furniture has always been made of wood. Almost anyone with at least a passing command of a hacksaw and a plane can make a garden table with their own hands. The whole process comes down to joining a small number of planed planks and giving the furniture a marketable appearance.
A few words about the choice of material
If you want your product to serve you faithfully for many years, then it is better to make a garden table from strong hardwood. Of course, the most the best option is oak, but the price here, even at cost, will be considerable. Therefore, as a rule, more affordable larch, aspen, birch, linden or acacia wood is used.

Advice: conifers they can be used for manufacturing, but they must first be well prepared and coated protective compounds. Otherwise, the abundance of resin may negatively affect the quality of the coating and your clothes.
For countertops, the quality and type of wood are especially important, so experts recommend not saving and buying a good tongue-and-groove board; the increase in costs will be minimal, but appearance you will be pleasantly pleased. It is advisable to assemble a wooden garden table from well-dried wood, so that the parts will not be damaged later.
In addition, the tabletop and some individual parts can be made of thick waterproof plywood or USB board. Chipboard (chipboard) is less suitable, since this material is afraid high humidity and it won’t last long in the garden.

Self-assembly
Assembly instructions can be very diverse, everyone chooses what he likes best.
The photos and videos in this article show several interesting and available technologies, we will tell you about the simplest, in our opinion, installation option.
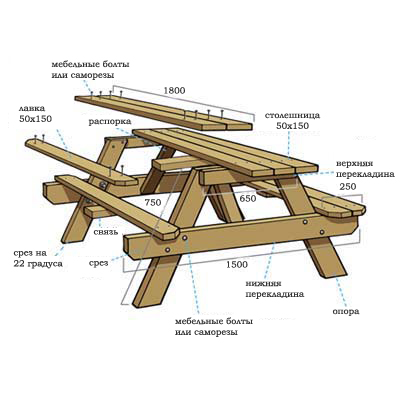
- As mentioned earlier, it is better to assemble the tabletop from a tongue-and-groove board, so it will be completely monolithic. The joints should be glued with regular furniture glue on wood. In this case, we will talk about a solid product designed for a family of 6 – 8 people.
- Comfortable design height for standard dining table is 700 – 750 mm. We will make the dimensions of the top plate 930x1450 mm. For a tabletop, a board thickness of 20 mm is sufficient, but a tabletop 40 mm thick will look more solid and solid.
- The boards are joined on a flat, horizontal surface and knocked down with nails or self-tapping screws, two or three perpendicularly located 50x50 mm bars. The bars are fixed at a distance of 300 mm from the edge.

Advice: since the wood is quite dense and thick, it is better to lubricate the screws with soap before screwing them in. Then they will fit into the array much easier.
- Next we move on to arranging the legs. Boards with a section of 50x150 mm and a length of 650 mm will be used as legs. They will be joined at the ends, so in order to reduce the length of the fixing bolts or self-tapping screws, 1 cut is made in the middle on each leg, about 70 mm deep and about 150 - 200 mm long.
- The legs are joined at the ends, and the selected grooves should be with outside on the same level. A stiffening rib is inserted between two pairs of legs, the function of which is performed by a 50x150 mm board, about 1 m long.
- From above, the legs are attached to the strips that secure the tabletop boards. In the lower part, to increase the support area, two boards of the same section 50x150 mm are tacked to the legs. The length is slightly less than the width of the tabletop.

Important: the entire structure, with the exception of the tabletop, can be made collapsible; for this, furniture bolts with a diameter of 6 mm are used. Or assemble everything with long self-tapping screws, but then the table will not be disassembled.
Do not forget that wooden garden tables will be used outdoors, so all wood must be coated with protective compounds. Often one layer of stain is used to highlight the beauty of the texture and two layers of waterproof varnish.
Important: all wood must be planed and cleaned with a sanding machine or sandpaper before assembly. Sharp corners should be chamfered so as not to drive a splinter in later.
Alternative designs
Easy coffee table it is quite possible to assemble from wooden pallets. For this you will need 2 pallets. The top row of boards should be torn off, the missing ones should be supplemented and knocked together end-to-end, more tightly.
This way you will have a monolithic countertop. To increase the height, 4 bars from the same pallets are inserted between the pallets. It is advisable to install furniture wheels from below.


Plastic garden tables are used everywhere, their price is quite affordable. They are durable, have a neat appearance and, as a rule, are quickly disassembled. But plastic rarely fits in natural interior country cottage. Artificial materials, for the most part, have already become boring in the city, and besides, such products cannot boast of durability.

Forged garden tables are a completely different matter; they are often true masterpieces of furniture art. Of course, making such beauty with your own hands is only possible to a narrow circle real specialists, which is why the price of such products, frankly speaking, bites.
Making stone garden tables with your own hands is quite problematic. Alternatively, you can stack the brick cabinets and install a pre-purchased countertop on top. You can also use a large piece of slate as a countertop, but such installation will require considerable physical effort.

Option for making a table.
Conclusion

Often it is not so important whether you have a wooden stone or metal garden table installed. Any design can be successfully fit into landscape design dachas, the main thing is to do it with love, because you are doing it for yourself.


How Nice on a fine summer day to sit with family and friends in the garden, drink tea and just talk about this and that, enjoying the voices of birds, the smells of herbs and clean air.
And to make the gatherings as possible as possible comfortable both for the owners and for guests, in the garden you need a reliable and convenient table.
What types of country tables are there and what is possible? use as material for them manufacturing, manufacturing Let's look at it in this article.
In contact with
Classmates
Types of garden tables
Options gardening there are a lot of tables. This could be a small table for picnic and a large outdoor dining table, table- grill(aka fire table) and gazebo table.

An excellent solution for a summer cottage - table-bench. It can be a stationary table combined with benches in single design, so transformer. In the latter case, seemingly ordinary bench with back if necessary, it can be converted into a table and one or two benches.
![]()
Another transformer option is a bench with a folding table for two

What can you make a garden table from?

- Tree
Country tables are mainly made from solid array,, MDF or plywood. Very impressive look like countertops made from cuts tree.
Tree - aesthetic, a strong, pliable material, but less durable than metal, glass and plastic. - Metal
Less popular, but no less beautiful are products from metal The disadvantage of the material is that options The decor of the tabletop is much less than that of wood or plastic. - Glass
Tempered glass looks beautiful, enough durable. Still, glass products are not popular as outdoor furniture. In addition, if you make it yourself, problems may arise with cutting material and subsequent fastening glass parts of the table. Also much fewer options glass table decor. - Plastic
In order for the plastic table to hold shape, metal must be used frame. - Scrap materials and unnecessary items
It's easy to build a table from a stump, old boards, pallets, logs and remaining unnecessary things. If you have the desire and perseverance, then the table can be woven even from newspaper tubes.

Table-bench

Materials and tools
To create a country table with benches you will need the following materials:
Also needed tools:
- pencil, ruler, marker;
- hacksaw or electric saw;
- chisel;
- sanding machine or medium grit;
- brushes for impregnation and varnish;
- manual milling cutter(can be used for additional edge processing).
Manufacturing stages

Step 2. Sand them by hand or grinding machine.
Step 3. All the top boards that hold together benches(4 pcs. each) and table (4 pcs.), we file at an angle of 45 degrees in the shape of a trapezoid. To do this you need to draw rectangle, fold two boards crosswise (from corner to corner), and saw them along bottom the long side of the rectangle. There is no need to file the top parts!
Next you need turn over boards with unsawed sides and do the same so that they take shape trapezoids. There should be a total of 4 trapezoidal boards for table(2 pcs. on one side and 2 pcs. on the other) and 4 pcs. for each benches(2 pieces on each side of the bench).
Step 4. We stack 7 long boards in a row with gap 3-4 mm and fasten them with beams (2 pieces on both sides) using self-tapping screws(80 mm).
Step 5. Place in rows of three boards the same length as the table and fasten them with smaller ones beams. The gap between the boards is 5-10 mm. Self-tapping screws 80 mm.
Step 6. We drive two bench legs on each side between the fastening trapezoidal boards. We fasten self-tapping screws 100 mm.

Step 7 Between the legs we fix board perpendicular to the bench seat. And long boards we fasten between both benches (2 boards on each side of the bench). It turns out rectangular dinner Zone with benches on the sides.

Step 8 The legs of our table will be crossed. To do this, mark the sampling location, saw off with a hacksaw and knock out half of the board with a chisel so that the second leg fits perfectly into the first. We make both in this way supports and fasten them with tabletop(between trapezoidal boards).

Step 9 Finished table supports insert between long boards (inside the dining area).
Step 10 All joints we strengthen furniture bolts and tighten.
Step 12 8-12 hours after application last impregnation layer can be applied transparent varnish We took the colorless protective covering in order to emphasize natural the beauty of the tree and focus on naturalness products.

Possible after impregnation paint table with regular waterproof paint or decorate other methods (carving, mosaic, painting contrasting paint through a stencil, etc.). After decoration, it is necessary to apply 1-2 layers of transparent varnish
Note! Instead of ordinary boards on the bench and tabletop, there are more aesthetic option there will be an edging made of boards, the edges of which are sawn strictly at 45 degrees.
You can build the same table, but a little lengthen it, placing another one in the middle support and fastenings on legs supports and benches. They make a table-bench with another option supports (A-shaped).
You can put it or do it right away with canopy:

Stump table

There must be a stump dried, no cracks, severe chips, rot or dampness wood(especially the middle). Term drying freshly sawn or a freshly uprooted stump - no less 70 days.
When bark the stump will become with ease move away from the inner surface, proceed to processing.
Note! Wood materials, used for the manufacture of tabletops, must be at least 20 mm thick.
Another option for a stump table is a stable, medium-sized stump with roots, on which the table top is attached various materials. In this case bark It is not necessary to remove it from the stump.

Materials and tools

- table top;
- level, pencil, ruler or tape measure;
- impregnation and transparent varnish;
- sandpaper medium grain;
- sander or hand sander plane;
- hacksaw(saw);
- chisel(chisel);
- screwdriver;
- hammer;
- screws, nails, screws.
Manufacturing stages
Step 1. We release the dried stump from bark using a chisel (chisel). If soft, damaged, rotten or damp places are found in the stump, they must also be carefully delete.
Step 2. With the help of construction level we trim the bottom and top of our hemp so that the tabletop is positioned clearly horizontally. Irregularities are removed using plane, hacksaws or saws. All new cuts polishing sandpaper and sanding machine. Necessary thoroughly work out all parts of the stump, all folds and bulges.
Note! By hard to reach places It is recommended to go first with medium-grain sandpaper and then with fine-grained paper.
Step 3. We make a tabletop. The most simple option will cut her from laminated chipboard or MDF. Simple rectangular or a square shape and a matching shade of varnish for processing hemp will make the table more attractive. You can also make a tabletop from edged boards fastened together. The most common form of such countertops is round.

Very cute option may be small slice thick tree trunk, glass tabletop or tabletop of some kind quirky forms.

Step 4. The table top can be attach thick long nails or using additional fasteners on it inside. To do this, boards are nailed (sideways) or bars on both sides, on the other two sides boards are attached a little longer.
Step 5. On the inside of the tabletop there are two small boards opposite each other so that they fall between fastenings on a stump.
Step 6. The table is treated with a special impregnation for 3-5 layers (each layer is well dried). After complete drying it processed transparent or translucent varnish.

Self-production gardening tables significantly saves money and time searching for the table you need.
Would you like to suggest photos on the topic for publication?
Please help us make the site better! Leave a message and your contacts in the comments - we will contact you and together we will make the publication better!
For those who live in big cities, country cottage area- This is a kind of paradise. Fragrant herbs, fresh air, the smell of a fire and definitely great house, which feels comfortable and homely. Special comfort country house and the outdoor area is furnished with custom-made furniture that can enliven the space. In this article we will tell you how to make a table for your garden with your own hands.
Agree, it’s still easier than making a sofa or wardrobe. To implement your plans, you do not need to specifically study or invite specialists. To work, you will need inspiration and prepare the necessary materials.
Preliminary stage
Appearance is important finished product. When you make a table for your dacha with your own hands, do not neglect this.
It will be nice to see the admiration and surprise of your guests, to whom you will tell that you made it yourself.

- Its main basis is wooden table top. As a rule, ready-made boards or wide boards are used for this.
- An important factor is also the selected type of wood from which you decide to make the table:
| Conifers |
|
| Deciduous |
|
- In addition to the tabletop, the table must have legs. You can make them from wooden shield or buy ready-made ones.
Tip: if you don't find them in the store, look on the shelves where they are sold auxiliary materials for the manufacture of stairs - 4 pieces of balusters made of metal or wood can be quite useful to you.
Factory-made blanks will add some gloss and chic to your table.

Preparation
First you need to determine where you will install the furniture and whether you plan to remove it from the house. Eg, a good decision For country house there will be a narrow and long table that will ensure freedom of movement for people around the room.

Materials and tools
- The boards are tongue and groove. They will create a tight connection and protect the table from liquid getting into the cracks. You can also use a pair of ready-made wooden panels measuring 2000x300 mm.
Tip: to ensure the table’s resistance to loads, select the thickness of the boards to be approximately 30 mm.
When choosing a material, make sure that the panels or boards are even, they must fit each other absolutely exactly, this will save time on separate measurements and cutting.
- Rails for fastening - 3 pieces. They are needed for the stability of the structure. The most suitable size is 2000x100 mm with a thickness of 28 mm.
- Table legs (finished) or balusters, their price depends on the quality of the material.
- Hacksaw.
- Self-tapping screws.
- Electric drill. Please note that this tool must be available. You will definitely need it, so if you don’t have your own, then rent it or ask for temporary use.
Advice: if there are power outages in your area, renting a diesel generator for your dacha will help solve the problem.
- Polyurethane varnish. You can choose either glossy or matte. The second one shows the structure of the tree well. You can use it instead natural oils, which will protect the wood from external factors.

In the photo - a country diesel generator
- Good quality brushes.
- Grinding machine. Its absence will make work much more difficult.
- Sandpaper with fine and coarse fractions. This will make it possible to provide the table with the desired smoothness.
Process
Below are step-by-step instructions:
- Connect the boards or boards and lay them outer side down. At this stage, it is necessary to monitor the joining so that the country table is level.
- Secure boards or boards. Place the slats along the long sides. This will strengthen them and fix them along short boards. To ensure the stability of the table, additionally secure the boards (or panels) using slats in the center in one or two places.
- Be careful when securing slats. Screw in the screws slowly, without changing the degree of pressure, angle or intensity. Otherwise, the shield or rail will crack, which will affect the quality of the product.
- Secure the table legs at a distance of 50-70 mm from the edge. Using an additional rail, strengthen the attachment point so that the support does not deform after a while. This will allow the table to look perfect for a long time. Secure the legs also slowly.
- Turn the table over and remove debris and sawdust, sand all rough edges using sandpaper and a sanding machine.. Dry the table thoroughly with a dry cloth.
Decoration
Building a country table yourself is not all.
Now you need to start finishing, and, if you want, decorating.
- Cover the entire surface of the table polyurethane varnish. (See also article.)
- Then you need to let it dry for 24 hours.
- Carefully examine the surface of the table, sand it again with sandpaper and varnish it a second time.
- If you wish, then you can paint the table, for example, with acrylic paint.
- Once the surface is completely dry, the product can be used for its intended purpose.
Conclusion
This article described in detail one of the methods self-made country table made of wood. Although at first glance the work seems difficult, in fact the process is quite exciting, which will make it possible to make good, high-quality furniture for little money. The video in this article will help you find additional information on this topic.

OLYMPUS DIGITAL CAMERA 
