Many garage owners try to equip them with maximum functionality. This is not just a place where a car is stored, they make cellars, store things, and some even furnish a living space. And for car enthusiasts who prefer to service their car themselves, an inspection hole is needed in the garage. It is exactly how to do it correctly that will be discussed in the article.
- Before asking yourself how to make a viewing hole in the garage, you should think about whether this should be done at all? And if 20 years ago this question did not even arise (the pit was considered a definite advantage), then with the development of the service station network, a category of car owners appeared who claim that they do not see the point in having an inspection pit. Why waste effort and time on independent vehicle inspection and repair, if this can be done in a specialized service, quickly and efficiently?
- The second argument against the pit is wet fumes, which will rise from it one way or another, forming condensation on the surface of the car and thereby exposing its underbody to corrosion.
- Naturally, many will agree with such statements, especially since there is, of course, some truth in them. But a sufficient number of well-founded facts can also be cited in refutation.

Advantages of an inspection pit in the garage
- First, about the economic side of the issue. Of course, it’s great when you can take your car to verified, professional hands and get back in a short time, completely ready for further use. And it’s even better when the bill for such fast and high-quality service won’t break your pocket.
- But unfortunately, in such difficult times as now, it is quite frivolous to expect that money will be found to repair the car in any case. Therefore, it is recommended to acquire an inspection hole, if possible. This is a kind of guarantee that, if necessary, you can carry out a basic technical inspection of your car yourself, and in fairly comfortable conditions.
- To be fair, it is worth noting that not everyone who has an expensive car and the means to maintain it is disdainful of looking under the body themselves. For many car owners, this is even a pleasure and a kind of hobby.
- Regarding wet vapors, this conclusion can rather be attributed to exaggeration. Although, of course, this problem exists, especially in heated garages. But a tightly fitting lid over the pit will solve this problem almost 100%. In addition, the car will obviously not stand in one place in the garage for several years (in this case, of course, corrosion cannot be avoided), and wet weather On the street, it spoils the bottom no worse than dampness indoors.
- Certainly, perfect option- when the garage area allows the car to periodically stand in a different place.
When installing a viewing hole in a garage is impossible
Of course, not every garage can be equipped with an inspection hole. And this possibility depends, first of all, on the level of groundwater. If it is higher than 2 meters, then the pit will be impractical, as it will fill with water. Even with fairly critical indicators, this problem can be resolved by making the correct garage drainage system and good waterproofing the pit itself.

- Drainage is a very delicate issue, so only knowledgeable people should deal with it at the garage construction stage. If you try to recreate this system in an existing building, it will result in a very troublesome, expensive and, most importantly, not always effective process.
- So, if the groundwater level is already below existing garage suggests that it is better to abandon the construction of a viewing hole, then this hint is worth listening to. As a last resort, you can try to equip a “lying” pit as a small alternative to a full-fledged one.
- You can check the level of groundwater by inviting the appropriate specialists. If you do not want to spend money on their services, then you can carry out the check yourself, although it will take much more time. Everything is very simple: having dug a pit for a hole, you should not immediately concrete it, but wait until the flood season or just heavy rain to evaluate its consequences.
Inspection pit dimensions
In fact, such a seemingly simple device as a viewing hole has quite a lot of options in addition to the standard one. For example:
- combined with a basement (cellar);
- narrow, when an ordinary ladder is often used for its operation;
- already mentioned above, recumbent.

And each of these pits has many subspecies. The dimensions of a full inspection pit in a garage can also vary. It all depends on the person with what parameters will use it and the dimensions of which car will be placed above it. If there can be many users and cars, then it is worth proceeding from the following calculations:
- width at least 80 cm, optimally 1 meter;
- depth 1.80 - 2 meters. This is the most difficult indicator, depending on a person’s height. Most best option when the depth of the hole exceeds the height by 10-15 cm;
- length is usually 2 meters.
When starting work on pit planning, one must take into account that these indicators are only a guideline for the pit. In practice, you need to dig it out making allowances of 40-50 cm for length and width, and 20-25 cm for depth. If the plans include insulating the walls, then the dimensions of the pit will also have to be increased by the width of the insulation (usually 50 mm).
How to make a viewing hole in the garage
Arrangement of the floor in the inspection pit
- After the pit has been dug with the necessary parameters, it is necessary to work on the floor of the future pit. A competent and thorough approach to this construction stage guarantee that problems with dampness can be avoided. In particular, from the very beginning it is worth remembering that the inspection pit really needs ventilation. To do this, you need to leave a hole in the floor through which a special flexible hose - an air duct - is brought underground and then onto its surface (20 cm). You definitely need to put a lid on it.
- First, prepare a “cushion” for concrete. It consists of two layers consisting of 10 cm of gravel and 5 cm of sand, each of which must be carefully leveled and compacted.
- Then the surface is lubricated with clay and a layer of waterproofing is placed (which material to choose will be discussed later).
- The next stage is laying reinforcement and concreting itself.
- After the concrete has dried, it is necessary to lay another layer of waterproofing and only after that proceed to finishing, or prepare the base for the insulation.
- But some people prefer to take the easier route and lay the floor in the inspection pit out of brick. But this is only rational if groundwater are located very deep, since it will not be possible to make high-quality waterproofing.

Materials for waterproofing inspection pit
There are a lot of waterproofing materials on the market now, each of them has certain qualities to varying degrees. But which one to choose for the inspection hole? On the one hand, the material must effectively cope with its functions, because, as already mentioned, the pit bears a very heavy load in terms of excess moisture; on the other hand, it must be in an affordable price segment.
Guided by these considerations, from the variety of materials we can highlight the following:
- polymer membranes, single-layer (from 1.5 to 2.00 mm) and double-layer (maximum 3.10 mm). Very durable and resistant material. But at the same time it is the most expensive. Or rather, it is not the membrane itself that is expensive, but the work of installing it, which requires certain skills and tools;

- bitumen, more precisely bituminous materials (roofing felt, for example) and bitumen lubricant. In contrast to polymers, these materials are the most inexpensive and easiest to install, but their maximum service life does not exceed 20 years. It is quite possible to waterproof them yourself. The material is sold in rolls and can be cut to fit right size and glue with an overlap of 15 cm. The joints are glued either by heating or using a bitumen solvent;
- waterproofing lubricant. Can be alternative options two of the above methods. This is a modern, relatively inexpensive, and, most importantly, easy-to-apply material. The main thing is to apply the lubricant to a damp surface, then it will completely saturate the concrete and will perfectly protect against excess moisture.
How to insulate a viewing hole
- Insulation of the inspection pit is done quite rarely. And, it should be noted, in vain. If you have time and financial opportunity, this procedure is worth carrying out, especially if the entire garage is heated. This will help minimize heating costs, which increase due to sudden temperature changes.
- The insulation is glued directly to concrete or brick, then the walls and floor can be finished.
- And, if you can doubt the choice of one material or another for waterproofing, then all professional builders will name one optimal option as insulation - expanded polystyrene. You just need to take into account its markings, put PSB-S-35 on the floor, and PSB-S-25 on the walls.
Construction of the walls of the inspection pit
There are two popular solutions here - concreting and brickwork. If desired, both options can be subjected to decorative finishing, plaster, tile or fiberglass.

Preparatory work for concrete and brick is required and looks the same. The walls should be covered with a layer of clay, a thick film should be laid on it, then formwork 10-15 cm thick should be installed.
At this stage, it is necessary to provide two important points:
- a safety rail, the function of which is to prevent a car wheel from falling into a hole. It will also prevent moisture from getting from the wheels into the pit. It is a “T” shaped metal strip that is attached to the formwork flush with the floor and acts as a support for the pit lid;
- ledges and niches in the wall that will serve as shelves for tools and other necessary things. How convenient this is will be appreciated during the first use of the pit for its intended purpose.
Lighting in the inspection pit
Even those who are unanimous that an inspection hole in a garage is a very necessary thing, find reasons for controversy, the most striking of which is the issue of lighting. Is it needed in the inspection hole?
- Many people argue that it is quite possible to get by with carrying it or using a lamp with a powerful battery. But, based on considerations about the level of comfort, when arranging a pit, it’s still worth thinking about its internal lighting.
- True, here it is necessary to take into account the SNiP standards, which state that the voltage in the socket inside the inspection hole should not exceed 36 V. There are also special lamps for this voltage. But standard 220 V is strictly contraindicated, because may pose a threat to life.
Inspection hole cover
The final, but also very important stage. As a rule, wood with a thickness of 50 mm is used for the lid, although 35 mm may well be enough, because The boards will still not experience heavy loads, but lifting them will be a little easier.

Pit covers, in addition to standard hinged ones, can be of several types, which depend on how the surface of the pit is edged:
- if it is a metal corner, then the lid can be made of several (3-4) shields, in the lower part of which small rollers are attached to strips of metal. They help the shields move. Each shield, in turn, consists of wooden planks, 30-35 mm wide;
- if two corners are attached along the contour of the pit, welded together, then the lid can be made of two large shields located at different levels. Rollers need to be installed on the movable shield, and limiters along the edge of the slats. This allows you to easily open only half of the pit by sliding one shield;
- The lid, which opens according to the roller shutter principle, is made as follows. Take boards with a thickness of 35-40 mm and a length corresponding to the width of the pit. On each board, grooves are made at both ends into which a metal cable is threaded. Springs are mounted between the bar and the cable, this will contribute to the mobility of the structure. The cable is fixed to the last board, and a handle is placed on the opposite, at the other end. Just pull it a little and you can open the hole to any size. This cover is very convenient, but requires treatment with waterproofing impregnation, otherwise it will not last long.
A little more in favor of the inspection pit
- From all of the above, it becomes clear that creating an inspection hole with your own hands is an additional cost, both in ready garage, and during its construction.
- But, when calculating losses, it is worth considering that such an option as an inspection hole significantly increases the cost of the building as a whole, in case it needs to be sold. Moreover, in engineering documentation the pit need not be mentioned.
Inspection hole video
- The benefits of doing your own car repairs were discussed above, but you can go further by organizing a small service station in the garage. Some, extending the pit into the basement, install a full-fledged workshop in the latter, which, in addition financial profit, significantly saves space in the garage. The entrance to such a basement can be made either from the inspection hole or from the side, then the car parked in the garage will not be an obstacle to any movement.
Reading time ≈ 4 minutes
The presence of an inspection hole in the garage makes it possible to carry out self-repair own car. It can be done with minimal knowledge in the field of construction and the availability detailed instructions. Using step-by-step master class, it will not be difficult to carefully and efficiently carry out the preparation and self-construction pits, regardless of the size and layout of the garage.
Determining the optimal size and shape of the inspection hole
The finished inspection pit should be both safe and convenient to use. Therefore, before starting work, it is recommended to study geological survey data on the condition of the soil and the location of groundwater under the garage. This will allow you to determine the optimal depth of the hole. If the groundwater is quite deep, then the recommended height from the floor to the “ceiling” may be about 2 m or less (owner’s height + 20-30 cm). The dimensions can be found in the drawing.

An inspection hole is made in the garage with your own hands after drawing up a project plan for the facility. Its width is determined according to the wheelbase of the car: it should be smaller, ensuring the possibility of safe entry of the car. The length should be at least 1 meter longer than the length of the car: this will allow you to work comfortably in the pit.

The installation of an inspection pit allows the presence of small niches. They can be used to store parts, convenient location tools. They should not be made too deep. It is recommended to determine the dimensions of the niches according to the available quantity of auto tools and spare parts.
Laying out walls and niches in the inspection pit
After digging a pit with predetermined dimensions, you should begin strengthening the walls, protecting them and then laying bricks. The use of brick is optimal due to the ease of working with it and ease of purchase. You can find out how to build a viewing hole in a garage from the most affordable building materials in the following instructions:
1. First, you need to make the floor of the inspection hole in the garage: level the bottom of the pit, lay down roofing material (with an overlap of about 0.5 m on the walls for each of them). Concreting is carried out with the M-200 brand, the thickness of the floor should be about 10 cm. The size of the length and width of the floor should include the sum of the thickness of the two walls, the length/width of the pit itself and an increase of 10 cm. After pouring, leave the concrete to harden for 4 days.

2. The construction of the walls begins with the laying of 4 rows and subsequent waterproofing of the inspection pit from the outside using bitumen mastic. This will prevent the destruction of the walls due to exposure to moisture from the earth cover adjacent to the brick. After laying out the walls, you need to fill in the remaining gap from the ground to the brick.

3. The final stage of work will be the installation of a metal frame around the entrance to the pit. It should protrude slightly above the floor level of the garage box.

The frames of the niches should also be made of metal corners. This will prevent the bricks from subsiding or breaking.
Features of the ventilation device and the choice of stairs
High-quality ventilation in the inspection pit of the garage will prevent the appearance of mold and the gradual destruction of the walls. It can be made exclusively exhaust or supply and exhaust. In the first case, when laying out the last rows of bricks, it is necessary to install a pipe that will allow air to be removed from the pit through the garage box upwards (it will approach ventilation pipe garage or go directly outside). In the second case it is set additional pipe, which is diverted outwards. Its end should be located at a distance of 15 cm from the floor.

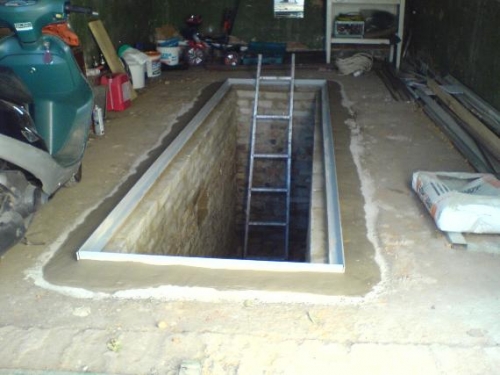
Make comfortable staircase for the inspection hole it can be made of wood or metal corners. For a small block, a repositionable ladder will be much more convenient. In the attached photos you can also see examples of pits in which the steps were laid out of brick or concreted.
Lighting supply
In the process of laying niches, you need to connect a 36V wire in an insulating rubber hose. This will allow you to connect the light in the pit and conveniently illuminate the car during repairs. When performing these stages of work, it is advisable to invite a qualified electrician who will help to correctly determine the optimal location of the wire and ensure its protection, and will ensure its correct connection to the power supply. When doing the work yourself, you should study the auxiliary video lessons on creating the correct lighting in the inspection pit.
Video of building a viewing hole in a garage with your own hands
Your own garage with an inspection hole is the dream of any car owner. So why not bring it to life with your own hands? After all, a garage pit will provide access to important components of the car, which will allow for technical inspection and renovation work without contacting car service specialists.
Why is an inspection hole needed and what should it be like?
The garage pit is the main assistant of the car enthusiast. It allows you to perform diagnostics, maintenance and minor or even major repairs of the car yourself.
It is worth remembering that the inspection hole is an increased source of humidity. This means that the most important task during its construction is waterproofing.
A damp inspection hole will quickly reduce the microclimate in the garage, which will certainly lead to the appearance of rust and mold.
Dampness coming from the inspection hole sharply reduces comfort when staying in the garage, especially in the cold season. And this is already dangerous to health, so the pit must be kept perfectly dry: oil drips or puddles of water are not allowed.
Before carrying out any capital measures in the garage, you must:
- study the soil characteristics under the garage structure and establish the depth of groundwater;
- assess the condition of the foundation.
Based on reliable geodetic data, as well as the requirements of building codes, it will be possible to make a technically competent and economically sound decision.
Attention: when planning an inspection pit, be sure to provide material for closing during downtime. This will prevent the underbody and lower part of the car from being exposed to excessive moisture.
Dimensions
It is reasonable to place the inspection hole not in the middle, but closer to one of the side walls and in the depths of the garage. Of course, it’s not worth reducing the already small area of a cramped or narrow room. But building a viewing hole less than 2 m long is unlikely to be advisable.
The optimal depth is assumed to be equal to the average human height (170–180 cm) in total with a small margin of 15–20 cm to increase the viewing angle of the bottom of the car.
The main requirements for entering the inspection pit are safety and ergonomics. If the garage is short but wide enough, the entrance to the inspection pit can be made from the side.
The width of the garage pit directly depends on the size of the room and, of course, the dimensions of the car. In private car garages, this value is taken to be 70–80 cm for passenger cars and 110–120 cm for trucks and minibuses.
Attention: it is better to take the depth of the inspection hole with some margin. At the bottom of the structure, you can always arrange an elevation, which will ensure the convenience of performing individual technical operations, while the passage under the machine placed on the pit will not be constrained by anything. In addition, it is worthwhile to provide special niches and recesses on the walls of the pit in which tools or car parts can be stored.
Features of waterproofing and thermal insulation of a garage pit
It is necessary to select materials for waterproofing and insulating the inspection pit at the planning stage. This will allow you to correctly calculate the parameters of the structure and make a decision on its interior decoration.
Waterproofing materials
The following can be used as waterproofing for a garage inspection pit:
- bituminous materials (roofing felt and its varieties, bitumen resin; service life 10–15 years);
- polymer geotextiles (single- and multi-layer polymer membranes on a self-adhesive basis; service life is at least 50 years);
- penetrating compounds (dry mineral or mineral-organic mixtures diluted with water immediately before use; service life is equal to the service life of the surfaces being treated);
- fatty clay in combination with petroleum products (in combination with modern materials fatty clay will increase the operational period of the main waterproofing);
- liquid rubber (emulsion containing latex, polymers and stabilizing substances; service life is about 25 years);
Waterproofing a garage pit must be carried out in conjunction with thermal insulation measures. The latter make it possible to reduce heat leakage through the floor and walls of the structure, as well as to minimize the amount of condensation formed due to temperature changes.
Thermal insulation measures
Extruded foam and expanded clay are excellent for thermal insulation of the inspection pit. The first one is laid on the waterproofing of the walls of the structure and covered vapor barrier film, after which it is filled concrete screed.
Expanded clay is used to fill the sand and gravel cushion at the bottom of the pit. A vapor barrier is installed on the compacted pad, after which the floor is poured or laid.
Attention: if the groundwater level is less than 2.5 m, it is necessary to organize a drainage system with drainage outside the garage premises.
Lighting and ventilation of the inspection pit
The presence of a lighting system in the inspection pit is a prerequisite for comfortable and safe work. Lighting equipment should have low power and need reliable protection from moisture and mechanical damage.
In the garage pit you can install:
- lamps with voltage up to 36 V (fluorescent lamps);
- low-voltage lamps with a voltage of 12 V (LED lamps);
- lamps with a voltage of 220 V in a waterproof design (not lower than IP54);
- battery-powered lamps with a sealed housing.
One of the most popular solutions is 36 V fluorescent lamps in a protected waterproof housing. They consume a small amount of electricity, which is beneficial for long periods of illumination. The same can be said about LEDs, the use of which provides a high level of electrical safety.
When lighting an inspection pit with equipment operating under a voltage of 220 V, it is necessary to install hidden electrical wiring with mandatory waterproofing, and cover the lamps with shades with grilles; ground all metal elements of the system from a single circuit led outside the garage.
Battery-powered lamps are rarely used to illuminate inspection pits due to their high cost, as well as the difficulty of repairing or replacing damaged elements. However, if it is impossible to install stationary lighting, such equipment is the most suitable solution.
Attention: sockets and switches must not be installed in the inspection hole. For the convenience of performing certain types of work, it is recommended to equip the garage pit with a portable lamp with a special housing (with a handle for carrying, a stand for permanent installation and a hook or clamp for hanging) on a protected electrical cord length of at least 4 m.
As for garage pit ventilation, in most cases it is left natural.
It is advisable to organize forced air exchange in tight spaces where exhaust gases quickly accumulate, as well as in garages located in areas with high level groundwater.
Ventilation in the garage is arranged in the following way:
- An exhaust vent with protection from wind blowing and rainwater ingress is installed under the garage ceiling on the leeward side.
- The inlet opening is made at a distance of no more than 50 cm from the floor, preferably closer to the inspection hole, on the windward side.
- The exhaust and supply ventilation openings are covered with a metal or plastic grille.
Attention: to increase the intensity of air exchange, the exhaust vent of the garage ventilation can be equipped with a small or medium power fan powered by a distribution panel or battery.
We build an inspection hole in the garage with our own hands (with drawings)
The garage pit must be located in such a way that it is possible to place the car on it at a certain angle. This will make it easier to access certain components of the machine, as well as simplify the performance of many technical operations. The length of the structure depends on the length of the machine (taking into account a margin of 1 m).
Project
Nothing more than a preliminary calculation of its parameters will help you approach the matter thoroughly when building a garage pit. And it is carried out based on the size of the machine, but with some reserve in case the latter is changed in the future. For example, if the length of the Opel Kadett is almost 4 m, then the Scoda Octavia is 4.6 m.
Let’s take the average value of 4.5 m and find that, taking into account a reserve of 1 m, the length of the inspection hole will be 5.5 m.
The depth of the structure should be taken in accordance with the height of the garage owner. With an average of 175–185 cm, the normal working depth of the inspection hole will be at least 195 cm, and the width sufficient for free movement and technical operations will be at least 0.8 m. For good measure, let’s take the last value equal to 1 m and get the basic inspection hole parameters:
- length 5.5 m;
- width 1 m;
- height 1.95 m.
You can transfer the obtained dimensions onto paper using an axonometric projection or a flat image.
In the second case, two drawings will be needed - for projections of the structure onto the vertical and horizontal planes.
When creating a drawing of an inspection pit, it is necessary to take into account the thickness of the hydro-, thermal and vapor barrier, as well as the concrete screed. This will allow you to more accurately determine the volume earthworks.
Attention: if the garage is used only for storing a car, it is more convenient to place the inspection hole in the center of the room. If the room is also used as a mini-workshop or storage room, it is better to move the central axis of the structure closer to one of the walls. When the car is parked in a pit, such a garage will have enough space to walk through and work at the workbench.
Preparing tools and collecting materials
Having approved the construction project, you can begin purchasing materials. In order not to waste time, it is worth preparing in parallel the tools that will be needed during the work process. It wouldn’t hurt to include in your list of essentials:
- construction tape, marker, knife;
- pickaxe, crowbar, shovel and bayonet shovel;
- building level;
- concrete mixer;
- welding machine;
- powerful hammer drill or chipper;
- concrete cutter;
- hammer, pliers and a set of screwdrivers;
- circular saw with metal cutting wheels;
- construction trowel;
- electric drill with a mixer for mixing the solution;
- buckets and water containers, building mixtures and solution.
- container for heating bitumen;
- burner for sizing roofing felt;
- shaft for laying bitumen;
- trowel for leveling concrete surfaces.
In your search for the strength and means to implement a project, you should not forget about the impressive list of building materials. It includes:
- cement, sand and crushed stone or gravel (for the production of cement mortar, concrete and sealing pad);
- expanded clay and/or gravel (as a stabilizing and heat-insulating cushion under the floor screed);
- insulation (extruded foam);
- surface waterproofing (penetrating composition for treating concrete surfaces);
- drainage pipe;
- reinforcement with a diameter of 10–12 cm (for reinforcing the floor of the inspection pit);
- boards, wooden blocks, nails and wire (for formwork construction);
- brick (in the case of building walls using the brickwork method)
- vapor barrier film (to prevent the accumulation of condensation on the walls and floor of the inspection pit);
- steel corner 20*20 mm (for framing the upper perimeter of the inspection pit);
- boards and beams treated with antiseptic and waterproof paint (for making a cover for the inspection pit);
- rolled roofing felt;
- bitumen resin (mastic).
Attention: the amount of building materials is taken depending on the size of the hole with a 2–10% margin.
Garage floor removal and excavation work
To implement the construction plan, the first step is to clear the territory. Everything unnecessary will have to be removed from the garage for a while, and an area outside the premises will have to be prepared for storing earth.
The order of subsequent actions will be as follows:
- The outlines of the inspection hole are drawn on the garage floor using chalk, a corner and a rule.
- The resulting rectangle increases by 10–15 cm on each side, which is necessary for the convenience of excavation work.
- Using the lines obtained this time, the floor is dismantled.
- If the garage floor is made of concrete, you will first have to work with a concrete cutter, and also get acquainted with the capabilities of the chipper found for this case (in extreme cases, a hammer drill high power, armed with a chisel).
- When working with reinforced concrete, you need to remember about reinforcement. In a standard reinforced concrete slab, it is located at a depth of 5 to 10 cm. The metal skeleton of the concrete screed must be carefully cut with a circular saw, for which you will first need to expand the cutting area with a hammer drill or chipper.
- After removing the concrete layer with reinforcement, all that remains is to remove the remaining screed.
- The dismantled concrete floor opened access to the soil under the garage, in which it was necessary to dig a pit 195–200 cm deep, 115 cm wide and 5.5–5.6 m long.
- When performing excavation work, you should regularly monitor the vertical level of the pit walls and the depth of the pit, and also make sure that there is no water in the pit, and that its walls do not crumble as they deepen.
Attention: if necessary, the walls of the pit can be temporarily strengthened with wooden beams. It is advisable to take the soil obtained during the digging of a trench outside the premises so as not to clutter it up. In the process of preparing the pit, you need to work in warm clothes, since as the hole deepens, the humidity level will increase and the temperature in the garage will decrease.
Waterproofing a garage pit: important points
No amount of tricks will save the inspection hole from flooding in the event of rising groundwater or heavy rainfall, or the garage itself from dampness, mildew and mold, if you do not pay due attention to water drainage. This can only be done with the help drainage system: it will provide protection against the penetration of rainwater and soil moisture under the internal perimeter of the room.
Self-installation of drainage
To install the drainage system you will need drainage pipes, wrapped in geotextile, as well as a piece of PVC pipe with a diameter of 100 mm and connecting elements.
The length of the drainage will correspond to the outer perimeter of a separate garage building. The system outlet is located at a distance of at least 5 m from the garage. It is highly desirable that the drain be carried out into a nearby ravine or other natural depression in the soil.
If there is none on the site, the drainage outlet will need to be taken out into a special container, which must be buried at least 20 cm below the drainage level and equipped with a pump for pumping out water with a float.
Drainage must be equipped manhole, in the role of which you can use a vertically installed and connected to the drainage perimeter PVC pipe. The upper end of the latter is closed with a protective cover.
Installation of the drainage system is carried out in several stages:
- Around the garage structure, at a distance of up to 0.5 m, a trench is dug with a depth equal to the depth of the garage foundation and a width of up to 0.5 cm.
- A 10 cm cushion of sand and gravel is placed at the bottom of the drainage ditch (to protect the system from destruction under the influence of soil pressure).
- The sand cushion is covered with geotextile film.
- Drainage pipes are laid in the trench and connected to closed system with output to a container or natural depression in the area.
- The drainage is covered with a cushion of a mixture of sand and crushed stone (gravel), which during the process must be carefully but carefully compacted (so as not to damage the pipe).
With the installation of drainage the most weakness in the garage waterproofing system, the base of its foundation will be reliably protected from water penetration from outside the structure. As a result, the requirements for moisture protection of the inspection pit will be reduced.
Attention: the top of the drainage can be covered with soil, turf or concrete screed (the choice is at the discretion of the garage owner). It is better to install a plastic container for water drainage, since it will last much longer than a metal one, and use the drainage drain for watering the garden, provided that no water gets into it. chemical substances, used in car care.
Protection from moisture and dampness
The main construction begins with waterproofing the pit. This problem is solved in several steps:
- A gravel cushion 10–15 cm thick is placed and compacted at the bottom of the pit, which is covered with 5 cm of sand on top.
- The walls of the inspection pit are laid with a layer of rich (red) clay.
- Roofing felt is spread on the floor surface. This must be done with an overlap of 10–15 cm and with the same margin protruding onto the surface of the walls.
- The overlap lines of the roofing material laid on the bottom of the pit are soldered with a burner or glued with molten bitumen mastic. The latter is laid using a special shaft.
- In a similar way, roofing felt is laid on the walls. The vertical and horizontal corners of the pit are additionally glued with bitumen or soldered using a special burner.
- A vapor barrier made of thick polyethylene film is laid on top of the roofing material, with mandatory gluing of all corners and joints.
Do-it-yourself floor and walls of the inspection pit
If the hydro- and vapor barrier of the pit is ready, it’s time to proceed directly to construction. To do this you need to prepare in advance construction site, tools and materials necessary for preparing concrete, insulating and reinforcing the screed.
Pouring the floor
Construction begins with floor screed. Its filling is carried out according to the following method:
- At the bottom of the pit, covered with waterproofing, it is necessary to lay 10–15 cm of rough concrete (grade no lower than M200). The latter is prepared on a concrete mixer in proportions from 1: 3: 4.5 (cement: sand: crushed stone).
- After partial drying, the surface of the rough screed is leveled using a special trowel made of wood or hard foam.
- If necessary, the rough screed is covered with a layer of insulation (extruded foam plastic 5 cm thick).
- A reinforcement frame of the floor screed is mounted on top of the thermal insulation gasket or, in the absence of one in the project, the rough screed. To do this, you will need steel reinforcement with a diameter of 10 mm and wire or welding, with which the mesh will be fixed before pouring the screed.
- Prepared using a concrete mixer or mixer cement-sand mortar in a ratio of approximately 1:4, which is poured onto the reinforcing frame so that the thickness of the screed is at least 5 cm.
- 2-3 hours after pouring the concrete, its surface is leveled with a trowel, after which you can begin building the walls of the inspection pit.
Attention: pouring rough concrete and reinforced screed must be completed in 1 step. Therefore, for work you will need at least 2, and preferably 3 pairs of hands. Rough concrete must be allowed to dry completely before insulation, which will take at least 3 days. The same period is required for the upper reinforced screed so that it can be walked on freely during the construction of the walls of the inspection pit.
Construction of walls
The walls of the inspection pit can be made of either brick or concrete. In the second case, before starting work you will have to install the formwork. An edged board or plywood is suitable for this and wooden beams. In addition, it is advisable to reinforce the walls of the inspection pit with a mesh of steel wire or reinforcement.
At this stage, it is necessary to start laying the electrical wiring, which, according to electrical safety requirements, must be hidden. To do this, you need to hide the wire in a corrugation, stretch it along the surface of the walls and lead it to the installation points of the lamps, and then secure it to the reinforcing mesh, for example, using plastic ties.
The walls are poured in tiers of 30–40 cm in height. During the process of pouring the walls, the solution should be thoroughly compacted using a crowbar or bayonet shovel- this will remove air from the concrete. Before pouring each subsequent tier, you must allow the previous one to dry, which will require waiting about 2-3 days.
When building brick walls, the thickness of the masonry is taken to be equal to the width of the latter. The masonry is done in a checkerboard pattern with the obligatory binding of the corners and careful grouting of the seams. At the final stage of wall construction, care must be taken to ensure that the walls protrude above the floor screed in the garage by at least 5 cm. This will eliminate the possibility of foreign objects sliding into the pit or accidentally being driven over by a car wheel when placed in the pit.
After laying the brick walls, it is necessary to wrap the hydro- and vapor barrier inside the structure and backfill the soil with outside walls In this case, the soil should be thoroughly compacted.
Attention: when laying brick walls or pouring them with concrete, you must not forget about auxiliary niches. In order to make them in concrete walls, you will definitely need to construct formwork liners of the appropriate size from boards. When working with brick, there is no need for such liners, but with them it will be much more convenient to lay the brick around the niche. Upon completion of pouring the concrete walls of the inspection pit, the formwork can be removed no earlier than after 6–7 days. Brickwork can be considered ready for further work after 4–5 days.
How and with what to close the inspection hole?
Even before starting to pour or lay the walls of the inspection pit, it is necessary to prepare the embedded frame. It will crown the side of the structure - the latter is located slightly above the garage floor or level with the latter.
To make the frame, you will need a pre-stocked steel angle, a circular saw with metal cutting discs, and a welding machine with electrodes.
The size of the frame is selected according to the inner or outer perimeter of the walls - the corner should be positioned as required by the cover fabric. By the way, if you plan to equip the inspection hole with one, the frame must be turned at an angle downward.
Fixation metal structure This is best done using anchors or dowels, for which you will have to make corresponding holes in concrete or brick, as well as in metal. Finally, to prevent the frame from rusting during the operation of the garage pit, it must be sanded, primed and painted before installation.
To make a cover for the inspection pit, you can use various materials. For example, you can make it sectional from metal frames covered steel mesh, or in the form wooden shield from edged boards with a thickness of 35 mm.
It should be remembered that the thinner the canvas, the easier it is to lift it, so you should not take too thick wood or panels with a heavy frame.
You can make a cover for the inspection hole in the following way:
Attention: when closing the pit, the outer edge of the cover sheet comes into contact with the embedded frame. Therefore, the structure is often additionally sheathed along the edges with steel or plastic tape. The thickness of such sheathing will have to be taken into account before cutting the fabric, and to fix it, buy special fasteners in advance. By the way, the lid can be equipped with special mechanisms that will allow partial opening of the inspection hole.
Video: step-by-step DIY construction of a garage pit
Construction of an inspection pit in a garage is not an easy task. Therefore, they should be approached with thorough preparation and, preferably, in consultation with those who have experience in such work. Smart layout, as well as careful attention to the issues of thermal and waterproofing of the room, antiseptic finishing and electrification will ensure comfortable operation of the cellar and will allow expanding the volume of household food supplies. At proper organization The construction of an inspection pit should take no more than 10 days, while the construction of a cellar may take about a month with an average density schedule.
In our country, the inspection pit is planned first during the construction of a garage. She happens to be a great assistant any motorist, because it allows you to carry out minor repairs or preventive work, as well as diagnostics, and without any special material costs. From this article you will learn how to make a viewing hole in the garage, what materials are required for this, as well as what its benefits are in general.
What is the inspection hole for?
The answer is obvious: it is needed to make it more convenient to service vehicle. Some people turn to special technical centers in case of breakdowns, but most car enthusiasts prefer to carry out the most complex operations with their own hands. And doing this in a cozy and calm environment is much more convenient.
Besides practical work, the inspection pit is capable of providing unhindered access to:
- chassis of the car;
- exhaust pipe;
- bottom;
- oil pan;
- gearbox;
- muffler.
Now, having familiarized ourselves with the purpose of the inspection hole, we proceed directly to work.
How to make a viewing hole yourself
The process consists of several stages, let's look at them.
Stage one. Preliminary marking
First, you must determine the shape and size of the inspection hole in the garage. This is an extremely important point, since the pit will be installed in an existing garage, which, accordingly, will make the task more complicated, and the working conditions will be cramped.

When marking, be guided by the fact that the soil that forms the walls of the pit will have some slope, while the dimensions of the structure themselves should be such that working in it is as convenient as possible. This is the first thing. And secondly, in the future you should be able to easily park over a hole without fear that the vehicle will fall into it. There are certain anti-slip measures, but more on them later.
Based on all this, the working width of the pit should be 70 cm - in this case, even the smallest car models will have about 15-20 cm for maneuvers. If necessary, the width can be increased.
Note! If you are the happy owner of a Zhiguli with a track width of 1.3 m, you can increase the width of the pit to 80-85 cm.
The length of the structure is also determined for reasons of ease of use, but the area of the garage itself should also be taken into account. In any case, it must be at least 2 m.
Using pegs with a rope or a small amount of lime, mark the perimeter of the hole on the floor, add wall thickness on each side (depending on the stability of the soil) and make a small margin for slope. If we are talking, for example, about dense loam, it should be approximately 25-30 cm. But the depth should be such that there is about 25 cm left from the top of your head to the bottom of the car. Let's give a small example.
Example .
For this we use the same Zhiguli. The ground clearance of this car is approximately 16 cm. And if your height is, say, 1.8 m, then the “net” depth of the pit should fluctuate between 1.7-1.8 m. Although it is better to make it somewhat larger, because in the future You can always arrange a raised floor to the required height or, as an option, substitute a bench.
Stage two. Preparing equipment and supplies
During the work you will need:
- rule;
- concrete mixer;
- capacity;
- shovel;
- self-tapping screws;
- concrete;
- boards;
- bulk building materials;
- screwdriver;
- roulette.
The amount of this or that material depends on the size of the future structure.
Stage three. Excavation
You have to dig about 9 m³ of earth, which is difficult, especially if the soil is strong, and the work will be done by hand. This is the most difficult stage, but professional excavators can be involved in the work.

After digging a trench, leave some of the earth in the garage or next to it - with its help you will fill up the sinuses after finishing the construction of the walls. Take everything else out. To correctly calculate the equipment required for removal, remember: the volume of loosened soil will be approximately ¼ greater than the volume of the pit itself.
After this, level the bottom of the trench and compact it using fine crushed stone. To do this, pour crushed stone in a layer 5-7 cm thick and compact it using a tamper.
Note! It will be much more convenient to work in the inspection pit if you make niches in the walls for materials, tools and spare parts. Provide such niches in advance, even at the stage of excavation work.
Stage four. Construction of walls and floors
There are two possible materials that can be used in this case:
- brick;
- concrete.
We recommend using the second option, as it will cost less. In addition, the design will be more reliable, and the embedded elements will be fixed better. Therefore, we are considering the option of monolithic concrete.
Step 1. First, build a concrete floor 6-7 cm thick on top of the crushed stone. Reinforce it with a reinforcing mesh 3-4 cm thick and cell sizes of a maximum of 15x15 cm.
Step 2. Prepare the concrete in the following proportion(for 1 m³): “four hundredth” cement (300 kg) + crushed stone with a fraction size from 0.5 to 2 cm (1210 kg) + water (210 l) + sand (680 kg). If you mix by hand, you will need a little more water, although it is still recommended to use a concrete mixer - this way the finished solution will be more mobile.
Step 3. Fill the floor with the resulting solution.
Note! The compressive strength coefficient of such a surface will be approximately 200, which in this case is quite sufficient.
Step 4. Prepare the mortar for the walls. The proportions here should be slightly different: 360 kg of the same cement + 1168 crushed stone + 670 kg of sand. The volume of water is the same - 210 l. The thickness of the walls will be 15 cm.
Step 5. Build formwork from OSB boards 1-1.2 cm thick. In the future, these plates may be required for other needs.
Step 6. Reinforce the walls. Many people neglect this, but it’s better not to skimp on quality. For this you can use the same mesh as for the floor.
Step 7. Pour the concrete in layers, the height of each tier should be 30-40 cm. Compact each tier using a bayonet shovel. In the last tier, arrange cylindrical “glasses”, into which you will then install lamps. To do this, place pieces in the holes in the formwork sewer pipe(necessarily at an angle).

Step 8 Use pre-welded metal corners to frame the pit; for fastening, use embedded anchors made from pieces of reinforcement. The frame will perform several functions at once:
- strengthening corners;
- “clip” for flooring made of boards;
- curb for insurance (so that the car does not slide off).
Step 9 Backfilling. Pour soil into the gaps formed in layers of 15-20 cm, carefully compacting each of them.
Stage five. Waterproofing
If in your region the level groundwater high enough, then take additional care of high-quality insulation. There are several possible options here.
- Ruberoid. It is laid in two layers on top of bitumen mastic. The overlaps should be 20 cm, all of them are also glued with hot bitumen. The shelf life of such insulation is up to 15 years.
- Dry penetrating mixtures. They are diluted with water immediately before use. The mixtures penetrate deep into the structure, but are used primarily as additional insulation.
- Polymer membranes. They have a long service life (up to 50 years). Installation involves the arrangement of a reinforced frame and laying a layer of geotextiles. The membranes are self-adhesive, the overlap should be 10-30 cm.
- Oily clay + oil refining waste. Practically not used.
What else should you pay attention to?
- If the lighting is provided by the cylindrical recesses mentioned above, then cable laying and installation of a socket will be required. If the light source is portable, then all this is not needed.
- Ventilation may be required to protect the pit from condensation, influx fresh air and outflow of various chemicals. The easiest way to do this is with a flexible air duct, which should be taken out of the pit to a height of 25 cm above the floor level.
- When carrying out excavation work, secure the walls of the pit without fail! Use boards with spacers for this.
- Finally, when performing work, use tools personal protection(boots, gloves, if necessary, a respirator and goggles).
Do-it-yourself inspection hole in the garage: video
Bottom line
It's easy to make a viewing hole yourself. Of course, it’s easier to do it at the stage of building a garage, but it won’t be difficult to do it in a finished structure. With such a “bunker” it will be much easier for you to repair and maintain your car.
As a result, we note that it is better to work with an assistant. He will not only help or provide tools, but will also come to the rescue in an emergency.
March 24th, 2016 Admin
 Car repairs often involve an extensive range of work. In some cases, access to components and assemblies can only be obtained from below, which cannot be done without a lift or inspection pit. The first, due to its high cost and high energy consumption, is used in car services, but the second is quite possible to do in your own garage.
The presence of a hole will greatly facilitate the repair and maintenance of the machine, but to make it, you will have to work hard. Today we will tell you how you can arrange a viewing hole yourself.
How to make a viewing hole in the garage

First you will need to take a few preliminary steps:
1) Find and study documents about what type of soil is in the area of your garage, how deep it freezes, at what depth the groundwater is located, etc. These data will greatly affect the configuration of your pit (depth and degree of waterproofing);
2) Compose detailed drawing indicating the size of the pit and its location relative to the walls of the garage;
3) Determine the necessary Construction Materials, buy them and bring them to Right place, the same goes for tools.
Designing an inspection pit for a garage

At the stage of drawing up the drawing, it is important to decide where exactly the hole will be:
- In the center of the garage, if it contains only the car and the items necessary for it, such as operating fluids, spare tires, etc.;
- Closer to one of the walls, if the garage is also a storage area for various household items, i.e. It is also used as a barn. But remember, the pit cannot be placed too close to the wall, otherwise it may collapse!
Be sure to also provide a plank flooring for the pit to cover it when not in use.
What should be the size of the inspection hole for a passenger car?

1) The length must match that of the car with an increase of 1 m, which is needed for arranging the steps;
2) The width again depends on the width of the car, but it is not advisable to make it more than 80 cm;

3) The depth should be made based on your height. At the same time, it is necessary to take into account that you, standing in a hole, should have 15 cm above your head. This is a comfortable distance that allows you not to reach for the bottom of the car, but to calmly reach it.
Having calculated all the dimensions, outline the contours of the future hole on the garage floor and get down to business.
What is needed to dig a trench for an inspection hole
![]()
At this point you will need a shovel and probably a drill. The latter is needed if the soil is rocky and cannot be taken with a shovel. The selected soil can be used for agricultural purposes by transferring the fertile soil to a vegetable garden (if you have one). It is better to put clay and stones in a separate pile - they will come in handy if you need components for concrete. They can also be used to raise the garage floor.
In the process of digging a pit, do not forget that the edges of the pit should be at least 50 cm (this is necessary to create walls), and a depth reserve of 30 cm should be made (for waterproofing), and do not forget to make an allowance for floor for the pit, the thickness of which you determine yourself.
We erect the walls of the inspection pit
Before erecting walls, it is necessary to make a level floor. The best way- This is a concrete screed, but asphalt can also be used.
The inspection pit must have walls, otherwise it will inevitably begin to crumble. There are quite a few options for creating walls; the most common ones are discussed below:
1) The simplest option is to use roofing felt or foil insulation, on top of which there will be a row of boards “painted” with waste (this slows down the rotting process) or slate, but not wavy, but flat.

2) You can plaster the wall by throwing a rough “coat” over a metal mesh, and after it dries, remove smooth walls using a new portion of the solution.

3) If you are determined to build a truly durable structure, and the size of your garage allows you to do this, then it is better to build the walls from brick.

The optimal wall thickness is 0.5 or 1 brick. Ideally, they should be new, but if the budget is limited, you can use used ones. The main thing is that they are smooth and not burnt. If the bricks are old, they must be cleaned of dirt. It is better to choose a classic mortar for masonry, consisting of cement and sand in a ratio of 1:3. If you are a beginner, it is better to add liquid soap or more water to the mixture. The solution will become more liquid and will take longer to harden, which will give you a lot of time for laying and correcting flaws.
Naturally, the walls must be made smooth. To do this, you should tighten the lace before laying. To control during the laying process, use a plumb line or a building level.
If desired, in brick walls you can build small niches. During repairs, it will be convenient to store tools, spare parts and other small things in them.
Whatever method of constructing walls you choose, they must be reinforced with strapping so that the structure is strong and cannot collapse. A steel corner 50x50x5 mm is perfect for this purpose. It is necessary to weld a contour from it, and in such a way that the lid made of boards, which was mentioned above, can be laid on top without any hindrance.
The finished masonry can be left in its original form or plastered and then painted in any color. In addition, the floor can be covered with wooden flooring for warmth.
If you are a resident of the Far North, it is important to take care of thermal insulation. It is better to use 5-centimeter polystyrene foam as insulation. Despite its small volume, this material has excellent heat-insulating properties.
What to do if groundwater is close?

As mentioned above, when digging a hole, it is extremely important to know where the groundwater begins. If you cannot find the relevant documents, you will have to drill a well or dig a hole. Has water already appeared at a depth of 2 m? Then you cannot do without waterproofing, otherwise in the spring your pit will turn into a mini-pond with melt water. Moreover, waterproofing must be done strictly before pouring the floor and erecting walls.
How to choose a waterproofing material
Currently, 3 types of waterproofing are most widely used:
Polymer membranes.

They are considered the most reliable material. Service life is unlimited. Due to such outstanding qualities, the material is very expensive, and not every car owner will be able to afford its purchase. In addition, its application requires special equipment, which can only be used by specialists. Because of these factors, we will not consider it in detail;
Rolled materials based on bitumen (roofing felt, rubemast, folgesol, brizol, etc.).

Have affordable price and very easy to use - no special knowledge required. But the service life of such waterproofing is limited - 10, maximum 15 years, after which it must be completely changed.
Penetrating waterproofing.

Very effective way prevent water from entering. More expensive compared to roll materials, but has an unlimited service life.
Waterproofing an inspection pit in a garage: stages of implementation
Waterproofing should begin from the floor. First, compact the surface tightly, then pour an even layer of clay onto it, sand onto the clay, and crushed stone onto it. Compact each layer thoroughly. The total thickness of all these layers should be 30 cm.
Rolled bitumen materials
Before laying them, a special primer (deep penetration) must be applied to the surface in 2 layers. Each of them must be completely dry before applying new or laying roofing felt.

It is best to lay roll waterproofing in U-shaped strips, giving an overlap of 20 cm. The corners must be turned in so that the strips remain on a flat area of the floor or wall.
The joints are glued using molten bitumen, but you can also use a bitumen solvent, which will melt the roofing material and it will set. Take the excess strip along the steps outside the pit - cut it off later. After the 1st layer (lengthwise and crosswise), let the bitumen in the joints cool and proceed to layer No. 2. During the process, make sure that the joints of the layers do not coincide with each other.
Penetrating waterproofing
This type of waterproofing is a dry mixture that is diluted with water before use. To prepare a solution for 1 kg. the mixture requires about 0.3 liters. water.

It is very important to stir the mixture thoroughly so that there are no lumps left. Then the solution is applied to the wall in a 1-mm layer. If the walls of the pit are brick, then you need to apply another layer on finished wall to reliably seal all the pores in the bricks. The principle of operation of the sealant is based on the fact that, covering the surface with a continuous layer, it does not allow moisture to seep through, as if “binding” it.
In combination with waterproofing brick wall it can withstand water pressure up to 20 atm. Its service life is unlimited.
How to ventilate a viewing hole in a garage
The ventilation system in the pit is a thing that is absolutely impossible to do without.

This is especially true for motorists whose “iron horses” run on liquefied gas, since when there is a leak, propane tends downwards (it is heavier than air), which means it will inevitably end up in a hole.
The hood is constructed before the waterproofing stage, so as not to damage the sealant or roofing felt. Proper ventilation consists of 2 parts - supply and exhaust.
The first is a pipe leading through the wall to the street. Through it, clean air will enter the pit. The second is also a pipe installed opposite the flow pipe, but it is discharged not through the wall, but through the roof. Its upper end should rise no more than a meter above the garage. Pipes can be either steel or plastic, but it is better to give preference to plastic products - they weigh much less, are easier to install and are completely non-corrosive.
Lighting the inspection hole in the garage - how to install the light
You can work in the inspection pit without stationary light sources, limiting yourself only to a headlamp. However, it provides little light and only in a limited sector. Therefore, it is still better to get normal lighting. As with any wiring, it is important to follow a number of rules:
1) If you do not have the appropriate education, it is better to entrust the work of creating an electrical circuit to a specialist so that he can do it in compliance with all safety standards;
2) The lighting should be uniform, you may need several lighting devices;
3) All switches, fuses and sockets should not be located in the pit - only in the garage itself;
4) If you plan to install a 3-phase outlet, be sure to ground it securely.
The wire through which electricity will be supplied to the pit must have a cross-section of 4 mm2 or more. It is desirable that the material from which it is made is copper. The wire must have intact insulation, ideally double.
Lamps suitable for garage lighting come in low and high voltage:
- 12 volt light bulbs;
- 36 volt lamps;
- lamps of various classes for 220 volts.
To operate low-voltage lamps, a step-down transformer must be installed next to the meter.
As for the type of lamps, it is better to use fluorescent lamps in the pit itself. Due to their oblong shape, it is advisable to place them in small recesses in the walls, otherwise they may interfere. It is better to purchase such lamps with a protective casing, since an open lamp will not last long due to moisture and dirt.

There is no need to use incandescent lamps in the pit. They get hot during operation, and if you touch them, you can easily get burned. The light from them is too bright, which damages vision. In addition, they consume a lot of energy, and if there is a voltage drop, they can spark and burst, which can lead to injury and fire.

Fluorescent light bulbs are good because they come in a wide range of colors, consume little electricity, and last a long time. However, they are not suitable for the pit because they are sensitive to cold - when the temperature environment falls below 5 degrees, they become unreliable. They must be disposed of in a special way because they contain mercury.
Energy-saving lamps have all the advantages of fluorescent lamps and almost no disadvantages, with the exception of a higher price and difficult disposal: they also contain mercury.

LED lamps are the most advanced because they combine everything positive characteristics other light bulbs. They do not contain mercury, but the price is very high, and for good lighting you need several of them, which not everyone can afford.

It is also useful to have a portable lamp or mobile 36-volt lamp in the garage. They may come in handy if you need to take a closer look at the repair site.

When installing wiring and lighting fixtures strictly follow the rules fire safety! Remember, any shortcomings in this matter can result in tragedy.