The hidden shelf is a decorative accent that creates the illusion. The shelf seems to “float” on the wall. By adding such furniture to the interior of your living room, bathroom, kitchen, bedroom, you can solve the problems of storing books, necessary accessories or souvenirs. Such furniture is often required to decorate children's rooms, which have a lot of tiny cars, dolls or other toys. “Floating” shelves are cheap, beautiful, keep everything safe on them, and it takes little time to make such furniture.
Types of fastenings
The inconspicuous fastening that supports the shelf has a wide range of varieties:
- Alcoves and niches - comfortable spot for mounting shelves, because they can easily be mounted on three walls at once.
- The hidden bracket with two slots is convenient because it can be used anywhere.
- Invisible fastener made from durable metal, with alloy steel connecting screws, creates tension between the posts. This gives them impressive support ability. If a longer shelf is needed, additional supports are added. Invisible fasteners can be used to create heavy-duty floating shelves.
Rustic Bathroom Shelves
If the time has come to modernize the interior, shelves with hidden fastening in the Provence style - perfect decor. She creates exclusively her own, unique home comfort. And at the same time it seems to be floating in the air! Its artsy yet simple appearance will brighten up the bathroom and any nook that needs storage space.
This shelf model installs as a floating shelf and is reinforced for added strength, making it a great storage option for collectibles, photos, keepsakes and glassware. The design is inexpensive and requires very few materials.
Tools:
- level,
- measuring tape,
- saw,
- drill.
Consumables:
- tree,
- screws,
- optional finish.
Advice. You should avoid last-minute shopping trips; it is better to prepare materials in advance.

Creation algorithm
- To make hidden shelves with your own hands, first draw a sketch; this will help you understand the design and find out what type and size of wood is needed. The step also includes measuring the width of the space from wall to wall.
- The next step is to create a special frame. You can use liquid nails to glue the frame together first, and then use screws and angle iron to hold all the pieces together.
- Next, the boards are painted or painted, which will then be fixed to the frame. You can use the same paint or varnish that has already been used on other furniture. It's nice that today there are varnishes on sale that will make wood look old in a matter of minutes and highlight its texture, this finish is great for rustic style.
- The desired height of future shelves is measured and the support frames are attached to the wall. Before drilling, the wall is checked using a detector for the presence of wires and pipes.
- Next you need to make sure that invisible shelf flat. It's pretty hard to find beautiful boards, which will be quite straight. If it turns out that the boards are uneven, proceed to step 6.
- Spacers are added to level the shelf. This step is repeated for the top and bottom boards.
- Then the top board is glued to the frame using liquid nails.
- The bottom board is much more difficult to secure liquid nails, so it is better to secure it with screws.
- The front part of the shelf is glued last.
Attention! The walls of the room are painted before attaching the shelves. Instead of boards, you can use MDF.
Hidden shelves from old drawers
These shelves are made from 2-8 drawers, not necessarily matching in color, shape or size.
- The drawers are cleaned and unnecessary parts are removed. Surfaces are sanded.
- Then the protruding edges of the cladding are cut off so that the entire side of the bottom fits tightly against the wall.
- The inside of the drawers is painted to match the color of the wall. This will create the illusion of floating shelves.
- Next, the boxes are laid out on the floor to find beautiful compositions to determine the places where they will be attached. The composition you like is photographed; this photograph will replace the sketch.
- According to the plan, they are mounted on the wall wooden supports. Make sure they are level.
- The boxes are placed on supports and secured with screws (the screws are painted over if they need to be hidden).
Decorative handles or accessories can be added if desired. Another idea is to attach a decorative "sticky note" to inside drawers that have become full-fledged shelves.
Shelves-tubes for toys

- Buckets are cleaned, labels are removed, and top part(use a hand or electric saw).
- Future shelves are painted on the outside with plastic paint.
- Then two holes are made for the screws.
- The structure is fixed on the wall.
And, voila, the furniture is ready! This DIY shelf is an economical idea for creating storage space for small items.
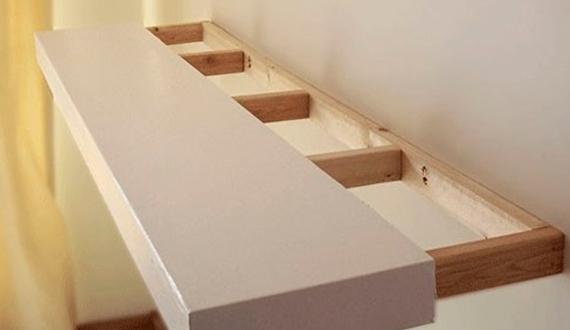
Wall shelves with hidden fastenings (they are also called floating) fit perfectly into any interior, do not overload it visually and at the same time look very light and floating. On such shelves you can store books, souvenirs, flowers and other small items. You don't have to buy them in the store at all. This master class is just about how to make such shelves with your own hands.
What you will need
sanded plywood 8 mm thick, pine blocks 1-1.5 by 2 cm long, approx. meters, a hacksaw for wood, emery, paint (in this version glossy white), self-tapping screws, a screwdriver, brushes, level.
Shelf drawings


Progress
The design of the shelf consists of two parts: a frame - the shelf holder and a sleeve, which is put on the frame.
First, we make a holder from pine bars 1 by 2 cm thick (thicker is possible). You will need 2 bars 70 cm long (this is the length of the shelf), 2 bars 20 cm each and 5 bars 18 cm each. We connect them all as in the diagram with self-tapping screws.
The sleeve is made from two rectangles of plywood 72.5 by 21 cm, between which there is a “U”-shaped base of bars (see diagram).

When all parts of the shelves are ready, you need to sand them with sandpaper or grinder and paint the sleeves.

Now, using a level, screw the shelf holders to the wall.

We put the sleeve on top. All is ready!


Please rate this post:
(Last Updated On: 01/21/2018)
Shelves make our homes and offices much more convenient, because they can accommodate a bunch of different small rubbish, put fragile and valuable items, and add variety and volume to a simple wall. However, shelves often have one big disadvantage - with their fasteners they spoil the whole picture, do not fit into the interior, visually make the structure heavier, etc. Therefore, in many cases it is practiced hidden mount shelves to the wall, in this case an ordinary wall shelf looks as if hanging in the air. Of course, such a solution is very, very attractive, but today not everyone knows how and with what kind of fittings such fastening can be done.
Preparing for hidden fastening of shelves
It is best to carry out such fastening in stages until the sequence becomes automatic. Otherwise, due to the omission of one or another moment, all the work may go down the drain.
The first step is to make sure that the wall can support the weight of the shelf and the objects placed on it. Main parameter, by which such an assessment is made, is its thickness. If the walls are made of 25 cm brickwork or 10 cm reinforced concrete slabs, then you can safely install wall shelves with hidden fasteners. If the wall thickness is less than the specified values or if the fastening is carried out to plasterboard cladding, then installation of a shelf with hidden fasteners will also be possible, but the shelf can only be used for easy storage small things.
Now you need to decide on the thickness of the shelf. This can be done without any complex calculations - just evenly place a load of a certain mass on the shelf and see how the shelf behaves. If it bends, then you need to make it thicker or reduce the planned load. In general, it is better to make a shelf thicker - excess thickness can be unnecessary only in rare cases when it violates the concept of the interior, but too thin ones will make them inconvenient to use.
Shelf with hidden fastening (photo):


Also, the depth of the shelf depends on the mass of things stored on the shelf. How more mass, the smaller the depth should be. For example, if no more than 10 kg of cargo will be placed on the shelf, then you can make a shelf up to 35 cm deep. And if you want to store items weighing up to 30 kg on the shelf, for example, 10 cans of apple compote, then the shelf should be no more deep 15 cm. However, in this case the jars of compote will not fit on it.
Options for fasteners used
Fittings for hidden fastening are presented today in many options, so choosing and buying the right one will not be difficult.
The most popular option is special hidden hinges that are placed on the surface of the shelf pressed against the wall. Working with them is done as follows:
- the gap between the central points of the loops is measured;
- along this gap, using a ruler and level, mark the points for attaching the hinges to the wall;
- holes are drilled in the wall, then they are plugged with a plug, and screws are screwed into the plug;
- screws should be screwed in as close to the wall as possible, but not forgetting to leave space for hanging the shelf;
- The hinges are screwed to the back of the shelf, after which it is hung with screws.
A more reliable option is to use metal pins:
- a line is drawn on the wall along the level of hanging the shelf and along the width of the shelf;
- segments equal to triple the thickness of the shelf are set off from the edges of the line; holes for the outer pins are drilled at these points;
- Central pins are mounted between the outer pins; the heavier the shelf, the more pins are needed;
- the pins enter the wall body strictly perpendicularly at a distance of about 10-15 cm, so this method is only suitable for houses with brick walls;
- The pins must enter the body of the shelf to a depth of at least three times the thickness of the shelf, but no more than 2/3 of its total depth.
Also, hidden fastening of a shelf to a wall can be done in other ways, but the above methods are the most common and reliable.
Every person wants to mount a shelf on the wall so that it fits perfectly into the overall design of the room. This problem is not at all difficult to solve. Absolutely anyone who has free time and a set of necessary tools can nail a shelf to the wall.
As the main support for the shelf, you can choose an anchor bolt, thanks to which you can securely fasten the piece of furniture.
Its dimensions are as follows:
- diameter up to 12 mm,
- length – 180 mm.
At one end anchor bolt there must be a thread in order to screw the anchor into wooden surface, and on the other hand, to screw it into a metal coupling.

As a base for the shelf, you can take a piece of board from a window sill with artificial turf.
The dimensions are as follows:
- thickness – 25 mm,
- width – up to 200 mm.
There are only two options for mounting:
- classic,
- hidden.
A hidden option for fastening shelves is needed in cases where decorative elements Absolutely incompatible with protruding fasteners. Attaching shelves in this version is just as easy as in the traditional one.


Sequence of work
Before you attach the shelf to the wall, you need to know that the thicker the shelf, the thicker the support should be. A hole is drilled in the end part an average of 5 mm below the surface. All holes for shelves in the wall must match, otherwise attaching them will be quite problematic.


Attaching the shelf to the wall:
- A staff is considered a template required length. It is applied to the end of the shelf and a hole of the required diameter is made, after which it is applied to the wall.
- The next step will be drilling, which must be done with maximum precision.
To attach the shelf you will need:
- electric drill,
- threaded coupling,
- brackets,
- lath - template,
- carpentry glue,
- screws.
Installation of a corner shelf (video)
Store shelf mounts
A shelf that you bought at a hardware store can be very difficult to attach to the wall. Be sure to read the instructions that came with it. Most likely, everyone will be in it necessary recommendations about how to screw the product onto the wall.
Next you need to understand what type of fastening the shelf has. Usually, complete with a shelf and instructions, it also includes elements with which the product is fastened. It is also necessary to select brackets, thanks to which the shelf will be secured.

Bracket options may vary:
- fastenings that do not extend beyond the shelves;
- flat brackets with pear-shaped holes at the end.
To fasten a shelf from a store to the wall, first take careful measurements, which were given above.
Steps to attach the shelf to the wall:
- Based on the possible dimensions of the shelf, you will need to decide on the place where the fastening will be made. Choose the right place so that other furniture in the room does not interfere.
- Using a building level, you need to control the position of the product.
- Nests are first created in the walls so that after this procedure the shelves can be safely attached. These nests are made with a puncher or drill, and then dowels are driven into the resulting holes.
- After this, the shelf is mounted on the wall.
- The final stage is screwing the fastening elements into the holes.
How to hang shelves on the wall (video)
Thus, it was clearly shown how to attach any shelves to the wall. The fastening is carefully planned and only after the plan has been developed, work begins.
There is nothing better than shelves for organizing space in rooms, as well as for decorating the interior. Comfortable, functional, original form, they help to conveniently arrange a lot of things and give rooms more cozy view. Making shelves on the wall with your own hands is not at all difficult, and you can use a wide variety of materials - wood, fiberboard, glass, pieces of tin, plywood.


| Types of Wall Shelves | Description |
|---|---|
| Classic | This type of shelves is the most common due to its simplicity, aesthetic appearance and ease of installation. They represent a huge flight of fancy: from simple square to creative asymmetrical shapes |
| Corner | This type of wall shelves differs in the method of fastening - it is carried out on adjacent adjacent walls. Most often they are installed in utility rooms and bathrooms. |
| Hanging | This original way creating a shelf involves attaching a simple structure to the ceiling using cables or vertical posts |
| Floor-standing | This wall shelf is a floor support design. This type of product is especially relevant in hallways, as well as large rooms, where you don’t have to think about wasting space |
| Open and closed shelves on the wall | Wall shelves can be designed, for example, with or without glass |
Making a simple wooden shelf

Wood is the most convenient material to work with. Wooden shelves are simple, complex shape, open and closed, vertical, horizontal and angular. Taking as a basis basic version, you can assemble a shelf from several modules and give it the most incredible look. In order for the product to serve for a long time, you should choose the right wood: the boards must be perfectly flat, completely dry, without cracks, voids or traces of mold.

During the assembly process you will need:
- hacksaw;
- drill;
- building level;
- pencil and ruler;
- boards 16 mm thick;
- stain;
- wood varnish;
- sander;
- screws, brackets, dowels.
As an example, we use a simple rectangular shelf width 250 mm, height 300 mm and length 1100 mm.

Step 1. Marking
The boards are laid flat on the table and the measurements are transferred from the drawing. The height of the side walls should be 268 mm, since they will be located between the top and bottom: wall height + board thickness x 2 = 300 mm.
Step 2. Cutting the boards

If the markings exactly match the diagram, you can start cutting. It is best to use a jigsaw for this, then the cuts will be perfectly smooth and neat. You should end up with 2 long pieces and 2 short ones.
Step 3. Processing of blanks

Before starting assembly, each workpiece must be sanded, stained and varnished. If you plan to simply paint a shelf, the blanks are processed - this increases their service life and makes the paint apply more evenly.
Step 4. Assembling the product

The bottom board is laid flat on a flat surface. From the ends of the workpiece, retreat 8 mm and draw 2 straight lines parallel to the cuts. Now on these lines you need to mark two points at a distance of 5 cm from the edge, and drill holes there for the screws. The same is done with the top blank. When all the holes are ready, install the side blanks on the bottom board and tighten the screws. Place a second board on top and also fix the side walls with self-tapping screws.

Brackets are attached to the ends of the side walls, holes are drilled in the wall for dowels, self-tapping screws are inserted and tightened so that they protrude by about 5 mm. The dowels must be positioned strictly horizontally, so before drilling, mark a line using a level. Now all that remains is to attach the brackets to the fasteners and hang the shelf. If desired, the back wall of the product can be filled with a piece of plywood, and glass can be inserted in front.


To be like this simple shelf has become more original; one side wall can be replaced with a stump of a thick branch. To do this, choose an even branch with a diameter of about 7-8 cm with smooth, clean bark, saw off a piece 28 cm long, and cut off all the side shoots. The chock is treated with a primer, dried and varnished. There is no need to remove the bark. After the varnish has dried, the workpiece is inserted between the upper and lower boards and screwed tightly with self-tapping screws.

Based on this drawing, you can make various variations of wall shelves. For example, reduce the length to 400 mm and make 3-4 blocks at once. Then install them on top of each other in a checkerboard pattern and secure them together using metal plates. Or simply mount them on the wall separately, placing them at a short distance from each other.

Often, to save space, shelves are made corner, and they can be mounted both in the inner and outer corners.


The blanks are made according to the scheme described above, only the upper and lower boards consist of two elements, with the ends cut at an angle. The process of making such a shelf is quite simple:
- the halves of the top board are coated at the ends with glue and clamped with clamps;
- repeat the same actions with the bottom board;
- when the glue dries, all workpieces are covered with stain or primed;
- Attachment lines are marked on the upper and lower workpieces and holes are drilled;
- insert the side walls and secure them with self-tapping screws.

| Wall shelf materials | Advantages and disadvantages |
|---|---|
| Wood: plywood, chipboard, MDF and others | This material is relatively easy to work with, it looks beautiful, natural and impressive, its service life is quite long, especially if pre-processed |
| Plastic | This material is the most versatile; it can imitate both wood and stone, while eliminating their shortcomings |
| Metal | Such wall shelves will be very strong, reliable and durable, but classic interior They will fit in with difficulty. In addition, corrosion can also be a problem, so metal products Requires special processing and conditions |
| Glass | Transparent wall shelves will create an atmosphere of lightness and comfort in your home. Of course, do it yourself glass structure it will be quite difficult, but if you nevertheless decide to do all the work yourself, then you will have to work with the glass for quite a long time and very carefully, especially if various cutouts are planned in the shelf design |
Original shelves for books
Shelves non-standard shape are in increasing demand, so if you wish, you can try to collect something original. Used for example bookshelf in the form of a simplified labyrinth.
To make it you will need:
- edged board 20 mm thick;
- wood glue;
- clamps;
- roulette;
- hacksaw;
- miter box;
- Sander;
- stain;
- furniture screws, self-tapping screws;
- decorative shelf holders.
If you have everything you need, you can start making the shelf.
Step 1. Marking
On the prepared boards, mark the cut lines with a pencil under a ruler. Measurements should be taken very carefully, since all horizontal parts have different lengths.
Step 2. Trimming the blanks
The ends of each workpiece are cut at an angle of 45 or 90 degrees. The diagram shows the first option, so you will need a miter box for sawing. It is very important to correctly install the miter box on the board so that the cuts are symmetrical. If the ends are cut off incorrectly, you will not be able to fold the shelf.
Step 3. Assembling the structure
The ends of the parts are smeared with glue, pressed tightly and additionally secured with slotted furniture screws. Ordinary self-tapping screws are not suitable here. Each joint will require at least 2 screws. Both parts of the shelf are applied to the wall, leveled and the attachment points are marked with a pencil. After this, holes are drilled for the dowels, brackets are screwed to the shelf with self-tapping screws and the structure is hung on the wall. Instead of brackets, decorative pelican shelf holders are often used.


Hanging shelf with straps
If you want to decorative shelf for small items, the following option is perfect - a board suspended on straps.


To make a shelf you will need:
- 2 edged boards 300x750 mm, thickness 30 mm;
- 4 leather belts, 75 cm long;
- 4 long screws with plastic dowels;
- 4 short screws;
- building level;
- ruler;
- sharp knife;
- drill.
Step 1: Preparing the belts
The cuts of the belts must be perfectly even, so if necessary they are trimmed with a knife. Fold each belt in half, press the ends to the table, step back 2 cm from the edge and drill a neat through hole with a drill. The same is done with the remaining three.
Step 2. Attaching the straps to the wall
Using a level, two points are determined on the wall at a distance of 60 cm. Holes are drilled and plastic dowels are inserted. The belt folded in half is applied to one of the holes and secured with a long screw - you get a large loop on the wall. Another such loop is attached nearby.
Step 3. Installing the shelf
A sanded board is inserted into the loops and aligned horizontally. To prevent the shelf from moving, the parts of the belts adjacent to the wall near the board itself are screwed with short self-tapping screws. Now another shelf is hung under this shelf, exactly repeating the steps described above. The result is a light and neat two-tier shelf. If desired, you can add another 1-2 tiers.
To make the shelves described above, you can use not only wood, but also plywood, as well as laminated chipboard sheets. Last option It is used most often, since laminated chipboard is light in weight, high strength, practicality and durability. When assembling shelves from this material, all sections must be covered with a melamine edge to match the color of the sheet.


Making a glass shelf

Glass shelves fit harmoniously into any interior, and the installation process does not take much time. To work you will need:
- strained glass;
- hammer;
- electric drill;
- building level;
- aluminum profile;
- dowels;
- adhesive tape;
- ruler;
- pencil.
Not everyone knows how to cut glass correctly, and therefore it is better to order the cutting of blanks in a workshop. There they will also grind and polish the edges so that when installing the shelf you will not cut yourself on sharp edges. You can do everything else yourself.

Step 1. Marking for fasteners

The section of the wall where the shelf will hang should be as large as possible. Using a building level, draw a horizontal line on the wall with a pencil. The locations of the fasteners are marked on the line and holes are drilled.

Step 2. Installing profiles


An aluminum profile is applied to the wall surface and the alignment of the fastening marks is checked. Then insert dowels into the holes, attach the profile with one screw and level it horizontally. After this, tighten the remaining screws.


 Instead of a drill, insert a bracket screw
  Screw in the bracket screw
  Leave the bracket screw protruding from the wall

 Checking the position
  Arranging the shelves
 Step 3. Attaching the shelf
The rear edge of the glass shelf is covered with adhesive tape. You can use separate spacers made of tape, placing them where the glass will touch the screw heads. The shelf is inserted into the profile, the edges of the profile are covered with protective caps. If two shelves touch on the sides, their edges are fastened with metal fittings.
If you have free time and a desire to experiment, you can create very unusual shelves for the wall from scrap materials. For example, it looks original corner shelf from plastic pipes. To make it you will need pieces sewer pipes and corner cuts. The shelf is attached to the wall with screws and dowels.


Old suitcases and briefcases can also make great items wall shelves. To do this, they are cut to half their height, covered with plywood at the back and secured to the wall with screws or on brackets.

Drawers from unnecessary bedside tables are quite suitable for making shelves. To give them an elegant look, the boxes should be thoroughly sanded, primed and painted. bright colors. Then they are leaned against back wall to the surface, mark the attachment points and drill holes for them. Even one such shelf looks very original, and a composition of 2-3 drawers will become a real decoration.


Video - DIY wall shelves
Interesting wooden shelf. Master Class

You will need:
- Rope;
- Board at least 2 cm thick;
- 2 corners (mounts) for shelves;
- Steel washers;
- Lighter;
- Drill;
- Saw.


