In every city apartment, especially if it is small, over time a certain number of different things accumulate, which take up a lot of space, and thereby create a mess and cramped home. Owners of their own houses, barns, or summer cottages have the opportunity to store items that are not constantly in demand in convenient location outside the residential area.
What should those who do not have such useful additional premises? When out-of-season clothes, winter preparations, or things needed for rare use are piled up everywhere and constantly take up the energy and time to rearrange and organize them, a properly equipped balcony can help out. More precisely, a balcony cabinet created with your own hands.


Features and Benefits
A wardrobe on the balcony is not a new idea, but relevant today. Useful space does not sit idle, but is used with all conveniences. The peculiarity of this furniture is that it can be free from a clearly defined apartment interior design in color and style. This means having an arbitrary shape and appearance that fully corresponds to both the size of the balcony and the individual taste preferences of the owners. The advantages include the fact that by assembling a cabinet yourself, it is possible to make it best suit your needs, rather than adapting to a finished item, complementing or changing its original appearance and functionality.


Plus, this is a real chance to save money and practice your creative skills. A fairly spacious wardrobe for the balcony, as an additional storage space, significantly relieves the living space of the apartment, does not disturb anyone, is always nearby, and makes the balcony look neat and well-groomed from the street.


Kinds
There are two types of this furniture: free-standing and built-in. By type: open, sliding and hinged.


Open cabinets are a series of shelves located one above the other in the form of a bookcase. This can be either a separately manufactured product to specified dimensions and displayed on the balcony, or built into free space the end part of the insulated balcony, away from the exit to it. Such cabinets are often equipped with curtains or blinds that cover the contents of the shelves from the street and the front. The number of shelves is chosen at your discretion, but top shelf It is better, for ease of use, to be placed no higher than arm’s length.


Hinged wardrobes can also be either free-standing or built-in. They differ from open ones by the presence of doors. Doors can be single-leaf or double-leaf. Sliding wardrobes have sliding doors in the form of a compartment. The choice of model is determined by its convenience for the owners and the features of the balcony.


These can be either all shelves that are completely closed with one or two doors at once, or each pair of tiers that can be closed separately. Hinged wardrobes and sliding wardrobes can be equipped not only with shelves, but also with clothes hangers. If clothes, shoes, equipment, and expensive necessary items are stored on the balcony, it must be insulated and protected from moisture. In the same cabinet you can combine open and closed shelves, depending on the function intended for them. For example, when planning to grow flowers on the balcony, they can be partially placed on some open shelves or on a cabinet on top.


Wardrobes can be open, hinged, or a combination of both. Most often they are built into insulated balconies or loggias. They are shelves mounted in the corner between the balcony and the wall of the house. Such cabinets are more spacious. This can be one wide cabinet that occupies the entire corner.
You can also combine two separate cabinets of smaller width, one of which occupies the corner itself, and the second is located next to it, filling all the remaining free space.

If corner balcony very small, or vice versa, after installing the cabinet there is still enough free space, it is advisable to place a bedside table under the window sill, flush with it. It will not cover the window, and several shelves will be useful for storing household items and other small items. You can place flower pots on top of it, or use it additionally as a table.

photos
Materials
Cabinets for balconies are made of natural wood, plywood, plastic or chipboard panels. A combination of them is possible. For finishing, lining or PVC panels are usually used. If the balcony is not insulated, then it is wiser to use natural wood, you can combine it with weather-resistant finishes facade panels. Coated with water-resistant outdoor paint or varnish, or otherwise treated in a suitable manner wooden product will be able to last, despite temperature changes and precipitation.


If the balcony is well insulated and protected from dampness, then you can use any materials at your discretion, since nothing will damage them.

photos
How to make it yourself
It is necessary to take into account the specifics of the installation location of the cabinet, since this completely determines what type and material the product will be made from. Open air, or protected space, as well as the size of the balcony, as well as the level of skill, dictate different approaches.


A completely inexperienced craftsman can build the simplest one, for example, start with an open cabinet - a bookcase for placement on any balcony or loggia. To create it, it is enough, using a tape measure, to take all measurements from the balcony without errors and, based on them, prepare a drawing with detailed dimensions of each part of the future product: their height, thickness and width.


When drawing up a drawing, you need to think step by step about the purpose of the cabinet, since the size of the shelves and the distance between them will depend on this. After this, buy the appropriate materials and, checking the drawing, make precise markings on them. Then, using a saw, a building level, a plumb bob, a hammer and nails, or a screwdriver and screws, assemble the frame and place the shelves on it.


The frame is assembled from below. Having secured the base evenly, the vertical parts of the cabinet are attached to it. Then horizontal parts are attached to them, fixing the rigidity of the structure. Next, the ledges are attached on which the shelves will be supported. You can make them a little more than you need this moment to be able to change the height of the shelves in the future to suit current needs.


The main thing is to carefully ensure that the structure is smooth and symmetrical, which ensures its neat appearance and the reliability of the placement of storage items on it. The cabinet that will stand on open balcony, it is advisable to process special compounds for wood, paint it with street paint, or coat it with durable varnish to increase its service life without damage.


To create a more complex product with doors, you will also need a drawing. It should indicate in detail all the dimensions of each part for assembly, and think over the sequence of connecting them together. All cabinet dimensions must correspond to the size of the balcony and its intended purpose. Depending on what you plan to store in the closet, its depth, height, and distances between shelves are determined.


Having thought through the details and nuances in advance, preparing a drawing, a choice of materials is made, including small details - handles, hinges, and fasteners. It also depends on the type of balcony and the desired type of product. Having purchased everything necessary materials, you can start working. First, parts for assembly are prepared according to the drawing, then, using step-by-step scheme, it is necessary, using a building level and a plumb line, to assemble them into ready product. It is better to use sheathing; it looks good in a room that is sheathed with the same material - be it plastic or lining.


The lower parts of the frame and its support are installed first, then, in turn, its longitudinal and transverse parts are attached. Lastly, shelves are inserted and doors are hung. Their size is determined by the cabinet doorway in assembled form, taking into account the installation of hinges. It is necessary that the structure is smooth, without distortions. At the very end of the work, handles are attached to the doors. The tools for assembling such a cabinet will require, in addition to a saw, screwdriver, screws, level, plumb line, a chisel and a drill. With their help, holes are prepared for attaching handles, and recesses in places where door hinges are attached.

Regardless of whether the balcony is wide or narrow, when correct use space, you can not only get additional storage space, but also decorate it in a very functional, beautiful and creative way.


A built-in monochromatic wardrobe, consisting of many closed modules, which combines plastic doors of different heights, widths, opening directions with drawers, looks very interesting.

Convenient, similar from the inside, is a hinged cabinet containing many sections of various sizes for objects of various sizes. But it is equipped with only two external doors at its full height. Its convenience lies in the fact that when using the doors, you can see all the contents of the cabinet at once. The beauty and shine of such a cabinet can be given by covering it with plastic lining.


The cabinet with inserts from frosted glass. This makes the balcony look like an extension of the kitchen, which brings comfort and harmony to the space. A cabinet in the shape of a kitchen buffet gives the same impression.


An unusual balcony wardrobe is a compartment with mirrored doors that visually increase the size of the balcony.
Very often balconies or loggias in apartments are not just usable area– you can arrange a real pantry on them. It is there that many housewives store their stocks of pickles and jams for the winter and “store” unnecessary things. And the best budget solution is to make a cabinet on the balcony with your own hands. In this case, the design can be made both cheaply and beautifully, taking into account the individual wishes of the owners.
Why a closet? Because regular racks with shelves, although they require less expense for their manufacture, they still do not look very aesthetically pleasing. But a full-fledged design with closed doors is the most best option for the balcony. Especially if you build the cabinet yourself.
Cabinet Types
There are only two of them: a free-standing one and a built-in wardrobe for the balcony. A free-standing cabinet is assembled into a single unit, has doors on hinges and does not take up everything usable space on the balcony or loggia. But built-in wardrobes (or wardrobes) are more of an option for installation according to individual project. Built-in wardrobes can be placed on a balcony of any size, size and layout.
Before you start making and installing a cabinet on the balcony, you should consider several important points:
. Here you will have to think about what exactly you are going to store in your closet and select boards for the shelves of the required thickness. The wooden cabinet fits perfectly into the interior of the balcony and loggia.
 Wooden cabinets have a more aesthetic appearance and higher strength characteristics, which plays an important role when securing boards to the walls of the balcony. However, their disadvantages include more complex assembly of parts (this is true for a free-standing cabinet) and their fastening. In addition, wood weighs more than drywall, therefore the load will be greater.
From advantages of drywall we can note the ease of processing the material, the speed of installation and assembly, light weight, resistance to deformation when mounted on metal frames. But the disadvantages include low impact resistance, less ability to withstand loads than wood.
- Design. Yes, yes, the type of furniture should be in harmony with general view interior of the balcony, so you will have to take this aspect into account. Today you can assemble cabinets various designs, everything will depend on the size of the balcony you have. Thus, narrow balconies require built-in wardrobes, mainly at the end of the room, “decorated” with a pair of sliding doors - such designs significantly save space, leaving more free space.
If the ceiling height allows, you can arrange a closet with four doors with mezzanines. On wide loggias, free-standing cabinets with rounded side shelves will look beautiful - you can place all sorts of cute trinkets, framed photographs, houseplants in pots. Extra charm general interior will give the structure a matching finish balcony frames, door or flooring.
In any case, the choice of material, production and installation of the cabinet on the balcony remains with the owner.
How and with what to properly lubricate plastic window fittings
Stage 3: covering the frame with plasterboard sheets

Perhaps this is the simplest of all assembly stages - gypsum boards are simply attached to the frame using self-tapping screws (a kind of cladding), a screed is installed in the places where the sheets touch (so that the boards do not “move apart” after the first loading of things onto the shelves). When the entire frame is completely sheathed, you can proceed to the next stage - finishing.
Stage 4: finishing
 We glue and then putty the joints of the plasterboard sheets
 This includes the processing of joints and the final finishing of the cabinet. Despite the fact that drywall is considered ideal material when arranging cabinets, it also needs to be processed. If you are planning to paint your cabinet, this can be done using water-based paint. However, before painting, the surface must be primed, joints and gaps must be puttied, and sealed with reinforcing tape.
The putty should be applied in two layers, allowing the previous one to dry thoroughly, cleaning the surface and sanding it. Finishing layer(painting) should be applied when the putty is completely dry.
Important: Marking and installation of shelf fastenings should be done before puttying and painting.
In some cases, cabinets are simply covered with wallpaper - “to match” the overall interior of the balcony. Wallpapering surfaces is the most a budget option. Before applying glue to the surface of the plasterboard, it is necessary to clarify what type of glue will be needed for gluing. Some types of wallpaper can only be applied to special types of adhesives.
After graduation finishing works You can install shelves that are also painted/pasted to match the cabinet and doors.
Stage 5, final: installing doors
The most optimal - installation sliding doors. If you have already installed a frame with hangers on which the guides are attached, installing a sliding door is as easy as shelling pears. To do this, you can also use a gypsum board sheet with counter rollers attached to it for sliding doors (hardware kits for sliding doors can be purchased at any construction department or department for the manufacture and sale of doors).
This is how you can make a wardrobe on your balcony yourself - quickly and not very expensive!
DIY wardrobe on the balcony photo
This section presents photographs on the topic of our article “How to make a wardrobe for a balcony.” All photos are clickable.
Looking for extra storage space for your household items? Why not use it for this? Supplying him spacious wardrobe, you will get an excellent “home” for household utensils, winter clothes, tools and other things that are not used very often, but should always be at hand. Moreover, you don’t even need to purchase special furniture for this, because you can make it yourself. As proof, we offer a step-by-step photo analysis of how to beautifully make a high-quality cabinet for your balcony without high costs.
General preparatory work
Before you begin the actual construction of the cabinet, you need to complete a series of preparatory work. First, create on the balcony the necessary conditions for furniture installation. Firstly, the balcony must be well insulated, otherwise the cabinet will quickly deform and shrink due to dampness. Secondly, you need to think about the location of the furniture and make sure that there are no obstacles to opening the doors. Thirdly, you need to level the area of the floor under the future cabinet, otherwise the furniture will be installed distorted and its subsequent use will cause a lot of inconvenience.

Next, you need to take measurements of the future cabinet and make drawings. To do this, you will need simple available tools: a tape measure, a pencil and a sheet of paper. Taking into account the dimensions of the balcony area on which the furniture will be located, determine the optimal width, depth and height of the product. Also, taking into account the dimensions of the things that you plan to store in the closet, consider the number and height of the shelves.
Advice. It is advisable that there is a gap of 5-7 cm between the cabinet and the walls of the balcony on each side - this will make it convenient for you to install furniture and change its position.
Having received all the necessary measurements, create a drawing of the future structure. To be on the safe side, you can also build a cardboard model of the furniture so that you have a real guide during the work process.
Now you can proceed to the actual assembly of the cabinet. Let's consider two options for making furniture:
- from store parts;
- from our own lumber.
Assembling a cabinet from purchased parts
To make furniture on the balcony, in addition to the factory parts and fittings themselves, you will need the following tools:
- screwdriver and European screws;
- jigsaw;
- metal corners;
- wood screws;
- clamps;
- Phillips screwdriver;
- construction stapler;
- hammer.
Advice. If you bought blanks from regular chipboard, before work, cover the material with a special transparent film to protect the cabinet from scratches and moisture.
Assembly order:
- Assemble the frame by connecting the sides with the bottom and top: place the elements on the end, connect them at an angle of 90 degrees and securely fasten with a clamp.
- Drill holes in the sides, bottom and top for future fastenings. Also prepare holes for countersunk screws - they should be 2-3 mm wider than the main holes.
Advice. To prevent the workpieces from cracking while screwing in the screws, initially make holes in the material slightly smaller than the diameter of the fasteners.
- Secure the frame with screws and cover them with plastic plugs. Install metal corners at the corners of the structure.
- Attach the legs to the base of the cabinet.
- Place the resulting frame in the place where you plan to install the finished cabinet, and check its shape and dimensions.
- Lay the structure with the facade down and fix the back wall. It does not have to be made from the same chipboard - a plywood sheet is quite suitable here. But whatever material you choose, it is best to secure it with construction staples.
- Place the cabinet back upright and prepare holes for shelves and doors. Next, perform a number of final works: secure shelves, hinged doors, closers and other fittings.
Construction of a cabinet from lumber
If you want to make a cabinet from lumber, it is best to use pine, as it is quite easy to work with. You will need the following set of materials and tools:
- bars 40x40 mm for the skeleton of the frame;
- boards 3 cm thick for panels;
- clamps;
- hardware,
- electric drill and screws;
- plane;

- plumb and level;
- hacksaw;
- hammer and nails;
- accessories.
The procedure for constructing a cabinet:
- According to the previously taken measurements, cut the workpieces from the boards and bars.
- Assemble the skeleton of the frame from the bars, fastening them together with screws. When connecting parts, be sure to check that they are vertical and horizontal.
- Build the bottom of the future cabinet entirely from blocks.
- Using self-tapping screws, secure the sides and top of the cabinet to the skeleton and connect them together with clamps at an angle of 90 degrees.
- Lay the resulting structure on the floor and secure the back wall to the timber frame.
- Inside the finished box, install the bars for the shelves and fix the shelves themselves.
- Prepare the panels for the doors and make holes for hinges in each. Make the same holes in vertical bars frame. First, secure the first halves of the hinges to the box, then hang the doors one by one and screw the second halves of the hinges to them. Then install the handle, closers and other fittings.

You can decorate it if you wish ready-made wardrobe: paint, varnish, decorate, decorate with self-adhesive or stained glass film.
As you can see, if you have at least minimal experience in constructing something with your own hands, make nice closet on the balcony will not be difficult. Take measurements carefully, prepare high-quality components and follow the chosen step by step instructions– if all these conditions are met, you will definitely get beautiful, reliable and roomy furniture.
Assembling a built-in wardrobe on a balcony: video
Wardrobe on the balcony: photo


It is necessary to have a kind of storage “for all sorts of junk” in the apartment. This is not a debatable issue. But the mezzanine, if there is one, will not fit much due to its modest size. And you don’t have to run into the garage, even if it’s located next to the house, for every little thing. It’s somehow customary for us to use a balcony as a mini-warehouse - it’s convenient and not expensive. But in order not to turn it into a banal dump, installing a cabinet on it is quite rational decision Problems.
Buying is not a guarantee that you will be able to find the right size. Ordering it will be quite expensive; besides, you may not like the finished product. For someone who knows how to hold a hacksaw, a hammer and use household tools, the best option is to make a cabinet on a balcony or loggia with your own hands. There is nothing complicated about this. And if you think through everything carefully and “put your soul” into the work, it will turn out cheap and beautiful.
If the balcony is “open”, then it is hardly worth making a cabinet on it without first glazing. Someone may have a different opinion, but the author considers it necessary to express his own.
Firstly, the influence of the atmosphere (temperature changes, humidity), direct contact with water (precipitation) and ultraviolet radiation will lead to structural changes in wood. Simply put, the closet will “lead” pretty soon. As a result, there are problems with drawers, skewed doors and a number of others.
Secondly, in such conditions, what will be in the closet will not last long. The fabric will rot and the metal will rust. Consequently, such storage loses its meaning - it’s easier to immediately send it to a landfill.
Thirdly, on an unglazed balcony, a cabinet is unlikely to look impressive from the outside, especially since its rear part (back wall) cannot be constantly put in order without disassembling the structure.
Scheme
Before you begin to outline the instructions for making a cabinet, you should figure out what options you can implement with your own hands. Considering that House master is not a professional in this matter, but the tool is only a household one. And based on the chosen model, focusing on the size of the balcony, it is easy to decide on the dimensions of the “furniture”.
Sectional composite model. How many compartments there will be depends on their desired capacity and the dimensions of the future cabinet. This option makes it possible to combine with the size of the cells in each pencil case.For example, if you don’t fill the long one with anything at all (leave it empty), then for the summer you can put children’s sleds, clubs and other sports equipment in it. And for the winter - a bicycle. Not a bad solution, and you won’t have to constantly stumble over all this in narrow hallway apartments.

For example, the same racks, which at the same time serve as sheathing slats. Well, it’s not difficult to decide how to divide it into compartments. Either as stated above, or choose your own, more original option.

You can experiment here too. For example, divide the cabinet into levels, and install shelves in each compartment so that you get “cells” of different capacities - for bulky items, jars of pickles/jams, some household items, and so on. A specific solution will be suggested by your own imagination.

As an option - a modification of the wardrobe, corner, in which door leaves move apart easily. But doing it is much more difficult.
There are enough models of cabinets on the balcony, and besides, these are just tips. The main thing is that there is something to focus on, and coming up with your own scheme and determining the required dimensions of all structural elements is not so difficult. In principle, for storing property that is not constantly needed in the apartment, shelves, racks, and so on are suitable. There is no doubt that it will turn out cheap, but whether it is beautiful is where opinions differ.
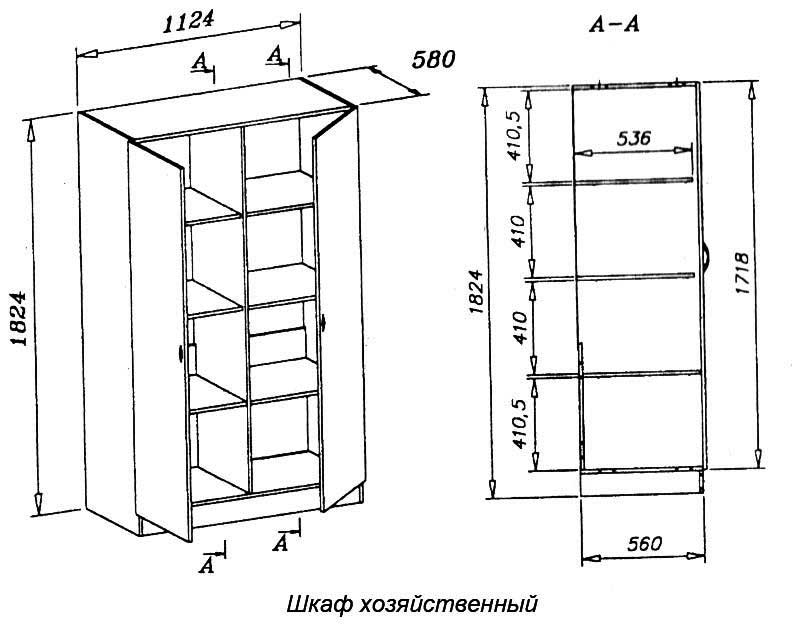
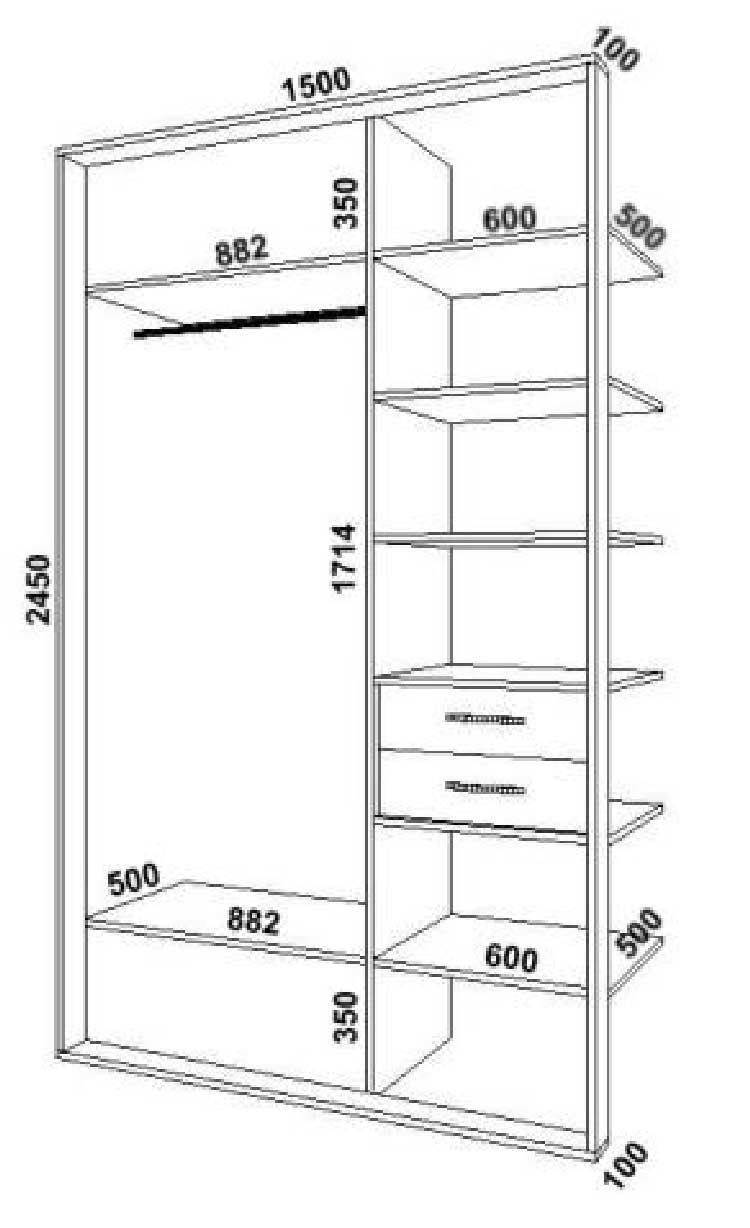
Examples of drawings and sketches of cabinets that can be placed on a typical balcony will help you design them yourself.

It is worth dwelling on the nuance of what the cabinet should be - stationary or mobile (mobile). The first option is much easier to do with your own hands. And there is not enough free space on the balcony to regularly rearrange the furniture on it. Therefore, it is advisable to install a rigidly fixed structure.
Cabinet dimensions
Beam for racks
A 4 x 4 section is quite enough. Recommendations for using metal profiles (although it is easier to work with) are not entirely correct. A balcony, even a well-insulated one, is, first of all, exposed to dampness and temperature changes. Therefore, all materials must be selected according to their expansion coefficient. The combination of wood + metal on a balcony is not The best decision. This design will definitely work.

Selection of materials
The question is no less important. Firstly, not every wood or sample based on it (sheet, slab) is easy to cut and process with your own hands. Secondly, the durability of the cabinet is also important, since not every material has a long shelf life when used in such conditions. For the balcony you will have to select the most suitable ones.
Unfortunately, all the recommendations miss one point. It concerns the weight of the cabinet. Few would argue with the fact that as soon as the structure is completely assembled and lined, it will be filled almost to the top within a matter of days (if not hours). For a loggia this may not be so important. And in relation to a balcony, characterized by the fact that its slab has only one “point” of support (along a line along the wall), it is more than relevant. Whether the balcony can withstand such a load (glazing + finishing + cabinet with all its contents) is a big question. Especially if the house has been standing for decades.
In this regard, it is worth thinking about acceptable materials for the cabinet. If you focus on the maximum possible reduction in weight of the structure, then it is advisable to choose a combined option. For example, supporting elements (racks) made of solid wood; shelves, cabinet doors - from . It's up to you, reader, to decide, but it's worth considering.

Plywood
Since there will be a lot, and samples need to be taken from the “moisture resistant” category, the choice is small – FC or FSF. Since the cabinet will be on the balcony, there is no fundamental difference - this can already be considered external work. For information, FC plywood is more “ecologically friendly”, since there are practically no toxic components in the glue used in production. And if you purchase some of the sheets with lamination (more expensive, but not much), then you won’t have to deal with the external decoration of the cabinet.
Plates
It is not practical to use them for sashes due to the mass of the products. But for shelves, bottoms drawers, closet walls are a good option. In terms of service life on the balcony optimal solution– OSV slabs. They are easy to cut with your own hands, and they are less susceptible to atmospheric factors.

Plastic
These panels have significant limitations in use due to low strength. Just how external finishing wardrobe on the balcony; They are not suitable for anything else (shelves, etc.).
Wood
Coniferous. It is preferable to hardwood for a balcony. There are enough advantages - the soft structure makes it easier to process lumber yourself, and the presence of resins protects it from rotting. And the price is lower, which means it will be cheaper to do it yourself. But there is also a disadvantage that needs to be taken into account. When heated conifers tarred. Therefore, such a cabinet cannot be left in a “clean” state - only finished. Applying varnishes, impregnations, oils, and so on will not save the cabinet on the balcony from resin discharge.
When choosing bars, it is not advisable to save money. It is better to purchase lumber at a higher price, but even. Using a “slab” will ultimately create so many problems (for example, when installing sashes, cladding) that its cheapness will result in additional costs and loss of time.
What you shouldn't buy. In principle, the list of materials that are not suitable for making a cabinet on a balcony, although they are often used for furniture in an apartment, is relatively small.
- GKL. Any type of drywall is gradually saturated with moisture. Even for lintels or sheathing this is not an option.
- Chipboard. Fasteners will not hold securely in such material. Therefore, already after a short time the cabinet will warp, the doors will start to fall off and the like.

Selection of fasteners and accessories
The main question is how to record the details. The fact that structural elements will have to be reinforced with brackets (plates, corners) is one thing. But what kind of hardware should I use?
Nails - since the wood is mounted only when it is dried, they can easily split the workpiece. In addition, the maintainability of the structure is highly questionable. But the plus is that the nails will not interfere with the wood when it starts to “play” a little. And this is exactly what will happen on the balcony – changes in humidity and temperature will have an impact. Self-tapping screws - only for wood. If necessary, it is easy to dismantle and replace the rotten part. In addition, fixation is ensured “tightly”. Here you should focus on the type of wood. If it is soft, then this solution is better. For dense wood - nails, with preliminary drilling of landing channels.
Everything else is at your own discretion (baskets, hangers, handles, decorative strips, etc.).
Wood processing issues are a separate topic. Read in detail the list of drugs to protect it from “enemies” and their approximate cost.
Instructions for making a cabinet
It is probably more correct to understand some of the nuances, since the list of technological operations and their alternation largely depend on the chosen option for balcony furniture.
Preparing the site
In the area where you plan to place the cabinet, if the balcony has not yet been finished from the inside, it is necessary to thoroughly clean all surfaces (wall, slab) and inspect. Particular attention to mold and mildew. If there are any signs of them, you should start processing this segment. Otherwise, they will safely move onto the wood with all that it entails. Significant defects (cracks, crevices, chips) are eliminated immediately using a solution or putty composition.

Marking
Having your own drawing or at least a sketch of the cabinet, this is not difficult to do. First of all, the locations for attaching the racks are outlined. Everything else depends on how well the frame is positioned and assembled on the balcony.
It is advisable to immediately decide on the “pedestal”. It is not advisable to install the cabinet on a bare slab. The reason is the same - dampness. A good option is to lay a piece of polyethylene film (or linoleum remaining after repair), and on top - a fragment of the OSB slab. It practically does not absorb moisture, and it is strong enough to withstand the weight of the cabinet along with its contents.
Don't forget about the ceiling. If you choose a cabinet layout for the entire height of the balcony, then it is advisable to fix the upper ends of the racks on the slab. The cross members of the frame are also “fastened” to it. In this case, the marking is done from top to bottom. That is, first the fixation points are determined on the slab above the balcony, and then they are projected onto its floor using a plumb line.
What to consider:
- After completing the marking, it is advisable to check all lines of the same type on different surfaces for the same size. Some deviations in drawing are inevitable, so everything should be corrected. Otherwise, the correct cabinet geometry cannot be achieved.
- If back wall as such is not provided (it will be cheaper), then it is advisable to correlate the location of the frame slats with the shelves. These are the last ones to be attached to. This is more convenient than specially stuffing additional bars later.
Making cabinet racks
Here it is short - at first you only need one. After testing it locally, it can serve as a model from which others are made. The reasoning is simple - it’s better to ruin one if something is wrong than to redo everything later and waste lumber. After they are completely adjusted and processed, they can be fastened in place.

Installation of horizontal slats
All the same. But it’s worth figuring out how best to make connections. In this case, traditional “furniture” technology (tongue and groove or mortise) is hardly suitable. It is enough to fix the jumpers on the wall, and additionally fasten them to the racks with metal elements. The same corner. Doing it yourself is much easier.

Making shelves
From the point of view of expediency, it is advisable to make them removable. In this case, the wardrobe on the balcony will be universal, since, if necessary, the dimensions of the compartments inside it can be easily changed. It is enough to either simply remove one of the shelves or reinstall it. But for this you should immediately provide additional guides (supports).

Methods of fastening door leaves, external design of the cabinet - all this is determined independently. By the way, the procedure for assembling it on the balcony is the same. Having a drawing in hand, installation will not be difficult. Basic recommendations are outlined, examples of cabinets are given. Everything else is at your personal discretion, reader. Look, think, evaluate and make a decision.
Good luck in arranging your balcony, home craftsmen!
You can save space in your apartment and neatly arrange your balcony by preparing spacious drawers for this room. Everyone can make their own furniture if they first figure out what to make a cabinet on the balcony from and how to proceed. Spacious shelves are suitable for storing canned food, clothing, bulky items, and building materials. Making racks for a balcony will not take much time and special skills will not be needed for this work. All necessary materials easy to find at a hardware store, and the tools can be found in every home.
Types of structures
 Before moving on to making furniture, it is important to decide what type of product will fit well into the size of the balcony. If space small size, then you should pay attention to the built-in model. During the carpentry process, the balcony walls will serve as load-bearing structural elements. Shelves and racks are attached to the walls of the balcony without taking up much space. Making a built-in wardrobe for a balcony with your own hands is not difficult, but before starting work it is important to think through all the details, since moving the product if necessary will no longer be possible.
When there is a lot of space in the room, you can complement it with a cabinet. Carpentry work will require large financial costs, since it will be necessary to manufacture all structural elements and the inner wall, including. The product takes up more space on the balcony, but if necessary, it is convenient to move or transport when moving.
make corner cupboard building a balcony with your own hands will be a little more complicated than the two previous design options, but such a product is very roomy. This type of furniture can be built-in or cabinet type. A similar model is made in the form of shelves attached to the corner of the room. Product corner type installed on an insulated loggia or balcony.
 It will be much more convenient to be in the room if, before making a built-in wardrobe or cabinet on the loggia, you decide what kind of doors there should be. You can make a design using the following elements:
- Swing doors. Suitable for a loggia with a lot of free space. You can install doors to the full height of the structure or divide the structure into certain zones, where each will have its own door;
- Accordion doors, compartments and roller shutters. This type of door is suitable for a room where space is limited. They will help you save space and use your closet more conveniently.
What materials will be needed?
 You can make a cabinet using plywood, wood, chipboard, plasterboard or plastic. If desired, you can combine several materials with each other. In the process of finishing work, it is important to use PVC or. Using natural wood when making a balcony cabinet with your own hands is important when the room is not glazed. If you pre-coat the wood with waterproof paint or varnish, you will be able to prevent damage to the material under adverse weather conditions.
Before deciding on the building material from which the cabinet will be made, you need to take into account the design of the balcony, whether the room is insulated or not, and what the load will be on the shelves. A universal option for any type of balcony is natural wood. Materials such as plastic and MDF are also resistant to moisture.
Product frame
 Having decided to make wooden cabinet on the balcony, you should consider what material to use for each individual element designs. When manufacturing the product, the main attention is paid to the frame and doors. Some cabinets come with a side stand and trim.
It is possible to make a cabinet frame using timber with a section of 50x50 mm or 40x40 mm. This option is suitable for a heated balcony. If the room is not heated, then it is better to exclude wooden frame and pay attention to other materials, since under the influence of moisture the tree will change its size and begin to deform.
A universal way to make a frame is to use galvanized profiles for, since they do not change their appearance under the influence of adverse weather conditions. It is very easy to attach plasterboard, chipboard, plywood and other materials to a galvanized profile.
Cabinet shelves
 You can make a high-quality and reliable wardrobe for your balcony if you choose the right one construction material for shelves. The main load will be directed precisely to this element of the product, so the shelves will have to be given Special attention. Best for making this parts will fit Chipboard, OSB or thick plywood.
If the load on the shelf is more than 5 kg, then it is better to give preference to a wooden board. This material will cope perfectly with cargo in the form of canned goods, dishes or books.
The shelves are attached to pre-mounted bars or screws. It will not be difficult to make a frame for a cabinet from bars if you prepare all the tools and materials in advance. You can make a cabinet using metal corners, where you can also attach shelves. If the cabinet is of a built-in type, and the walls of the balcony can be drilled, then it is important to use corners and self-tapping screws.
A home-made cabinet on the balcony will look no worse if you build shelves using metal guides and brackets. In this case, changing the height of the shelves is very simple; just move the brackets to another hole.
You can build shelves from the remaining scraps wooden planks. Before attaching the part to the frame, it is important to first prepare the boards. To do this they are covered paint and varnish material(preferably on water based). Such shelves will not deform under the influence of moisture and ultraviolet radiation.
Preparatory work
 Before moving on to carpentry, you should stock up necessary tools. Prepare electrical appliances in the form of: a screwdriver, a jigsaw. You will also need to take a hammer, a chisel, a building level and a square. When making a product, you cannot do without nails, self-tapping screws, a plumb line, a tape measure and dowels. It will be easier to draw a drawing of a cabinet for a loggia if you prepare a ruler and pencil in advance.
Before you start assembling the cabinet, pay attention to the following points:
- Pre-repair the floor surface on the balcony. If it is not possible to repair the entire floor on the loggia, then pay attention to the area where the closet will be located.
- In the process of installing a cabinet on a balcony with your own hands, drawings will help you avoid troubles and get the desired design.
- If you install the structure on glazed loggia, then the cabinet will last much longer;
- Insulate the balcony (walls and floor) in advance and eliminate cracks using mineral wool, foam or PVC. This measure will extend the shelf life of the cabinet.
How to make a product for a beginner?
 Having understood what the cabinet on the balcony is made of and how to properly prepare the room, you should move on to the next stage. Think in advance about where the structure will stand, and also take into account the fact whether the balcony is glazed or not. This factor will help you figure out which material is best to use for carpentry.
Beginners can make open cabinet in the form of a bookcase. The process of creating a loggia cabinet includes the following steps:
- Using a tape measure, measure the exact dimensions of the future cabinet.
- Prepare a drawing. Consider the width, thickness and height of each piece.
- Buy the necessary materials at a hardware store and prepare the tools.
- Based on the dimensions indicated in the drawing, make markings on the boards with a pencil.
- Using the prepared materials, cut out the parts, assemble the frame and attach the shelves.
It will be much easier to make a wardrobe on the loggia with your own hands using a photo or drawing. Make a frame following the basic rules. Start assembling the frame starting from the bottom. To begin with, install the base evenly, and then attach it to it vertical parts. After this, fix the horizontal parts on the structure, not forgetting to fix the rigidity of the product. Then attach the tabs where the shelves will go.
When you start assembling the cabinet, make sure that the product stands level and its parts are arranged symmetrically. If the product will be placed on an unglazed loggia, then pre-treat the boards with varnish so that the cabinet will last as long as possible.
 The process of making a cabinet with a more complex design includes the presence of doors. Having figured out what to make a balcony cabinet from and what tools to use, proceed to the next steps:
- Think over the drawing. Decide on the dimensions of each piece, the height and depth of the cabinet, and the distance between shelves. Think about the order in which you will assemble the design parts.
- In order to make swing or sliding doors for a cabinet on the balcony, buy hinges, handles and fasteners.
- Using the drawing, prepare the materials, cut out all the main parts with a saw.
- Assemble the cabinet one at a time using a building level and a plumb line.
- At the final stages, cover the cabinet with clapboard or plastic (the covering should be combined with the rest of the repairs on the loggia).
Assemble the wardrobe for the loggia with your own hands according to the drawing, starting from the bottom of the frame. First install the support, and then secure the longitudinal and transverse parts. After this, attach the shelves and doors. Try to straighten and carefully secure the hinges on which the doors will be located. Finally, attach the handles to the doors. You can prepare holes for hinges and handle fastenings using a drill and chisel.
Unusual design ideas
 It is important to install on the loggia not only an ordinary hinged cabinet with doors, but also other options for cabinets with beautiful design. It will be much easier to design a cabinet for a balcony using photos and ready-made drawings. Frosted glass inserts will help make the product as cozy and homely as possible. A cabinet in the shape of a kitchen buffet looks unusual on the balcony.
A wardrobe with mirrored doors will help to visually increase the size of the room. The product can also be arranged as a workplace. This option is suitable for an insulated balcony. A computer monitor and system unit can be hidden behind the cabinet doors.
 You can add fresh flowers or books to your closet if you think about neat shelves on the side in advance. If the loggia is large and it is insulated, then the room can be equipped as a separate room. Bottom part The cabinet can be designed in the form of a soft bench or sofa. It is important to equip the window sill on the loggia in the form of a table and complement it with a folding chair.
Wardrobe on the balcony - video