In this article we will tell you how to install a car alarm in any car with a step-by-step guide.
Car alarm - effective method insure your investment and give you peace of mind. While many cars come standard with some kind of alarm system, some do not. It's no surprise that many people want to install an alarm system, either because they don't have one or because they think they need to upgrade the system. Installing a car alarm may seem like a daunting task, but with a little preparation and information, it becomes a series of small tasks.
Planning your installation
Develop an installation plan. Planning ahead can reduce installation time. Specifically, gather documents and manuals that describe your vehicle's wiring colors, locations, and polarities.
Check each of your doors

You want to make sure that they trigger the "door ajar" indicator on dashboard. If a door fails, the alarm will not sound when that door is forced.
- Most alarms come with additional contact switches that trigger the alarm when the door is opened. This may be a good alternative if your doors don't cause light to flicker when opened.
Alarm connection diagrams

Write down which panels will need to be removed and what tools you will need to remove them. Study the wiring diagram of your car and draw a plan where you will connect the car alarm.
Car alarm installation

Remove the necessary panels. This will allow you to access the wires needed to connect your car alarm. This will also give you access to areas under the dashboard where you can install an alarm. Typically, this will include panels near the center of the dashboard on the driver's side. They are often located near the floor or under the steering wheel. These panels will be different for each vehicle, but you can consult your vehicle's service manual to find the correct panels.
Install a car alarm

Try installing a car alarm in a hidden place. Some people will mount it inside the dash if there is room, or under the seat. Just keep in mind that if the alarm is visible, a thief could disable it. The harder your alarm is to find, the more effective it will be. Install the mount using the screws and accessories included with the car alarm.
- Be sure to look at the other side of any surface before you pass the screw. You don't want to accidentally screw in wires or other parts.
Drilling protection in the car

You can avoid this step by running the wire from the car alarm to the siren through the existing hole in the guard. It often helps to run the wire near the heater core hoses, power amplifier wire, ignition power supply, or any other wire going to the other side of the guard. If not convenient location, you will have to drill a place for the wire. If you need to make a new hole, be sure to look at both sides of the guard to make sure the area you want to drill is safe.
Pass the wire through the protection
This wire will connect the car alarm to the siren.
- It is important that you insulate this wire with rubber gasket or fill the hole with silicon. This prevents the wire from being damaged by friction with protection and short circuit. You should also try to put the wire somewhere that you won't be able to touch it.
We install an alarm system

You can choose a place on the guard or somewhere else in the engine compartment where there is enough space. It is important to install the alarm face down to prevent water from accumulating in the voice coil.
Wiring connections

Start the valet switch. This will be the wire from the car alarm module. This switch will allow you to disable the siren functions. This will make it easier for mechanics when working on the machine.
Fire up the LED

The car alarm LED indicates when the alarm is on. This light is usually installed on the dashboard by drilling a small hole in the dashboard and running a wire to the car alarm module. The light is then attached to the dashboard using super glue to hold it in place. Be sure to look at both sides of the dashboard and make sure your drill won't hit other parts.
Install an external antenna

If you have an external antenna, it extends the range of your wireless remote control remote control, receiving a signal from outside the car and transmitting it to the car alarm module. Most external antennas are glass mount antennas. This means that you will install the receiver on outside your glass and repeater on inside the same glass. The signal will be transmitted through the glass without the need for drilling holes and repeater wires directly to the antenna wire of your alarm module.
Connect the siren

The siren must have two wires, one negative and one positive. Most car alarms produce a positive siren, so connect the alarm box to the positive wire of the siren and connect the other wire of the siren to ground.
Connect alarm sensors

The sensors are responsible for signaling that something is wrong and the siren should sound. You'll connect the sensor wires from your car alarm to the wires that signal your door ajar or dome light. You can also connect them to the trunk and hood sensors and the ignition switch, depending on the features available in your security system.
Connect the power wire

You must connect the power wire of your alarm module to a test or other source direct current. This will ensure that the alarm sounds even when the vehicle is turned off. Your alarm is now turned on and active.
Reinstall the panels on your car
Be sure to replace them in the right order so that all panels line up correctly. It is also recommended that you consult your service manual for this step.
First let's look at general scheme security alarm connections.
It is shown in Fig. 1 and includes:
- receiving and control device - PKP;
- detectors (sensors) - IO;
- sound and light warning devices - OP;
- power supply - BP.
Certain control panel models have a built-in power supply with the ability to connect detectors. For a small number of sensors, power is sufficient. On the reception diagram control device these points are designated as the “plus” and “minus” or “common” output of 12 volts.
Please note - the control panel is the central part of the alarm system, which, in fact, is determined by the purpose and operating principle of the system.
The given example illustrates the interconnection of security system equipment, specific connection diagrams technical means are given in the documentation of the manufacturers. However, for various types sensors and devices have a lot in common, so you can connect them together without using special instructions and descriptions.
CONNECTING THE SECURITY ALARM
Let's look at how to connect a security alarm using the most common types of equipment as an example.
Reception and control device.
This device must have terminals designated as “ШС” - alarm loop. Depending on its type, the polarity “+”, “-” may be taken into account when connecting. This is necessary when using addressable devices or detectors that receive power via a loop. For conventional sensors this is not important.
In addition, the following are connected to the control panel:
- sirens,
- notification transmission systems (TSS) - monitoring station terminals.
* * *
© 2014 - 2020 All rights reserved.
The site materials are for informational purposes only and cannot be used as guidelines or official documents.
Car alarm connection:
The modern realities of our lives make installing a car alarm one of the most current problems. First of all, it is ensured reliable protection car from attempted burglary and theft. Currently, motorists are offered the widest selection of alarm systems. And then the question of how to connect the alarm to a specific car comes to the fore. However, first of all, it is necessary to consider the main types of these devices and make the right choice.
Types of modern alarms
Any car alarm can perform several basic functions. All of them, in one form or another, are present in every design. First of all, these devices must respond to all actions towards the car that are illegal. Many of them can block the engine, preventing unauthorized start attempts. In such cases, a good alarm attracts not only the attention of the car owner, but also the people around him.
Based on functionality, modern alarm systems are divided into the following types:
- Alarm without feedback. This design represents a budget option and is installed mainly on inexpensive cars. The radio channel is considered the most vulnerable point. This car alarm is not capable of protecting the car from experienced car thieves, however, it may well scare away petty thieves.
- Alarm with feedback function. Compared to the first option, it is capable of solving a much larger number of problems. That is why it is so popular among drivers. With the help of feedback, the car owner remotely receives information about his car, which is sent to a special key fob. In addition to security functions, it is possible to remotely start the engine. You just need to disable the mobilizer installed at the factory. In urban conditions, the range of such an alarm is up to 1 km.
- Usage GSM alarms with GPS module. These devices are becoming increasingly popular due to the ability to control the car via mobile phone. Thus, you can track your car from anywhere, provided the network of the service operator is covered. All information is transmitted in both directions via SMS. Some operators provide a service that makes it possible to track the position of a vehicle linked to a map via the Internet. With this service it will be much easier to find a stolen car.
- Satellite signaling belongs to the area high technology. The level of protection allows it to be used in expensive cars. All information is transmitted via communication satellites. This is the most reliable and expensive type of car alarm.
Wide choose electronic devices allows you to choose the most suitable option car alarm system, which includes all the necessary functions. After purchasing, you can install it. To solve this problem, there are two ways: contact a car service center, an experienced auto electrician, or try to install an alarm on your car yourself.
Rules and procedure for installing alarms
If you do not have knowledge of electrical engineering, you should not try to install the alarm yourself. These devices are quite complex and require special knowledge and skills to operate them. After all, the electrical circuit of the alarm system will be combined with the electrical network of the car at many points. The slightest inaccuracy in installation can lead to failure of various relays, blocks and other elements.

There is a certain installation procedure that must be followed. First of all, the places where the main alarm elements will be installed are determined. Typically, an electronic control unit, sensors, antenna, light and sound signals are used for this. A mistake many car owners make is trying to make design changes to a circuit or connection at random. individual elements. At best, such equipment simply will not work.

The main connection point for the alarm is the control unit, in which all the wires are concentrated. This greatly simplifies the connection. In addition, the unit is located under the instrument panel, in hard to reach place. After determining the connection locations, you can proceed to the actual installation of the device.
Alarm connection procedure:
- Installation of sensors in places recommended by the manufacturer.
- Installing a sound siren under the hood of a car.
- Sensors, sound alarms, light sources are connected to the control unit in accordance with the diagram.
- At the end of installation, the unit is connected to the power source.
As a rule, this procedure does not cause any particular difficulties. You just need to carefully understand the connection diagram supplied with the equipment. There are certain connection difficulties with central locking. In such cases, you have to individually understand the circuitry of each car.
Connecting an alarm to a car with central locking
Most modern cars are equipped central locking. Along with burglar alarm, it also does protective functions. Therefore, these individual systems must work in harmony, and this depends on correct installation.

The main function of the central locking system is to open and close the locks located on the doors, trunk, hood and fuel filler flap. When the driver's door closes, other body elements are locked at the same time. To control the central locking, there is a button installed in the cabin and a key fob with a remote control. Considering the features of both devices, it should be remembered that the car alarm and central locking circuits must be compatible with each other, and their operation must occur synchronously.

After installing the alarm, additional useful functions appear in the car:
- Automatic closing of the sunroof and lowered door windows.
- Upon command from the control panel, you can remotely start and warm up the engine.
- Create a simulation of an engine breakdown so that the thief lingers in the cabin.
- Complete blocking of engine starting.
- Driving a car using SMS messages.
In some cases, the installation of a car alarm is carried out simultaneously with the central locking. This makes it possible to immediately combine the electrical circuits of both devices.
DIY alarm installation rules
In some cases, mainly in the absence service centers, car owners try to install the alarm themselves. This matter is not at all hopeless. You just need to follow the basic rules for installing such devices:
- All connections of wires to each other and to device elements are made through terminals or by soldering. All connections must be carefully insulated.
- The wiring is carried out in hidden form, under the interior trim. Special attention you need to pay attention to the transitions between body elements.
- During the connection process, the colors of the wires must be observed in the same way as in the attached diagram.
- During work, the battery must be completely disconnected.
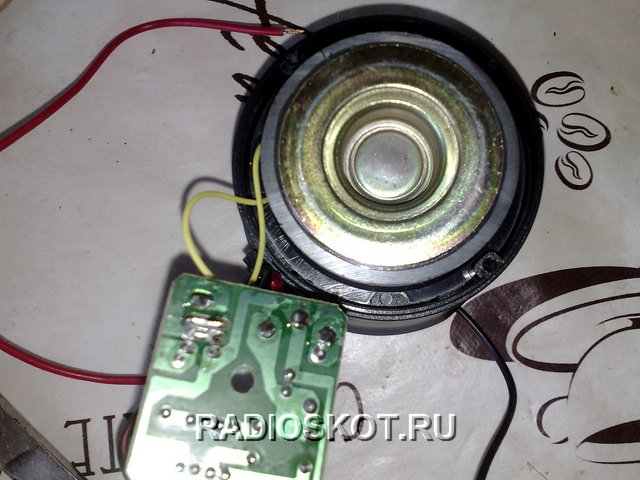
The idea of creating a laser alarm system was not new, but I just couldn’t find the time to assemble it. And now the weekend has finally arrived. A ready-made, simple car alarm was purchased at the store for $3. A compact piezoelectric head, inside of which the electrical alarm circuit itself is assembled.
When connected to a power source, the alarm makes a very high-pitched sound that resembles a police car.
So, the task was to make a sensor for an alarm. The transmitter is a laser diode. A simple red laser pointer ($1) was also purchased from the store, then the diode with optics was removed from the factory body of the device.
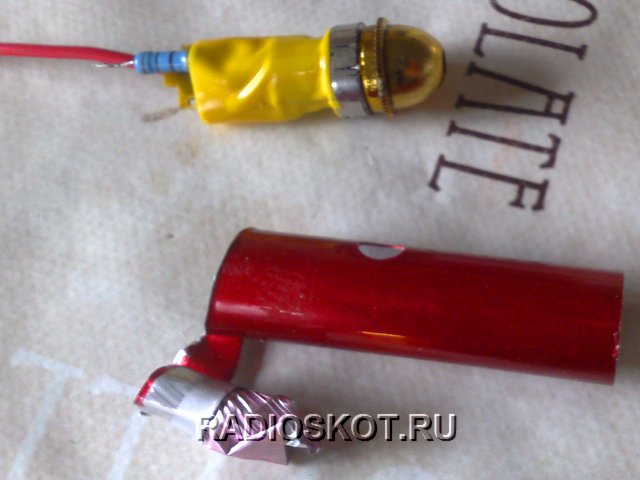
The laser button was unsoldered.

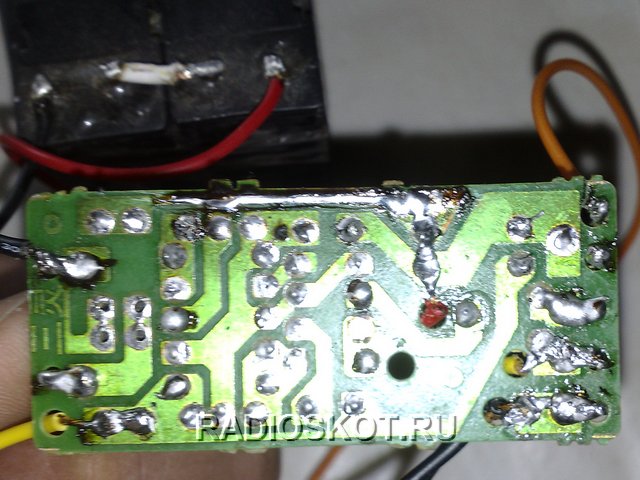
The minus of the laser diode is connected directly to the power source, and the plus is connected to the power source through a 30 ohm limiting resistor. The power source is a switching power supply from a DVD player, since the unit produces the voltage we need 6 volts.

The photodiode is used from a KODAK camera. The circuit is designed in such a way that in the presence of light, the photodiode does not allow the transistors to open, since its resistance is greater than the resistance of the 100K resistor, therefore current will flow through the photodetector. Electrical diagram For a simple alarm, see the figure (click to enlarge).

As soon as the lighting weakens or disappears altogether, the resistance of the photodiode increases and current begins to flow through the 100K resistor to the base of the first transistor and the junction opens, after which the second transistor opens to the collector of which the alarm is connected. After the alarm is triggered, the relay instantly turns off the laser diode, this is done so that after the lighting is present, the alarm will not turn off until you turn it off yourself.
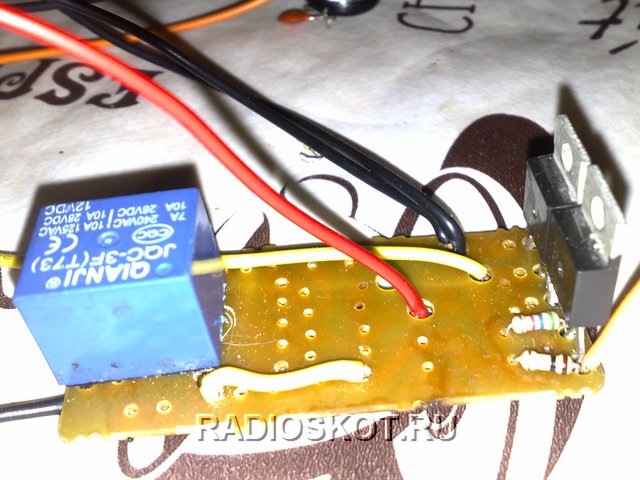
Any relay will do; I used a relay from an imported voltage stabilizer without any modifications.
It must be taken into account that the photo- and laser diode must be at the same level so that the laser beam illuminates the photodiode; the latter must be in a dark housing, since solar lighting interferes proper operation devices. Sensitivity to light depends on the value of the 100K resistor; as its resistance decreases, the sensor will be more sensitive.

The distance between the laser diode and the photodetector can reach several meters. When an object passes through the sensor activation zone, for a moment the laser beam falls on its body and does not illuminate the photodiode, at this moment an alarm is triggered and the laser is simultaneously turned off so that it does not illuminate the photoresistor later. This sensor can be used as a sensor to turn on the yard light, you just need to install a second relay instead of the alarm, which will turn on the light.
Discuss the article ELECTRICAL ALARM DIAGRAM
This article provides diagrams of the simplest electronic alarms, which can be made by anyone who is at least minimally familiar with electronics or simply knows how to hold a soldering iron in their hand. Such alarms are useful in many cases. They can be placed on the windows if the house has Small child, which can open them. There is a guarded parking lot on the doors of the apartment or garage. And when triggered, the watchman will call the police. You can install such an alarm in your apartment if you are friends with your neighbors. Even if you are going on a hike, it is not a sin to spread a security line around the camp at night in case wild animals or strangers appear.
First scheme Electronic signaling is simple to the extreme, it couldn’t be simpler. This is just one transistor, resistor and executive relay. If an audible alarm is expected, then instead of a relay, an audible siren or howler is turned on.
Principle of operation: The security loop is a thin wire, or a closed contact. When the wire is intact (or the contact is closed), the base of the transistor is grounded and the transistor is turned off. No current flows between the collector and emitter.
If the security wire is broken or the contact is opened, the base will be connected to the power source through resistor R1, the transistor will open and the relay (or siren) will operate. You can turn it off only by turning off the power or restoring the security loop.
Such an alarm can be used to protect your belongings, for example. A reed switch is used as a security contact; the alarm is hidden in the side pocket of a bag or backpack, and a magnet is placed nearby. If the magnet is removed from the alarm itself (move the thing), the siren will squeal loudly.
Second scheme with more advanced user features

As in the first case, the sensor is a security loop, a normally closed (in security mode) contact or a reed switch, closed magnetic field. If the loop is broken, an alarm is triggered and continues to operate until the power is turned off. Restoring the loop does not turn off the alarm; it will still continue to work for some time. The alarm has a temporary blocking button, which is necessary for the owner to leave the protected area. The alarm also has a response delay, which is necessary for the owner to turn it off when he enters the protected area.
Let's analyze the operation of the circuit. Before arming the alarm, you must turn off (open) switch S1. It must be installed in a secret place near the entrance. You can use, for example, a hidden reed switch, which is closed or opened by moving an object with a magnet built into it, etc. This switch blocks the operation of the system and it stops responding to a broken loop. When leaving, switch S1 opens and capacitor C2 begins to charge through resistor R2. Until the capacitor is charged to a certain value, the system is “blind”. And you have time to leave the facility by restoring the security loop or closing the contacts. By selecting the values of resistor R2 and capacitor C2, achieve an acceptable output delay for yourself.
If the security loop is broken, then capacitor C1 will begin to charge through resistor R1. This pair creates a slight delay in the alarm, and the owner has time to neutralize it by turning on switch S1. It is necessary to select the values of the resistor and capacitor for a comfortable response delay time.
If the loop is broken by an intruder who does not know how to turn off the alarm, then some time after the loop is broken, the alarm will go off (at both inputs of element D1.1 there will be a logical “1”, respectively, at the output “0”. Having passed through the inverter D1 .2 it will again become “1" and open transistor VT1. The transistor will discharge capacitor C3 and, through the inverter, open transistor VT2, which will force the executive relay to operate or turn on the siren.
Even if the attacker quickly restores the loop, the siren will continue to work, since capacitor C3 will sufficient time charged through resistor R3. It is the ratings of this pair that determine the operating time of the alarm after the loop is restored. If the loop is not restored, the alarm will work continuously.
Microcircuit - K561LA7, transistors - any n-p-n (KT315, KT815, etc.) Power source - any with a voltage of +5 - +15 Volts. The executive relay or siren can be connected to a more powerful power source than the circuit itself. In standby mode, the circuit consumes virtually no current (at the level of battery self-discharge).