It is rare to find a private house structure that does not have a cellar. It is in the cellars that a variety of products are stored, which the owners grew on their own land, and are happy to treat their neighbors in cold weather.
Housewives also store in the cellars pickles and other baked goods made with their own hands, which are the most important delicacy on the table in winter. But the presence of a cellar also implies the presence of a hatch leading into it. If you do not want to spend extra money, you will have to make a cellar hatch with your own hands.
Before you begin, you should pay attention to the following points:
- Choose the best location for the hatch and decide on its size. must match the build of the owners of the house. In any case, you should not make the hatch smaller than 750/750 mm, because otherwise it will be quite difficult to get out of the cellar with food.
- Make sure there are supports on which your new hatch will rest. Ideally, there should be four such supports.
- Also take into account such a parameter as the weight of the product. Not all household members will be able to open a heavy manhole cover. The strength of the woman or child may not be enough to hold her.

Note!
The light weight of the lid should not in any way affect its strength.
In order to build a lid that is both strong and light, you should use materials such as:
- A layer of wood at least 2.5 cm thick.
- Plywood sheet at least 1 cm thick.
Tip: For greater reliability of the structure, you should thoroughly soak all the boards with drying oil.
Hatch construction
The price of a basement hatch becomes much lower if you build it yourself.
Materials and tools
In order to build a cellar hatch with your own hands you will need:
- Hammer;
- Nails;
- Saw;
- Ruler or tape measure;
- Screwdriver;
- Screws;
- Pencil;
- Drying oil;
- Plywood;
- Reiki;
- Boards.

In order to outside The lid looked more pleasant if you covered it with linoleum. Before fixing the linoleum, be sure to let it rest well. The linoleum needs to be secured around the perimeter of the entire hatch cover using aluminum corners. This option exterior finishing The cover is quite practical and reliable.
Pen
An important element of the hatch design is the handle, which should provide ease of opening and closing the lid. If you screw a handle to the lid, even if it is very beautiful, it will cause inconvenience. Your household members will, without a doubt, constantly trip over the handle sticking out of the floor.

There are very suitable designs called flip handles. At correct installation such a handle, as the instructions say, it will not interfere at all. And if necessary, it will be easy to raise and lower.
For convenience, you can provide a removable handle. This design is especially suitable for families with small children. After all, the basement is not a place for games.
Loops
If you want the hatch cover leading to the basement to not only be removed, but to be able to open and close, then you should provide hinges. Absolutely any hinges can be used; even old hinges from the hood of a Soviet car will be a completely suitable material.
When installing your sunroof cover on car hinges, you will have the following benefits:
- Easy opening. Car hinges are equipped with springs, which makes it easy to open even heavy lids.
- Fixed position. The lid will remain open until you close it yourself. This eliminates the possibility of the hatch slamming shut under its own weight.

Installation of such hinges is carried out only when the springs are removed. To begin with, the hinges are installed from the bottom. After installation, the hatch opens completely and the hinges automatically fall into place.
Installation of the cellar cover
Installation of the cellar cover is carried out as follows:
- We make markings. To do this, place the finished hatch shell on the floor in in the right place and circle it with a marker;
- Using a puncher, we make a hole in the ceiling 3 cm smaller than the markings made on the ceiling;
- Using a hammer drill, we make a neat concrete protrusion so that the cover frame fits flush into the ceiling;
- If the hatch design provides for the installation of anchors, we install the anchors;
- Seal the gaps between the frame and the ceiling cement mortar from inside and outside the cellar.
Note!
If the hatch is installed after the floor covering has been laid, it should be disassembled around the planned opening.
Sealing and insulating the cellar
In order to seal the hatch and insulate it from noise and moisture, you will need insulation. As insulation of this kind, you can use ordinary door insulation, the price of which is low. But ordinary felt tape may also be suitable.
In any case, the use of insulation can save you from such unpleasant moments as:
- Through the cracks in the hatch the house will always be warm;
- When closing the hatch, the lid will not slam loudly;
- If mold appears in the cellar, then insulation will relieve you of unpleasant odors.
If you decide to make a cellar hatch with your own hands, you should take into account even the smallest nuances.

Everyone decides for themselves whether to buy a factory-made cellar hatch or make it themselves. The main thing is that the structure being installed is reliable, durable and makes you happy long years. The video in this article will help you see how to make a cellar lid with your own hands.
The production base must have a fleet of equipment: metal cutting and bending, stamping, drilling machine, welding station, Grinder, spray booth.
Materials
What you need to make a hatch for a floor hole:
1. Door hinges.
2. Lock with a latch for a square key.
3. Corner for the frame.
4. Pipe for the cover frame.
5. Sheet metal for welding loops.
6. Rod for making a T-shaped removable handle-key.
7. A sheet of drywall for the lid.
8. Car shock absorbers.
9. Nuts for attaching shock absorbers to the cover and base.
All these materials must be found in different places and buy at retail in pieces with a reserve if it doesn’t work out the first time. The workshop for welding metal structures does not keep this nomenclature in stock; they will look for it or entrust it to you. GKL is sold in sheets, and metal - in rods! You will receive the remaining materials with the finished product and, most likely, throw it away as unnecessary.
Drawing and calculation of hatch dimensions
You can find drawings of floor hatches on the Internet and modify them yourself if you have real skills in design and strength calculation of loads on metal structures. When you come to production, specialists will tell you which components need to be improved, in terms of their experience and your wishes.
Hatch "Standard" with hinge

No one will guarantee the proper operation of the hatch on site after installation in the nearest metalworking shop. A metal structure will be manufactured and painted according to your requirements. technical specifications. Does it open? Opening! Are there any chips on the body? No! Thank you for your order, come again! When leaving the factory gates, all responsibility for the quality work of the hatch at the facility falls on you.
Installation
Your builders install the hatch to the best of their ability. Drawings and wiring diagrams from the Internet can help, but you need to take into account the specifics " self made» the product you made.
Expert advice: What to pay attention to when making a basement hatch with your own hands?
If you decide to weld a hatch into a floor hole yourself or order a metal structure from your nearest workshop, we recommend that you pay attention to the following points:
1. The angle you choose for the frame must be strong enough to withstand the load and maintain its geometry during operation. It is optimal to use a corner with a thickness of 4-5 mm.
2. Power of shock absorbers - the cover should not fly out suddenly to avoid traumatic consequences, and if the shock absorbers cannot cope with pushing out the cover, the hatch door simply will not open. Your goal: easy and smooth lifting of the lid when turning the handle in the lock. The number and power of shock absorbers must be determined at the testing stage of the product design.

3. Correct location shock absorbers relative to the frame base of the structure and hatch covers. The shock absorbers must be secured so that their complete release raises the cover to a 90-degree angle. Otherwise, the gas pneumatic lift may simply be torn out of the bushing due to the inertia of the heavy door.

4. The location of the plasterboard panel of the cover relative to the plane of the base of the frame in height. A low-set lid will not open with tiles. The high lid opens well with the tiles, but does not align with the finished floor. Look for balance.

5. Hidden hinge design, simulated hinge opening with floor tiles on the lid. Hidden hinges are often used in entrance doors. But on vertical doors there is no cladding up to 15 mm thick. The minimum clearance requirement must be taken into account. This requires additional design work on the hinge configuration and checking the technological feasibility of the product components before assembling the finished hatch.

6. The gaps between the tile seams on the hinge side should ensure contactless opening of the lid without creases or chips of the tile edge in the hinge area. A well-made hidden hinge should provide a smart gap with equal tile spacing around the entire perimeter of the door. It is ideal to achieve a front-hinged opening design, when the lid first rises up and then folds back. This is aerobatics!
What does this look like for manufacturers of ready-made basement hatches?
We admit that a basement hatch, like a cutlet for McDonald's, can be made to order by any manufacturer of metal structures, but several recognized manufacturers in Russia have design documentation with load calculations.

Consistently high quality products are provided by those who design and mass-produce basement hatches horizontal installation. Such niche enterprises in Russia can be counted on one hand. They have accumulated invaluable experience and, taking into account the operation of the products, created design documentation for almost every hatch size.
Let us note, however, that despite all the apparent lightness of the design of the hatch components, it is based on deep technological development of the mechanisms and preparation of production. Therefore, simple attempts to reproduce a metal structure sometimes lead to unsuccessful results or a series of alterations in finished interior after renovation in a residential area. Real example- it was necessary to weld additional fasteners to install the third shock absorber.
What benefits do you receive as a buyer of a ready-made floor hatch?
Industry enterprises paid a high price for production errors. A huge amount of experience has been gained taking into account the actual operation of hatches in basements and cellars of houses and garages throughout Russia.


The engineers of these industries know exactly when three opening mechanisms are needed, and when two gas lifts are enough to maintain the price of the product.


It has been tested in practice how much power shock absorbers are needed - 700 or 1000 Newtons, so that the hatch smoothly opens the hole in the floor and does not shoot out along with the tiles.
The company's designers have clearly defined the parameters for using an angle or pipe square section so that the hatch frame can withstand the declared load.
The need to install additional fasteners to maintain the geometry of the frame and prevent twisting of the body elements is regulated.

The universal height of the lid relative to the frame has been calculated for the correct opening of the lined lid without chipping.
Recommendations have been issued on the number of stiffeners in the door so that it can withstand the declared load and guarantee smooth running in the floor with a uniform load of the door frame on the shock absorbers.
The hatch production plant receives necessary materials tons and kilometers. In addition, flow production minimizes waste. Who do you think has a cheaper purchase price?
Still, should you cook it yourself or buy a ready-made hatch?
It would seem that it would be difficult to make such a hatch into the basement with your own hands? There are hinges, shock absorbers, locks, but simply copying the design does not always lead to the desired result. Either the lid does not rise, or the gap between the tiles is at the hinge the width of a finger. That closed lid walks in the floor when you step on it, which, by the way, leads to the breaking of the tongue in the lock.
Insure yourself against these problems once and for all! Order a reliable basement hatch factory assembled from a recognized manufacturer in Russia. Serial production guarantees the compatibility of components and mechanisms; welding according to type-setting templates is carried out without frozen splashes or metal sagging.
It is no secret that the presence of a basement under the floor of the first floor significantly saves space in the main room of the house. Waterproofing, external wall insulation, ventilation system - all this work allows you to maintain a constant temperature and humidity in the basement. In such a room you can not only store preserved food. If you install an insulated hatch in the basement, you can even equip it with a workshop or billiard room. Or take a swing at the bodega.
Having arranged the basement, you can refuse to build some outbuildings in the courtyard. Even at the stage of designing a house, you should decide whether yours will be. This room is not often used, like the attic. The entrance to it must be equipped with a tightly closing hatch. Then cold, humidity, odors, and noise will not penetrate from the room to the basement and vice versa. If you approach this wisely, you can install a hatch into the basement in any convenient location. The main thing that basement had a comfortable and safe entrance.
Important! IN open state The hatch cover should open almost to a vertical position. The comfortable opening angle is 90°.
The lid, opened at this angle, is easily held in place by spacers and latches. And when going down to the basement you can lean on it. In addition, it does not clutter up the space of the entrance itself and does not require additional space around it.
All this applies to the hinged lid. Its advantages over removable, folding or folding options are obvious.
Advantages and features of various covers
As for the hinged lid, firstly, it does not require additional space to open, like a hinged one. When opened, it does not lie on the floor or rest on furniture. And the entrance to the basement can be located as close as possible to the wall.
Secondly, the hinged lid can be made to any size. Equip it with additional stiffeners and heat-insulating materials. Of course, a reinforced and insulated basement hatch will have more weight. But if it is equipped with a lifting mechanism, then even a child can handle it. Moreover, it will not need to be torn off from the frame and set aside, as is the case with the removable version of the lid. The removable hatch must be both lightweight and durable. That's why they are made small size, at which the combination of strength and weight becomes optimal.
Thirdly, installing rollers on a folding basement hatch cover makes the structure heavier. In the open position, folding doors take up more usable space entrance to the basement than a hinged lid. In addition, folding the doors requires considerable effort.
Let's say it can be equipped with folding mechanisms and make the lifting process easier. But what to do with the technological gap between the sashes? Such a lid must have at least one additional seam at the border of the flaps. This seam will need to be protected from dirt getting on the hinges.
The optimal type of hatch for the basement is a floor-hinged hatch with one or two doors. The hatch should open fairly easily and not block the opening to the underground room. We will talk about the design features of the convenient hatch below.
Dungeon Entry Materials
First of all, let's look at which components a hatch is being made. This is the frame of the opening and the lid itself. The frame must be fixed to the opening with anchors and have a recess for the cover. Then it lies flush with the frame and does not fall down.
What materials can it be made from? floor frame to enter the basement? In principle, the choice is small - wood and metal. But the type of wood must be hard, not only because the hatch will be part of the floor, but also so that moisture and condensation do not penetrate deep into the structure of the wood and do not have a destructive effect on it. The frame for the cover is made of timber rectangular section, for example, 60 x 40 mm for better resistance to deflection, and the frame of the opening is made of thick boards, for example, 100 x 40 mm.
Important!For the top cover, a board with a thickness of at least 25 mm or plywood with a thickness of at least 12 mm is used.
Subsequently, it will be possible to cover the surface of the hatch with linoleum or laminate. You can also glue tiles onto plywood if the floor and the lid are in the same plane.
The space between the timber is filled with insulation and hemmed vapor barrier film. Bottom wooden lid It is better to hem it with a galvanized sheet and bend its edges onto the sides of the frame.
Reinforced entrance
Metal can serve as a structural material and alternative to wood. A corner with a wall thickness of at least 4 mm is used for the outer frame, and profile pipe- for the base of the lid.
Advice! If floor covers are used in technical rooms, then it will be enough to weld the sheet on top of the pipe truss. All welds must be carefully ground.
A completely different attitude should be towards the hatch if you decide to equip it in a living space or, for example, in the kitchen. In this case, it must be installed exactly at the level of the subfloor. That is, directly on the screed. Then you can put tiles or other flooring material on top of it and veil its presence as much as possible.
The angle, pipe, sheet and other metal components of the hatch significantly make the overall structure heavier. If it is impossible to do without them structurally, then the product can be made technologically lighter. Ferrous metal is heavy and “morally” unstable to moisture. It begins to oxidize and rust. The solution nearby is to use aluminum for the frame. Excellent surface strength, frame rigidity and the most important thing for a basement - its anti-corrosion qualities.
The floor entrance to the basement is on the border of temperature and humidity. The wood must be treated with an antiseptic and covered with layers of varnish or drying oil. Black metal also does not like moisture. Therefore, painting in several layers with preliminary priming is mandatory. Aluminum is the most unpretentious material for a basement hatch.
Treasured hatch
So, we have come to the point that the ideal hatch into the basement should combine several qualities:
- It’s better to have an insulated lid swing type so that the basement is maintained constant temperature and humidity;
- have lifting mechanisms, hinges, stops and position locks to facilitate entry into the basement;
- be made of aluminum (preferably) to protect against rust and save yourself from systematic painting or other surface treatment of the hatch cover and frame;
- have a reinforced lid so that it is a full-fledged part of the ceiling and has the same finish as the rest of the floor in the room - linoleum, laminate, wood or tile;
- have minimum dimensions 750 x 750 mm, so that a person can freely descend and ascend with a load in his hands.
However, to order or manufacture such a hatch, it is not enough to draw a drawing. You also need to have experience in creating such structures and know many of the subtleties.
Invisibility hatch
A floor entrance to a basement can be both reliable and safe. If you glue a tile on it, the same as on the rest of the floor surface, hide the hinges down and remove the handle, then the closed hatch will be difficult to see. However, not all so simple.
To begin with, the lid should have the shape of a trough, the upper edges of which are located flush with the surface of the frame corners. Reinforcement must be installed inside this trough, which creates a reinforcing mesh. After installing the hatch in the opening, it is necessary to fill the trough with concrete or cement mortar to the very level. Only after strengthening the lid with mortar can tiles or other flooring be laid. Without this procedure, the lid will sag under the weight of a person, and the material will crack.
When performing the tie, it is necessary to fix the tube opposite the lock key. Then you can insert a T-key through the tile and turn the latch. The same key can also serve as a handle for opening the hatch. People living in the house will not trip over the protruding parts of the hatch. The key hole can be hidden with a plug.
Invisibility hatch to the basement.
Advice! It is advisable that the master lay tiles on the floor in the entire room at once, and the seams fall on the edges of the hatch cover. Then no one except the owners will guess about the existence of the entrance to the basement.
A safe, beautiful, reliable and discreet hatch in a house with a basement is a technical highlight. You will always feel a flat floor surface under your feet and the absence of protruding elements.
Hatch into the basement under the tiles.
Additional comfort components
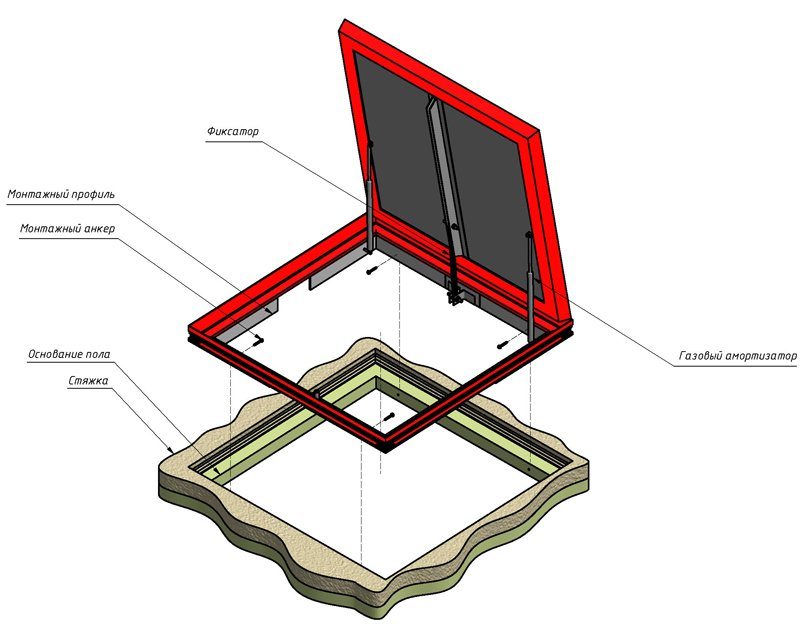
A story about a reinforced and insulated, perfectly smooth and invisible hatch to the basement would be incomplete without mentioning some of its features. First of all, it is smooth operation and the ease with which you can open it without any effort. This effect is achieved solely by equipping the lid with gas shock absorbers.
Manufacturers of hatches calculate the load of shock absorbers depending on the weight and size of the hatch. The hinges hidden under the front corner and the shock absorbers work in pairs. They simultaneously lift the lid, first straight up, and only then tilt it to the side to a vertical position.
Advice! If the outer edges of the tile or laminate are cut inward, then when opening the lid on gas shock absorbers, the facing surface will not rub at the joints with minimal gaps.
The hatch cover and frame must fit snugly against each other. This fit is ensured by a rubber seal along the entire contour. If you decide to make or design a similar hatch, then hood hinges and car trunk shock absorbers can be very useful to you.
Do it yourself, trust or explain to the master, or maybe buy ready product– it’s up to you to choose. As well as using it with pleasure.
DIY cellar hatch.
There are two main design options for entering the basement - a door and a hatch. Each of them is suitable for a specific room. If we're talking about In the basement, the entrance to which is located inside the house, most owners prefer a hatch.
Making it yourself is easy and quite quick.
Before we begin installing it, let's decide for ourselves whether a basement is really needed in the house. Will he be able to solve the tasks assigned to him and will he not be a heavy burden for us?
A basement is a room whose floor is below ground level. construction site more than half the height of its walls. Otherwise it will be the ground floor.
What affects the structure of the basement
- Hydrogeological conditions;
- Soil type. For example, excavation work on rocky soil will be very expensive, since it is impossible to do without special equipment;
- Level groundwater. When this indicator exceeds the depth of the foundation, you will have to purchase expensive waterproofing.

Advantages
- Creates additional usable area, which can be used for storing things, canning and food. Often a workshop or room for engineering communications, wine cellar and others.
- Having arranged a basement under the main house, you no longer need to think about building an additional utility room on the territory, thereby keeping such expensive square meters plot.
- The basement allows you to always have a warm and dry floor on the first floor.
- The owners receive additional comfort, since they do not need to run to the annex for groceries in bad weather; they can simply go downstairs and take everything they need.
Flaws
The only thing that can influence the decision to install a basement is its price. It can reach a quarter of all costs for a private house, which is a lot. This is due to expensive land work, for which you will have to hire special equipment.
You can do everything yourself, but it will require a lot of effort and time. In addition, careful arrangement of the room will be required, which includes waterproofing, interior decoration and placement of the necessary shelves.
Basement entrance cover
Prepare materials and tools:
- sheet steel - thickness at least 3-5 mm, otherwise it may collapse;
- metal corner;
- tin;
- welding machine;
- dense rubber;
- expanded polystyrene;
- screwdriver;
- self-tapping screws;
- roulette
- The lid must be made strictly to the size of the shaft so that it fits exactly end-to-end when closing. To do this, use a rubber seal, which will protect the basement from air entering it, which can lead to an increase in temperature.
- It can be covered on top with the floor covering used in the room, or left as is, after being painted with paint to protect it from rust. Weld a corner around the perimeter to the bottom of the steel plate, providing additional rigidity to the structure.
Tip: Leave room for free movement so that the lid fits tightly into place.
- Lay insulation on the inside of the lid. For this, use polystyrene foam, which you cut so that it fits flush against the inside of the corner.
- Cover the lid with a sheet of tin, bend it at the sides and secure it with self-tapping screws.
- Attach the basement hatch to the external hinges. There are also electric version mechanism for closing and opening the lid.

Electric drive
Unlike the previous option, when the hatch can be opened by anyone, this design turns the basement into a safe. Unwanted visitors will not be able to get there no matter what they want. The design depends on how the do-it-yourself basement hatch drawings are drawn up, the skill of the contractor and the financial capabilities of the customer.

Regular option
Prepare:
- electric motor;
- duralumin pipes;
- sheet steel;
- grinder with a circle for cutting metal;
- welding machine;
- electrical cable;
- three-position toggle switch;
- current source.
This option is considered the simplest, therefore it is used not for special protection of the cellar, but to simplify interaction with the hatch. Install the mechanism directly on the hinged lid.
Tip: never install the hatch at 90°, leave room for free reverse movement.
The operation of the design is quite simple - you send a signal to the electric motor from the remote control, it begins to rotate and set the mechanism in motion. The lid rises upward thanks to the rod to an angle of 80°, where it is stopped automatically.
You can close the hatch by pressing the second toggle switch on the remote control, which turns on the reverse rotation of the electric motor shaft and returns the rod to its place. You can hide the moving elements behind light duralumin pipes or steel boxes. Even a beginner can assemble the mechanism quite quickly.
When arranging the entrance to the basement great importance has the reliability and quality of the hinges used; installation of elements that are not strong enough or cannot withstand loads leads to rapid loosening of the doors or complicates the process of opening them. If you have the correct drawing, installation is not a problem; mandatory conditions maintenance includes measures to extend service life: inspection, tightening, oil lubrication. Buy the necessary fittings can be found at any hardware store; in most cases, the frame and cover are made independently.
1. Stretched overhead hinges, fixed on one side of the hatch and on the floor or wall. The cost depends on reliability and decorativeness; maximum costs are observed when using forged types.
2. Hidden, mounted in the ceiling or internal frame and allowing the basement door to be brought to the same level as the floor covering. When choosing this option, the hole in the underground is easily covered with a carpet; only the owners of the house will know about it.
3. Driven mechanisms that automatically open and close heavy and massive hatches, most often metal. This variety, in turn, is divided into retractable and folding groups.
4. Pantographs that ensure sequential movement of hatches upward and only then to the side. When using such hinges, the edges of the door come out of the ceilings without problems, regardless of the thickness of the materials. The best results are achieved when they are installed on wooden structures and doors with two leaves.
5. Gas shock absorbers, closers and stops, simplifying the lifting of the hatch from the cellar and allowing it to be fixed in the desired position. The main advantage is the ability to lift heavy doors made of metal and wood by one person when they are positioned horizontally.
Regardless of the type, the fasteners used are subject to strict requirements in terms of withstanding weight loads, ensuring backlash and anti-corrosion protection. Hinges, like handles, are purchased with a reserve. For small manhole sizes (within 0.75-1 m2), two pieces installed closer to the corner are sufficient; in other cases, the axis is strengthened in the center. Actively used hatches require metal edging around the edges; this requirement is taken into account when selecting the backlash.

Description of the “Cellar” set
At self-production and installation, it’s worth buying a universal kit. Standard kit includes:
- Gas shock absorbers (stops) with the required length and force (from 500 N and above).
- Mounting brackets, including wall bracket.
- Hidden hinges (left and right) with a bracket for a gas shock absorber and central ones without it.
- A prefabricated lock consisting of a mounting and lifting plate, a locking part with a set of keys that simplify opening the hatch and lifting it.
The Cellar set can be purchased fully equipped, but in most cases not all of its parts are used. When installing a simple basement hatch without shock absorbers, the central hinges and lock are sufficient. Regardless of the selected configuration, the mount ensures free opening of the manhole with a minimum gap along its perimeter and thickness flooring up to 1.5 cm. Hidden or secret handles with brackets or ring are purchased separately. The cost of the parts included in the Cellar kit varies from 150 to 1500 rubles; they are characterized by high quality metal and anti-corrosion protection.
Step-by-step instructions on how to make a hatch with your own hands
Work begins with drawing up a layout of the lid, taking into account future furniture and passage locations; if possible, the entrance is arranged at the stage of building the house. To make a small structure, boards up to 40 mm thick are used, covered with moisture-resistant plywood; if intense load is expected, it is better to construct the frame from solid timber. All wooden elements pre-treated with drying oil, antiseptics or similar hydrophobic impregnation. Metal option It is recommended to make it from a sheet of steel from 3 mm and higher and the same corner; to insulate the underground, it is insulated with a sheet of foam plastic.
When making from wood, a simple procedure is followed: to subfloor a frame of 4 pieces of timber is nailed → a blank 1 cm smaller than the selected size is assembled from boards and plywood → regular hinged hinges are nailed on the basement side or shock absorbers are fixed → a hidden handle is cut into the right place → the lid is screwed at an angle of 90 ° and checked for jamming .
Wooden hidden hatches It is recommended to create multi-layered ones, top scores are achieved by making the first and outer layers of moisture-resistant plywood, padding along the edges of the sheathing and filling the internal space with insulation. A 1 cm gap is required.
Wooden varieties are easier to make yourself; you will need a welding machine and an angle grinder with appropriate discs. Step by step diagram The work includes: cutting out a door from metal in compliance with the exact dimensions → welding a corner around the perimeter of the hatch; if the area is large, it is fixed inside the structure as additional stiffening ribs → laying a sheet of foam plastic with a thickness no more than the height of the corner → fixing the insulation using thin steel and self-tapping screws. The next stage consists of welding and anchoring the metal frame; subsequently, reinforced hinges and closers are mounted to one of the selected sides, and a sealing strip is installed to the other.

When arranging a manhole in the basement with simultaneous filling concrete floor There are no problems - to bring the hatch to the same level with the floor, it is enough to recess the frame a few mm deep. In this case it is more difficult to hide the handle; when making it yourself, it is simply welded to outside metal The exception is types covered with floor materials; they require a special approach to fastening fittings. Everyone involved steel elements must be coated with anti-corrosion primers or paints.
When carrying out hidden installation Special attention is given to markings. On metal structures holes for future fastenings are prepared in advance, all elements have precise dimensions; when working with wooden hatches knocked down or glued together, they are cut 5-10 mm smaller due to the risk of fiber swelling. During installation, a strip with a height that matches the size of the provided gap between it and the floor is placed under the end of the door. Screws or self-tapping screws are screwed in when the hinges are positioned at right angles. During fixation, the lid is opened and closed several times until a smooth movement is achieved, without jamming in any area. If necessary, the hinges are shifted and twisted, but under no circumstances should they be used in an incorrectly secured state.

To ensure safe and long-term service, a number of measures are taken even at the stage of constructing a hatch into the basement with your own hands.
1. In houses with children, protection is provided against accidental opening of the door; if necessary, a lock with keys is inserted into it.
2. The outer part of the cover is finished with the same materials as the rest of the floor. To bring the upper plane to the zero level, the type and thickness of the floor covering are determined in advance.
3. At least once a year, the rotating elements are treated with lithol or oil; with active use, this period is reduced. Both hinged and hidden hinges require lubrication; free access is provided from the cellar side or from above.
4. Measures are being taken to insulate the underground: the hatch is sealed around the perimeter and insulated.

5. When high risk Damage to the flooring To prevent creases at the moment of opening, the edges of the tile or laminate facing the axial side are cut at an angle of 60°.
6. The risk of the cover being pressed into the basement is eliminated; the width of the corresponding supporting strips is at least twice the size of the gap or sealing layer.
7. Actively used horizontal hatches are reinforced at the edges with metal.
Temporary doors to the cellar can be secured using a piece of rubber or simple canopies. If it is impossible to purchase factory-quality products, they are fixed on hinges from the hood of the car with a spring mechanism. This option is also worth choosing if it is heavy or requires frequent installation in the open position. Car shock absorbers successfully fix both wooden and steel varieties.
Possible mistakes
The main problems arise when bringing the upper plane level with the floor mark, especially when making a hatch under the tiles with your own hands. Erroneous actions include fixing the door or screwing the hinges before installing the floor covering or adjusting its position when the concrete has not yet hardened.
Opening and changing the fastening is only permissible if there is a stable frame: the heavier the structure, the stronger Negative consequences. Violations of installation and operation technology also include the lack of anti-corrosion protection for metal elements and anti-fungal protection for wooden elements, the use of weak hinges and ignoring the need for their lubrication.