Building a house from profiled timber with your own hands is not as difficult as it might seem at first glance. Houses are built from everything: brick, concrete, natural stone, marble, clay, sandstone and shell rock, wood. Historically, in our region the most beloved building material there was and remains a tree. Every year the choice of lumber on the construction market is growing. Our ancestors built their houses from damp round log.
Today, the choice of construction wood is quite diverse: logs, timber natural humidity, rounded, profiled (both natural humidity and chamber drying) and laminated veneer lumber. In this article we will tell you how to build a house from profiled timber step by step.
A beautiful 2-story house made of profiled wood. Such housing can be built in 1-2 seasons.
What kind of wood is best to buy?
You can build a wooden house at any time of the year, but it is best to buy winter wood. Prepared in winter time The wood is denser and releases moisture more evenly when drying. Profiled timber is made mainly from trees coniferous species, therefore, the air in such a house will be saturated not only with the aroma of wood, but also with the natural antiseptics of the released resins. Walls have such a natural property as “breathing”. Up to 35% of air passes through wood pores, ventilating the room. The phased construction of a house made of profiled wood begins with the selection of building materials.
What types of treated wood are there?
Ready assembled kit for construction.
- profiled timber with natural humidity: length 6 m, the most common thickness is 150x100mm, 150x150mm and 200x200mm. The drying process does not stop until a house is built from this material. No one can predict whether this building material will dry out or not, and cracks may appear on its surface. The shrinkage period takes from 6 months to 3 years;
- profiled timber of chamber drying: drying takes place in special drying chambers. However, this does not mean that the treated building material will not shrink, only significantly less than wood with natural moisture content. In addition, “roasting” in an oven allows you to rid the wood of fungus, insect larvae and other biological nasties.
For more information about this type of building material, see the video tutorial.
It's time to start talking about step by step construction houses made of profiled timber.
Foundation
The beginning of construction is the foundation: a wooden house has a relatively light weight, so it is not at all necessary to build a massive capital foundation for it. Based on soil indicators, the house can generally be erected on pillars or stilts.
This is often resorted to, since in this case the price of building a house from profiled timber will be slightly lower due to savings. However, most often they still build a strip foundation.
Attention to the video:
Bottom harness
During the bottom trim, a beam or log is laid on the foundation, on top of which the house is directly assembled. Before tying is carried out, waterproofing made of bitumen mastic and roofing felt must be laid on the foundation. The log intended for tying is coated very carefully, perhaps even in 2-3 layers, with an antiseptic composition.
Sometimes, on top of the antiseptic, the wood along its entire length, excluding the ends, is also treated with machine oil. The oil film prevents moisture from entering the wood.
What is the harness for?
If you are interested in the question of how to build a house from profiled timber with your own hands, then you are probably wondering - why is the strapping even needed? Wood and concrete, even waterproofed, have different thermal conductivities, so the place where they come into contact is most susceptible to rotting.
Do the trim beams need to be attached to the foundation? Experts are divided on this issue. Some people think it is necessary, otherwise the house may move. Others say that it is not necessary, because there have not yet been cases of a house “escaping” from its pedestal. You decide.
Be sure to watch the suggested video on the topic of the article.
Laying floor joists
The material for the manufacture of floor joists is profiled timber, a carriage (round sawn from two parallel sides log), sometimes a 50 mm board folded in three layers. This standard kits for the construction of a house from profiled timber. The logs are laid apart from each other at a distance of 60-80 cm, parallel to the short wall. If the length of the log is not enough, it can be extended, then an additional support is built under the joint.
The logs serve as a frame for the floor; rough floors are laid on them (unedged boards 15-50 mm are used), insulation and a finished floor on top.
We continue to tell you how to build a house from profiled timber yourself.
Laying the first crowns
The first crown - it, like the strapping beam, must be very carefully treated with an antiseptic (however, machine processing is not forbidden). When laying the first crown, do not rush, use a rope to check that the lengths of the sides and diagonals match. And the level means no distortion.
Wall assembly
The walls are assembled crown by crown to the height specified in the project. Don’t forget to lay between the beams tape insulation or tow, the crowns are connected to each other by dowels. Special attention need to pay attention to corner joints. The presence of drafts in the house depends on their quality.
Roof and ceiling
Of course, before you build a house from profiled timber with your own hands, you chose what kind of roof will cover your house. The ceiling beams, as a rule, accurately copy the location of the floor joists; boards, waterproofing, and insulation are laid. A frame is made for the roof - rafters and sheathing. The thickness of the sheathing depends on the material chosen to cover the roof.
That's it, the main work is completed, the house must go through the drying stage.
Final finishing of a house made of profiled timber
After a year, the house is caulked, windows and doors are installed, flooring, communications, exterior and interior wall finishing are done. By the way, it is best to treat the house against pests in the first three months after assembly (if the wood was not treated before installation). Watch the video for more details.
Is it possible to build a house without insulation?
Is it possible to build a house from profiled timber without insulation?
I guess, yes. It all depends on the thickness of the wood used (for permanent residence it must be at least 180 x 200 mm), the climate in which the house is built, and the type of operation planned - seasonal or permanent.
How to assemble a house from 150x150 timber? Full review of the issue. No experience
 The embodiment and implementation of the idea of how to assemble a house from 150x150 timber may be of interest to those owners of a plot or land who want to build a not too bulky, usually one-story building at a fairly fast pace and without involving specialized construction teams.
Whether it’s a summer house or a place for permanent residence, a bathhouse or a utility room, the opportunity to perform many of the jobs is attractive on our own.
But in order to begin the construction of a building made of timber, you need to clearly understand the plan and scope of work to be completed, so that later your project does not turn into another long-term construction due to a lack of materials or insufficient funds.
How to assemble a house from timber 150x150, provided that the site for construction has already been selected (the purchased plot of land has been analyzed for heaving and the presence of groundwater, and soil samples have been taken and its nature determined)?
As a rule, everything starts with a project.
If the building is small and one-story, choosing it independently (there is a lot of free information on the Internet) will allow you to save quite a lot of money, since developing projects from scratch in the appropriate company costs big money. Therefore, it is best to spend your time, not money, on planning.

Foundation
The basis for the long life of any structure.
Sometimes very, very much depends on what it will be and how well it is thought out. Typically, provided the soil is normal and the terrain is not too uneven, either a self-leveling strip or piled concrete foundation is chosen.
This will be quite enough to implement the plan. But a self-leveling slab is both costly and does not justify the material investment for such a not too heavy and massive one-story building.
How to make a strip foundation with your own hands has already been described in our other article, so we will not dwell on this step in detail, but rather move on immediately to the assembly stages.
Advantages and disadvantages
It must be said that timber is an environmentally friendly material, so for people who care about health and nature, it is very suitable as a building material of choice.
In addition, timber has significant advantages over logs: less material is needed for construction and it is better processed.
However, in the red– its susceptibility to screw deformation (which is successfully combated by the use of profiled material) and poor security of seams and joints, requiring additional processing.
Manufacturers have recently dried profiled material.
This procedure helps to avoid shrinkage after construction. There is also laminated veneer lumber - a high-tech material that is geometrically stable and not susceptible to moisture.
Although it is more expensive, you should try to build from something like this.

Walls
To build the walls, take 150x150 timber, cut at the corners of the installation. Everything must start from the bottom crown. This part of the building should be given the most careful attention.
But first you need to think about waterproofing (if it was not installed when pouring the foundation).
Before laying the timber, you need to lay roofing material with longitudinal fastenings with boards that are treated with bitumen.
One of the methods for creating a log house is half-tree. Here dowels are used - special spikes - wooden or metal, designed to connect the beams.
Special holes are made, both in the corners and according to the length - a step of no less than a meter. The first crown is installed, and fiber insulation is placed on top. In the future, the laying of subsequent crowns continues. Pins are usually driven in starting from the 3rd row of timber.
Another assembly method is a lengthwise connection.
The correct technology for assembling a house from timber
The length of the timber is 6 meters (standard). The ends of each of the beams are cut out using a certain method so that they can be connected into a lock. This design must also be secured with pins from the third row.
Root Thorn.
On the first beam you need to drive a tenon. In the other, make a groove of the required size. The angle of the log house is created when these parts fit closely. But they still prefer to collect the first crown in half a tree. The entire structure is also connected using dowels.
Which assembly method to choose is up to you to decide, based on your preferences and the characteristics of the materials for construction. And it may also directly depend on personal skills and abilities if you are going to remove the log house with your own hands.

Roof assembly
If the removal of the walls reaches a certain design level, you can begin building the roof.
This is a rather complicated process that is difficult to complete without preparation. The best option is a gable design.
Rafters are the basis of any roof. They are secured with staples and nails. During construction, you should remember about connecting communications (for example, a gas pipe), as well as about installing a chimney if a stove or fireplace is supposed to be installed in the house.
Next, you need to lay a film on the rafters to insulate from steam, sew slats for the counter-lattice, and then the lathing itself.
The material from which the roof covering will be made is selected and installation is carried out. For example, if you took metal tiles, then our article with the appropriate title will tell you how to install it as a working roof surface.
Floor installation
Assembling a log house from timber cannot be done without traditional floor installation, in which special care must be taken. Most often, the floor is made double, and an insulating layer is laid between its parts.
For the floor, edged boards are usually used, which are hemmed from below.
To ensure that it does not come off in the near future, the stitches must be sewn evenly and accurately. A cranial beam will also be used for the floor. And its fastenings are made using joists. Finishing the floor can be done with either modern or antique coatings, depending on what you have in mind. interior design premises.
Ceiling
- In a log house, the ceiling must consist of several layers, the installation of which seems mandatory.
- The filing, which is located inside and has mainly aesthetic characteristics.
- The vapor barrier layer, which is located next and serves to protect the beams from air penetration from the inside, prevents rotting of the rafters.
Insulation, which will serve to warm air did not leave the building during frosts (it is located closest to the roof).
After its installation, the implementation of the idea of how to assemble a house from 150x150 timber can be completed, and you can begin installing windows and doors, interior and exterior decoration self-built building.
Source materials of profiled timber
Profiled timber is usually made from timber pine, spruce, fir, larch or cedar. They are less susceptible to various tree diseases than deciduous ones, grow relatively quickly, and have less weight and density. Of the hardwood species, GOST 11047 considers only aspen and birch suitable for the manufacture of wall beams, but with restrictions on location in the log house: except for window sills, rafters and beams forming the two lower crowns, i.e.
e. in places of greatest precipitation and condensation formation. Coniferous trees produce higher quality products impregnated with their own natural antiseptic - resin.
Coniferous beams are divided into 1st, 2nd, 3rd and 4th grades depending on the number and types of permissible wood defects: cracks, bending of fibers, tilt, core, sprouting, fungal and biological damage, warping, etc.
(only the number of knots is not standardized).
Specific requirements for wood quality, dimensions and characteristics of lumber and products are given in the following standards:

Manufacturing technology of profiled timber
- The log, cleared of bark, is planed on four sides, giving a square or rectangular cross-section.
- Then, using profile cutters, several parallel recesses are cut along the entire length (the width and shape depend on the purpose).
- As a result, a “groove-ridge” system is obtained on two opposite sides, which now become side and will be combined in the wall with the profiles of the lower and upper beams.
One or both front sides (“street” and “into the house”) can be flat or semicircular, imitating a rounded log.
The ribs on the outer face can be left as a sharp rectangular edge or cut with a slight slope. Such chamfers create additional protection for the joints from water ingress during rain or snowfall and accelerate its flow down the wall.
After profiling, the timber is either immediately delivered to the consumer or first undergoes a special drying(V drying chamber hot steam), and in accordance with these they distinguish:
- Profiled timber with natural humidity 82-87%
- Dry profiled timber no more than 18-20%
The dimensions, the same as for other types of timber, are prescribed in standard 24454-80, starting from 100 mm in width.
The length varies from 2 to 9 m, the most common is 6 m.
When making beams from wood with a moisture content exceeding 22% , allowances are provided for shrinkage in width and thickness in accordance with GOST 6782.1 for coniferous wood and GOST 6782.2 for hardwood. The higher the moisture content of the timber, the longer it will take for them to dry out and the longer the shrinkage of the walls will take.
Possible measures to prevent cracks during timber drying:
- Build a house in autumn or winter, then cracks will appear less often and look smaller;
- When choosing a beam, give preference to a rectangular cross-section - in this case, only the wide side cracks; on a “square” beam, the crack can go along any side;
- A small compensation cut made in advance on the beam will allow internal stress to escape more easily.
Characteristics of profiled timber

| Strength pine/spruce 420, 375 or 280 kgf/cm² |
For a particular type of wooden products and structures, several values are determined depending on the type of load. Basic:
First of all, the strength of a certain breed is influenced by grade. For example, here are the bending resistances when the face is loaded for pine and spruce lumber of grades 1, 2 and 3, respectively (SNiP II-25-80). |
| Thermal conductivity 0.1-0.36 W/(m °C) | The value decreases with thickening of the timber and increases with increasing wood moisture content. |
| Geometry violation |
Profiling increases the reliability of the joining of beams, makes the walls not blown through and protected from the penetration of precipitation. Nevertheless, after a year and a half, the structure shrinks - the beams lose moisture (even dry glued ones), decreasing in size. In addition, the process occurs unevenly throughout the body of the beam, which is explained by the unequal density in different parts logs (butt, tops, knotty places). The result manifests itself in the form of bending, twisting around its axis. The profile becomes a disadvantage because it does not allow caulking of defects that have arisen. To initially minimize their appearance, you need to press down on the wall as much as possible, for which the upper crown is assembled from the heaviest beams. The ideal option would be to build attic floor, because the weight of a simple attic space is not enough for sufficient loading. |
| Disease susceptibility | Since wood is a material of natural origin, its uniformity depends on the conditions of growth and development of the tree, on the degree of exposure to microorganisms and insects during this period. Therefore, the presence of certain defects is almost inevitable - areas of wood in which the homogeneity is impaired. Their quantity and permissible types are standardized by standards for each variety separately. The higher the homogeneity of the wood, the more durable and thermally resistant the product will be. Treatment with antiseptic agents is intended to maintain its performance at the proper level and extend its service life. |
| Shrinkage up to 8% of size |
|
| Fire resistance group G (combustible materials) | Impregnation with fire retardant compounds and/or paints is required. |
| Price planed profiled timber with natural humidity from RUB 7,000/m³ |
If the ends are not cut for corner joints, then the timber is considered molding and its price is approximately 40% lower than timber with bowls (made for a specific project, i.e. e. when purchasing a kit from the manufacturer that is completely ready for assembly at home). Also, the price increases with the thickness of the timber. For example, if a product with a cross-sectional side of 150 mm costs 7,000 rubles. per cube, then the following will cost: 200 mm - 7400, 250 mm - 9300. These values are given for pine and spruce wood, but timber from Siberian larch and Altai cedar will cost from 14,500 rubles. - moldings and from 18500 - with bowls (wall kit). The cost of dry planed timber is from 7900 RUR/m³ |
Advantages

- The complex profile and its high-precision design ensure a tight fit of the beams and an almost monolithic structure;
- Assembly of walls is easier and faster than from non-profiled timber;
- The air and vapor permeability of a house made of solid timber is better than a house made of laminated veneer lumber;
- Although the glue, which is necessarily used in the production of laminated veneer lumber, is responsible sanitary standards, yet this is an artificial material, and natural solid wood looks preferable from the point of view of environmental friendliness;
- Due to the low thermal conductivity of wood, heating costs are reduced, and its low weight reduces the load on the foundation;
- A characteristic feature of profiled timber (especially dry) is its exceptional smoothness, achieved by clean processing using high-tech equipment, so you can do without additional wall finishing;
- Profiled dry timber approximately 2-2,5 times cheaper than glued, but at the same time very close to it in its technical characteristics: thermal insulation, shrinkage, speed and technology of building a house, aesthetics, etc.
Disadvantages of profiled timber
- Less durable and hard than glued;
- As on a regular beam (of a simple cross-section), due to drying and temperature changes, cracks form and deformation can occur (primarily this applies to profiled timber with natural moisture; dry timber cracks much less often);
- Despite the low thermal conductivity of wood, if the timber is less than 220 mm thick, wall insulation may be required.

Transportation
When ordering a house kit made from profiled timber, delivery to the construction site becomes, in fact, one of the (no less important) stages of the production process: the slightest damage will subsequently lead to a violation of the integrity of the wall.
Therefore, the safety of each element, and then the accuracy and efficiency of assembling the future home, depends on the quality of loading and unloading operations, compliance with the rules for packaging and placing transport packages on the loading platform.
For greater reliability, the beams are placed on pallets, wrapped with film and packing tape (GOST 19041-85).
It is better to transport heavy packages on vehicles equipped with manipulators to avoid falls, impacts and other dangerous situations when unloading.
Alexander KiyaevDate: 2013-05-05
Questions and answers on the topic
No questions have been asked about the material yet, you have the opportunity to be the first to do so
House made of profiled timber - beautiful without finishing

Houses made of profiled timber are one of the most common types of wooden housing. The characteristics of the building material give them many advantages, which manifest themselves both during construction and during living.
MATERIAL
Profiled timber is a wooden beam (most often made of coniferous wood), processed on four sides on a special machine.
When assembling a house, the beams are connected using a tongue-and-groove system. Profiled timber has a smooth surface that does not require additional finishing.
In addition, it is more durable than regular timber, since it is made only from the middle part of the trunk. The material has low thermal conductivity (0.18-0.35 W/m3). Houses made from it have numerous advantages.
ADVANTAGES
— A house made of profiled timber is easy and quick to assemble. This is due to the fact that the materials necessary for assembling a log house are supplied in kits, which include timber that has already been trimmed according to a specific project and is equipped with connecting locks and holes for dowels.
— The connection of the timber does not allow water to flow inside the walls, and this, in turn, prevents rotting.
— Since the production of profiled timber removes stress from all four sides, there are far fewer cracks in the walls of a house made from it than in houses made from logs.
— When making profiled timber, only natural raw materials are used, so houses made from it belong to the category of the most environmentally friendly housing.
— Processing on machines gives the surface of the profiled timber a smooth and attractive appearance, so that the house does not need external finishing.
And this leads to direct savings on construction.
— Low thermal conductivity and tight connection of the beams with each other ensure high energy-saving performance of the house. It warms up quickly and retains heat for a long time. In addition, to ensure warmth in the house, you will need less profiled timber than rounded logs.
For example, a profiled beam with a cross-section of 140x140 mm is equivalent in thermal insulation to a log with a diameter of 240 mm, 190x190 mm - 320 mm and 240x190 mm - 420 mm.
To achieve the same thermal insulation, profiled timber requires up to 40% less in both volume and cost than rounded logs, and it is almost half the price of laminated veneer lumber.
— A house made of profiled timber, unlike a house made of rounded logs, does not require caulking after shrinkage, which leads to savings on both material and labor.
— Unlike structures made of laminated veneer lumber, in houses made of profiled timber, natural air exchange due to the fact that the internal structure of the wood is not damaged.
Even with the windows closed, the house always Fresh air. This means that you won’t have to buy an additional 22 air conditioners. The house itself supports optimal humidity, oxygen balance and distributes heat, creating comfortable living conditions.
— The strength of the timber and the reliability of the connections ensures the stability of the structure.
FLAWS
— If construction is carried out from timber with natural moisture, then shrinkage of the structure necessarily occurs. Therefore, it is necessary to either let the house stand for one season before installing windows and doors, or leave so-called technological gaps. This can be avoided by using dry profiled timber (15-18% humidity).
o Despite fire-prevention treatment, wood is still a flammable material, so a house fire is possible.
— Walls may be damaged by rodents and insects.
Price for materials and labor when assembling a house from profiled timber

CONSTRUCTION PROCESS
The first stage from which the construction of a house begins is design.
Since each manufacturer of house kits has its own characteristics, it is advisable to take them into account at the design stage. Therefore, it is ideal if the design is carried out in the same company that will build the house. Design costs 180 rubles/m2. Construction of the foundation Houses made of profiled timber are usually placed on a strip foundation. If the soil moisture is such that the construction concrete base impossible, screw piles are used as a foundation.
Piles can also be used if the house is on a slope.
Assembling a log house
The crowns are fastened to each other using dowels in a checkerboard pattern. To ensure the best heat-saving properties of a house in our region, it is recommended to use timber with a cross-section of 200×200 mm. Insulation is laid between the crowns. Banners are left in window and door openings.
In order to avoid damage to the structure during shrinkage, the supporting pillars are equipped with jacks.
Roof and everything else
After the log house is ready, the rafter system, floor beams and roof are erected. If the structure is complex and there is a risk of damage during shrinkage, a temporary roof is made. After this, it is recommended to interrupt construction for one season to allow the timber to dry.
At the second stage, windows and doors are installed, utilities are installed and the wood is treated to protect it from the sun, moisture and insects. It is advisable to start heating smoothly to avoid stress in the wood.

Beam in profile
Profiled timber, thanks to its clear dimensions and profile shape, allows you to save on inter-crown insulation, internal and external finishing.
Tongue-and-groove connections between the beams prevent rainwater from entering the wall.
One of the most common materials in wood construction- profiled timber.
During the production process, lumber blanks are given a clear size and a strictly defined standard shape.
MATERIAL
Profiled timber is most often made from coniferous wood (pine, cedar, spruce, larch).
Profiled timber is made only from sound wood (located in the middle of the trunk), since it has a stronger structure. This is due to the fact that in the middle of the trunk there is practically no sap flow, as well as a higher concentration of resin (in coniferous trees) or tannins (in deciduous trees). Coniferous trunks have fewer knots, are also less susceptible to rotting and are easier to process.
The most popular material is pine, because it has optimal ratio prices and quality. Trees growing in colder areas have best qualities for construction: their wood is less moist and more dense.
PRODUCTION TECHNOLOGY
Profiled timber is produced from edged timber with a moisture content of no more than 22%.
Before profiling, the material is kept for 3-5 months in a natural drying warehouse or in a drying chamber. The minimum cross-section of timber is 250×240 mm. Using a set of cutters, the workpiece is given the required shape, turned and chamfered from the corners. Then, tenons and grooves (profile) of a certain shape are cut along the entire length of the beam. The work is carried out using high-precision automated equipment.
DIMENSIONS
The material is available in sections 95×95 mm, 95×45 mm, 145×145 mm, 145×195 mm, 195×195 mm.
Length - 6 thousand mm. For the construction of external walls of a house or bathhouse, a cross-section of at least 145×145 mm is used, smaller timber is used for internal partitions.

Advantages:
- environmental friendliness.
All stages of assembly
No chemicals are used in production. Fire retardants and biocides, with which the timber is impregnated to protect against fire and biological damage, are harmful to humans only at the time of processing. Once dry, they have no effect on humans or animals;
- low thermal conductivity (0.18-0.35 W/m3) with low density (500 kg/m3).
Compared to other building materials, profiled timber is lightweight, but has better thermal insulation properties (see table). Thanks to the low thermal conductivity coefficient, a house made of profiled timber heats up quickly and retains heat for a long time;
— optimal price/quality ratio. Profiled timber is cheaper than laminated timber, but more expensive than edged timber (due to more labor-intensive production).
If we compare a wall made of profiled timber and a wall made of rounded logs, then with equal thermal conductivity values for the first
- aesthetic appearance.
Due to the fact that the material is additionally processed on a machine, the walls do not require either external or internal finishing. Therefore, houses made of profiled timber are often built in places with low average temperatures and high humidity: you can come to such a house in the cold season and quickly warm it up to a comfortable temperature;
- the ability to “breathe”.
Walls made of profiled timber provide natural air circulation and comfortable humidity, which has a beneficial effect on the well-being of residents;
- a strong connection that protects the walls from rainwater getting between the beams, which, in turn, prevents rotting.

Flaws:
— flammability (requires treatment with fire retardants);
— exposure to adverse effects of atmospheric phenomena;
— susceptibility to biological damage (requires treatment with bioprotective agents);
— may crack when the structure shrinks (if the timber is not previously dried to at least 20%);
- additional insulation of walls is required outside;
— after building a house or bathhouse from profiled timber, redevelopment or superstructure work is impossible.
more on the topic:
What to build a wooden house from?
timber
Solid wood houses
Wooden houses made of beams versus frame-panel houses
How to make profiled timber yourself?
Every year, the range of products on the lumber market is expanding more and more. Building materials suitable for the construction of wooden houses are becoming more and more advanced and modern.
How to work with ordinary timber that was not profiled from the very beginning? Especially considering how quickly it is being replaced by more modern analogues, such as laminated veneer lumber or profiled timber and others.
The least expensive to work with is the most common edged timber. And today it is possible to do timber profiling even with your own hands.
Profiled timber

Distinctive features
Profiled timber is a building material made from coniferous wood and having specific dimensions.
As a rule, pine, spruce or cedar are used as the basis for timber. If you look at the timber more closely, you can see that its inner side is planed very evenly, while the outer side has a semi-oval shape.
It happens that all sides of the beam are even.
Unlike the usual one, profiled timber has grooves on the sides that allow the beams to be joined to one another. This is done to better fasten the beams together. An important advantage of profiled timber is its environmental friendliness, because no glue is used in its production.
In addition, profiled timber is attractive to the mass buyer due to its price and ability to retain heat, as well as ease and convenience of assembly, which, of course, is an important factor for those who build on their own.
Despite all the positive qualities of profiled timber, like any other building material of wood origin, pores may remain on it.
Because of this, mold or mildew may gradually form on it. To avoid this, wood must be treated with special protective compounds.
When using wood as a building material there is a high probability of cracks appearing, which indicates its poor quality.
Over time, these defects can become more noticeable, and they must be constantly monitored for the appearance of through cracks. On a profile beam, the probability of crack formation tends to zero.
Independent timber profiling can be done in several ways.
This can significantly save your finances and obtain high-quality competitive building material. Some people think it is impossible to do this. However, practice shows that if you have the desire, time, patience and appropriate experience, nothing is impossible.
Advantages of self-made profiled timber
Of course, buying ready-made building material is much easier and faster, but self-production building materials in the form of profiled timber has still not lost its relevance.

Self-made profiled timber allows you to save tens of thousands of rubles. But it requires a lot of time.
2. By making timber on your own, you can give it any geometric shape, which will allow it to be laid more densely in the future, and this in turn will ensure the absence of drafts.
In addition, when producing timber, only you will be responsible for its quality, which means you will be 100% confident in it.
3. Finished walls made of profiled timber do not require further finishing. Therefore, it is important to lay the building material in such a way that it will hide the insulation. By making building materials yourself, you can provide for this important point.
4.
With your own hands you can ensure higher quality of connecting grooves, which will affect the tightness of the beams joining each other.
What type of profile should you choose?
When choosing the most suitable profile for you, you should first give an adequate assessment of your experience in the field of manufacturing building materials.
At first glance, it may seem that there is nothing complicated in the production of timber. However, some effort will still have to be made, spending a lot of time.
The easiest way is to choose the profile that is most simple designs. In this case, you will not need to use any specialized tool, you will not need to make complex calculations.
Based on already existing standards developed for basic connections wooden parts, profiled beams are manufactured.
The calculation algorithm can be found in the available documents. It is possible to produce two types of profiles:
— profiling through a block;
— profiling through triangles.
Before starting to manufacture the profile, it is necessary to calculate its dimensions.
Calculation is required for each section. The calculation algorithm can be taken from the existing GOST. When laying timber from this category, it is necessary to use insulation with a thickness of at least five centimeters.
Making profiled timber yourself
When making profiled timber, you can use various methods.
The easiest way to work will be with a hand router with a power of at least one and a half kilowatts. It is necessary to work with the tool using special nozzles.
If there is a simple profile, a cutter with a diameter of ten centimeters is used. At complex form profile, nozzles may be different.
How to assemble a house from profiled timber
With such a tool, you can independently make timber of any complexity, even with a D-shaped side. But in this case, you cannot do without a grinding machine and a special electric plane.
The most important thing when working is to follow the calculations exactly, because the term “profiling” itself implies perfect cleanliness and dimensional accuracy.
The advantages of this method are:
— the exact final result, provided that the workpiece is of high quality, is achieved thanks to the precision of the router;
— if the milling attachment is well sharpened, no additional grinding will be required.
In addition to the obvious advantages, this method also has its disadvantages:
— high price milling machine;
— the difficulty of selecting suitable attachments, since they are not produced for all machines.
What can you use a circular saw for?
Another method for profiling timber is using available tools.
One such handy tool is a circular saw.
Its cost will be about five thousand rubles. And you should choose a suitable tool based on the manufacturer’s brand.
An important aspect when choosing a saw should be the ability to make cuts of different depths with its help.
The advantages of this method are:
— the ability to control the accuracy of the cut dimensions;
- the end result is perfectly straight and smooth grooves.
The disadvantages of working with a circular saw are:
— small cutting depth;
— inability to clean the groove;
— the need to change the instrument settings after each operation performed;
- low speed of work.
It is most convenient to work with a circular saw when making a triangular groove.
It is allowed to use both tools.
So, for example, to cut out a rounded quarter, you can first use a circular saw, and then refine the roundings with a milling machine. It is better not to dispose of the remaining waste immediately, because it may be needed to connect the beams to each other.
Features of laminated veneer lumber
This type of beams is popular in the construction of private houses.
In its manufacture they use modern technologies. Individual boards are cut from coniferous wood, which are also called “lamellas”. Then these boards are planed to perfect smoothness, and after that they are glued together with a special compound.
The finished workpiece is placed under a powerful press. Big advantage glued laminated timber is considered to be its length, which can reach 18 m.
In terms of strength, profiled timber is inferior to laminated timber, since during its manufacture the strongest outer part of the tree is removed. Whereas the additional strength of laminated veneer lumber is achieved by pressing and gluing. Thanks to these manipulations, laminated veneer lumber practically does not deform over time.
Although the price of laminated veneer lumber exceeds the cost of its competitor almost twice, which is due to the peculiarity of the manufacture of the beams.
After purchasing a plot of land, there is a desire to build a house on it. Often, due to limited budget, this remains only a desire. We will consider self-construction small house without resorting to the help of specialists.
This will help you save a lot and realize your plans.

We will build the house from non-profiled timber measuring 150x150 mm. This is an old technology that gained wide popularity in the 70-80s of the last century, which can be easily handled by inexperienced builders.
So, in this article you will learn, how to build a house from timber with your own hands, you will see a specific project of a log house measuring 6x4 m, learn how to lay and select a foundation, build walls and a roof.
House project
Any construction begins with a project.
As we have already written, this house project measures 6 x 4 with an attic floor. A columnar foundation was chosen as the base. As you can see in the photo above, the house is clad with false beams. Metal tiles were chosen as the roof.
Let's say right away that this house is not insulated and serves as a summer house. If you want to build a house from timber for permanent residence, then you need to carefully insulate the floor, roof, and walls.
There is an article on our website that calculates the thickness of insulation for walls. (link)
Below is the project of the house that you see in the photo.

Foundation
We have written about various types of foundations more than once in the “Foundation” section.
We also told you that for light buildings made of timber, a columnar base is best suited, because it is the least expensive and least labor-intensive. The columnar foundation discussed in the article “link” was chosen as the foundation for this timber house.
 You can also make other types of foundations, such as strip, pile, screw, shallow, slab, but they are all much more expensive.
As can be seen in the diagram, to build a box of this wooden house you need to lay 15 pillars.
For the porch you need 2 more pillars.
We will not describe in detail all the nuances of such a foundation in this article.
Bottom harness
Immediately after building the foundation, you can begin installing the lower trim. This is one of the stages where many people make mistakes.
Since the house is built of timber, there are some subtleties in the design of the lower frame. First, look at the timber laying diagram.

Now let's look at some points related to this stage. See the connection of timber in one row just below in the chapter “Walls of the House”.
- Before laying the first beams on the pillars, you need to put two layers of roofing material, thereby waterproofing the wood, which will protect the lower crowns from getting wet and rotting.
- All elements of the lower trim must be treated with antiseptics, since this part is most susceptible to moisture rising from the surface of the earth.
- Pay attention to the boards nailed from the inside to the strapping beam.
The size of this board is 150 x 50 mm. They serve as a ledge on which the floor boards will later lie.
- Internal partitions are made of timber 100 mm wide, but 150 mm can be used
House walls
As we already mentioned, external walls The houses are built from non-profiled timber with a section of 150x150 mm.
Between each beam there is a gasket in the form of heat-insulating material. Felt or a more modern inter-crown insulation flax wool is used as such material.
For ease of installation, when laying the flax tape, it is shot using a construction stapler. The tape is taken slightly less than the width of the beam itself.
To prevent water from getting into the crown joints during rain, a chamfer is removed from the upper edge of the front part of the beam.
Now let's look at connecting the beams to each other.
The timber must be connected to each other not only in one row, but also in height.
Connection in one row
Several joints were used in the construction of this house. For this we use a chainsaw and a chisel. This topic is discussed in more detail in the article “Methods of joining timber”

Connecting rows
To fasten the crowns in height, use round wooden dowels with a diameter of 20-30 mm.
Let's look at this connection in more detail.
Pins have long been used in wooden construction. You've probably heard about houses built without a single nail.
Do-it-yourself house made of profiled timber
In our case, wooden dowels with a cross section of 20-30 mm are also used. Their length should be greater than the height of the beam. The maximum length is not limited and depends on what length of drill you have.
It is best to buy dowels on the construction market. Making them with your own hands is quite difficult and time-consuming.
Main stages
 You've done the framing and it's time to build the walls.
- A flax tape is rolled out onto the bottom trim around the entire perimeter and everything is fixed with a stapler.
- Cuts are made in the next beam and the row is laid.
- After that, you need to fix the two rows together using dowels.
To do this, make a hole with a drill and hammer in the dowel. If you have a longer drill, you can first lay three or more rows, and then drill everything together.
- The height of the dowel must be a multiple of the height of the beam. In our case it can be 15 cm, 30 cm, 45 cm, etc.
Important. The holes in the timber should be slightly wider than the diameter of the dowel. The height of the hole is also made larger by a couple of centimeters.
This is necessary so that when the house inevitably shrinks, individual beams do not hang on the dowels.
Why such a multiplicity?
The thing is that for a reliable connection the dowel must be located at the junction of the crowns in the middle. In addition, if the dowel sticks out from the top crown, then to lay the next row you will have to make holes in the beam in advance, which is not always convenient.
In what places should the walls of the house be connected with dowels?
- Walls made of timber are connected with dowels every 1-1.5 m.
- There must be a connection in the corners and at the junction of the walls.
- Next to the windows and doorways Dowels should also be installed at a distance of 15 cm.
Roof rafter system
There are various options for the rafter system.
We will consider the simplest and most understandable option, in our opinion, and give brief instructions. For more details on all the nuances of roof construction, including the rafter system, see the section of the same name.
Everything must be done in the order indicated below.
1. We lay seven boards with a length of 6 m and a cross-section of 150 x 50 mm on the end at equal distances and fasten them with self-tapping screws or nails to the walls
We make temporary flooring from boards to facilitate further work
3. We build an auxiliary structure and install a ridge girder. This will greatly facilitate the task of laying the rafters.
4. We install rafters in the amount of 7 pieces on each side. To do this, we use boards 4.5 m long with a section of 150 x 50 mm.

We attach the lower part of the rafters to the wall and the boards that we laid in the first point. These boards not only serve as the basis for the floor of the second floor, they are also tie-downs for the rafters, which gives the entire structure greater rigidity.
Read the article (link) on how to attach rafters to the mauerlat.
6. We connect the upper part of the rafter system lying on the ridge, as shown in the diagram
We make lathing for the subsequent roof. What type of sheathing will be, continuous, with intervals, and what material it will be made of greatly depends on the type of roof. Various roofing options can be found in the “Roof” section on our website.
In this project, the sheathing was made from unedged boards 25 mm thick in increments of about 5 cm
8. We build a frame for further cladding of the pediment, not forgetting where the windows will be located
We lay the metal tiles and remove the auxiliary structure made in the 3rd point.
Floors
Since this timber house was built for summer living, its floors and roof are not insulated. In this project, 45 mm thick tongue and groove boards were used for the floor of the first and second attic floors, which were laid along the length of the house.
If you want to insulate the floors, you can find out how to do it yourself in the article “link”).
Wait for the continuation of this article in which we will look at how to install windows and doors in a wooden house and the structure of the rafter system.
We hope this article was useful to you and you will build your first house from timber with your own hands.
Houses made of profiled timber are cozy and reliable. They proved their worth many years ago. A lot of time has passed, but the advantages of wooden houses are only increasing. Nowadays, such houses are built quite quickly, because they are assembled like a children's construction set. This is also facilitated by the presence of special fasteners and the availability of materials. In this article we will look at how you can build a house from profiled timber yourself.
- Installation of base and floor
- Insulation and finishing of the house
Features of profiled timber
Profiled timber is a building material that is extracted from coniferous trees, for example, pine, cedar, spruce, and larch. If you look closely at the material, you will notice that the inner side is smooth and planed, and the outer side has the shape of a semi-oval, or it can also be smooth. There are special grooves and tenons on the sides that allow you to quickly and efficiently fasten the timber together. The main advantage of profiled timber is considered to be environmentally friendly, since it is made without the use of glue.
The material is also very warm and relatively inexpensive. These moments captivate many people. As mentioned above, profiled timber is quite easy and quick to assemble, which is good news for amateurs self-construction. But do not forget that profiled timber is a tree on which pores remain. Over time, mold, fungi, etc. may appear there. Therefore, it is always necessary to treat wood with special protective compounds.
Profiled timber has practically no cracks, but if they appear, they can expand over time. It is very important to ensure that the cracks do not turn through. Also remember that all wooden houses do not tolerate moisture. Therefore, you should carefully monitor the roof and not delay its repair. If your home will be periodically exposed to cold weather, additional insulation should be done.
Start of construction of a timber house
It is very important to design a house made from profiled timber. When you draw up a plan, carefully and accurately make all the calculations, since this will play a very important role in the purchase of material. You can draw a design for your future home yourself, or you can contact a construction company. Before you start preparing for construction, you should understand that the best time for construction is winter.
If you plan to harvest wood yourself, it is better to do this in the cold season and dry it for a long time at home. In this case, the timber will shrink evenly and calmly. But you shouldn’t go to extremes - very coldy It is better to refuse such work, since the wood can become very fragile.

When preparing the material yourself, you must take into account all the factors and choose a healthy tree without cracks. After this, you need to cut the logs evenly and treat them with a special antiseptic. You can purchase ready-made material that will be cut to suit your needs. Also, grooves will be cut there, and you will just have to lay out the house from profiled timber with your own hands, like a designer.
Building a foundation for a house
Before you decide on the type of foundation you need, study the geological conditions. To do this, you should find out the groundwater indicator, the composition of the soil, and look at the foundation structures of already built houses in this area. Strip foundations are often laid for houses made of concrete, brick or cinder blocks. The process of constructing such foundations is quite simple, but is characterized by high material consumption and labor intensity.
For wooden buildings From timber, a columnar, pile or shallowly buried strip foundation is ideal. Let's look at the scheme for constructing a shallowly buried strip foundation. It all starts with the markup. It is very important to be precise in this process. Mark the outer and inner corners of the building with pegs. After this, you need to combine them with cording to add volume. This way you will understand what the foundation should look like.

After this, you can begin to dig a hole, the depth of which should not exceed 60 centimeters. But it’s also not worth making the depth too small, because we are building a house from profiled timber and do not want to reduce the strength of the structure with our rash actions. Two bayonets of a shovel will be enough. In this case, you should not deviate from the initial markings by more than 20 centimeters. After this, you need to put a crushed stone cushion. As part of this procedure, the bottom of the trench is covered with a layer of sand (or dense soil) of 10 centimeters and a layer of crushed stone of the same thickness.
You can make the formwork yourself or order it. Homemade formwork is made from wood that has no cracks or seams. When ordering, it is better to choose steel or plastic formwork. You must install the formwork in the trench and align it in the center. To increase strength, it makes sense to use reinforcement - parallel rods with jumpers. The diameter of the reinforcement must be at least 1 centimeter.

It is advisable to use a frame and at least 2 reinforcement belts. When welding, they should not be placed closer than 3 centimeters. The rods should fit freely into the trench, but not be closer than 5 centimeters. After this, you can moisten the formwork with water and begin concrete pouring. If you are using wood formwork, wet it down a bit to prevent the wood from absorbing moisture from the solution. The formwork is removed immediately after the solution has dried.
For insulation, you can use extruded polystyrene foam slabs of 5 centimeters each, and 8 centimeters at the corners of the foundation. When the sides of the foundation of a house made of profiled timber are tarred, crushed stone is poured in place of the formwork. This is necessary for waterproofing. The upper part of the foundation can be insulated using roofing felt. Then it is necessary to carry out backfilling, for which you can use previously removed soil.
Installation of base and floor
The construction of any house begins with the creation of a row, which is laid on a treated and leveled waterproofing foundation. It is worth noting that for external walls it is necessary to use timber with a section of 150 by 150 millimeters, and for the floor and internal walls - 100 by 50 millimeters. When the first row is laid, it should be treated with an antiseptic to good strengthening. After this, it is necessary to install floor joists, which should preferably be laid on edge.
The logs can be installed on the foundation of the house and attached to the walls of the log house, as shown in the video about houses made of profiled timber. They must be placed indoors and left there for several days to get used to the temperature. Two logs should be placed on opposite walls and nylon threads should be stretched between them, every one and a half meters. These threads will serve as a guide for making the rest of the logs. Gaps and voids will form between the lags, which should be filled with insulation. As insulation, you can choose sawdust, polystyrene foam, isolon, mineral wool and polystyrene foam.
If you lay logs from boards 30 - 40 centimeters thick, then the distance between them should be 80 centimeters. If the thickness of the floor boards is less, the distance should be 50 - 60 centimeters, and for too thick boards - about 1 meter. Using wedges made of thin plywood or wood, you can adjust the height of the joists. You can strengthen the wedges using self-tapping screws or long nails. The logs are secured with anchors or dowels. After this, you can proceed to installing and strengthening the boards.
You should retreat one and a half centimeters from the wall and strengthen the first row of boards along a stretched line. Holes should be drilled for self-tapping screws. It is necessary to lay a board on each joist and strengthen it. If there are gaps between the wall and the floor, they can be covered with plinths or staples, which should be connected to the board and secured with nails. The subfloor is covered with thermal insulation on both sides. Boards with a cross section of 25 by 150 millimeters are suitable for it.
The floor can be laid with or without displacement, judging by the photos of houses made of profiled timber. First you must lay the first layer and lay it on top wooden flooring. Remember about the waterproofing that is placed on the sub-base of the future floor. For these purposes, you can use penofol or dense polyethylene. At the last stage, you should lay the floor from any material. A tongue and groove board 28 or 36 millimeters thick is perfect for this.
Construction of walls from profiled timber
To build the walls of a timber house, it is necessary to lay out alternating rows of timber. Each subsequent row is fastened together using dowels (pins for vertical connection), which does not allow the timber to move or twist. Pins can be made of metal or wood. It is advisable to use the same wood from which the house is built. It is known that metal dowels are more reliable, but they are more expensive than wooden dowels, and the cost of a house made of profiled timber will increase in this case.
How are dowels installed? This happens according to the method brickwork, through two or three rows after one. To do this, you need to drill holes with a diameter of 3–4 centimeters. The dowels will be easily inserted into these holes. The distance between the dowels should be one and a half meters. Between the rows of timber, do not forget to lay a sealant for insulation. Where external walls are connected, it is advisable to use the “warm corner” method.

In one beam, you should cut out a protrusion of the required size, and in the other, you should cut out a groove with similar parameters. Some layers of timber can be alternated with grooves and tenons. This will greatly strengthen the structure, and the corners will not be blown out. If you are building a house with one and a half floors, the walls of the second floor need to be raised by approximately 1200-1500 millimeters, this depends on the steepness. Partitions must fit into the main walls of the floor. For them, you can use timber with a section of 100 by 150 millimeters. The installation of partitions is done only after the construction of the log house.
If the dimensions of the house are larger than 6 by 6 meters, there should be at least one partition on the first floor, which will provide additional support for the floor on the second floor. If you want to reduce the price of a house made of profiled timber, the internal walls can be framed. To do this, you need to create a frame from bars with a section of 50 by 50, cover it with clapboard or other material. In order for a wooden house to be fire-resistant, all its parts must be treated with a fire retardant. You can apply it to the walls using a spray bottle or a paint brush.

And the last point that is worth understanding when building walls: pay due attention to the creation of window openings. In the places where windows are installed, it is necessary to cut out technological openings through which air will move while the material dries. When the house is finally settled, the windows can be installed. Window blocks for a structure made of profiled timber, they can be metal-plastic or wooden.
Insulation and finishing of the house
If the thermal insulation of a wooden house is of high quality, you can reduce heating costs. Wall insulation will significantly reduce your heating costs, regardless of fuel. Exterior decoration at home significantly increases thermal insulation, due to the reduction in timber moisture. It isolates it from various atmospheric precipitations. The most popular types of finishing are lining and siding, but it is better not to use siding for a wooden house.
You can use mineral wool, glass wool slabs, tow or flax-jute fabric. Glass wool slabs must be laid with foil vapor barrier material. This approach will help reflect heat into the room, and the vapor insulation will reduce moisture evaporation, which is known to steal heat.

It is worth noting that for insulation, according to the technology of houses made of profiled timber, it is better not to use polystyrene foam, since it will not allow the moisture of the wood to evaporate completely and will cause rotting of the wood. For the same reasons, you should not insulate walls with roofing felt, plastic film or glassine. It is better to use a vapor-permeable membrane material.
It is also advisable to trim the inside with profiled timber, as this will give you additional thermal insulation. Interior decoration can be made of lining, hardboard or plasterboard. Remember that insulation should resemble layered cake. Each layer must protect against heat loss and prevent the penetration of cold and moisture. If you plan to spend time in the house only in the summer, you don’t have to insulate it.
Roof for a house made of profiled timber
To cover the roof, you can use ondulin, corrugated sheets, roofing felt, and metal tiles. Remember that insulation should begin from the top or attic floor, and then move on to the roof itself. In accordance with the structure of the future roof, it is necessary to install ceiling beams, rafters and sheathing. When the walls are built, ceiling joists should be placed that should protrude 50 centimeters beyond the base of the wall. The logs are made of timber with a section of 150 by 100 millimeters. They must be laid out on edge at a distance of approximately 90 centimeters from each other.
After this, you should assemble a rafter system from boards with a section of 50 by 150 millimeters. This structure is the skeleton of the roof, so it needs to be strongly strengthened with racks, crossbars and braces. Rafters should be installed in increments of no more than one centimeter. When the frame is ready, you can begin laying out the fronts, which can be made from siding or timber with a section of 150 by 150 millimeters. At the last stage, a sheathing with a cross-section of 25 by 150 millimeters should be nailed onto the rafters.

It is worth noting that the sheathing pitch should not be more than 400 millimeters. To prevent the accumulation of condensation, it is necessary to make a vapor barrier using a layer of waterproofing. If you used slate as a roof covering, and the attic is ventilated, you can avoid waterproofing during the construction of a house made of profiled timber.
When choosing a coating material, you must pay attention to the manufacturer’s advice, since different types coatings they can differ significantly. When installing, it is very important to follow the specified fastening techniques. Otherwise, the integrity of the roof may be compromised. If you strictly follow the principle of laying the selected material, you can easily build the roof of the house yourself.
Building a house from timber is perhaps the easiest way to build a house with your own hands. You don’t need any special skills to do this, and if you know how to use a chainsaw, you can easily handle this job. Assembling the house will turn out to be like the construction set you played with as a child. For this purpose, special fastening elements are provided along the edges of the material. You will also need a strong foundation and a reliable roof! We hope this article will help you understand construction technology and build a reliable and beautiful house from profiled timber!

Technology for assembling a log frame for a house or bathhouse
Organization of a workplace for assembling walls
To ensure the work progresses, the beams are laid out in a stack at a distance of 5-6 meters from the building on one or, better yet, both sides. Each layer of beams in a stack is placed on spacers made of boards.
Next to the stack will be equipped workplace for marking and cutting beams. A variant of such a workplace is shown in the figure.
It is convenient to mark the timber using a template at a height of 0.9 - 1.1 meters in the marking area, node A in the figure. After marking, the timber is lowered onto low pads into the cutting area. In this position, it is convenient and safe to saw the timber chain saw.
The cut timber is lifted onto the wall. To facilitate the ascent, slopes are arranged - inclined beams, whose upper end rests on the upper crown of the log house. The timber is moved along the slopes using a rope.
Wedge-shaped stops are nailed to the slopes, which make lifting the beam safer. In addition to safety, the stops allow you to get by with little force. Even one person can, if necessary, lift the beam, fixing it with stops at intermediate points.
It is most convenient to carry out work on assembling a log frame from timber with a team of four people. You can work together, but the work will just go slower.
Scaffolding is constructed to install the upper rims of the log house and the roof.
 Three-tier scaffolding on the gable of the house. 1
— extreme racks; 2
- L-shaped scaffolding stand of the first tier on the side facade; 3
- flooring; 4
— central racks; 5
— cruciform braces (shown conditionally); 6
- bosses
Three-tier scaffolding on the gable of the house. 1
— extreme racks; 2
- L-shaped scaffolding stand of the first tier on the side facade; 3
- flooring; 4
— central racks; 5
— cruciform braces (shown conditionally); 6
- bosses The assembly of the upper crowns of the log house is carried out from the level of the first tier. The flooring of the first tier is laid on L-shaped racks, pos. 2 in the picture. The racks are installed around the walls of the house and attached to the walls using bosses, pos. 6.
At the stage of constructing the roof (attic), on the facades where the installation of pediments is necessary, scaffolding has to be made in three tiers. To construct scaffolding racks, boards 50 x 150 are used. mm. Flooring is made from the same boards.
Working from scaffolding is more convenient, faster and safer than from ladders - don’t forget about this.
Marking beams for wall assembly
Practical construction experience shows that it is not realistic to keep in mind the sequence of marking the elements of corner joints.
Before starting work, draw a diagram of the assembly of the walls of the house, which indicates: the serial number of the crown, the type of connecting element at the ends of the blanks, the position of the openings in the wall.
An example of a house wall assembly diagram is shown in the figure:
 Scheme for marking corner joints of timber and joints of parts longitudinal walls, for home with overall dimensions 6x9 meters. A And WITH- longitudinal walls; D And B- transverse walls; E- internal wall made of timber - partition; 1
- joints of beams.
Scheme for marking corner joints of timber and joints of parts longitudinal walls, for home with overall dimensions 6x9 meters. A And WITH- longitudinal walls; D And B- transverse walls; E- internal wall made of timber - partition; 1
- joints of beams. For the house shown in the diagram, each crown consists of 7 pieces of beams ranging in length from 3 to 6 m.
The crown of the longitudinal wall consists of two parts: the main beam of a standard length of 6 meters and an extension of 3 meters. On one crown, long beams are laid on the left, and extensions on the right. On the next crown, installation begins in a similar order, but on the right.
The parts of the crown of the transverse wall and the partition are made from one beam of a standard length of 6 meters.
To eliminate cold bridges in external walls, the joints of the beams of the longitudinal wall, item 1, are made by making vertical cuts “into the floor of the tree” with an overlap of 15 - 20 cm. The timber in the corners of the crowns is connected into a dressing with a root tenon (see below for more details).
How to correctly and quickly mark tenons, grooves and other profiles, ensure identical dimensions of lumber blanks?
The easiest way to do this is using templates. The template is placed on the beam and the outline of the template profiles is transferred to the surface of the beam with a marker.
It is more convenient, faster to mark and there will be fewer errors if the template completely follows the contour of the part and has the same length as the part being marked. I placed the template on the timber and immediately transferred all the dimensions and profiles to the workpiece.
For our example, we will need to make seven templates, corresponding to the number of parts in the crown. One template is used to mark two mirrored wall parts.
If you think about it, the number of templates can be reduced. Let's look at how to make universal templates for marking parts of the longitudinal walls of a house (see above for the wall assembly diagram).
 Two templates (highlighted in bright yellow) for marking the beams of the longitudinal walls. 4
— groove for the main tenon; 5
- groove for tenon interior wall; 6
- sample; 7
- finishing beam.
Two templates (highlighted in bright yellow) for marking the beams of the longitudinal walls. 4
— groove for the main tenon; 5
- groove for tenon interior wall; 6
- sample; 7
- finishing beam. The picture above shows the template for marking the main beam in the crown, in which the extension is located on the right. On the wall marking diagram, these are crowns A1, A3, A5 and C1, C3, C5.
Bottom template serves for marking the main beam in the crowns with extension on the left - A2, A4, A6 and C2, C4, C6.
The templates are the same at first glance, but differ in that the grooves, item 5, for connecting to the partition, are located in different places templates
The same templates are used to mark the parts of the extensions. To do this, on the templates at points b And With through holes are drilled, and at points A And d cuts are made.
To mark the extension, the template is placed on the beam and points are made on the surface of the workpiece through holes and cuts.
Remember this technique when making holes in the template. This will help you create universal templates in many other cases.
The templates are made from planed inch boards.
As a result, we manage to reduce the number of templates from seven to three (2 for longitudinal walls and 1 for transverse walls). Two longitudinal templates (right and left) provide the ability to obtain blanks for longitudinal walls, and one transverse template allows you to prepare parts for transverse walls and partitions.
Now let's look at how templates are used. To mark the first beam of the crown (for example, starting from the left), the left template is laid on the beam and the end of the template on the left is outlined with a marker, then two grooves and, finally, a recess for the connection “into the floor of the tree”. The marked timber is transferred to the cutting site, where unnecessary fragments (it is better to mark them out)
hatch) are cut with a chain saw.
How to mark parts with spikes? Obviously, the tenon and groove are elements of the same unit, which means they must match each other in size and location. In a part with a tenon, a tenon is marked in place of the groove.
If the groove dimensions are 5×5 cm, then the spike should have dimensions - 4.5 × 4.5 cm. The gap is filled with inter-crown insulation.
The template profile is transferred to the upper edge of the beam. The markings are transferred to the vertical edge of the beam using a square. Accurate cuts are made using these markings.
How to assemble smooth walls from timber of different widths
The technical conditions (TS) for the manufacture of timber allow deviations in the size of the timber in one direction or another from the standard value specified in the documents.
If the purchase documents indicate standard sizes timber, for example, section 150x150 mm. and length is 6 meters, then the actual dimensions will differ from the standard.
Each beam in a batch of timber brought to the construction site will differ from the dimensions indicated in the documents by several millimeters. The cross-sectional dimensions and length of the bars will be different.
The variation in sizes must be taken into account when developing templates, marking timber and assembling walls.
How to assemble smooth walls if the beams are different in width and length?
 b— minimum beam width; delta b- the difference between a narrow and wide beam.
 Obviously, using timber of different widths, you can make only one surface of the wall flat - either from the outside or from the inside of the building.
If they want to make the outside wall of the house smooth, then All beams in the wall are aligned along the outer edge. Then, inside the house, wide beams will protrude from the wall by the amount of “delta b"(the difference between narrow and wide bars). Alignment along the outer edge leads to an increase in gaps in the corner joint of the beams (see figure).
If the beams in the wall are aligned along the inner edge, then the “steps” from the protruding beams will already be on the outer surface of the wall. The outside of the wall is usually sheathed. And if you chamfer the outer edges of the timber, then the steps on the wall will be invisible even without cladding. The corner joints of the beams are more dense and “warm”.
How and with what to connect the crowns of a log house
Each crown of the log house is connected to the lower crown with metal or wooden dowels. The dowels are placed at a distance of approximately 250-300 mm from the end of the beam and then every 1-1.5 meters of the length of the beam.
Each detail of the crown is secured with at least two dowels. The length of the dowel must be at least 1.5 times greater than the height of the beam.
 cm., pos. 1.
 Round steel dowels with a diameter of 6-8 mm.- pins with a pointed end or nails (6x200-250 mm), simply hammer into the beams of the crowns, option a on the image.
The upper ends of dowels made of any material must be buried into the timber by 2-4 cm. If this is not done, then when the timber dries and the log house shrinks, the dowels will be higher than the timber and will lift the upper crown. A large gap forms between the crowns.
For the same reason Driven pins cannot be made from reinforcing steel. The corrugated surface of such dowels will keep the crown beams from moving when the log house shrinks, even if the dowel is buried into the timber. The crowns will simply hang on such dowels.
Small-diameter steel hammer-in dowels cannot always provide the necessary wall rigidity, especially with long wall spans. Their use can be recommended for small buildings - for example, baths. To increase the rigidity of the walls of large buildings, it is necessary to install dowels of increased diameter.
Steel dowels with a diameter of 10 millimeters or more, as well as wooden dowels, are inserted into pre-drilled holes in the timber. The diameter of the holes is made slightly smaller than the diameter of the dowel.
When the dowel fits tightly into the hole, the rigidity of the wall increases, but the risk that the dowels will interfere with the shrinkage of the frame increases.
Wooden dowels with a diameter of 25-30 mm Convenient to cut from round cuttings for tools. Such cuttings are made from hardwood. It is recommended to chamfer the lower end of the dowel - it will be easier to drive the dowel into the hole.
You can cut 25x25 square dowels from a regular “inch” board mm. One end of the workpiece is chamfered. Such pins are driven into a hole made with a drill with a diameter of 24 mm.
The ribs of such a dowel, made of relatively “soft” coniferous wood, become crushed when hammered in, the wood becomes compacted, ensuring a fairly tight fit of the dowel in the hole.
How to properly drill holes in timber for dowels
The depth of the holes in the wall for installing dowels must exceed at least 4 cm. dowel length. Moreover, the hole must be free of chips.
To drill holes in timber that are deep enough and have a large diameter, a low-speed electric drill (drill) is usually used. The passport of a power tool usually indicates what diameter of drilling in a particular material the drill is designed for. Given the large drilling depth, it is better to choose a drill with a power reserve.
To drill holes in timber, it is convenient to equip the drill with a stop, as shown in the figure.
 The stop block is attached to the drill with steel clamps.
 Emphasis, in the form wooden block, attached to the drill, for example, with clamps. The stop stops drilling at the required depth, but the rotation of the drill does not stop after that. Continuing to rotate in one place, the drill clears the hole from chips, grinds in and then easily comes out of the deep hole.
It is convenient to drill holes for connecting the crowns in a beam that is already installed on the wall in the design position on the inter-crown insulation. But here it's usual A problem arises - the crown gasket cannot be drilled. The fibers of the spacer material simply wrap around the drill bit and clamp it.
You have to install the beam on the wall in two steps. First, the timber is mounted without a gasket and temporarily secured from displacement, for example, with nails. Drill holes for dowels. Then the timber is moved from the wall and inter-crown insulation is laid.
At drilling sites the gasket is cut out sharp knife . Then, the removed beam is put back in place, this time on the gasket, and secured with dowels.
Drilling holes in timber laid on a wall should be done while standing on a solid foundation - scaffolding, scaffolding, flooring. Stand on narrow wall and drilling is dangerous. The drill can “bite” powerful drill will turn around and easily throw the worker off the wall.
How to make a straight wall from crooked timber
Some of the timber delivered to the construction site may be bent. The beam can have a curvature in one plane, or it can be twisted with a screw and become diamond-shaped in cross-section.
If possible, it is better not to use curved beams for the walls of a house or bathhouse. It is recommended to cut beams with curvature into smaller pieces and use them in other, less critical places.
A small amount of timber that has curvature in one plane can be used to mount walls. You should not lay such a beam into a wall with its convexity up or down, in the hope that it will straighten under the weight of the house - the beam will not straighten, even if it is placed in the lower crowns.
The curved beam is laid in the wall, straightening it in a horizontal plane as shown in the figure.
 The crooked beam is straightened sequentially by fixing it with dowels
 The curved beam is drilled, aligning it with the straight beam at the drilling points. After laying the inter-crown insulation, the curved beam is fixed with dowels at one end and, when unbent, is sequentially fixed with dowels at other points.
Unbending the beam does not require much effort. A lever and bracket will help make work easier
Inter-crown gasket - insulation, sealant
For cold protection, a gasket is placed between the crowns. Previously, moss or flax tow were used for this. Currently, special cushioning materials based on flax wool or flax jute are available for sale. The material is sold in the form of a roll of tape with a width of 20 cm.
A strip of cushioning material is laid along the entire upper edge of the beam in two or three layers and secured with staples using a construction stapler.
If the wall is not sheathed, then the gasket should be 1-2 inches from the outer edge of the beam. cm., otherwise it will get wet.
Some craftsmen lay the cushioning material in one layer and suggest caulking the joints after the frame shrinks, adding additional material to the voids of the joints. In this option we have less consumption of cushioning material.
The work of caulking joints is quite labor-intensive and tedious. It is better to immediately lay a thicker sealant, in several layers (three layers), to eliminate the need to caulk horizontal joints.
How to control the correct assembly of a log house
During the construction of a house or bathhouse, it is necessary to regularly check the correct assembly of the log frame. To do this, it is enough to control the following five parameters:
- Verticality of corners.
- The height of corners and walls.
- Horizontality of the crowns and upper edges of the timber.
- Straightness of walls.
- The quality of installation of inter-crown insulation.
For control of vertical angles The following method is used.
 To control the verticality of the angle, a vertical line is applied on each side of the crown. 1
— bottom harness; 2
- crowns; 3
— control lines; 4
- base.
To control the verticality of the angle, a vertical line is applied on each side of the crown. 1
— bottom harness; 2
- crowns; 3
— control lines; 4
- base. On each side of the crown, a vertical line is drawn at the same distance from the corner edge.
When laying the crowns correctly, this line should be straight and coincide with the vertical. The verticality of the line is checked with a plumb line.
If deviations are found, the work is suspended and the cause is eliminated.
The height of corners and walls is measured roulette. The measurement is taken from the base horizontal line, which is applied to the strapping beam using a water level.
Horizontality of crowns and top faces timber is checked by level.
Straightness of walls determined visually by pulling a cord along the wall.
The verticality and height of the corners should be especially carefully and constantly checked. Deviations from verticality are eliminated, up to the replacement of the timber in the crown. The height of the corners is adjusted by increasing the thickness of the gasket between the rims in the sagging corners. Sometimes it helps if you tap a sledgehammer on a beam in a high corner.
The quality and thickness of the installation of inter-crown insulation is checked visually by inspecting the walls.
Window and door openings in a log house
From the second crown they begin to form doorways. The distance from the floor level to the window is chosen in the range of 70 - 90 cm.
Laying timber in crowns in the area of openings has its own characteristics.
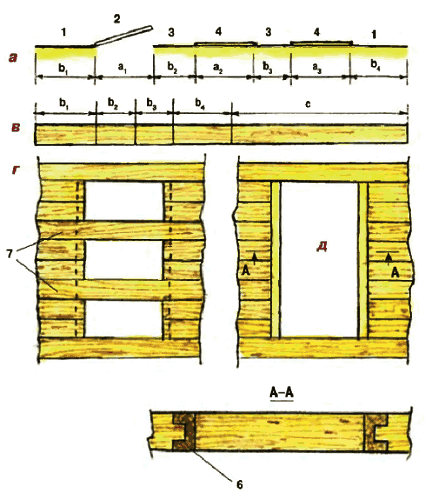 A
- layout of openings in the wall, where: 1
- wall; 2
- door opening; 3
- pier; 4
- window opening. V
— diagram of timber cutting, where c is the remainder of the cutting. G
- option for constructing an opening in a log house with the installation of temporary fastening bars, item 7. d
- option with installation of decks in the opening, item 6 - we immediately get an opening ready for installing a door or window.
A
- layout of openings in the wall, where: 1
- wall; 2
- door opening; 3
- pier; 4
- window opening. V
— diagram of timber cutting, where c is the remainder of the cutting. G
- option for constructing an opening in a log house with the installation of temporary fastening bars, item 7. d
- option with installation of decks in the opening, item 6 - we immediately get an opening ready for installing a door or window. In practice, two options are used for forming openings when assembling a log house.
One option is " G" on the image. The opening is made in rough form; only preparations are made to create the opening. The opening is not prepared for the installation of doors and windows immediately when assembling the log house. This work is left for later - usually done after the frame has shrunk.
This option allows you to speed up the assembly work of the log house. Beams must be installed in the opening to fasten the partition to the log house, item 7 in the figure. At least two such beams are installed in the doorway.
During the shrinkage of the log house, the piers can “lead” inward or outward. To prevent this, timber in the walls is fastened with vertically installed boards.
In another version - " d"in the figure, the openings are immediately prepared for the installation of doors and windows. To do this, install decks (windows) in the openings - vertical beam with groove, item 6 in the figure. The tenon of the wall beam fits into the groove. In this way, the partition beam is fixed from displacement. In this option, the openings are immediately ready for the installation of doors and windows.
Decks (jams) traditionally serve not only to connect timber in the opening, but also serve as window slopes and window sills. To do this, they are carefully processed and chamfered.
 Option for installing a window in a wall made of timber: 1 - finishing the window slopes; 2 - a vertical frame board with a tenon strip, fits into the groove of the wall beam; 3 — plastic window frame; 4 — PSUL sealing tape
 In modern conditions, when installing plastic windows and the installation of plastic slopes and window sills, decks (jambs) can be omitted. The beams in the opening are fastened like this. At the ends of the beams along the entire length of the opening, a vertical groove is cut out and a rail is inserted there, which secures the pier beams from displacement.
The length of the deck (plug) or slats should be less than the height of the opening by 5-7 cm so as not to interfere with the shrinkage of the log house.
Timber for home, bathhouse in your city
How to properly install windows in a timber wall
If the opening in the wall was made in a rough version (see above), then the installation of the window begins with cutting out the opening to the desired size. To do this, a lath is filled along the edge of the cut, item 2 in the figure, and the beams are sawed off along the edge of the lath with a chain saw.
 Correct installation windows in the wall made of timber. 1
- wall; 2
- rail; 3
- platband; 4
- window; 5
- window box; 6
- wall beam above the window; 7
— interventional insulation; 8
— shrinkage gap above the window and deck; 9
- window frames; 10
- wall beam (pier); 11
- deck; 12
- nail.
Correct installation windows in the wall made of timber. 1
- wall; 2
- rail; 3
- platband; 4
- window; 5
- window box; 6
- wall beam above the window; 7
— interventional insulation; 8
— shrinkage gap above the window and deck; 9
- window frames; 10
- wall beam (pier); 11
- deck; 12
- nail. Then, using a circular saw, tenons are cut out at the ends of the wall beams (wall). The deck, pos. 11, is placed on the tenons, pos. 10, with a groove. The joints are sealed with insulation. The deck is nailed to the wall beam with nails driven in at an angle, pos. 12. This way the nails will not interfere with the shrinkage of the frame.
A window frame is inserted into the opening prepared in this way, which is attached to the deck with self-tapping screws. Above the window box be sure to leave a gap, pos. 8, to compensate for the shrinkage of the log house. Gap size 5-7 cm. The gap is filled with soft insulating material.
An expansion gap must also be left above the upper end of the deck.
Openings are prepared in the same way and doors are inserted into the walls made of timber.
After completing the assembly of the first floor of the house, the log house is covered with beams of interfloor or attic (if the building is one-story) floor.
Can be a structural element. And they can also perform an independent function.
The next page describes the structure of a broken roof of a house made of timber, where the floor beams simultaneously serve as an element of the load-bearing frame of the attic roof.
Watch the video clip, which describes and shows in some detail the technology for installing a log house from construction timber.
Profiled wood with proper processing quality gives a gapless connection. A lock made of groove elements - the tongue of a labyrinth-type double cup lock has been tested for decades. Adjusting gapless corner joints can turn the frame of a log house into a thermos without significant heat loss.
Cold bridges are blocked
It is profitable to order a ready-made standard project for the construction of a cottage from timber with reference to the region. It is up to the designer to select from savings on the network and adapt the technical design to the request. What are the advantages of the project:
- Get a detailed cost estimate for materials, components, and work costs;
- Issues of material shortages or sale of remaining surplus will not arise;
- Detailed drawings and subassemblies will lead you out of the maze of errors;
- Transport costs are optimized;
- Laying pipes and cables will not cause any difficulties;
- The maximum cost of a standard project is 20 thousand rubles.
But the implementation of the idea depends on the need to hire a team of qualified carpenters. The level of responsibility, skill of specialists and the seriousness of hidden defects will become clear during the first wintering.
What should an ordinary person, inexperienced in construction, decide to build a warm house from profiled timber with his own hands? Order a house kit from a local house-building plant and save a considerable amount of money with this step and speed up your move-in date.
Essentially, a house kit is a kit for the builder. The profiled timber is cut to size, the dovetail-type connecting locks are made without gaps using precise factory equipment, which eliminates the appearance of cold bridges.
In the attached video, craftsmen use a chainsaw for this purpose. But are they capable of reproducing the precision of a machine production line? It can be seen that the cuts were made approximately, with a margin. Will they definitely caulk or foam the inconsistencies in the cuts? Doubt encourages self-building. And the cost of the work will amount to no less than factory processing.
Do-it-yourself house made of profiled timber
The benefits of purchasing a house kit made from profiled timber

The technological worker replaced the carpenter - that’s what machining means
The developer is limited in time, looking for an opportunity to reduce the cost of building a log house. Let’s look point by point at whether the costs of cutting and sampling are reasonable:
- You receive chamber-dried wood with 10–16% humidity in sealed bags;
- End processing with film-forming stabilizer INDULINE. This means that the main channel for moisture absorption is blocked, the web of cracks will not disfigure the cut;
- Each part is numbered, the instructions indicate the location of assembly;
- Adjustments and modifications are excluded, time is spent only on the process of assembling the house;
- Check prices at wholesale stores per cubic meter of long profiled timber. It turns out that the cost of a similar unit of a house kit is the same or up to 10% more expensive - this is where the benefit is hidden;
- A set of timber for a house with an area of 120 m2 will cost approximately 650,000 rubles, for 190 m2 - approximately 950,000 rubles;
- The average assembly cost will be 25% of the cost of the timber. Manage the reserve fund at your own discretion;
- The thickness of the log house will be offered according to climatic zone: a common timber size of 150 x 150 mm is suitable for Voronezh. In Siberia, wall thicknesses less than 220–250 mm are unacceptable;
- Installation will be doubled;
- The material is 100% treated with antiseptic and fire retardant.

100% complete from base to ridge, this is the construction service
Ready-made house kits from the manufacturer
Laying the foundation
Weight of 1 m 3 of dried coniferous timber 0.5 tons. Roofing will be added, interfloor ceilings, furniture, wind and snow loads. The total weight will not exceed 40 tons for a two-story house 10 x 10 m. The depth of groundwater and the type of soil influence the choice of basis.
The pile will speed up the start of the assembly of the log house. Columnar and shallow foundations are labor-intensive: the volume of excavated soil is large. To prevent the concrete from getting wet, a compacted sand bed of 0.3 m is made, with a gravel cushion on top.
The concrete foundation is poured in advance, at least six months before the start of construction. Box reinforcement with a metal period of Ø 12–14 mm will strengthen the monolith. After polymerization of the concrete, the base must stand so that the heaving of the soil during freezing and thawing reveals weak spots or confirmed strength.
The marking of the foundation of the house is carried out in accordance with the drawing. Corner reference points of external and internal mates require special attention. Precision is required in the placement of threaded inserts. After removing the formwork, the walls and top edge are coated with a waterproofing agent. Insulation with polystyrene foam will extend the life of the foundation. Backfilling of clay is done with an outward bevel.
Raising a house from profiled timber
We level the upper edge of the foundation and lay 2 rows of roofing material for waterproofing. We lay antiseptic and treated with bitumen mastic boards of fifty large format: the logs will rest on them.
The bottom row is susceptible to rotting. Let's sacrifice the boards - they are easier to replace. We lay the first crown over the insulation layer. We pay special attention to the coincidence of angles. We do not let go of the level, plumb line, and cord for checking the diagonal.
Insulation tape is inserted into the grooves of each row of profiled timber and corner joints of external walls. Wooden dowels, driven in with tension, strengthen the connection between the elements of the log house. Steel ties will cause dew point in the thickness of the material, causing decay and rotting. Therefore, they are used only to connect the log house with the foundation.

There is no loophole for the cold: the barrier is reliable
The installation of logs under the subfloor is consistent with the size of the slab mineral wool insulation in increments of 0.6 m. Fastening to the timber with reinforced corners and on hangers stabilizes the spatial position of the logs.
Splicing is allowed by overlapping or by placing trim at the joint with a fixation zone of at least 0.6 m at each end. On both sides, the logs are covered with 9 mm OSB boards or moisture-resistant plywood. Installation of a vapor-conducting membrane is required.
The interfloor ceiling is analogous to the subfloor. The only difference is the amount of insulation that has become a sound insulator. The partitions are mounted in one axis - partial unloading of the load-bearing walls is necessary: in addition to its own weight, the roof transmits wind load.
The skill of assembling walls from profiled timber and partitions according to drawings and instructions comes quickly. An important concern, while the roof is not covered, is to protect the log house and unclaimed workpieces from precipitation and air humidity in bad weather.
In heat and frost, cracking of wood saturated with moisture is inevitable. The appearance of cracks will worsen the thermal conductivity of wood. Repairing damage is a long-term “pleasure” that lasts more than just one day.
Let's give the floor to the Scandinavians
There are a lot of insulation materials that are superior to wood in terms of heat conservation. And large-format profiled timber is used for roads due to the abundance of waste that is unsuitable for processing into building materials. Swedish builders decided to reduce the cost of processes by including paired parts with a thickness of 70 mm.
Using smaller section wood reduces costs by up to 40%. Foamed breathable insulation seals joints and allows you to reduce the power of heating devices even in the Arctic zone. Penoizol is ideal in terms of cost and thermophysical properties on the market.
An option was tested with the replacement of wooden beams with a laminated analogue of chipboard made from chips. The 100 mm heat insulator bears the main load for heat conservation. The resulting monolith is not afraid of warping and cracking. Shrinkage has also decreased. It often makes sense to adopt such a new product.

Progress does not stand still
If you know how to build, learn to wait
After you have brought the house under the roof, closed the windows and doors and left only gaps for drafts (let excess moisture blow out), you need to wait for shrinkage. Under its own weight, the tenons of the timber will cut deeper into the grooves of the structure. The pause lasts up to six months. Windows and door frames are waiting in the wings, otherwise the structure will warp.
Now is the time to carry out additional insulation from the inside. It should be noted that in this way the costs of profiled timber are reduced: a reduction in size by 50 mm in thickness and width results in savings of 2–2.5 thousand rubles. per cubic meter
The only condition: natural and artificial materials having vapor conductivity. Let's turn the house into a polystyrene box - destroy the tree, set up a bathhouse in the room. You will have to invest in forced ventilation.
No matter how good the profiled timber is, the smoothness of the walls is relative. If you like the interior of the hut, leave it as is. The texture of the timber under a layer of varnish looks attractive. But, of course, the design of a modern stylish home requires a different approach.
As an option, drywall mounted on vertical holders will hide the flaws. A heat insulator will be placed between the guides and the house will not be afraid of the cold. While one floor is being finished, the other will become residential.
Protecting the facade of a house made of profiled timber, as a regular event, will drive you crazy. Varnishes, paints, and impregnations fade under the sun and lose their protective properties. Perhaps sooner or later you will have to think about a ventilated facade. But the house, assembled from timber, under plastic lining will lose the charm of natural material.

Result: own roof over your head
Conclusion
Building a house from timber on your own during the summer season is a feasible task. Do not make adjustments to the finished project - this may be the only wish of the manufacturer. The implementation of a large-scale project by the customer and the contractor as one person ensures that your expectations are met.
Profiled timber is one of the most reliable modern materials. Such a house looks presentable, beautiful and rich. Another advantage is the naturalness of the selected material. Thanks to the high performance characteristics and ease of processing of profiled timber, you can easily bring any ideas to life.
You can watch the video to see how to assemble a house from profiled timber with your own hands. There's nothing complicated about it. The timber is manufactured in production and goes through certain stages of processing. Its surface is perfectly smooth. Also, the profiled timber has special grooves with which you can easily connect the elements together.
Assembling a house from profiled timber and its advantages
 |
Advantages of a wooden house. In addition to environmental friendliness and beauty, there are several other important aspects that make such housing affordable and of high quality. |
 |
Assembly stages. To do everything correctly, you must follow the instructions and follow all recommendations. |
Assembling a house from profiled timber. Video. With my own hands. pros
As with any other material, when building a house from profiled timber, some nuances should be taken into account. It is especially worth studying carefully this question for those who are going to do this on their own for the first time.
Positive aspects of a house made of profiled timber:
- Attractive appearance.
High-quality profiled timber does not require additional processing or finishing. The entire process of decorating walls indoors will be reduced to a decorative and protective coating. This not only saves money, but also time. And the wooden house itself looks solid.
- Easy to assemble.
A very important factor, especially if you decided to do everything yourself. But it’s worth considering one recommendation: don’t skimp on the kit. The fact is that you can simply buy a profiled beam and try to assemble it according to your own design. But then it is better to seek help from specialists.
For self-construction, it is better to purchase a ready-made kit, which will come with instructions. Thus, at any time you can find answers to your questions and, in the company of several assistants, you will cope very quickly.
- Low cost.
The price of profiled timber is much lower than, for example, brick. At the same time, it is easier to work with. The costs of building such a house are much lower. In addition, you can do without interior or exterior decoration.
- Environmentally friendly material.
Wood is natural material, it has no synthetic impurities. Therefore it poses no threat environment or human health. In addition, a pleasant microclimate will always be maintained inside the house, which has a positive effect on the body as a whole. Wood also absorbs excess moisture and retains heat well, this is very important especially during the cold season.
When working with such material, you should be careful to maintain an attractive appearance. Wood absorbs dirt very easily and quickly, subsequently it is difficult to remove it from the surface, you have to use sandpaper. It is best to prepare a separate area where it will be relatively clean and where the material can be placed.
Carrying out the work of assembling a house from profiled timber with your own hands. Video
Building a house is not an easy task, but choosing the right material this can be done quickly and efficiently even without the involvement of a team of workers. The fact is that profiled timber is relatively light in weight and can be easily processed. For those who ordered the kit, the work becomes twice as easy, because they have a description of the work in all details and in a certain sequence. It is important not to deviate from it. You can also watch a video on the Internet that explains how to handle timber and how to lay it.
- Preparatory stage.
This process begins with you deciding on a project or creating one yourself. Many companies offer ready-made plans according to which the client can independently assemble ready house from profiled timber. In the catalogs you can find a wide variety of projects for every taste and taking into account all the nuances.
- You should decide on the area of the house.
If this is a country or garden house, then you can choose small option, which will fit perfectly on the site. If you decide to live in it permanently with your family, it is better to choose spacious options. It can be one-story or two, the main thing is that everyone is in it necessary premises. Also, the size largely depends on total area plot.
- Select a suitable project.
It turns out it's not that simple. Sometimes, due to certain circumstances, it is not possible to realize our plans. The fact is that in addition to desire, it is also necessary to take into account the placement of communications. But the most important factor is convenience and comfort. The finished projects are quite thoughtful and offer a lot of options. You can create your own based on several.
It must be remembered that when choosing timber you should take into account its thickness. For a residential building, it is better to choose a material of 200x200 or more. Elements with less thickness will freeze in winter.
- Calculate the amount of material needed.
The best option is to contact a company that will help you do this. You can also use online calculator on one of the sites. If you have construction skills, you should try to do everything yourself.
- Preparation of necessary documents.
This procedure may take some time, but construction cannot begin without obtaining permission and approval of the plan.
- Main job.
- Foundation.
Assembling a house from profiled timber with your own hands according to the video begins with the foundation. Since the weight of the structure is small, you can get by with a strip or pile base. It is important to take into account the depth of soil freezing and the foundation must go into solid layers. In the area where The groundwater close to the surface, a slab base is used that can withstand active soil movement. For concrete to be strong it must be left for at least 4 weeks. To avoid getting hit excess moisture in the lower part of the house, the upper end is treated with bitumen mastic, and then roofing material is laid on it.
- Lower crown.
For this part, the strongest elements are chosen, often of greater thickness. They must be treated with an antiseptic several times and dried. Place with an indentation of 25-30 centimeters wooden slats, which reduce the contact of the profiled beam with the foundation. It is recommended to use larch for the lower crown.
- Wooden frame.
- Interior decoration.
Usually it is not necessary. Wooden beam simply treated with a special solution. The interior is different from brick house simplicity and comfort. All necessary communications are also carried out.
Assembling a house from profiled timber using a video with your own hands is a very convenient option. This process will not take much time. Wooden house- This is an economical option.