It is difficult to imagine an avid gardener without a walk-behind tractor on the farm. This is an irreplaceable thing, which, first of all, is necessary when plowing the land on garden plot. But the functions of a mini-tractor can be expanded by attaching a wheelbarrow/trailer to it. Of course, it’s easy to buy a cart for a walk-behind tractor in a specialized store, but a real man can easily make a trailer for a walk-behind tractor on his own.
Trolley variations
Variations of trolleys for this type of equipment directly depend on the ability to transport a certain load.
- A simple single-axle trolley. Weight Limit lifting up to 70 kg. Its design will be simple and inexpensive.
- Cart for walk-behind tractor with load capacity up to 110-120 kg. Most universal option for use on the farm.
- Trailer for transporting heavy loads weighing more than 120 kg. The design becomes more complicated, and the cost of material for the frame and cladding increases. This option is more expensive, but the capabilities of the trolley increase significantly.
Self-assembly of a walk-behind trailer - it couldn’t be easier
How to make a trailer for a walk-behind tractor with your own hands? The main thing you need to save wasted effort and avoid unwanted mistakes is the correct trailer drawings for the walk-behind tractor and diagrams.

Having selected accurate drawings with your own hands and the dimensions of the planned trailer, you need to calculate all the nuances during manufacturing.
- Consider what the cart is being made to transport: whether it will be a small-sized, light load or, most likely, a heavy one. Based on this, choose a material based on strength for the frame and skin of the trailer.
- If the trailer is a tipper, two-axle, with a large load capacity, then there is a need to equip it with a hydraulic drive. This is necessary for easy capsizing.
- For a model with one axis (single-axis), a manual type device is sufficient.
- For safety, a cart with a load capacity of more than 350 kg must be equipped with a homemade mechanical brake. When the walk-behind tractor with the trolley is sufficiently loaded, it will be impossible to stop it when going down the hill. But since it is quite difficult to make brakes on a trailer for a walk-behind tractor yourself, therefore the best option there will be help from a qualified person.
The first stage is preparing the necessary parts and tools
In general, this is the usual combination of body, frame, wheels and hitch. To install a homemade trailer to a walk-behind tractor, you need to purchase (or perhaps you already have them on the farm) the following parts:

- pipes with a diameter of 60x30 mm and 25x25 mm, usually they must be iron for the reliability of the future product;
- two wheels, perhaps you have old unnecessary ones from Moskvich lying around, as well as springs;
- duralumin sheets, their thickness should be about 2 mm;
- steel sheets, their thickness should be about 0.8 mm;
- channel No. 5;
- fasteners.
Of course, when mounting a walk-behind tractor trolley, you cannot do without necessary tools: grinders for cutting parts, electric jigsaw, screwdriver and welding.
Frame for walk-behind cart
 To make a trailer for a walk-behind tractor with your own hands reliable and durable, you need a very strong frame. When producing a grid for the frame, a 60x30 mm pipe is suitable; the cross-section should be square (rectangle) and a corner for the connection 25x25 mm. In order to make a lattice frame, all the parts need to be connected with 5 additional crossbars.
At the corners of the frame grid to the longitudinal pipes using welding machine fasten 4 vertical racks. If the wheelbarrow for the walk-behind tractor has a folding side, then the frames must be produced separately and only then installed.
Frame covering options
To cover the structure, craftsmen choose inexpensive material or what is available. The price of the product becomes much lower.

- Wooden planks that are often left behind after construction. The main advantages are low-cost, the disadvantages are moisture-resistant, and as a result, the low life expectancy of a wheelbarrow for a walk-behind tractor. In addition, additional funds are needed to process them.
- Plastic. Pros: resistant to moisture, unlike wood; cons: not strong; if damaged, it will break.
- Sheets of metal. Pros - durable material, therefore durable, cons - one of the most expensive options.
But if the cart for the walk-behind tractor will be used constantly, then it is more profitable to make it metal and not spend extra money on repairs. The sheets can be secured to the frame using a welding machine.
We manufacture the chassis
To transport cargo, a trailer needs wheel units that can be removed from unnecessary vehicle. To attach the wheel assemblies, it is necessary to weld additional pipe. The trailer hub is attached using the press-on method. The rear part is put on the axle, which is machined beforehand. There should be no distortion, so it must be constantly monitored. The mounted wheels must be secured with nuts and finally put on the caps.
Motoblock trailer hitch
Motoblock trailer hitch - enough important element the entire structure. The best option is a knot, when a pipe is connected to another pipe. IN curved pipe on one side you need to weld another small part of the pipe. This must be done in a vertical position. The same operation is performed on the other edge of the main pipe. Finally, a king pin is installed to connect to the trailer. When turning or on uneven roads this design will provide a strong grip.
How to avoid mistakes when making a trolley for a walk-behind tractor?
If a walk-behind trailer is being manufactured for the first time, then errors occur even among the best master. The main ones:
- incorrectly selected seat. It should be convenient, because you often have to do housework. The best lava seats;
- To save money, they do not install brakes. Do not under any circumstances skimp on own safety. Homemade hand brakes are better than nothing;
- low-quality and cheap cladding. And again for the sake of budget option, but remember - the miser pays twice.
Using a walk-behind tractor on the farm often requires additional attachments. You can save on its purchase by making a trailer for the walk-behind tractor with your own hands. This work is simple and accessible to anyone with a little plumbing skills.
Possible trailer options
Trailers for walk-behind tractors most often fail due to exceeding permissible load. Therefore, you should first decide on the main types of work for which the model is intended and the volume of transportation. The following options are possible.
Light trailer. The model, designed for a load capacity of 50-70 kg without the weight of the driver, can easily be made from an ordinary garden cart with one axle. It is enough to weld a towing mechanism to it and make a stand for the seat.
Universal option suitable for transporting small loads weighing up to 120 kg on areas with uneven terrain. The U-shaped frame is welded from an I-beam. A towbar from a plow is attached to the drawbar.
Heavy model with rubber running is the most rational, although a little more expensive. It allows you to use all the capabilities of the walk-behind tractor and extends its service life by decades. To make it you need to purchase a metal profile the right size and some spare parts for automobile chassis.
Necessary materials
The set of materials and equipment required for work consists of:
- electric welding machine;
- Bulgarians;
- electric drills with drills of different sizes;
- ten electrodes No. 4;
- steel profile - tubular square with dimensions 40X40 20 m long and 20X40 15 m long;
- a steel pipe, the internal diameter of which corresponds to the external size of the bearing at the hub;
- sheet metal 2 mm thick with an area of 2x3 m;
- two hubs in a set from a Moskvich car of the M2140 or M 412 brand;
- two wheels from it, in normal technical condition;
- two garage door awnings.


The main dimensions can be selected independently, depending on the type of work, for example, 150X200 cm. The height of the homemade trailer is selected in such a way that it has a horizontal position in working condition. The trailer's carrying capacity for a conventional walk-behind tractor should not exceed 500 kg. For powerful walk-behind tractors with a 12 hp engine. With. the load capacity parameter may be greater. The trailer can be attached to the walk-behind tractor using a standard plow hitch or you can make it yourself. The carrier is made from a pipe round section with a distance from the trailer to the mounting hole of 1.3 m.

Housing welding
To make the skeleton of a homemade body, you should:

- cut a square metal profile;
- weld a rectangular frame from longitudinal and transverse spars;
- make a couple of transverse spacers inside it to strengthen the underbody;
- then cut and weld the sides of the trailer - 4 pieces, each 50 cm high;
- sew up the sides with steel sheets and weld them to the base of the body;
- lay out the bottom sheet metal and fasten with metal profile beams;
- install the tailgate using door hinges so that it can be folded back when unloading;
- if desired, you can make the sides folding;
- treat the structure with anti-rust and coat with primer.
Chassis

The most important part of the work is the installation of the chassis. First you need to prepare the wheel axle. Any wheels can be adapted, but a trailer for a walk-behind tractor made with rubber wheels will make it easier to control and increase driving safety. The axle is firmly welded to the side members at several points and to the longitudinal hinge. Its length must be chosen taking into account that the wheels do not protrude beyond the dimensions of the homemade body.
For better fixation of the axle, corner supports are used. The running gear must be installed strictly parallel cross beam frame. The use of a tubular axle will increase the strength of the structure when the permissible load is exceeded. The position of the hubs in the pipe should ensure minimal wheel runout.
Making a trailer hitch
Effective use of various attachments on a walk-behind tractor is impossible without a high-quality hitch. You can do it yourself, saving on the purchase of a factory mechanism. When manufacturing a coupling device, it is necessary to ensure:
- compatibility of sizes for walk-behind tractor and attachments;
- simplicity and reliability in operation;
- the ability to configure equipment to perform a specific task.

The main part of the hitch is a U-shaped bracket with mounting holes. It is attached through them using pins:
- On the one side- to the walk-behind tractor;
- on the other side– to a trailer or other attached equipment.
The material for this unit can be a channel of the required size. The holes must be of a certain diameter. The pins are made of high-strength steel. The position of the device is changed using a lever. The coupling unit is located under the steering control.

Advantages and disadvantages of a homemade trailer
When there is a need to use a trailer for a walk-behind tractor on a farm, many are faced with a choice: what is more profitable - buying a device or making a trailer with your own hands? Everyone makes their own decision, depending on their skills in craftsmanship and existing prices on the market. Advantages homemade unit consist of the possibility:
- determine its dimensions according to your needs;
- change some parameters;
- choose strong and durable materials that will provide the trailer for the walk-behind tractor long term operation;
- use improvised devices that will save money on factory samples.

A DIY trailer can be equipped with other useful devices, for example, reflectors, brakes. To manage, you need to acquire some skills that will take a little time.
Which can be used for any work: plowing the garden, transferring crops, seedlings, and so on. In order to be able to transport even more contents on a walk-behind tractor, you need to do self-production trailer for walk-behind tractor.
So, first, let's look at how to make a simple walk-behind tractor with a trailer. Will be needed steel pipes, wheels, springs, sheet metal, “five” channel, fasteners. Of course, you need to have some tools, welding and be able to use it all.
The frame will be in the form of a solid structure. It will be installed on a frame mesh. To do this, we make traverses from corners. We make spars from pipes. They are connected by crossbars to form a lattice.

We will weld the racks to the longitudinal pipes by welding. A corner strap will be installed in the upper part. You can also make the sides of the trailer that will fold down. Using a duralumin sheet we will create a platform. For the sides you can use thinner sheets.
To create a beam, you need to connect two channels. At one end there will be a wheel axle.
The resulting beam will be connected by springs to the side members. The ends of the spring are placed on the shackle axle. From rectangular pipes Let's make a drawbar. If desired, the trailer can even be equipped with side lights and headlights.
Homemade trailer for walk-behind tractor, video
Now we’ll tell you how to make a trailer with large functionality. It is worth saying that it is best to carry out all work on the basis of pre-prepared drawings. Once the size of the trailer is determined, you can start counting materials. this work is very important because it will save a significant amount of money. You definitely need to find a welding machine, since self-tapping screws alone will not be able to ensure the strength of the product.
 Do-it-yourself walk-behind tractor trailer dimensions, drawing
 In order to create a strong frame, you will need profile corners. We also take rectangular pipes of square or rectangular section. In order to make the body, we use inch boards and racks.
Note that the created structure will have one axis. Therefore, in order to properly distribute the load, it must be placed closer to the center of the axle, and not towards the drawbar. However, folding sides cannot be made. But if you really want to, you can make folding sides.
The chassis is the main part of the trailer that will be attached to the walk-behind tractor. In order not to think about where to find wheels or how to make them, we simply buy ready-made wheels from other small equipment. A console is made to connect the walk-behind tractor and the trailer. It is attached to the bracket hanging system. The drawbar is inserted into a tubular body and secured with a thrust ring. This will allow you to easily control the created equipment on all types of surfaces.
In the front part of the trailer, there is a seat on the walk-behind tractor, on which the driver will sit, rest his feet on a specially made platform and direct the ride.
Watch the video: do-it-yourself cargo trailer for a walk-behind tractor
Well, now a little humor:

- How and when to clean white cabbage to…
The need for a trailer for a walk-behind tractor in a household plot is difficult to overestimate. It can be useful for many things: transporting seedlings and harvested crops, as well as necessary tools and even garbage. By spending just a few days making a trailer for a walk-behind tractor with your own hands, you can make your future work much easier.
The simplest trailer model
To build the structure needed on the farm, you need to prepare:
- Steel pipes 60x30 mm and 25x25 mm;
- Springs and wheels (can be from a Moskvich car);
- Duralumin sheet 2 mm thick;
- Cut of sheet steel 0.8 mm thick;
- Channel No. 5;
- Fastening elements;
- Tools (jigsaw, grinder, welding machine and screwdriver).
The trailer frame is a one-piece structure placed on a frame grid. To equip it, you need to make two traverses from a 25x25 mm corner, which will act as front and rear cross members, and spars from a 60x30 mm pipe. All elements are connected using five crossbars so that the result is a lattice.
A simple trailer model with folding sides is a very necessary thing in the household. With its help you can not only transport boxes and bags of harvested, but any long cargo
When arranging the lattice platform, you need to place the cross members and traverses relative to the side members so that small outlets remain. Longitudinal pipes will subsequently be welded to them.
Four racks are attached to the longitudinal pipes by welding, to the top of which strappings from a 25x25 mm angle are welded. To equip a trailer with folding sides, the frame of the structure is made separately from the frame. The platform grille is covered with a duralumin sheet, secured with bolts. To sew the sides, you can use thinner ones. metal sheets, securing them to straps and racks by welding.
To make a beam, two channels of the same length are inserted into each other, equipping one of the ends of the structure with wheel axles. The finished beam is connected to the side members using springs. To do this, the ends of the springs are put on the bracket axis and the shackle axis, and the central part is welded to the beam with stepladders.
The drawbar is made from rectangular pipes 60x30 mm. To manufacture a two-beam structure, the front ends of the pipes are joined and welded to the body of the unit’s towing device, and the rear ends with an overlap of 200 mm are welded to the front ends of the side members.
The trailer is ready. If desired, it can be equipped with brake lights, turn signals and side lights.
Manufacturing a multifunctional trailer
When planning to make a trailer yourself, you must first develop a drawing in which to calculate the dimensions of the structure and imagine its future appearance.

When thinking about the dimensions and load-carrying capacity of the structure, you should expect that with the help of a trailer in one trip you can transport an average of 6-7 bags of vegetables, the total weight of which is about 400-450 kg
Having decided on the size of the trailer, you need to calculate required amount meters of rolled metal. You also need to calculate the number of channels that will act as a frame for the hitch. By paying enough attention to this stage, you can not only save costs by protecting yourself from the possible costs of purchasing extra screws and corners, but also be confident in the correctness of your actions.
When making a homemade trailer, there is no way to do without a welding machine, since the functional design will not last long with self-tapping screws.
Material on proper storage of power tools will also be useful:
To build a strong trailer frame, steel angles with sections of 50x25 mm and 40x40 mm, as well as cuttings of rectangular and round pipes, are suitable. To make a trailer body, you will need 20 mm thick boards and 50x50 mm timber for the support beams.
Stage #2 – production of basic elements
As a basis for manufacturing, you can take a ready-made design of the structural part.

The trailer has an increased safety margin, which allows it to be used on difficult terrain surfaces
The design has four main components: body, carrier, frame and wheels. All of them are connected by welding.
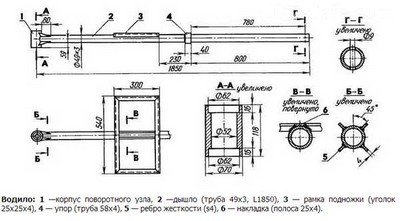
To increase the strength of the structure, four stiffening ribs are provided in the area where the drawbar meets the body of the rotary unit
The body represents wooden structure, assembled from 20 mm boards, the corners of which are equipped with steel corners. The body is attached to the trailer frame using three wooden beams– support beams.

The trailer frame is made from a set steel elements: pipes, angles and rods
Since such a trailer is a single-axle structure, the load distribution must be such that the center of gravity is shifted to the front, without going beyond the axle of the wheels. The only drawback of this body is that there are no folding sides. If desired, the design can be slightly improved by installing folding walls. It is also advisable to make side loops with straps on the body, which will be necessary to secure the cargo during transportation.
Stage #3 – arrangement of the chassis
The chassis of the structure is one of the key ones in the manufacture of a homemade trailer for.

You can purchase new wheels and springs, but it is much easier to use used parts of a domestic car, for example, from a Moskvich or Zhiguli.
In our case, the trailer is equipped with wheels that were removed from the SZD motorized stroller and used as an assembly with the hub. To match the axial rod with the diameter of the hub bearings, it is necessary to sharpen its ends.
When arranging the wheel axle, it is enough to use a steel rod with a diameter of 30 mm. The length of the rod should be such that assembled form the wheel structures did not protrude beyond the body rims. The rod is attached by welding through gussets and corner supports to the side members and the body of the longitudinal hinge.
To connect the trailer to the walk-behind tractor, you need to make a console. It will be attached to the attachment bracket, so its upper part should follow the contours of the holder. Bottom part The console is an axis around which, with the help of angular contact bearings in a fixed position, the rotating assembly of the carrier rotates freely.
How to make an adapter for a walk-behind tractor yourself:

The drawbar is inserted into the tubular body of the longitudinal hinge and secured with a thrust ring. This constructive solution makes it easier to operate the unit uneven surfaces, since the wheels of the trailer will work independently of the wheels of the walk-behind tractor itself.
The trailer is almost ready for use. All that remains is to place a seat for the driver in front of the body and attach a footrest in a special frame to the drawbar of the driver, which you can lean on while driving.
Other options for making trailers: video examples
The driver will control the unit from the seat, holding and manipulating the levers. It is advisable to equip the seat soft pillow so as not to turn working with a trailer into a real test of the body’s endurance to shaking.
One of the most necessary tools for every gardener, farmer or gardener who owns mechanized agricultural machinery is a trailer for a walk-behind tractor. Using a walk-behind tractor on the farm, you can plant, plow and cultivate. And if we attach a trailer to the walk-behind tractor, we get great assistant, which can transport fairly heavy loads. The dimensions of the trailer for the walk-behind tractor are calculated in such a way as to be a universal and multifunctional unit. They also make the farmer’s work easier by tilting the body and the ability to open the tailgate.
Optimal trailer sizes for a walk-behind tractor
Most trailers can be used while sitting, thanks to the installed seat. Before choosing a trailer for a walk-behind tractor, you need to check its compatibility with the walk-behind tractor itself. You also need to consider the strength of the frame and thickness steel sheet so that when operating the walk-behind tractor, deformation of the trailer does not occur.
Let's look at specific examples What sizes are trailers?
Dump trailer PM-0.6S. Trailer length 1400 mm. Trailer width 1000 mm. Load capacity 350 kg.
Motoblock trailer with 7C springs. Trailer length 2900 mm. Trailer width 1000 mm. Trailer height 1200 mm. Maximum load capacity 500 kg.

The trailer for the walk-behind tractor is homemade. Trailer length 2250 mm. Trailer width 965 mm. Trailer height 885 mm. Load capacity 400 kg.
Drawing of a trailer for a walk-behind tractor
This trailer can be used with both a walk-behind tractor and a passenger car, and is a transformed unit. Equipped with a simple sprung suspension.
One of the purposes of a trailer is the ability to transport a walk-behind tractor by car. The “Fork” unit allows one person to load and unload the walk-behind tractor without much physical effort.
With absence passenger car, the trailer is equipped with a body and connected to the walk-behind tractor. Instead of cutters, wheels are installed on the walk-behind tractor. The trailer has a good sprung suspension, resulting in excellent ride softness, good longitudinal stability and virtually no rigidity. The trailer parts can be easily separated, which allows the trailer to be stored compactly when disassembled.
The length of the body is 2320 mm, width 1590 mm, and height 500 mm. The track width is 1490 mm. Body dimensions: length 1500 mm, width 1200 mm, height 300 mm. Fork size 500x300 mm.
Options

All parts by detail

Trailer usage options

Trailer dimensions

The main purpose of a trailer is to transport cargo. The trailer itself is an intermediate link when transporting cargo. Therefore, the primary task when creating a trailer is to achieve low weight and good load capacity. All elements of the trailer design are used rationally. Chassis weight - 25 kg. The weight of the transported cargo is 200 kg. When stored, the trailer takes up very little space and easily fits into a passenger car.