http://s30893898787.mirtesen.ru/blog/43737382522/C...i-nozhnitsyi-stali-ploho-rezat
Your scissors do not cut well: they “chew” the material between the blades, and when the blades are completely closed, they make only a small incision. There are calluses on my fingers, and I’m gloomy in my soul... Don’t rush to run to the store for new scissors. Let's tell you a little secret.
First of all, look to see if there is any lateral play on the axle. Simply put, are the two halves of the scissors dangling on the axle? To do this, take the scissors by the rings and use your hands to make rotational movements, as if you were tightening and unscrewing a screw. If there is any play, you will feel it immediately. As a result of this defect, the material is not clamped by the blades and “slips.” How to fix it?
The halves of the scissors are pressed against each other on the axis. If the axis is a screw, then simply tighten it tightly. If it is a bolt with a nut, tighten it while holding the nut with pliers. But if there is a rivet there, then you will have to tinker. Place the scissors on a sturdy metal surface(for example, on the metal part of a hammer) so that the rivet head is at the bottom, on the metal. Take a pointed carbide metal object. Let it be a nail that is driven into a stone wall or, in the absence of one, an ordinary thick nail (slate, for example). Place it vertically upward in the middle of the rivet and with several short blows on the nail, knock out a hole in it up to 1-2 mm deep. Then tilt the nail 20 - 30 degrees and tap with short strokes from the hole to the periphery, gradually describing a full circle. And so on until the backlash is eliminated.
Little advice:
Before eliminating the play, drop a drop of spindle (oil that is used in sewing machines).
Attention! During all of the listed procedures for eliminating play, the scissors must be opened. The fact is that the design of the scissors has one feature - the blades of the scissors are not perfectly straight, but are somewhat curved towards each other. This was done for the purpose that when they start cutting, the material pushes the blades apart, and if they were straight, then the closer to the tips, the larger the gap would become. Take the scissors, open them slightly and look at them from the narrow side. If the ends of the halves do not cross and you are unable to bend them neatly, it is better to buy new scissors.
Have you eliminated the backlash? Try scissors. As a rule, this procedure is sufficient. If the blades “tear” the fabric or, when you apply force, the fabric gets jammed between the blades, you will have to sharpen it.  Take a whetstone you use to sharpen knives, or a finely cut file. Open the scissors. Grab the top half of the scissors by the ring with your left hand. Take a close look at the cutting edge. It is a cut at an angle of approximately 60 - 80 degrees, facing outwards. Accordingly, you place the block against the cutting edge at an angle of 60 degrees to the blade. Using movements downwards and towards you, from the tip to the axis, sharpen. Please note - the width of the strip of freshly sharpened metal along the blade should not be more than a millimeter! If the strip is wider, it means you are placing the block at an angle of less than 60 degrees, and the scissors will quickly become dull.
That's probably all. You should not “straighten” the blades or grind them after sharpening: small serrations on the cutting edge perform a useful function - they do not allow the material to slide between the blades.
Most efficient repair plastics as an example hand scissors, in which one of the handles broke due to excessive force. I will tell you about a method for restoring broken plastic products. This method will allow you to use them as intensively as before the breakdown.
What do we need
- Cyanoacrylate glue (regular superglue, and best of all gel - it does not spread);
- Paper tape;
- Soldering iron;
- A piece of stranded wire.
Preliminary restoration by gluing
First you need to restore the geometry of the broken handle. To do this, we glue it with superglue, following the rules for performing the work - the substance is applied to both surfaces, and after the reaction with the plastic begins, they must be pressed tightly together until completely hardened. 
In order not to sit for several hours with scissors in your hands, we use paper tape to fix the broken handle. 
Connection reinforcement
Once the glue has dried, scissors can be used, but if you cut something with force, they will most likely break again in the same place. To avoid this, it is necessary to perform reinforcement. To do this we need to remove the insulation from copper wire cross-section 2.5 mm and cut 1 cm from the edge. Then it must be placed on paper tape, gluing only half, and then placed in the center of the glued joint and glued to the scissors with the same tape. Thus, on one side of the fault, the wiring harness will not be covered by anything. 

Next, using a heated soldering iron, we begin to warm up the wires of the free edge, which, in turn, melt the handle and slowly sink into it. We smooth out the plastic that appears on top of the wires with a soldering iron, leveling out the traces of our intervention. 
Then we repeat the procedure with the other edge of the tourniquet, after removing the tape. The wires should be completely immersed in the plastic; no protruding wires should be left. At the end of the work, we level the entire surface of the area where the reinforcement was carried out. 

Reinforced connection on both sides. 
Safety precautions
When working with a soldering iron, you should take precautions - the part above the handle is very hot, and the tip has the melting point of tin and can cause severe burns if it comes into contact with the skin.
Trial 
After the plastic has completely cooled, the scissors are ready for use. To check the strength of the connection, take a sushi stick - it is made of wood and quite strong. To cut it, you have to put in a lot of effort, but the restored connection showed excellent results in this experiment, withstanding a fairly serious load.
Restoring plastic using reinforcement is a completely simple procedure, but very effective. In any case, now you definitely won’t have to throw away the scissors. 
Watch the video
You may like:
- Edible bouquets: varieties, rules...
- SHE TOOK A PIECE OF YARN AND WRAPED IT AROUND THREE FINGERS OF HER HAND!…
- Tips that will be useful for both beginners and...
Let's talk about how you can use polymorphus to repair small things in the house. Let's take scissors as an example.
The handle of the kitchen scissors broke a long time ago while cutting baked chicken. In 5-10 minutes it was again made of polymorphus.
Before the repair, the scissors looked like the photo below.
The handle is plastic. The metal base (frame), as you can see, is short. The rings are purely plastic, otherwise the scissors would not break.
Necessary " dissect" handle ( dental education affects) - remove the plastic layer and make hooks. Hooks are needed so that the handle, made of polymorphus, holds securely and does not dangle or jump off. I cut off the plastic layer with a regular knife.
The photo shows the prepared part of the scissors for forming a ring of polymorphus.

Pour boiling water over the polymorphus granules (by this time the kettle should be boiling). Polymorphus becomes transparent in water, which indicates its readiness for use.
We take it out of the water with a fork or stick and form a new handle for the scissors.
As it cools, the polmorphus becomes cloudy and turns white. This is what it looks like:

Place the handle in cold water and let cool completely. The handle was a little rough. To give it a gloss we pour it again hot water part from polymorphus. Upper layer melts a little and smooth the surface with a wet finger.
This is how the pen turned out. So what, what is she white(it can be painted black), but it is much stronger than the plastic from which the scissors themselves are made

My first video “test drive of polymorphus” can be viewed on our channel http://www.youtube.com/watch?v=AiixF1XwbGQ
If anyone has made something from this material, please write!
This is one of the most common tools, which is available in every family for cutting all kinds of materials, but does not always perform its tasks clearly enough.
Reason rough work is improper sharpening of the blades or unbalanced movement of the cutting edges.
Eliminating them is quite simple for anyone with regular set sharpening devices. To do this, it is necessary to understand the principles of creating a cut.
Article provides advice home handyman on how to sharpen scissors and adjust their blades for proper operation with your own hands at home with an explanation along the text with pictures, diagrams and a video.
To understand the principles of sharpening and setting up a tool, you should understand its design and the basics of cutting the materials being processed.
How scissors are designed and work
The well-known children's riddle about two ends, rings and nails fully reflects the design and operating principle of this instrument.

Scissors consist of two symmetrical halves connected by a common axis of rotation. The cutting force is created due to the occurrence of a torque, the magnitude of which is influenced by the length of the lever.
Knife blades have working surfaces ending in a cutting edge. The ends can be of different shapes:
- sharp;
- rounded;
- combined.
The axis of rotation is usually performed by a screw mechanism with the possibility of slight adjustment of the preload.
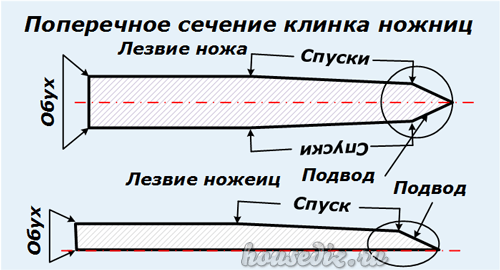
Blade geometry
Hairdressing scissors have the best surface shapes. They are designed for the delicate work of hair cutting, made of durable steel with well-sharpened cutting edges, moving in the opposite direction.

The cutting edge of each half slides with one side along the common cutting plane towards the material being processed. The cut is created due to the sharpness of the blades and their minimal approach to each other.
Blade sharpening, unlike regular knife, is created by a one-sided supply.
Cutting force
It should be taken into account that each tool is manufactured to work under certain conditions. For example, hairdressing scissors are made straight. The loads they experience are minimal. It is not advisable to use them for other purposes: they are easy to damage.
Garden shears can cut tree branches, and the surface of their blade is formed with three zones of developed loads:
- the recess closest to the axis of rotation allows you to generate maximum cutting force;
- the next one is the average;
- the remaining part is intended for cutting thin branches.

In this case, the effect of creating a bending moment through the lever is used: bringing the material being processed closer to the axis of rotation increases the shear force, and moving it away reduces it.
Typical defects
Any scissors can work poorly for two reasons:
- the blades came apart;
- the cutting edge of the supply has become dull.
How does a gap occur?
If the scissors are made of soft alloy steel, then when large loads are placed on the blade, the latter may become deformed and move away from the cutting plane. In this case, they will further bend the material rather than cut it.
Such a defect is easy to detect if you look at the gap between the shifted blades.

How to adjust blade stroke
The reason for the divergence of the surface of the edges may be:
- loosening the screw clamp of the rotation axis;
- metal deformation due to the application of increased loads;
- a combined manifestation of both faults.
In the first case, just tighten the screw: the scissors will cut normally. If there is a bend in the plane of a thinner blade (they are most often created different thicknesses), then it should be given its original shape.

It is unlikely that it will be possible to bring hairdressing scissors to an ideal level in this way. However, household models designed for cutting paper or fabric can be adjusted by making a convex bend on the surface so that when processing the material, both blades touch, being in a common cutting plane.

Cutting edge irregularities
The metal of the scissor blade, like a knife, wears out over time.

It is periodically required to be sharpened and the surface of the cutting wedge to be formed. Depending on the purpose of the tool, the edge is formed:
- regular sharpening;
- or additional polishing of its surface.
Hairdressing scissors do not polish their edges when sharpening. Thin grooves made of fine-grained abrasive materials located on the inlets hold hair well when cutting.
Sharpening methods
A professional approach angle is formed on special machines in the factory. It must be preserved and maintained. The article does not discuss factory technology, but publishes simplified methods available to the home craftsman for bringing household models into working condition.
Scissor straightening tools
Sharpener
The blades of the scissors are spread apart and alternately pulled through the slot prepared in the tool. The supply metal is ground down with abrasive materials. Rotating disks can be used for this. All nicks and irregularities are removed to a single level.

Various types of sharpeners can be purchased through Chinese online stores.
Diamond needle file or file
When sharpening, scissors should be firmly fixed or held tightly in your hand, resting it on some stationary object, for example, a table surface.

The cutting surface of the file must be positioned in only one plane. This technique ensures the same sharpening angle along the entire length of the blade. Its factory value must not be violated.
If there is a large notch on the surface of the file, additional polishing of the lead with another tool may be required.
whetstone, whetstone, whetstone
It is advisable to disassemble the scissors, but you can also work in assembled form. The technology is the same as . The supply is placed on the surface of the sharpening stone, the blade is directed in one direction, and the same angle of inclination is maintained at all times. The abrasive material is periodically moistened with water, removing particles of cut metal.

The photo shows work on a homemade whetstone,
If the shape of the blade differs from a straight line, having a convexity or concavity, then the direction of sharpening movement is changed by 90 degrees.
Available means
Let's look at the most affordable sharpening tool:
- sandpaper;
- foil;
- steel wool;
- glass bottle neck;
- steel wire.
Sandpaper
Select varieties with the smallest grains - zero. Cut it along the entire length of the blade. The abrasive material of the sandpaper, passing under the cutting edges, sharpens them.

Food or technical thin foil
The material is folded in several layers, cuts are made along the entire length of the blade.

Foil kitchen sponge
This method works according to the technology of the previous one. Scissors should work along the entire length of the blade.

Glass bottle
Grasping the neck with both blades, make cutting movements along their entire length in both directions. Surfaces are polished. Therefore, the plane of the inlets is positioned in the optimal direction for their alignment.

Needle, screwdriver or steel wire
By squeezing and unclenching the scissors, they are simultaneously processed with force along the entire length of the blades with the inserted needle.

A characteristic feature of this tool is the curved blades of a curved shape. To their processing without good metalworking skills and round fine-grained files with diamond coating It's better not to start.

If nail scissors started to work poorly, then try first:
- tighten the screw fastening of the rotation axis;
- inspect the gap between the cutting edges of the leads;
- polish with a needle.
If you have any questions, ask them in the comments.
The most effective repair of plastic is based on the example of hand scissors, in which one of the handles broke due to excessive force. I will tell you about a method for restoring broken plastic products. This method will allow you to use them as intensively as before the breakdown.
What do we need
- Cyanoacrylate glue (regular superglue, and best of all gel - it does not spread);
- Paper tape;
- Soldering iron;
- A piece of stranded wire.
Preliminary restoration by gluing
First you need to restore the geometry of the broken handle. To do this, we glue it with superglue, following the rules for performing the work - the substance is applied to both surfaces, and after the reaction with the plastic begins, they must be pressed tightly together until completely hardened.
In order not to sit for several hours with scissors in your hands, we use paper tape to fix the broken handle.

Connection reinforcement
Once the glue has dried, scissors can be used, but if you cut something with force, they will most likely break again in the same place. To avoid this, it is necessary to perform reinforcement. To do this, we need to remove the insulation from a copper wire with a cross-section of 2.5 mm and cut 1 cm from the edge. Then it must be placed on paper tape, gluing only half, and then placed in the center of the glued joint and glued to the scissors with the same tape. Thus, on one side of the fault, the wiring harness will not be covered by anything.

Next, using a heated soldering iron, we begin to warm up the wires of the free edge, which, in turn, melt the handle and slowly sink into it. We smooth out the plastic that appears on top of the wires with a soldering iron, leveling out the traces of our intervention.

Then we repeat the procedure with the other edge of the tourniquet, after removing the tape. The wires should be completely immersed in the plastic; no protruding wires should be left. At the end of the work, we level the entire surface of the area where the reinforcement was carried out.


Reinforced connection on both sides.

Safety precautions
When working with a soldering iron, you should take precautions - the part above the handle is very hot, and the tip has the melting point of tin and can cause severe burns if it comes into contact with the skin.Trial

After the plastic has completely cooled, the scissors are ready for use. To check the strength of the connection, take a sushi stick - it is made of wood and quite strong. To cut it, you have to put in a lot of effort, but the restored connection showed excellent results in this experiment, withstanding a fairly serious load.
Restoring plastic using reinforcement is a completely simple procedure, but very effective. In any case, now you definitely won’t have to throw away the scissors.