Each thing in the house, made independently, brings a special mood and flavor to the design of the rooms.
So if you want to create unique interior, don’t be lazy, and create original masterpieces to decorate your home.
This kind of thing includes do-it-yourself photo frames, which today can be made from the most simple materials.
Someone will say, why make frames with your own hands if you can buy almost the same thing in a store.
We, of course, cannot disagree with you, but we still remind you that by making cute crafts for the home with the whole family, you put a special aura into them, which will always emit positivity and wonderful memories.
The Ideal Style team will offer you amazing ideas on what kind of frames you can make for photos with your own hands, surprising you with unexpected solutions.
The presented photo frames will not only enrich your interior, but will also preserve the most valuable thing - the memories associated with a particular photograph.
After reading our review, you will see 50 examples of photo frames representing different ways design of this item.
Original and unusual do-it-yourself photo frames 2020-2021: ideas, design, current decor trends
In order to make frames with your own hands, you will need a base, aids in the form of tools, glue, etc., and, of course, materials with which you will decorate photo frames.
Human imagination is limitless, which gives us the greatest opportunities in any business.
When making photo frames with your own hands, you can use cardboard, colored paper, fabric, vinyl records, matches, ceiling plinths, tree branches and dried plants, window frames and much more.
It all depends on your idea and desire to create a unique thing for a unique interior.
Let's take a closer look at the great ideas on how to decorate your own photo frames, and which DIY frames will successfully complement your captured memories.
DIY frames: photo frames made from shells - ideas and finishing options
 For many, going to the sea is a dream that may never come true. And someone, on the contrary, goes on vacation to the sea every year, bringing amazing shells from the resort different forms, sizes, types.
If you don’t have shells collected from the sea, but you really like this decor, you can easily purchase shells at a decor store, creating wonderful frames with your own hands from shells in different interpretations.
In order to make frames with your own hands from shells, you will need a base (cardboard, wood, plastic) and shells.
You can also make frames with your own hands, using not only shells, but also other decor that harmoniously combines with seafood, for example, rope, pebbles, twigs, etc.
It is noteworthy that the more chaotically you lay out and stick the shells, decorating the frames with your own hands, the more interesting your product will be.
Making a DIY photo frame with embroidery or beads
 Truly masterpiece examples include do-it-yourself frames decorated with hand embroidery or beads.
Beautiful photo frames of this type can be made using special stencils, which determine what kind of thread or bead embroidery will decorate your creative frame.
DIY frames with embroidery can be bright and multi-colored, or they can be made in a single color, laconically complementing the shades of your interior palette.
You can improve embroidered photo frames with your own hands by adding buttons, old jewelry, pearls, etc. to the craft.
If you choose beads for decoration, you can not only embroider with them, but also stick them in the shape of a photo frame.
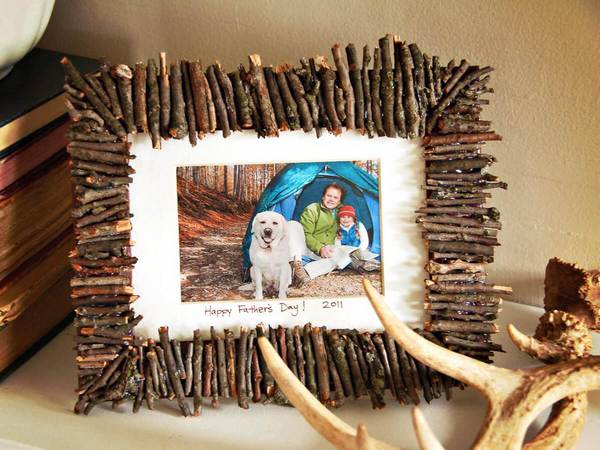
Original do-it-yourself frames made of wood, twigs, dried flowers
 Each interior has its own characteristics, so DIY frames can be completely different, and sometimes very unexpected.
Wood products are one of the elements of many types of interior, so if you make frames with your own hands from rough and uneven pieces of wood, old boards, dry branches, tied together with a thick rope, or carefully glued and varnished, you will get something incredibly interesting .
Also, a do-it-yourself frame for a frame is often made from vine branches using a special weaving technique.
DIY frames look no less creative when dried branches are glued to the base of the photo frame in combination with pebbles, ropes, burlap, etc.
DIY frames look tender and sensual when you glue dried flowers or leaves onto the finished base.
Beautiful do-it-yourself frames made of fabric, thread, burlap
 We have already named a lot interesting ways DIY frame design. But that, of course, is not all.
The next unique ideas for decorating your interior will be DIY photo frames made using different pieces of fabric, burlap, coarse threads, and yarn.
Our collection shows do-it-yourself photo frames made of denim, photo frames made of fabric flowers, exclusive do-it-yourself frames made of several types of fabric.
Of course, to make such a frame you will need a little patience and time, but the result is worth it.
Also, do-it-yourself frames made of thread, burlap and other types of fabric can be supplemented with pebbles, twigs, shells, and unexpected objects found somewhere in a box of trinkets.
Super fashionable DIY frames using decoupage, quilling, origami techniques
 Using colored paper and paints, ribbons, etc., you can create truly unique frames with your own hands that will remain relevant after a long time.
These include photo frames made using the decoupage technique, which involves painting the surface of the frame in a certain style.
With the decoupage technique you can create frames with your own hands in vintage style, draw flowers and pictures on the frame, cover the frame with special decoupage paper.
Frames made in the style of origami and quilling are not far behind in originality. Both techniques involve the creation of certain details from paper, with which photo frames will be decorated, or rather pasted over.
Cute curls, delicate flowers and leaves, strict figures and unusual shapes– this is exactly the kind of frame you will get with your own hands by using these techniques.
Unusual DIY frames made from coffee, cereals, pasta
 When you need to create cool frames with your own hands for a gift to a friend, but you don’t have any special materials in the house, pay attention to coffee, cereals, pasta, which incredibly interestingly transform from cooking products into material for a photo frame.
In our review you will see beautiful DIY coffee frames. See how unusually you can arrange coffee beans and what you can combine them with.
Play with buckwheat, peas, pasta, rice, etc. You can create unique frames with your own hands.
In addition, these materials can also be combined with other types of finishes. Let us note that pasta, due to its variety of shapes, is a godsend for those who want to surprise everyone with their product.
How to make frames with your own hands: extraordinary photo frame ideas
 You can only create something unique if you approach this process in the same way.
Your DIY photo frames will turn out to be unconventional if you cover the base with keys from a calculator, or old keyboard, take colorful pencils for decoration, use parts of an uncorrected watch mechanism as material.
Professionals also suggest gluing multi-colored skeins of thread, old newspaper, corks from wine bottles, buttons and old keys onto the base for the frame, or creating frames with your own hands in completely unusual shapes.
But that is not all. How do you like DIY frames made from jewelry? As they say - expensive and angry.
50 DIY photo frame ideas
As you can see, each idea is unique. If you bring at least a few ideas to life, you may succeed unique collage, decorating and transforming your room with pleasant memories.
Dare, because everything impossible is possible!


It's hard to find a home or office that doesn't have space for paintings and photographs. But simply attaching a photograph or a masterpiece of art to the wall will be ugly and absurd. It is precisely in order to frame photographs and paintings that frames were invented. With their help, you can refine the interior and add comfort to the premises. Nowadays there are millions of frame options in stores, but it is not always possible to find what suits your home. That is why we will tell you how to make a frame with your own hands, while spending a minimum of money and effort. You need to start by choosing a design for your future craft.
Deciding on the design choice
What you need to pay attention to when choosing a design for a frame:
- will she fit in? general interior premises;
- the frame must be in one color scheme with images, not with walls;
- the frame should complement the image.

To achieve the desired result, you need to carefully consider the material from which the frame will be made.
Material selection

There are no special restrictions on the material. The only thing that remains unchanged is the base on which the decorations will be glued. It should be dense, strong and not get wet from glue. Thick cardboard and, of course, wood work well for the frame. Moreover, the wooden frame itself is already a completed craft. It can be varnished and will be appropriate for any interior.You can decorate the product with any available means. This could be pasta, pebbles, clothespins, buttons, beads. But do not forget that the chosen material should complement the picture. So, for example, shells will go well with a seascape, and a frame of pasta with the addition of cereals will be perfect for the kitchen.


Let's look at the two main materials from which frames are most often made - wood and polyurethane foam.
Wooden frame
The tree is classic material, from which picture frames are made. Such designs are durable and fit almost any picture and room design.

To make a wooden frame, you don’t have to go to the forest to get wood, then process it and cut out the planks. You can go to a hardware store and purchase wooden skirting boards there. They are perfect for a product like this.
What you need:
- Wooden plinth. Its length and width should correspond to the size of the picture. Therefore, be sure to measure the picture before buying a plinth and do not forget that the frame will be longer than the canvas.
- Well sharpened knife.
- Scissors.
- Sandpaper.
- Furniture glue. PVA will do.
- Hacksaw.
- Small nails.
- Hammer.
- Ruler. It would be better if it was angular.
- Cardboard or plywood.
What to do:

For a richer look, you can use carved wooden baseboards. Their price corresponds to their appearance, so you will have to pay a decent amount for such material for the frame, but upon completion of the work it will be worth it.

Polyurethane foam frame

For women, “polyurethane foam” sounds threatening, but there is no need to be afraid, because it is ordinary polystyrene foam, only stronger. Ceiling plinths are made from it, which are now used to renovate apartments. Their price is low, but the variety of patterns is impressive. Differences in manufacturing with wooden baseboard No. But don’t forget that this is not wood, so you should handle polyurethane foam more carefully. Any blow can lead to dents, or even break the entire structure.
What you need:
- Ceiling plinth.
- Hacksaw or sharp knife.
- Glue.
- Ruler.
- Plywood or cardboard (depending on the size and strength of the catrina).
Cool fashionable photo frames are an integral element of any interior. DIY photo frames can not only become a unique accessory for your home, but also serve as an excellent gift for family and friends.
In this post the site made a selection of 14 cool ideas, how to make a photo frame with your own hands from simple materials, many of which can be found even at hand.
1. Frame made of dry twigs
This option is suitable for creativity with children; they will willingly help you first collect sticks in the forest, and then happily break them into short pieces.
What you will need: wide-brimmed frame, glue gun, sticks

2. Frame from an old rustic window frame

3. Photo frame from an old book

An unusual frame made from an old book is a great example of a photo frame made from materials you have on hand. Suitable for a small but very sweet photo.


4. Frames made from cardboard tubes and toilet paper rolls

This creative panel is suitable for some kind of photo story, for example, about your last trip.
What you will need: bushings from toilet paper and any other cardboard tubes different diameters, scissors, glue, paper knife, pencil.
Step-by-step instructions in the pictures below:
5. Large panel with metal mesh

What you will need: 
How to do:
Attach the metal mesh with a stapler to the frame on the reverse side. Use clothespins to attach the photos to the grid. 
6. Dry moss frame
A stunningly vibrant photo frame made of real moss is a sophisticated decoration for your home. 
What you will need: an old wooden photo frame, dry moss (can be ordered), glue.
How to do it: Just glue the moss around the perimeter. Decorating will take no more than 30 minutes and will bring a lot of fun :) This photo frame is suitable for a wedding gift. 
7. Photo frame from old magazines

For this frame, you will definitely have everything at hand. All you need: old magazines, the frame you want to decorate, glue (it’s convenient to use a glue gun). 
Step-by-step instructions in the pictures below:
8. Photo frame made of thick sticks

9. Photo frames made from popsicle sticks

These simple and cute frames are perfect for family and children's photos. In this example, the popsicle sticks are supposed to be decorated with colorful tapes, and we suggest painting them by hand. 
And here is an even simpler version of the frame using sticks. 
10. Brutal photo frame made of cement

What you will need: cement, a container for mixing cement, cardboard or a box of porridge/cereals, etc., frame fasteners, glue, a paper knife, tape, small pieces of wood (you can cut a branch).
Detailed step by step instructions you will find in the pictures below:


During times digital technologies the value of paper image storage has dropped noticeably. But in vain, photography is primarily a memory from the past. People are used to holding dear to the heart things next to you. But storing photos in digital media is not always convenient, and the presence of an attractive frame with a favorite image on the table automatically attracts the eye and, accordingly, brings back pleasant memories. You can make a photo frame with your own hands from available materials, using natural materials for decoration.
You can make a photo frame with your own hands using available materials
Knowing how to make photo frames yourself at home is quite useful - sometimes a frame is required non-standard sizes to hang on the wall, for example, a poster from your beloved computer game, or photo large sizes, but buying a large frame can be quite expensive, and it’s not always possible to find a color and texture that matches the photo. A homemade frame will come to the rescue if you decide to hang a hand-embroidered picture, or a certificate of honor, or a page of assembled handwritten text on the wall - at weddings and anniversaries, guests often write such congratulations and wishes as a souvenir to the newlyweds or anniversaries. Photo from kindergarten, or from the school line on September 1, wedding or just good photo from a walk - are there many reasons to hang one of your happy moments on the wall or put it on the table? Let's take a step-by-step look at how to make a suitable frame for them.
You will need:
- 2 sheets of thick paper measuring 30 by 35 cm;
- Old glossy magazine;
- PVA glue, a piece of cardboard;
- Multi-colored threads, colorless nail polish;
- Stationery knife.

This photo frame will be quite affordable.
How to do:
- Stepping back from the edges of the sheet, measure 5 cm. Draw lines along the marked points. Cut the resulting rectangle from the middle paper sheet. The result is the base of a photo frame.
- Roll one magazine page tightly into a tube and secure the edges with glue.
- Wrap thread around the curled page, securing the ends of the threads at the bottom.
- Make several of these tubes.
- Glue each piece to the base starting from internal corners products. To give the effect of a volumetric bend, bend the tube at the corners.
- Glue three sides of the second sheet of paper to the inside of the frame. The fourth side is necessary for placing photographs into the product.
- We form the frame leg from a piece of cardboard.
After drying, the craft can be carefully and easily coated with varnish.
Cool DIY photo frame in 5 minutes (video)
How to make a beautiful photo frame from cardboard
Necessary:
- Colored cardboard, colored paper;
- Stationery knife;
- Colored pencils, stickers.

A cardboard photo frame can be very simple
How to do:
- Cut out a rectangle of the given parameter with a stationery knife.
- Mark the dimensions of the photograph on the wrong side of the figure, deviate 1 cm from the markings, and place measurement points for the window. Cut out the inner rectangle.
- We cut out the inner side of the product from less dense paper.
- Glue both sides of the frame, leaving one side for inserting a photo.
- Draw the desired pattern with pencils and decorate with stickers. The edges of the photo frame can be decorated with golden chocolate wrapper.
We make the frame's stand from cardboard. Cut a thin rectangle, fold it in half, and glue it to the craft with the base.
Original design for a photo frame: master class
Very gentle and beautiful frame obtained by decorating with artificial flowers, wallpaper, pieces of lace or braid.
Necessary:
- Wooden or plywood frame - base;
- Scissors, glue;
- Pieces of wallpaper, golden braid, lace, beads.
The photo frame can even be decorated with broken branches
How to do:
- Artificial lilac branches or other flowers with small fluffy flowers are ideal for crafts. Arrange each flower into inflorescences.
- Cover the base with wallpaper and let it dry completely.
- Place one inflorescence on a drop of glue from the top corner, bend the petal up a little and glue the second one next to it. Thus, fill the entire upper corner of the frame with flowers.
- We decorate the lower opposite edge with lace, gluing it with glue.
- We glue golden braid along the edges of the inner frame.
- Place the beads on the glue like flower cores. Glue beads of the appropriate tone to the lace ornament.
- Glue a piece of starched lace along the top of the flower corner of the craft.
How to decorate a regular photo frame
Photo frame design options:
- Worn discs. Since the material contains sharp corners when broken, it is more advisable to wrap the discs in an unnecessary towel. Break it with a hammer. Place small pieces in an interesting mosaic on the frame using glue. After drying, apply black paint to the spaces between the fragments. acrylic paint under gloss.
- Wallpaper. Pieces of wallpaper remaining after renovation are very suitable for decorating crafts, especially if they have pictures. Cut out a wallpaper pattern or flower and glue it to the corner of the frame.
- Old buttons. Collect all unpaired buttons. Decorate the product with them, gluing them with glue from the outer corners.
- Sea pebbles and shells. They look great when paired with starfish decor made from salt dough, rope threads and a figurine of a sea anchor. Such a frame with a joint photo - wonderful gift for a close man.
- Satin ribbons. When gluing the ribbon as a decorative element, decorate it with the remnants of lace.
- Puzzles. Pieces of the picture, laid out randomly around the frame, will be an amazing addition to a child’s photograph. For variety, add toy figures cut out of paper to your decor.
- Decorate the frame in the New Year style with Christmas tree tinsel and shards of balls.
- Paints. To paint frame parts, it is better to use gouache or acrylic paint.
- Pieces of fabric. Here you can come up with both finishing each detail of the frame with a fabric base, and weaving decorative elements from fabric strips.
- Quilling and beads. Paper swirls will make the photo frame very interesting. And beads and beads give the decoration a fabulous look.
- Colored threads. They harmonize well as decoration when creating frames from magazine pages. Tie each page with thread and glue it to the base of the product.

The photo frame can be decorated however you like
If desired, crafts can be decorated with decorative small flowers, knitting threads, pieces of wool, dry herbarium, colored pasta or seeds.
What can you use to make a photo frame with your own hands?
If you plan to hang a framed photo on the wall, it is better to take it for lightweight manufacturing material - ceiling plinth, cardboard, paper.
- A very simple frame layout can be made from ceiling plinth. The smooth surface of the material will ensure that you do not make a mistake in size. Measure carefully with a ruler necessary measurements, cut with a stationery knife. Further, according to inspiration, the product can be decorated with paints or decorated natural materials: shells, branches and leaves of a tree. After the glued decor has completely dried, carefully cover the craft with colorless wood varnish.
- Wooden frames are more durable in construction. For the craft, take two identical strips in size. Knock down with nails or glue in the form of a rectangle, open with varnish.
- A photo frame made of cardboard and yarn is a very easy craft to make. Fold into a rectangle or other shape geometric figure cardboard or thick paper in several layers. Carefully spreading PVA glue, we sequentially glue the frame with multi-colored yarn and buttons.
- A frame from a glossy magazine looks unusual. Roll each page of the magazine into a tube and glue it into a geometric shape.
You can involve your child in creating a frame from dough. An exciting activity will amuse the little fidget, and the product will turn out to be unusual.
- Mix flour, non-iodized salt and water. We take salt in half the portion of flour, and half as much water as salt.
- After kneading the dough, let it rest, then mold the craft. Keep the finished frame in the oven at 80 degrees until completely dry on both sides.
- The ornament for such a product can be molded together with the frame.
After drying, paint the craft with gouache and open it with colorless nail polish.