Many needlewomen are interested in: how to make a photo frame from scrap materials? It's very necessary thing, but store frames made of plastic look exactly the same. Therefore, it will be very interesting and useful to learn how to make these things with your own hands, our today’s MK for beginners will help you with this.


DIY photo frames made from eggshells
These stylish items can be made from any old and unnecessary items. You just need to use your imagination and don’t be afraid to create.
The base for a photo frame is usually made of cardboard. In addition, you can use blanks sold in the store for this purpose.
How to decorate a cardboard base? Here you can only be limited by your imagination. We invite you to pay attention to the master class of an original product decorated with eggshells.

1) Cut out a cardboard base for a frame 4 cm wide. The inner perimeter of the frame should correspond to the size of the photo.


2) Make a stand for the photo frame. Cut out such a figure from cardboard.

3) From the rectangular uncut side, measure a two-centimeter strip and bend it.
4) Cut out a rectangle for the back wall of the frame. Let's glue the parts together.

5) Glue the leg. To do this, spread a bent two-centimeter strip with glue and glue it to the middle of the back wall of the frame.


6) We begin registration. Let's cover the frame with blue acrylic paint.


7) Boil 5 eggs, peel the shells from them in large blocks. Paint it in different shades blue paint.

8) When the paint is dry, grind the shells.

9) Now cover the frame with eggshells in a random order, but tightly together.


10) What a successful decor it turned out to be.

Instead of eggshells you can use broken ones seashells or other type of decor.
Simple paper frame
You can very simply make a photo frame out of paper, but it must be beautiful and embossed, for example from wallpaper.

You will need:
- wallpaper;
- cardboard;
- glue;
- ruler;
- a simple pencil;
- scissors;
- breadboard knife;
- stapler

Sequencing:
1) Draw two rectangles on the back of the wallpaper. The inner perimeter should be equal to the size of the photo. The width between the inner and outer perimeter should be 3 cm.

2) Draw diagonal lines in the central rectangle and mark 1.5 cm from them.


3) Draw another inner rectangle through these points.

4) Cut the inner rectangle along diagonal lines using a breadboard knife.

5) Bend the corners inward.


6) Fold down the side of the outer rectangle.

7) Fold the outer three-centimeter strip in half.

8) There are small squares in each corner. We cut one fold.


9) Fold the frame into a box.


10) We cut it with a stapler.

11) Cut out a rectangle from cardboard and glue it to the frame. This is the back wall.


Making such a frame is easy and will be very interesting for children.
Comfort and coziness
Personally made household items are a kind of amulet, a symbol of comfort and prosperity. Because things into which a person has invested his labor and love have very strong positive energy.
Handmade gifts are especially valued all over the world. They will definitely bring peace and warmth to the homes of your friends, loved ones and relatives. Your boyfriend will certainly be delighted with your photo together in an original frame. And the children will be simply delighted when they receive it as a gift color photo in a bright frame.
Let's look at very simple and quick ways making frames.
DIY photo frames from toilet paper rolls
Make a three-dimensional base and cover it with details at your discretion.


Cut the rolls into rings with a diameter of 1.5 - 2 cm, bend them into a petal. Glue the petals together good glue, paint in suitable color and the frame is ready!


Cut all the same rolls, connect them together, cover them with sequins or rhinestones and the royal frame is ready!


Making frames using the appliqué method
Here you can literally use all the materials that you can get your hands on: beads, coins, shells, coffee beans, etc. It is better to glue the parts with a hot glue gun.
In this article we will talk about how you can make comfortable and beautiful photo frames with your own hands.
Each photograph is a unique phenomenon, preserving a piece of some emotion. So why not frame these images in unique frames?
Crafts - beautiful do-it-yourself photo frames from scrap materials: ideas, photos
To begin with, we suggest that you familiarize yourself with the ideas of what kind of photo frames you can make:
Photo frame made from burlap roses 
 Photo frame made of fresh flowers - short-lived, but beautiful
 Frames with knitted spirals


 An extremely original idea - an old clock as a photo frame

DIY cardboard photo frame: master class
To make a cardboard photo frame you will need stock up on the following things:
- Corrugated cardboard
- With a knife
- Pencil
- Glue
- Paper for decoration – absolutely any paper will do
- Buttons, shells, beads
You can start making:
- From a piece of cardboard need to cut out the front and back of the frame. It should look like this blanks, as in this photo:


- Now is the time to decide how much you need measure paper for decoration.
IMPORTANT: It is necessary to take into account that it will have to be folded inward. That is, you can’t do without a reserve.

- Now front part of the cardboard blank need to treat with glue, and then glue paper to it for decoration. Until the glue has completely dried, you cannot proceed to further steps.


- But after drying you can Glue the front and back parts of the photo frame together. Only the upper parts do not need to be glued, since a photograph will be placed through the top in the future.
- But that’s not all, because it’s necessary build a support for the frame. For this purpose, you need to cut out such a part from cardboard as shown in the photo below. You can make it out of paper and then glue it onto a cardboard base.

- All that remains is decorate photo frame of your choice.


How to make a children's frame out of paper: templates, diagrams with descriptions
Such a bright photo frame will surely appeal to children, especially girls. It will definitely decorate the interior of a children's room:


If you like this idea, you should stock up on the following: components to implement it:
- Paper - regular colored paper, gift paper, or even unnecessary magazines will do.
- The frame is made of wood, which can easily be found in a craft store. Or maybe there’s an old frame collecting dust somewhere in the house?
- Glue
IMPORTANT: Hot glue gun will also come in handy, it is especially convenient for beginners in needlework.
- Scissors or stationery knife
- toothpick
You can start:
- If you want to update the frame coating, you can do it now, having painted her.
- From paper you need cut strips.


- Then all the stripes are necessary fold in half.
- Now every strip is needed roll into a roll. This is where a toothpick comes in handy, although you can completely do without using one. ends each roll needs to be carefully glue.


IMPORTANT: Do not be upset if the blanks turn out well different sizes. It is even preferable that each roll be different from the previous one.

- As soon as there are a sufficient number of bright rolls, you can begin to eat them. fixation on the frame. This is where a glue gun comes in handy. You can attach the parts randomly, but the strength of their pressing to the frame is required!

We would like to present to your attention another photo frame manufacturing diagram:


How to make an autumn frame in autumn style - golden autumn: templates, diagrams with descriptions
The easiest way to create a frame in honor of the golden autumn is Cover the finished frame with leaves. Leaves are needed first iron. Then they are recommended Place in hot water for one minute. However, not boiling! This will allow the leaves to lie better on the cardboard.
After fixing the leaves on the frame, you should send the craft under press With. You can then cover the surface with matte varnish.


If you want something not as familiar as leaves, you can decorate the frame acorns.


More a few ideas for creating an autumn frame:


How to make a beautiful felt frame: templates, diagrams with descriptions
The felt photo frame magnet is quite unusual and easy to make.


If you like the idea, you will need to buy:
- Hard felt
IMPORTANT: It is advisable that it corresponds to a thickness of 2 mm and dimensions of 13x26 cm.
- Tapes approximately 5 mm wide and approximately 3 m long
- Needles - one regular and the other with a wide eye
- Floss threads - it is preferable that they be the same color as felt
- Ready-made magnet or magnetic tape
- paper
- Scissors
- Ruler
- Toothpick or awl
- Colored pencils
- Coin


You can get started:
- On the back of the felt required to draw two squares. Each of them must have equal sides 13 cm.


IMPORTANT: Now is the time to take the coin. You should not ignore this stage if you want to get a rounded frame.


- Blanks can be cut out.


- Now is the time to get busy template for making a hole for the photo. IN in this example it is presented as a cloud, but in reality it can be any shape.

- Hole need to cut out.

- But, of course, without covering the cut area not enough! It will be useful for this overcast stitch with two threads. Fastening occurs on the inside.


- Now the template blank must be traced on paper. It is worth marking the outlines of the embroidery on it.


It's time to get busy ribbon embroidery! The green one should be cut off about 50 cm by inserting it into a needle with a wide eye.
IMPORTANT: Try to cut the end of the tape at an angle of 45 degrees.

- End ribbons follow fasten on the wrong side felt blank using a needle and thread.

- What follows in advance pierce the felt in the places where you plan to insert the needle and ribbon. The fact is that hard felt is too strong for a needle, so it is recommended to use an awl or, in extreme cases, a toothpick.


- Now it’s worth flashing the frame in the same way and blue ribbons.


- Next you need fold both felt blanks. They should sew with a blanket stitch using floss threads.


- Left stick magnetic tape on the back of the frame.


How to make a carved photo frame from wood: templates, diagrams with descriptions
Choosing the right wood for making a frame is already half the success. Very will look attractive products from cherry, walnut, ash, linden. If in the future painting planned, That optimal options will become spruce and pine.
IMPORTANT: It must be remembered that the softer the wood, the easier it will be for the craftsman to make patterns on it. This is especially important for beginners to take into account.
You need to make the frame as follows:
- From the die it is necessary cut blanks,the thickness of which will reach approximately 26 mm. Minimal allowances are needed.

- Now you need trim the edges, then glue the workpiece.
- Having drawn template for the pattern, it is worth attaching it to the tree. The pattern is transferred to the future frame.
- Contours outlining hole for placing a photo, needs to be cut.
- It is also necessary to cut patterns.
- Now we need to designate rebate dimensions, intended for glass with a photograph.
IMPORTANT: It is worth following the symmetry of the marks.
- It's your turn milling.
- Now it's happening leveling using straight chisels.
- Can be done back of the frame.


We offer the following patterns. They are mainly used by craftsmen for making platbands, but they are also perfect for photo frames:

 Patterns-1 for a photo frame made of wood

How to make a photo frame from plywood: templates, diagrams with descriptions
For a similar photo frame needed:
- Multilayer plywood minimum 10 mm wide
- Wood plywood saw
- Electric jigsaw
- Drill – can be either manual or electric
IMPORTANT: The most important thing is to have wood drills.
- Scissors, measuring instruments
- Stapler for working with furniture and staples for it
- Metal bracket or reinforced thread to fix the frame
- Grinding devices – fine-grained sandpaper or special grinding machines
- Woodworking varnish


You can get started:
- The first thing you need to do is transfer templates for material.


- Using a drill need to do several holes, and end-to-end.
- Now You need to place a jigsaw in the holes. They produce cutting out the pattern.
- Now it's time grinding.
- Next you can proceed to painting object.
- Now you can insert photo. If you wish, you can place it under glass. In this case, you will have to attach back wall, fixing it with a construction stapler or self-tapping screw.


How to make a photo frame from plinth: templates, diagrams with descriptions
To create such a photo frame needed:
- Pieces wooden plinth
- Glue type “Moment” or “Adhesive nails”
- Stationery knife or knife for construction work
- Protractor or miter box
- Marker
- Ruler
- Acrylic paints, as well as acrylic putty for working with wood
- Cardboard – always thick


Operating procedure:
- First it is advisable to cut cardboard base, which will be slightly larger than the desired photo.
- Next you need to cut out another piece from cardboard - the front of the frame.
IMPORTANT: Each side of the second part should be approximately 5 mm smaller than the first.
- Now both parts need to be glued to each other.
- Then you need to measure 4 pieces of plinth. You need them with a miter box cut at a 45 degree angle. If you don’t have a miter box, you can draw a corner on paper and then mark it on the baseboard with a marker.
- Now you need glue the panels to the cardboard base. If you don’t want to make such a base, you can simply glue the parts to each other.


- If there are cracks, they can be easily cover with putty.


- After the putty has dried, you can begin painting.
IMPORTANT: If there is no water-based or acrylic paint, you should coat the workpiece with PVA glue before applying any other paint. Moreover, it is necessary to apply several layers.


- It's time to apply water based varnish.


How to make a photo frame from disks: templates, diagrams with descriptions
For a similar craft needed:
- DVDs, CDs
- Black stained glass paint
- Thick texture cardboard
- Pencil, ruler, scissors, tweezers
You can get started:
- From cardboard cut out blank frame


- Now is the time to get busy cutting out pieces from disks.
IMPORTANT: These pieces must be irregularly shaped.

- Next you need coat the frame with glue, by gluing colored pieces onto it. It is most convenient to use tweezers. It is advisable to lay out the parts not tightly to each other, because you need to fill the gaps with paint.


- Now The spaces between the pieces are filled with paint. The edges of the frame can also be painted black.


How to make a photo frame for scrapbooking: templates, diagrams with descriptions
Necessary things to create a frame:
- Special paper for scrapbooking
- Cardboard
- Construction or stationery knife
- Scotch tape, glue, scissors, ruler
- Decorative elements, stencils for drawings
Operating procedure:
- On cardboard are noted product boundaries
- All excess is cut off– only the blank frame should remain.
- Received The blank should be glued to the back of the scrapbooking paper.
IMPORTANT: The excess edges of the paper must be slightly cut and then folded over the frame.
- All the edges future framework needs secure with tape. The upper part cannot be glued, since the photograph will be inserted through it.
- Further made of cardboard need to cut a piece for the back panel of the frame.
- Now it is desirable to create support leg for the frame.
- The most interesting stage of work remains - decor! It can be very diverse.
Attached several ideas:


Decorating, decorating and decorating photo frames with your own hands: ideas, decor, photos
Ready-made standard frames can also be beautifully decorated. Moreover, after decoration you will get unique and nice things:


 Photo frame decorated with colorful spools of thread


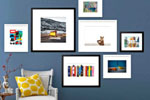
DIY photo frame collage: ideas, photos Collage of photo frames in the form of a puzzle for children's photographs 
As you can see, even novice craftsmen can create an original photo frame. Such a product will give the interior a unique charm and will definitely catch the attention of guests. And as a gift, such a photo frame will bring a lot of joy.
Master class on creating an unusual carousel photo frame
We will send the material to you by e-mail
The picture looks complete and laconic only in frame design. Whatever one may say, an unshaped piece of canvas or just art on a sheet of paper will not make the right impression without a frame. The editors of the online magazine site believe that it is not necessary to buy a baguette, since making a picture frame with your own hands is not only interesting, but also easy!
It doesn't take long to become a frame maker
What determines product design? The interior surrounding it. It is not enough just to wish to see a blue ornate frame on a picture in a room with classic interior- therefore, we focus strictly on the style of the room.

The size of the canvas and the image itself will tell you which sizes are preferable. Agree, if the canvas is small and the frame takes up half the wall, this indicates problems with the person’s taste.
How to make a stretcher for a painting with your own hands
The stretcher is used to stretch the canvas and comes in two types: modular and solid. When making picture frames, people themselves decide which stretcher is more convenient - each model has its own characteristics. A blind subframe is a solid structure, the corners of which are fixed to each other with glue and wooden triangles. If the canvas sag, you have to re-tighten it.


We'll tell you how to make a blind stretcher with dimensions of 100x180 cm.
To do this, we will prepare two-meter wooden slats, Moment wood glue, a tape measure for measurements, sandpaper for processing the product, a hammer, a furniture stapler with staples, corners and screws.
Moment-Joiner
- We apply slats perpendicularly to the length of the slats (180 cm) and measure 100 cm.
- For stability, make a couple more vertical support sticks.
- We cut the slats at an angle of 45°. Let's pass sandpaper and remove shavings and sawdust.
- To connect the vertical and horizontal slats, we need wood glue: apply it to the saw cuts, press it and immediately fasten it with a stapler on each side. If you have a special vice in the house, now is the time to use it.
- We tap the staples with a hammer to ensure that they do not bulge.
On the reverse side of the structure, metal corners need to be screwed to the corners.
Related article:
Photo frames for the wall: varieties, how to choose the right one, rules for making collages, selection of scenes for different rooms, examples of photo placement, original ideas for compositions - read in the publication.
How to make a baguette for a picture with your own hands
Painting on canvas or paper can be framed in a beautiful wooden or polyurethane foam baguette, simple or carved - as your soul dictates. A baguette is made from a wooden or polyurethane foam profile using a jigsaw, stapler and clamp. We'll show you how to make a picture frame from a baguette.
Making your own wooden picture frames
Wooden picture frames look elegant and fit into almost any style.


What do you need for work?
As already mentioned, we purchase ready-made wood profile, fine sandpaper, prepare a jigsaw, wood glue and tape measure.

If the profile is completely ready, then no additional actions are required, although, if desired, the baguette can be decorated with gilding, craquelure varnish, or patina.
Instructions for making a picture frame from wooden plinth
We take measurements of the painting and compare them on the profile. The task is to make cuts at an angle of 45° and sand each one perfectly.

We apply glue to each cut and connect them together. This is where we come in handy with a clamp, which will help make the fastening points very strong.

The reverse side of the picture must be covered with a sheet of plywood or durable cardboard.
Making your own picture frames from polyurethane ceiling plinths
If you want to see a white picture frame on the wall, you can make a baguette from the ceiling plinth.


What do you need for work?
Ceiling plinths are now sold in every hardware store, and the choice of products is large. For the first time, we suggest trying to make the simplest version from a medium-width profile without any special decorations.
For gluing we take Titan glue for ceiling tiles and baseboards, we also need a stationery knife, a ruler and a protractor for measuring the angle. If you want to paint over the whiteness of the baseboard, prepare desired color acrylic paints.
Glue Titan

Instructions for making a picture frame from polyurethane plinth
Having taken horizontal and vertical measurements, we prepare the base of the picture from thick cardboard or ceiling tiles (if the size of the canvas allows). The base either matches the picture or slightly exceeds it.
Let's start creating the frame:
- We measure all the measurements taken on the baseboards and mark them using a protractor (remember that we need an angle of 45°).
- We make cuts with a stationery knife according to the markings made, or using a miter box we immediately cut off the finished elements.
- Before starting the gluing process, all sides are aligned with each other to ensure that all edges match exactly.
- You can glue all the parts together and leave them alone for a while.


How to make a cardboard frame with your own hands
A do-it-yourself picture frame made of cardboard can be made by people without experience in applied arts: it is cheap, beautiful and not at all difficult. In order for everything to work out the first time, you need to immediately prepare all the elements necessary for creativity.


What do you need for work?
The work will require thick cardboard for the base and for the framing itself. Both simple cardboard and corrugated cardboard are suitable here: it all depends on the desired thickness and strength of the product.

In addition to the main material, we prepare scissors, a stationery knife, a glue gun with glue sticks(or, in the absence of one, we purchase wood glue or “Titan” glue for ceiling tiles). All that remains is to select everything for the exterior decor.


Cardboard products allow you to widely use your own imagination: there are no boundaries either for shape or for decoration. You can decorate the product with textiles, beads, shells, and scrap paper.
Instructions for making a passe-partout
Let's proceed to the instructions on how to make a cardboard frame for a picture.
| Illustration | Description of action |
|---|---|
 | We cut out a frame from cardboard taking into account the size of the photo. We lay the scrap paper face down on the table and place a cardboard blank on it. We're not gluing anything yet. |
 | We cut off the outer corners with scissors, and make diagonal cuts inside using a stationery knife. |
 | We bend the outer borders. |
 | Carefully cut off the excess inside the product and bend the internal borders. We are not in a hurry: everything should be smooth. Now we glue the inner borders to the frame, and then the outer ones. |
 | This is what the frame will look like. You can leave it simple without any decoration, but a couple of decorations will not be superfluous. |
Video: DIY cardboard photo frame
How to make a picture frame with your own hands from scrap materials
Making picture frames with your own hands is your own imagination, embodied in practical application. It has become fashionable to decorate walls or tables with your own products, because this is the most direct inclusion in the design of your favorite home. Why is it worth trying to make frames with your own hands when there are a great many of them on sale? Well, who knows your preferences better than you? Who cares more about the warmth of the home, except the owner of the apartment?


If we describe all the ways to create picture frames, all the pages of our magazine will not be enough, so we will focus on the two most available materials: newspapers and buttons.
How to make your own picture frame from buttons
Beautiful picture frames are made from buttons! Many people have button deposits left over from their grandmothers and mothers, but not everyone knows where to put them. For creativity, we don’t need tons of new buttons, any will do!


What do you need for work?
Here we will use the previous point of content and get down to making a cardboard base: cut out the desired frame shape from cardboard.
Advice! Don't limit your imagination! Let the shape be unexpected, catchy, angular, streamlined.
Preparing the framework acrylic paints or spray paint, instant glue or hot-melt gun. If the buttons themselves are very beautiful, chosen in a harmonious combination with each other, then you only need to paint the base.
Now turn on the appropriate music and get creative!
Manufacturing instructions
We select the largest buttons and use glue to attach them one by one to the frame base. Don't rush with the next layer - let the first one set properly.
Then we begin to glue medium-sized buttons, trying to cover all the holes. Small buttons cover the remaining holes and are located over the entire surface of the frame.


A spray can will paint the entire frame at once, and you can create interesting color variations with acrylic paints.
Picture frame made from old newspapers
As soon as newspapers that have been read and become unnecessary are not used in everyday life! If earlier they used to wash glass and mirrors, today it is a fertile material for weaving baskets and various kinds of decor. Fans of making frames were also attracted to newspaper as a decorative material.


What do you need for work?
We will not explain the basics of weaving here, but will show you how to easily and quickly make a wonderful frame for a picture or photograph from. We take a bunch of newspapers, PVA glue, a heat gun, acrylic paints or gouache of the color in which you want to see the frame and the actual frame base (can be cardboard).
Nuance! Magazine pages are too bright for color paintings, but are perfect for black and white. Newspaper tubes It’s better to either paint or simply varnish.
Manufacturing instructions
We cut newspaper sheets in this way:

- Each strip is laid on a thin knitting needle (in its absence, an electrode that needs to be tapped first, or a strong thin long wire, equal in length to the knitting needle, will do) at an angle of 45° and begin to wind almost to the end of the strip. The tip of the strip is greased with PVA glue and wound until the end. The tube is removed from the knitting needle and coated with PVA entirely. In this way, several dozen tubes are made (if the volume of the frame is large). Once the products are dry from the glue, you can paint them any color.
Subframe – necessary element any picture. It serves to evenly tension the canvas with the image. The closer the subframe fits to the frame, the better. Those craftsmen who have been making picture frames for a long time choose their own stretcher options.
Subframes are deaf and...

 Modular - allows you to adjust the tension. Its elements are movable.
 A blind subframe is the easiest to manufacture:
To make it, you need to select wooden slats of a universal size. Reiki can be purchased at any store. You will need: wood glue, tape measure, sandpaper for processing, nails, corners.
We measure the slats. Horizontal and perpendicular. The frame size should be slightly smaller size canvas.
We make cuts at an angle of 45° and process them with sandpaper.
What you need to make a wooden frame with your own hands
There are many variations of wooden frames, from the simplest.
To more complex ones. For example, from carved wood or baseboards.
Instructions for making a picture frame from wooden plinth

We apply glue to each cut and connect them together. This is where we come in handy with a clamp, which will help make the fastening points very strong.
Making your own picture frames from polyurethane ceiling plinths
If you want to see a white picture frame on the wall, you can make a baguette from the ceiling. The most important thing is to cut the joints perfectly evenly.
Advice! For gluing we use Titan glue for ceiling tiles and baseboards. The top of the product can be treated with acrylic paints.
How to make a cardboard frame with your own hands
Simple, fast, most cheap way make a picture frame using cardboard. You can decorate the creation with fabric, pebbles, and interesting decorative elements.
1 of 4
Advice! For work, it is best to choose thick cardboard. The ideal way to attach elements would be a heat gun.
An interesting video will show you how to make a mat for a photo with your own hands.
The following photos and diagrams for creating a mat will help you create the layout correctly.
How to make a picture frame with your own hands from scrap materials
Making picture frames with your own hands is a difficult but exciting activity. If you decide to purchase such an exclusive product once, you will definitely never forget about your hobby.
Any picture is a story; a spectacular frame can highlight this story and make it even more vivid.
If you want to make a wooden frame with your own hands, then you can explore several manufacturing options and choose the one that suits you. At first glance, it is easier and faster to buy a ready-made wooden frame in a store, but in fact it will not be difficult to make such a product, and of the required dimensions (even non-standard ones), and you can decorate the frame to your liking. If you have a large collection of photographs at home that you plan to hang on the wall, you will need a lot of frames, and this will cost money. The way out of the situation would be self-production framework
Wooden frames can be made using simple tools or using a woodworking machine. The finished frame can be decorated with skillful carvings or a beautiful ornament can be burned out. Such products can be done by craftsmen, but it is better for beginners to try their skills on the example of a simple wooden frame made of smooth planks or slats.
Simple wooden frame
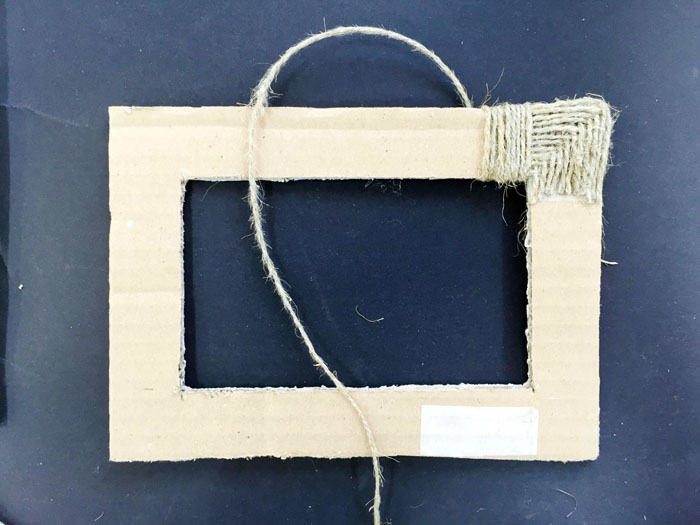
To make such a frame you will need: smooth wooden strips, a ruler or tape measure, a saw, a miter box, a plane if necessary, a simple pencil, staples for a stapler, thick cardboard or a piece of fiberboard, metal clamps, twine, sanding paper, paint, varnish and decorative elements to decorate the frame.
The procedure for making a wooden frame
- Estimate the dimensions of the frame and select transverse and longitudinal wooden planks. You can cut a wooden strip into four elements. All parts of the future frame should be as smooth as possible, so if necessary, they can be planed and then treated with sanding paper.
- Saw off the ends of the wooden planks at an angle of 45 degrees. To ensure that the corners are even and the product comes out neat, it is better to use special device– miter box with suitable connectors.
- The ends of the planks are greased with PVA glue and pressed tightly at an angle of 90 degrees. To fix the corners, the frame should be tied tightly with twine, making sure that the corners do not move. Can be used to secure the corners of half staples from a stapler. They are cut into two L-shaped halves. Next, these corners are inserted into the middle of the cuts at the ends wooden slats, and then the two sides of the frame are connected.
- The PVA glue hardens for 15-20 minutes, and after that the frame is again treated with sandpaper and coated with paint or varnish. You can use stain or potassium permanganate, which also gives wooden products beautiful brown shade.
- The reverse side of the frame is cut out of thick cardboard or a piece of fiberboard. If the design is not intended to be collapsible, then you can glue the back side to the frame with glue, and for a collapsible frame, use special metal clips.
Wooden frame with passe-partout
 This frame is well suited for decorating photographs, as it will emphasize the expressiveness of both color and black and white photographs. Before you start making a frame, you need to carefully consider not only the size of the frame, but also its pattern, as well as the color of the mat.
This decorative frame is made of wooden planks and thick cardboard (for passe-partout). Profiles for a wooden frame can be very different - smooth, with carvings or patterns; the type of passe-partout also varies - thickness, color of cardboard, its pattern. In this regard, you can choose frame details that will be in harmony not only with the photograph or painting itself, but also with the entire interior of the room. This is especially true if you plan to hang several paintings - they must be combined with each other. For example, on dark walls or surfaces of rich color, light wooden frames look good. Accordingly, on light walls you can hang paintings and photographs in dark frames.
How to make a frame with a passe-partout
