Even if a dacha is a place where work comes first and then rest, we do not forget about the beauty that helps us not to lose heart and enjoy every day spent there. Therefore, today we invite you to feel like landscape designers and build a pond in your dacha with your own hands.
Rules for creating a pond with your own hands and requirements for materials
A pond in the country is not a luxury, but in some ways even a necessity. As the ancient philosophy of Feng Shui says, water near the house brings financial well-being and calms.

In addition, it allows you to maintain relative humidity in a particular area, pleases the eye and allows you to create original solution in a designated area. Therefore, more and more often, summer residents create ponds and small ponds with their own hands, as in the photo.


Not everyone has a pond on their territory that can be tidied up, surrounded with stones and made an element of the landscape. More often, we create a pond at our dacha with our own hands from scratch, faced with many issues that have to be resolved during construction.
Let's start with the fact that you need to decide on the location of the reservoir. For this the following factors should be taken into account:
- relief of the territory;
- the location of trees and other plants with a powerful root system and foliage;
- illumination of the selected area.
Carefully study the terrain of the area. You may already have well-placed indentations, holes, or ruts that you have made in the past. All of them will simplify the process of digging the pond itself.
In addition, do not forget that plants tend to grow and take up more and more space underground. Over time, the roots can spoil or even destroy the bottom of your pond, and the leaves, seasonally falling into the water, will rot and bleed bad smell. Which will require more attention from you to care for the pond, but not the joy of having it. Therefore, before you start digging, it is worth considering how far away the trees and bushes are located.
Most landscape designers recommend placing a pond near the house. This will make it easier for you to illuminate it without requiring separate lanterns and lamps. In addition, there is always enough free space near the house with natural light, because not nearby tall trees and dense vegetation blocking the light.

If you have found a place that meets the above requirements, then you can begin work.
But first you should stock up on materials and sample project of your future artificial reservoir.
Exists several ways to create a pond with your own hands in your dacha area:
- from the finished bowl;
- made of PVC film, polyethylene or rubber;
- using available materials.
Besides in addition to materials to make the bottom, you will need:
- shovel,
- measuring instruments,
- finishing and decorative materials,
- water.
After creating a pond, you can put fish there. But then the depth of your artificial reservoir must be at least a meter so that the fish do not freeze in winter.

The procedure for constructing a pond
If you have decided to arrange a landscape, have chosen a location and are thinking about the appearance of your future pond, then first decide main question– what will it be like? Will you choose a ready-made bowl or cover the dug pit with film? It's up to you to decide. And we will help you create it according to all the rules.
Dig in the finished bowl
A ready-made mold cast at the factory is an excellent and simple solution for those who want to enjoy a charming and calm view of the pond after a busy day at the cottage.


Nowadays, specialized stores offer bowls of different sizes, types and contents. They may be:
- simple plastic baths;
- containers with several depth levels;
- bowls with complex contours of the shore.
Therefore, everyone will be able to choose the form that best suits the territory and landscape without extra costs by time.
In addition, there are others advantages of ready-made bowls:
- the plastic form is durable and not susceptible to ultraviolet radiation;
- the bowl is non-toxic and easy to install;
- The average shelf life of this form is tens of years, which makes the pond durable and of high quality.
The main thing is not to damage the bowl when installing it in the future pond. The form cannot be repaired or restored. However, if you are building to last, you can choose a fiberglass bowl; it is famous for its strength and lasts 2-3 times longer.


So, you have chosen a bowl, found appropriate place, cleared it and are ready to create a pond with your own hands at the dacha. What's next?
First you need to transfer the contours of the bowl to the ground so that it fits exactly into the dug pit. For this you will need:
- bowl;
- pegs;
- shovel;
- rope.
To make the contour as similar as possible to the shape of the bowl, you need to place it on the ground and retreat 10-20 cm from its edge. Following the shape of the bowl, stick the pegs into the ground and stretch the rope along them.
This way you will get the outlines of your future pond, under which you need to dig a pit 20-30 cm more than the height of the bowl.
Don't forget to keep an eye on the top level. It is very important that the surface of your pit is level, otherwise the ground around the pond will always be wet and sticky, spoiling appearance shores.
When you achieve the desired depth and shape, be sure to sprinkle everything with sand and compact it thoroughly. This sand bed will become the foundation for your pond. Afterwards you can install the mold and fill it with sand. free space between the side of the bowl and the ground.
When your future pond becomes stable, you can begin filling and decorating it.
You can line the shore decorative stone, plant water lilies or other water-loving plants along it. Install small figurines of swans or others created by yourself.


Making a pond from film
If for some reason you do not want or cannot buy a ready-made bowl, then you can always make a pond with your own hands without it.


Enough to stock up:
- Shovel;
- a rope or hose to outline the contour of the future pond;
- thick film.
You will need the rest (water, decorative elements and figurines) later, when the main stage is completed - creating a pit for a pond.
As when creating a pond with a finished bowl, first you need to decide on the size of the future reservoir and its contour. Afterwards, mark its borders on the ground using a rope or hose, which can simply be laid along the drawn border, or can be wrapped around driven pegs.
When you are sure that you like the shape and approximate appearance of the future pond, you can start digging. Here the process will always be the same, because we just need a foundation pit.
The pond level should be the same. Therefore, check the evenness of the banks using a building level or timber laid on both sides of the pit.

When you reach the desired depth, fill the bottom with sand, compact it well, and then lay it with geotextile so that the film does not tear over time. To do this, you can use special material sold in construction stores, or you can do it yourself. Take, for example, old carpets, rugs, roofing felt or linoleum that fit the area of the dug pit.
Now that the bottom is ready, measure your future pond and calculate the size of the film you need to create it. Usually for this it is enough to know the area of the pit and its depth. Then add an allowance of 50 cm on each side to strengthen the film along the shore. And you can already go shopping.
The film must be very strong and dense in order to withstand the weight of the water that we will eventually pour into the pond. Therefore, do not skimp on this primary material and choose it wisely - the film thickness should be at least 300 microns so as not to tear under constant pressure.

So, as soon as the film is laid out on the bottom:
- Level it out it so that there are no folds and swellings.
- Line the shore with stones so that when filling it does not gather at the bottom.
- Prepare the plants, if you want the pond to have water lilies or other living decorations.
He will share with us a trick on how to arrange plants and flowers in a film pond. Maxim Maximov in your master class:
The film pond is quite economical and allows us to create it of any shape and depth, which is impossible to do with a ready-made mold cast at the factory. That is why many choose this option to create their own pond in the country with their own hands.


But do not forget that the deeper you want to make the pond, the more likely it is that the shore may crumble. That is why we recommend that after the pit is dug, you strengthen its walls. Depending on their height, you can use tiles or slate. And how best to do this, he will tell us Talla Khukhrianskaia in your master class:
When all technical points solved, the pit can be filled with water. To do this, just throw a hose connected to the water supply into it.
In addition to the stone, which has an important function and holds the film on the shore, you can place decorative figurines, flower pots and crafts that you made for your garden with your own hands. Design your pond to reflect your creative nature and was pleasing to the eye.
Don’t get carried away with the decor, because the pond needs to be cleaned periodically so that the water in it does not die out and turn a beautiful country pond into a large puddle. And to do this, be sure to leave a place on the shore so that you can approach the pond. Better yet, provide a stream that will drain the water.

We create a pond at the dacha from scrap materials
Unfortunately, it is not always possible to find the right and high-quality Construction Materials, but if the desire to create a pond with your own hands does not go away, do not despair. Simple materials at hand will also come to the rescue, of which any summer resident has enough.
A pond can be made from a variety of things:
- from an old car tire;
- from old bath, remaining after repair;
- from a barrel, basin or bucket.

Bath pond...

...from old tires...

...and from an old barrel
If you truly want to create an unusual and original pond, then the lack of capacity will not stop you.
We use old containers
As we have already said, a pond can be made even from an old bathtub. After all, in essence, it is no worse than the finished form.


The process of creating such a pond will be similar to the previous ones:
- dig a pit for the form;
- fill it with sand and make a cement screed;
- insert bathtub;
- fill with water.
Due to its weight, the bathtub will sag greatly in the pit, which is why it is recommended to tighten its bottom with cement to strengthen it. So that over time the pond does not go deeper.
Also, use sand and soil to stabilize the bathtub inside the pit. To ensure a tight fit of our improvised bowl to the banks, fill in all the voids.
And do not leave the side of the bathtub open, it will not look aesthetically pleasing and will spoil the appearance of the future artificial pond.

And he will clearly show and tell you how to dig a bathtub and shape it into a pond with your own hands. Vitaly KIY in your video tutorial:
However, if your dacha plot is not large enough to have a full-fledged pond on it, do not be discouraged - you can make a pond with your own hands at the dacha from small containers, as in the photo.

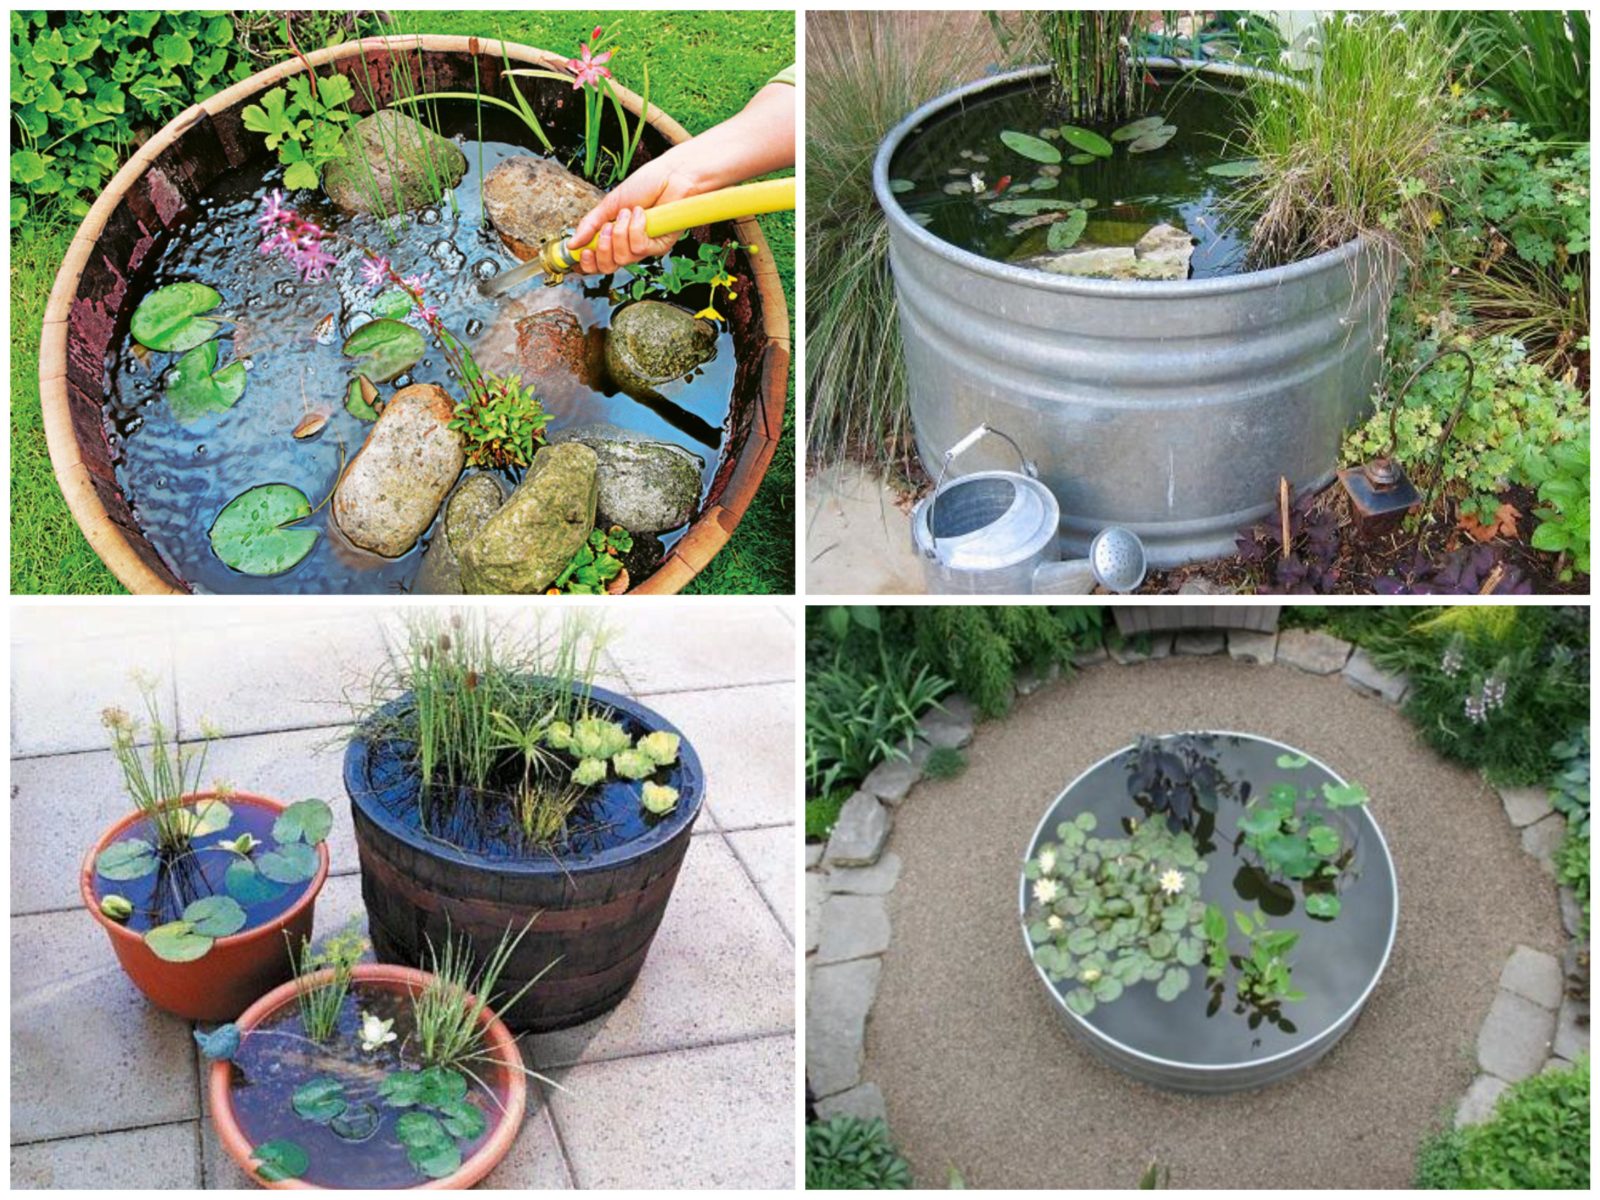
Take an old metal or wooden basin, a small barrel or tub. All of them can become an original decorative pond, which does not even have to be submerged below ground level.
U small pond from an old basin there are many advantages, so don’t deny yourself the joy of creating a modest artificial pond if the area of the site does not allow for more:
- does not require excessive costs - everything necessary for its installation is at hand;
- it will take a little time to arrange it - from a few minutes to a couple of hours, but not a day or more;
- it can be placed anywhere;
- if you installed the pond on the surface and did not dig it in, then you can always move it to another place by simply pouring out the water and filling it again after moving it;
- he doesn't require special attention for care - it is enough to change the water from time to time and wash it from the inside so that the bottom is clean.
Ponds made from a basin or small barrel can be installed on a reinforced, flat surface, filled with water and decorated with decorative figures or flowers.


But if your basin has long lost its decent appearance and there is no way to return it to its former luster, then simply dig a small pit to suit its size, install it there like an old bathtub and cover it with pebbles along the shore.

As you can see, old containers allow us to fantasize and create incredible ponds with our own hands in a dacha of any size. And this helps us realize our creative potential.
Pond for the dacha made from a tire
However, if renovations in the apartment are not planned, and the old basins have long since become leaky or turned into flower beds, do not despair, you still have a chance to get your own pond.
And for this you will need the most irreplaceable and available material – car tire. Tires in modern country society have long turned into a universal substitute for building materials.

And it’s not surprising - the strength and shape of the tire allows you to make anything out of it, including a pond. And the size of the future reservoir will depend only on the size of the tire you choose.
First you need to prepare your future container - cut it along the top edge so that only the sides remain. For this you will need a jigsaw or sharp knife(if you chose a tire from a passenger car).
Afterwards you can move on to the pond itself.
Installation steps:
- Outline the outline of the tire and dig a pit to the height of the prepared bowl.
- Fill the pit with sand and compact the bottom.
- Insert the tire inside.
- Cover the tire and the bottom of the future pond with thick film.
- Fill the edges of the film with sand, and then decorate with turf, stone or embankment so that the film is well fixed.
- Fill the pond with water and decorate it with pre-designed decor.
Your tire pond is ready. And it is not inferior in beauty to either ready-made bowls or large film ponds located over large spaces.

In addition, it is easier to care for and keep it clean, and it does not require a lot of water or effort to arrange it.

As you can see, if you have long wanted to feel landscape designer to turn the cottage into a nice place a vacation where you can not only work, but also enjoy nature away from the noisy city - you can always create a pond with your own hands without much expense.
If you liked our ideas, read other articles in the series!
Everyone dreams of recreating a miniature paradise on their site. We associate it with beautiful landscape, garden trees and bushes, a gazebo for relaxation, entwined with plants, and a fireplace for cooking over a fire. An addition to this idyllic picture will be a pond on the site. A pond can organically fit into the natural ensemble and become its decoration, because water is the fourth element that a person needs to feel harmony.
Creating an artificial pond is not so difficult; the main thing is to decide on its size, design and place where to place it.
Pond dimensions
The determining factors here are the area of the site, how you see the reservoir and the place that can be allocated to it. Conventionally, home ponds are divided into three categories:
- small decorative ponds that decorate the site and complement the landscape design (up to 5 square meters);
- a pond that performs a decorative function, but at the same time fish are bred in it (from 10 sq. m.)
- landscaped pool where you can swim. The sizes depend on the capabilities and free land that can be allocated for these purposes.
Ecoponds, as an alternative to a tiled pool, are becoming increasingly popular. Apparently, this is caused by a subconscious craving for pristine nature.
- Small decorative ponds are made from different materials.
At the dacha or site of the house, you can make it from big tires, plastic containers, old bathroom, ready-made forms that you can buy. If desired, equip them pump for water circulation and filter, make a cascade or waterfall. You can launch a small number of decorative fish, koi carp or shubunki.
The design of the pond and plants will become the basis of the water composition. The beauty of small ponds is that you can make them yourself. You will be able to realize your fantasies and tastes in design, so that you can subsequently enjoy your work.
- Medium-sized ponds are more labor-intensive to manufacture and require certain professional skills.
Making a medium sized pond, basics


This is a rather complex ecosystem where it is necessary to properly install equipment and select plants that would maintain the natural balance and purify the water.
Important. There are several rules for choosing a reservoir location:
- trees should not grow nearby due to falling leaves;
- avoid planting plants with a strong root system near a pond;
- The pond should not be in the sun or get too hot. You need to choose a place so that it is in the shade during the hottest part of the day.
Decoration of the shoreline of the pond
The most interesting and pleasant moments in landscaping a water garden is the design coastline. This is where your talent and creativity can shine. Before you start decorating, you need to decide on the style.
What techniques are used for decoration:

Terrace board is one of the elements for decorating the shoreline of a pond; it fits well into landscape composition reservoir A bridge or path across a pond will become a detail that will add additional originality.
These rules are general in nature. The main thing is to bring your vision and creative energy into pond decoration. The main thing is that it is beautiful and pleasing.
Plants for pond decoration
When choosing vegetation for a pond, you need to focus on the size of the reservoir and its depth.
Important. On 1 square meter plant 2.3 plants. 1/3 underwater to maintain ecological balance.


The optimal time for planting is spring, early summer. It is better to line the containers with film and sprinkle with pebbles to prevent the soil from being washed away. As it grows, excess vegetation is caught and thinned out. As it evaporates, water is added to the pond.
Making a pond at your dacha with your own hands is not difficult if you work a little and take into account the recommendations.
- It is better to choose a place in the shade of a house or near a fence. This is the optimal location for a pond and relaxation during the hottest part of the day.
- Nearby you can put a gazebo for relaxation, a barbecue, and benches.
- A pond made of film would be optimal and less labor-intensive.
- Try to locate the pond close to the water supply point.
- When digging a pit, pay attention to how close they lie groundwater. If the water is shallow in the ground, it can accumulate and squeeze out the bottom of the reservoir.
- Buy film with a reserve. You can measure it using an ordinary cord, which is pulled through the bottom of the pit from one edge to the other.
- After filling the pond, let the water sit for a while.
A pond at your dacha or at home will become your favorite relaxation spot. If it is made with your own hands, then it is a source of pride. Have a nice time summer evening on the shore of our own small lake.
Creating a pond on video
Photo gallery of pond design examples


When for integrity landscape design The dacha lacks a small reservoir; mini-ponds save the situation. Beautiful and compact, original and always appropriate, miniature ponds easily fit into the surroundings of any site.

Features of mini-reservoirs
Already from the name it is clear that these structures are small in size. Usually their depth does not exceed 0.5 m, and the mirror area is 2 sq.m. Such modest parameters allow you to install a mini-pond anywhere.

The video below shows a miniature pond consisting of several pots.
Choosing a pond container
It just so happens that to the dacha we often transport things that we do not need in city life, in the hope that they will one day be useful outside the city. With small bodies of water, this is precisely the case when almost any item that can be used as a container for a pond is used.

Let's list some of them:
- bath and baby baths;
- all kinds of basins, including cracked ones;
- large pots;
- various barrels, canisters, etc.

The video below shows examples of small bodies of water.
Don’t forget that you can make the container yourself using the following materials:
- pond film;
- trimmings plastic pipes diameter 50 cm;
- old car tires;
- reinforced concrete rings;
- brick, etc.
Making a miniature pond
The idea is to use a ready-made container or build one from existing materials. If the tank is intact, then it does not need additional waterproofing. But what to do when you have to deal with a structure that allows water to pass through? Let's consider general approach using the example of pond film. Its use is attractive because it allows you to create a reservoir of any size and shape.

- Select a location. There are no restrictions, it all depends on the lighting conditions. Usually the choice is made in favor of flat, secluded places illuminated by the sun for about half of the daylight hours.
- Dig a hole. A depth of 40-50 cm will be quite enough. Make sure that the walls of the pit do not collapse. If this happens, make them more beveled.
- Use waterproofing. It is advisable to use a special pond film. But for a small pond, thick polyethylene film for a greenhouse is quite suitable. Cover the entire hole with it, leaving 30 cm wide material around the perimeter on the surface of the ground. Press it down temporarily with stones so that the film does not slide off while filling the pond with water.
- Decorate the resulting container. Use flat or round stones - it's up to you. The edge can be decorated with covering decorative material under a stone. The banks can be made more rigid by lining them with small stones planted on cement mortar. For these purposes, first glue a plastic reinforcing mesh onto the film. After this, apply the first layer of mortar (cement/sand in a ratio of 1:3). After waiting for it to set, apply the next layer and cover the surface with stones.
- Fill the container with water. For the smallest bodies of water, a few buckets of water will be enough. Otherwise, use a hose. Fill the container taking into account the volume of water displaced by the plants during planting (usually 10 cm is not added to the brim, but it all depends on the situation).
- Plant the plants. What and how - read about it below.
- Launch the fish. Read more about this in the article.
We invite you to familiarize yourself with a small selection of videos on which a wide variety of objects and materials are used as a pond bowl.
Example correct application old bath.
The video below shows a universal technology for constructing an above-ground pond.
The next video shows an example of how you can use unnecessary tires.
Some tips for setting up a mini-pond.
- You can put several fish in a mini-pond. They will not only become its decoration, but will also play important role: will eat mosquito larvae, saving you from unnecessary discomfort.
- You should not combine fountains and waterfalls with all the variety of aquatic plants. The pump will become clogged with green matter, and plants will not be able to grow normally in unsettled water.
- It is worthwhile to provide a drain at the bottom of the above-ground tank. This will allow you to quickly drain the water for the winter.
- Get an inexpensive one submersible pump, with which you can easily prepare a mini-pond for wintering.

7 plants for a mini pond
In fact, the number of representatives of aquatic flora is far from limited to the 7 plants we selected. If you wish, you can create your own unique composition, which will become a real decoration of your small pond in the country. We will consider the features of working with the plants we have selected.

Plants for a mini-pond and their features
|
Plant name |
a brief description of |
How to plant |
|
Urut water |
Herbaceous underwater plant with feather-like leaves. Forms dense green growth in the thickness of the reservoir |
Plant in a pot with soil, sprinkle gravel on top. Immerse the pot completely in water, adjusting the depth of immersion using stone stands |
|
Water lily |
A spectacular plant with leaves floating on the surface and a large flower |
IN Plastic container pour a layer of fertile soil 5 cm thick, place the roots of the water lily and sprinkle with about a 2-3 cm layer of soil. Cover the top with a layer of gravel. Immerse the container completely in water |
|
Three-leaf watch |
A low plant with a developed rhizome, creeping stem, large leaves and pinkish-white flowers |
|
|
Iris ensiform |
Perennial herbaceous plant with purple flowers |
Plant in a clay or plastic pot with soil, pour gravel on top so that the soil does not wash out. The edges of the pot should protrude about 1 cm from the water |
|
Lobelia splendor |
Perennial plant with a high emergent part and red flowers |
|
|
Dwarf papyrus |
A tall plant with a panicle-shaped inflorescence for sweeping away dust |
|
|
Pistia teloresidata |
Floating plant with a small reduced inflorescence |
Place a mini-reservoir on the surface of the water in a place you like. |
Plant care in summer boils down to the following work:
- removing fallen leaves from the surface of a pond,
- pruning dead parts of the plant;
- feeding plants at the beginning of the season;
- thinning and dividing plants.

in autumn, with completion summer season, the plants are transferred to a frost-free cellar and placed in a container with water. Water is pumped out of the mini-reservoir and left in this form for the winter.

Whether you like to swim or just relax near the water, relaxing on the shore of a body of water is one of the wonderful pleasures of summer. But not every summer resident has the opportunity to build a summer house near water. Therefore, sooner or later, each of us thinks about how difficult it is to make a pond on the site with our own hands. Ideally, we see a pond at the dacha not only as decorative element landscape design, but also as a small pond in which you can happily swim on a hot day.
 Let's start with the basics - what fundamentally distinguishes a pond from a swimming pool is the self-regulation system.
DIY swimming pond.
We will tell you the process of creating a pond step by step, and you can do garden pond with your own hands - by building a cool oasis in the middle of the heat right on your summer cottage, where with every light breath of fresh breeze our everyday worries disappear. 
A garden pond is a living organism.
The pond at the dacha imitates the process that nature uses to keep lakes clean. Everything from the size and shape of the pond, plant species and water circulation are designed to maintain the pond in a stable natural state. 
The problem that a pond owner faces is maintaining a balance between plants and water - the plants either die or cover the entire surface of the pond. Only a pond that represents a balanced ecosystem provides optimal water clarity and quality, and maximum enjoyment from swimming in the pond. 
The water in the pond must circulate among the roots of the plants to cleanse itself. Plants enrich the water with oxygen, which supports the vital activity of beneficial bacteria that utilize pollutants and potentially pests, and also create habitat for dragonflies, frogs and other aquatic inhabitants. The result is a stable, ecologically diverse system. Nature has revealed its technology to us and we need to use it carefully.
How to make a pond yourself. Principles of pond operation.
Water is a living biologically active component and all purification occurs due to the work of plants and beneficial microbes. For this purpose, the pond has a swimming area and a filtration area for plants. The filtration zone is actually the swamp part of our water zone, and just like in nature, it is this zone that guarantees the cleanliness of the entire reservoir. This zone must occupy at least 50 percent of total area water surface of the pond.  If you have noticed, in nature there are almost no tiny bodies of water with consistently clean surface water - they quickly become overgrown or silted up. Natural stable biological balance can be achieved in ponds with an area of 100 sq.m. Smaller ponds require more of our attention, because... Their biological balance is precarious. Therefore, to maintain cleanliness, these ponds include a skimmer and UV sterilizer, but still offer a chemical-free swimming area and support the growth of aquatic plants.
It is useful to regularly enrich the water with oxygen by adding a small waterfall, stream or fountain to the pond. Although, an aerator can be used for the same purposes.
How is water purified in a pond?
 You can see that the process of filtering water in a pond is not complicated:
1. Water from the swimming area enters the regeneration area.
2. Water circulates back to the bathing area.
Through drainage pipes under the roots of plants in the regeneration zone and/or after the skimmer, water is pumped through a UV sterilizer into a waterfall, stream or to the bottom of the swimming area. The pipe leading to the bottom of the swimming area is raised slightly above the bottom so that the flow of water prevents the formation of silt on the bottom.
What should the shape of the pond be?
The pond bowl looks more like a soup bowl with large rims than a bathtub. The height difference should be about 30 cm for every meter of depth. It is this shape of the pond bowl that ensures the stability of the walls. The picture shows cross section pond with planting and swimming area:

After compacting the surface layer of soil in the pit, geotextiles and a sealed liner are laid on the bottom of the pond. In the plant area there are drainage pipes and gravel. In order to separate the swimming zone from the plant zone, a small mound is formed - its top is 3 cm lower from the surface of the water. You can make it from bags of sand or gravel. The mound allows water from the swimming zone to pass into the plant zone, where the water is filtered by plant roots, and at the same time protects the plants from fluctuations in the water of the swimming zone. 
This pond design will allow you to conveniently clean the swimming area without affecting the plant area. In addition to cleaning the water, the shallow waters warm up quickly and provide habitat for frogs and other invertebrates, which you will appreciate when they begin to eat mosquito larvae.  To imitate the natural contours of a pond, use a combination of different pond edge profiles. If you place plants on the terraces of the pond, it is better to do this in pots so that they can be easily removed when cleaning the pond.
What size pond is suitable for our site?
The optimal size of the pond is 1/10 of the area of your site.
What about mosquitoes?
One of the first questions that arises when you hear the word “do-it-yourself pond” is what about mosquitoes? Mosquitoes breed only in stagnant water, but the water in a pond will never be static, so mosquitoes will find it unattractive for their habitat. Even if at some point they appear, the ecosystem of the pond in the form of frogs will reduce their population to a minimum. 
Why make a pond at your dacha?
People who make a pond with their own hands make this decision because they want their pond to be a beautiful part of the landscape design and at the same time have a clean, attractive place for swimming on a hot day.
Is it possible to have fish in a swimming pond?
Unfortunately, fish, on the one hand, happily eat beneficial microflora, on the other hand, they are carriers of pathogenic bacteria, so there should be no fish in bathhouses. 
Is it possible to do sand beach on the pond?
The best solution for entering the pond is a walkway or ladder. For a beach entrance to the water, you need enough area, because... The angle of entry into the water is small. In addition, the sand quickly silts up - those beaches that we see are often simply trampled down to sand, most of the shore of the pond is usually densely overgrown with plants. 
Should I swim with frogs?
Yes, frogs are full-fledged and important inhabitants of the pond. Additionally, to purify the water in the pond, it is good to have bivalve shells or pearl barley, which filter water up to 40 liters per day. You can also get snails (coils, livebearers) - they eat dead plants and clean the pond well. 
Which the best place for a pond?
It is better to place the pond away from trees, because... falling, the leaves will rot in the pond. Moreover, growing roots can damage the waterproofing film or tilt the finished container. The illumination of the area should be about 5 hours in the morning, and the rest of the time should be in partial shade. The pond does not need high illumination because... leads to increased formation of algae and overheating of water in the reservoir. 
What to do with a pond in winter?
In winter, the pond, like natural bodies of water, freezes. There is no need to drain it. For the winter, all equipment (pumps, filters, skimmers) must be removed from the pond.
Does soil type affect the creation of a pond?
No, the composition of the soil does not affect it. There is a misconception that it is good when the groundwater level is high. In fact, groundwater at the freezing level is more of a problem. When ice freezes, it can bulge the bottom of the pond. This is especially problematic if the pond is made on the basis of a rigid finished mold. 
DIY pond made of film.
The main question when creating a pond is how to make it waterproof. There are several types of pond waterproofing - film, clay castle, concrete and rigid form installation.
Installing a rigid mold is a simple and durable method, but they are usually produced small sizes up to 3.5 sq. meters. Their service life is 10-50 years.
Waterproofing with concrete is the most expensive; in addition, to protect it from frost, it requires additional treatment with a frost-resistant agent and liquid glass.
A clay castle is the cheapest in terms of materials, but the most labor-intensive. In order to waterproof a pit with clay, the compacted soil is covered with wood ash or soot. Then a 15 cm layer of clay dough is applied to the walls and compacted. When the layer dries, apply a second 30 cm. When the layer is almost dry, crushed stone is poured onto it, slightly pressing it into the layer.
The optimal solution for the construction of ponds with an area of more than 5-6 sq.m. - film waterproofing. 
How much film is needed for a pond:
Film length= length of the pond + 2 depth of the pond + 50 cm reserve for fasteners.
Film width= pond width + 2 pond depth + 50 cm margin for fasteners.
The film is available in widths from 2 to 10 m and lengths of 10-50 m. Knowing your needs, you can choose the optimal roll. Buy the film before digging a pit; this will allow you to cover it immediately when the pit is ready, preventing its edges from fraying.
Which film to choose for a pond.
PVC film for a pond is cheaper, but over time it is destroyed by ultraviolet radiation, its service life is 8-10 years.
Butyl rubber fabric is more expensive, but has protection from both ultraviolet and cold. The service life of such film is 50 years.
DIY pond construction photo.
A do-it-yourself pond begins with marking a pit. The curved shape can be marked with a hose. We remove the turf along the coastline and remove the soil with a bayonet - this will be the line of the swamp zone, then the next level of soil is removed inside the resulting border, and so on. As a result, our terraces will be 50 cm wide with slopes of 20 cm. When the pit for the pond is ready, everything hard objects that can damage the film: stones, roots, etc. , we remove. We level and compact the walls and bottom of the pit.  Before work, the film is laid for several hours in a sunny place so that when it warms up, it becomes more elastic. Film installation is done in warm weather. Overlapping panels of geotextile or felt are laid on the compacted pit; they are needed to protect the waterproofing film from protruding roots and stones over time.
A waterproofing film is spread on top of the geotextile with a margin of 50 cm along the edges of the pit. The edges are temporarily fixed with stones. The film is allowed to sag a little, smoothing and leveling it to the shape of the pit. 
The film inside the swimming area can be protected with dry stones stacked on top of each other. 
Instead of stones, you can use bags of gravel or sand. But keep in mind that it is more convenient to care for a pond with film walls. – it is easier to clean it from silt and mud. 
Fill the pit with water in portions, removing air bubbles from under the film. 
When the pond is completely filled with water, securely fix the ends of the film in a trench, which is made at a distance of 15 cm from the edge of the pit. In a trench 20 cm deep, the edges of the film are wrapped in a roll and covered with stones and pebbles.
We make a pond with our own hands. Coastal decoration.
After you have made a pond with your own hands, before you start decorating the shore, you need to water it generously and wait 2-3 days, because... shrinkage is possible. In addition, during this time the water in the pond will settle.
We mask the film on the shore with crushed stones, stones, and snags. We plant plants in shallow water. A pond needs plants that saturate the water with oxygen. There are many suitable plants - reeds, crabgrass, iris, bathwort, marigold, arrowhead. Any plant that grows on the shore of a natural body of water will be suitable for your pond. Don't forget about algae, such as hornwort, which just floats in the water. Deciduous ornamental shrubs It is better to plant behind marsh herbs that are planted directly on the shore. 
Illumination adds additional charm to the pond. 
Floating flower beds look seductive on the surface of the pond. 
Pond safety.
If there are very young children in the family, then perhaps the construction of a pond should be postponed until they are older. It is necessary to consider visiting the pond by elderly people and children school age. Do comfortable staircase to enter the pond, remember to clean it so it doesn't become slippery! It is better to cover all other sides of the pond, except the entrance, with plants. 
Pond care.
The new pond will find its own natural look within a year - while it forms its ecosystem. Small world your pond is very vulnerable. The pond may quickly heat up or freeze, water may evaporate, or the pond may overflow after rain. This puts stress on aquatic life that cannot immediately transition to a safer, more stable environment. 
Therefore, your pond, like any living organism, requires care. On a hot day, you need to add water, use a net to collect debris that floats on the surface, check whether the plants have grown or perhaps something has not taken root and needs to be replanted. However, a surprising number of life forms will colonize your new pond; they will quickly explore new waters and will stay if conditions suit them. 
The quiet splash of water is the most enchanting melody of a hot summer; water bewitches, attracts and seduces us with a playful play of light, transparent depth and invigorating coolness. A DIY pond will give your dacha a special charm.
A water zone is what any garden needs. After all, real relaxation is sun, water, river or pond. And if you are not the happy owner of a house on the shore of a water surface, make a pond or a hint of it yourself. In some cases, a very small zone will be enough, which will fill the area with a special lake mood. But if possible, make several separate islands of freshness in the garden.
Homemade pond in a metal bath
Choose a really large container for water. This could be an old galvanized bathtub, or a technical tank. Add water and move some plants from a nearby lake or quarry. If the pond is large enough, you can even add small fish into it.

Zinc bucket fountain
Any dishes from previous years will look very colorful in the garden. Find something interesting at a flea market or in your own barn. Fill a bucket with large stones and install a special pump for a garden fountain.

Construction of ceramic pots
Several pots of the same color, but different sizes can become the basis beautiful composition With small fountain in the center. Leave one of the pots as a classic one - let flowers grow in it.

Buy a water garden
The easiest way to organize a water garden is to buy special plants in the store. They are ready for transplanting and won't cause you too much trouble. Use a large pot without a drainage hole.

Small pond from a plastic container
Place a plastic container for storing small items in a hole that follows its shape. Place on all sides paving slabs and large pebbles. Cover the bottom of the container with pebbles or sand.

Using the same principle, you can organize a pond from a plastic bucket.

Small pond made from old furniture
You can use the entire shelves or make a rectangular box by disassembling the cabinet into boards. Cover the inside with film, securing it with a layer of earth. You can insert a small plastic tub into the drawer.

Enameled basin
Even such a simple solution will look good in the garden. You can plant aquatic plants in one garden, and ordinary plants in another.

Use large flowerpots
Huge pots made of ceramic or plastic do not need to be filled to the brim with soil. aquatic plants They will be able to get used to them perfectly.

Fountain from an old stump
Instead of uprooting the stump, equip it with a small fountain pump. Another option is to make a hole in which you can build a small pond with water lilies.