I would like to use it in the design of a house or apartment. natural materials, but this is not always justified. For example, using natural stone for interior decoration. It is expensive, difficult, and requires high qualifications. There is one very similar to natural fake diamond. It is also made from natural ingredients, but it weighs several times less and costs much less. Moreover, finishing the hallway with decorative stone can be done with your own hands - its installation does not require special qualifications.
One of the hallway design options
Types of decorative finishing stone
Today there are three types of decorative artificial stone used for interior decoration:
- cement-based;
- gypsum based;
- agglomerate.
These products are very similar in appearance to natural stone, only they weigh much less (from 14 kg/m2 to 50 kg/m2). The cost is also much lower (compared to natural), especially if the manufacturer is Russian or Belarusian. The advantages include easier installation - only the front part is textured, the other three are more reminiscent of tiles or bricks.
Actually, there is another type of artificial finishing stone - clinker tiles, imitating brickwork of various types. It is made from clay using almost brick technology - fired in a kiln and glazed. The difference in thickness is 1-3 cm. This type of finish is good for many - from high-tech to.

Gypsum based
Gypsum finishing stone is the most inexpensive of this type of materials. Its second advantage is that it is the lightest. This is what is used when installing on drywall, since it simply cannot withstand heavy loads. Disadvantages - it is quite fragile, hygroscopic, and can collapse if wet. Decorating a hallway with decorative stone based on gypsum is possible only if, after installation, it is treated with a special protective impregnation or acrylic-based varnish.
The format of gypsum tiles can be any - a very plastic solution allows you to get any surface and shape Light shades in the hallways do not “press” and do not add weight Heterogeneous color adds additional volume and charm Gypsum decorative rock in combination with a plaster panel in the corridor - oriental style
Cement based
A strong and durable finishing stone is obtained from a gypsum-sand mixture. It can be washed, even with a brush using liquid detergents. Its disadvantages:
- Hard to cut. You will need a grinder with a diamond blade to reduce dust, you can wet the tiles.
- Heavy weight. This is when compared with a gypsum analogue, and compared to natural, the weight is more than half as low.
- Higher price. In the production of cement decorative stone, high-quality cement is used, and it costs a decent amount. In addition, the production technology affects the price - cement takes longer to gain the required strength (28 days), and until this moment the molded tiles must be stored somewhere, and under certain conditions (at a temperature of about 20°C and sufficient humidity of 40-50%). This means that significant areas for storage space are required, and this means additional costs.
All these shortcomings are compensated by durability and ease of maintenance, so this is one of the most common decorative stones for interior and exterior decoration.
You can completely line the walls in the hallway with decorative cobblestones. Light gray - just right for a small hallway
Artificial agglomerate stone
This type of decorative finishing stone has appeared recently. It consists of natural rocks crushed to crumbs - marble, granite, quartzite - to which polymer resins or cement are added. For getting bright colors coloring pigment is added. This decorative stone looks great - interspersed with natural fragments, reflections on the edges of the crumbs... It looks really good, suitable for finishing work indoors.
Painting methods
When choosing a collection made from gypsum or cement, pay attention to the method of painting. Pigment can be added to the solution, and then the entire tile will be the same color. Tints are then applied to its front surface, which give the surface a more natural look. With this technology, even when chipped, the difference will be unnoticeable, since the shades are close.
In another embodiment, the pigment is applied only to the surface. Then, if it is chipped or needs to be cut, the color will be very different.
Laying artificial stone with your own hands
Before starting work, you need to decide on the quantity. It's not as simple as it seems. If you look at the collections, you will see that they mainly consist of fragments of several sizes and shapes. Exception - ceramic stone and collections imitating brickwork. Once you know the sizes of the fragments, you can estimate how approximately you want to arrange them.
Outline the proposed finishing boundaries on the walls. Now you can more or less accurately calculate how many “squares” of decorative stone you need. Add about 10-15% to the resulting figure for trimming and possible changes in the process. This will be the required quantity for finishing.
Pre-layout
Craftsmen who have experience working with decorative stone first “figure out” where to place which fragments and how to rotate them. You can make the layout on the floor, you can do it in design programs (if you know how to work with them), you can try to draw a plan on graph paper or a piece of checkered paper. The main condition: it is necessary to maintain proportions and not forget about the seam. It can be very small - this type of installation is called seamless or continuous, or it can have a thickness of up to 1 cm or even a little more.

This stage when self-finishing Many people skip decorative stone on walls, hoping that everything will become clearer during the work. Of course, this is possible, but keep in mind that the glue sets very quickly and there is very, very little time for rework. It will be easier to work according to the plan.
Surface preparation
Walls made of any material can be finished with artificial stone, but they all require preliminary preparation. If the walls were previously decorated with something, all the finishing is removed, leaving a bare wall with plaster. Gluing decorative stone onto old wallpaper is a waste of time and money: the finish will simply fall off. Some very light collections can be glued to wallpaper, but these can only be fragments - a few tiles. And then, no one will give a guarantee that the wallpaper will not tear and everything will not collapse.
The easiest process for preparing walls is if they are plastered. Just cover them with primer. Its type is selected depending on the material (gypsum or cement). Then you can begin the actual finishing.

If the walls are made of brick, building blocks, or any other similar material, they are first primed and then plastered with a suitable plaster. Plasterboard is also allowed. But at the same time, you greatly limit yourself in choosing a finishing stone - you will need to choose from the lightest collections, and this is mainly a decorative stone made of gypsum.
If the walls are wooden, they are first coated with waterproofing impregnation, and after drying they are treated with a primer. Then a painting mesh is nailed to the surface and only then plastered. When choosing plaster, it is advisable to choose those that “breathe” and will not interfere with the wood’s ability to regulate humidity. With glued tiles this will be problematic, but finishing a hallway with decorative stone is usually fragmentary - the tiles are glued only in some places, and the rest of the surface will remain vapor-permeable.
What to glue on
Most manufacturers of decorative stone advise using special adhesive compositions designed specifically for working with this material. They come in three types:
- for lightweight finishing stone weighing up to 30 kg/m2;
- for heavy from 30 30 kg/m 2 and above;
- For low temperatures(even +5°C).
The glue should be diluted in small portions, strictly following the manufacturers' recommendations. It is better to stir with a drill with an appropriate attachment - this makes it easier to achieve homogeneity.

You can also glue it with good quality tile adhesive, but it must be really good - you will have to hold a decent amount of mass. The third option is for liquid nails. This method works great on drywall; on plastered surfaces it is better to use an adhesive solution.
Gluing technology
Walls plastered or lined with gypsum board are coated with a primer. While it dries, dilute a portion of glue. When laying, it is important that the rows of finishing stone are laid horizontally. To achieve this, you can apply markings on the wall. This can be done using a paint cord, or you can draw with a pencil using a bubble or.
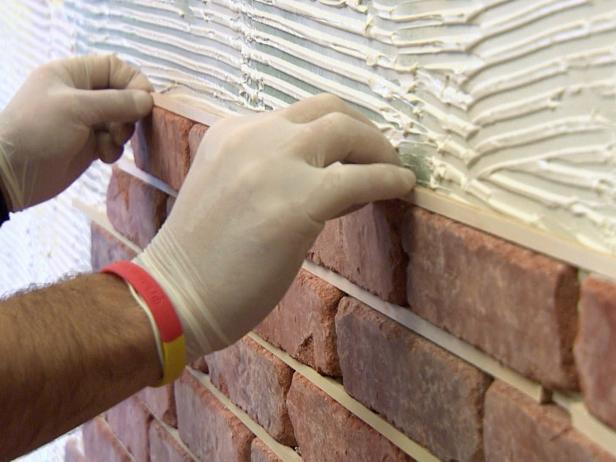
Laying decorative stone in the hallway begins from one of the corners. Some collections have special corner tiles - they are easier to work with. If there are no such fragments, you will have to decorate the edges with “end” fragments. They are in some collections - their edges are also painted. These same elements are used last in a row, where it is necessary for the ends to have a decorative appearance.

Before laying, the back of the decorative stone tile must be inspected. There may be remains of cement laitance - this is a thin, light-colored foam-like coating. It needs to be removed. This can be done using a stiff brush.
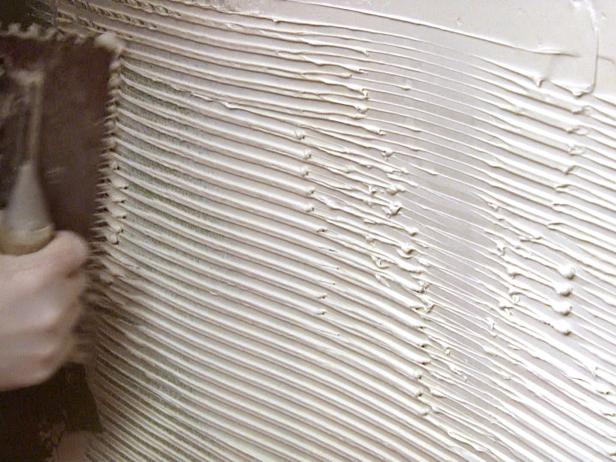
If the air temperature is high or the humidity is low, the back of the stone is moistened with water. Then a layer of glue is applied with a regular spatula, leveled, and the residue is removed using a serrated spatula (with a tooth of 4-5 mm).


The fragment is pressed against the primed surface, moving it slightly from side to side, close contact with the wall is achieved, and the fragment is placed in the desired position. You can tap the surface with a rubber mallet for better adhesion.

This option of laying finishing stone on the walls requires a significant amount of time. It is used when you need to lay only a few tiles or along the edges of a large fragment. If you need to lay a significant volume, it is easier to apply glue to the wall, and also remove the excess with a notched trowel. And press the tile moistened with water to the glue on the wall.

Otherwise, the entire sequence of actions does not change.
If the masonry is seamless, the next element is installed closely. If a seam is necessary, the distance between the tiles is fixed using plastic or wooden wedges of the same size; pieces of drywall are also suitable. If the seam is small, you can use plastic crosses.


When working, glue may be squeezed out from under the tiles. If it gets on the front surface, it must be removed immediately. Concrete finishing stone can be cleaned with a damp cloth, gypsum finishing stone can only be cleaned with a dry cloth. The glue sets very quickly, and then removing it without damaging the surface is almost impossible.

Based on this principle, the planned volume of finishing is laid out. When the glue has set (indicated on the package), you can begin filling the seams.
Grouting joints
A special compound is used to fill the seams. In color it can imitate masonry mortar or be contrasting with the color of the finish.
The composition is diluted with water to a paste-like state (the proportions are indicated on the packaging), placed in a special syringe or a tight bag with a corner cut off. The paste is squeezed out between the seams. Depending on the type of finish, the seam is filled almost completely or only halfway (up to 5 mm can remain to the edge of the tile). The result is either a relief masonry or a more even one.

While the grout has not set, take a special jointer and level the seams, giving them a convex, concave or flat shape.
Photos of options for decorating the hallway and corridor with decorative stone

Decorating a hallway with decorative stone often means finishing corners and doorways


What’s good about this option is that all “dirty” places are covered with stone
Interiors modern style often contain materials that have natural textures, since not everyone can afford the use of natural materials and bricks. Decorative stones are placed on the wall to impart respectability to the decor, and the variety of shapes and color palette allows them to be used in all sorts of stylistic directions of design. Like any building material, decorative stones have their own installation features and rules for choosing a product. What does an average person need to know who has decided to introduce natural decoration into their interior?
Types of artificial products
Limited natural resources and difficult methods of processing them make natural building materials expensive. And people’s desire to furnish their premises in an eco-style does not fade. What did they come up with to replace natural materials for wall cladding? Decorative stone-look tiles are a modern solution for decorating walls or individual elements of a room. Thus, brickwork has become a common decoration for the inside of apartments.
Artificial facing material is made from gypsum, cement, sand and various additives. The output is a product that is not inferior in its operational characteristics natural analogue. Externally, it is difficult for a non-professional to distinguish, for example, from sandstone or shale.
Popular textures of artificial building materials are imitation slate, brick and wild masonry. There are also products for internal and external works. The thickness of the stone varies from 1 to 8 cm. Depending on the purpose of the material, it is also used for floor coverings, and for landscape design.
Material quality
To avoid mistakes and achieve the desired effect noble interior or exterior, you need to carefully study the decorative stone offered on the market, the price of which, although lower than that of natural material, is not so low as to neglect quality.
The front side of the product should not contain black inclusions. These are micropores formed due to improper casting. Through these holes, during operation, water gets inside the material, and when there is a temperature difference, which is typical for cases of external use of decorative stones, it expands. The result is cracking of the slabs.

When choosing decorative stone for interior decoration, you should compare the texture of the product with the size of the room. Small textures (slate) can visually expand the space, and such as brick look great in large areas.
Important! The material is supplied in packs, packaged in 1 square meter units. A sign of quality is the absence of duplicate stones in one batch. But it should be the same.
Basic installation rules
Laying decorative stone requires compliance with certain installation rules:
- The façade cladding starts from the base with an indentation of 10 cm. If you lay the tiles without fulfilling this condition, you can expect that winter time, after the soil freezes, the lower masonry products will disappear. When finishing the interior of the entire wall, you also need to remember about the indentation for the baseboard.
- The base and back side of the product must be treated with concrete contact, primer or other similar solutions for better adhesion. On the brick and should be filled metal mesh and cover it up cement mortar, and then treat with primer. Decorative stones are placed on the wall after the plaster mixtures have completely dried.
- The adhesion of the material to the base occurs through special adhesives recommended by manufacturers of artificial stones.
- Treatment of the cladding with a water repellent is mandatory. This is a product that protects the porous structure of the stone from moisture.
Tool
Laying artificial material does not require any special tools. For cladding you will need:
- level;
- roulette;
- cord for installing horizontal beacons;
- metal brush;
- electric drill with a mixer for preparing grout and adhesive solutions;
- paint brush;
- trowel;
- Bulgarian;
- rubber hammer;
- syringe gun for filling seams;
- wooden rods, approximately 12 mm thick.
Some of the listed tools may not be used when working using the seamless method.
Decorative stone tiles are mounted on the prepared wall. As with wallpapering or ceramic tiles, the base must be level. Though artificial material lighter than natural, it still creates a greater load on the wall. Therefore, veneer plasterboard partitions Decorative stone is not recommended. It is better to replace them with OSB sheets, on which the material is easily mounted
Work is carried out at above-zero temperatures. On particularly hot days, it is necessary to wet the wall and the back of the slabs with water. After drying for three minutes, you can begin styling. If the back side of the stone has cement laitance or a glossy layer, it should be thoroughly cleaned with a wire brush.

Unlike ceramic tiles, laying decorative stone begins with preliminary laying it out on the floor. As mentioned earlier, the products differ in appearance from each other. Therefore, by laying 1-2 square meters on the floor, rearranging and swapping tiles, you can achieve best combination, which then remains to be transferred to the wall.
Laying technology
Tile elements can be glued from top to bottom and vice versa. Both methods have their advantages. If you start facing from the top, you can avoid the mortar from flowing onto the layer laid below, which is typical when laying from bottom to top. When installing the stone from below, the likelihood of the tiles slipping is reduced.
Decorative stone is laid with an offset. That is, the vertical seams between the rows should not match. Then the wall or corner element will look natural.
The prepared solution (glue) is applied to the base and the back side of the slab with a spatula. The estimated thickness of the adhesive layer should not exceed 10-12 mm. Then the decorative element is pressed with some force against the wall surface. It happens that the stone moves, the reason for this may be a liquid solution.

The option of laying with seams involves the presence of wooden rods of the same thickness. They are installed end-to-end between the tiles, forming the same joint width over the entire surface.
Joining seams
After the decorative stone in the apartment has set to the surface, it is recommended to start grouting on the fourth day. Compositions for filling the space between tiles must be selected according to the instructions of the artificial stone manufacturer.

The grout is placed in a syringe gun or a thick plastic bag, from which a corner is then cut off according to the thickness of the seam. In order for the masonry to have a pronounced relief, filling is carried out to a depth of no more than 5 mm. The grout depth depends on the artistic design concept.
After laying the mortar into the seams and starting to harden, the leveling stage begins. Use a shaped spatula or spatula for this. The remaining grout is cleaned off with a brush.
The final stage
Decorative stones can be placed on the wall indoors or outdoors, and after installation they should be treated with a hydrophobic compound. Such impregnation can further protect the room from cement dust, which is released from untreated artificial materials, and give expressiveness to the texture of the stone.

If it is necessary to embody the designer’s artistic intent associated with painting stone, then the characteristics of the product allow the application of paint and varnish compositions. Decorative gypsum stone especially requires such a final stage.
Errors
Knowing the technology of laying artificial stones and having experience in tiling with ceramic tiles, it is difficult to independently install decorative elements without errors. To check the quality of the masonry, you can remove it after ten seconds while gluing the product and look at the places where the material adheres to the base. If the back side of the tile is not completely coated and there is a trace of glue left on the wall that does not correspond to the area of the back side of the product, then such masonry is doomed to failure.
The fact is that the solution is applied to the entire back side of the tile and when installing it on the wall, it is pressed down well. Thus, part of the glue protrudes on the sides of the product and a single surface is formed with the seam. The presence of voids can be observed by knocking on the lining rubber mallet. The sound of a drum is a sign of marriage.
Material properties
The “Decorative Stone” tile is made from crumbs and alabaster, which indicates the naturalness of the components. This material is not hazardous to health, since it does not emit harmful impurities. The advantages of artificial stone are high thermal insulation properties, frost resistance, moisture resistance. This is all the same as natural stones. Besides, decorative material superior in quality natural analogue. Firstly, it is cheaper than natural and lighter. And secondly, artificial stone products are easier to process and install.
Various compositions of man-made stone products enable the consumer to choose the scope of their application. There are heat-resistant samples that are suitable for laying fireplaces. Decorative stone in the kitchen as an apron must be resistant to moisture. The material is also used for bathrooms: both on the floor and on the walls.
Stone in the interior
The decorative material fits so harmoniously into modern apartments and is combined with other building materials that ideas for its use have become available to everyone. When planning a renovation, a person looks at examples of room design for inspiration, so that he can then implement the designs he likes in his apartment.
Having studied repair catalogs modern apartments, we can highlight popular places for decorating with stone material:
- columns, bar counters, arches;
- fireplaces;
- decorative stone in the corridor;
- kitchen apron;
- slopes, corner elements;
- balconies, loggias;
- baths and swimming pools;
- facades of houses.
Decorative stone: price
In the building materials market in 2016, an artificial material that is not inferior in its properties to natural stone costs around 1 thousand rubles per square meter. The “rock” and “slate” texture will cost the consumer 1,350 rubles. It will be cheaper. Its manufacturers estimate it at 850 rubles per square meter.
Corner elements with the listed textures can be purchased separately. Their cost is calculated per linear meter and varies from 1200 to 1300 rubles.
The idea of creating a business for the production of artificial stones has been flourishing in Russia for seven years now. There are programs for calculating the economic model for the production of facing materials, classified technologies and even special molds for casting.
Once it has dried, you can begin installation. Laying decorative stone from gypsum is quite an exciting activity that anyone can do, because it does not require any special tools or experience. You can do all the work yourself and save a lot of money, because... for one square meter installers ask from 1000 to 1500 rubles.
From this article you will learn:
- How to prepare tiles for laying;
- How to glue tiles on walls;
- How to cut stone without dust;
- Is it possible to glue it to wallpaper?
- How to grout seams on brick;
- How to cover the stone.
Preparation for installation
The wall on which the stone will be glued must be dry and even. Perfect option: plastered primed wall or drywall. The tiles need to be laid out on the floor and compared, because... The sizes of individual tiles may vary. It often happens that the length of the stones is different; if for slates this does not play any role, since it is laid closely, then for bricks this is a problem. Even if the length of some tiles is 1-2 mm longer, then “in volume” your seams will shift and it will not be beautiful. There are 2 options to work around this problem:
- File each tile;
- Do the installation “by eye”. Usually, when laying bricks, a bead of equal thickness is used to form a seam and laid at horizontal and vertical joints. If the bricks are different in length, then this bead is not placed on the vertical seams, but is done “by eye”, slightly narrowing or widening the seam. If you do this and move a few meters away from the wall, you won’t even notice anything, it will seem that everything is smooth.
Installation
Let's look at installation using an example decorative brick, because it is more difficult to install than slate. It is better to start gluing the stone from external corner and from the second row. It’s up to you to decide what the corner will look like; some installers cut each tile at 45 degrees and join, others overlap. The second option is simpler, because No need to cut the tiles, but it is only suitable for stones with simple relief. Laying from the corner involves gluing solid tiles without cutting their length, if you do the opposite, it may turn out that you have a 2-3 cm scrap that fits the corner and it will honestly say “no ice”.
Before starting work, we make marks on opposite sides of the wall, equal to the height of the tile with the seam. If the height of the brick is 5 cm and the seam is 1 cm, then we make marks 6 cm from the floor. Then we draw a line using painting thread and screw something flat along the entire length of the wall: a block, a lath, a profile for drywall, etc. Next, we make similar markings with a pencil up the wall after 5 and 1 cm. We draw only horizontal lines, they serve as a guide. if you have laser level, then such markup is not needed and you can use it.
Let's start installation. For gluing, you need to press on the tile slightly to the sides.

Don't forget to lay the glazing beads before the glue dries.
I only had 1 glazing bead, 1.5 meters long, when I did the installation at the customer’s apartment. I laid the first row, then started the second, and as soon as the tile extended beyond the length of the bead, I carefully removed it and moved it further. And so on with each subsequent row until you reach the ceiling. Most likely the ceiling will need to be trimmed to length.

There is also another installation method: glue is applied to the tile itself with an ordinary spatula, then glued to the wall. This way there will be no glue between the tiles. Many do not even fill this space, but leave it as is.
How and with what to cut gypsum tiles?
You can cut the tiles with a grinder with a stone disc for dry cutting or with a regular hacksaw. But it seems to me that the easiest way is to take a metal file and a miter box, put a stone there and cut it. The stone cuts perfectly and there will be no dust like from a grinder. Now you know how to cut artificial decorative stone at home without dust.
About wallpaper and stone
Frequently asked question: “Is it possible to glue decorative stone to wallpaper?” The answer is “no!” The fact is that the wallpaper can get wet from the glue you are laying it on and it is possible for it to peel off from the wall. Usually in such cases, the wallpaper is cut to extend 1-2 cm under the tiles, as in the photo.

Grouting decorative brick joints
Grouting, or as it is also called “grouting,” involves filling the seam between the tiles and gives the natural appearance of brickwork. You can grout the seams using different methods and mixtures. You can use special grout and a narrow spatula, as in the photo.

Or you can take regular finishing putty (it’s usually white), dilute it with water and place it in a milk bag. On the other side of the bag, cut off the corner and squeeze the whole mixture into the seams. You can see how this is done in the video.
How to cover the stone after installation?
The finished masonry can be painted with water-based paint, if necessary. Another common question is: “what varnish should I use to coat gypsum decorative stone?” There is a special varnish for stone on sale, you can look for one. But you can coat it with regular water-based acrylic varnish. You can buy this varnish in any store. Varnishing is necessary so that the wall can be washed. It’s better, of course, to do two layers, but if the budget is limited, then one.
Since not everyone can afford to use natural stone, which is highly valued in decoration, products that imitate this material are becoming quite popular. Stone-look gypsum tiles are one such material. It has many advantages and looks great in the interior of the room. In some aspects it falls short of natural stone, and in others it even surpasses it. This is what finishing a room with gypsum decorative stone looks like.
If you are interested in this topic, then this article is for you. We will take a closer look at not only the advantages of this material, but also learn the installation principle. And for those who are not ready to overpay, we will place detailed instructions creating stone-look tiles from gypsum with your own hands.
Advantages and disadvantages of gypsum products
First of all, I would like to consider the advantages of the material with which you will have to work. Everyone knows that stone itself is a fairly strong and durable material. It is natural and brings a touch of nobility and quality to the room. What can you say about gypsum decorative stone? Below is a list of the distinctive characteristics of the products:

That is why many choose this particular material for interior decoration. At a low cost, decorative gypsum stone is difficult to distinguish from natural stone. It looks great and makes the room beautiful and reliable. However, there are some drawbacks to gypsum products. There are only two of them, so many people don’t even pay attention to them. And with proper installation and use they are insignificant. So, these are the disadvantages of gypsum decorative stone:
- low level of strength. Since it is mostly plaster, it is quite fragile. Even with a slight mechanical load it can collapse. But with careful use this can be avoided;
- the material, unlike natural stone, is afraid of moisture. If the room in which the gypsum decorative stone will be laid is damp or damp, then there is no need to use it there. This is, for example, a kitchen, bath or toilet. And to protect against moisture, the coating is treated with varnish.

But now you can decide whether it is worth installing gypsum tiles or not. But many people make a choice in the direction of the material. After all, at a low cost, they get a wonderful decorative effect that decorates the room. In addition, the fact that you can create a decorative stone from gypsum with your own hands makes the material even more popular. How exactly can you create it yourself? Let's find out.
Technology for creating gypsum stone
Even though the production of installation materials will be cheaper, you will still have to spend money on materials and tools. You need to understand the principle of creation, which is somewhat reminiscent of baking bread. Then you will understand why. So, here's what you need to get started:

It is from this set that the gypsum tiles will be created. The process itself has no difficulties. There are only some points. For example, the pigment can be added directly to the plaster mixture. Then the color of the stone will be throughout the structure. Due to this, even if one finishing element is damaged, it will be difficult to notice. Another coloring option is to apply the color with a brush to the form itself. What to choose, everyone decides for themselves. The number of molds can also be different. It is clear that it is more convenient to use several at once. This way you can quickly create the required amount of decorative stone.

To begin with, dry gypsum mixture and water are mixed in a tank. It must be remembered that the quantity ready mixture must be identical to the number of completed forms that are available. In other words, it is unacceptable for the prepared plaster to remain for a long time without a mold in the tank. Cook as much as will go in at a time. It is important to make the mixture similar to sour cream and maintain a similar proportion so that the batches of gypsum stone are the same.


Note! Laying of gypsum decorative stone can be done on a concrete base, on brickwork, on plastered or wooden wall and even on drywall.
That's all, all you have to do is wait for it to dry and make a new batch. When you have collected a sufficient number of decorative elements, you can begin to lay them out. How to do this? Let's find out.
Laying gypsum tiles with your own hands
You already have the main element, gypsum decorative stone. It remains to stock up on the remaining materials and tools that will be required for the work. Here's an arsenal of what you'll need:
- gypsum or other adhesive for this purpose;
- deep penetration primer;
- regular spatula and notched one;
- miter box, for giving the stone the desired shape in the corners;
- tape measure, level, plumb line;
- pencil;
- mounting gun;
- hacksaw for metal;
- acrylic lacquer;
- roller with bath;
- sponge to remove excess glue.

When you have everything you need, you can start working. The process itself is simple, you just need to follow the instructions. First, it is important to prepare your work surface. Ideally, it will be plastered. After which a primer is applied to the surface. The best method of application is to use a roller and a tray.
Now you can start preparing the adhesive composition. Many people prefer to use ceramic tile adhesive. Only here it can be improved a little by adding a little PVA glue to the composition. The ratio is from 6 to 9% of the total volume. Thanks to this he will receive water repellent properties. Mix everything thoroughly with a mixer to obtain a homogeneous mass.

Everything is ready for installation. The first row of decorative gypsum stone plays important role. Further masonry depends on it. Therefore, it is important to make it perfectly even. To do this, markings are made on the wall using a level, plumb line, tape measure and pencil. The markings must be perfectly level. After which the installation process begins. The adhesive composition is applied to the surface of the wall or to a decorative gypsum stone. For reliable fixation, the mixture can be applied to both surfaces. Using a notched trowel, furrows are made. All that remains is to place the first stone in its place according to the markings and press it to the surface. You then have 6 to 12 seconds to adjust the position decorative element from plaster. Watch for unevenness and quality of gluing. Other plaster parts are glued in a similar way.

Advice! Using a straight spatula and sponge, remove excess glue. Otherwise, it will dry out and petrify, adhering to the surface.
A hacksaw is used to fit the elements. It happens that the decor is made figuratively, an arch, a column or a corner of a wall is processed. In this case, use a miter box, cutting the products at an angle. To give the product a neat appearance, it is sanded with sandpaper. After laying the gypsum decorative stone is completed, using mounting gun the joining grooves between the plates are filled. A soft sponge is needed to remove excess. But many people lay the stone close to each other without creating seams.

The final step is to treat the coating with varnish to protect it from moisture. This is done at will. And in the case when the gypsum stone has no color, the surface is painted in the desired color before varnishing.
Advice! Remember, you need to work with stone-like decorative gypsum tiles carefully so as not to damage them.
That's all the work. As you can see, this is not difficult, especially if there is an excellent video in addition. There is another one in this video interesting way styling decorative plaster, which is slightly different from the one described above. You can use it as a base.
Let's sum it up
With development building materials, the use of natural stone in decoration is moving away. Although this is a practical, but unprofitable way to transform a room. After all, there are materials that are much more accessible and practical. Those who have made a choice in favor of gypsum decorative stone do not regret their choice. The ranks of satisfied users are growing, as evidenced by reviews. Therefore, if you do not have enough funds to get a stone finish, do not be upset. Gypsum stone is a worthy alternative. And the installation process can be done with your own hands.
A well-laid artificial facing stone can protect the walls of a building from negative influence external natural factors, while simultaneously giving them an impressive appearance, making them look like small castles. Therefore, owners of private houses who decide to produce stone often have the question of whether it is possible to install artificial stone with their own hands? To answer this, you must first obtain information about how this process is carried out and what is needed for it, as well as about the materials from which artificial stone is made, and what solutions can be used to lay it.
How to choose the right artificial stone?
If artificial stone is purchased ready-made, then when choosing it you need to pay attention to some nuances that will help determine the quality of the material and, accordingly, the aesthetics of the future finish:
- Appearance of artificial stone.
For façade finishing, select different types cladding, depending on general style, in which the house will be decorated. For usually the heavier one is chosen appearance samples that, even by their appearance, will give the building solidity - these are boulders of different sizes, which are matched to each other during masonry.

Also perfect for this purpose are “rock” type stones, which imitate layers of rocks that have acquired irregular, intricate, “wild” shapes under the influence of natural factors.
Prices for artificial stone
Fake diamond
 Artificial stone under weathered “wild” rock
 For facade walls, a smoother version of the stone is most often chosen, as it gives neatness to surfaces and corners.
In addition, you need to take into account that natural stones almost never have the same shade and standardized, correct shapes and sizes. Therefore, if you want an artificial stone to look as authentic as possible and be practically indistinguishable from natural stone, you should not choose a material made in one even shade. A cladding that has not only relief, but also color transitions inherent in natural minerals, will look picturesque, and therefore more interesting, in contrast to a monochrome one. If artificial stones are purchased from the same collection, but from different production batches, they are usually mixed before installation.
- Surface quality of artificial stone.
It is very important to inspect the surfaces of artificial stones when purchasing. Their front side should not have any irregularities or growths that are not typical for natural material. The back, on the contrary, should be smooth and have slight roughness for good adhesion to the glue and the wall.

If you select a stone made from mortar filled with solid inclusions up to 5 mm in size, then they should not protrude beyond the surfaces of the stone. In addition, inclusions should not exceed the average established fraction, since this factor can directly affect the reduction in the strength of artificial stone and can lead to premature cracking and crumbling of the blocks.

Such filler elements are especially clearly visible on the back side of the stone and on its cut, so special attention must be paid to these areas.
- Stone coloring method.
To ensure that unpainted areas do not appear in the finish in case of accidental chips, it is recommended to choose tiles made from a fully pigmented solution. This indicator can be determined by looking at the section of the tile.

If there is a desire to make color adjustments to the surface pattern of the artificial stone, then this can be done on tiles already fixed to the wall, in this case it will be much more clearly visible where they are really needed.
- Manufacturer of finishing materials.
First of all, it is recommended to pay attention to the products famous manufacturers, which have proven themselves to be of high quality and proven durability of their products. By the way, experienced finishing craftsmen who have been working with artificial stone for a long time recommend giving preference to domestic products, since they are designed and adapted for installation in local climatic conditions, and often does not even require additional protective treatment.
- Packaging of finished products
When choosing an artificial stone, you should immediately ask in what packaging it is sold. It would seem like such an insignificant detail, but, by the way, it immediately helps to determine the manufacturer’s attitude towards its products. In addition, you need to take into account the fact that no matter how high-quality and beautiful the tiles are, without reliable, well-thought-out packaging during transportation, the material can lose both its integrity and decorativeness.
The most the best option for such products are boxes made of corrugated cardboard with a securely reinforced bottom.
Wall cladding with artificial stone
Masonry tools
After choosing and purchasing the artificial stone you like, the next step is to take care of preparing tools, many of which may be found in the owner’s home “arsenal”. So, for work you will need to have the following tools and accessories at your disposal:

- Spatulas – wide 400÷500 mm, toothed with a ridge height of 8÷10 mm, and smooth, 100÷120 mm wide.
- A brush with metal bristles for cleaning the wall surface.
- Rubber hammer for tapping tiles laid on adhesive.
- Construction level to control the horizontality of the rows.
- Grinder with disc for concrete or stone.
- File for processing cuts and the back surface of tiles.
- Ruler 1000÷1200 mm long.
- Gun or cone bags for filling seams.
- Grouting is a tool for leveling grout in joints.
- Calibration strips of different lengths and the same thickness to maintain the selected joint thickness.
- Brushes with soft long and hard short bristles.
- Roller for priming the wall.
- Electric drill with mixer attachment.
- Water containers for diluting glue and grout.
- Roulette.
- Safety glasses, gloves, and a respirator will be necessary when sawing and processing artificial stone tiles and when preparing the surface of walls.
Several recommendations for exterior wall decoration with artificial stone
In order for the artificial stone to be securely fixed on the external wall, some recommendations should be followed when performing facing work.
- The artificial stone is laid on the wall using an adhesive composition that is mixed with water. Therefore, it is recommended to carry out cladding work at air and surface temperatures from +5 to +25 °C. If this condition is met, then use additional materials or the use of special technological approaches will not be required.
- If it is necessary to carry out finishing at subzero temperatures (but in any case, not lower than -5 ° C), then it is possible to build a so-called greenhouse at the masonry work site, consisting of a frame and dense polyethylene, in which a heat gun is installed for heating. However, it should be remembered that in this case the work will take a very long time, since in order to seal the seams, you will have to wait for the glue to dry completely, and under such conditions this process will take quite a long time.
- Another way out in a situation where you urgently need to Finishing work at sub-zero temperatures, it can become a frost-resistant adhesive mixture, enriched with special additives that allow work to be carried out in frosty conditions. But the quality and reliability of the cladding will still cause certain concerns - it still makes sense to wait for warmer days.
- Another serious problem may be becoming too heat, if work is carried out in the middle of summer. Difficulties are caused by glue that sets too quickly, as it loses moisture in a shorter time than provided by the manufacturer. Therefore, this composition reduces adhesion, that is, adhesion to the surface, which means that the artificial stone may not stay on the wall for a long time. Under no circumstances should tiles laid at high daytime temperatures be left to dry under direct sun rays– for finished areas it is necessary to provide shading.
Find out how by studying several options in a special article on our portal.
Carrying out work on laying artificial stone
Having prepared the materials and tools for masonry, you can proceed directly to the installation process itself. An example of cladding a façade with artificial stone is discussed in detail in the table below:
| Illustration | Brief description of the operation performed |
|---|---|
 | Before starting work on decorating walls with artificial stone, the surfaces must be cleaned using a wire brush or a grinder with a brush attachment. Then, if cracks or crevices are found, they must first be cut to a depth of 20 mm, primed, and then sealed with repair mortar or putty. After the repair “patches” have completely hardened, they are cleaned again. Next, the surfaces are checked for evenness according to the rule, and if necessary, they are leveled with tile adhesive and dried well. If the laying will be carried out on a level concrete wall, then in order for the artificial stone to be held more reliably and the masonry not to be subject to deformation and cracking, a reinforcing mesh is fixed to the surface of the wall before applying the leveling layer using fastening anchors. |
 | If artificial stone is laid on a brick wall that has significant unevenness, then a layer of plaster is first laid on it. Plaster will help to significantly save on adhesive composition, which is not cheap. |
 | For finishing external surfaces, it is recommended to use professional building mixtures, which will be required for priming, fixing tiles and sealing joints. In this case, it is necessary to pay attention to the packaging, which must indicate that this mixture is intended specifically for outdoor use. In addition, as mentioned above, you should select materials made on the same basis as the finishing stone itself. This is the only way to achieve reliable adhesion of surfaces. For work, it is advisable to choose products from well-known manufacturers, such as “Art Stone”, “Ceresit”, “Unis Plus”, “Coral”, “Litokol”, “Acrylica”, “Montelli”, etc. |
 | Prepared, dried walls must be primed very well. Before application, the primer composition should be mixed well until completely homogeneous. |
 | The primer is applied in two layers, each of which must be well dried. |
 | The primed and dried wall, ready for masonry, should look something like the one shown in this illustration. |
 | The primed wall must be marked, for example, if it is necessary to separate the basement part from the facade wall, if these areas will be lined with a material of different texture. For artificial stone that will be laid in even rows, you should immediately draw horizontal reference lines, outlining their location using a water or laser level. |
 | While the primed wall is drying, there is time to start laying out the stone. In different batches, the color of very similar tiles may have a more saturated or diluted shade. Therefore, stones from different batches must be mixed together. For the convenience of selecting the corner elements of the stone, it is recommended to make a kind of podium (conductor) from the boards. |
 | Such a device should have such a width that not only the corner tiles can be laid on it, but also those that will be located next to them. |
 | The tiles are laid out so that you can first assess how they will look on the wall. While the artificial stone is not fixed, there is still an opportunity to adjust the masonry by rearranging the tiles so that they look most harmonious. When laying artificial stone of the type shown in the illustration, the seams between adjacent blocks are not visible, which is why the masonry itself is called seamless. |
 | Wall cladding with another version of artificial stone is carried out slightly differently. |
 | Initially, and with this option, tiles from different batches also need to be mixed, and then “dry” laying is done on the floor. Individual blocks of this type of artificial stone have different sizes, and therefore the overall “mosaic” is laid out by selection. In this case, elements can be swapped, moving individual tiles in one direction or another, trying to avoid long vertical and horizontal lines. Only after the tiles have been optimally laid out on the floor for a certain section of the wall can you begin to mix the adhesive solution from the dry mixture. |
 | The adhesive solution for laying artificial stone is mixed as follows: - first, water is poured into a clean container; - then the dry glue composition is poured into it (and not vice versa, otherwise the mixture will turn out heterogeneous); - then, using a mixer attachment installed on an electric drill, kneading is done. If necessary, you can add a little water. Information about the proportions for making tile adhesive, mixing time and the “lifetime” of the finished composition can be found on the packaging - they may differ slightly for different compositions. |
 | The finished solution is taken from the container with an ordinary even spatula or trowel, applied to a notched trowel, and the grout is distributed over the wall section. |
 | The laying of each row starts from the corner, and for it it is best to purchase ready-made corner elements that cover both of its sides at once. |
 | If ordinary flat tiles of artificial stone are used to cover the corner, then they are laid with a bandage - a corner lock. |
 | The adhesive solution is applied not only to the wall, but also to the tile itself. It is also advisable to distribute it with a notched trowel, but the direction of the stripes should be perpendicular to the grooves on the wall surface. |
 | Next, the tile is placed against the corner and pressed tightly in the place designated for it. A tight fit can, if necessary, be achieved by lightly tapping the installed block with a rubber hammer. |
 | The rest of the laying of each row is done in the same order as it is laid out on the floor or on the jig. |
 | Each successive stone is installed close to the previous one and to the underlying one, pressed well against the wall, and, if necessary, tapped with a rubber hammer. |
 | Having laid out the first row completely, they move on to the next, and again the cladding is started from the corner. |
 | The result should be smooth masonry with evenly distributed splashes of color. |
 | The corners of the facade are often finished with rustications, which can have different sizes, depending on the style chosen for finishing the house. Such slabs of artificial stone are heavier, therefore, when laying them, a thicker layer of glue should be applied to the wall. The laying of this artificial stone at the corners is also done with interlocking ligation. |
 | Quite often, two or even three types of artificial stone are used for finishing on one façade. As mentioned above, rustics are almost always installed only at the corners, but sometimes they decorate entire walls. For the basement of a building, if you need to give it solidity, dark-colored tiles are most often used. For the rest of the wall located above the base, a thinner version of tiles in light shades is usually used - this will make the front of the house visually larger. |
 | In this case, to decorate the upper part of the facade wall, the same “wild stone” in relief is used as for the base, only in a lighter shade. |
 | When finishing, you cannot do without adjusting some stones. They have to be marked, and then the excess part must be cut off in order to install them close, for example, to the rustications that decorate the corner of the facade. |
 | This photo shows the cutting of artificial stone across its pattern, and in the same way the cutting occurs along it. The work is done using a grinder with a stone wheel installed on it. After the cut is made, its edges are well cleaned with a file and sandpaper, for precise fit of the surfaces of adjacent elements to each other |
 | This illustration clearly shows how artificial stone tiles with a cut out excess fragment and corner rust are joined. |
 | The result of this type of masonry can be seen in this illustration. |
 | And this illustration shows the laying of a different type of artificial stone, thinner, and laid using a suture method. In order for the seams between the stones to be approximately the same, and the overall masonry to look neat, it is necessary to prepare calibration slats of several sizes in length. They are laid on top of the finished row and the next one is installed. |
 | In this masonry there are no horizontal and vertical seams common to the entire row, so the calibration slats should not be made too long. Their length can be estimated after the tiles are laid out in the desired pattern on the floor. There you can also experiment with the width of the seams, ultimately choosing the optimal one. |
 | If seams are left between blocks of artificial stone, then they must be sealed, thereby immediately achieving both tightness and aesthetics of the surface. The joint compound consists of materials that set and harden quickly, so do not overmix it. large quantities. A one to one and a half liter bucket is suitable for kneading. Water is poured into the container, into which the dry mixture is poured with a spatula, and kneading is done with it. The solution should be homogeneous, without the slightest lumps or inclusions. The proportions of the mixture and water can be found on the packaging. |
 | Before applying the jointing solution or grout, all seams must be cleaned of any adhesive residue using a medium-hard brush. |
 | Next, the seams need to be carefully filled. To do this, it is very convenient to use a simple device made of ordinary dense polyethylene, called a cone. That is, in essence, it is an ordinary plastic bag made in the shape of a cone - you can purchase it at a hardware store or simply make it yourself. |
 | The white color of the jointing can be changed by adding a special dye to the solution. It must be said that the same type of stone with jointing different color will look completely different. For example, a dark-colored stone with light grout will look fresh and neat, while a light tile with grout of the same or light gray color resembles walls European houses XIX century. |
 | After filling the joints, the mixture is compacted and leveled special tool, which is called jointing. It can give the seams a convex, depressed or even shape. |
 | Then, the seams are additionally passed with a soft brush, removing excess mortar. Well, if you need to create a textured pattern on the seams, then take a stiffer brush with short bristles. |
 | With proper cladding with artificial stone and high-quality sealing of the seams, such wall covering should last for decades. |
 | When the grout in the joints has dried, the entire surface of the stone-clad wall can be coated with a special water-repellent compound (this is especially true for the basement part of the wall). This treatment will not only protect the surface from moisture saturation, but will also add brightness to the artificial stone. It is important to choose the right composition and apply it only to a well-brushed stone. |
Advantages of decorating walls with artificial stone
To summarize, we can mention all the advantages of artificial stone over natural material:
- Artificial material is much lighter natural stone, so it is more securely held on the wall surface without additional fastenings.
- High-quality artificial stone, due to a carefully selected component composition, can be more resistant to high and low temperatures, to their sudden changes, and to other negative external influences of a natural or man-made nature.
- A variety of textured patterns, colors and shades allows you to choose imitation stone to suit any chosen façade design style.
- Artificial stone is easy to process, and this process does not require special effort or special equipment. For example, if the material is made of gypsum, it can be cut with a regular hacksaw, but for cement-based artificial stone, a grinder with an appropriate wheel will be sufficient.
Even an inexperienced craftsman can clad the walls of a house with artificial stone if he approaches the work with all responsibility and accuracy. The most important conditions Precision and slowness are essential in performing such finishing. If you listen to everyone technological recommendations and instructions that have been tried and tested more than once, the work will pass It’s easy and you’ll be pleased with the results.
Prices for popular artificial stone
fake diamond