(function(w, d, n, s, t) ( w[n] = w[n] || ; w[n].push(function() ( Ya.Context.AdvManager.render(( blockId: "R-A -185272-6", renderTo: "yandex_rtb_R-A-185272-6", async: true )); )); t = d.getElementsByTagName("script"); s = d.createElement("script"); s .type = "text/javascript"; s.src = "//an.yandex.ru/system/context.js"; s.async = true; t.parentNode.insertBefore(s, t); ))(this , this.document, "yandexContextAsyncCallbacks");
A true French “Shell” or “Twist” hairstyle can be done with your own hands at home. It is suitable for long and medium hair. There are several options for this styling, which allows you to wear it almost constantly, but at the same time subtly change your image.
The famous French “Shell” hairstyle has many names. These are “Bun”, and “Banana”, and “Twist”. It has been known since the beginning of the last century, but during all this time it has not lost its freshness and relevance. If you look closely at this styling, it is surprisingly similar to a shell that was taken out of the sea.
Today “Shell” has again risen to the world catwalks and become popular. Moreover, every year more and more new options for laying “Shells” appear. Once upon a time it was invented as a hairstyle for going to a social event. However, around the 80s, “Shell” began to appear frequently on the screens of Hollywood films, which made it very popular. In addition, “Shell” has become not only a fashionable evening hairstyle, but also a stylish business one.
It combines amazingly with evening dress and a business suit. And the ease of execution and feminine appearance were appreciated by many women of different age categories. Moreover, you can do it yourself.
Let's prepare tools for installation

- Massage brush.
- A comb that has small teeth is made of plastic.
- A small comb to create a backcomb.
- Curling iron for classic styling.
- Invisibility pins.
- Set of hairpins.
- Varnish and foam for styling.
How to do the styling correctly?
 If you have long hair, then the “Shell” hairstyle can emphasize the elegance of the neck, the slimness of the figure, and will also give you elegance and lightness. This hairstyle is quite suitable for a serious social event, private party or wedding celebration.
The “Shell” hairstyle is good for long curls, but it can also be done if your hair is of medium length. Straight curls are considered ideal for this styling. Styling curly hair is more difficult and takes more time. If you are doing this styling for the first time, it is better to practice a little beforehand.
Hairstyle "Classic Shell". Simple french twist parikmaxer tv hairdresser tv
 How to do the Shell hairstyle correctly is of interest to many girls. Many schemes have step-by-step instructions.
To make your work easier, simply follow the steps:
- To style your hair well, you need to use mousse or foam. In this case, it will turn out smooth, and the strands will not get out.
- Most nice option“Shell” hairstyles are obtained by making a side parting.
- You need to comb the strands to the left side.
- Then secure them with pins in an asymmetrical order.
- Now you need to twist the curls inward.
- Secure the resulting shell with hairpins.
- In order for the hairstyle to retain its appearance longer, for reliability you need to lightly spray it with hairspray.
French hairstyle has some nuances.
- Wet hair is not suitable for this hairstyle. They need to be dried well. If your hair is wet, your hairstyle will quickly fall apart.
- Too much a large number of mousse will give your hair an untidy look.
- You can add a little romance to your hairstyle by leaving a few strands and twisting them.
- There is another way to create this hairstyle - you can use Chinese chopsticks.
Chinese chopsticks
- Gather your hair into a bun at the bottom of your head.
- Clamp the strands using chopsticks.
- Then screw them onto the sticks and then secure them with hairpins.
- After this, carefully remove the sticks from your hair.
- Secure the “Shell” with a small amount of varnish.
Performing “Shell” is also possible on wavy hair. This hairstyle makes you feel truly glamorous. The French Shell is surprisingly versatile. Moreover, if you decide to do it yourself with your own hands, then you should not use a lot of mousse and use curling irons to straighten your hair.
Moreover, the French hairstyle will be more airy and light.
Double bun
 This hairstyle is obtained in the form of a “Double Shell”, when both parts are twisted towards each other.
The principle of performing the “Double Shell” is the same as the usual one. The curls are twisted towards each other and fixed together. To achieve this hairstyle, you will need a little more pins, and the hairstyle itself will be more fragile.
Double French Bun Cute Girls Hairstyles -Holiday Hairstyles
Informal styling
 This French hairstyle is suitable for those who love eccentric looks. However, this hairstyle has a more complex technique, and you won’t be able to do it yourself if you don’t have enough experience.
First you need to make a big backcomb to get a large volume. On the side, the curls are twisted into thick strands. Then the remaining strands are twisted into a shell shape. This hairstyle looks absolutely fantastic.
In the form of a French "Twist"
This hairstyle looks more vintage. The “Shell” is fixed on the side. But they twist it freely, creating the effect of soft waves. The hairstyle is complemented with backcombing and bangs, which are placed high. Fix it with varnish in large quantities.
No secrets - French twist
For a wedding
 It must be said right away: this hairstyle is only suitable for those who have long hair. You can create it yourself and with your own hands. First you need to make a regular “Shell”. However, the ends of the hair need to be exposed. These ends can then be styled into strands or curled into ringlets. A beautiful headband or tiara will help complement your hairstyle.
Hairstyle for medium hair: Shell. French twist hairstyle tutorial
What's the advantage?

In order to create such a hairstyle, it is not at all necessary to have hairdressing talent. Everything can be done in a short time and at home, especially if you are unexpectedly invited to a restaurant or to a romantic party.
It will help to complement this image Nice dress, diamond earrings or a string of pearls.
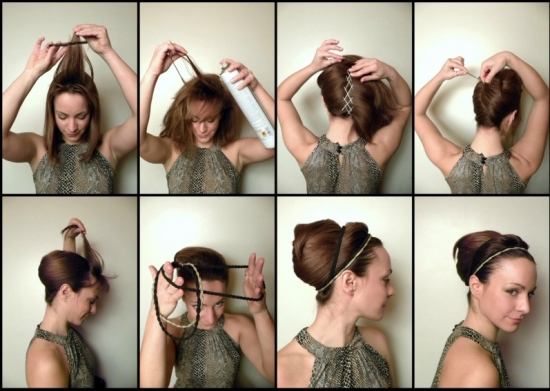
- You need to collect your hair in a high bun at the top of your head. In the area where the bangs are located, leave a triangular-shaped strand and the same strand on the back of the head. The tail is secured with an elastic band. A bun is twisted around the elastic band, which is used to disguise it. Then the bundle is fixed with hairpins.
- Then the hair from the bun is wound around the base of the ponytail and also secured with hairpins in the form of a vertical roller.
- The strand that remains at the back of the head is divided into two parts.
- The right one needs to be tapped and secured around the base.
- The strand that remains next to the bangs is backcombed, and then it is laid on the parietal area.
- The tip of the curl is wrapped around the base of the bun and then fixed.
- Do the same thing with the strand that remains on the back of the head. They just put it in the other direction.
- In order for the hairstyle to remain neat for a long time, it is fixed with varnish and decorated.
Shell hairstyle, how to do it?
Shell hairstyle for medium hair is a classic styling option. Ideal for work or study, as well as for evening and formal events. Doing it at home is quite simple - the main thing is to decide on the type of hairstyle you want and study the nuances of creating an elegant look.
Who is it suitable for?
The main advantage of the hairstyle is its versatility. It looks equally beautiful on different hair lengths. But experts note: it will be easier to perform it on straight curls. Therefore, girls with curly hair It’s better to straighten them first using an iron.
Other advantages also include:
- Laying has many options. It will complement any look - everyday, wedding, evening.
- If you practice several times, it will take very little time to create a hairstyle the next time.
- An ideal choice for those with thin, weakened hair. By styling your curls in an elegant shell, additional volume is created. The strands can also be corrugated or lightly backcombed.
- The look can be complemented with any accessories of your choice - a hoop, shiny hairpins, decorated bows, hairpins, which will give it more brightness and sophistication.
- Not needed for installation special devices. Even a beginner can cope with the task.
Required Tools
- Massage comb. It is better to choose a large square or flat one of medium hardness. It will help give the strands the necessary shape and comb tangled hair without tearing it out.
- A brush with small teeth and a pointed tip. The accessory is indispensable for quickly separating curls, creating a parting or backcombing.
- Curling iron with wide plates. If the hairstyle is planned to be smooth, with strict straight lines, then before styling it is necessary to straighten the hair well.
- Styling products – varnish, mousse, foam, gel. They should have a strong hold and help maintain beautiful view strands for the whole day.
- To secure, you will also need bobby pins, hairpins, and bobby pins.
- If desired, for a special event, the curls can be decorated with various accessories - a headband, a bow, flowers, decorated hairpins or a comb.
Types of hairstyles
There are many types of shell hairstyles for medium hair. You should choose them based on your own preferences, as well as depending on the event for which the styling is being created.
Classical
The basis of a classic French hairstyle is a simple braid. Having learned how to make this element, you can continue making the traditional “snail” without any problems.
- Apply a little foam to clean hair, this will make it easier to work with. Dry.
- Comb the strands and gather them at the back of your head.
- Do not secure the tail with an elastic band, start twisting it into a tight rope. If you want your hairstyle to look more casual, you can make it a little looser.
- Wrap the tourniquet in a loop, hide the ends of the curls inside the shell.
- Secure the “snail” with hairpins or bobby pins.
- Use a thin comb to comb any stray hairs back.
- Fix the result with varnish.
Evening
The evening version is created according to the classic scheme. But you can complement it with a variety of shiny or more discreet jewelry.
- You can add shine by using glitter varnish as a fixation.
- You can complement the look with small decorated hairpins, hairpins with pearls, a comb or a headband with rhinestones.
- The original accessory in summer time Fresh flowers can serve.
- You can leave one or more curls on top without twisting them into a shell. Screw or corrugate them. The strands will serve as an elegant frame for the face.

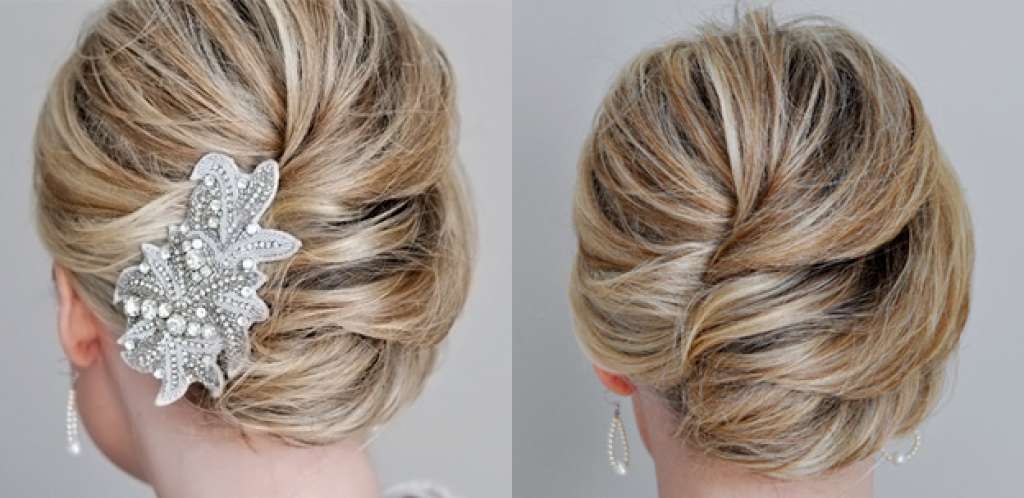
Wedding
For such a special celebration, a romantic, gentle image is created. Feminine shell styling will help decorate it.
Important! If the bride wants an original variation of her hairstyle, the plait can be collected on the top of the head, almost at the neck, on the right or left - almost at the temple, twist it diagonally.
Fresh flowers, hairpins with rhinestones, tiaras, and combs are used as decorations. The shell visually makes the girl’s neck longer and her silhouette more graceful.

Double French bun
An interesting and unusual variation of the classic styling. Especially suitable for those with thick and voluminous hair.
- Divide the curls into three parts. The first is the strands of the upper part of the head. The second is the occipital region. The third is the lower ones.
- Start working with the third part. Twist the strands into a rope, pointing it upward. Tuck the ends of the strands into a shell. Secure with pins.
- With the separated curls at the back of the head, you need to do the same steps, but the second bun should be secured in a downward direction. The result will be two identically located “snails”.
- Next, start working with the top strands. They can be lightly combed, making a voluminous “tuft”. Or divide it into two parts, twist the curls so that they fall, framing the face. Another option is to treat your hair with a small amount of gel, form a wave (which goes to the right or left) and secure with bobby pins.
- If desired, decorate your hair with decorated hairpins, barrettes, or a hoop.
- The final stage is fixing the double shell with varnish.

Step-by-step instructions for a seashell hairstyle:
- Prepare your hair for styling. Comb the strands with a thin comb, sprinkling each with varnish. Highlight the parting. It will look very impressive with a side parting.
- Gather the curls at the back of the head, without securing them with an elastic band, and twist them into a rope. Next, wrap it in a shell, hide the ends of the strands in the formed “snail”. If you want a more discreet hairstyle, make the braid tight. For a more romantic and casual look, leave your hair a little looser.
- The finishing touch is to fix the styling with varnish.

Important! If you want the effect of a luxurious professional styling, do not comb the front strands, leaving them smooth.
The shell hairstyle with bangs has not lost its relevance for many years.
- When forming a tourniquet, the bangs must be separated, since in the future they can be effectively styled.
- To create a voluminous hairstyle, pin it back after lightly combing it.
- For a 60s-style hairstyle, comb your bangs well, apply a little mousse, and form a smooth wave out of it. Spray with varnish and secure with bobby pins to maintain its shape throughout the evening.
- It will look original if you separate the front strands using a hoop or silk ribbon.
- Experts advise not to style short bangs, but simply spray them lightly with hairspray to fix them.

Classics are always relevant. Of course, there are classic hairstyles that are more popular, and there are less popular ones. There are hairstyles that are completely forgotten over time, but this is not the case with the hairstyle we are going to talk about today. So, today we will talk about the classic shell hairstyle. And you shouldn’t immediately think that this is something boring and uninteresting, it’s not like that at all. In today's master class we will talk about the variety of this hairstyle, about the various options and types of hair styling that can be depicted with a little imagination. We’ll also see how to make a shell hairstyle with your own hands and understand whether it’s difficult or easy.
When this hairstyle appeared, and it was at the beginning of the last century, it was a variant of evening hair styling. But time is running and today the shell is no longer just an evening hairstyle. The classic styling option goes well with a business suit, so many women style their hair this way before a business meeting or just every day at the office. If you add a bit of mischief and a little dishevelment, it will be great option for everyday hairstyle. And if you attach flowers, bows or ribbons, you will get a wonderful wedding hairstyle. You can see this for yourself in the photo below.
Classic hairstyle


Shell hairstyle option for every day


By adding jewelry or carefully highlighting a few strands, the hairstyle turns into a wedding one. It is also perfect for any other special event.


By the way, stars also do not shy away from this hairstyle; the photos speak for themselves:


As you can see, the application is very diverse. It is universal. The shell hairstyle is perfect for long hair, medium hair, and I’ve even seen options with short hair (but here, of course, you need to look at how short it is). There are also no age restrictions. It is worn by girls, young women, women and older ladies. It suits everyone and very correctly emphasizes beauty, grace and elegance.
And now she’ll see how to make a shell hairstyle herself, with her own hands at home.
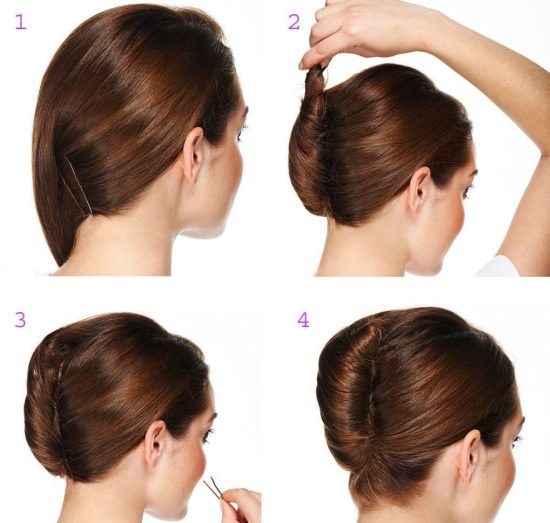
How to do a shell hairstyle
1. Comb your hair in one direction, no matter which direction, wherever is more convenient for you. We fix them from below so that they hold on and spray them with varnish.

2. Gather your hair into a ponytail and twist it tightly the opposite side. If you combed your hair initially to the left, then you need to twist it to the right and vice versa.

3. We remove (hide) the remaining tail into a shell and secure it with hairpins.

4. Using the same pins, tuck the remaining loose hair into the shell.

5. We fix the resulting styling with varnish.

For a classic shell, the tighter you secure it, the better. But for a hairstyle for every day, it can’t be so tight. And if the remaining tail is not removed, but left, then you may end up with an eccentric shell.

Experiment, try several options to understand which one suits you and what you like. And don’t be discouraged if you don’t succeed the first time, it’s a matter of skill. Try again and again. And with each new time you will see that it will turn out better and better. 

If you have not yet fully understood how to do a shell hairstyle at home, then watch the video tutorial below. It presents another technique, perhaps it will be easier for you.
You can create a “shell” hairstyle without any additional funds and accessories
This installation is simple and quick to implement if you practice creating it in advance. Of course, it won’t come out absolutely neat the first time, but later you will be able to do your hair in 10–15 minutes.
“Shell” can be of the following types:
- Classic.
- French (single and double).
- Wedding.
- Evening.
- With a bang.
- With weaving.
The classic version of the “shell”, laid smoothly on one side, is the most popular among all types of styling. But it is only suitable for those with straight hair.
 Girls with curly hair are advised to pay attention to the double or single “shell” in French, which, with some modification, can become a wedding hairstyle
 The evening “shell” is a true formal classic; it is distinguished from a regular hairstyle by the presence of a high backcomb or a roller added for volume. This styling is especially suitable for creating a retro look at dinner parties or formal receptions.
A “shell” can be created even with bangs of any shape; moreover, this type of hairstyle looks more original with it.
A hairstyle with a roller looks vintage and original. It is suitable even for girls who do not have full hair, only in this case it is necessary to select the shade of the roller to match the tone of the hair so that it is invisible.
All types of “shells” are created according to approximately the same pattern, therefore, having learned how to create a classic styling, you can easily master others. To create a classic style, you only need a massage comb, a comb, hairpins or bobby pins, and a fixative - varnish or mousse.
Creating a “shell” for long hair
For long hair, the following types of “shells” are the most popular.
Classic with an elongated silhouette
 This hairstyle is especially suitable for girls with a round or square face shape, as it can visually lengthen it and make the image more chiseled due to the additional volume on the top of the head
 How to do:
- The hairstyle is performed on clean, damp hair, which is then dried with a hairdryer and straightened.
- The front strands or bangs are separated forward using a comb, and root volume is created on the main part of the hair.
- The front strands are carefully combed back over the backcomb and secured with bobby pins.
- The total mass of hair is formed into a shell, and the tip is either fixed in the same way or curled into small curls.
- The hairstyle from below is fixed with bobby pins or hairpins, and is also secured with varnish.
Styling for long hair cut in a cascade
 A “shell” can be created even with a cascading haircut; moreover, in this case, an uneven edge can make the hairstyle especially elegant, complementing it with small curly strands
 Step-by-step execution hairstyle like this:
- The hairstyle is performed on clean, damp hair, drying it with a hairdryer and styling products.
- Short strands are formed into a cap on the top of the head, long hair is combed and pulled back in a neat, even mass, immediately taking the shape of a shell at the back of the head.
- The lower part of the hairstyle is secured with bobby pins or hairpins.
- The remaining curls in the front are curled using a curling iron and distributed evenly throughout the hair, subsequently secured with bobby pins.
How to make a simple shell for long hair with your own hands: video
Shell for medium length
For medium length hair there are also two most popular and simple ways creating a "shell".
Classical
 The simplest hairstyle is perfect for medium-length hair with a straight structure.
 Performing the “shell”:
- Washed hair is dried and combed.
- The shortest strands are fixed into a voluminous cap on the top of the head, and the long ones are combed back and formed into a “shell”.
- The “shell” from below and along the turn line is secured with bobby pins or pins.
- The tip of the curl is also wrapped inside the shell and secured with a bobby pin.
French
 The French version of this hairstyle is more feminine and is great for medium length hair.
 Unlike the classic “shell” style, styling can be done even on curly hair.
Creation stages:
- Clean and damp hair is dried with a hairdryer and smoothed on the sides using mousse, licking a little.
- The front part of the hair is pulled back, secured at the neck with 2-3 bobby pins.
- The remaining curls are collected along the entire length and twisted into a bundle towards the fixed bobby pins. The end of the harness is brought up.
- The hairstyle is secured from bottom to top with hairpins or bobby pins.
- The tip is hidden in a “shell” or in the hair on the top of the head and is also secured with a bobby pin.
Styling for short hair
 It is extremely difficult to create a classic shell-shaped hairstyle for short hair, since at least a medium length is required, but you should not despair, as you can create an imitation of a “shell” using styling products
 DIY “shell” hairstyle step by step:
- Comb your hair with a comb.
- Apply styling product to the back of the head, gathering relatively long hair into a ponytail. If they are too short and you can’t make a ponytail, just lay the strands separately in one direction.
- Twist the resulting ponytail to the left and secure with hairpins or bobby pins.
- Fix your hair with hairspray or mousse.
How to secure and decorate your hair
 By complementing the “shell” with ribbons or stylish headbands, you can turn it into a Greek hairstyle; elastic hoops in a braided style are perfect for this.
 You can secure your hairstyle using bobby pins or hairpins. For everyday use, it is recommended to choose accessories that match your hair, and for formal occasions, give preference to jewelry with beads and rhinestones. You can enhance the durability of your hairstyle using styling products such as mousse or strong hold varnish.
All of the hairstyle options described above are harmoniously combined with an evening dress and everyday jeans, and with reliable fixation, the styling can last for more than one day. We wish you to choose the option that suits you and learn how to create it in a few minutes.
Classics are relevant at all times. Of course, the shell hairstyle is not trendy, however, it is appropriate always and everywhere. This styling has many variations, from the simplest to the incredibly complex, requiring great skill.
The French shell hairstyle appeared in the last century, and at first it was considered exclusively an evening hairstyle. However, then women appreciated the convenience and versatility of the hairstyle, and they began to do it in an everyday version. This hairstyle was especially popular among teachers and teachers, as the shell looks elegant and stylish.
Nowadays, the shell remains a popular hairstyle option; it is done both for every day and for special occasions.

After looking at the photo various options shells, you can see how different the styling can look.
Shell is universal option styling that suits almost any girl. The only limitation is the length of the hair; a bun in the shape of a shell is done by long-haired girls; in extreme cases, it can be done on medium hair (at least to the shoulders). Performing this installation on short hair possible only with the use of hairpieces and overlays.

How to choose a styling option for your face shape? As always, girls with oval faces are the most “lucky”; the most suitable different variants styling If you have a round face, then you should complement your hairstyle with thick bangs and leave the curls around your face free, falling along the cheekbones.

Girls whose faces are closer in shape to a square or triangle should make a shell of an asymmetrical shape, that is, form a roller not in the center of the back of the head, but shift it to the side. The hairstyle will be complemented by oblique asymmetrical bangs.
Technique
Let's look at how to make a shell hairstyle yourself. In principle, this hairstyle is simple. With practice, you can learn how to do the styling in 5-10 minutes. But, when planning to do your hair for the first time, especially before a special event, it is worth rehearsing several times to acquire the necessary skills.
Read also: Bob haircut on the leg: who is suitable and styling methods
To do the installation yourself you will need:
- Hair brush. With this the necessary tool You will need to comb your hair well, achieving perfect smoothness.
- Comb with fine teeth and a pointed handle. This tool will be needed to smooth the strands.
- Invisibles and stilettos.
- Means for fixation. Before you start styling, you should use mousse, and finally fix the result with varnish.

In addition, you may need additional tools:
- Iron. If you are doing a classic shell hairstyle, then your hair should be perfectly smooth and shiny. Therefore, if your curls are naturally wavy or unruly, then they should be pre-treated with a straightening iron.
- Comb for backcombing. If your hair is thin, you need to comb it first before styling.
- Special pad-roller. When doing hairstyles for medium hair, the hair volume may not be enough, so styling is done with a roller, placing it under the bun.
- pretty shell hair clip. The classic version of the hairstyle is secured with hairpins, but other options can be used. For example, use a crab hairpin or a double-sided comb hairpin.
- Decorations. When creating a festive hairstyle, you can use a wide variety of accessories. For example, a hairpin decorated with pearls or rhinestones, flower wreaths, headbands, etc.
Step-by-step instructions classic version Shell-shaped hairstyles for long hair:
- Preparation. You should wash your hair, comb the strands well and apply a small amount of styling foam. You can pre-wind the strands on curlers large diameter or straighten them with an iron.
- Making the tail. We collect the hair into a neat ponytail without securing it with an elastic band.
- We twist the tourniquet. We twist the resulting tail into a rope. In the classic version of styling, the tourniquet is made quite tight, but if you want to make a more casual styling option, the tourniquet can be made loose.
- We form a shell. We place the resulting tourniquet on the back of the head in the form of a loop and secure it with hairpins. The ends of the tourniquet are carefully tucked inside the prepared bundle.
Read also: Trash haircut - rebellious spirit of freedom

- We correct the styling. Now, using a fine-toothed comb, we adjust the styling and secure any loose strands with bobby pins.
- We finish the installation. We fix the styling with varnish and, if desired, use accessories.
Laying options
Described above classic way hairstyle, however, the shell can be done in different ways.

- Wave. This is one of the most romantic styling options. Before doing the hairstyle, the hair is twisted in the form of curls, and then any version of the shell is made from them. In this case, the ends of the hair can not be hidden in a bun, but beautifully laid in rings on top of the hairstyle.

- Spiral. When performing this hairstyle option, the hair twisted into a plait is laid in the form of a spiral. The resulting bundle actually resembles a sea shell in shape. This version of the shell can be made either perfectly smooth or deliberately careless by slightly tousling the curls with your fingers.

- Double. The double shell looks unusual. To perform the hairstyle, you need to divide your hair into two ponytails and lay each strand separately.

- Asymmetrical. When performing this styling, the tail is not collected at the back of the head, but is mixed to one side.

- Corrugated. Unlike the classic version, this hairstyle does not require perfectly smooth hair. On the contrary, the strands are treated with an iron with a special corrugated overlay. As a result, the hairstyle turns out to be more voluminous and looks very original.

- Bow. The original styling is done like this: the tail is divided into three strands, and the middle one should be slightly smaller than the side ones. A bow is formed from the two outer strands, and the third strand is used to tie the resulting bow in the middle.