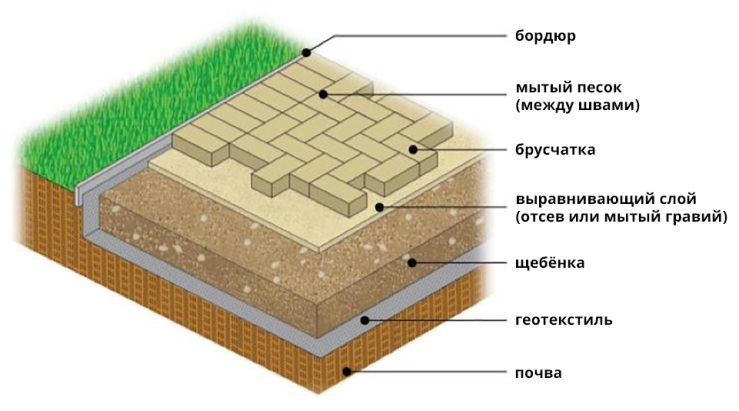
Paving slabs are a product that today is actively used for tiling floors in a gazebo, on a porch or in another area. The main advantages of tiles are their durability. But this criterion is particularly influenced by compliance with technology during the arrangement of the base and the quality of laying work.
Let's consider what is better to lay paving slabs on. This article will only touch on technical issues.
Laying methods
Paving slabs can be laid in three ways:
- on the sand;
- on concrete;
- on the ground.
How to lay tiles on a concrete base is described in detail.
On concrete
This method is advisable to use in cases where the area where the installation will be carried out already has a concrete base. It should simply be cleaned of dust and dirt, moistened and a layer of solution applied. After this work, paving slabs are laid. The laying technology is similar to the principle with a sand cushion.
On the sand
Dry laying occurs when the owner plans to make changes to the building project in the future. In addition, this method is actively used by those who do not want to bother with cement mortar. Dry installation is an excellent solution for placing a chaotic or random pattern of sidewalks, with space between the products.
On earthen soil
This installation option, like on the ground, has become widely known during the design of summer cottages, as well as in the courtyard of a private house when laying tiles in the country, and this is naturally the easiest. Used in this case large tile, which imitates natural stone. The tiles are laid in prepared holes (preparation is required), and then the compaction process is carried out using a wooden hammer. The space between the tiles and the edges of the pits is eliminated using soil.
Mortar laying technology
Most types of products can be laid in this way. The process of laying on a concrete base begins with preparatory activities.
Polymer sand laying technology paving slabs described

Action plan:
- Marking the area where the path will be located.
- Remove from marked area upper layer soil.
- Make a 3–4 cm deepening.
- Compact the bottom of the pit and fill it with crushed stone, the layer thickness of which is 10–20 cm, compact it again.
- Install curbs.
Before preparing the solution, it is necessary to lay the paving slabs on a layer of sand. It must be laid out in the order in which it will be used.
To obtain a concrete solution, you need to prepare the following materials and tools:
- cement grade 500;
- quarry crushed stone fractions 10-20, 20-50;
- paving slabs 50-60 mm thick;
- corresponding to the established ;
- sand;
- water;
- vessel;
- shovel or electric drill.
To prepare it in appropriate ways, you need to take cement and add the required amount of water to it. Using an electric drill, mix everything and add 4 parts of sand. Mix everything again and the solution is ready.
Installation process:
- Remove 4 tiles from the sand and apply mortar to the area.
- Reinstall the product. Do the same manipulations with the remaining tiles.
- This must be done until the entire sidewalk is laid out.
- It is imperative that there is space between the tiles. And this can be achieved if you install special wooden spacers.
Screening stacking technology
How to lay tiles on screening? This installation method is the most economical. However, this will not affect the quality of the final coating in any way. 
The installation process and technique is carried out according to the following plan and subject to specific rules:
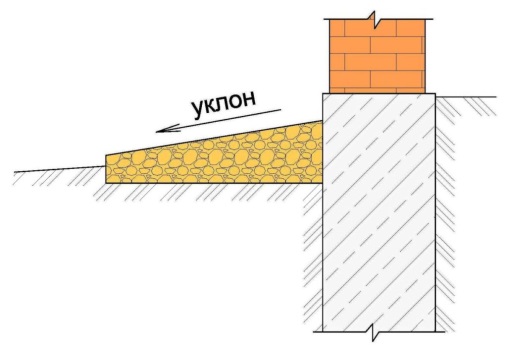
- Mark the site and plan water flow. Such measures are necessary to ensure that water does not accumulate on the finished site. For effective removal water, you need to make a slope of 1-2%. You may also be interested.
- Remove top layer of soil. The depth of the removed layer depends on the intensity of use of the coating. As a rule, it is in the range of 15–50 cm. If the soil is weak, then it can be further compacted. Pour the screenings over the dug hole. If you want to make a high-quality base, then the minimum number of layers should be 3.
- Pour in crushed stone and compact well. Its thickness can be 5–10 cm since the crushed stone shrinks during compaction, so make a reserve of 10–15%. spread out the screenings up to 7 cm thick. Compact thoroughly.
- Place the screenings again, but adding cement to it in a ratio of 1:4. In the tamping field, make sure that this layer is 5 cm higher than the desired tile level.
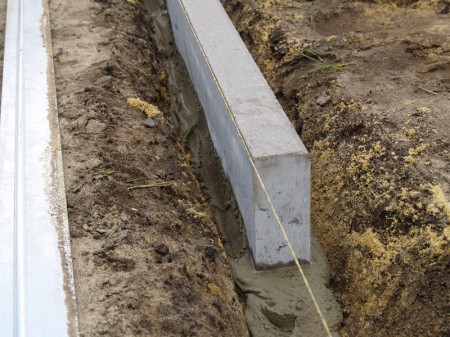
- . This process can be performed using a cord, the tension of which is carried out at the required height. The process of installing the side edging takes place on a concrete base, the width of which is 20 cm, and the height of the concrete castle is 15 cm.
- Laying the material. During the process, you need to clearly follow the drawing. It is necessary to lay out the first row with special care. The tiles must be installed tightly. If irregularities have formed, they must be eliminated. The quality of the work performed can be checked using a marking thread; when making roundings, pay attention to the fact that outside The width of the gaps had minimal dimensions and did not exceed 8 mm. To cut tiles you can use circular saw or Bulgarian. A diamond disc is used for these purposes.
- Grouting the surface. When the surface is laid out, it is necessary to fill it with river sand. Then, using a hard-bristle mop, grout. You can also buy for these purposes special compounds, but their cost is high.
- Compact the surface. After completing all the work, it is advisable to take a vibrating plate (vibrating machine) and use a rubber gasket to compact the entire surface. If such a tool is not available, then there is nothing to worry about, since such an operation is not mandatory. Just so the tile will be firmly and securely fixed.
A vibrating plate is a tool necessary for compacting and leveling the concrete mixture when laying paving slabs. The design of the equipment assumes the presence of a metal beam and an IV series vibrator.
Read how to lubricate molds for paving slabs.
In the video: how to correctly lay paving slabs on the screening (instructions):
Laying granite paving slabs
Granite paving slabs are construction material, which is actively used when laying areas. But today I actively use it for other purposes. The main advantages of granite tiles are high strength and reliability.
Work order/step by step:
- Mark the area.
- Lay the base in the form of geotextile. Why geotextiles are laid under paving slabs will tell you.
- Lay a layer of crushed stone on top of the base, the thickness of which is 15–25 cm (base preparation)
- Using a rake, form the required slope.
- Compact the laid layers.
- Using sand and geotextiles in the process, perform secondary device grounds.
- Treat the second layer with water and install side edging around the perimeter. For the base, you can use lean concrete. The edging is fixed using cement-sand mortar.
- When all preparatory activities completed, you can proceed to laying granite paving slabs. To prevent the tiles from falling out during operation, the gaps between the products must be eliminated using sand.
- Each laid row must be compacted using a rubber hammer.
- Upon completion of work, treat the finished surface with a weak stream of water.
Video: laying granite paving slabs
Laying tiles in different weather conditions
Today the question remains: is it possible to lay paving slabs in the rain? No one can prohibit this, since before laying even the sand, the craftsmen lightly moisten it with water. If you want to get a high-quality coating, then all work must be done in dry and warm weather.
Do not install during rain, which immediately begins to freeze. Otherwise, you will have to do all the work again in the spring. The reason is that water expands when frozen. Therefore, when the tiles are laid level and everything is fine, but after frost it becomes warm, the water will melt, reduce its volume, and the tiles will shrink.
How the material is laid in the gazebo, on the porch
Today, many owners use paving slabs to lay the floor in a gazebo or on the porch. This procedure is very simple to perform.
First you need to stock up the following materials and inventory:
- quarry sand;
- fine gravel;
- cement grade 500;

- paving slabs;
- rubber hammer.
The action plan is as follows:
- Remove the top layer of soil; its depth should not be less than 20 cm.
- Lay a layer of sand and gravel. The thickness of each layer should be 3 cm. Compact everything thoroughly and add a layer of sand and cement.
- Replacing two last layers An ordinary solution may appear, for the preparation of which sand, cement and water are used. The laying out of the solution should not be carried out immediately, as the material is laid.
- You can level the laid tile surface using a rubber or wooden hammer. If you use any other tool, this will lead to damage to the product. The main difficulties that arise during this process depend on the shape of the selected product. Not everyone can cope with this job. As a rule, all material is laid according to the principle of assembling puzzles. The same thing can be done with a large slab 300x300x30
What is plastic tiles for paths in the country you will find out.
On the video there is a video tutorial: laying paving slabs yourself and with your own hands (crisis option):
Cost of work
If you decide to use the services of an experienced specialist, then you need to know the price/prices for laying 1 m2. the cost may vary, as it depends on the chosen installation method (how much it costs to lay paving slabs must be found out in advance
- Turnkey laying of tiles on a concrete base for square meter– 2100 rubles, for crushed stone – 1650 rubles.
- Laying on a finished base – 400 rubles.
- Laying material on sand – 1400 rubles.
- Laying granite tiles – 1400 rubles.
- Laying a product with a pattern – 450 rubles.
Laying paving slabs is a process through which you can obtain a durable, reliable and practical coating. It is actively used for arranging gazebos, squares, and courtyard areas. The service life of the finished surface depends not only on the quality of the product, but also on precise adherence to the installation technology.
Greetings, my fellow handymen.
Owners of private houses dream of beautiful arrangement your yard. Lawn, beautiful fence, barbecue, and of course - the paths. The simplest option is this, but more quality material is paving slabs, the durability and strength of which I don’t need to tell you about.In this article I will introduce you to step-by-step instructions for laying paving slabs.
This is a rather difficult task, but if you follow simple rules, then in about 5 days you can make a standard private yard, with a little handiwork :)
A few simple and effective advice before starting work, which will subsequently save you a lot of time and nerves:
- To begin with, you need to create detailed plan future work and make markings based on it. Use regular twine and wooden pegs for this. Thanks to these simple steps, you will be able to correctly assess the scope of future work and at least roughly understand how much Supplies you will need.
Usually the site is divided into several zones:
- main entrance to the yard, as well as a parking area
- paths around the house and in the yard
- rest zone
The tiles differ both in size and in the manufacturing method, and each zone has its own
| Purpose tracks | View tiles | Tile thickness | Tile thickness |
| Sidewalk, pedestrian part | Vibrocast | 25-40 mm | sand cushion |
| Road (entry point, parking place) | Vibrocast | 40-60 mm | Cement-sand cushion |
| Industrial | Vibro-pressed | 60-80 mm | Concrete + DSP pillow |
If you have loose or moving soil, then you can’t do without it; in other cases, a TSP - pillow is enough.
2. Choose your tiles carefully. On this moment there are a lot of manufacturers on the market and, unfortunately, not all of them are conscientious: (High-quality paving stones should have good performance properties and will please you for many years)
3. When installing, it is important not to forget about the slope (5 mm is enough) so that the water can drain freely.
4. Before starting work, it is necessary or (if any) to lay all communications.
5. Don’t forget that if it rains, all work must be stopped. The pillow must be completely dry before installation.
Materials and tools
 1. Paving slabs
2.Sand and cement
3. Curb or curb stone
It will be needed not only for beautiful framing of paths or garden beds, but also to prevent the paving slabs from spreading (thanks, Cap!).
4. Level
5. Lace
6. A wheelbarrow, so as not to carry an unbearable burden on your back
7. Broom
8. Buckets and shovels
9. Trowel
10. Rule
1 1. Two long pipes - preferably about an inch
12. Mallet - also known as a rubber hammer
13. Tamper
There is no point in buying an electric rammer, since it is impractical, although you can rent one. In Rostov, such a service will cost about 1000 rubles per day.
But in order not to spend extra money, we’ll make a regular tamper from scrap materials.
Here is one of the variants of handshake:

14.Bulgarian
It is advisable to purchase a stone disc with diamond coating. And don’t forget to wear safety glasses when cutting, otherwise I, of course, understand that two eyes is a bit much... :)
So, we got the tool - let's move on to excavation work.
Preparing the base
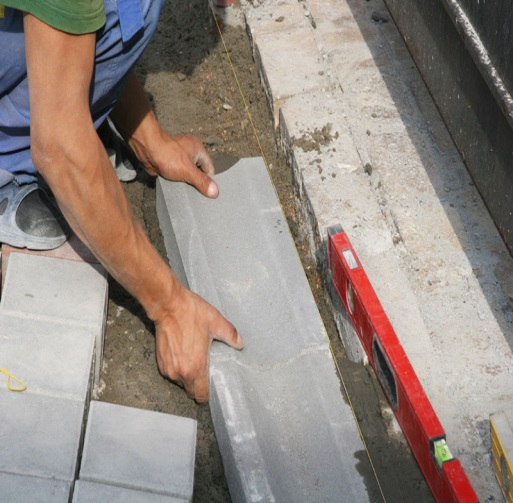
1. Installation of curbs. How to do it correctly - . There is a small nuance here - the fact is that there are handymen who first install the curb and then begin to lay the sidewalk stones; and there are, on the contrary, those who first lay the paving stones, and then the curb. I believe that this is unprincipled - as long as everything is done “in the right way.”
2. In order to avoid the germination of vegetation in the future tiles, it is necessary to lay a layer of geo-textiles. Geo-textiles are laid in two layers - before the gravel and after.

3. Next, you need to deal with the slopes of the site. A slope, even a slight one, must be present, otherwise after rain all the water will remain in place. It is best to make a slight slope towards the street; the street level will be the zero mark.
4. We drive two posts along the zero line (let me remind you: the zero line is the place towards which the water will flow) and pull the string, not forgetting to use a level :)

5. We drive in two more columns, thereby marking the entire area of the site

6. Pull the lace parallel to the posts with the zero mark - only a few degrees higher. We control the process by level.

7. Ultimately, we get a rectangle that covers the entire front of future work.

8. Now it needs to be divided into several strips. We choose the width of the stripes based on the width of your rule. You should take into account the fact that this is not jewelry work and special precision is not required from you, so you can “manipulate” as much as you want!
9. Thus, our plot turns out to be cut into small sections and this is done in order to make our work easier!
10. Then we begin to level our site for laying paving slabs. Everything here is extremely simple - if something sticks out, then we knock the shovel into the teeth.

If there is a hole, then add sand and cement mixture. We make it right on site in a 6:1 ratio (six parts sand to 1 part cement).

The gap between the lace and the ground should be approximately two tiles wide.

11. We proceed to filling the base. We mix our “brew” of sand and cement and begin to spill our marked squares, which then need to be carefully compacted with our “homemade” tamper.

And just like that...
 12. After all the work done, we have an exciting journey ahead of us into the world of crustaceans :) The fact is that almost all subsequent work on laying paving slabs will be done in the “suture” position. Therefore, we put on clothes “a la homeless”, inject a couple of ampoules of diclofenac for prevention and, barely holding back the attacks of flatulence, we continue to work :)
Now we need ours inch pipes. They must be set so that they are parallel to our threads and are strictly at the same height.

By the way, the gap between the tile and the lace should be about a centimeter smaller than the thickness of the tile.

Having installed the metal guides, add a little more sand mixture and insert the rule under the threads, run it through the pipes, leveling the base.

Where we see gaps, add the mixture and repeat the operation. You can compact it with your own hands, and then add a little more cement-sand mixture until you get something like this result.

So, preparing the base for laying paving slabs completed.
Step-by-step instructions for laying paving slabs with your own hands
1. First of all, you need to polish the tiles - a wheelbarrow will help you, paying attention to ensure that there are no defects. The tiles may have manufacturing defects and are best left for trimming.

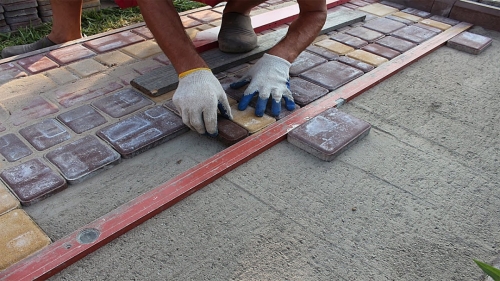
2. The most important thing is to lay the first stone! We align it exactly with the lace.

3. Then we knock him out rubber mallet, achieving the ideal level.

4. We start laying the tiles from ourselves. We follow the pattern and thus soon something similar will begin to appear.

5. In the same way, lay the tiles on the remaining marked squares.

6. If any obstacle appears on your way (a sewer hatch, a pole, etc., etc.), then it is better to go around it with a whole tile, and leave the trimming to the “sweet spot”!

7. In order to lay tiles in empty spaces formed when avoiding obstacles, as well as places in contact with curbs, we use a grinder. The places where the pieces will be placed must also be carefully compacted.
 Grouting paving slabs
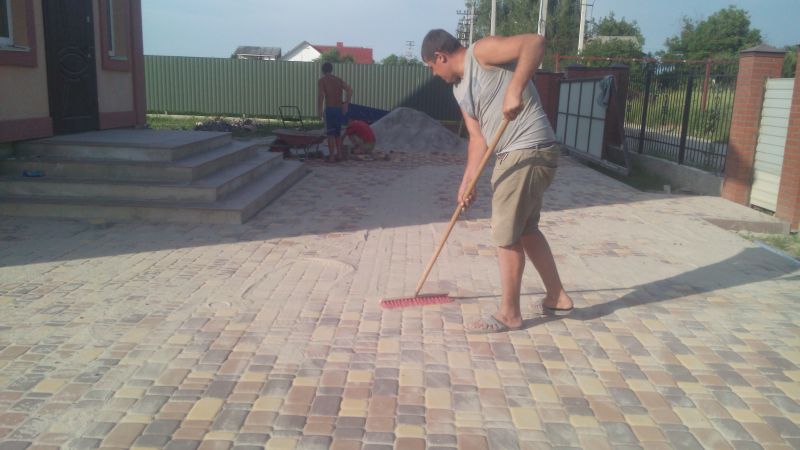
After laying the tiles, they need to be swept to fill the gaps.

You can sweep or essentially fill all the cracks with the same cement-sand mixture, you just need to pay attention to the fact that sometimes “efflorescence” or white spots remain on the tiles. If you don't want to take risks, you can just use sand.

Then all that remains is to thoroughly pour the paving slabs and if the bedding “goes into the cracks”, then you need to repeat the above steps.

IT IS IMPORTANT TO KNOW
Friends, the distance between the tiles and the curb is under no circumstances concreted, and is also filled with TsPS or simple sand.
Step-by-step instructions for laying paving slabs - video
Well, that's all friends. I hope mine step-by-step instructions for laying paving slabs proved to you that not only professionals, but also ordinary citizens can do this, because it’s not for nothing that they say: “The eyes are afraid, but the hands do the work.”
The ideological mastermind and author of this blog, Alexander Alexandrov, was in touch with you.
Subscribe to my blog updates and stay up to date with all the latest construction trends.
How to lay paving slabs with your own hands without any problems so that they last for many years? There are generally accepted recommendations that everyone should follow. In this case, it is not difficult to achieve high quality using a minimum amount of effort.
Material advantages
Paving slabs are considered a popular material that is used to form pedestrian paths and platforms.
Path made of paving slabs
It has numerous advantages:
- a wide selection of shapes, colors, and textures of materials, which allows you to realize any design solution;
- paving slabs are made from environmentally friendly materials, which prevents harm to the environment;
- the coating does not change color or change shape when exposed to high or low temperatures;
- styling street tiles implies the formation of drainage, which prevents the accumulation of water on the surface;
- characterized by high strength to various types loads and wear resistance;
- operation of the finished coating is easy, since caring for it does not cause difficulties;
- Laying paving stones is carried out quickly and does not require the involvement of specialists.
Site marking
At the planning stage, it is necessary to carefully consider where the paving stone paths will be placed and how they will be laid. It is best to draw a site plan, which will allow you to calculate all the required areas.
After calculating the required volume of materials, you should add 10-15% to the resulting number. Laying paving slabs may not be so easy, so a supply is needed in case they are damaged during the installation process.
When planning paths, you should also not forget that curbs are installed along its edges. They should be much thicker than paving stones. The border will help maintain the integrity of the coating and give it a complete appearance.
To lay paving slabs with your own hands, use the following tools:
- shovel (it is advisable to use a shovel and a bayonet);
- rubber or wooden mallet;
- building level;
- Bulgarian;
- a set of spatulas of different widths;
- rule;
- twine or cord;
- roulette;
- Master OK;
- container suitable for preparing building mixtures;
- rake.

A rake will help distribute the material evenly
Preparing the base
Before laying paving stones, you need to take care of. First, markings are carried out on the site by driving wooden pegs along the edges of the paths. A cord or twine is pulled over them.
The resulting site must be carefully leveled. During the work, all high places are removed and holes are filled in. The technology for laying paving slabs implies the presence of a slope (transverse, longitudinal, transverse-longitudinal). When it rains, it will allow water to drain and prevent puddles from forming on the surface.
After leveling the area, it is carefully compacted.

Various types of manual rammers
This allows you to prevent uneven shrinkage of the coating during operation. It must be remembered that all installed structure paving stones will have a thickness of 20 to 30 cm. Therefore, in many cases it is recommended to remove the top plant layer of soil and deepen the coating.
Laying paving stones on a concrete base
Is it possible to lay paving slabs on a concrete base? This must be done if the coating will be placed on soft soils. Such actions will prevent premature destruction of the tracks. You can lay out all the layers of the structure in the following sequence:
- A layer of screed formed from is poured onto the compacted base.
- The surface is carefully leveled and compacted to remove air bubbles.
- It is necessary to lay the curbs, filling both sides with fine gravel.
- Curbs are installed taking into account the fact that they inside there will be paving stones (provide a gap of 2-3 mm).
- Curbs are concreted with a solution prepared using a 1:2 ratio.
- The rules imply the use of cement-sand mortar as glue.
- Wooden spacers are installed in the gaps between the individual covering elements to form seams.
- After installing the entire track, the remaining solution is carefully removed from the surface.

The process of removing mortar residues from paving stones
Application of sand base
How to lay paving slabs on sand so that the resulting coating lasts for more than one year? This foundation is the most successful because it acts as a drainage system. Sand increases the stability of the structure several times and prevents its premature destruction.
How to lay paving slabs correctly in this case:
- A sand cushion 50-60 mm thick is placed over the entire surface.
- The bulk material is carefully leveled with a rake.
- The sandy base is watered until puddles form.
- After 3-4 hours (in sunny weather), the pillow is given the desired shape.
- An ordinary pipe or block is used as a guide profile.
- The pipes are placed at a distance of 2-3 m, and the sand in the interval between them is leveled using the rule.
Laying paving slabs
Installation on cement-sand mixture
How to lay paving slabs correctly if they are expected to be subject to heavy loads? The following recommendations should be followed:
- A sand powder 3-4 cm thick is applied to the prepared base.
- Install reinforcing mesh, which will significantly increase the strength of the coating.
- It is necessary to mix dry fine sand with cement in a ratio of 4:1 (you can buy a special tile composition in the store).
- The finished mixture is leveled on the surface (the maximum preparation thickness is 4 cm).
- To facilitate all operations, guides made from reinforcement bars or pipes are used.
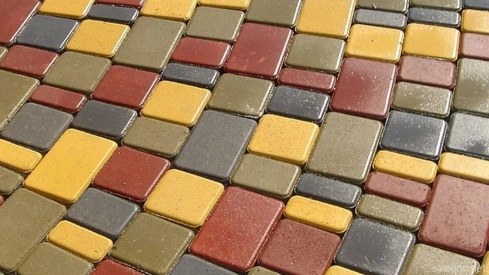
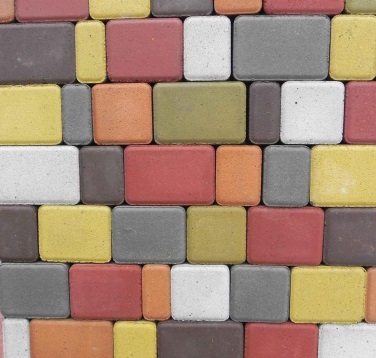
Popular patterns for laying paving stones
How to lay paving slabs to make them look beautiful? There are several popular schemes.

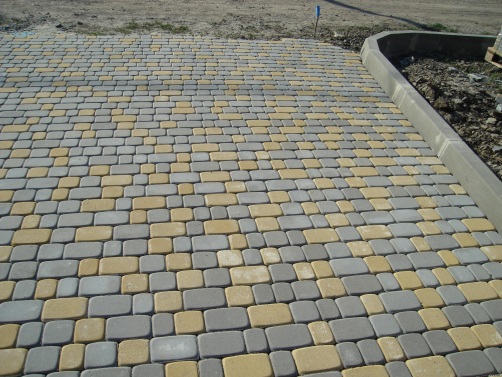
Classic order
For a beginner, laying tile in the yard is easiest using the classic pattern. It involves placing individual coating elements one after another. In this case, it is best to use paving stones correct form– rectangular or square. It is easy to install without professional skills.
To improve the appearance of this coating, it is recommended to use paving stones during the formation of the path different color and textures. In this way, it is possible to implement various design solutions.
Laying scheme “offset”
This technology for laying paving slabs is also traditional. It involves installing individual elements in such a way as to avoid overlapping joints.
To achieve a good quality coating, it is recommended to use paving stones of the same shape. There are no restrictions regarding the color and texture of the material.
Herringbone pattern
You can even lay paving slabs in a “herringbone” pattern, which means installing each element of the covering at an angle of 45 or 90 degrees.

In this case, the paving stones can have a rectangular or shaped shape.
An improved version of the “herringbone” is considered to be “wicker”. It involves alternating longitudinally and transversely placed coating elements. To ensure that the resulting pattern is clear and aesthetically attractive, it is recommended to use materials of only two colors during installation.
Other schemes
There are other ways to lay paving slabs:
- chess order. It is recommended to combine several colors;
- diagonal pattern. The longitudinal seam of the coating is shifted relative to the axis of human movement by 30-60 degrees;
- geometry. We use tiles of the same size, but different colors(various patterns are formed in the form of geometric shapes).

Rules for laying paving stones
It is necessary to start laying paving slabs in the direction away from you. In this case, the coating does not deform under the weight of a person. Laying paving slabs on sand occurs according to the selected pattern. Each element is carefully leveled and fixed with a mallet.
Subsequent rows of covering are also installed maintaining a 2 mm gap. During installation, the evenness of the paving stones is constantly checked. If a defect is detected, the tiles are dismantled and installed again.
After laying the paving stones is completed, they begin to fill the seams. For this purpose, sand or a sand-cement mixture is used.

At the final stage of work, excess grout is removed, checking the quality of filling the joints. They are also thoroughly moistened with water. The seams should be tight, as they take on part of the load.
Some installation nuances
Existing methods of laying paving slabs are implemented in compliance with the following rules:
- installation of paving stones occurs from the lowest point to the highest;
- when installing in a circular manner, work begins from the center of the drawing;
- during operation, check the horizontal level every 2-3 rows;
- when installing paving stones on sand, the gap near the curb is not concreted;
- To better fill the joints with sand, it is recommended to compact the surface with an area vibrator.

Care and maintenance of coating
It is allowed to walk on the laid paving stones only 2-3 days after the final sealing of the seams. To clean the surface of dirt, use a broom or rinse it with a stream of water from a hose. You should constantly monitor the safety of the seams. Over time, sand is washed out, so it must be added periodically.
It is forbidden to clean paving stones with abrasive powders. For this, it is better to use sifted river sand. If necessary, the surface can also be washed with a mild soap solution.
Laying paving slabs with your own hands, the step-by-step instructions for which are presented above, is carried out without any difficulties. The main thing is to follow the recommendations of experienced specialists.
My name is Rostislav, I am 37 years old, and I am a builder with twelve years of experience. I started at a construction site as a helper, like many others. He worked according to the rule: “bring it, serve it, hold it and don’t interfere.” But time has passed - I have grown over the years and professionally, acquired a personal instrument and started working on my own.

My first rule when carrying out any project is to carefully prepare the material and tools to achieve a good final result.
We will talk about the technology of laying paving slabs.
Paving slabs have confidently occupied their niche in decoration personal plots, gradually displacing its direct competitors - asphalting and concreting.
And the most important advantage is the natural drainage of precipitation into the ground, without its retention on the surface.
Before you get started, read this article to the end, because at the end there will be calculations from which we will need to begin preparing for implementation.
So, materials and tools:
Materials
1. Paving slabs.
2. Curbs: road, sidewalk.
4. Cement grade 400.
6. Crushed stone, fractions 5x20mm.
7. Screenings, medium-grained
8. Geotextiles
Tools
1.Hydraulic level.
2. Pegs (wooden or reinforcement).
4.Roulette.
5. Corner Grinder(Bulgarian)
6.Manual tamping or tamping machine.
7. Concrete mixer.
9. Shovel.
10. Rubber hammer, weight 400 grams.
11. Guide pipes 20 – 30mm in diameter.
12.Rule or flat strip 50x50mm
So, when starting work on a site, you first need to carefully calculate the square footage of the area where the work will be carried out. This can be done using a calculator, which
Selection of paving slabs and curbs for the path
It should be taken into account that when ordering or purchasing paving slabs, you need to purchase material that is 5-7% larger than the calculated area, because during laying and transportation, very often chips may appear on the tiles. You also need to take into account the undercuts, and if after installation you have 10-15 pieces left, they may be useful to you in case of repairs or in other unforeseen situations. We will also calculate the footage of curbs and gutters.
I want to focus on why paving slabs “ Old city" This tile has a number of advantages.
Firstly: the tile size is four-component, that is, the set consists of four different sizes.

Using this, we can calculate the width and length of the area being developed as approximately as possible, avoiding cutting tiles as much as possible.
Secondly: tiles have different color scheme. This allows us to take a more expansive approach to the issue of the design project of the territory being developed.
Thirdly: depending on the purpose, this tile has different thickness in the range of 40, 60, 80mm. For example, in areas of the developed territory that are intended only for pedestrians, it is recommended to use tiles with a thickness of 40 mm. Where short-term traffic is expected Vehicle– 60mm. And where the constant load from vehicles and other factors is projected - 80mm.
The tiles are also divided into types according to the manufacturing method: cast, vibro-cast, and vibro-pressed.
Cast- These are tiles prepared by pouring liquid concrete mortar into molds. Without affecting the workpieces by a mechanical process, the tiles are brought to readiness by solidifying the solution in molds under favorable conditions. It is characterized by a low price, but low performance properties - it is afraid of constant exposure to serious weather and mechanical factors.
Vibrocast – involves the same preparation process as cast, but with the use of an electric vibrating table, with the help of which a more compacted texture and composition of the component materials used in the preparation of tiles are achieved during production. At the same time, the amount of water in the prepared mixture for making tiles is much less than that of cast tiles. This affects the operating time during the operational period.
Vibration pressed. Unlike the technologies of cast and vibro-cast tile production, during vibro-compression concrete is compacted not only by vibration, but also by compression. Installations for the production of vibropressed tiles provide vertical pressure on the form with concrete (compression, pressing) and at the same time subject the form to vibration. Due to this, the density of the finished tile is higher than the density of cast or vibrocast tiles. The difference from vibrocast tiles is the amount of water. For vibrocompression, “dry” mixtures with a minimum amount of water are used. The mobility of such concrete is low, so vibration without additional pressing will not force the mixture to completely fill the mold. The minimum amount of water in the mixture for vibropressed tiles increases its strength, abrasion resistance and reduces the ability to absorb water (frost resistance). Strength, abrasion and water resistance are increased by additives and additives.
Curbs also differ in type:
- Road curb. The most popular is a 1 m long road curb. The height and width vary depending on the location of application. To separate roads from sidewalks and lawns, a curb 30 cm wide and 15 cm high is used. At public transport stops, a curb also 30 cm wide and 18 cm high is used.
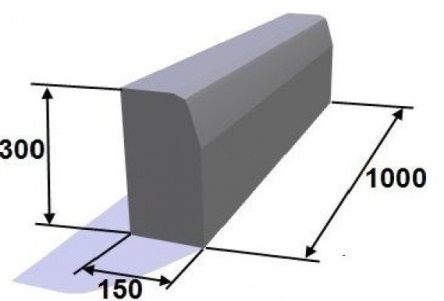
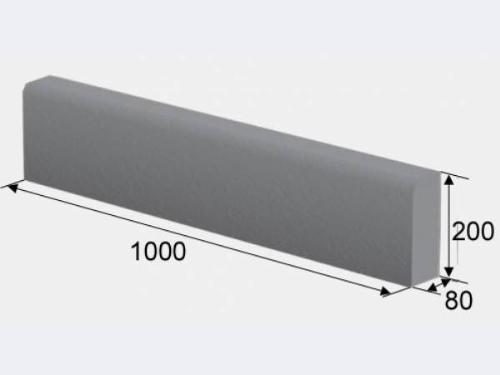
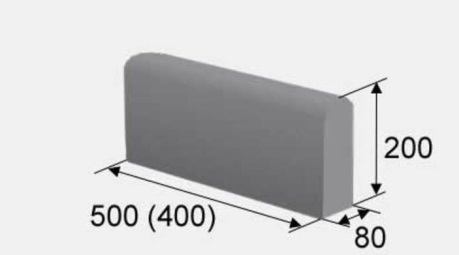
- Sidewalk curb. It has dimensions of 1000x200x80mm, and also 500x200x80mm. It is used for landscaping sidewalks, paths, blind areas, lawns, various sites, and can serve as an element landscape design, encloses structures and gives them a finished look. The most important thing is that the curb is a stop for the road or tiled surface, and it is with its installation that the preparation of the base begins.
Today, the color range of borders is very diverse. In principle, color and even size can be discussed with the manufacturer or supplier when purchasing equipment for the construction site.
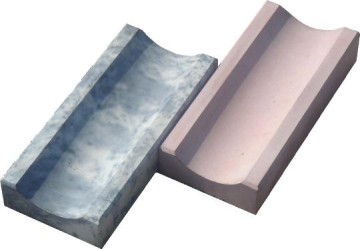
Gutter. The main purpose of the gutter is to drain rain or melt water to drainage well or storm water inlet, and in a simplified version - to the place of discharge. Concrete gutters consist of separate ready-made gutters, and they differ in shape:
- for small ones - open semicircular gutters, have dimensions of 250x160x40mm, 500x200x65mm, and also 340x155x60mm.
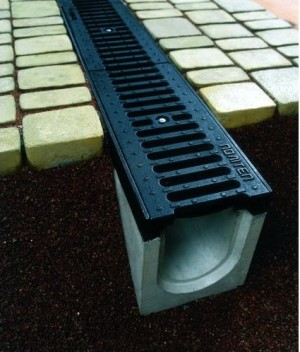
- to in-depth – having in cross section rectangular shape and closed at the top with a lattice. They have dimensions: length -1000mm, width -165mm, and height can be 80,100,165,190 and 215mm.
Open gutters are quite safe and easy to maintain, but in the event of heavy rainfall they cannot cope with the flow of water. Recessed concrete gutters are covered with metal protective grilles to prevent injury and to allow unimpeded passage of vehicles.
The grates protect the gutters from large debris getting inside, but the gutters need to be cleaned periodically.
A concrete gutter can perform an additional function – decorative. Often used when laying sidewalks different types, shapes and colors of tiles. In this case, the drain can become a kind of separator.
Gutters, like curbs, can be matched to the color of the tiles, or vice versa, to highlight certain sectors in the area being developed.
When calculating gutters and curbs, you also need to take into account a 5 percent margin for trimming areas and installation difficulties.
We begin installation work before installation
When approaching a project and having completed all the calculation work, we first carry out a breakdown of the territory. We determine, according to the project plan or the plan agreed with the customer, into which sectors the territory will be divided, which areas need to be allocated in the high-rise plan - that is: areas for gazebos, barbecues, ramps or parapets, slopes, places for gutters and water discharge points. From my own experience, I will say that if the work is carried out on the territory of a private residential sector, then all slopes are arranged at the maximum distance from the buildings, that is, after the work has been done, it should visually appear that the buildings are located above the sidewalk or roadway of the site. This is done in order to remove moisture from buildings as much as possible.
Preparing the foundation
All work begins with preparing the foundation. In the area where the work will be carried out, the top layer of soil is removed in order to remove the root system of plants as much as possible (no more than 40 cm) and go deeper to the depth we need to fill the base under the tiles. You must understand that all slopes on the site must be started when leveling the roadbed. Then the added layers will lie in an even layer, creating and correcting the slope we need. If you are paving the area small area and you have enough strength to remove the required thickness of the layer of soil, you can do this with a pick and shovel. After removing the soil, clean the bottom of the trough to remove tubercles and hummocks. After this, you need to thoroughly compact the subgrade using a tamper or vibrating plate. Without these tools, it is impossible to properly compact the surface of the earthen trough. Laying underlying layers and tiles on uncompacted soil will lead to subsidence of individual sections of the coating.
To find out at what depth we need to remove the soil, we need to drive stakes around the perimeter of the site. If the area is large or has hidden areas, then you need to split one large plot into several small ones - visible. On these stakes, using a hydraulic level, we beat off the “horizon” (I wrote how to do this correctly in the article “Design of an armored belt under mansard roof"). When we have horizontal marks, we determine the slopes of the areas. The slope is necessary so that precipitation does not accumulate in one place, but is diverted away from buildings and pedestrian areas. The most optimal slope is “Road slope”.
Road slope is the slope that is used in the construction of the roadway and is equal to 1 meter = 1 centimeter. That is, the deviation from the horizon at one meter is one centimeter.
Example: if the length of the area is 10 meters, then at the beginning and at the end of the area we hammer in a peg. Using a hydraulic level, we mark horizontal marks, and where we need (at the beginning or end) to lower the area, on this peg we mark down 10 cm from the horizontal mark.

When the slopes and grading are finished, you can begin installing curbs. To do this, in the places where the curbs will be installed, we hammer in guide stakes and set an altitude mark on them, tighten the fishing line or string. This will be the High Altitude Lighthouse.
It should be noted that if the tile area is laid with a slope, then the curbs should be installed with the same degree of slope.
From the elevation mark down, we mark the height of our border, plus 10 cm for the bedding and concrete on which the border will be installed and, if necessary, remove excess soil. Next, we prepare the base, tamp the bottom, sprinkle it with crushed stone in a 5cm layer, and tamp again. Preparing concrete. The concrete should be thick, prepared in a ratio of 1/3. One portion of cement and three portions of sand and crushed stone. Evenly, with a shovel, on top of the compacted crushed stone, apply concrete along the entire length of the curb, in an approximate layer of 6-7 cm, and install the curb so that the top of the curb is along the line, touching.
So, when all the curbs are installed and the concrete has begun to set, we begin installing the gutters. In principle, the technology for installing gutters is almost the same as installing curbs. We agree on the place where the water will drain, take it as the lowest point and, using pegs and a hydraulic level, make markings for the installation of gutters. It should be remembered that the top of our gutter is already the top of the future tile. The gutters must be placed very carefully under the fishing line, since the slightest failure at the junction of the elements will lead to inhibition of water drainage and subsequently to freezing of ice and destruction of the concrete elements of our site. Sidewalk gutters must be connected to the pipes of the drainage system of buildings on the site, since during rain or other precipitation the roofs of buildings have a large area for water intake, and when water flows from the roof, it will first wash out the tile seams, and in the autumn - spring period the freezing stage - freezing will destroy concrete elements. For safety reasons, meter-long gutters should be covered with a special grill, which is included when purchasing gutters.


Rolling out geotextiles for paving slabs
The next stage of our work is rolling out geotextiles. Geotextiles are roll material. As a material, it has recently appeared on the market, but has very useful functions. With the help of geotextiles, we prevent the appearance of weeds, which with their roots destroy the structure of the base under the tiles, prevent sand from being washed out, and protect from ant holes and other beetles and insects. Geotextile is also a drainage material in our design.
It rolls out very simply, directly onto the ground surface - where the tiles will be laid, with an overlap of 15 cm over the previous section, and with small vertical flaps. As a rule, 10 - 15cm. Immediately sprinkle with a small layer of sand.
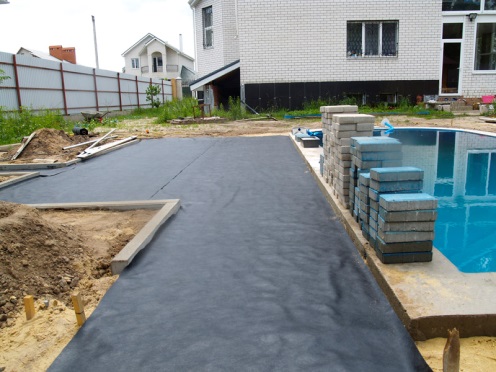
Installation of sand and crushed stone base for paving slabs
Using a wheelbarrow and a shovel, scatter sand over the rolled out geotextile. Layer thickness 4-6cm. We compact it using a hand tamper or vibrating plate. Large areas It is better, of course, to compact using a vibrating plate, since it not only compacts, but also levels the surface of the area. You need to compact so that there are 5 blows or passes of the vibrating plate in one place.
When the sand is leveled and compacted, we lay a layer of crushed stone with a fraction of 5 – 20mm. The thickness of the crushed stone layer should be 15cm. This is quite enough for sidewalks and pedestrian areas with average traffic. Crushed stone also needs to be compacted, and as practice shows, manual compaction is ineffective here; a vibrating plate is better. When compacting crushed stone, it is recommended to do the so-called “unclinging”. Decluttering is a mixture of dry sand with screenings in equal parts. That is, we take sand and screenings in equal proportions and use a concrete mixer to mix until homogeneous, and when the vibrating plate has filled one pass over the entire area, we take a shovel, scoop up the mixture and spread the mixture over the area with a fan. Thus, sand and screenings clog all the cracks that form on the surface of the crushed stone base. After declinging, we go through it again with a vibrating plate. Vibration and pressure will help the decluttering mixture sink to the bottom of the crushed stone cushion. We repeat these operations until the lining mixture lies in a thin layer on the surface of the crushed stone base. The final stage of preparing the base is watering it with water from a hose. You need to pour thoroughly and using the “falling water” method, lifting the tip of the hose up. After watering, tamp again. If the preparation is done correctly, the base becomes level and dense.
If there is asphalt concrete on the site where we are going to lay the tiles and it is not of poor quality and visually there are no dips or bumps, and we are satisfied with the hydraulic level height, then we can assume that our preparations are ready, the tiles can be laid using only a leveling screening layer of cement.
And yet, sand and crushed stone base is used only on sidewalks and pedestrian areas. In places where there is traffic and constant heavy load, paving slabs are laid on a prepared concrete base.
Getting ready to prance
Gartsovka is a dry mixture of screenings and cement in a ratio of 1:3. One part cement and three parts screenings, without adding water.
On the compacted surface we make markings for the top of the tile. To do this, we hammer in pegs, in pairs, at the beginning and end of our site and stretch the fishing lines along the visual top of the tile. When this operation is done, lower the fishing line down to the thickness of the tile, minus one centimeter. For example: if our tile is 6cm thick, then we lower the fishing line 5cm from the level of the top of the tile. Do not forget also about the longitudinal and transverse slope. We check all slopes with a building level, touching the line or with a hydraulic level. We set up our lighthouse pipes along these lines. It is advisable to choose a round pipe - this makes it easier to position. The pipes are placed at a distance from each other so that our rule applies to the pipes with a margin of length. For example: if our rule is 2 meters long, then the pipes are placed at a distance of no more than 1.7 meters from each other. We backfill the pipes where the pipes will lie, lay the pipes so that the top of the pipe touches the fishing line. Then, using a wheelbarrow or shovel, we fill the space between the pipes with a prance and usually pull it towards ourselves, so that the prance stretches out in an even layer over the entire grip.
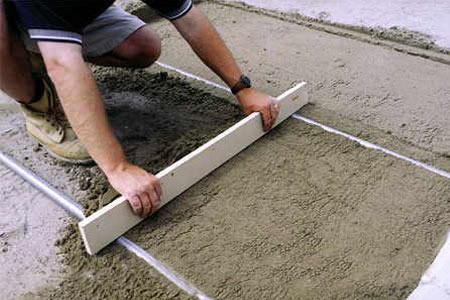
If we are making paths that are no more than 1.5 meters wide, we can use a wide one, but flat board, having previously cut grooves in it for the border to the thickness of the tiles being laid. In this situation, the use of pipes is not necessary.
After aligning the trample with our grip, it is necessary to compact it using a manual tamper in one pass, without removing the pipes. The garter will immediately thicken and show the gaps where you need to add more. Using a shovel, we make a bedding and pull it together again
rule. And we ram it. We repeat this operation two to three times until a perfectly flat, compacted area is formed on our grip. Only after this do we take out the lighthouse pipes and fill the grooves after the pipes. Compact with a rubber hammer and level with a trowel.
Important point: When preparing the leveling layer of the tile, you need to use the entire prepared mixture, that is, lay, tamp and lay the tiles. Since the prancing consists of cement and screenings, and the screenings have a certain degree of moisture, the cement reacts with this moisture and a ready-made prancing left, say, for tomorrow will no longer perform its functions.
Laying paving slabs with your own hands
Paving slabs "Old Town" have an advantage when laying in that it has different design. That is, there are a lot of design and styling options. But the process itself has some rules. Firstly: the evenness of the seams. Every three to four rows, check the direction of the seam with a stretched fishing line; if necessary, straighten it with blows of a rubber hammer. Secondly: flatness on the plane. Also, every three to four rows, take a level or rule and apply it on top of the laid tile and look at the bottom gap. It should hit the minimum, if this is not the case, then we will also trim it with hammer blows, only from above. And thirdly: when laying tiles, each one should be tapped a little with a hammer. This provides additional compaction of the underlying layer of the garnet.

At the beginning of the article I gave information that the calculations will be at the end. So, when we start working on paving slabs, we ask ourselves the question: to what depth should we remove the soil and prepare the base? So, now we can calculate it. To do this, we need to know the “anchor points”, the thickness of the tiles, the features of the territory (where there will be garden paths, platforms, and most importantly - the races).

Anchor point – These are places on the territory where the top of the paving slabs must coincide with the elements of the building on the territory. For example: the threshold of a house, the bottom of a step, the bottom of a dedicated area, etc.
When we have all this data, we summarize the construct: the thickness of the sand cushion, plus the thickness of the crushed stone base, plus the thickness of the bedding, plus the thickness of the tiles. The thickness of the tile can be taken minus one centimeter. This centimeter is compensated when compacting the laid tiles with a vibrating plate. It must be taken into account that the thickness of the tiles may vary throughout the area, depending on the technological purpose.
So, when we have the tiles laid, if there is trimming , (trimming is places where a whole tile does not fit) Then we perform the trimming using a grinder with a diamond-coated disc, not forgetting about personal safety equipment (goggles, gloves), and sprinkle the finished areas with sand. The sand must be dry, finely calibrated and clean. Using a broom or garden brush, distribute the sand along the seams so that it fills the seams as much as possible; we do not sweep away the remaining sand, but leave it in an approximately even layer on the tiles.
Tamping tiles
And the last stage is the compaction of the finished areas using a vibrating plate. The vibrating plate must have a rubber sole, which comes complete with the vibrating plate, otherwise the metal sole can simply destroy the elements of our work. If the preparatory base for the tiles is well compacted, one pass of the vibrating plate over the area will be sufficient. At the same time, the sand that we swept into the seams will sag a little and become compacted. Here the sand that we left on the square will help us, especially since it is well high. After compaction with a vibrating plate, the tiles are leveled over the area, sag slightly, and compacted into a single monolithic platform. After this, we sweep the sand over the area again, but now we sweep away the remaining sand so that the pattern on the area gains brightness.
Paving slabs are valued for their practicality, high strength, durability, resistance to moisture and temperature changes. It does not emit substances harmful to humans when heated, like asphalt pavement. The variety of shapes, sizes, colors and textures of road building materials is amazing. By combining different types of products, you can create beautiful coatings. Laying paving slabs requires strict compliance with all construction regulations. If paving technology is violated, the coating quickly collapses.
It can be vibrocast or vibropressed. Products differ in manufacturing technology. Vibro-cast elements are created by compacting the solution on a vibrating table. During the manufacture of a vibrocompressed product, the mixture is subjected to pressure and vibration. Vibropressed products have higher strength. The tiles are made from concrete mixture and clay. Screenings of granite rocks and plasticizers are added to the composition. Granite tiles are the most durable. It is made from natural granite.
Products can have diamond-shaped, hexagonal, rectangular, square and wedge-shaped shapes. Popular shaped materials are “Wave” (with wavy edges), “Clover” (with semicircular protrusions) and “Bone” (reminiscent of a coil). There are many ways to lay diamond tiles (hexagons, snowflakes, stars). From diamonds you can create a coating with a 3D effect.
For creating garden paths near the cottages and country houses purchase vibro-cast tiles 40 mm thick. Vibration-pressed products can be laid on roads with heavy loads (squares, sidewalks). They must have a thickness of at least 60 mm. If you plan to install it outdoors on the roadway, it is better to use granite tiles. Material with a thickness of 70-80 mm can withstand heavy traffic of passenger vehicles. If trucks will drive on the road, the coating thickness should be 100 mm.
Before purchasing, you need to evaluate the quality of the tiles. There should be no holes, nicks or chips on its surface. When you tap the tiles against each other, a ringing sound. If the sound is dull, you should refuse to purchase the product. You should not buy brightly colored products, as well as those that have voids. To estimate the density of the material, you need to ask it to be broken. It is necessary to find out how smooth the surface of the product is. If the paving slabs lie flat on the table with all corners and do not wobble, they are of high quality.
Laying options
Before purchasing paving slabs, you need to choose a laying option. On straight and level sections it is easiest to perform a linear diagram. This technology for laying paving slabs is the simplest. It allows you to use material economically.
Linear layout can be horizontal, vertical, straight or offset. When the rows are shifted, the coating pattern resembles brickwork. If you use the products different shades, you can get a “crawler trail” effect. Rows of tiles are sometimes placed at an angle to the path line. This installation is called diagonal.
If a diagonal-corner layout is used, a herringbone or braided pattern is formed. To lay the herringbone pattern, the rows of tiles are placed at an angle of 45° to the line of the path. The “wicker” is paved by alternating horizontal and vertical laying. The diagonal-corner pattern is highly durable. It visually reduces the space.
Tiles can be laid in modules of 2-3 elements. Combining 2 colors creates a checkerboard pattern. If you use elements different sizes and shade, you get an original chaotic pattern. On local area The spiral layout looks beautiful. To create decorative circles, you need to purchase material with wedge-shaped elements. Artistic layout is made from products of different shapes and colors. When choosing methods for laying tiles, you need to take into account the design of architectural buildings and garden areas.

Required materials and tools
To perform installation work, you need to purchase the following tools:
- Bayonet and shovel shovels for excavating soil.
- Rake to level the surface bulk materials.
- Pegs and rope for marking the area.
- Rubber hammer for leveling the material (wooden mallet with rubber head).
- Construction level (1.5-2 m).
- Roulette.
- Brush or broom.
- Stamping.
- Rubber spatula.
- A level bar for leveling the surface of the layers.
- Grinder (diamond-coated disc).
- A crowbar to dismantle paving slabs.

You need to prepare curbs, sand, crushed stone (fractions 10-20, 20-50) or gravel, plaster mixture or cement (M400, M500). To strengthen the foundation of the coating, you will need a reinforcement grid with cells of 10x10 or 8x8 cm. A laying machine will help to create a coating over a large area.
Marking future paths
To correctly lay out the tiles yourself, you first need to make markings. You need to start work near a building, fence or gate. Near the structure you need to hammer in 2 pegs. The distance between them should correspond to the width of the track. It is better to adjust the width of the coating to the size of the product so that you do not have to cut the material. Since the structure will be supported by curbs, it is necessary to leave space for them (10 cm on each side). The other 2 pegs are driven near another building. 2 ropes are pulled between the pegs.
Laying street tiles over a large area is carried out after dividing it into strips 1-1.5 m wide. If the road has bends, it is divided into small sections. Each section is marked separately.

Excavation and protective layer
Volume earthworks depends on the type of soil. If the soil is dense and clayey, it is enough to remove a layer 15-20 cm thick to remove plant roots. When the soil is loose, it is necessary to remove a layer 30-35 cm thick. If you plan to lay paving slabs in winter, the paving trench must be prepared before the cold weather.
Sand is poured onto the surface of the trench. The sand is compacted together with the soil. To prevent plant seeds remaining in the soil from germinating and destroying the coating, a non-woven fabric is laid at the bottom of the trench. The strips of material should overlap each other by 15-20 cm.

Drainage device
Proper installation of tiles does not guarantee the durability of the coating. Ground and rainwater particles of sand and soil are gradually washed away, destroying the base of the road. To prevent moisture from damaging the coating, it is necessary to drainage layer.
You need to pour crushed stone at the bottom of the trench. The layer thickness should be 15-18 cm. The crushed stone must be well compacted and leveled. A thin layer of sand is poured on top and also leveled, on which a non-woven fabric is laid. Care must be taken to ensure that water flows to the edges of the path. For this purpose, transverse and longitudinal slopes are made. The cushion under the paving slabs is performed at the last stage preparatory work.
Placement of boundary borders
Laying the curb is carried out immediately after completing the drainage work. It is better to use a ready-made concrete curb. Curb blocks are installed near the vertical cut of the soil along the edges of the road. It is desirable that the top edge of the border is 1-2 cm above the soil level. Otherwise, the paths will be constantly dirty.
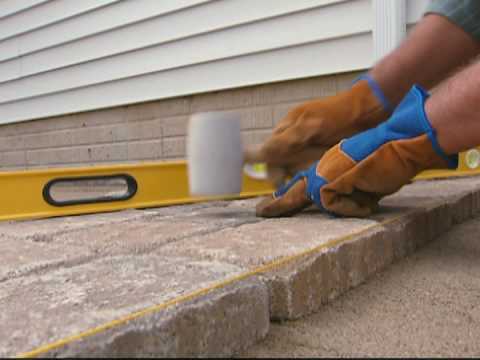
Curb blocks are secured concrete mortar. After laying the curb, you need to check how even it is. To do this, use a building level. If some blocks are installed incorrectly, their position is corrected with a wooden mallet.

Types of bases used
Before you lay out the tiles, you need to make a base. The underlying layer helps to level the surface of the area. It gives the coating stability and increases its strength. Solid foundation prevents the sidewalk from collapsing under the weight of people and cars. It protects the coating from destruction in autumn-winter period when ice forms in its gaps.
The technology for laying paving slabs depends on the method of use of the coating. If the load on its surface is small ( footpath), it is enough to make an underlying layer consisting of sand and cement. If paving is carried out under a car, a concrete base is required.
Concrete
Before concreting the base, reinforcement work is carried out. Reinforcement mesh placed on metal or stone stands. The reinforcement should be 3-5 cm above the surface of the trench. The lining for paving slabs is prepared from sand and cement in a ratio of 3:1. It is better to use washed river or quarry sand. It should not contain particles of clay or lime. The solution is evenly and carefully distributed over the trench area to achieve a smooth surface.
It is better to fill the entire path with concrete at once. If part of the work is postponed until the next day, the area filled with concrete must be covered with polyethylene. The concrete base for paving slabs should have a thickness of 10-12 cm. In order for the cement pad to be strong, it must be moistened for 3-5 days. After moistening, the concrete is covered with polyethylene. The coating can be laid after 7-12 days.
From sand and cement
The trench is filled with a mixture of sand and cement. It is prepared in a 3:1 ratio. The thickness of the sand-cement base should be 12-15 cm. The underlying layer must be well compacted and leveled. If the depth of the trench is too deep, it can be reduced with sand. Sand is poured under the base and compacted thoroughly.
The technology of paving with paving slabs requires that the cement-sand mixture be dry. Therefore, it is better to make the base immediately before paving in dry weather. The cement-sand layer must be laid on geotextiles. If this is not done, the sand will quickly wash out and the tiles will sag.
Treating tiles before laying
Before installation, the tiles must be treated with a hydrophobic solution. The product will increase the frost and moisture resistance of the material, and also increase its service life. Water repellents improve decorative qualities and protect against fungal microorganisms. Salt stains do not appear on the surface treated with a hydrophobic solution. The material is immersed in a hydrophobic composition and then dried. The procedure is repeated.
During processing, you need to carefully inspect all elements. Products with defects should be set aside. When you need to cut paving slabs to form corners, the defective elements will come in handy.

Laying work must be carried out under suitable weather conditions. The weather should be dry and windless. Do not lay the coating on a sand-cement base when sub-zero temperature. When the soil freezes, it expands and when it thaws, it sags. If you lay the coating on frozen ground, it will collapse after it thaws. The rules for laying paving slabs allow you to carry out work on a concrete base during frost, but it is not advisable to do this.
Installation
Paving slabs on a concrete base are fixed with cement mortar. The seams are completely filled with the mixture. In this case, the thickness of the seams should not exceed 3 mm. When laying elements, you need to be on the surface. You cannot step on the base. After laying each row, you need to check the quality of the work performed at the construction level. Elements that are laid incorrectly are leveled with a rubber hammer.

It is necessary to lay it on a cement-sand base, driving each element with a wooden mallet. The material must be securely fixed to the base. If the product “falls through,” you need to pour a layer of sand under it. The gaps between the tiles are filled with mixture or sand. After completing the work, the coating is moistened with a hose and sprayer. If the mixture “sags” in the gaps, you need to pour a little more mixture into them. You can use the coating after 2-3 days.
The seams of paving slabs are sealed using sand, cement or concrete mixture. If sand is used, it must first be sifted. The cement mixture is prepared from cement and sand in a ratio of 1:5. When preparing a concrete mixture, cement is mixed with sand in a ratio of 1:3. Sand and mixtures must be dry. The grout is laid out using a rubber spatula. The level of the mixture in the gaps should be from 1/2 to 3/4 of the height of the tile. Excess mixture is swept off the surface with a broom.
After this, they begin to fill the seams. When the mixture hardens (after 1-3 days), pour the mixture into the gaps and moisten it again. After the composition has dried, the procedure is repeated a third time. You may have to add the mixture to the seams a few more times. You can finish the work when the mixture in the gaps is flush with the surface of the tile.