The heating system is necessary in order to provide maximum comfortable temperature in the house, which depends on many factors. These include the method of laying pipes, the number of radiators, the total length of the system, the area of the house, etc.
This means that the system is selected individually for each home, so many people wonder how to properly connect the heating battery?
Connection methods
There are ways to connect heating batteries with your own hands, which can often be found in private homes:
- Unilateral. It consists in the fact that the supply pipe and return pipe are connected on one side to the first section: the direct pipe is connected to the upper part, and the return pipe to the lower part.
In this way, all radiators are heated evenly. However, it is recommended to use this connection when there are many sections or in tall buildings with a parallel connection; - Saddle and bottom connection ideal for systems in which the pipes are hidden under the floor. In this case, both main pipes are connected to the branch pipes of the opposite sections in the lower part. This method is ineffective, since power losses are within 15 percent;
- Diagonal. Used when available large system heating supply with a corresponding number of sections. This connection method produces uniform distribution of the coolant and maximum heat transfer from the devices.

Place for connection
In principle, the connection of the heating battery should be carried out in a certain place, where it is possible to create protection from the access of cold air from the street and at the same time heat the room well. This is why radiators are often located under window sills.
At the same time, it is necessary to maintain a certain distance from the device to the wall - approximately 5 centimeters, and to the floor - 10 centimeters. If you follow these recommendations, then warm air from the radiator will create a kind of thermal curtain.
Important. The window sill should not obscure or block the radiator, because this will significantly reduce the efficiency of heat generation.
In some cases, radiators are covered with a screen, usually this is done when they become very hot.
Main types of heating systems
Today, there is a connection for heating radiators in a private house using two heating systems: one-pipe and two-pipe.
- In the first option, water enters the pipes from above (the tank is located on the hill) and thus spreads through the pipes.
This is a fairly common system, but with this option there is no way to regulate the temperature, since this requires additional options. - The second option is that warm water flows through one pipe, and cooled water flows through another. In this case, the batteries are connected in parallel.
This scheme for connecting heating batteries is common in cottages and houses. It is characterized by the same temperature of all radiators, and temperature control is carried out in the supply pipe using a thermostat.
In any case, heating radiator connection diagrams can be designed vertically or horizontal system. In the first, heating devices are connected to a vertical riser, and in the second, they are connected to horizontal pipelines.
Any scheme for connecting a heating battery can be carried out by connecting pipes with an energy carrier to the radiator through the bottom or side.

Radiator structure
Usually a standard heating device consists of the most heating element(radiator) and additional parts as shown in the figure below.

In this case, installation is carried out when a thermostat is needed in the heating system. Since many people connect heating batteries with their own hands, this diagram will be interesting for them.
But before you understand and determine for yourself how to properly connect heating batteries in your particular case, you need to familiarize yourself with a variety of videos and photos in our website gallery. They will tell you in detail about the pros and cons of a particular system, and will also help you choose pipes and other additional elements.
Naturally, it is better to start installation in the warm season, so that later in the cold season you will not be left without heating. Therefore, prepare everything in advance, buy everything in order to quickly carry out all the necessary work.
The big advantage is that the connection diagram for heating batteries in a private house can be very different, and you are not within certain “technical” limits.
Advice!
When replacing batteries, do not forget to install a Mayevsky valve, with which you can easily bleed air from the system.
And so that the room does not become too stuffy, a valve is installed that partially or completely shuts off the heat supply.
Shut-off valves
Everyone understands that shut-off valves play when connected important role, since it not only provides water supply, but also distributes the coolant throughout the radiator. Control and shut-off valves are placed on the return and supply pipes. Shut-off valves are necessary to cut off the water supply to the battery in order to replace or repair it.

Connecting a heating battery with a bottom connection may not imply the installation of a bypass and adjustment devices. Shut-off valves are provided in most two-pipe systems with lateral or diagonal connections. Typically, the instructions require that you always provide easy access to shut-off and control elements, even if the radiators are closed.
Battery selection
This is an important stage in building heating, because the material from which the radiators are made directly affects their heat transfer, and, accordingly, the temperature in the room. You must also correctly calculate the number of sections in the room.
Based on the material from which the batteries are made, they can be divided into:
- Cast iron;
- Bimetallic;
- Aluminum;
- Steel;
- Copper-aluminum.
Aluminum batteries have a power of one section of about 192 W, and operating pressure– 16 atm. They have good heat dissipation and fast heating. Used in autonomous and central heat supply options.
Their main disadvantage is that they are sensitive to the composition of water, so they are very quickly damaged by internal corrosion. Also, these devices are subject to sudden changes in pressure in the system.

Cast iron batteries have a section power from 79 to 160 W, and a pressure from 10 to 15 atm. They can operate at high coolant temperatures - up to 150 degrees Celsius. Their minus is their heavy weight, but their plus is simple installation and resistance to various pressure changes.

Bimetallic radiators have a power of about 200 W and a working pressure of about 35 atm. They have a steel core and an aluminum body. Often such batteries are used in offices or apartments with central heating.
Their advantages: lightness, practicality, resistance to the internal environment, high heat transfer. The downside may be the higher price compared to others.

Important!
Even if you choose the right battery and calculate the correct number of sections, you should know one piece of advice - the better thermal insulation your home, the higher the efficiency of your system.
Conclusion
Installing heating elements is a crucial step towards creating an efficient heat supply. To carry out this work, you need to calculate everything down to the smallest detail and consult with several specialists.
The installation of a heating system (hereinafter referred to as CO) in a separate apartment or in a private house is carried out by connecting heating radiators to the main line supplying hot water coolant from an external heat source. In standard cast iron, bimetallic or aluminum batteries There are threaded sockets at the ends of each section for assembly connections between each other or for connecting coolant supply and removal pipelines. The figure shows a traditional cast iron radiator with the top and bottom end sockets plugged.
Cast iron heating radiator
To properly ensure the tightness of the connection steel or polymer pipe thermal wiring to the battery, welding and threaded connections are used. The photo shows a section element cast iron radiator with a fitting for a threaded connection method.

Fitting for connecting the heating distribution pipe to a cast iron radiator
Coolant circulation through radiators
Heating of the room in which the heating radiator is installed is carried out according to the following principle:
- the coolant water heated to the required temperature is supplied through a single-pipe or two-pipe piping system to one of the end sockets of the radiator, intended for the inlet of hot liquid in accordance with the selected connection diagram for heating radiators in this house or apartment;
- the coolant supplied to the input of the heating battery circulates through all its sections, giving off the brought heat to the material of the radiator walls;
- the walls of the radiator, heated from the inside, radiate heat from the outer surface into the surrounding environment, thereby heating the room;
- the coolant, which has thoroughly cooled down inside the radiator when passing through its sections, leaves the battery through the upper or lower end socket, designed by the selected connection diagram for the outlet of the cold coolant;
- The cooled water leaving the radiator is carried through the outlet pipeline (commonly called “return”) to the heat source for subsequent heating and passage of the next circulation circle.
The presence of four input/output sockets at the ends of the mounted battery (two on each opposite side) predetermined the existence of several options for the movement of hot water inside the radiator, depending on how they are connected. With any fluid circulation scheme inside the volume of batteries assembled from 6-8-12 or more sections, there is an uneven distribution of heat flows both in height and along the battery. The figure shows a thermogram of a cast iron radiator with bottom supply. The temperature spread in height or length can reach 10 degrees.
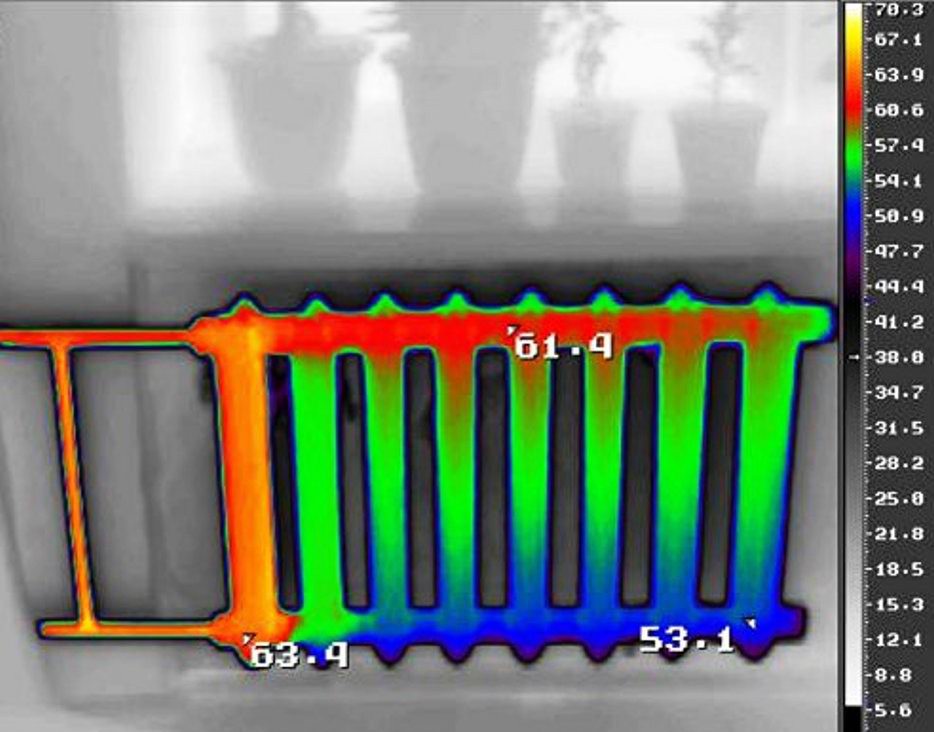
Thermogram of a cast iron radiator with bottom supply
In reality, the temperature spread is much greater, since scale and lime deposits settling in the lower cavities of the sections prevent the passage of hot water at the bottom of the radiator. The hot coolant immediately rushes through the free upper ducts to the exit, without even washing the distant sections. In fact, the temperature of such clogged sectional areas remote from the entrance can reach only 25-30 degrees.
The efficiency of each heating device individually and the entire heating system of the house depends on the connection diagram of the heating radiators, which determines the route of movement of the coolant inside the assembled sections and affects the intensity of hot water circulation when it washes the internal surfaces of the sections.
Coolant supply systems
Organization of heating in a private or apartment building carried out by installing single-pipe or two-pipe water coolant circulation systems.
Single-pipe heating circuit
In a single-pipe version of the home heating system, the water coolant is supplied in series to the connected sectional batteries. This option eliminates the division of the main heating main into hot water supply and cooled water return circuits. A closed single-pipe circuit encircles the entire house along the corresponding trajectory of the heating main. The picture shows circuit diagram single-pipe heating option for a two-story house.

Schematic diagram of a single-pipe CO system for a two-story house
The scheme works as follows:
- the hot water coolant comes from the heat source (in this case, the boiler, in other cases, the main heating main) through the pipeline (red lines in the diagram) to the sectional radiators;
- red arrows mark the branches of the movement of hot water supply to each battery separately;
- in batteries, the hot liquid gives off the heat it brings to the walls of the battery sections and, already cooled, leaves the radiator;
- blue arrows show the movement of cold moisture along the outlet branches of the pipelines towards the vertical section of the main line, which returns the coolant to the main heating main;
- cold water goes to a centrifugal pump (or pump group) to repeat the circulation.
Serial connection of heating devices condemns radiators to unequal temperatures of heating radiators not only on all floors of the building, but also in each apartment, since the coolant gradually loses its initially obtained temperature as it passes through each heat consumption point.
Two-pipe heating circuit
In a two-pipe heating system two independent pipeline branches are used:

Schematic diagram two-pipe system heating
- Hot coolant is supplied through one pipeline (red line);
- another pipeline receives cooled coolant (blue line).
This scheme ensures uniform distribution of hot coolant across all heat consumption points. The main advantage of a two-pipe heating heating system over a single-pipe scheme is:
- possibility of control and adjustment temperature regime in each separate room;
- possibility of repairing each heating device without stopping the entire CO.
When comparing heating systems, one should take into account the fact that for a two-pipe system there is no need to supply hot water at a high pressure at the inlet. In a single-pipe CO system, in order to uniformly heat the radiators throughout the entire circuit, high pressure must be pumped, which leads to emergency leaks in the network and equipment wear.
Supplying coolant water to radiators
An unambiguous criterion that determines how to correctly connect the battery to the heating main with hot water, it is impossible to work out. Manufacturers heating radiators filled the market with devices with different schemes placement of inlet sockets for supply and exit of coolant. Architectural and planning considerations contribute to the motivation for choosing a method for installing batteries and connecting them to the riser.
In many cases, the concept of “correctly connecting the batteries” means hiding all pipeline communications as much as possible in the floor or walls, without delving into exactly what method - diagonal or other method - the connection will have to be made. Models are available that allow you to connect pipes not only from the sides, but even from the bottom, using compactly located pipes (in modern products the distance between them is only 50 mm).
The only criterion that allows you to objectively assess the effectiveness of the connection according to the chosen scheme is the ambient temperature in the room. A comfortable microclimate in a house or apartment directly depends on how correctly the number of sections of each heating device is determined, and on their heat transfer, the level of which can be varied by the way the wiring pipelines with batteries are installed.
Connecting radiators to the heating main is carried out according to several schemes, among which the most common are:

Diagrams for connecting heating radiators to the main network
- pos. (a) – lateral one-sided connection;
- pos. (b) – diagonal connection;
- pos. (c) – lower scalene;
- pos. (d) – bottom connection; the figure shows options for connecting to a single-pipe and two-pipe CO system.
In the diagrams, red lines and arrows show the movement of the hot coolant, blue lines and arrows show the direction of the cold (cooled) coolant.
Features of connection diagrams
- The lateral one-sided location of the coolant inlet and outlet is popular in high-rise apartments as the most convenient for installation with the accepted vertical passage of heating risers. Best heat transfer achieved when hot water is supplied to the upper pipe and cooled liquid is discharged from the lower pipe (pos. a in the figure).
Heat transfer parameters for lateral decoupling are taken as a basic standard when compared with other schemes (diagonal, bottom and their variations). The heat transfer of circuit (a) is taken as 100%. In addition, when calculating the power of heating devices, a correction factor is introduced that increases or decreases the calculated values. For radiators with side connections, we agreed to take K = 1.0. For diagonal connections K = 1.1-1.2, for lower connections the coefficient varies from 0.7 to 0.9.
When hot water is supplied to the lower pipe, heat transfer decreases from 5 to 10%.
- A correctly connected diagonal connection involves supplying hot liquid to the upper pipe on one side of the battery and draining cold water from the lower opposite (diagonally) fitting (item (b) in the figure). The circuit is most efficient in multi-section batteries; its heat transfer is equal to 102% of the same parameter of the reference side decoupling. Diagonal connection is better than other schemes in ensuring uniform heat distribution over the radiator area.
- The lower versatile connection is realized by supply and return connections in the opposite lower end pipes of the radiators (item (c) in the figure). Compared to the side circuit, heat loss is 20-25%. But this scheme suits many owners due to the possibility of connections with main pipes hidden under the floor. Most often used in private buildings.
- The lower connection through adjacent pipes is similar in performance to the previous diagram. Its use is caused by architectural considerations, when all communications are recessed into concrete screed floor or under a false floor.
Video about schemes
Options for connecting heating radiators are discussed in the video below.
Understanding the Features in various ways connecting the heating main to heating devices will allow the most efficient use of every square centimeter of the heat transfer surface of the heating radiator.

The battery does not heat well due to an error in choosing the connection diagram
Otherwise, instead of a heater, the owners will receive an ordinary piece of furniture, and they themselves will freeze all winter. The figure shows the heat distribution in a battery with an incorrectly selected connection option.
In contact with
One of the most important factors of comfort in a home, especially in winter, is warmth. This can only be achieved by a well-designed heating system that is both efficient and economical. Achieving such a balance will only help the right approach to choosing the optimal heating system scheme for a particular room and correct connection batteries Otherwise, the efficiency of radiators will be only 50-70% of the maximum possible power. We will try to analyze all the options for connecting heating radiators and the method of their installation.
The type of connection depends on the heating system used (natural or forced circulation, two-pipe or) and on the design of the building.
The following connection types are distinguished:

Each of them, in addition, can be implemented with or without a bypass.
Lateral (one-sided) connection
 This scheme involves connecting the outlet and inlet pipes on one side of the heating device. The coolant, as a rule, enters the upper pipe and is discharged through the lower one. The circuit is distinguished by fairly small heat losses (no more than 5%) and ensures uniform heating of each section of the radiator. According to statistics, side connection heating radiators - the most common option in multi-storey buildings connected to central system heating.
 The popularity can easily be explained by the convenience and low cost of installation with decent heat dissipation from the batteries. This scheme is most effective in, as well as when using radiators with no less than 10 and no more than 15 sections. Increasing the number of sections will sharply reduce the efficiency of the battery, since the coolant will not be able to effectively heat the sections furthest from the pipes.
Diagonal (cross) connection
 In a cross circuit, the inlet pipe is connected at the top of the heating device, and the outlet pipe is connected at the bottom, and on the opposite side. This scheme is the answer to the question of those who are interested in which connection of heating radiators is better in terms of heat transfer, since the coolant is distributed evenly over the entire area of the battery. The diagonal connection is considered the most effective, and radiator manufacturers in the product data sheet link the rated power of the device to the diagonal system.
It allows you to reduce heat loss by up to 2%. Diagonal connections are especially in demand with 10-12 or more sections in heating devices. The scheme also has a number of disadvantages:
- not very aesthetically pleasing;
- excess pipe consumption;
- inconvenient and time-consuming installation.
Despite obvious advantages, due to the last two minuses construction companies They practically do not use such heating connections in their apartment complexes.
Bottom connection: saddle and vertical
 In the post-Soviet space, the lower scheme is often called the “Leningradka”. The saddle version of the lower connection involves installing the inlet pipe on one side of the lower part of the device, and the outlet pipe on the other side of the lower part. Overall this is the least effective method connections among all, because top part The radiator warms up noticeably worse, and heat loss reaches 15%. However, this is only true in relation to multi-storey buildings with a large total length of pipes and a huge amount radiators.
 Saddle connection of heating batteries in a private house with autonomous pumping system reduces heat loss to acceptable levels. The main application area of the saddle system is one-story houses, the pipes of which are laid inside the floor. An undeniable advantage of the scheme is the aesthetics of the heating device due to the almost invisible pipes.
 The second subtype of lower connection is a vertical diagram. It is rarely used and only for those types of radiators that have a bottom connection. The pipes in such batteries are located next to each other in one of the lower corners of the device. A special locking and connecting unit is used for connection. The advantages of a vertical scheme are appearance(pipes are even more invisible than in a saddle design) and saving pipes. The disadvantages are uneven heating and the resulting low efficiency.
In general, both methods of connecting heating batteries are the least effective of all.
Bypass connection
 In the case where a series connection of heating radiators (single-pipe) is used, to be able to regulate the temperature in each room, a special jumper is installed - a bypass. The bypass is located between the inlet and outlet pipes of the radiator and allows the coolant to move even if the valves on the devices are closed. To better distribute the water flow between the bypass and the radiator, the bypass is made from a pipe of smaller diameter than the main pipes. Piping a radiator in such a system involves installing two valves - on the inlet and outlet pipes.
A much less popular version of the scheme is to install only one three-way valve at the junction of the bypass with the riser.
Radiator installation
 Before purchasing and installing heating appliances for your home, it will be useful for the owner to learn about how a heating battery works, the principle of operation of a heating battery, their classification by design (sectional, plate, tubular, panel), volume and material of manufacture (cast iron, steel , aluminum, copper, bimetallic). In general, bimetallic panel and sectional radiators are considered the most optimal, albeit expensive, option.
Necessary equipment and materials
When the heating devices have been purchased and the connection diagram has been selected, you can begin installation. Whatever the devices, proper connection of a heating radiator is impossible without the following (common for all types of pipes and batteries) set of tools:

Among the materials needed for connection:

The need for additional tools and materials is influenced by the methods of connecting heating radiators and the material of the pipes. Before properly connecting the heating battery to metal pipe welding method, you will have to acquire a gas welding machine and, of course, the skill to work with it.
If you plan to connect to threaded connections, you will need to purchase:

To connect radiators to metal-plastic pipes you will need:

If the owner is wondering how to properly connect heating radiators to polypropylene pipes, he will need to get:

Installation procedure
So, the apartment owner purchased tools, Consumables and the heating radiator itself, how to connect it to the heating system?
The installation procedure is generally similar for all types of devices:

It is also necessary to remember: if the radiator is new, it is not recommended to remove the plastic film from it until installation is completed. This will prevent scratches and dirt during installation.
Battery settings
If the house is beautiful, but cold, living in it will not be very comfortable. Therefore the assembly engineering communications- this is a very responsible matter. If it is carried out independently, experts recommend that you first study all the installation features in as much detail as possible. We’ll talk about how to connect a radiator and which circuit to choose for maximum heat transfer.
Before talking about options for connecting radiators, it is worth dwelling on existing heating schemes, choosing the most suitable place to install the radiator, as well as describing the methods of coolant circulation
Heating schemes
Today, two heating systems are actively used to service apartment and private buildings - one-pipe and two-pipe.
The single-pipe scheme involves supplying hot coolant from above the house, and then distributing it to heating devices installed in each apartment. This system has one serious drawback. It does not allow you to regulate the temperature created by heating devices without additional installation special devices. And there is one more significant disadvantage - upon reaching the lower floors, the coolant noticeably cools down, so there is not enough heat in the apartments.
The two-pipe system is completely devoid of such moments. It's more efficient scheme from existing heating systems. After all, in it, hot water is supplied to the battery through one riser, and then through another - the return - goes back into the general circuit. Separate batteries are connected to the system in parallel, so the coolant temperature in each heating device is approximately the same. It can be adjusted by installing a thermostat on the radiator. And this is another advantage of such a heating organization.
What is important to consider when choosing a radiator installation location?
When choosing where to connect the battery, it is important to consider that the functions of this device are not only to provide heat, but also to protect the room from the penetration of cold from the outside. That is why radiators are installed in places that are weakest from this point of view - under window sills. This is how they cut off the flow of cold air that enters the room through a window or balcony block.
Exists ready-made diagram location heating batteries. Installation distances are determined in accordance with existing SNiP standards. They allow you to ultimately obtain maximum heat transfer. Therefore, it is definitely worth mentioning them.
Note! The batteries must be placed at a distance of 12 cm from the floor, 10 cm from the windowsill and 2 cm from the wall. Violating these norms is not recommended.
Additional equipment and methods of coolant circulation in the heating system

How to connect heating correctly
Before moving on to the description of heating connection diagrams, it is worth talking about the equipment that will be needed at the time of its implementation.
Water inside the system can circulate naturally and forcedly. The second option involves connecting circulation pump. He pushes hot water, helping her get to the very hard to reach places. In order to do this, the pump must be installed in common system, choosing a place directly next to the boiler.
Note! By connecting the circulation pump, we make the heating system energy-dependent. If there is a power outage, it will not work.
But engineers long ago came up with a device that allows you to reconfigure the forced circulation of coolant to natural. This device is called a bypass. In fact, similar equipment- this is a regular jumper that is installed between the supply pipe and the return pipe. For the system to operate without interruption, the bypass diameter must be smaller than the diameter of the main wiring.
Radiator connection diagrams
There are several heating schemes that allow you to connect batteries to the central line. This:
- Lateral one-way connection.
- Lower.
- Diagonal.
The first option provides maximum heat transfer, so many people prefer it. When choosing such a scheme, the batteries are connected to the wiring as follows. The inlet pipe is connected to the upper side pipe, and the outlet pipe to the lower one on the same side.

Radiator installation
This scheme promotes uniform distribution of the coolant volume inside the battery. The latter warms up completely, which means that it gives off heat in greater quantities. Experts strongly recommend choosing this option when the radiator consists of large quantity sections - up to 15 units. It should also be used when all heating devices in a house or apartment are connected into a single network in parallel.
The bottom connection allows you to hide the piping pipes in the floor. With it, both the inlet and outlet pipes are connected to the lower outlets of the batteries. The system only works effectively at a constant maximum water pressure. As soon as it falls, the radiator is half empty inside, and heat transfer is reduced by 15%. With this option, the batteries warm up unevenly - their bottom is hotter than the top. And this must be taken into account when choosing this connection method.
A diagonal connection involves connecting the supply pipe to the upper branch pipe of the battery, and the return pipe to the lower one, located with opposite side. With this option, the battery inside is also completely filled, so the heat transfer loss is no more than 2%.
How to make the connection correctly?

Installation of heating radiators
After choosing the connection diagram, you need to install the batteries correctly:
- It is better to hang the radiator from the wall using brackets. In this case, two are attached to the top, taking on the main load of the weight, and two to the bottom, supporting the heavy heating device. Note! If a radiator consisting of 12 sections or more is used, an additional bracket is required, which is mounted on top exactly in the center of the heating devices.
- When mounting, it is advisable to arm yourself with a building level and align the batteries horizontally and vertically. Any distortion, even the slightest one, will lead to the formation of an air plug inside the radiator. It will not allow the device to demonstrate its maximum capabilities.
- The number of sections is calculated not only taking into account capacity. Models are selected whose width completely covers the space under the window sill.
- When connecting, it is necessary to prevent the upper supply pipe from bending down and the lower outlet pipe from bending upward. This will also lead to the formation of air pockets, but not in the battery itself, but in the pipes. Moreover, eliminating them will be extremely problematic.
- If radiators consisting of more than 12 sections are installed, it is better to choose a diagonal connection. Otherwise, it will be extremely difficult to fill the entire volume of the heating device with coolant.
- To achieve maximum heat transfer, experts recommend using a foil screen, which is attached to the back of the device directly to the wall. If this is not done, a significant amount of heat is spent heating the wall rather than the room.
What material should I choose to connect batteries?

Complete heating system diagram
Today, in 90% of cases, radiators are connected to metal-plastic pipes. The leads are attached to the devices by metal welding, and then the wiring is installed using the soldering method. The result is a very strong and reliable connection that looks very aesthetically pleasing.
For greater safety, all necessary locking equipment is installed immediately. Instead of ball valves, experts recommend paying attention to valves with thermostatic heads. They will allow you to automatically carry out all the necessary adjustments.
At the time of buying modern radiators no need to think about choosing a kit for proper connection. The package already includes brackets, radiator liners, an air vent, American valves, several connectors, tees, elbows and clamps. Therefore, making a high-quality connection, taking into account the recommendations given, will be very simple.
Conclusion on the topic
Heating batteries are connected in three ways. The choice of a specific option depends on many factors. It is important to consider the number of radiator sections and the features of heating systems.
So, for example, if there is forced circulation You can use any of three types of connection - bottom, diagonal, and one-sided side. During natural circulation, coolant pressure surges often occur, and the lower connection in this case is not always effective.
There are three schemes for connecting heating radiators to the heating system. Each of them has its own advantages and disadvantages and is used depending on general scheme heating.
Side circuit or side connection
With a lateral connection, the supply and return pipes are located on one side of the radiator. In this case, it is possible to supply the feed from above (with upper wiring) or from below (with lower wiring).
It is believed that side connection is less effective compared to other radiator connection schemes. When implemented, a loss of power of the heating device from 5 to 15% is possible.
Lateral connection schemes for heating devices are successfully implemented in houses with high coolant flow rates and high, more than 4 atm, pressure in the heating system. Thanks to high blood pressure And high speed movement, the coolant completely fills the volume of the radiator. As a rule, these are multi-apartment high-rise buildings.
In private houses with a relatively low flow rate of the coolant, it is better not to use a side connection, and in houses with natural circulation, this heating device piping scheme is simply not acceptable.
Bottom connection

At bottom connection radiators, the supply pipe is connected to the lower side hole of the heating device, and the coolant is discharged from the lower hole located on the opposite side of the radiator. Thanks to natural convection, heat coming from below rises and completely warms up the heating device. However, in the upper corners of the radiator, with such a connection, stagnant cold zones are formed, the presence of which reduces the efficiency of the heating device by an average of 5%.
Despite this drawback, the lower radiator piping scheme is widespread in private homes, especially when using single pipe system heating. As a rule, the main argument in its favor is the low material consumption - the pipes for the lower connection diagram will require slightly less than when implementing a diagonal connection scheme.

When connecting radiators diagonally, the supply pipe approaches one side of the heating device, and the coolant exits through a hole located diagonally opposite the radiator. In this case, the supply can be connected to the upper corner, then the outlet will be the lower hole on the opposite side.
If the supply is connected to the bottom corner, then the outlet will be the top hole located on the opposite side of the heating device.
The diagonal connection diagram for radiators is considered the most effective, and the most correct connection option is considered to be the coolant supply to the upper corner, and its outlet through the opposite lower hole. With this connection, radiators operate with maximum heat transfer.
How to choose a radiator connection diagram?
Which radiator connection scheme to give preference largely depends on the heating wiring diagram.
There are several heating schemes:
- single-pipe
- two-pipe
- collector
The choice of heating scheme largely depends on the method of movement of the coolant: by gravity or forced, using a circulation pump.
Gravity heating system and its implementation scheme

Until a certain time, a gravity heating system in private houses was the only possible one. It was probably its widespread use that created the myth about the simplicity and cheapness of gravity heating. In fact, it is the heating scheme based on the natural movement of the coolant that is the most difficult to implement and resource-intensive.
Moreover, gravity heating works effectively only in one-story houses. In two-story buildings, overheating of the second floor inevitably occurs, to eliminate which it is necessary to install additional bypasses, which will also lead to an increase in the cost of the heating system.
In higher-rise buildings, a gravity heating system is not used.

Another important condition for the successful implementation of a gravity heating system is the presence of an attic, where a heating expansion tank must be installed and supply manifolds (arms) must be laid.
If there is no attic, but the house has an attic, expansion tank it has to be installed in a living room, connecting it to the sewerage system to discharge excess coolant if necessary. It should be remembered that in a gravity system the expansion tank is open and its location inside the house is possible only when water is used as a coolant. If the heating system is filled with antifreeze, the vapors of which are dangerous to humans, an open expansion tank cannot be installed in the room.
Another condition for the normal operation of gravity heating is the installation of the boiler below the return level, for which the boiler is placed in a special recess or in ground floor. And finally, the installation of pipes of such a system must be carried out with a slope, ensuring free directed movement of the coolant towards the boiler.
As you can see, the scheme of a gravity heating system cannot be called simple. It has too many disadvantages, but only one advantage - uninterrupted operation of the heating system in the absence of electricity.
Single pipe heating system

With a single-pipe heating system, the coolant enters the radiator, passes through it and returns again to the same pipe. In this case, the temperature of the coolant gradually decreases as it moves from one heating device to another. As a result, the first radiator is the hottest and operates with full heat transfer.
To ensure the calculated heating power, the second radiator must be of greater power, and the third heating device must be even more powerful.
In private homes, it is difficult to accurately calculate the required power of heating devices when connecting them to a single-pipe system. As a rule, the selection of radiators occurs “by eye”, which leads to uneven heating of the room: in one room close to the boiler it will be hot, and in the other, on the contrary, it will be cold.
It remains to add that it is also impossible to achieve real savings on pipes when installing a single-pipe heating system.

At collector circuit For heating, the coolant from the boiler first flows into the distribution manifold, and then from it to the radiators. In this case, each heating device has a supply pipe and a return pipe.
For efficient work such a heating system an important condition is equal lengths of pipes to each radiator. This can only be achieved if the collector is located in the center of the heated house, which is not always possible.
If it is not possible to create a heating system with equal lengths of pipes to each heating device, you have to balance the system by creating artificial obstacles to the movement of the coolant (by opening and pressing shut-off valves), which leads to the need to use a more powerful circulation pump and can cause uneven heating of the rooms.

With an associated heating scheme, the sum of the lengths of the supply and return pipes of each radiator are equal, which means that the hydraulic resistance of each heating device is equal. This heating scheme does not require balancing.
The associated heating scheme is implemented quite simply: a supply pipe is connected to each heating device, and the return flow moves in the same direction to the boiler. As a result, the closer the radiator is located to the boiler, the shorter its supply pipe, and the longer the return pipe. And, conversely, the most distant radiator has the longest supply pipe and the shortest return pipe.
Let's sum it up
Despite the variety of radiator connection schemes for a private home, the most effective is the associated heating scheme with diagonal connection of radiators.