Decorating a corridor in an apartment or house cannot be limited to choice general style, buying furniture and decorating walls and floors. It is important to understand the ceiling properly so that its appearance completely satisfies you and does not create a feeling of dissonance. To do this, you must comply certain rules, which will be discussed.
Types and forms
Ceilings are:
- Multi-level. Such a ceiling is rarely used in the corridors of residential buildings and apartments. This design exhibits its aesthetic advantages over a large area. Most often it is used in other rooms. So, two-level ceiling differs from three-level and more sophisticated options only in the number of layers created. The more there are, the stronger the supporting structures on the original tiers should be.


Mandatory requirement It turns out that the marking is very precise, but this inconvenience is compensated by the opportunity to cover communications, change the visible geometry of the space, or use a unique lighting scheme.
- Floating. The effect of a floating ceiling is achieved through the use of LED lighting. You can create it yourself.


- Curly ceilings, as multi-level options, are formed from plasterboard. They are quite simple to make, but the resulting structure will be heavy and cannot be disassembled. If old whitewash does not crumble, you can create such structures directly on top of it.


Finishing options: pros and cons
Can be used to finish the ceiling various materials, which have their own characteristics, pros and cons. Let's take a closer look at them.
Painting
Painting ceilings is permissible with water-based or water-dispersion paints, but there are other options. So, acrylic compounds with latex will close cracks and allow you to wash the painted surface. If there are concerns about the flooding of the apartment, apply silicate paint, which easily tolerates strong moisture.
You can use either a stepladder or a table as a support. In the first case, the support is more compact and reliable and is easier to rearrange, but in the second, you don’t need to think about where to put the can, and you’ll have to climb down less often to move to another place. Decision is on you! Regardless, be sure to wear a hat, and ideally, also bring safety glasses.


It is better to decorate a low ceiling in light colors; By painting the walls darker, you will visually expand the space. If the room is high enough, it would be better to use darker shades.
Wallpaper
Pasting the ceiling with your own hands is not the worst idea, because in this way you can both save money and create an elegant appearance by investing an additional amount of money. Professionals say that top part corridor is best compatible with glass wallpaper, as well as non-woven or non-woven fabrics vinyl based. The paper version is less elegant and does not last as long, although it is relatively cheap.


Whitewash
Considering the caustic nature of the composition used, it is advisable to take the furniture outside the room, and if this is not possible, cover it with polyethylene. You can use both chalk and lime whitewash. The bottom layer is applied from the light source (window, lamp, passage into a glazed room), and the second layer is applied in the opposite direction. As a rule, you need to whitewash the ceiling once every five years.
Whitewashing, plastering and painting begin only after:
- the entire surface is cleaned up to and including concrete or other permanent foundation;
- primer treatment was carried out;
- Beacon profiles are set along the level, creating landmarks.


Drywall
Various suspended and mounted structures are made from plasterboard, which have gained great popularity over the past 10-15 years. Home craftsmen and professional builders highly appreciated the lack of need for plastering and puttying of the rough base. There is no need to remove the previous finish, with the exception of old hanging elements.


Attention: be sure to measure all dimensions with high accuracy and double-check the calculations to eliminate the appearance of irregularities and defects!
You should not assume that a gypsum board ceiling is better than all others, since it also has an inevitable drawback - height absorption. Because of this, in the room with low walls It would be better to use other solutions. Such as plastic panels, For example.
PVC plates
This ready-made blocks made of polyvinyl chloride, dimensions 50x50 cm. Important advantage when using them is that there is no need to carefully prepare the base of the ceiling. All preparation for applying plastic panels will only consist of removing old coatings and any contaminants. It is enough to apply glue to the back surface of the block and vigorously press it against the ceiling to literally transform the room in a few hours.


Plaster
Advantages the latest methods do not give a single reason to neglect plaster. It is quite simple to apply - careful puttying is not required; on the contrary, it will be possible to mask any unevenness in the relief with the material used. You will spend relatively little money, time and effort, but the result will be aesthetically attractive.
The work proceeds as follows:
- apply the mixture you bought to the plastered ceiling;
- a relief is formed with a sponge, spatula, grater or other tool;
- Then all you have to do is wait for the layer to dry.


The dried coating can even be painted, and if desired, in two different colors at the same time, even black and brown, even yellow and green.
Aluminum slatted structure
Slatted structures made of wood and aluminum are widely used in technical and utility rooms because they:
- practical;
- aesthetic;
- insensitive to water and high humidity
- well mounted;
- are relatively inexpensive.


Aluminum ceiling systems will be one of the optimal solutions not only for the corridor, but also for the bathroom. Since aluminum suspended systems are installed below the ceilings, the actual condition of the rough ceilings does not matter. They just need to withstand the load consistently. Arranged similar systems simple: this is a series of hangers to which supporting profiles are attached (they fix the aluminum strips that create the outer surface).
Aluminum slatted ceilings can be colored, and can be painted in any of the many shades included in the RAL palette. Most often, white structures are used (including the entire range of varieties of this color) and beige coatings. Most often, these options for slatted systems are always available, and if you need other colors, you will have to make individual order. Matte, glossy, semi-gloss surfaces can be found in the assortment of any self-respecting company.


The difference between the slats concerns their width and geometric shape. A plank produced at a Russian or German factory will be straight from the face, but in Italy they prefer to make it round. It is not advisable to take perforated options, because all their advantage is optimal internal ventilation, but it is undermined by an overly cold and official style, more decent in an institution than in a private house or city apartment.
Slats with edges are not very suitable for corridors. Their main place is bathrooms and kitchens. Important: the wall guide must match the main planks or slot profile. It is advisable to select the stringer corresponding to the width of the individual slats. In a room that is not high enough, dowel-nails are preferable rather than pendants. With their help, you can reduce the height reduction to the limit and even attach the material close to rough ceiling. Good to know what's in the hallway small sizes The thinnest strips are sufficient (their reserve of rigidity is enough to avoid sagging).


White flat slats are the cheapest, and manufacturers and sellers charge the highest price for chrome products. Two-level structures open additional features, but it is better to entrust their installation to professionals.
Wooden slatted structure
As for wooden slatted ceilings, their undoubted advantage will be their relevance in any interior (from classical to modern). Thanks to modern methods processing from natural wood, you can even get lamellas that look like natural stone.
Various positions of the slats are possible:
- longitudinal;
- transverse;
- diagonal (in some newer versions).


A wooden ceiling is much more effective than other options in inhibiting the spread of loud sounds. You just need to strictly follow the technology and install a fiber-acoustic slab (the price for it is completely justified). If the upstairs neighbors really like to do renovations or hold discos, your home will be relatively quiet. For certain interior styles, it is more correct to choose slatted ceilings with small gaps between the elements. Important: a wooden slatted ceiling will help hide even the most unsightly communications and defects of the main surface from prying eyes.


Tensioners
Stretch ceilings are used very often. It is not at all surprising that such solutions are regularly used in the corridors. An undeniable advantage This choice results in quick installation. You only need a day or two to get optimal results. Responsible owners will invariably be pleased by the absence of dust and dirt during the installation process. There are also weakness: if you have not yet installed all the planned communications at the base of the ceiling, you will have to speed up this process or postpone cosmetic repairs.

Lighting
Adding lighting fixtures to hanging structures is extremely important for more than just stylistic reasons. Thus, incandescent light bulbs are incompatible with tension fabric, since they can melt it. You will have to either use chandeliers or resort to LED backlight, which does not produce excess heat. A small chandelier is easy to install, but only if the wiring goes under the frame. Immediately determine the places where the lighting fixtures should be and take care of laying wires to them.


The desire to save money when renovating is quite reasonable, but not in this case. Be sure to entrust the installation of electrical appliances and wiring for them to professionals, because the slightest mistake will have very serious consequences. The choice of the type of fixtures among all that meet safety requirements is limited only by your personal taste and the style of the corridor. It is quite acceptable to use spots.
According to most experts, it is unnecessary bright light inappropriate in the corridor. It is much better to use dim lighting there. If the ceiling is completely flat, you can use fluorescent lamps, both open and installed behind the cornices. 50-60 watts should be enough for the entire room.


For gypsum plasterboard surfaces, professionals believe optimal choice oval niches with lamps, the rays of which intersect, and the lamps themselves are slightly inclined in relation to the plane.
Additional design
Stained glass may look quite attractive, but they alone cannot “pull out” a bad design. Therefore, immediately think through the entire style, including auxiliary decorative elements, so that later it will be easier to achieve success. Stained glass ceilings are created using frames, and for quite a long time they have not been an attribute of a luxurious and elite interior and can be used almost anywhere. It should be taken into account that it is almost impossible to make a sufficiently strong frame at home and even in a home workshop.


So you will have to order it from official suppliers. Stained glass windows are not only rectangular and round. They often imitate the shape of lampshades and domes, or are even made in non-standard configurations. It is advisable to use dome solutions in large-area corridors.
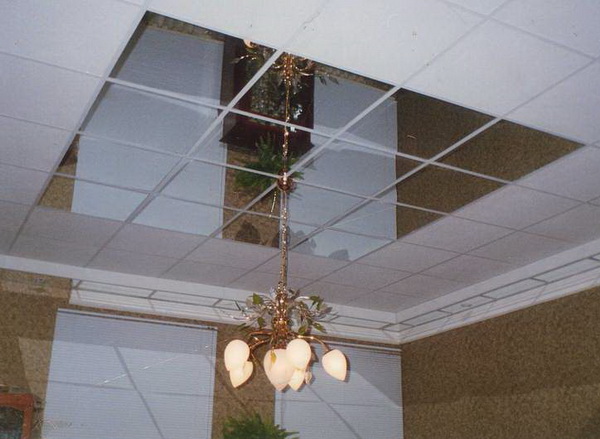
For lovers natural wood It is not at all necessary to choose ceilings from boards or slats. It is quite possible to imitate it with the help of plaster (a “bark beetle” type coating reproduces the effect of oak wood eaten away by wood-boring beetles). Mirror materials and designs can brighten even the darkest corridors farthest from windows. Mirrors help add elegance and luxury to a room. Beveled slabs with hidden hanging systems are especially good.


Mirror tiles can be covered with decorative patterns (ornaments), but it is not recommended to use suspended ceilings with the same effect. Attaching them is quite simple, but the image will be blurred and the seams will be too visible on the canvas. The serious weaknesses of a mirrored ceiling are its fragility and soiling. The slightest stain is immediately visible in good lighting.
It is quite difficult to decorate ceilings with solid mirrors (harder than with single tiles). The slatted version coated with a reflective film is attached with screws or held in place with cement. This coating is flexible, but can catch fire and the image will be distorted. Tiled mirrored ceilings, as practice shows, are better suited for corridors than all others. Their strict geometry and refusal of excessive decoration will only benefit. Important: think through the design in such a way that the shelves placed at the top of the wall can be used without problems.


Features of choice
The purpose of the room (hallway or corridor) requires, as already mentioned, to use only durable and non-staining solutions. In long hallways (the length of which is over 3 m) it is necessary to use only those slatted ceilings that have special connectors for the guides. To choose the right plasterboard structure, measurements must be taken as accurately as possible, leaving a reserve of space for built-in lamps and communications.
Choosing a ceiling for a Khrushchev-era corridor is not very easy, because the dimensions are frankly small. In many cases, they are limited to painting in white tones or coating with lime. This is quite reasonable stylistically, because light colors draw out the room and allow you to get rid of the oppressive feeling at least a little. But now there are alternative solutions, such as light-colored stretch ceilings. For them, varnish or glossy fabric is used.
As a rule, the final stage of renovation in an apartment is the installation of a ceiling in the hallway. This is quite justified, because in order to preserve all the decorative elements in other rooms in their original form, the renovation of the hallway is left to the very last moment. However, having completed the renovation in the rest of the premises, you should not relax, because the hallway is the first thing that guests see. And the first impression should always be as ideal and perfect as possible.
Ceiling options in the hallway
Modern market offers construction materials big choice finishing options, not to mention photo and video samples.
In general and in general, all options can be divided into two types:
- What is mounted on the base ceiling surface;
- Something that is attached to pre-assembled structures.
- whitewash;
- painting;
- wallpapering;
- finishing with ceiling tiles;
- finishing with decorative plaster.
The above types, one way or another, are attached directly to the ceiling. Accordingly, in order to ensure the smoothest and most high-quality surface, it is necessary to carefully prepare the base surface, namely, get rid of traces of the previous finish, and then prime it.
As for the second group, its elements are also divided into:
- plastic panels;
- plasterboard and multi-level ceilings;
- stretch ceiling.

Such ceiling options require a certain distance between the panels and the base surface, which, unlike the previous ones, does not require special preparatory work.
What kind of ceiling to make in the corridor: preparatory work
As mentioned earlier, for the most ideal effect, the base must be prepared in advance for subsequent repair work.
Standard concrete floor, as a rule, should be prepared as follows:
- Cleaning the surface right down to the concrete, the old whitewash is washed away, the paint is removed with a metal brush, and the old wallpaper is removed with a spatula.
- Then the base surface is treated with a primer.
- Next, using a level, beacon profiles are attached to the ceiling, which will help create a guide for the process of plastering the ceiling.
- Direct plastering, the leveling of which is carried out by using a special slatted rule.

It is also necessary to keep in mind that after the plastering process is completed, the beacon profiles should be removed and the cavities formed from the profiles should be filled with plaster mixture.
After the plastered layer has completely dried (drying time depends on the quality of the plaster), it is necessary to putty the ceiling. If standard whitewash is used, then a particularly smooth plaster coating is not required, but if further painting is planned, then you should pay closer attention to the smoothness of the surface. After preparatory work have been done, the next stage is finishing.
What kind of ceiling to make in the corridor: whitewashing and painting
The simplest and in an accessible way finishing the ceiling for a narrow corridor involves whitewashing and painting. However, it is worth considering that the finishing processes themselves are really simple, however, they require significant work at the preparatory stage.
Besides, the hallway is already on its own small size, so there is little scope for possible masking of defects. Therefore, it is necessary to level the ceiling as perfectly and thoroughly as possible during the puttying process, because there is a high probability of not hiding, but rather emphasizing the slightest surface defects.

The advantages of this method are:
- Maximum space saving, unlike structural ones, which eat up to 40 cm of space.
- Visual increase room height. Especially with the help of well-chosen colors. For example, a ceiling in light shades, in combination with a dark floor, allows you to visually stretch out the corridor.
Ceiling design in a narrow corridor: decorative plaster
The use of decorative plaster is also one of possible options ceiling finishing.
The application process is carried out as follows:
- A decorative layer is applied to the pre-plastered base layer of the ceiling. It is necessary to create an even layer 2-3 mm thick.
- Immediately after this, using any sponge, grater or spatula, we decorate the still wet plaster with relief. Which relief to choose is at the discretion of the decorator - dotted, linear, wavy - whatever your heart desires.
- Let it dry completely, and then paint or tint, which is done by passing over the protruding parts with a brush or the same sponge.

Instead of whitewashing, painting or plaster, you can also use wallpaper or ceiling tiles. Such methods are also quite accessible and low-cost.
Ceiling in the corridor made of panels: suspended ceiling
The second type of ceiling is also called independent, since it is not mounted on the base ceiling surface itself, but on a specially designed frame system, which can be either wooden or metal.

The installation process is as follows:
- At approximately a distance of 15-20 cm from the base surface, an initial profile is attached along the entire perimeter of the corridor.
- Hangers made of galvanized iron are attached directly to the base ceiling.
- Then parts of the structure are attached to the hangers, which must be connected to each other by the initial profile.
- Plasterboard or plastic panels are attached to the created frame. The first can be attached using self-tapping screws, the second - with any adhesive mixture like liquid nails or a construction stapler. Read also: "
- With help construction hair dryer or use a special heat gun to heat it in order to further stretch it to the required size.

The only disadvantage of purchasing such a ceiling is its rather high price, and besides, only professionals can guarantee a high-quality and perfectly flat surface, so for more budget option However, plastic ceilings in the corridor will do.
The mediocrity forced me to write about the ceiling in the hallway, although this topic does not deserve a separate article. I have already written about 3 types of ceiling designs that make sense: . Now I’ll tell you what not to do with your ceiling in the hallway.
The first part is sarcasm to show the absurdity of elaborate ceilings. The 2nd part is already serious.
Collective farm ceiling in the hallway
You have money? If yes, then everyone should probably know about it. Everything needs to look as expensive as possible, especially the ceilings. Especially in the hallway, so that everyone, even couriers, immediately knows that the owners of the apartment have money. The ceiling in the hallway should clearly demonstrate its superiority, should look expensive and not be shy about it.
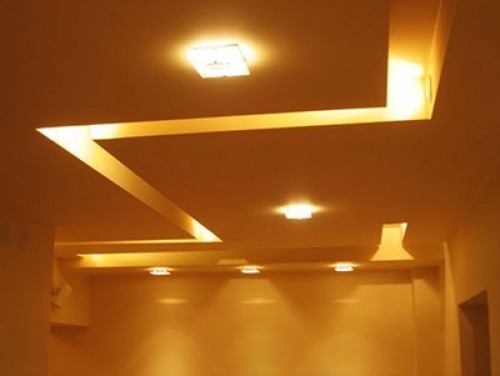
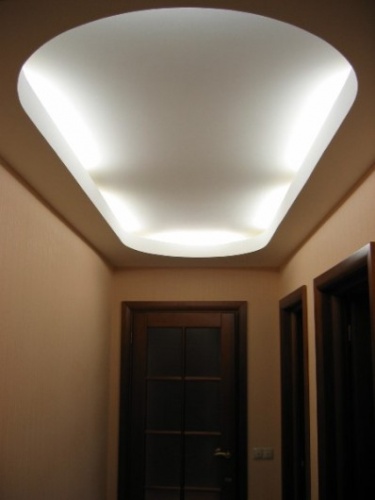
Curved plasterboard ceilings
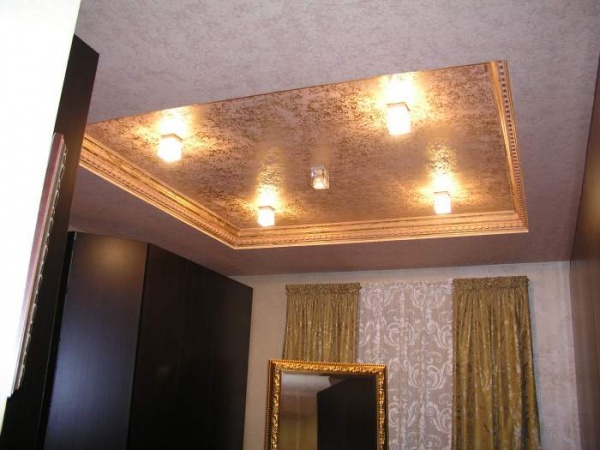
Best of existing options ceilings for the hallway. We cram a ceiling of maximum complexity into a minimum area. It’s only cooler if you make it multi-level. Minimum 3 levels. And insert an LED strip onto each one. And in order to leave no doubt about its eliteness, the last figured level can be made from colored or glossy (or even better, colored and glossy) stretched fabric.
So that everyone knows how carefully you approached the design of the ceiling for your hallway, some levels, preferably protruding ones, need to be painted in accent colors. I especially recommend pink, blue, peach and purple. Moreover, it is absolutely not necessary that this one matches the rest of the interior, just choose your favorite one for this!
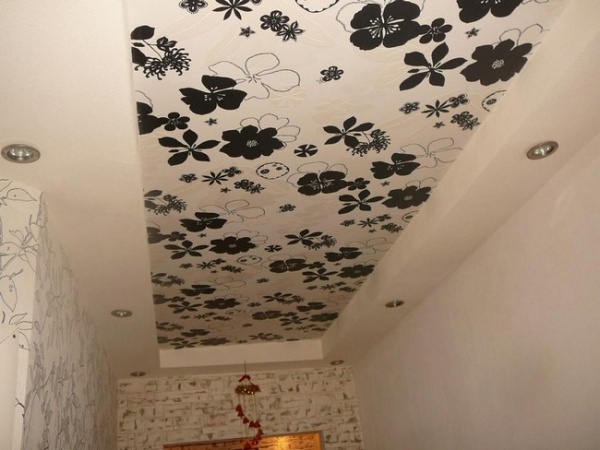
It is better to make shaped parts on a suspended ceiling in the form of flowers, butterflies, hearts, the sun, etc., and not just an abstraction. Let abstraction be done by those who do not have enough money to hire craftsmen capable of making real works of art from drywall.
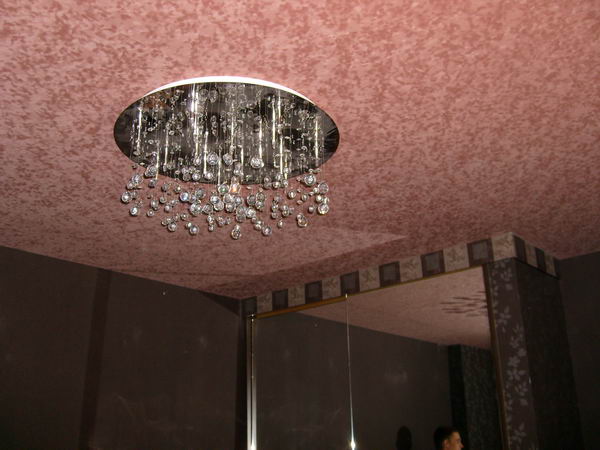
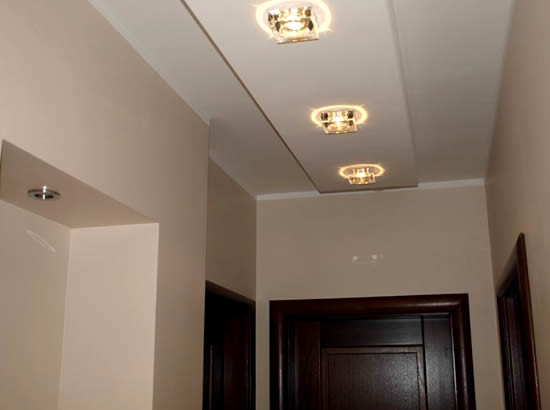
A prerequisite for chicness is the use large quantity spotlights. Moreover, you must choose one with a chrome-plated or gold-plated ring; we’re not suckers to settle for flat, minimalist dots. It’s even better if the lamp has a crystal or glass diffuser so that the light also falls on the ceiling itself, forming a beautiful rosette.
That's it, perfect figured ceiling ready for the hallway. Now everyone will look at him and be surprised, they will feel your superiority.
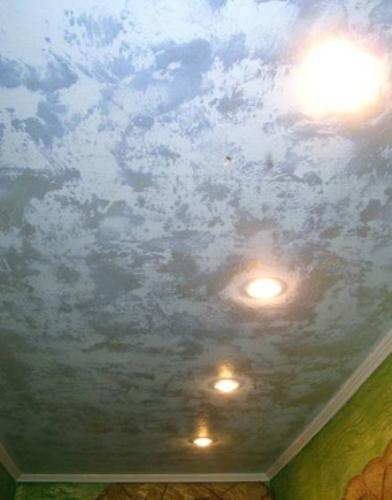
Colored glossy stretch ceiling in the corridor
If you want the ceiling in your hallway to dominate your guests, but not too much so that they don’t despair and at least have hope of rising to your level and affording themselves the same, then choose a tension ceiling.
But not some boring matte suspended ceiling, colored gloss - the choice of champions. The color should immediately catch the eye, and therefore you need to choose the most contrasting one. Best colors for a suspended ceiling in the hallway:
- Red
- Blue
- Green
- Violet
- Orange
- Solid black
I’ll even tell you a secret version of a stretch ceiling in the hallway: a ceiling with a sky print with clouds. If you also backlight it, it will look like a real sky. Imagine how surprised your friends will be! They'll probably think you actually cut a hole in the ceiling to admire starry sky at night. It’s as if there is no ceiling at all, just a miracle! How stupid they will look later when you explain everything to them! No matter how creative you will be considered after this, the ceiling is clearly worth it.
The main thing to remember is that life is too short to make simple ceilings. Don't be afraid to be different from the gray mass, don't be afraid to stand out from the crowd. There is no better way to express yourself than a bright and sophisticated ceiling design in the hallway.
Simple and complex ceiling in the hallway
Forget about the existence of glossy ceilings. Actually, forget it completely.
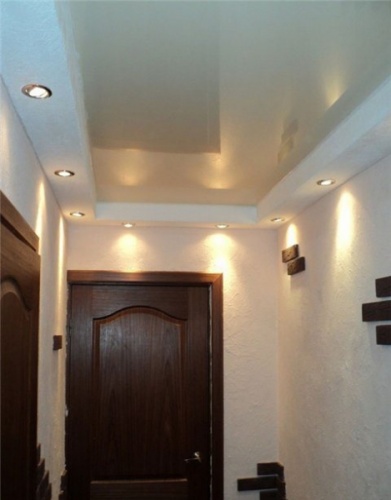
If the ceiling plane is still shared with adjacent rooms, and you don’t want to see the joint, then you’ll have to fork out for other options. Drywall is better than simply painted in all respects except price. Many people are afraid that plasterboard ceilings reduce the height of the room. If you want, you can lower the ceiling by only 4-5 cm, you won’t even notice it.
But all the wiring can be routed along the top, plus plasterboard ceilings are less likely to crack, because between concrete slabs the ceiling and the finishing part have a buffer zone made of profiles.
But this is all lyrics. Here's a photo of stylish simple ceilings. It turns out that to be cool, you don’t have to make ten levels, a million LED strips and gloss, who would have thought.


The peculiarity of the renovation of the corridor and hallway is that if work is carried out in the entire apartment, it is completed at this stage. Until the completion of repair work in other rooms, there is simply no point in dealing with the hallway and corridor - garbage is taken out through them and Construction Materials. The materials that will be used to decorate the hallway and corridor must not only have an attractive appearance and color scheme do not discord with the interior of the apartment. It is necessary that they are wear-resistant and practical for further use. This rule applies primarily to the floor and walls, but also applies to the materials from which the ceiling will be constructed.
Features and methods of repairing the ceiling in the hallway
Before you start renovating your hallway, you should think carefully about all the details. In most cases, the hallways and corridors in our apartments are not pleasing in size, and a mistake in choosing a finishing option will visually make a narrow and long room even smaller.
It is customary to call the hallway the place where the apartment and the street “meet”. And in order for it to be exactly part of the apartment, and a cozy part, it is necessary not only to small area place shoe storage areas and outerwear, but also to ensure optimal lighting in the hallway. Moreover, with the help of properly selected lighting, try to visually expand its area.
On reinforced concrete floor You cannot install built-in lamps; this will require a suspended structure. A few ceiling chandeliers They will look strange in a small hallway.
Important! “Flat” ceiling installation options (painting, wallpaper, tiles, decorative plaster) will reduce the opportunity to achieve optimal lighting in the hallway, and suspended structures will expand these opportunities.
Typically, to finish the ceiling in the hallway they use:
Painting. You can choose high-quality and affordable paint without any problems, but before painting the surface must be leveled, plastered and primed. On an uneven ceiling, the paint will “stick out” all surface defects.
PVC plates. Cheap, fast and proven finishing method.

Ceiling installation with mirror tiles. These can be polystyrene tiles coated mirror film, giving a blurry image, or traditional mirror ones. They are attached with special glue or screws. It should be remembered that a mirror ceiling is a unique, even extravagant finishing option, and it must be used carefully. So as not to turn the hallway and corridor into a kind of “laughing room”. This finishing method is very suitable for small children. dark rooms where the light needs to be amplified. Reflected in mirror tiles, light even from one lighting fixture It will illuminate the hallway well.


Wallpapering. Paintable glass wallpaper, or thick wallpaper(vinyl, non-woven). Some may say that this is an outdated way of finishing the ceiling. But fashion in clothing tends to return after 25-30 years, the same thing happens in repair work. After all, the new is nothing more than the well-forgotten old. Finishing materials have only become better quality.
Decorative plaster. This technique will help hide all surface defects and will not require significant funds from you to achieve an excellent result.
(cassette and rack and pinion). They have wonderful performance characteristics, attractive appearance. The problem is that most people associate such designs with office or production premises, and slatted ceilings - with bathrooms.

Suspended plasterboard structures. Universal method, which eliminates the need for preliminary plastering of the ceiling surface. It is important that there are no leaks. The “limiter” will be the height in your apartment, because such a suspended structure will “eat” about 100 mm. Agree, at a height of 2.20-2.30 m, such a loss will be quite noticeable.

A very popular, although quite expensive, method. Beautiful appearance, reliability, practicality, durability - that’s it positive sides. Optimal for rooms with a large number of corners and irregular shapes.


Installation of plasterboard suspended structure
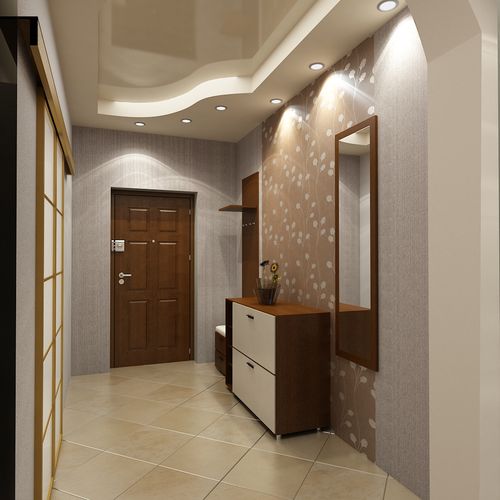
Very popular way ceiling devices. Combines beautiful appearance and practicality, allows you to hide surface unevenness reinforced concrete slab ceilings without the need to level and plaster, carry out any communications and organize multi-point lighting. In very small hallways, arrange a multi-level plasterboard ceiling hardly advisable (you can limit yourself to a simple one-level one for organizing combined lighting), but for rooms larger area it will be the optimal solution.
Important! In no large hallways it is advisable to use a two-level design with simple geometric shapes. This design will not seem pretentious, and will make it possible to arrange hidden lighting along the contour, which will visually “raise” the ceiling. Installation of rotating built-in lamps will allow you to create a light accent on the desired areas of the hallway or interior items.
When choosing a color, you can move away from traditional white and use others light colors. But don’t get carried away; you shouldn’t paint the structure in more than three colors. Glossy colors will “work” to increase the volume of the room, and it is advisable to use them for painting the ceiling in small hallways. Matte ones will create an atmosphere of comfort, so they are perfect for plasterboard structures in large hallways. The combination of hanging plasterboard construction, painted with matte paint, with a glossy stretch ceiling.
A suspended plasterboard ceiling will last long service, it can be easily updated by painting. The construction materials are environmentally friendly. Only gypsum is not friendly with water and will not tolerate a leak. Even moisture-resistant drywall will suffer from a leak.

Stretch ceiling
This method of finishing, in addition to decorating the ceiling surface, also solves whole line practical problems. No surface preparation is required; it is only important that there are no significant leaks. And existing defects and unevenness of the ceiling will be reliably hidden. “This painting is very useful - it blocks the hole in the wallpaper.” It’s difficult to formulate better than what the mother of the boy nicknamed “Uncle Fedor” said.
Another task that can be successfully solved with the help of a stretch ceiling is the organization of optimal lighting in the hallway, a room without natural light And small area. Using lighting systems in a suspended ceiling, you can provide comfortable lighting that will make the hallway cozy. Adjustable lighting brightness and emphasizing certain areas will make the interior design of the hallway original.
In rooms with irregular geometry, the use of suspended ceilings will make the visual perception of such a hallway better, because a person’s attention will be drawn to the attractive ceiling, and not to the angularity of the room.
Important! The moisture resistance and wear resistance of suspended ceilings will save you from problems with leaks from your neighbors, and will protect furniture and repairs made in the hallway.
Types of suspended ceilings
Stretch ceilings vary in surface type (matte, satin, glossy), color (plain color, with a printed pattern) and the material from which they are made.
Stretch ceilings made from PVC film are the most popular due to their versatility and affordability. The welds that are made on such structures (the width of the fabric is usually 1.3-2.0 meters) are practically invisible. Manufacturers produce many options for shades of canvas, so choosing the one you need won’t be a problem. And one more important advantage of such structures made of PVC film is that even a significant leak will not harm it. The film sags under the weight of water, and after release through a special valve it restores its shape without consequences for appearance. Such suspended ceilings are installed using heat guns.
When starting a home renovation, we all think about the design of the hallway, so the question often arises about how to decorate the ceiling. Its area is usually small, so modern technologies mastering finishing on it is much easier and much faster. In addition, you can see the results of your work very quickly.
Ceiling design
Often, when designing a hallway ceiling, people completely forget about the role of design. And completely in vain. After all, it has long been known that using design techniques, can be decorated small room, hiding and sometimes correcting existing shortcomings.
Finishing secrets
Making out low ceiling in the hallway, should be used bright hues. They will go well with light walls and darker floors. This way you will visually increase the height of the room.
If the ceiling in the hallway is too high, the room has a somewhat disproportionate appearance. The situation can be improved dark color, then the hallway will become more comfortable and harmonious.

When choosing a finishing method, you can leave the area of the room unchanged. For example, if you choose and position the ceiling tiles correctly.
In any case, before starting work, you need to think about the implementation of the design idea - it can radically change the room.
Plastic ceiling in the hallway
This material has won the recognition of many of our compatriots. It is widely used in the design of residential premises, offices, and shops.

For those who are afraid of various innovations, you can suggest painting the ceiling with high-quality paint (fortunately, the choice is now huge), whitewash it or cover it with foam panels. The last method is probably the most affordable and does not require complex installation. And the range of such slabs in stores finishing materials The stores are quite varied.

They do not require complex surface preparation before starting work. You just need to clean it thoroughly from the previous coating (if any), from dust and dirt. Mark the middle of the ceiling and stick the first four tiles from there in the shape of a cross. And then, focusing on them, glue the next slabs. detailed instructions for this material is on the packaging.
This ceiling does not require complicated maintenance - if it gets dirty, just wipe it with a damp cloth. In addition, anyone, even those very far from construction, can do it with their own hands.
Don't be afraid to experiment - your hallway will only benefit from it. The main thing is that the result of your work pleases you for many years.