Almost every owner of a plot of land, sooner or later, thinks about building a bathhouse. After all, the bathhouse is not just a room for washing, but also important element country holiday. The construction of a turnkey bathhouse can be ordered from professionals for a tidy sum, or you can try to build a bathhouse with your own hands.
After reading this article, you will be able to select a project, find out the sequence of the construction process, get acquainted with boiler models and find best option baths for your dacha.
Before starting construction, it is necessary to develop a bathhouse design. To do this, you don’t have to contact an architect; you can develop a simple project yourself, especially since there are now many computer programs for design.
Think about what size bathhouse will be optimal for your family. What rooms will be located inside the bathhouse? What materials to make the foundation, walls and roof from, do not forget also about finishing the bathhouse. An important point in design is the placement of the boiler and the method of firing it.
Below you can see popular bathhouse projects:

- The design of the bathhouse is 4x4 meters in size.

- Bathhouse design - 4x6 meters.

- Bathhouse design - 5x6 meters.

- Bathhouse design – 6x3 meters.

- Bathhouse design - 3x3 meters.
Once you have decided on the size and materials for the bath, you need to create a cost estimate.
Foundation
To build a bathhouse, several types of foundations are used. Depending on the weight of the walls and soil characteristics, the following types of foundations are made:

- Slab foundation.
- Columnar foundation for light walls.
- Pile foundation.
- Concrete strip foundation.
As practice has shown, the most reliable foundation for almost all types of soil, there is a concrete strip foundation reinforced with reinforcement.
To make a reinforced strip foundation for a bathhouse you will need:
- Cement.
- Sand.
- Gravel.
- Fittings.
- Formwork.
- Ruberoid.
- Wire.
- Shovels.
- Concrete mixer.
- Tourniquet.
- Stakes.
- Tools (pliers, hammer, tape measure and others).

In the location chosen for building the bathhouse, mark a trench for the future foundation. To mark, use a tourniquet stretched between the pegs. The width of the trenches is based on the weight of the wall material. For one-story bathhouse made of wood or brick, it is enough to make a trench 30-40 centimeters wide. After installing the markup, do the following:
- Using the markings as a guide, dig a trench 50-80 centimeters deep.
- Compact the bottom of the trench and fill it with water to shrink the soil.
- Cover the bottom of the trenches with roofing felt for waterproofing.
- Fill the trench with gravel to a third of its depth.
- Install formwork along the edges of the trench.
- Make a frame reinforcing the foundation from reinforcement bars tied together with wire.
- Install the reinforcement cage into the formwork.
- Using a concrete mixer, make a cement mortar in the proportion: one part cement to one part sand and two parts gravel.
- Pour cement into the formwork, being careful not to allow any air voids.
- After the concrete has dried, remove the formwork.

The foundation for the bathhouse is ready!
Walls
The following materials are used for the construction of walls:
- Wooden beam.
- Logs.
- Boards.
- Brick.
- Blocks from various building mixtures(cinder block, aerated concrete, wood concrete, and so on).
Since the construction of a bathhouse from logs or bricks is already quite widely described on the Internet, let's consider the option of building a frame bathhouse from timber 15x15 and 5x10 centimeters and boards with a section of 2x15 centimeters:

- Make the bottom trim; to do this, take bars with a cross-section of 15x15 cm and install them on the foundation, connecting them together with special metal plates and corners. There is another way to connect bars, by cutting out tenons and grooves at their ends and then fastening them with screws or nails. When making the strapping, do not forget to place waterproofing under the bars.
- Install vertical posts from 5x10 cm timber. The distance between the posts is usually 50-60 centimeters. First of all, determine the position of the window and door openings and install the racks framing them.
- While working, secure the already installed racks with temporary strips so that they do not warp.
- Make the top trim, securing it to the ends of the vertical posts.
- When making the final fastening of the top trim, carefully monitor the position of the vertical posts, checking their evenness with a level.
- Be sure to strengthen everything corner connections diagonal posts, this will help avoid warping of the frame.
- Make the ceiling sheathing.
- After making the frame, make outer skin walls of the bathhouse with a board with a section of 2x15 centimeters. If you do not want gaps to appear between the boards, then make the sheathing - “overlap”, laying the bottom edge of the board on a nailed board. By appearance, this method is reminiscent of decorating walls with siding.

- Having covered the bathhouse with outside, proceed to installing the insulation. Sheets of foam or mineral wool are installed along the vertical posts of the frame.
- On top of the insulation, it is necessary to install a layer of vapor barrier, which is attached to the vertical posts using thin slats.
- After installing the vapor barrier, line the interior of the bathhouse with clapboard or slats.
- Insulate the ceiling by laying vapor barrier sheets on the inner lining, then insulation. Sheathe the ceiling from the outside with sheets of plywood.
Please note that the manufacture and insulation of the ceiling can also be done after the roof has been installed.
Roof
There are three types of roof for a bathhouse:
- Single-pitch.
- Gable.
- Complex - consisting of four or more slopes.
Usually the first two options are used for a bath. Let's look at the option gable roof covered with metal tiles: 
The manufacture of the roof begins with the installation of the Mauerlat. In case of frame walls, the role of the Mauerlat is performed by the upper outline.
- Place the uprights on the bench.
- Connect the posts using purlins and ties.
- Install rafter legs, attaching them to the Mauerlat, purlin and connecting the upper ends to each other. The distance between the rafters should be 50-60 centimeters.
- Install sheets of metal tiles.
- Cover the gables with wooden slats or sheet metal.
For a more visual understanding of the roof fastening, here is a drawing: 
All dimensions of roof elements are given in the list: 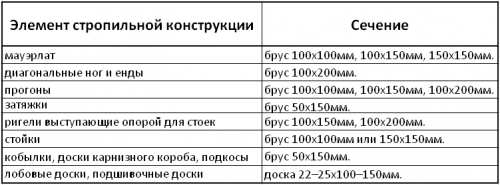
Please note that the less you slope the roof, the more snow load it will bear in winter. Also, slight slope roofs, can lead to poor water drainage and leaks.
Floors
The design of the floor depends on the type of room. In the recreation room, ordinary wooden floors are made. In the wash and steam rooms, the floors are made of two levels:
- The first level is made of concrete and has a slope towards the drain hole.
- The second level is a finished floor made of boards with gaps for draining water.
If you want to make a porcelain stoneware floor or tiles, then they are simply laid on the first level with a slope towards the drain hole. 
In order to make a concrete floor and drain in a bathhouse you need:
- In the center of the steam room and washing room, install plastic pipes 5-10 centimeters in diameter with a bell at the end. The pipes should go out through the foundation to the street and connect to the sewer system.
- Lay down a layer of waterproofing material.
- Spread a layer of gravel 10-15 centimeters thick over the entire area of the rooms.
- Make a cement mortar and pour the floor with a slope towards the hole installed on the drain pipe.
- Install a screen over the drain hole to prevent debris from entering the drain.

At the second stage, wooden floors are made:
- Install baths in all rooms wooden joists. Make the distance between the logs 30-40 centimeters. As logs you can use bars with a section of 3x5 cm or 4x6 cm.
- Nail boards with a section of 2x15 cm or 5x20 cm onto the logs.
- In rooms where water is expected to drain, leave gaps of 0.5-1 cm between the boards.
Don't forget before you start installation wooden floors, treat all parts with wood impregnation. When making floors, keep in mind that they should be higher, or at the level of the upper edge of the foundation.
Boiler
The boiler model for a sauna will largely depend on your financial capabilities and the fuel you will use for heating. If you know how to use welding, then you can make a simple boiler yourself from thick sheet iron. If you prefer more advanced colas with gas or electricity, you can purchase them from specialized companies.
The boiler in the steam room is installed in such a way that the combustion chamber is loaded with fuel either from the street or from the rest room (dressing room). The boiler itself, for fire safety purposes, is located 10-15 centimeters from the nearest walls. The walls are as high as the boiler and covered with iron sheets. A good solution would be to line the boiler with bricks, thereby reducing its cooling time and protecting the walls from fire.
When installing a chimney for a boiler, pay special attention to the place where the pipe comes into contact with the ceiling. The opening for the chimney should be insulated with refractory material. Also, pay attention to the place where the chimney pipe exits through the roof. This area is usually prone to leakage, so it should be sealed thoroughly. Below are the options for boilers for baths:

- Homemade boiler made from metal sheets.

- A gas boiler.

- Electric boiler.

- Solid fuel boiler.
Arrangement of the bathhouse
After the bathhouse is built, it is necessary to equip it:

- Connect all available communications to the bathhouse - electricity, sewerage, water supply.

- Place a sink, shower stall, light sources, and furniture for relaxation inside.

- Decorate the walls of the steam room with shaped slats and make stepped shelves.

- Buy wooden tubs, buckets, ladles and brooms.
After arrangement, you can safely invite guests to take a steam bath in your personal bathhouse!
You can also watch the instructions for assembling a mini-sauna for a summer house without a foundation in the video:
Options for beautiful and unusual baths
Except traditional materials and design for the bath, there are many alternative solutions. Below we present photographs of the most unusual baths:

- Mobile sauna made of clapboard, built on a car trailer.

- Bath in a huge wine barrel.

- Bathhouse made of plastic bottles.

- The dugout bathhouse was built directly into the ground.

- A sauna housed in an iron container.

- Forest sauna made of untreated logs.
![]()
- A beautiful bathhouse made from a gun carriage.

- Bathhouse made of unedged boards.
At the end of the article, I would like to remind you that heating a bath is associated with fire and high temperatures. Therefore, when building a bathhouse from bricks, logs, cinder blocks or boards, pay attention great attention fire safety. This warning also applies to electrical wiring, since the rooms inside the bathhouse have high air humidity and the risk of a short circuit due to condensation is very high. 
We hope that reading our article will encourage you to self-construction baths!
Having spent the whole day fruitfully at your summer cottage, it is appropriate to start your relaxation with a visit to the bathhouse, where you can take a steam bath and in this way relieve accumulated fatigue. It is unnecessary to talk about the benefits of such procedures for the human body; this has long been a proven fact. The only thing left to do is to determine where the bathhouse should be located in the country and build it with your own hands. You will learn how to do this correctly from our article with step-by-step instructions for the construction of this popular structure.
Construction stages
To make a sauna yourself, you need to outline a clear procedure:
- Choose appropriate place for construction.
- Design a bathhouse building and determine its dimensions in accordance with needs, wishes and capabilities.
- Select building materials and calculate their quantity according to the developed project.
- Prepare the site and make the foundation.
- Build walls, partitions and roofing.
- Carry out the interior arrangement - install communications, install a sauna stove and organize ventilation.
The best option for a bathhouse is a separate building, an extension to the house - it is economical, but inconvenient. There are no strict requirements for the placement of the building, except for one thing - compliance with fire safety standards. Based on them and taking into account the common wishes of dacha owners, we will give the following recommendations for choosing a location:
- plan a construction site somewhere in the backyard, in quiet place and at the maximum distance from neighbors;
- the optimal distance to a country house is 8-10 m;
- excellent location - next to the home pool or on the shore of a pond;
- think over the question of how to inexpensively connect water supply, sewerage and electricity to the bathhouse;
- outbuildings from where they can be heard unpleasant odors(garage, barn, stable) should be as far as possible from the designed building.

Site plan with the location of the bathhouse
Note. If you decide to start building a bathhouse near a pond, then you need to foresee the possibility of flooding and take measures in advance, for example, raising the level of the clean floor higher.
Step one - choosing a project
Unlike similar structures erected next to private houses, 2 main requirements are put forward for a country house building:
- A summer cottage bathhouse should be designed for daily washing after working day and fast heating. If warming up the steam room lasts for half a day, then it is easier and more convenient to use a summer shower.
- The design is designed to be as simple and cheap as possible. We do not take cases when country house is a two-story cottage and the sauna should look like it.

Reference. For those who do not want to engage in construction in principle, there are options for ready-made mini-baths. For example, a mobile bathhouse in the form of a trailer for a car or ready product in the shape of a barrel, shown in the photo.
In order for the steam room to be heated quickly, its size needs to be optimized for the number of people who constantly live in the country and take bath procedures. This will not create any problems for guests who can take turns washing. The drawing below shows the plan of a 3 x 3 m mini-bath, designed for two people to stay at the same time:

As you can see, the small house is divided into only 2 rooms - a relaxation room and a steam room combined with a shower. Because this a budget option saunas, then the ceiling height is small - up to 2.7 m. If you need to divide the rooms and increase the size, you can take as a basis the layout of the building 5 x 3 m, shown in the following drawing.

Note. The terrace is shown in the picture conditionally and is built according to your wishes and dimensions.
For comfortable washing and relaxation for 4 people total area All bathhouse rooms should be 20 m², 5 m² for each. Then a 5 x 4 m building diagram with a large open terrace is suitable for you:

Stage two - selection of materials
In general, bathhouses are usually made from various building materials - bricks, blocks and even sandwich panels. But the best option– this is a tree and here’s why:
- wood is a natural, eco-friendly material;
- it is easy to process with a minimum of tools;
- lumber is affordable;
- wooden structures are lightweight and do not require a powerful foundation (with the exception of log houses).

Bathhouse built according to frame technology
When constructing a bathhouse, the environmental cleanliness of the constituent elements plays a special role. It's all about the high temperature, due to which harmless normal conditions building materials begin to release compounds that negatively affect the health of those washing. Therefore, it is extremely undesirable to use any artificial insulation - mineral wool and polymers - in a bath house. What to use:
- dried timber with a section of 15 x 15 or 10 x 15 cm;
- edged boards 150 x 50 or 150 x 40 mm;
- finishing lining;
- materials for caulking – jute, moss, flax;
- natural insulation materials - expanded clay, sawdust, clay and so on.

Log bathhouse
Note. For vapor and waterproofing, it is allowed to use polyethylene films and special membranes that allow moisture to pass in one direction.
A few words about how best to build a bathhouse from lumber, or more precisely, about the design of the walls. There are 3 methods to choose from:
- Installation using frame technology.
- Prefabricated timber structure.
- Walls made of logs (log house).
The preferred option is a bathhouse built with your own hands from timber, shown in the photo below. It meets all the requirements and is relatively inexpensive. Yes, frame building It is cheaper, but it uses basalt wool for insulation, which releases carcinogenic substances when heated. A log house is environmentally friendly, but requires a strip foundation, and this increases the cost of the project. In addition, the logs must be able to be connected correctly to make the structure beautiful and warm.

Advice. If you want your bathhouse to look like a log house, nothing prevents you from building it from timber, and then finishing it with a block house that imitates a log.
We are building a turnkey country bathhouse
Before starting construction work, it is necessary to prepare the selected site. Remove unnecessary objects, stones and vegetation from it in order to calmly begin marking. If the site has a slight slope, then it is advisable to level the site.
Using pegs, rope and measuring instruments, make markings to outline the contours of the future building. Make sure that the setbacks from other buildings correspond to your calculations, and then mark the installation points for the foundation supports. Usually they are placed like this: 4 corner posts, and between them - intermediate supports with an interval of no more than 1.5 m. For the installation of internal partitions and logs in the middle, several more rows of posts are planned.

Base structure
We took the columnar type foundation as the basis as it is the simplest and cheapest to implement. Pour under a small country bathhouse concrete tape there is no point, unless it is built from logs and therefore has a decent weight. The work algorithm is as follows:
- In the places marked with pegs, dig holes 0.7-1.2 m deep, depending on the location of the stable soil layer. Make the dimensions of the recesses 20 cm larger than the dimensions of the future columns so that they can be conveniently laid out.
- Compact the bases and sprinkle them with sand to a height of 10-15 cm, and on top make a so-called footing 40 mm thick from cement-sand mortar.
- Lay out brick or cinder block posts to the required height. Inside each, insert reinforcing bars with a diameter of 12-14 mm to secure the beams.
- After the solution has hardened, treat the masonry bitumen mastic, providing waterproofing, and lay regular roofing felt on top (2 layers are needed).
- Fill the depressions around the supports with soil and compact it.

If the soil at the dacha is oversaturated with moisture and subject to frost heaving, then the columnar and strip foundations will not last long. In winter, the freezing soil will push it out and the structure will warp. Since the depth of the unstable horizon sometimes reaches 3 m, a pile will serve as a reliable foundation here. screw foundation, shown in the photograph. Laying so much concrete is simply unrealistic and pointless.

The essence of the idea is to screw piles with blades into the ground to the required depth so that they reach dense soil that does not allow subsidence. The wet soil will not be able to push them back - the blades will get in the way. The construction of a pile-screw foundation is described in detail in the video:
Construction Guide
The crucial moment is the installation of the first crown. The beams are laid on supports, aligned horizontally and at the corners, and then secured. If you need to connect 2 beams to increase the length, then the joining is performed on one of the foundation pillars by cutting into half a tree.

Attention! Before construction wooden structures All elements of the bath should be soaked with an antiseptic.

Connect the bars at the corners in the simplest way - “in the paw”. To speed up the process, make a template for cutting the ends, shown in the diagram:

Before combining the sawn beams, lay the joint with caulk - jute or flax fiber. Repeat the same action before laying subsequent crowns so that there are no gaps between the elements. Connect every 3 rows of bars with steel staples - dowels, as prescribed in the diagram:

To cut internal partitions into external walls, it is necessary to saw out each beam to obtain a half-wood connection, as shown in the figure. Other cutting methods are also shown there, but they are more difficult for a novice carpenter to implement.

Note. Using the presented connection diagram, you can assemble walls with cuts, as is done in log houses. But keep in mind that the consumption of timber will increase.
During the installation process, check the vertical position and, if necessary, adjust the position of the elements before installing the dowel. Having reached the design height, lay the boards around the perimeter (in technical language - Mauerlat) and proceed to assembly rafter system gable roof, whose design is reflected in the photo:

The installation procedure is as follows:
- Attach to the Mauerlat cross beams in increments of 0.5-0.6 mm.
- Place in the center of each crossbar vertical stand. Rafters are attached to it, resting the other end on the mauerlat.
- To support the rafters, place 2 slanting lintels on each beam. Nail the sheathing boards on top.
- Cover the sheathing with diffusion membrane sheets and nail it with strips. Install a roof covering made of slate, corrugated sheets or metal tiles.
- Support the ceiling beams from below with clapboard. Sew up the gables with the same material.

Thermal insulation of ceilings with sawdust
To prevent heat from escaping through the roof, be sure to insulate the ceiling. Use sawdust mixed with clay, vermiculite or expanded clay. Do not lay the floors until you have installed communications into the building - water supply and sewerage. The construction of a bathhouse from timber is described in great detail and in an accessible way in the video:
Interior arrangement
The organization of water supply and wastewater disposal begins at the stage of foundation construction. While the mortar of the brickwork of the pillars is hardening, trenches for communications should be dug, as was done in the example in the diagram:
![]()
To fully equip a bathhouse in your country house, you need to complete the following work:
- Lay water and sewer pipes along the trenches (the former should lie higher than the latter) with outlets at the designated points. At the entrance to the building, insulate these communications.
- Place at least 30 cm of expanded clay on the ground so that it forms a trench under the steam room and washing room. Place a sewer pipe into the gutter and fill cement screed, as shown in the diagram below. After this, you can sew up the floors with boards.
- Install plumbing fixtures and connect them to the supply pipes. Install sinks and siphons.
- Make lighting by connecting it to the mains via an RCD. Use lamps and switches that are not afraid of moisture, and hide the wires inside special corrugated sleeves.
- Organize ventilation by installing adjustable wood dampers in the outer walls.
- Put together wooden shelves and put them in the steam room.

Installation of an inclined subfloor in a steam room
A separate issue is the installation of a sauna stove. There is no need to build a brick one, it is too time-consuming and expensive. It is better to install a metal one (you can make it homemade) with a firebox placed in the dressing room. The recommendation for installing a chimney is this: take insulated sandwich pipes and try to immediately lead the duct to the street so that you don’t have to go through the attic and roof. Wooden walls steam rooms need to be protected from the stove steel sheets- This is a fire safety requirement.

Installation of a sauna stove and crossing wooden floors with a chimney
Conclusion
From the above, the conclusion suggests itself: to build even a simple bathhouse in a country house you will need to put in a lot of effort. But don’t let this bother you, imagine that to complete all the work you have hired a team of builders who will present you with a hefty bill. Add here the time spent supervising construction and the unknown number of mistakes made by workers. Here it is worth remembering the proverb adapted to the occasion: if you want to make a bathhouse well, build it yourself.

Design engineer with more than 8 years of experience in construction.
Graduated from Eastern Ukrainian National University them. Vladimir Dal with a degree in Electronics Industry Equipment in 2011.
Related posts:

It’s hard to imagine without an indispensable attribute - a hot bathhouse, which raises vitality with the aromas of birch broom and eucalyptus steam. Bath procedures cure many diseases, relieve stress and provide an opportunity to communicate mentally with loved ones. So, no matter how you look at it, you can’t do without her, my dear. The topic of our research is a do-it-yourself bathhouse. , photo, important nuances and the invaluable experience of practitioners - all this is in this material.
Read in the article
What is the basis for choosing the optimal location for building a bathhouse?
Perhaps it will be news to some that the bathhouse cannot be placed in any place. There are many official and practical principles which should be followed. Moreover, incorrect choice place can lead to dire consequences. Let's look at all the rules.
Location of the bathhouse in the summer cottage
There are three main requirements when planning the location of a bathhouse complex on a garden plot:
| Distance from site boundary | The distance from the bath complex to is at least three meters. The building should not obscure the territory neighboring plot. This gap will protect the buildings from a possible fire, because the bathhouse is a fire hazard. Another important aspect– water disposal. A three-meter zone, even if your bathhouse has the most primitive drainage system, will not allow dirty water penetrate into adjacent areas. For reliability, you can lay it along the fence filled with gravel. And a couple more important points: the distance to the neighbors’ residential building should be at least eight meters (six if the bathhouse is brick). When deciding where to build an object, keep in mind that the smoke from the sauna stove should not reach the windows of the neighbor’s house. |
| Distance to the reservoir | On the one hand, the location of the building on the banks of a river or lake is very advantageous. And it’s easier to collect water, and the pleasure of diving into the cool waves after a steam room is guaranteed. On the other hand, you should strictly follow the rules that protect the reservoir from negative influences. To do this, the structure must be located no closer than 15 meters from the shore. This distance will also protect the structures from being washed away during floods. The coastline should be strengthened with your own hands using wooden or concrete frames. |
| Gap to residential building | The Russian one is located on the leeward side of the house at a distance of at least twelve meters. This will prevent smoke from entering the rooms. It is advisable that there are no other easily flammable structures near the building. Experts recommend maintaining a four-meter distance from the barn. |

There are situations when, with the purchase of a summer cottage, a bathhouse is inherited, as they say. In this case, of course, it is not always possible to move it to a new place in accordance with the listed rules. But, with the help of competent reconstruction, fire safety standards can be achieved.
How to attach a bathhouse to a house without damaging the main structure
The size of the plot does not always allow meeting all of the above requirements. There is only one way out - to attach a bath complex directly to the house. Let's consider the advantages and disadvantages of this solution:
- saving site area;
- In winter, it is more convenient to use a home bath, since there is no need to go outside;
- you can save significantly on, since one wall will be internal;
- you can use general and .
Advice! When purchasing material, make a small supply. It will come in handy if the part is damaged.
Step by step construction small bathhouse:

- A columnar or foundation type is suitable for a bathhouse. The base does not require reinforcement. A small wooden bath does not pose a serious load;

- Considering the high humidity in the bathhouse, it is necessary to protect the foundation with high-quality. It is best to use mastic and two layers of roofing felt;

- Before installation, the crown should be treated special composition or regular used machine oil. It is important to set the crown level and prevent bending;

- We make logs from 50x150 per edge. How to make floors we will discuss in detail below;

- There is no need to rack your brains about how to lay timber if you have profiled material at your disposal. Walls from it are assembled simply, like a children's construction set. For additional fastening, dowels made of wood or iron are used. How to build using dowels in the following video:

- doors and timber bath you can simply cut it out after laying and shrinking the walls;

- Before the final shrinkage of the walls, a rough roof is installed. After a year, you can make a regular one on the rafters.
Advice! The most environmentally friendly steam room is made from beams. Drawings and dimensions of structures with different layouts can be found freely available on the Internet.
A short video on how to build a sauna from timber:
Related article:
This technology is used to speed up the construction of not too heavy buildings and other architectural structures. In the article you will find step-by-step instructions for constructing the structure and useful tips specialists.
Frame bathhouse - cheap and cheerful
It may surprise you, but for a frame bath you will not need any drawings or any expensive projects. Everything is quite simple - we proceed from the sizes standard sheet and assemble the bathhouse like a construction set, quickly and inexpensively. The foundation you will need is the simplest, columnar or on stilts. The lightweight construction using frame technology does not shrink and can be assembled in a matter of days.
Pros and cons of such construction:
| Advantages | Flaws |
| Light weight of the finished structure | The need for exterior and interior decoration |
| Excellent, in no way inferior to brick and wooden models | Comparative fragility of the design |
| Construction speed exceeds all other construction technologies | |
| Low cost of materials and labor make this design the cheapest | High fire hazard |
| Ease of assembly allows you to build such structures yourself |
How to make a high-quality structure based on ? It is necessary to provide reliable vapor barrier. The humid climate of the bathhouse and exposure to precipitation adversely affect the wall material.

Insulation of the bathhouse is another aspect. It doesn't matter if you are building a 3x4 mini sauna or a full 6x6 sauna. From good insulation depends comfortable temperature in all rooms.

You can use metal or wood for the frame. The first option has virtually no disadvantages. It does not dry out or become deformed. Saunas with a metal frame are easy to repair. The only disadvantages of metal structures are the need for a detailed diagram and qualified personnel. If the choice is made in favor of a wooden frame, make sure that the board and timber are made of larch or linden.
Natural lining is used for interior lining.

Internal organization frame baths are no different from other options. The only thing worth remembering is that you need high-quality insulation of the wiring and protection of the area around the furnace from accidental fire.
In general, reviews of frame structures are positive. On the Internet you can find detailed photo reports from home craftsmen about the construction. You can find construction plans for baths measuring 2x4, 3x5, 4x6 and larger.
Photo and video story about how to build a frame bathhouse:
We build a bathhouse with our own hands: an overview of the construction stages
Building a bathhouse at your dacha with your own hands begins with a project. You can use a ready-made project or order individual design in one of the companies specializing in such developments. It is not difficult to prepare a construction plan yourself; a simple village bathhouse has a simple layout.

- Where to start construction? Of course, with the construction of the foundation. This is the first stage, which must be approached very responsibly. To build a durable structure, you will need to install a foundation that matches the soil characteristics. In old times wooden baths placed on large stone boulders.

Guided by the experience of our ancestors, the bathhouse small sizes should be installed on a hill - on a pile or columnar foundation. Compact panel buildings made of OSB do not require a reinforced base. It's a different matter if construction is planned. In this case, you cannot do without a tape. It, unlike, will cost more and require more time to manufacture. How to properly install a strip reinforced foundation for a bathhouse - in the following video material:
- Next step - . In an ordinary Russian bathhouse, it is preferable to make floors from boards. They are less durable than concrete floors, but you can walk on such floors barefoot, they dry quickly from moisture and do not heat up to extreme temperatures in the steam room. But the logs should be made from asbestos-cement pipes; this little trick was suggested by professional builders. Concrete joists They do not rot, they are strong and durable.
- The walls in the bathhouse complex can be made of logs, beams, and panels. They are , . You can assemble walls from sandwich panels. It all depends on your decision and financial capabilities. It is clear that building a brick sauna from scratch will be more expensive than, for example, a frame structure.
- It is easier to assemble the roof rafters for a bathhouse complex on the ground, and then lift it and install it on the walls.

- The last stage is the installation of equipment for the bath. The inside of the walls is usually sheathed with birch or linden lining; the outside of the frame structure can be sheathed or made imitation log house from a slab.

This is what it looks like short description main stages of construction. It's time to show each of them in more detail. We offer step by step show construction of a bathhouse complex and video instructions on how to build a bathhouse.
Do-it-yourself columnar foundation for a bathhouse: step-by-step instructions and video
In principle, a frame bath can be built without, for example, on a substrate made of car tires. But keep in mind that within a year or two the structure may become warped. A bottom harness will rot from exposure to flood waters.
The best option is a columnar foundation. It will withstand the lightweight structure perfectly. On it you can build not only a bathhouse, but also a home and others.


Advantages and disadvantages of a columnar foundation:
| pros | Minuses |
| It can be erected with your own hands, without the involvement of special workers. Foundation installation frame structure does not require special skills. | Not suitable for brick and block buildings |
| Suitable for almost any soil (including heaving) | |
| Compensates for differences in height on the site, does not require leveling | |
| Installs in one to two days | Does not provide for arrangement ground floor or basement |
| Doesn't need | |
| Has a long service life | |
| Does not require capital investments |
The installation depth of the bases differs in:
- buried, installed below the soil freezing mark;
- shallow - from 40 to 70 centimeters deep;
- V drain hole
lined with brick or concrete. The pit is located in close proximity to the bathhouse structure and is periodically cleaned using a special machine; The drainage system for the bathhouse is laid at the stage of forming the foundation
It is necessary to dig a trench in advance for sewer pipes and bring them to the place of drainage from the steam room and washing room. The pipe should be laid with an inclination of five degrees. To prevent the drain from freezing, you can insulate it yourself using heat-insulating materials.
Step-by-step installation guide sewer in the following video and photo material:
Another significant point is the installation of floors in the steam room and sink. The simplest option is leaking floors. Water simply penetrates through the cracks between the boards. Under them there is a sealed receiving plane with a hole for drainage.

Advice! In non-leaking floors, the drain must have a water seal, otherwise unpleasant odors will ruin the pleasure of the bathing procedures.
You can also make completely concrete floors and cover them.

But it should be taken into account that it is easy to slip on the tiles, and in the steam room the ceramics heat up quickly, so you cannot enter it barefoot.
It remains to resolve the issue of water supply. In a separate building, it is better to carry out the water supply underground, in a protected enclosure. If your region has severe winters, it is worth considering heating the water supply to prevent the occurrence of emergency situations. Photo reports that are not difficult to find on the Internet will tell you how to install such a system.

Article

Advice! For a lightweight structure, you can use not concrete pipes, but plastic or wooden poles treated with resin to protect them from rotting.
Detailed video material on how to build a foundation for a 4x4 sauna with your own hands
Bathhouse with shower in the country: how to supply and drain water
A well-thought-out drainage system is an important point in the design of a bath complex. Correct drain in the bathhouse will not only protect the base of the building from mold and rot, but will also save you from problems with neighbors in the area.
Where can you drain the sewer:
Often land only involve the construction of vital buildings. Not big square plot, the use of every piece of land for planting or thoughtful simply does not leave room for additional buildings. In this case, there is only one solution left for lovers of bath procedures: building a mini-bath. What is a mini-sauna for a summer residence, how to build it and what is needed to build it - let's figure it out.
Read in the article
Mini-sauna for a summer residence. Advantages and disadvantages
The main advantage of a mini-bath is the area occupied during its construction. Second, no less important parameter is the cost of building a mini-bath in the country.

Ready-made projects for frame mini-baths are available online, and it is also possible to create such a project to order from construction organizations. But sometimes, in a do-it-yourself mini-bath project, the projects of frame and combined baths are simply combined.
We offer you to watch a video of building a frame mini-bath quickly and inexpensively:
Important! When purchasing lumber, pay attention to its quality. Lumber for construction must be well dried and free from geometric defects.
A summer bathhouse made of boards is a variant of a frame bathhouse, for which cladding is used. Like a frame bath, a bathhouse made from boards can be built quickly and easily with your own hands. The construction technology is similar to conventional frame bath, with one exception: instead of OSB panels for external cladding board is used. The budget savings are quite significant, especially if you use unedged boards for cladding. At the same time, such a structure is less durable than one using composites and has greater heat loss than one assembled using panels.

When building a bathhouse, you should pay attention to heat and vapor barrier. The more quality materials are used during construction, the longer the steam room will last.
Laying boards on the wall should be overlapped. This order of installation will make the wall more dense and will reduce heat loss during use.
Before you build a bathhouse from boards with your own hands, you should take care of the selection of lumber. It is better to use wood for lining the inside of a bathhouse. coniferous species wood (pine or larch), while it is better to use aspen for exterior cladding. It is quite low, which will allow the bath to retain heat longer. Particular attention should be paid to vapor barrier. Dampness is the worst enemy of wood.

Typically, mini-ovens for small volumes are metal structures designed to generate steam. As an example, consider the Varvara “Mini” sauna stove.

Sauna stove Varvara Kamenka mini
This is a wood stove with overall dimensions 48x66 cm and height 88 cm. Steel structure The top of the firebox itself is covered with a casing, inside of which there are convection channels. The air, heating up in the firebox area, escapes into the heater through the holes in the casing, thereby quickly heating the stones. As a result, the oven heats up very quickly, warming up small room in a very short time.
In addition, there are also simpler stove designs in which the heater is heated directly by exposure to heat from fuel combustion. When using in a steam room, you need to provide a place for storing fuel, or a canopy not far from the bathhouse.
For small steam rooms, in some cases it is advisable to use electric sauna stoves and electric heaters.

On a note! Installing a heat exchanger on the chimney will allow you to quickly warm up the air in the steam room. But this option is possible with the appropriate dimensions of the bath.
Mini-pools for baths
Additional installation in the bathhouse will expand the functionality of the bathhouse and add comfort. It is worth noting that it is better to initially provide for the installation of a swimming pool in the bathhouse design, since mini-pools for a bathhouse require water supply systems, water drainage, and heating.

For this reason, embedding a pool into a finished bathhouse is quite troublesome and costly. There are several types of pools designed for installation in a bathhouse:
- Stationary. In this case, the pool is initially included in the bathhouse design, a pit is dug under it, the walls of the pool are concreted and covered with a decorative coating. This type of pool is used mainly for full-size bath buildings.
- Font. Metal or plastic construction, intended for installation in a pre-prepared bed. To put it into operation, you only need to connect the font to the water supply system.
- Portable pools. Metal structures with plastic trim. Just like a font, they are installed in a prepared bed, after which they are connected to the water supply system.
Swimming pools can be equipped with water heating systems and hydromassage equipment, but in this case, connecting them requires the help of qualified specialists.
Mini sauna for a summer residence
It is distinguished from a bath by the type of steam and the temperature. In order to make a sauna out of a steam room, it is enough to install an electric steam generator, an electric heater or a wood-burning sauna inside the steam room. When using a steam room as a sauna, it is recommended interior decoration from one type of wood: pine, linden or alder. A mini-sauna in a country house should be as closed as possible, almost airtight. Particular attention should be paid to its thermal insulation. This is necessary for preservation inside the sauna high temperature for a long time, with minimal energy costs.

portable sauna
How to build a small sauna for your dacha with your own hands
Before construction, you should familiarize yourself with the designs of already built baths and choose the most optimal option. Do-it-yourself mini-bath projects for a summer residence (both frame and timber) are quite widespread, and finding them is not difficult. Before you build a small bathhouse with your own hands, you need to decide on the type of bathhouse, the material for its construction and its location.
 Foundation on screw piles with your own hands. This technology is used to speed up the construction of not too heavy buildings and other architectural structures. In the article you will find step-by-step instructions for constructing the structure and useful advice from experts.
 The main requirement during construction is accuracy. Everything needs to be done calmly and without haste. This will allow you to build a bathhouse in a short time without any incidents in the work.
Helpful advice! When purchasing materials for construction, focus on the medium and high price range. Purchase soft materials for roofing, insulation and vapor barrier according to a pre-calculated estimate, +10% on the supply of material.

An important point when building a bathhouse is not to forget about. For a small steam room, a channel in the wall is sufficient; for larger rooms, a fan will be required. This is necessary so that our small bathhouse at the dacha is a place comfortable rest, and not a carrier of miasma.
Article
We will send the material to you by e-mail
If you have your own plot of land, then one of the objects can be a bathhouse with your own hands. Projects, photos and features of construction work are presented on our website. You can choose any one for construction interesting option or a project from our review.
So, to build a quality building you need to think through the following points:
- choose the ideal project;
- think through each stage of work;
- purchase suitable material;
- plan all communications;
- important point is the interior decoration.
A beautiful bathhouse on the site can be not only a functional building, but also a luxurious element of landscape design
To make a bathhouse correctly and correctly choose its location, you need to adhere to all SNiP standards. Important attention should be paid to the material for the construction of the building. The choice of location must take into account certain distances in relation to other objects.
Before building a bathhouse, take into account the features of the site: design, climatic conditions and soil characteristics, features of the local landscape area and soil properties. If the territory is uneven, then it is better to carry out construction on an elevated area, since this will ensure optimal water flow. You should not install such a building on sandy soil. In any case, the foundation should be strengthened. The harder the soil layer, the better. Most often, the construction of such buildings is planned on the leeward side of the main buildings. This placement protects from heavy rainfall.


- Budget wood concrete is also often used. At the same time, the building turns out to be warm and durable.

Bathhouse made of timber
How to build such buildings depends on the material options. Projects can be made from the following materials:
- natural wood;
- edged timber;
- glued timber;
- profiled timber;
- rounded logs.
There are several ways to build a sauna with your own hands. A simple option can be seen in the video:
Most often, construction is carried out using rounded logs and timber. A timber bathhouse is a simpler option than rounded logs. is a cheaper material than logs. Construction from timber is carried out using.

When deciding how to make a building from timber, you must follow some rules. This type of construction refers to light buildings, so you can use a shallow or non-buried foundation.
How and what kind of foundation to make depends on the type of soil. For clayey and marshy soil The columnar version will not work. In this case, or are used.

Before deciding how to lay the timber, it is necessary to carry out waterproofing. To do this, a layer is distributed on the surface of the foundation, and a sheet of roofing material is placed on top. Then the second layer is applied. And the boards adjacent to the foundation are treated with antiseptic solutions. This is how we build a bathhouse, no matter how small or large it is. Common option for construction work small sauna from half timber.

When deciding how to build a sauna yourself, you must first choose quality wood. The material is most often harvested from December to March. Blanks 150×150 or 100×150 are made from felled trees. At the same time, they must be cleared of bark. It is important to inspect the material before construction work. There should be no signs of rotting or cracks. The wood should be smooth and even. When choosing beams, drawings and dimensions must be prepared in advance. In this case, the purpose of the material is important, for example, a floor made of edged boards. At self-construction you need to know how to build step by step and how to join 3x4 or 4x4 logs.

It is important to know how to install 50x150 boards on edge, as well as options for increasing the length. There are such connection options as in the paw and in the head. For a structure made of profiled timber, the burl method is suitable, in which the connection is made when creating key grooves.
Frame bathhouse in the country
Consider a variety of projects for . The walls are lattice structures. For the walls you will need:

How to build such a structure depends on the main project. This construction technology has many advantages. This is a high installation speed and low labor intensity. According to reviews, this is an economical construction. The finished building is characterized by rapid heating of the premises. A mini sauna or even a 4x6 or 6x6 design does not require long-term shrinkage. There is also big choice materials, both for internal and external exterior finishing. Can be used different option s foundation, for example strip or on piles.

How to make such a design is demonstrated by a photo report, where the photo shows detailed diagram and features of the construction of such buildings. Such structures also have certain disadvantages. First of all, careful thermal insulation of such structures is required. Also, such structures have a short service life. Depending on the projects: 3x4, 2x4 or 3x5, drawings are selected. Ready project must contain working drawings with the correct assembly of the structure, with engineering communications and specification of materials.

We build a bathhouse with our own hands: a brief description of the construction stages
Any construction of a bathhouse in a country house requires careful planning. Before construction begins, it is necessary to mark the site. To do this, you will need a project, according to which marks on the ground are made. Where to start marking the dimensions depends on where the corner of the building is located. This place is where reporting is done from scratch. At the same time, a peg is driven in, and the lengths of the sides are measured from it. Then compact pegs are installed and other walls are also measured.

The design of the bathhouse and dimensions are indicated in accordance with the project data. After this, the marking is made depending on. When building a bathhouse with your own hands from stone, brick or blocks, you need to level the foundation. At the same time, roofing material is laid, and then roofing material is placed on top.
How to build a building will depend on what material it will be built from - from boards or from. Specialists can show you the installation features. Useful videos can be found on YouTube.

If used brickwork, it should start from the corners. In this case, the first blocks are placed on the cement mortar. They must be located in the same plane. If you don't know how to do it correctly, use string as a guide.
In the video below you can see a step-by-step demonstration of construction work:
After installing the jumpers over the windows or doors, an armored belt is mounted and then made. The foundation bolts are attached to this part. A simple or panel design involves the construction of a frame made of wood. This element is sheathed and insulated with various types of finishing materials. To make the frame, boards made of aspen, linden or larch are used, since these options are characterized by low.

The wooden frame made from timber is made on the foundation. In this case, cuts are made at the ends of the bars and fastened to each other with self-tapping screws. For small bars, metal corners are used.
Let us note the main stages of manufacturing a frame base:
Any sauna is subject to high humidity, so the steam room is treated with a vapor barrier film. This will protect against moisture accumulation from the inside. As thermal insulation material fiberglass or mineral wool. Such options provide an excellent level of sealing. Insulation and wall covering are carried out after the roof is installed. This approach will protect the wood and insulating materials from getting wet.
Particular attention should be paid. Before choosing equipment for the bath, you must completely complete construction works. The finished building is equipped with furniture and everything necessary equipment. A country bath can be made from various materials, but not from slab.

Do-it-yourself bathhouse foundation: step-by-step instructions
How to build a bathhouse depends on the type of foundation used. It is worth noting the following options:
- slab foundations are not performed often. It is suitable for massive and complex buildings. The markings are made according to the dimensions of the building or slightly larger;
- You can make a strip foundation for a 4x4 sauna with your own hands. In this case, the marking is done so that the tape runs along the perimeter of the building;
- columnar is used for the installation of wooden buildings. Depending on the dimensions 3×4, 3×5 or 3×6, markings are made according to the number of supports;
- . The advantage of this option is the ease of installation. With its help, it is possible to install it on a foundation even on a sloping site. Marking is carried out according to the number of piles.

It is even possible to build without a foundation. Shallow strip foundation can be used when the soil is hard and dry and low level groundwater and the buildings are not very heavy. The shallow version is the simplest. Here are the main points to consider:

How to install a screw foundation can be seen in the video below:
Bathhouse with shower in the country: how to supply and drain water
Exist different ways How to arrange a shower inside a bathhouse with your own hands. There is even a special step-by-step guide. The photo report demonstrates different shower installation options. The easiest option for cooling is to mount a simple wooden bucket on the wall. Water can be poured into it through water pipe with tap. In this case, no special heating is required. In the photo below you can see a shower with hydromassage jets. In this case, it is necessary to consider water heating, as well as pressure using pumping equipment.

A shower does not require a large area; it is enough to allocate a little space in the dressing room. Necessarily . It is necessary to install a drain for the bathhouse. You can also make inside the bathhouse Summer shower. In this case, there is no need to set up a separate cabin in the yard. Even in an already constructed building you can find a corner for a washing room. But this will require constructing a drain in the bathhouse.

Instructions for building a bathhouse roof with your own hands
When building a bathhouse, you need to figure out how to install the roof. The stages of such construction can be seen below:
Options for creating a roof may be different, but in any case you need to think about waterproofing and thermal insulation. Without waterproofing, steam will travel into the attic and settle on the rafters and beams. In this case, condensation may drain onto the insulation, which will affect the durability of the material. It is important to take into account some features of buildings:

Organization of internal equipment of a bathhouse in the country
An important point is the arrangement of the internal environment. A variety of interior photos will help you decide how to design the interior. Any projects should start with installation. This design will reduce the concentration of hot air.

After construction is completed, it is also done outside with your own hands. Another important point is. If there is insufficient ventilation, electric heating will cause a decrease in oxygen levels.
We must remember to constantly monitor temperature regime. Cannot be installed mercury thermometer. Better buy a bath thermometer. To control humidity, use -.

Special attention interior decoration deserves. The most suitable material is wood. A good solution and an economical option is lining. Wall decoration should be done in pastel colors. It is worth considering the floor in the bathhouse.

Step-by-step instructions include stages finishing works, as well as lighting and ventilation layout. must be of high quality. Also think about bath accessories. The step-by-step guide also includes providing good sound insulation.
Article