It is customary in many families to equip their ceiling surfaces with a beautiful chandelier. This is understandable, because such a lighting device is used not only for functional purposes, but can also be a “highlight” and an accent element of the entire interior composition. Therefore, very often apartment owners set out to connect a chandelier to double switch using only your own strength.
At first glance, the process of connecting the lamp does not cause any difficulties. However, the presence of wires of different colors, both on the ceiling and in the device itself, can confuse the average person who is unfamiliar with electrical manipulations. Therefore, it is better to figure out in advance how to connect the chandelier yourself.
When installing a lighting kit on a ceiling surface, wires are found both on the ceiling itself and in the device. If the wiring of the room is already laid, then there may be two, 3 or 4 wiring on the ceiling plane. Regardless of their number, one will be “zero”, the rest will be phase. Sometimes there is a ground wire. But this is rare and a similar conductor is found either in newly built houses, or after major major renovations. repair work, during which the entire electrical wiring was changed. According to existing standards, grounding is colored yellow-green. It connects to exactly the same conductor on the chandelier. If the lighting kit does not have a ground connection, the ceiling wire should be well insulated and left unused. It is impossible not to isolate it - it may short out.
After the grounding has been found, you need to deal with the remaining conductors and determine where the neutral and phase elements are. As a rule, all wiring is painted black, therefore, to recognize which is which, it is better to ring them.

Calling can be done in two ways:
- Indicator screwdriver - in this special device the red light will light up as soon as voltage is detected. To work with it, first of all, you should set the switch key and the button on the input switchboard to the “on” position. Now you can ring the conductors very carefully. Having determined where the “phase” is located, you need to highlight them with color. After ringing, the keys must be switched to the “off” position. If possible, all manipulations to connect the chandelier should be carried out with the machine on the panel turned off;
- Tester (multimeter) - here the switch is set to the “volts” position, then a scale with an indicator greater than 220V is selected. Using the existing probes, carefully, holding the handles, you need to touch the pairs of conductors. If there are two “phases” in a pair, the tester indicator will not change in any way. If a similar pair is found, then the third wire is most likely neutral. Next, the selected pair must be connected to the “zero” using a probe, at the same time 220 V should appear on the indicator. In accordance with the international classification, the neutral conductor is designated by the letter N, and the phase conductors by L.

If there are three conductors on the ceiling panel, and the switch has 2 keys, then there are two phase wires for each of the keys, and one common neutral conductor.
Analysis of lighting fixture contacts
Having a pair of conductors, it’s as simple as shelling pears: one needs to be connected to “phase”, the second to “zero”. At the same time, it doesn’t matter where and which one hits.
In a situation where there are two “phases” on the ceiling panel, and the switch has a pair of keys, then there are several options:
- Both phase conductors are twisted, and one from the chandelier is connected to them. In this option, the device will be turned off using two keys at once, but either of them will turn on;
- The wire is connected to one of the phase wires on the ceiling, and the second is insulated. Then only one switch key will be able to work, while the second will remain idle.
In the case of three-lamp and other multi-arm chandeliers, we have more than two wires. If among them is yellow-green, that is, grounding, then if there is the same on the ceiling, you need to connect them together. Three wires have lights with one working bulb.

We connect a device with three horns
To connect a chandelier to a two-key switch that has outputs for 3 bulbs, you need to carefully familiarize yourself with each horn individually. There are two contacts in a single cartridge: phase and zero. Often the zero ones are painted in a blue tint, and the remaining ones can have any other color. A three-lane lamp will turn on like this: one switch key turns on one light bulb, and the second turns on the remaining two. When you turn on both keys at the same time, all the lights will turn on at once.
Since all contacts are identified and marked, all neutral conductors coming out of a separate cartridge are initially combined in the center. In this case, the “phases” remain divided into 2 groups in the form of 1+2. Where there are 2 contacts, they must be twisted into a single pair. When the power is turned off, the contacts of the device itself are connected to the ceiling ones.
Connecting a four-arm model
The standard situation for connecting a chandelier to a double switch with 4 shades is the presence of the lamp itself, a two-key switch and three contacts coming out of the ceiling. Sometimes, especially, there is a fourth contact in the form of a ground, which is used if the lighting fixture has one.

There are two options for connecting such a device:
- the first, when the contact connection diagram will look like 1+3, that is, either one or three lamps can light up;
- the second has a 2+2 circuit, when the light bulbs light up in pairs. This method is energy-consuming and is most often used when 1 lamp is not enough to fully illuminate a space, but three is too much.
When you press a pair of keys at once, all four horns on the chandelier will light up.
To connect a 4-arm chandelier to a double switch, you need to connect the phase contact coming from the network through the distribution panel to the wire that goes to the switch. Then you can connect it to the input contact, where it is always located. The second conductor, which is connected to the key conductor, is led to the distribution box, where it is connected to a contact that is connected to the installation area of the device. Here the contacts of the device and the network need to be connected to each other. The contacts on the adjacent key are connected using the same scheme.
The difference between these two keys comes down to different quantities“phase” wires connected to the network cores.
Operation of the five-arm model
The wiring diagram for a device with five light bulbs is quite complicated. This is due to the large number of conductors, each of which must be dealt with. When operating on a two-key switch, lamps help save energy by operating in the appropriate mode.
Before starting work, you should determine the common wire coming out of the device. This will be the zero contact, which is marked with colored electrical tape. This must be done so as not to confuse it with other veins in the future. There is a similar contact on ceiling surface, and it is also marked with electrical tape of the appropriate color.
Those contacts that, after checking with an indicator screwdriver, showed voltage, are called phase contacts. They are coming out of the ceiling hole, and in each horn.
When all the wires have been found and marked, the five-arm chandelier is hung on a hook and the contacts begin to be connected. First, the neutral and then the phase conductors are combined. You can distribute light bulbs on the switch keys according to the 2+ 3 or 1+4 scheme. The optimal option is the first one, in which one key turns on two lamps, and the second key turns on the remaining three. Also, all light bulbs can work simultaneously.

The intensity of light fluxes in a room depends on the specific type and power rating of the light bulbs used in the lamp.
Connecting a chandelier with six lamps
If you plan to connect a multi-lamp six-arm lamp, then the wiring must be suitable accordingly. In this case, the two-key switch model can provide only three operating modes:
- two burning lamps;
- four lamps;
- all 6 working bulbs.
Most devices with 6 bulbs have the electrical part already assembled correctly. If not, then the average person will find 12 contacts in the lamp (2 for each horn). Six neutral wires should be combined in one terminal. The remaining six phase contacts are combined into two terminals in groups (2+4).

On the ceiling, all contacts are also called to highlight “zero” and “phases”. Next, it is determined which conductor corresponds to which key. To do this, one key is switched to the “off” mode and the presence of electricity is checked. If the indicator shows no current, then the conductor corresponding to the switched off key is selected.
After all preparations, contacts from the chandelier are connected to each switch key. The zero ceiling conductor is connected to the “zero” in the terminal box of the chandelier, the phase conductors are combined with groups of phase contacts of the device.
How to connect wires correctly
When connecting a chandelier to a double switch, you should be very careful, as it is not forgiving of mistakes. When combining wires into a group, simply wrapping or twisting them will not be enough. Over time, any twist will begin to oxidize and heat up. Professionals recommend soldering such connections. If you have the opportunity to work with a soldering iron, you should definitely carry out this operation.

When connecting the wires coming from the device with those on the ceiling, you also cannot use the conventional twisting method. Here you should use special terminal boxes. Many modern chandeliers are already equipped with such devices. If they are not available, then you need to purchase them in specialized stores.
You should think in advance about how to properly connect a chandelier using terminal boxes. In order for a twist of several contacts to pass through the hole of the box, you need to solder a conductor to it, which is a single-core or multi-core wire made of copper material with a cross section of 0.5 sq. mm. And no more than 10 cm long. Such a connection requires good insulation. The free tip of the soldered conductor is inserted into the terminal box.
After all the contacts coming from the chandelier are threaded into the terminal box, it is raised to the ceiling and secured. After this, the wires are connected to the terminal block in the appropriate order.
After the electrical installation work to connect the chandelier to the double switch model is completed, you can turn on the general power supply to the entire apartment and check the operation of the device.
Before purchasing and installing a two-key switch, you first need to decide what it is for? And it is designed to control two lighting circuits from one point.
Don't confuse it with pass-through switches, which have different roles. They differ in the number of contacts. Therefore, when choosing, look first of all not at the front panel, but at the back of the switch.

two-key pass-through light switch

two-gang simple switch
Let’s say if you have 2 or more light bulbs in a chandelier, using a two-key switch you can make it so that when you press one key, only half of the lamps turn on, and when you press the second, all the rest turn on at once. 
It can also control two different lamps located at separate points from each other - for example, sconces at different ends of the room or in another room altogether. 
The two-key switch differs from its single-key counterpart not only in the number of switches, but also, most importantly, in the number of contacts. There are only 3 of them here. One common and two outgoing. Through them, the phase is separated and then returned to the junction box via separate wires or directly goes to the lamps.

Please note that to install a double switch you will need at least a three-wire wire, even if you do not have a PE protective grounding conductor in your apartment wiring. 
Installation of a two-button light switch and connecting wires
There is nothing complicated in the connection diagram and in the process of installation, installation and connection of wires to the switch contacts. First of all, the switch needs to be disassembled. To do this, remove the keys themselves. If you can’t do this manually by simply pulling them towards you, use an ordinary screwdriver, prying the keys off from the side. 
As a result, what you have in your hands is the body itself with the fastenings on the sides and the internal contact part. The main task is to supply voltage from the phase conductor to the common contact. Further, when two keys are closed, this phase will diverge into one or the other lighting circuit. 
To find the central contact, look at the marking, since it may not always be located alone and in the center. 
What to do if you don’t understand the inscriptions or they are erased and painted over? Then you need to use a contact screwdriver with a battery-powered tester with a continuity test function.
Insert into the intended common contact any metal object(nail, screw). You wrap your fingers around it and touch the other two contacts with a screwdriver.
When you press the keys one by one, that is, turn on one - check, then turn off the first and turn on the second - check, the screwdriver LED should light up each time. If this does not happen, then this is not a common contact. 
To connect the common contact, use the conductor phase coming from the junction box gray. Strip the end of the core, insert it between the contact plates and tighten the screw with a screwdriver. 
Next, connect the other two wires in the cable to the outgoing contact connectors. 
Connecting the conductors directly to the two-key switch itself is now complete. Insert the housing into mounting box and tighten the mounting screws. 
Then you tighten two spacer screws, which help the mounting fork with teeth to rest as much as possible against the walls of the box and firmly hold the switch body inside it.  After this, you can return all the decorative frames and the keys themselves to their place.
Installation of connections for a two-gang switch in a distribution box
The following cables can enter the junction or distribution box:
- power cable from the machine in the panel
- cable going down to the switch
- one (if you have a chandelier with two lighting circuits) or two cables (if the light points are in different places) to outgoing lamps

To avoid confusion, follow the following order:
First of all, connect all neutral conductors. They are usually blue. Zero does not pass through the two-key switch and goes directly from the panel to the lamp, through the connections in the distribution box.
All stripped wires can be connected using Wago quick-release terminals.  Although everyone has to them different attitude, but specifically for lighting circuits with minimal loads, they are an ideal option.
Next in order is protective grounding. This is a yellow-green wire. If you do not have a grounding conductor in your apartment or the lamp body is insulated and the cable is two-core, then this connection will not be in the junction box. 
It remains to connect the phase conductors. Here you need to be extremely careful. First, clamp the phase that comes from the power supply into the Vago terminal block. Then insert a wire into the same terminal that comes from the common phase contact of the two-key switch.
You should have 4 free, unconnected wires left. Two of them are the wiring that goes to the chandelier or sconce, and the other two wires are phases connected to the lower outgoing contacts of the two-key switch.  Take two more clamps and SEPARATELY connect these conductors through them. Thus, you will connect two lighting circuits to the lamps independently of each other.
Connection to a chandelier or lamp
In a lamp or chandelier, terminal blocks are usually used for connection. Place the wires of the cable coming from the junction box onto them according to the color marking. 
A factory-made lamp must have cores of exactly the color specified in the rules. Phase - a gray or dark-colored conductor should go to the central contact of the lamp, and zero - blue to the base of the light bulb itself.
The yellow-green ground connection can be attached either to the terminal or directly under the screw on the housing. 
Errors when connecting a two-key switch
The first mistake that an illiterate specialist can make is to connect not a phase to the switch, but a zero.
Remember: the switch must always break the phase conductor, and in no case the zero conductor.
In the opposite situation, the phase will constantly be on duty on the base of the chandelier. And simply replacing a light bulb can end very tragically. 
By the way, there is another nuance due to which even experienced electricians can break their heads. For example, you wanted to check directly at the contacts of a chandelier whether the phase arrives there through a switch or zero. You turn off the two-key switch, touch the contact on the chandelier with a Chinese sensitive indicator - and it lights up! Although you assembled the circuit correctly.
What can be wrong? And the reason lies in the backlight, which is increasingly included with switches. 
A small current, even when turned off, still flows through the LED, applying potential to the lamp contacts. 
By the way, this is one of the reasons for blinking LED lamps in the off state. How to deal with this can be found in the article "". To avoid such a mistake, you need to use not a Chinese indicator, but a multimeter in voltage measurement mode.
The second error is when the phase supply conductor is connected not to the common contact of the switch, but to one of the outgoing ones. In this case, the circuit will not work as expected. All lights will light only if you press two keys at the same time. But if you press only the key to which the phase does not come initially, the chandelier will not light up at all. 
If you have entered new apartment, where you were not the one who connected the chandelier, and it behaves in such a strange way, that is, it does not respond as expected to the two-key switches, then the issue is most likely precisely this erroneous installation of the supply wires. Feel free to disassemble the switch and check the common contact.

If you have an illuminated switch, an indirect sign of such an incorrect connection may be the neon bulb not working properly. Why indirect? Since here everything depends on which key you start the phase on.
The third common mistake is connecting the neutral wire on the chandelier not to the common zero in the junction box, but to one of the phase wires.  To avoid this, use and follow the color coding of the wires, and even better, if you don’t trust the colors, check the voltage supply using a high-quality indicator or multimeter before turning on the lamp.
Today there will be a simple article about how to connect two lamps from one two-key switch. For electricians, this is a very simple thing, but I know for sure that more than half of the male population of Russia will easily get tangled in three wires when connecting a chandelier. No offense meant. This article is just for them.
In detail, step by step, with diagrams, I will consider all aspects of installation and connection of two ceiling lamps with 2 lamps.
Why was the lighting alteration needed in this case? There was minor repairs with the redevelopment, and the configuration of the hall changed - it became more square, and the chandelier, which previously hung in the middle of the room, is now on the edge.
Therefore, it was decided to install another chandelier (lamp). This solution has the following advantages:
- you can turn on the room lighting separately by zones,
- you can save energy,
- when the lamps are turned on simultaneously, the lighting is more uniform, there are no sharp shadows,
- If one of the light bulbs in the chandeliers burns out, the others back it up.
The only downside is the cost of construction works and purchasing a lamp.
Anticipating comments about aluminum wiring, I will say that there is no point in changing all the wiring in the apartment. The aluminum boxes are high-quality welded, the sockets and switches are connected by me personally, and the entire apartment is divided into two lines, each 16A. And yes, the downside is that the sockets and lighting hang in parallel; no one does that now.
What is the difference between a chandelier and a lamp?
First, let's understand the terminology. What is a chandelier and what is a lamp?
Lamp is the broadest concept; it can be of any design, mounting and light source. It can be ceiling-mounted, spot-mounted, wall-mounted (according to the installation location), LED, halogen (according to the type of lamp), indoor, outdoor (according to the type of design).
A chandelier is a lamp that has two features that distinguish it from a number of lamps:
- The chandelier must be attached to the ceiling and has a hanging structure,
- A chandelier is a luxury item, decoratively designed and usually having more than 1 lamp.
Here is a list of my articles that discuss different kinds lighting devices and many photos:
- – device and installation,
- – installation example,
- (the process of mounting to the ceiling is discussed in detail),
- – in detail, with theory and examples,
- , error analysis,
- (wall lamp),
- – device, types and repairs.
My point is that there is very little difference between a chandelier and a lamp from an electrical point of view. It’s just that the concept of “chandelier” is included in the concept of “lamp”.
An old chandelier and a little theory
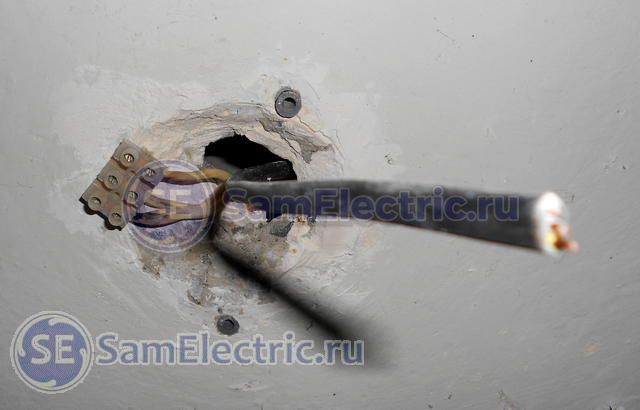
So, at the beginning of the installation of two chandeliers we have the following picture:
What kind of black things are screwed to the terminal block parallel to the light bulbs is described in detail in the article ““. By the way, the switches are backlit;)
To complete the picture (in case anyone has forgotten school course physics) I will give a classic diagram that shows a lamp with two lamps (two lamps in parallel), which is turned on via a single-key switch:

Scheme 1. How to connect a chandelier with two lamps, connection diagram via a single-key switch
The lamp is conventionally shown with a dotted line, zero is constantly supplied to the lamps, and the phase is switched by a switch.
Here is the connection diagram for a chandelier with two lamps, which was in place at the time the renovation began:

Such circuits are usually used in large rooms to turn on chandeliers containing two or more light bulbs to save energy and lamp life.
I'm filming old chandelier, this is what remains on the ceiling - the terminal block (zero is marked with a marker), dowels for attaching the chandelier to the ceiling, and you can see the bent hook on which the previous chandelier hung:

After digging out the hole with a hammer drill and throwing out the old hook, we get the following hole:

Here we need to return to theory once again. The ceiling slabs are arranged in such a way that they have voids at a distance of 185 mm from each other:

In these voids they lay power to all the lamps in the apartment, and sometimes power wires are also laid there.
A hole is drilled in the slab with a 12-16 mm drill, into which the cable enters from the wall and comes out where the chandelier should be. The wire that I freed from old plaster, dangled freely in the emptiness of the slab.
Laying a new cable to the second chandelier
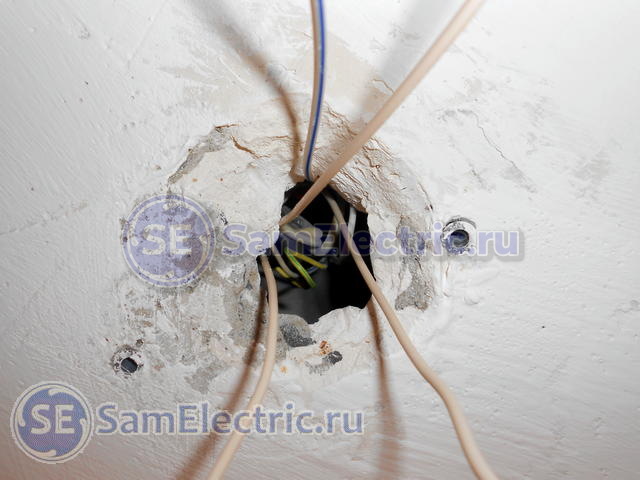
Now you need to make a hole into which the cable for the second chandelier will come out. As always, my reliable friend and assistant helped me with this - hammer drill. Make a hole along the same line along the slab:

Hole in ceiling slab for the cable of a new lamp
This is what the two dots look like; the new one and the old one on the far right:

The VVG-ng 3x1.5 cable enters the slab with a whistle:
Even when there is no plan to use a third wire, I try to use a three-core cable. It has happened many times already that the backup wire turned out to be very useful!
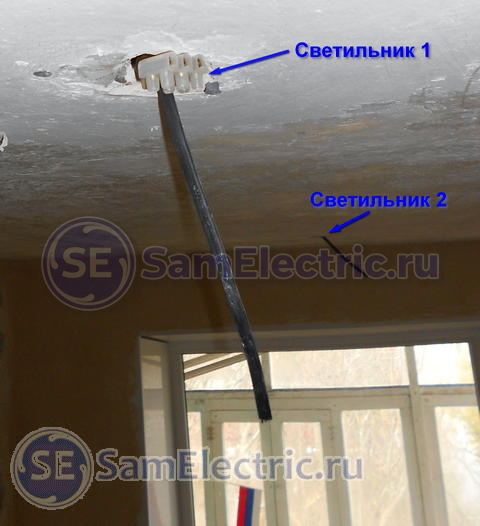
Place of the new lamp:

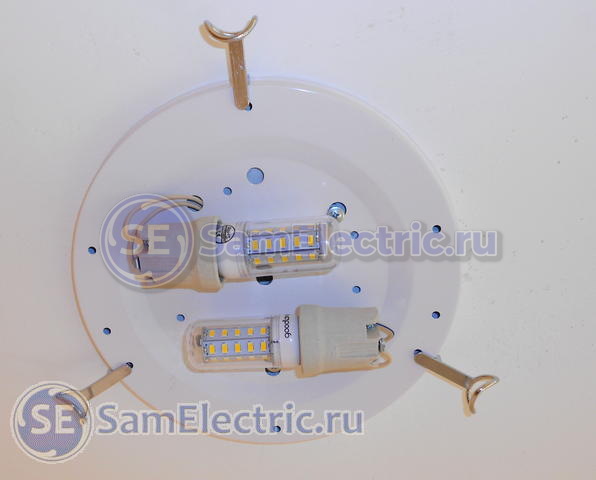
Temporary connection of two lamps
While the room was being renovated, I temporarily connected old lamp sockets. And, of course, I used my favorites. Fast, reliable and simple.

Light bulb in new place:
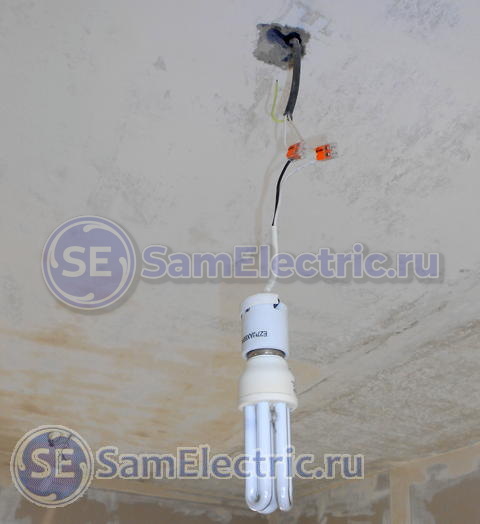
Closer connection via Vago:

Installation and connection of two chandeliers on the ceiling
It's time to connect two new lamps on the ceiling. Disconnecting the old temporary light bulbs:

These, for example, were used when connecting aluminum to copper at .

To simplify life, we use blue zero wires (with a blue stripe), and white phase wires. Choose the length with reserve!
Here you need to insert a diagram for connecting two new lamps:

As can be seen from the diagram, now each key turns on its own lamp with two lamps. Thus, the room is divided into zones according to lighting.
We carefully hide our terminal blocks in the channel in the plate, only copper comes out. Two phases and two zeros, each for its own light bulb of this lamp.
Despite the fact that the diagram shows that a lamp with two lamps includes two wires (zero and phase), in this case it is easier to make the wiring to the lamp and insert 2 phases and 2 zeros into it, even if both lamps are connected in parallel .

It was decided not to hang a bulky old-fashioned bourgeois chandelier on the ceiling, but to install compact, neat lamps in a minimalist style.
It used to be fashionable in pious houses to hang a chandelier in the hall with many shades, glass and pendants, which collected dust and was beaten against by children sitting on their shoulders. And they beat me, and I beat me :)
We attach the lamp to 2 self-tapping screws. Fortunately, it has a lot of holes, and you can choose it so as not to use a hammer drill.
- The first rule before doing any work: think about what you can do to avoid doing this work.
- Second rule: think about how to do this work easier, faster, and better.
- The third rule: think about how to get pleasure from doing work.
It's not a matter of laziness, but optimization of labor. ;)

Near the terminals of both cartridges we output the phase and zero, which we connected in advance. We connect so that the phase is on the central contact of the lamp socket, zero is on the lamp thread.

Screw in the light bulbs:
Let there be light!


In the interior of a house or apartment, everything is interconnected and must be done correctly. Installation of the ceiling covering must be verified with the type and method of connecting the central lighting chandelier. For example, when installing stretch ceiling ceiling lamp is installed at the same time, and when gluing tiles it can be installed much later.
Choosing a chandelier is not an easy task. In the store the lamps seem smaller in size, and it’s not always clear how this or that model is connected, and what will be needed for it Consumables and how long it will last. But finally, the choice is made!
After the long-awaited purchase of a chandelier, it should be installed and connected correctly. If we talk about a single-key switch, everything is simple. But in some cases, the wiring diagram for a chandelier with a double switch may seem intimidating.
Required Tools
First, let's prepare the working equipment. We will need:
- An indicator screwdriver is necessary to check the circuit and find the phase.
- A set of slotted and Phillips screwdrivers that every owner will probably have. Required for assembly and disassembly of the structure.
- A multimeter is the most important device that will help check the integrity of the connection of individual parts of the network.
- The terminal block will make it easier to assemble the wires when connecting. For household appliances A block with a diameter of 2 to 4 mm is suitable.
All this can be purchased at any electrical center; the rest of the equipment can be found at home: a chair for working under the ceiling, a knife, electrical tape and a marker.
Purpose of wires in a chandelier
Connecting a chandelier requires skillTo determine the purpose of the wires coming out of the chandelier, use the instructions. But if the instructions are foreign language, follow these rules:
- If the wires from several lamps are connected in one terminal block with a contact coming out, this is “Phase-L”. In this case, the connection is usually made in two groups: one combines the wires that connect only a few lamps to the phase, the second connects the remaining contacts. Thus, a circuit is obtained that allows the use of a multi-key switch with the ability to alternately turn on/off each group of lamps.
- Ground contact - PE, usually painted yellow. May be required if the house has central grounding. It is rare in houses younger than 2000.
- Neutral wire - N. A single core to which the neutral contacts from all lamps are connected. Determined using a multimeter or special factory markings.
You need to know that this moment there is a law on electrical installation work, which prohibits the use of all wire alloys other than copper.

General chandelier connection diagram
If the chandelier is equipped with one or three lamps, and the switch has several keys, then there are three options for connecting this lighting device.
- When turned on, all lamps will light up;
- For switches with multiple keys, you can set the lamps to start one after the other;
- In a multi-arm chandelier, you can create sequential, group starting of lamps or simultaneous using one key.
If two wires come out of the hole in the ceiling, then you can make the first connection option. The manufacturer's instructions must indicate that the chandelier is connected in accordance with its functionality. Basically, luminaires with several lamps combine paired contacts of lampshade connections, which can be connected according to the second principle.
The third connection scheme is considered more complex. The wires are connected in such a way that when the switch is turned on, each lamp lights up individually. In this case, it is necessary to connect all existing wires in parallel order.
 Standard scheme connections
 Connecting a 3-arm chandelier without grounding
Connecting a chandelier to a double switch looks a little more complicated. But in fact, everything is simple, just understand the purpose of the wires and connect them correctly.
There are usually two or three wires coming out of the ceiling. In our case, when there is no grounding contact in the house, only two cables are required. You can determine where the phase is located using a multimeter or an indicator screwdriver. It is enough to touch the bare ends of the wire and if the light comes on or the signal goes off, then the wire is live - a phase.
Next step. It is necessary to check the cables leading to the switch and chandelier for breaks. You shouldn’t rely on factory marks and wire color; it’s better to double-check everything yourself.
We strip the ends of the cable with a special tool for removing insulation or using a lighter: carefully heat the insulation for five seconds and with a sharp movement tear off the burnt area. But first of all, it is necessary to completely de-energize the apartment by turning off the input circuit breaker. It is best to completely cut off the power to the apartment.
If you have a multi-core cable installed, we press the ends of the wires using lugs, but if you use a monolithic cable, no additional insulation is required. We distribute the wires into groups and fix them in the terminal block.
Please note that incorrect cable routing may result in short circuit inside the lamp!
You can determine which cable does what by using the color of the outer sheath. White and black wires are most often used in a chandelier. We fasten them by color and that’s it, don’t confuse them. At the end, you get a small twist of two groups, which are responsible for a certain part of the lamps through which the current will pass.
We screw the block to the base of the chandelier; if you do not tighten the screws on the terminal too much, this can lead to rapid overheating and oxidation.
Electrical part of the chandelier assembly
Inside the lampshade there is an electric cartridge, a lamp is screwed into it and two contacts come off, one is phase, the other is zero. A live wire can be made in several colors, and a zero wire almost always has a blue tint. The live cable is secured in the center of the electric cartridge, and the neutral cable is secured at the bottom using a factory latch. The lamp arms are attached to the main base of the lighting fixture, in which the wires are distributed as required by a separate switch; for example, you can take any two-key switch.
A technically competent connection of the chandelier to the switch will allow you to adjust the lighting depending on the situation. For example, let’s take a three-arm lamp, one switch key will turn on one lamp, and the other the other two, or vice versa, everything will depend on the technical feasibility and time of day.
Using the example of a connection diagram for a chandelier with a double switch, you can see what such a connection would look like: the first button turns on one lamp, and the second turns on all the others.
 Chandelier connection diagram
 The neutral and phase conductors that come out of the base and side of the cartridge do not have their own voltage, but are designed to transport it. In each type of lighting fixture, the zero is not connected through a switch, but is supplied directly. The main part of the wires with zero contact coming out of the sockets is concentrated in the center of the lamp and forms a kind of plexus. The wire strands that protrude from the base of the cartridge receive a positive charge from the central network and are divided into two groups.
Depending on the desired lighting functionality, full or partial, connecting the chandelier is best done in stages, as indicated in this article. The phase cable and the zero plexus must be connected alternately to each of the three wires inside the chandelier. The presence of a third, grounding cable is optional.
Connection in the distribution box
Let's look at the most common disconnection methods.
Twisting is the most popular and favorite method of separating wires in Russia. This method is very simple, you need to strip the ends of the wires and twist them together, after which it is advisable to wrap them with electrical tape.
Soldering – used for better contact of wires with each other. Typically used in places that require increased security: hospitals, schools. But it is worth remembering that, under increased loads, this connection method is prohibited.
Welding is the most safe type connection requires special welding skills. Creates perfect contact between all connected wires.
 Wire processing
 Pressure testing is carried out using a special sleeve. A time-tested method, the connection can last more than 20 years.
The use of special screw clamps is the youngest type of connection. Allows you to connect various combinations wires into one common network. Very often used for quick installation.

Three cables go from the main distributor to the switch, the same number goes to the chandelier. The main power source is the central cable. The phase cable is connected to the conductor going to the switch. At that time, another cable going to the chandelier in the box is connected to the current drain wire. The cable from the lamp, which connects to the lamp, is secured inside the box using a plastic terminal.
Connection in a two-gang switch
This step can be carried out by absolutely anyone who has at least a little knowledge of electrics. The center of the wire connection is located in the switch; this is where the order of turning on/off the lamps is set. A switch with two keys has a mount for two or three contacts: phase, neutral, ground. The grounding contact can be found on switches with a metal body. Their main purpose is to connect wires into one common system.
Need to know. A phase wire is connected to the central mount in the switch, which is always under high voltage.
When working with wires you need to be especially careful and follow the rules fire safety, disconnect the apartment or house from electrical energy. For this reason, carry out connection work ceiling chandelier needed during daylight hours.
There is one significant advantage in connecting a chandelier to several switches: energy savings when there is no need for general lighting. It is better to place the switch near the door so that it is convenient to use it when leaving the room. With this little effort you'll save family budget and if you connect the chandelier to the wires correctly with your own hands.
After purchasing a chandelier, the next question is related to its connection. This procedure requires special care and seriousness, as it involves electricity. Following simple recommendations When connecting a chandelier, it’s quite possible even for a beginner to do this.
Connecting a chandelier to a switch: features
Every residential building or apartment has chandeliers. They are an object in the form of a multi-lamp lamp, which is installed on the ceiling, closer to its central part. A chandelier provides lighting to the entire room, depending on its area, a device of a certain power is selected.

When a place to install the chandelier has been chosen, a hook is attached to it, on which the chandelier is hung with brackets or a special ring. They are located on top of the chandelier.
If this hook is not available, you will need one. self installation using special tool. The next question involves connecting the chandelier to the electrical network.
Two, three or four cables are removed from the installation site of the chandelier. The number of cables affects the type of switching on of the chandelier, for example, two cables are responsible for switching on all lamps simultaneously. The more wires, the more options for turning on the chandelier.
Connection diagram for a chandelier with a switch
If the chandelier has two cables and the same cables are on the ceiling, then the connection process becomes easier. Connecting a chandelier, in this case, involves connecting two wires in pairs, in any sequence.
In the chandelier connection diagram, a chandelier with one lamp is connected to a single-key switch, that is, a device designed to install one lamp.
For this type of connection, you need to connect the junction box with the blue supply wire, that is, zero to zero.
The second wire, most often has a brown color, indicating its phase, it is laid along the route: junction box- switch - phase wire of the chandelier itself.
Screw terminals are used to connect the wires. In their absence, the wires are carefully twisted using pliers and insulated using special caps.

Some lamp designs assume the presence of two vertical tubes in which the wires are located.
If there are several lamps in the design of the lamp, to connect it, you should connect all the neutral cables together and connect them to the neutral cable from the mains. In addition, all phase wires are then connected and connected to the main power supply.
During the connection process, all wires of the same color gradually twist. All twists are connected to wires that reach a single-key switch through the ceiling.
How to connect a chandelier to a double switch: work technology
Modern electrical wiring in most homes uses a three-core cable with multi-colored wires. In the place where the lamp will be mounted there are three wires that come from the two-key switch.
In this case, a question arises that involves determining the purpose of each of the wires. One cable is the neutral conductor to which all lamps are connected. The second and third wires are phase wires, and they are connected to each of the switch keys.

Please note that the color of the cable does not matter in this case, and before carrying out work, clearly define the specific purpose of the cable. To do this, prepare an indicator and use it to measure the voltage on the wires when the switch is turned on. If there is no phase on the cable, it is neutral, the other two wires are phase.
If the indicator is missing, then you will need to turn off the power to the apartment and disassemble the switch structure. After removing the cover, it will be clearly visible which wires are suitable for the chandelier; they are also phase wires.
The neutral conductor is not able to pass through the keys, and the phase conductor becomes divided into two parts during the passage.
The wires on the chandelier are connected in the same way as when connecting to a single-key switch. Although, the wires that come from the lamp are divided into several groups; a neutral wire departs from each of them, requiring connection to the neutral cable of the electrical network.
Connecting a chandelier to a double switch involves gradual adjustment of the lighting in the room.
How to connect a five-arm chandelier to a double switch
A five-arm chandelier consists of five light bulbs, which are combined into groups. Such a chandelier requires the presence of ten cables at once, the connection of which is sometimes difficult to figure out.
Most often the five wires are colored Blue colour, and the remaining five are brown. To connect, you should worry about connecting the contacts to the home electrical network, that is, three cables for input, neutral and phase purposes.

There are two main schemes for connecting a chandelier of this type:
- using a switch with several keys, each of which turns on one or more lamps at the same time, in this situation, the most optimal would be to use a two-key switch, which involves turning on one, two, three or five lamps at the same time;
Connection diagram for a chandelier with a double switch:
- If in this case you use a single-key switch, then all the light bulbs on the chandelier will light up simultaneously.
It is better to choose the first option, since it helps regulate the lighting and its intensity. In addition, if not all lamps are turned on, it will be possible to significantly save electricity and reduce the cost of paying for it.
- in case of a break, a phase wire is installed on it, since when connecting the neutral cable to the phase, there is a risk of electric shock;
- Vago terminal blocks allow you to fasten all the wires together; they are easy to use and quickly connect up to five wires;
- For your safety, before starting work, make sure to turn off the electricity;
- in the absence of color marking of the wires, an indicator will help to determine the input and zero phases; if there is a light bulb, the wire is phase, otherwise - zero;
- When using a lamp with a metal body, make sure to connect the grounding to avoid current leaks.

Five-arm chandelier with double switch - connection instructions:
1. Select for yourself the common wire that comes out of the chandelier. This should be done before installing the chandelier on the ceiling. The chandelier is first disassembled and the wire that is connected to all common contacts and sockets is determined. Mark this cable with electrical tape. Next, assemble the chandelier and hang it on the ceiling.
2. There is also a wire on the ceiling general purpose. In order to find it, you should turn on the switch (if it is a two-key switch, then both keys are turned on) and use the indicator to check all the wires. A cable on which there is no voltage and is common. When working with the indicator, it is not allowed to touch any delicate parts.
3. After turning off the power, mark this wire with electrical tape. When connecting a chandelier, the ceiling common wire is connected to the previously marked chandelier common wire. Connect all the wires that remain after this to the free contacts of the terminal. Please note that this should not cause a short circuit.
4. Check the strength of the chandelier's fixation on the ceiling. Install light bulbs with the power specified in the instructions. Turn on the power supply in the room and check the operation of the device.
5. One key should turn on two lights, and the second - three. If you get an unsatisfactory result, turn off the electricity and connect the wires in a different order.

Connecting a three-lamp chandelier to a two-key switch
Before performing this operation, decide on the purpose of the keys: which of them will be responsible for turning on two lamps, and which one - one. The ease of use of the switch depends on this.
As a rule, there are three cables on the ceiling, or one wire with three cores. Some new buildings have four cables at once. The fourth wire is responsible for grounding. They have a yellow-green color. Use the indicator to check the remaining wires. Find the wire with zero voltage, and the rest will be phase. At the same time, do not forget to turn on the switch.
The chandelier also has wires; if there is a ground connection, it is connected to the same wire located on the chandelier. Their color must match.
Modern chandelier models are characterized by the presence of only wires, the connections of which are hidden in the inside of the device. One of the wires has a general neutral purpose, and the rest are phase.
If the chandelier model has three lamps, then two of them will be turned on with one key, and one with another.
The neutral wire of the chandelier is connected to a predetermined neutral wire from the electrical network. Each phase wire located on the ceiling is connected to a switch. They are connected to the phase wires coming from the chandelier.

After making the connection, turn on the electricity and check the chandelier for functionality. If you need to change the parameters of the switch, swap the wires that are responsible for turning on two or one of the light bulbs.
If you turn on two keys at once, all the lights come on. Please note that all wires can be checked for the presence of voltage in them. Even the wire responsible for grounding. Since there is a risk of errors made by installers during the process of connecting the electrical network. In order to avoid unpleasant situations associated with health risks for the person performing the work, it is better to check all wires.
In addition, if there are instructions for the chandelier, you should first read them.

Chandelier - pretty important subject interior on which its atmosphere directly depends. Properly selected lighting can make the interior both soft and cold, dim or bright.
The first criterion for choosing a chandelier involves determining the type of this device. In terms of style, chandeliers can be classified into classic, modernist, naturalistic, high-tech, country style chandeliers, etc.
In relation to the material from which the chandelier is made, they are:
- metal;
- plastic;
- crystal;
- glass;
- combined.

In addition, chandeliers vary in shape, they are:
- round;
- semicircular;
- square;
- rectangular;
- cylindrical.
The choice of one type of chandelier or another depends on general style premises and finishing materials, which are used in the process of its design.
The chandelier should fit harmoniously into the interior; to do this, you should compare its size with the area of the room in which it will be installed. A chandelier that is too large will make the atmosphere overloaded, while a small one will provide insufficient light and the room will seem dim.
The power of the chandelier depends on the number of shades and bulbs. A standard chandelier consists of one, three or five shades. Besides, main function chandeliers are not only aesthetics and attractiveness appearance, but also the practicality of its use.

In addition, the procedure for choosing a chandelier depends on the purpose of the room in which it will be installed.
A chandelier in the living room should be chic, large, attractive - a chandelier made in a classic style is best suited for this room.
The ceiling view of the chandelier is perfect would be better suited for the room where children live. It is safer and more convenient.
A waterproof chandelier must be installed in the bathroom. In addition, it must have a closed lamp to prevent water from getting into the electrical wiring.
A chandelier for a bedroom should fill the room with coziness, warmth and comfort. You shouldn’t settle for bright and too powerful lighting fixtures. In addition to the chandelier, it is better to install a sconce or an additional lamp on the wall.
Ceiling lights are also suitable for the kitchen. Since this room requires a lot of space.