Hello! I'll tell you how I built a bathhouse at the dacha. Built alone. Sometimes only (when installing heavy or long parts) did he ask someone to help (when installing the frame and rafters).
Well, I'll start from the beginning. First, we determine the area where the bathhouse will be. We mark the location of the future foundation and begin digging.
We are digging under the foundation.
Since our site is located on quicksand, the foundation was made stronger. I bought pieces of reinforcement at a collection point for ferrous scrap metal. I welded a frame out of them and laid them on bricks so that the metal did not touch the ground.
Next, we make formwork so that the foundation protrudes above the surface. For the formwork I used chipboard from old cabinets. I placed the straight edges up and leveled it around the entire perimeter. This is necessary so that you don’t have to remove the level with a brick later. We lay a sewer pipe to drain the water.
Next we fill it with concrete. You can bring ready-made concrete with a mixer (this is if there are access routes for the mixer). In my case, it was not possible for a mixer to be accessible. I ordered 1 Kamaz OPGS (Enriched Sand-Gravel Mixture). They dumped it on the plot (by the way, my plot is small, only 4 acres). And all the hard work began. From one end of the site to the bathhouse, I carry 3 buckets of OPGS + 1 bucket of cement on a construction wheelbarrow. I add water on the spot and mix it in the same wheelbarrow using a shovel, ready mixture poured and leveled. Since I did it all alone, it took me 2 days. At that time, I thought it was pointless to buy a concrete mixer, but later it turned out that it would be better to buy it, because then I would fill the paths and other little things. In short, if you have such an idea, buy a stirrer, it costs 7-8 thousand. For one thing, we fill the foundation for the stove.
We wait until the poured foundation sets and gets stronger and begins to lay out the base of red brick. Between the foundation and the brick I put a layer of waterproofing on it, 2 rows of brick. When laying bricks I left sewer pipes 50mm for ventilation and one polypropylene pipe for cold water supply.
We bring the log house and lay out all the logs in order so that later we don’t have to look for the ones we need.
I already put 2 layers of TechnoNIKOL waterproofing material on the finished brick base and began to assemble the frame. I sanded each log using a grinder with a sanding attachment. I used jute to seal the joints. They were waiting to nail it with a stapler and when installing the log, they threw it in to crush the jute. The log house has been assembled. Immediately treated the outside with a bug and weatherproofing treatment.
The log house has been assembled.
Rafters and sheathing.
Pediments.
Waiting room.
Entrance door.
The ceiling is made of 40mm boards. I glued it with foil and covered it with aspen clapboard, and insulated it with ecowool on top.
Shelf frame.
The stove is fenced from the log house.
The floors in the dressing room were covered with yacht varnish.
Well, this is what happened in the end.
www.drive2.ru/users/malaika11/
A vacation without a bath is not a vacation. Replace the bathhouse with suburban area neither a summer shower nor a bath can. Of course, if your budget is very limited, you should not attempt to build a two-story bathhouse complex with a swimming pool. But it is possible to build a small cozy bathhouse on a suburban plot with minimal investment.
In this article, we will look at how to build a budget sauna with your own hands, reveal the secrets of choosing and saving building materials, and tell you how to prevent lapses and mistakes for novice craftsmen.
The most popular materials for building baths are wood, bricks and blocks. A wooden bathhouse can be in the form of a log house or frame.
Wood

Tree - classic material for the construction of baths. Wood is valued for its environmental friendliness and ease of processing. Wooden baths quickly warm up, and the essential resins released into the air have a beneficial effect on the well-being of visitors.
However, wood is far from perfect option for construction. In order for the walls of the bathhouse to be smooth, you need to choose quality timber or a log. Don't forget about shrinkage. The better the wood is dried, the lower the percentage of shrinkage and the risk that the log house will “lead.”

It is important to be able to work with an ax and a saw, to have sufficient physical strength and endurance to cut locks to connect corners, external and internal walls, and ceilings. Of course, you can buy a ready-made log house with delivery to the site, but this involves additional costs and is not relevant for the construction of a budget bathhouse. It is best to carry out the construction with at least two people, because it is extremely difficult to lay the crowns alone, especially the top ones.

For the construction of a bathhouse, hardwood, such as linden, is best suited. This material is considered relatively light, therefore, if the geological conditions of the area allow, you can save on the foundation and limit yourself to a lightweight strip version (monolithic or prefabricated).
What else can you save on? For example, on insulation and finishing. If the bathhouse will be used for its intended purpose only in the warm season, there is no need to purchase insulation, beams for sheathing, steam and wind insulation, finishing decorative material for the facade of the bathhouse. Wood, if thoroughly sanded and coated with protective impregnation and varnish, is quite aesthetically pleasing and fits perfectly into landscape design private land plots.

In a budget bathhouse, you can save on organizing a full-fledged sewerage system and water supply. Since ancient times, in Russian baths, the floors were made to pour, and water was carried in buckets in advance. Yes, this causes some inconvenience, but it will not spoil the overall pleasant experience of the bath procedures.
What can't you save on? Wood is a highly flammable material. If you just neglect to close the ash door, a falling hot ember will lead to a fire and damage to property. A similar situation is possible if fire safety rules are neglected when installing a stove and Therefore, in no case should you skimp on:
- fire-bioprotective impregnation;
- fire cutting;
- materials for insulating the floor in front of the firebox and
We strongly do not recommend saving on fasteners. Firstly, the difference will be insignificant, and secondly, low-quality metal hardware will quickly begin to rust, and unsightly black smudges will appear on the walls. The worst thing that rusted fasteners will lead to is the collapse of building elements due to the loss of their strength.
It is very important to properly organize ventilation in wooden baths. Even if the bathhouse is only 4-6 square meters. Visitors are unlikely to like the aroma of mustiness and mold, and the owner will not be pleased with rotting floors and walls.

Now let’s talk more specifically about wood prices in order to roughly calculate construction costs.
| Lumber | Breed | Section or diameter, cm | Price in rubles per cubic meter |
|---|---|---|---|
| Profiled timber | Pine, spruce | 140x140 | From 11.5 to 14.5 thousand rubles. |
| Profiled timber | Larch | 140x140 | From 16.5 to 18.5 thousand rubles. |
| Round timber | Larch | From 180 to 460 | From 8.5 to 10 thousand rubles. |
| Carriage | Larch | 150x250 | From 15 thousand rubles. |
*The average cost of building materials is current for 2017.
Based on the cost of new lumber, a budget bathhouse will definitely not work. The way out of the situation is to buy used timber at a price of 1000 rubles per cubic meter or from 80 rubles per 1 piece. Used pallets can also be useful if used correctly.
Bricks and blocks
A bathhouse made of blocks or bricks will undoubtedly be more durable than a wooden one. And a fire that suddenly breaks out is not scary for stone walls. At your own taste and discretion, you can build a bathhouse of any size and shape, as long as funds and personal time allow.

Brick manufacturers always have a wide range of products from the most different forms, shades, textures. For example, combining a brick of two different shades When building walls, you can build a bathhouse that will be very neat and aesthetically pleasing in appearance.
On a note! IN brick bath the window can be replaced with glass blocks. They have sufficient light transmittance. But in this case, it is important to take care of effective ventilation.

A brick bath takes longer to warm up than a wooden one, and cools down much faster. Brick walls need finishing, and this adds expense items to the overall estimate. Used for laying bricks cement-sand mortar, which you can buy ready-made and simply dilute with water in the required proportions, or prepare the mixture yourself and spend less money.
How much will it cost to build a bathhouse made of M100 ordinary brick?
| Building material | Description | Price |
|---|---|---|
| Width 120 mm, height 65 mm, length 250 mm. | From 6.20 rub. for 1 piece. | |
| Has the same dimensions as a regular one. Used for laying those walls that are exposed to direct heat. For example, a base for a stove and a protective screen are laid out of fireclay bricks. | From 41 rub. for 1 piece. | |
| River sand for preparing masonry mixture or concrete mortar for pouring the foundation | From 68 rubles for 30 kg | |
| The purpose is the same as that of sand. Crushed stone fraction 5-20 mm. | From 86 rub. for 30 kg | |
| M400 | From 195 rub. for 50 kg |
As an example of calculating the cost of masonry, let’s take a single brick and laying it in one brick (the wall thickness will be 25 cm). Using the table data we get:
- taking into account mortar joints per 1 sq. m of masonry requires 102 bricks;
- 102 bricks x 6.20 rub. = 632.4 rub.
Brick prices
Typically, bricks are purchased with a margin of up to 15%, taking into account possible defects. And to the cost of laying 1 square meter of wall you need to add the cost of the mortar. Don’t forget that you may need a concrete mixer, joint compound, a set of mason’s tools, etc.

Foam blocks and gas blocks are materials that are increasingly used for the construction of baths. Their main advantage is high speed construction. The disadvantages are similar to bricks.
The blocks are laid with reinforcement in the rows, fixation is carried out special glue or cement-sand mortar.
To build a bathhouse, blocks measuring 200 x 300 x 600 mm are often used. One such block costs from 93 rubles. For internal partitions blocks of smaller thickness are suitable - 100 or 120 mm and cost from 50 rubles per 1 piece.

Number of blocks in 1 sq. m the following:
- with a wall thickness of 20 cm, in one square meter the walls will be 5.5 blocks (5.5 x 93 = 511 rubles);
- with a wall thickness of 30 cm, there will be 8.33 blocks in one square meter of wall (8.33 x 93 = 774.69 rubles).
We conclude: for the construction of a budget bathhouse, it is preferable to use not brick, but blocks 200 x 300 x 600 mm, construction should be carried out with a wall thickness of 20 cm. You need to take into account the cost of glue for the blocks (from 155 rubles for 30 kg, consumption is approximately 1.2- 1.4 kg per 1 sq. m of masonry) and do not forget that blocks are purchased with a reserve.

Important! In an effort to save money, you should not sacrifice the reliability and durability of the bathhouse. You can always buy, for example, a used brick for pennies, but there is no guarantee that in the next decade such a brick, and with it the walls of the bathhouse, will not begin to collapse.
A big plus of building a bathhouse from blocks is the high strength of the walls, which is achieved by reinforcing the rows. Provided the reinforcement is done correctly, the walls will not crack. Even when building a budget bathhouse, you should not neglect the safety margin of the walls, so as not to start working in the next few years major repairs baths
Prices for foam blocks
foam block
Construction of a bathhouse made of aerated concrete with a brick base
We will consider the process of building a bathhouse with dimensions of 6x5 m. This area is enough to arrange three main rooms: a relaxation room or dressing room, a shower room, and a steam room. If the free space on the site does not allow the construction of a 6x5 m bathhouse, you can reduce the dimensions to 4x4 m, and divide the internal space into a dressing room and a steam room, without a shower or other amenities.

So, let's begin. Inspect your land plot, prepare the site for construction. It is necessary to remove debris, uproot stumps, remove upper layer soil with grass growing on it, level and compact the area.
You need to prepare a bathhouse design in advance with the order of the masonry. Using the drawings it is easier to calculate the amount of building materials and carry out construction.
Mark the area, dig trenches, and pour a shallow strip foundation. Don't forget about the products. You can read more about pouring technology.

It is important to especially carefully level the upper surface of the foundation during the pouring process. If, however, the base has horizontal deviations, it is necessary to level everything with cement-sand mortar.
Step 1. We lay waterproofing material, for example, strips of roofing felt, on the foundation strip.


Prices for roofing material
roofing felt
Step 2. Mix cement-sand mortar for brick laying. To prepare the solution we use the following proportions:
- cement M400 – 1 bucket;
- sifted river sand - 2 buckets;
- dishwashing detergent or any similar - from 50 to 100 ml.
Important! We recommend that you first add water and detergent to the concrete mixer or solution container, then add cement and sand, stirring constantly. The consistency of the finished solution will resemble thick sour cream, and if you run your finger over the mixture, a clear, non-blurring trace will remain. Kneading should be carried out for 3 to 5 minutes.

We transfer the finished solution into buckets and transport it to the construction site.
Step 3. Let's start laying brick plinth. We will work from the corners of the bathhouse.
Apply the mortar to the brick with a trowel. We lay the brick on the corner of the foundation (along the outer edge). Place a bubble level on the brick and, if necessary, tap the brick with the handle of a trowel. We repeat the procedure at the next corner of the bathhouse foundation.

It is important that the bricks laid at the corners are at the same level. To check, we tighten the mooring thread and additionally check the position of the bricks with a water level. Place the second brick at each corner perpendicular to the first.

We lay the plinth “in one and a half bricks”. At standard sizes bricks, the total width of the base will be 38 cm. This width is made up of one brick length (25 cm) and one brick width (12 cm), 1 cm is the connecting mortar seam.

Place the first outer row with a spoon facing outwards. We lay the bricks on the mortar previously applied with a trowel, pressing it into the mortar and moving it slightly back and forth. We leave a gap between adjacent bricks, into which we add mortar with a trowel. We immediately remove the excess solution with a trowel. We knock the bricks so that they are all in the same plane (the reference point is a stretched mooring thread). As a result, if you look at the base from the “street” side, you will see a row laid “in half a brick.”
We lay the inner row with a poke towards the future premises of the bathhouse. Next, we carry out the laying according to the order scheme, observing the bandaging of the seams.
We lay out 2 rows of bricks and move on to arranging the floor covering.

Step 4. To arrange the floor covering, you need to prepare the beams.

The beams must be fixed in the “sockets” of the plinth to a depth of 10 cm. We measure the width interior space, add 20 cm, we get the length of the beams. The section of beams can be selected using the table.
*Section is indicated in millimeters. The beams are laid on edge. Maximum floor load 400 kg/m 3 .
We cut the roofing felt into rectangular pieces 15 cm wide. We wrap the ends of the beams with roofing felt and fix it with a construction stapler.
We lay the beams on their ends, maintaining an equal distance between them.
We continue with bricklaying.


We lay out two more rows, observing the dressing. We also lay brick between the beams, sawing it with a grinder if necessary.

The height of a single row brick is 65 mm. Accordingly, two rows of bricks plus two mortar joints will be 150 mm high, the top surface of the beams will be flush with the surface of the brickwork.

Laying the fourth row
Recommendation! If the brick is pre-moistened with water (without soaking it), it will not absorb moisture from the mortar. The masonry will be very strong. The recommendation is relevant for work in hot weather.
Step 5. The basement is built, we move on to laying walls from aerated concrete blocks.
We lay a layer of roofing felt on the brick over the entire surface of the external and internal walls of the bathhouse.

We begin work again from the corners of the bathhouse. Mix the solution and place a layer on top of the roofing material.
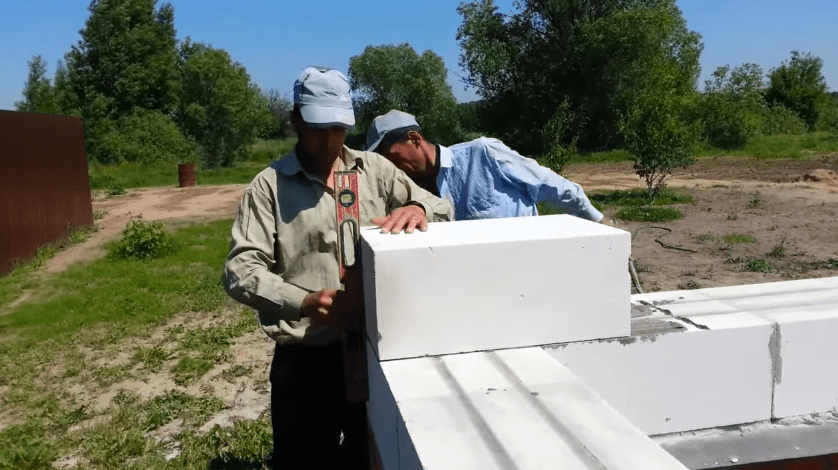
Level the solution with a notched trowel. Installing the first block.

Similarly, we install the second block on the adjacent corner of the plinth. The most difficult thing is to bring both blocks to zero. We check using a hydraulic level, bubble level, if available. laser level, it's better to use it.


There is no hurry here. If necessary, you can remove the block, remove excess solution, or add more solution. The horizontal deviation should not be more than two millimeters.


We lay out the first row of blocks on the solution. If the distance between adjacent blocks does not allow installing a whole block, you need to use a hacksaw with small teeth to make a cut. After cutting, sweep away the dust with a brush.

When laying out the blocks, do not forget about the doorway.

Step 6. Let's move on to reinforcing the first row of blocks.
We prepare a set of tools for work in advance.
| Tool | Approximate minimum cost, rub. |
|---|---|
| 450 |
| 490 |
| 500 |
| 600 |
| 365 |


*Used tools will cost less.
For reinforcement we use corrugated rods of class A3. The diameter of the rods is 8 mm. It is not advisable to take reinforcement of greater thickness.
Using a hand wall chaser, we cut two grooves for the reinforcement. For convenience, you can draw two parallel straight lines using a ruler on the surface of the blocks in advance with a pencil. At the corners of the bathhouse and at the junction of the internal partitions with the external walls, the grooves are round and parallel.

We clean the surface of the groove from dust using a damp brush.

We take the reinforcement and put it in grooves. We bend the reinforcement at the corners. Please ensure that the reinforcement bars are not connected at the corners. The rods can be connected at a distance of more than 30 cm from the corners.

We remove the reinforcement from the grooves and place it on the surface of the blocks.
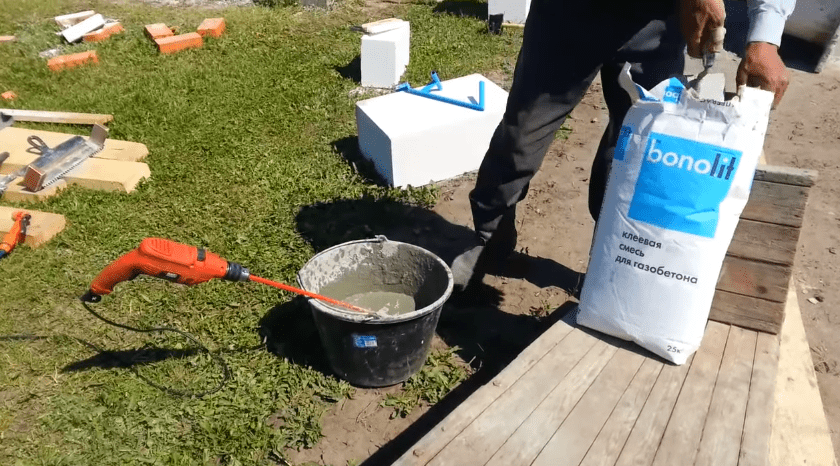
Mix glue for aerated concrete (approximate cost for 25 kg - 220 rubles).

Pour water into the bucket, then add the dry mixture from the bag. Mix the glue with a drill with a mixer attachment at low speeds (up to 800 rpm). The consistency of the glue should be similar to thick sour cream. The glue should not spread.
Fill the grooves with glue. Spread the glue with a spatula. We embed the reinforcement in the glue. If necessary, add more glue on top of the laid reinforcement so that the surface of the gas blocks is smooth, without grooves or bumps.
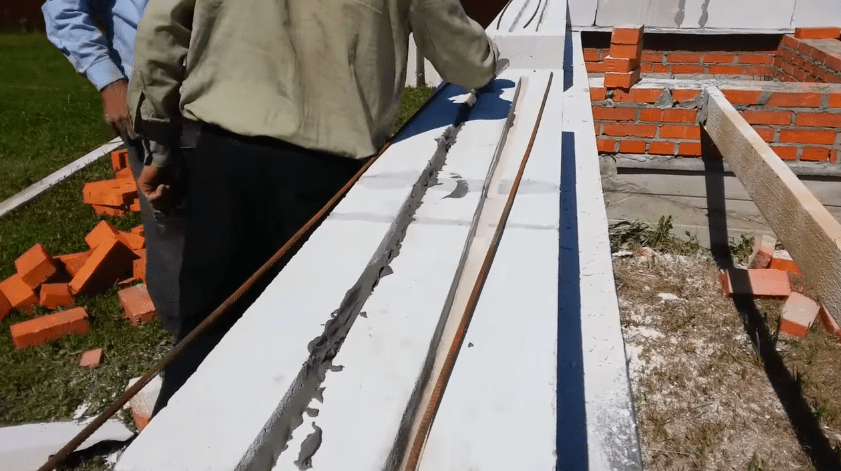

Step 7 We proceed to laying the second row of gas blocks. We start traditionally from the corner. Let's start applying glue under the block.
Important! Do not forget about the need to lay blocks with a dressing similar to brickwork"half a brick." The displacement of the upper block relative to the lower one should be from 15 cm to ½ the length of the block.
It is most convenient to apply glue with a ladle (trowel). The working width of the trowel must correspond to the width of the block. This will allow you to apply the glue quickly and accurately. But sometimes builders use homemade devices, for example, as in the photo. The main thing is to evenly apply a thin layer of glue over the entire surface of the blocks.
On a note! The applied layer of glue can be continuous, but it is the use of notched spatulas or special ladles that can reduce glue consumption.

We continue laying the blocks of the second row. We check the correct installation of the blocks in two planes - vertical and horizontal. If necessary, grind the surfaces of the blocks.

To make tying the blocks easier, you can start laying with half a block. We cut the gas block with a hacksaw. Sweep away the dust with a brush. Apply a thick layer of glue (2-3 mm) to the ends of the block. Installing the block.
We continue laying the blocks of the second row. We check the correct installation of the blocks in two planes - vertical and horizontal.

Important! If the bathhouse is more than 6 meters high, it is recommended to reinforce every fourth row of masonry.
Prices for cement M600
cement M600
Step 8 We move on to laying lintels and their reinforcement.
There should be reinforced lintels above the window and door openings. The easiest way is to use U-blocks, but this comes with additional costs.
To save money, you can manually make recesses in ordinary gas blocks. To do this, we make two cuts along the width of the recess on the block with a hacksaw, then remove the excess material using a chisel and a hammer.
To lay the blocks, we make formwork from boards. On top part The formwork will rest on the blocks. We fix the horizontal board with supports and fasten the elements with ordinary self-tapping screws.
The reinforced belt should protrude beyond the window and door opening by at least 15 cm. We install the blocks on the formwork. We fasten the ends of the blocks with glue.
Inside the blocks, closer to the outer edge, we lay pieces of EPS (Penoplex) 50 mm thick.
Let's start knitting the armored belt. For the link we use plastic clamps(screeds). The reinforced belt consists of four long parallel rods, and every 0.5 m there are vertical sections of reinforcement. In cross-section, the armored belt should form a square.
Important! The armored belt cannot be laid directly on aerated concrete. Plastic clips must be used. Without clamps, the reinforced frame will not take the correct position and will not be filled with concrete mixture on all sides.
We install the frame with clamps and fill it with concrete flush with the edges of the gas blocks. Concrete mix We compact it by piercing it with a rod or wooden strip. Level the surface as thoroughly as possible.
Now you need to take a technical break and wait until the solution sets. This will take from 10 days to two weeks.

Step 9 So, the concrete in the lintels has hardened, we continue construction. If the height of the walls is insufficient, we lay out another row of blocks. In our case, this row will be the final one on the first floor and at the same time will serve as an armored belt.
We make the armored belt on the floor using the same technology as the lintels, but with one difference. Now the armored belt will be poured along the entire perimeter of the external and internal walls. For the sake of economy, we do not use U-blocks, but cut and hollow out solid wall blocks.
- We lay the entire row of prepared blocks on the glue.


- We install polystyrene foam boards. We cut them carefully, using a ruler, so that the edges are even.
- We knit a reinforced frame.


- We install the clamps and lay the frame inside the blocks.

We pour concrete.
- Level the surface.
- We are waiting for the concrete to harden.

Step 10 The first floor cannot immediately end with a roof, of course. Let's move on to arrangement interfloor covering. It will be wooden. We place antiseptic beams with waterproofed ends on an armored belt. A similar technology was discussed above when the base was built.


But since now we are not laying brick, but gas block, we make cuts in each block under the ends of the beams.


It is important to accurately measure the distances between the beams and carefully select even rectangular niches in the blocks with a chisel and hammer. We lay the blocks in a standard manner, observing the dressing, applying glue to the previous row and the ends of the blocks.
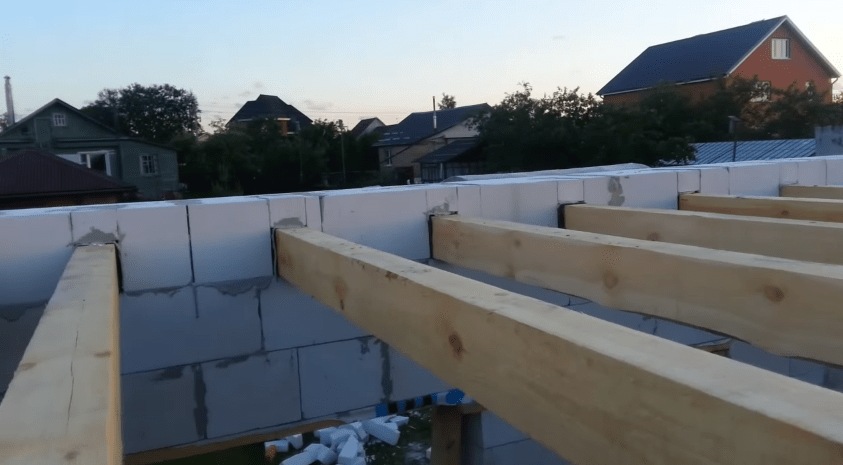

Important! In our construction example, the bathhouse will have a small balcony. Therefore, several beams extend beyond the bathhouse wall.

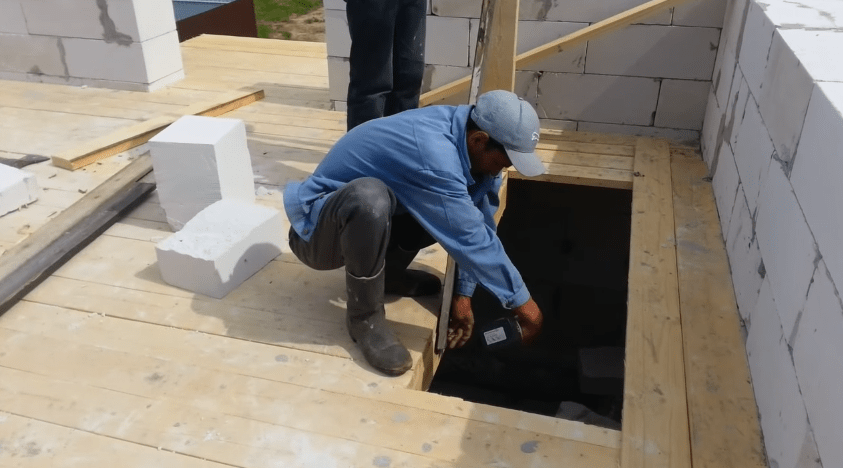
Step 11 Laying the subfloor. Laying it down edged board on top of the beams. We fix the boards to the beams with self-tapping screws right through the board. If the board is 50 mm thick, take hardware 8 cm long.
We leave a rectangular opening in the floor for access to the attic.
In the future, when the floors are ready, windows and doors are installed, decorative finishing will be done, foil vapor barrier will be stretched in the steam room, lining will be nailed or simple board from hardwood.
Step 12 Usually one-story bathhouse owners have enough for a comfortable pastime. The space under the roof is often used to store fragrant bath brooms.
Sometimes in the bathhouse on the second floor they put a small sofa and a table, setting up a relaxation room. Our project provides just such a room on the second floor. After the bath procedures, it will be pleasant to relax and cool down by going out onto the small balcony. A window on the second floor will increase the efficiency of ventilation and reduce the cost of building materials.
The roof has a complex configuration. On both sides there are two trapezoidal pediments, tightly laid with gas block. And if you look from the side of one of these gables, the perpendicularly located roof slopes on both sides are clearly visible.

Advice! If you are not confident in your abilities, limit yourself to building a simple pitched or gable roof.
The main stages of work during the construction of the second floor and roof:
- installation of vertical racks made of timber;
- installation of horizontal piping;

- laying floor beams on top of the frame;


- installation of extreme roof trusses along the gables;

Floor beams and rafters


- installation of intermediate trusses;

- masonry of gables from blocks;


- installation of vapor barrier on the room side;

- lining the ceiling and slopes from the inside with boards;

- laying mineral wool in two layers;

- installation of wind protection on top of the insulation;

- installation of counter-lattice under metal tiles;


- assembly of a gable canopy over the balcony, installation of a windproof membrane and counter-lattice on the canopy slopes;

- installation of metal tiles and additional elements.


You can watch the video to see how a roof of complex configuration is erected.
Prices for gas blocks
gas blocks
Video – Roof construction
Video - Construction of gables
Video - Rafters, armored belt
Video - Completion of installation of rafters, laying aerated concrete walls of the second floor
Video - Overlapping, vapor barrier
Video - Roof insulation
Video - Counter-lattice for metal tiles
Video - Washed down the ends of the counter-lattice, filing the ceiling
Video - Laying metal tiles
Shed roof for a budget bathhouse
Step 1. We attach the Mauerlat on top of the armored belt. It is a board fixed with dowels (wood grouse).
We drill holes in the boards and then in the blocks. We hammer in the dowels. We lay a layer of roofing felt as waterproofing. We lay the Mauerlat board and screw in the screws (capcaillie).


Step 2. Install vertical racks and horizontal strapping beam. The height of the front part is 130 cm, from the rear of the bathhouse – 30 cm. The roof slope will be 18 degrees.
We fix the beams with metal perforated corners and wood screws.
On a note! To prevent the racks from loosening due to gusts of wind, we temporarily fasten the boards connecting the front and rear frames with self-tapping screws.


Step 3. We lay the rafters (we place straight boards on edge and fasten them with perforated corners to the horizontal beams of the front and rear frames).

Step 4. We install counter-lattice boards perpendicular to the rafters.

Step 5. We fasten the corrugated sheets. We cut off the counter-battens sticking out at the edges of the boards.


Step 6. We strengthen the frame with jibs. On the sides we install posts made of timber and one additional jib to later attach the sheathing.


Step 7 We hem the rough ceiling.


Step 8 We cover the frame with plywood. We treat plywood sheets with protective impregnation.


Step 9 We foam the gaps between the blocks and plywood.

Step 10 If decorative finishing of the facade is not yet planned, we attach protective canopies made of tin.

As decorative finishing You can use plaster on the façade of the bathhouse. It is necessary to select a mixture for cellular concrete. Regular cement-sand mixtures are not suitable for this purpose. Aerated concrete quickly absorbs all the moisture from the plaster, the decorative coating cracks and falls off.
To plaster the facade, you need to clean it with a grater from any remaining glue and sand off any unevenness, if any. After sanding, you need to apply the “Aerated Concrete-Contact” primer to the walls. The plaster solution is applied with a wide spatula over a fiberglass mesh secured with self-tapping screws. After the plaster has dried, you can paint the facade or simply apply a water repellent.
Do you want to get a bathhouse, but your summer cottage is so small that it does not allow you to build a steam room of standard dimensions? The best way out from the situation - a mini-bath. In terms of functionality and comfort, it is in no way inferior to traditional structures, but it takes up much less space and does not require serious expenses. In addition, you can easily make a small steam room for your dacha with your own hands - then we will tell you how to bring such an idea to life.
Design and foundation
Even a small bathhouse cannot be built without at least the simplest project, so the first stage of work is drawing up a plan diagram. Here you need to indicate the location of the main objects and their dimensions.
As a rule, there are four zones in a bathhouse:
- dressing room - enough space with an area of 1.5 x 2 m;
- rest room - about 2 x 2 m;
- shower room - at least 1 x 1 m;
- steam room - no more than 1.5 x 2 m.
Thus, we obtain the minimum dimensions of the bath: length – 6 m, height – 2 m, width – 2.5 m. This is quite enough to create a comfortable and practical steam room.
The second stage of work is pouring the foundation. When deciding on the type of foundation, focus on the type of soil in the area.
If a mini-sauna is being built on hard and dry ground, you can limit yourself to a lightweight foundation: lay flat stones over the entire area of the future sauna, cover them with clay, compact them, and arrange a dense layer on top wooden beams and treat them with waterproofing bitumen.
If your site has soft soil, lay a strip foundation: dig a trench, fill it alternately with layers of sand and crushed stone, compact the base and secure a reinforcing mesh on top, and then fill the pit with cement mortar.
Important! Strip foundation must be covered with a layer of waterproofing. The simplest option is sheets of roofing felt.
Based on high content sand, a foundation of concrete blocks can be laid under a miniature bathhouse. For a lightweight design, 10 blocks of standard dimensions 20 x 20 x 40 cm are enough.
Construction of a bath frame
The best method of constructing a mini-bath is frame. It is lightweight, fast and economical. To build the frame you will need:
- bars 5 x 5 cm;
- boards 2.5 cm thick;
- waterproofing film or foil;
- thermal insulation material.
First, a frame is assembled from beams, corresponding in its dimensions and configuration to the previously developed project. The inside of the frame is covered with boards. To connect the elements together, use all kinds of anchors and various screws. Insulating materials are mounted on top of the boards: mineral wool, expanded clay or sawdust can be used as thermal insulation, and bitumen or polymer mastics. It is necessary to insulate not only the walls, but also the floor and ceiling.
Advice. It is advisable to additionally cover the thermal and waterproofing of the ceiling with roll-up boards - a row of wooden boards.
After insulation procedures, you need to take care of the roof. You can use corrugated sheeting, slate or metal tiles as a covering: first mount it on the frame rafter system, and then fasten the roof on it with self-tapping screws. When constructing the roof, leave an opening for the chimney.
The outside of the mini-bath can be covered with a block house or clapboard - these materials will give the structure an aesthetic appearance.
Arrangement of communications
The final stage of work on the mini-bath is the arrangement of the necessary communication systems.
Water supply and drainage. Feeding can be done by gravity:
- Prepare two 50 liter tanks, a hose and a pipe with a mixer.
- Tank for hot water install 0.5 m lower than the cold tank.
- Connect the tanks together with a hose: fix one end in the lower zone of the “cold” tank, the other in the upper zone of the “hot” tank.
- Additionally, connect the tanks with a pipe with a mixer at the end.
To ensure water drainage you will need a drainage system:
- Dig a drainage well near the steam room.
- Make holes in the floor of the bathhouse for drainage.
- Bring the pipes to the holes, installing them with a slight slope.
- Direct the pipe into the drainage well.
Water heating system. To heat water, you can use a mini-stove or heating elements. In the first case, you must first install the device, and then in its hottest place, going around the base of the chimney, install a U-shaped metal pipe: the supply end of the pipe should be placed on the body, and the outlet end 5 cm higher. In the second case, it is necessary to install heating elements under the “cold” tank and connect them to the water supply system with hoses and pipes.
Ventilation system. To ensure ventilation in a small bathhouse, it is enough to make holes with a damper in the wall opposite the entrance.
A mini-sauna is the choice of those who do not want to give up a full-fledged steam room due to the modest dimensions of their summer cottage. As you can see, building it with your own hands is not difficult: foundation, frame, communications - you will successfully cope with these tasks if you follow simple recommendations and rules.
Do-it-yourself mini-sauna: video
Washing in a country bathhouse is a pleasure available to everyone. Its construction does not require large financial investments. In a minimal plan, such a structure is erected in a few days.
In this article we will look at the topic of how to build the simplest bathhouse in your country house quickly and inexpensively.
Let's start by studying ready-made options, we will discuss the designs of walls, floors, stoves and sewers that are popular among craftsmen.
Design Features
The main conditions for the comfort of any bath are:
- Walls, floor and ceiling well protected from heat loss.
- Reliable insulation of structures from water and steam.
- Compact, quick heating oven.
- Effective sewerage and ventilation.
Examples of country baths
In photo No. 1 we see a simple bathhouse, reminiscent of Diogenes’ barrel. You can only take a steam bath in it. You won't be able to wash yourself here because there is no sewage system in the building. However, if desired, it is not difficult to do. To do this, you need to install a standard shower tray in the corner of the bath and remove drain pipe to the septic tank.
 Photo No. 1 Build such a “barrel sauna” at your dacha and steam to your heart’s content
An important advantage of this design is its low weight, allowing it to be placed on a plank terrace.
The device itself the simplest bath from the container category is shown in photo No. 2.

Photo No. 2 Container option country bathhouse
It consists of one steam room. For washing, the owner needs to attach a canopy with summer shower or supplement the room with sewerage, and the stove with a tank for heating water.

Improvising on the theme of a barrel-shaped bath, let’s pay attention to cellular polycarbonate. It can be quickly and easily assembled original design. In order for it to retain heat well, it will take two large sheets this material and a frame made of metal or wooden bars. A mineral wool insulation 10 cm thick is laid between them.

The ends of the building can be made from boards, stuffed onto an insulated wooden frame. Place such a bathhouse anywhere: at your dacha, on a polar ice floe or on the top of Everest and you will always be comfortable in its steam room (photo No. 5).

Photo No. 5 Simple barrel-shaped bathhouse
A small Russian bathhouse, made from scraps of timber, can be installed on oak posts. We see an example of such a structure in photograph No. 6.

Photo No. 6 Oak posts are an excellent support for a small wooden bathhouse
Larger structures require their own foundation. There are three possible options here:
- Rubble concrete tape.
- Brick columns.
- Piles made of asbestos cement pipes.
Do not forget that the type of foundation affects the choice of material and wall design. Pile and columnar foundations are used for installation wooden frame, as well as for baths made of timber or logs (photos No. 7 and No. 8).

Photo No. 7 Bathhouse made of SIP panels on screw piles 
Photo #8 Brick pillars – best option for timber, log and frame structure
The “tape” of rubble concrete is suitable for any walls (made of gas silicate blocks, logs and frames).

A cheap, reliable and simple version of a bathhouse is obtained using a technology called “clay mortar”. For such a structure you will need little: a truck of firewood, a cart of straw and a dump truck of clay (photo No. 10).

The best shape for a wood burning structure is round. It eliminates the need to reinforce masonry corners and looks aesthetically pleasing and original.
Borrowing from birds the technology of building nests from branches and clay, you can build such a simple and warm bath(photo no. 11).

Photo No. 11 Wicker frame coated with clay - “know-how” of an inexpensive bathhouse design
Recommendations for choosing finishing, insulation, sewerage installation, flooring, roofing and stove
For exterior decoration frame bath We can recommend the following materials:
- Wooden blockhouse.
- Metal tiles or corrugated sheets.
- Plastic siding.
- Cement particle board (CSB).
- OSB board.
- Flat slate.
It is best to use ecowool as insulation. It does not accumulate moisture, does not rot and does not burn. If ecowool is not available in your region, then you can buy regular mineral insulation in the form of a semi-rigid slab. It is easily and simply placed in the spaces between the frame posts.
To protect mineral wool from water vapor and reduce heat loss, the walls are lined with sheets of foil polyethylene. After that, a frame made of slats is attached to them and trimmed with wood: alder, linden or pine clapboard (photo No. 12).

Photo No. 12 Steam and heat insulation of the walls of a country bathhouse built from any material
We do not recommend installing OSB board indoors. This material releases toxic gases when exposed to high temperatures.
Options for steam and thermal insulation of walls of a frame structure, as well as a bathhouse built from blocks or logs, are presented in Figure No. 1.

Building a simple bathhouse with your own hands includes sewerage. It can be made from standard plastic pipes, derived in cesspool or drainage well.
The water intake funnel is placed in the center or in the corner of the room, and the floor is made in the form of expanded clay concrete screed with a slope towards the drain. Before concreting, you need to compact the soil and cover it with several layers of waterproofing. Wooden floor - great option, but in the bathhouse it quickly rots and requires replacement. Instead, we recommend making gratings from wooden slats and put them on concrete screed. After washing, they can be removed, taken outside and dried.

Constructive bath ceiling standard First they “shoot” at the rafters vapor barrier film and fill the counter-battens (3x4 cm). A clapboard cladding is attached to them. The gaps between the rafters are filled with insulation and covered with under-roofing film. It protects it from weathering and atmospheric moisture (Fig. No. 2).

Fig No. 2 Ceiling structure of a country bathhouse
A counter-lattice is placed on the film, creating a ventilated gap between the roof and the insulation. The work on the installation of the ceiling and roof is completed by installing the main sheathing and laying roofing material(slate or metal tiles).
The main “detail” of any country bathhouse is the stove. It should provide rapid heating of the air and maintain a high temperature. A metal stove heats up the fastest.
To accumulate heat and create steam, it must be equipped with a compartment for stones. Options for stoves for simple baths A lot has been created, so we will not dwell on them in detail. Let's just say that the easiest way to make a heat generator is from steel pipe large diameter, an old gas cylinder or barrel (photo No. 14). Another easy-to-use material is steel sheet 3-5 mm thick (photo No. 15).

Photo No. 14-15 A simple stove made of a pipe and a heater made of ferrous metal
Mastering the simplest techniques welding work, you can assemble such a structure without outside help.
For a Russian person, a bathhouse is not a luxury, but a vital necessity. Even historians are convinced that the love for a bath broom and good heat is literally in our blood, and even in the poorest villages next to rickety dilapidated huts, new steam rooms were regularly built every five years (the old ones burned down). And Peter I, during his trip to France, could not stand being without his family for even two days, urgently ordering the construction of a Russian bathhouse right on the banks of a foreign river, which shocked the natives quite a bit. But what to do if building today is so expensive, and public steam rooms are not to everyone’s liking? And if relaxing in a steam room is not easy useful procedures, but also valuable communication with friends, barbecue and the opportunity to breathe fresh air? Then we will learn the cunning tricks of modern Russian masters who manage to build their steam rooms literally for vacation pay.
So let's look at the most successful projects construction of baths and their implementation, where the main task was to save as much as possible, but at the same time not lose the comfort of bath procedures. After all, as they say, the most budget-friendly bathhouse is the vestibule of a summer commuter train.
What can and cannot be saved on when building a bathhouse?
Agree, no savings are worth the loss of health, property or life. But the saddest situations occur when the issue of cheapness is approached thoughtlessly: such baths first slowly poison their owners by releasing hazardous substances, and then either burn or quickly deteriorate. But this does not mean that it is better to give up and give all your money to the construction team - it is better to simply refuse dangerous use during construction from the very beginning:
- Uncertified materials and fakes, for which unscrupulous sellers charge much less. And at the same time they convince the buyer that “there is no difference with expensive material, there is simply no markup for the brand, my brother/in-law/son-in-law has had a bathhouse with this for half a century, and nothing.”
- Materials that are strictly not intended for the construction and finishing of baths. So, if you can’t insulate the walls in a sauna with polystyrene foam, then it’s impossible, and this is not the whim of the manufacturer. Again, a neighbor who insulated in this way at his own risk and is now bragging is not an example.
- Unsuitable components for conducting electricity in the bathhouse (wires, sockets), unprotected lamps or cheap Chinese products.
- Homemade stoves and water heaters that no one has tested for fire safety.
- Combustible materials and those that do not indicate that they can be used in conditions of high air humidity and heat.
If you are building a bathhouse with your own hands and are forced to save as much as possible on materials, carefully calculate each step, consult with specialists and do not leave anything unattended “it seems to work.” And finally, if you have a limited budget, it’s better to save on cubic meters of steam room, but not on its finishing materials. This is the advice.
Let's take a little look at affordable insulation materials. So, basalt wool is made from stone (basalt). Its main advantage is that the fibers inside the insulation are not connected chemically, but with a different technology, and therefore even when placed behind foil in a steam room they will not stand out hazardous substances. This insulation is non-flammable and insulates the firebox well. For a bath - the most the best option. If you want to save money, then put one layer on the ceiling basalt wool and a couple of layers of other, cheaper material.
Used as economical option also penofol - porous propylene with polyethylene film and foil coating. You can purchase it at in roll form, and attach immediately to bare wall. This material is a good heat bridge between the wall itself and the insulation.
- Buy a stove without a remote firebox - this way it will take much less firewood to heat the steam room, and such a unit is inexpensive.
- Be sure to install a water tank - this is the fastest and most economical way.
- Make a cheap, removable foundation for the bathhouse: it is much cheaper and easier to carry out repair work later and replace it with another one.
- Pay maximum attention to the insulation of the bathhouse - the less you “heat the street”, the more economical the heating itself will be.
- Place packaging film with bubbles on the window in the rest room in winter - this will retain heat by at least 50%.
- Instead of regular shower or shower stall, install a traditional Russian tub. And it’s healthier, by the way. And it is not at all necessary to pour only ice water into it.
- When purchasing lining, take short-sized bars - they are cheaper and look no worse.
- Build a low roof for the bathhouse, no more than a width-to-height ratio of 1:3. Such a design will take a lot less materials, and the chimney will also not need to be made high.
Project #1 - compact bathhouse at a minimum cost
So, step by step process:
- Step 1 - foundation. We will make the foundation columnar. To do this, you will need to get a 2-meter auger. As casing pipe take ordinary cheap sewer pipes of 110 mm. Insert the reinforcement from two connected rods.
- Step 2 - strapping. Place 500 mm long pins under the harness. Assemble the 150x150 frame and prepare the frame posts with a height of 2200 mm. Treat the frame with Neomid 440 or any other suitable for the same purposes.
- Step 3 - walls. You can modify the walls directly on the frame and simply raise them. We sheath the DSP. To do this, we pre-drill the plates and then fasten them with self-tapping screws with a semicircular head.
- Step 4 - roof. The roof is covered with eight-wave slate. We're saving money!
- Step 5 - insulation. Now we put in any inexpensive insulation that is suitable for a bathhouse. In this project - Linerock Light.
- Step 6 - bake. We install an inexpensive stove, or a homemade one. But under any one, we must additionally lay out a brick corner.
- Step 7 - finishing. We fasten the lining, skirting boards, casings.
So your compact and inexpensive steam room is ready.


If the walls, due to savings, are not too strong, then the smaller the bathhouse in volume, the better - so its structural properties will be higher.
Project #2 - wood concrete is used
And here good example construction of a budget bathhouse from wood concrete - the price is not much more expensive than frame technology. So, the outer walls of the steam room will be 20 cm thick, and inside there will be a brick partition from the stove.
Here's what the construction process looks like:
- Step 1. Dig drain hole dimensions 1.2x1.8x1.4 m. We fill up the OPGS with stones on both sides, make formwork, and fill it.
- Step 2. We dig a foundation 30 cm wide and up to 50 cm deep. We fill it with sand and tamp it.
- Step 3. We put up the formwork, reinforce two rods at the top and bottom. We place vertical rods every meter. We pour the foundation.
- Step 4. We lay EPS, mesh in the washing and steam room and fill the floors. In the washing room we additionally organize drainage.
- Step 5. Lay the blocks, check the evenness of the walls with a level.
- Step 6. We make the roof using 50x100 boards. Optimal distance between the rafters - 55-80 cm. Cover.
- Step 7. Cook the oven or buy a budget ready-made one. The ventilation scheme is suitable as follows: outside air goes to the gap between the stove and brick wall where it heats up.
- Step 8. Install the shower tank in the attic.
- Step 9. Finish the walls from the inside. If possible, use Izospan FB - a material special for baths, plus heat-resistant tape. Izolon is good for ceilings, as it can withstand temperatures up to 150°C.
This is such a budget-friendly and quite successful bathhouse.
When choosing wood concrete, pay attention: according to its density, it can be thermal insulating and structural. The first has a density of 400-500 kg/m, the second - 500-850 kg/m. This material is used for the construction of self-supporting walls and has good heat and sound insulation.


Project #3 - miniature bathhouse made of timber in the national style
And if you can’t imagine a Russian steam room made of another material, like timber, you can build this relatively budget option.
- Step 1. We level the area for the foundation from the screenings, knock together the “formwork” and leave only an opening for draining water from the washing room.
- Step 2. Lay out the EPS and knit the reinforcement cage. We fill it with concrete, make a water ramp and the foundation is ready.
- Step 3. Lay the frame. Under the first crown we place a board treated with an antiseptic, which we cover with roofing felt on three sides. You can put moss on the board itself - it has antiseptic properties, and therefore the crown of the bath will last even longer.
- Step 4. We build the walls and leave it like that for several months for shrinkage.
- Step 5. Attach the rafters and cover the roof. We make a pipe passage through the ceiling - it can be easily made from a metal angle and a stainless steel sheet.
- Step 6. Between the steam room and the dressing room we do frame partition, we insulate it mineral wool and cover it on both sides with clapboard.
- Step 7. Lay out the floor in front of the stove with porcelain tiles. We leave a special hole in the floor for fresh ventilation.
- Step 8. We lead the pipe from the stove through the roof. We make the passage from Master-flash rubber, which is resistant to temperature. The joint with the roofing is sealed with MS polymer.
- Step 9. We attach the shelves in the steam room and conduct electricity.
Remember: the first step to huge savings when building your own sauna is to build it yourself!


Project #4 - steam room on a light frame made from improvised materials
The beams for the bathhouse frame can even be made from collected firewood, if desired. The main thing is to choose one without defects and knots, and be sure to treat it with an antiseptic.
So, let's build budget sauna from improvised means:
- Step 1. We make beams for the frame, process and dry.
- Step 2. We build a pile-rubble foundation: we dig up a meter of soil with a drill, put thick pine stakes there and make a backfill of concrete and stones on top. Next, fill the pillars to the top.
- Step 4. Assembling the frame.
- Step 5. We dig a hole under the drain, insert a barrel with broken brick and using crushed stone, we bring a ladder there. This is a non-insulated summer option, but for winter you can lay insulation or a heating cable.
- Step 6. And the ceiling, put a film on top of the insulation. We use Finnish foil paper for saunas on the walls and ceiling.
- Step 7. Put on the oven. Take it with a register, because... you need to heat the water for washing - so as not to purchase a boiler separately. So, it has proven itself well - inexpensive and heats well.
Such a bathhouse lasts a surprisingly long time, the steam makes you happy, and spending time in it is a pleasure. And you can always find disadvantages.


Mini-baths: cheap and cheerful
But if you don’t have the funds to build a steam room at all, you shouldn’t despair - today there are many options for building a steam room literally out of nothing. Let's take a closer look.
Barrel sauna
This is the most common one, only in larger sizes. Part of it is covered by a wooden lattice screen, behind which the stove is hidden. There is a small bench in front of the screen. Even three people can steam in such a bathhouse at the same time. But this option is only for summer: they rolled it out onto the site, placed it horizontally, threw firewood into the stove and you can pour water on the stones. But as a low-budget option, it’s nothing at all.
Camping sauna
Such a bathhouse is mainly taken on camping trips, but if there is no other alternative, it can also be used on the site. It will not cost much, because it is an ordinary tent in which a stove or electric stove is placed. This is no longer the same soft Russian bathhouse, but as a temporary phenomenon it also has the right to exist.
Built-in mini-sauna
There is also a fashion for doing this in the bathroom. So let's move it washing machine to the kitchen, and in its place we are building something similar to a closet. This is a small structure, about 1.5 m high, made of a frame and covered with clapboard. Inside there is one shelf for a seat and a built-in steam generator. The person sits down, closes the door, and turns on the device. But his head remains outside for safety's sake. Using special aromatic oils and other SPA elements is quite a good way to improve your health. We can say that this is the smallest and cheapest bathhouse in the world.
Baths in the car
If you have the opportunity to get hold of a non-working minibus or a car with a body, you can build it right into it small bathhouse. We even have it on our website detailed master classes How to do this, and such an undertaking will turn out to be much more profitable than starting the construction of a steam room by pouring the foundation. Experiment!