It’s no secret that the “rooster” is a symbol of the New Year 2017, but it is also an excellent decoration for a dacha or even an apartment. Exists great amount various materials for crafts, but this time we suggest using old plastic bottles. This craft may be difficult for small children, but an experienced needlewoman will only need scissors, a little glue and free time.
Interesting ideas for making cockerels from old plastic containers
Craft one - a cockerel made from several bottles
Before starting work, you need to prepare several bottles without relief and different colors. If the plastic is only one color, it doesn’t matter, use acrylic paints and give the craft required colors. Don’t forget to thoroughly rinse the container to remove glue and label residues before painting.
Wait until the paint is completely dry and only then proceed to the next stage. Place a painted bottle or bottle of the color you like on a stick, after cutting out the bottom. Using a marker, mark the expected location of the scallop, beak, eyes and wings.
From bottles of a different color you need to cut out all the details of the future plastic bird. The parts can be glued using a heat gun, or they can be secured with an office stapler. Then paint the joints acrylic paint.
Making a fluffy tail from a bottle is so easy. Enough to take top part bottles and cut it into thin strips. Due to the nature of the plastic, they will curl and give the final craft an interesting look.

Also, the parts of the cockerel can be made from harder plastic, for example: from a shampoo bottle.

Cockerel made from a plastic bottle and disposable tableware
For work, prepare:
- one and a half liter brown bottles – 3 pcs.;
- disposable colored glasses and plates;
- plastic ball;
- double-sided and regular tape;
- stapler;
- marker.
Progress:
Start making a cockerel from the body, to do this, cut off the top of three bottles and glue them with tape, as shown in the photo.

Take 10-12 disposable cups, cut off the bottom and cut the walls into strips 0.3-0.5 mm wide. Next, put them on the long neck and glue everything with tape.

The tail is made from disposable plates. Cut the edge of the plate 3-5 cm thick and make small cuts from the inside.

Attach a ball that is used in a dry children's pool to the improvised neck; this will be the head.

From the bottom disposable plate, preferably red, you need to cut out the beak, crest and comb for the neck. And for the eyes, use a disposable spoon or bottom part bottles.
Video lesson: Master class rooster from bottles
Similar crafts:
- Useful and necessary crafts that can be made from…
I made him out of what was...
Good afternoon friends! As promised, I’m sharing my work on different types handicrafts. Manufacturing various crafts making from bottles has already become a folk art. I don’t really like cluttering up my space, but I still made a few crafts for fun, some look quite good and even funny. So the rooster appeared.
I made a new flowerbed and decided to add some homemade decorations to it. Moreover, the post in the middle for gartering loaches looks dull; a twist was needed. So the idea came up to impale a rooster. But how? Of what? What to fasten with?
So, let's get down to business. I didn’t take any photos from the beginning of the process, because I didn’t yet know what would come out of this idea, I made it up as I went along. Nevertheless, something happened. This is how the blank was formed.

It is not clear who it is: a rooster or a chicken? In my opinion, it looks more like a chicken, no?
Well, how it turned out. Oh, and as it turned out, it’s not easy to glue plastic, I freaked out). It is easy to work with, but attaching parts is not so easy. The plastic did not lend itself to any adhesives. I tried Moment, superglue, and various tapes. I made a masterpiece out of what I had.
I needed: one large bottle 5 liters, 2 types of wire, paper tape, electrical tape, self-tapping screws, bottle cap, furniture stapler, Moment furniture glue, superglue, a piece of linoleum, handy scissors, pliers, 6-8 dark bottles, 2 green bottles, paints , bronze varnish, different colors, as well as patience and resourcefulness.
Along the description, all the details of what to use in your work,
and what did not live up to my expectations.
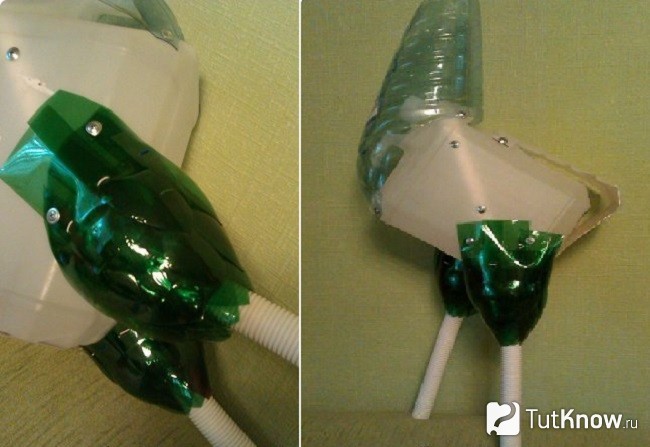
The large bottle remained solid at first, but then I cut off the back part, otherwise the butt of the rooster would hang down. I cut off the bottom and folded the edges inward. I made the paws from wire, it is better to make it from thick wire and thread the wire through for strength.

Making transparent tubes with wire. You could make the legs from a corrugated hose, that’s also an option.
Now the head. I made the beak from a bottle cap, fastened it with a self-tapping screw and glue. On the reverse side you need a support for the screw. I used a wine cork. I fastened the beak with a furniture stapler, somehow! Glue did not accept such a design. Attach the head and beard of the rooster with self-tapping screws as well.

The tail is the main advantage of the rooster. This is why fan-shaped binding is important. If you just attach the strips to the body, it will be unreliable! Therefore, you first need to make a tail, and then attach it entirely to the body!

What to attach the tail feathers to? I took a piece of old linoleum and stapled the feathers onto it with a stapler. I bent all the staples on the back side. The attachment to the body must be strong. Therefore, I spanned the linoleum with a tail onto the screws and secured it with electrical tape. I also used glue, but it was of little use.
It turned out to be such rubbish inside. You need to attach the screws to something, for example, foam or wood. I didn’t think about this at first, or rather I didn’t find the material at hand. I left it like that and it holds up fine.

Feathers can be cut out individual parts, and I just cut the ribbons in a zigzag. Attaching each part is very tedious. All ribbons with feathers were coated with Moment furniture glue and secured with tape. I let it dry and glued it with instant glue.
Now painting. I made the tuft from the bottom of a bottle and pre-painted it. The product came out with roughness. Therefore, I decided to paint the rooster completely and thus hide the defects.
The paint is bronze varnish and dries quickly. Applied with strokes different colors, used varnish and colors.

It was necessary to highlight the rooster's breast with other colors, by the way. I left it like that. I also decided to color the tail feathers. After painting, all the insides of the rooster with screws and other details are no longer visible. I let the product dry. She secured the tuft to the head with self-tapping screws, cut out the eyes, and glued on flirty eyelashes. In my opinion, the cockerel comes to life).

And this is what happened.


A rooster is made from plastic bottles easy with your own hands, step-by-step instruction is proof of this. The first version of the craft is perfect for working with kids, and the resulting souvenir will look great at home or on the property. The second craft made from this material is already more complex manufacturing crafts that require certain Additional materials and knowledge.
Now you can start making the paws, for which you will need copper wire. You need to bend the shape of the legs, and then create the desired effect from the corrugated tube. Insert the tail between the two tubes and secure everything with glue for strength. Cut the claws from the bottom of the bottle, they must be long and narrow, and attach using glue. Using a can of spray paint, paint the existing parts of the cockerel.


While the body and legs are drying, you can start creating the head. First, it should be cut out of foam plastic using a stationery leg. The cuts should be sharp, but in no case torn. If it is difficult to cut out the head at once, you can cut out its parts separately and then fasten them with glue. Sandpaper will help remove unevenness, and then treat the surface with acrylic lubricant. Then apply a layer of regular glue and, when it is completely dry, paint the bird’s head with acrylic paints and make eyes.
Now fit the head to the body. Prepare a mold for the wings and attach the long wings to the back, leaving it open. Color everything, make a tail. To do this, cut long feathers from a two-liter bottle, paint them on both sides and attach them to the body, again using wire. To finish the feathers on the back, cut out short 2 cm feathers from bottles and attach them to the back; you will need self-tapping screws for this.


Step-by-step instructions first or second will help you make a rooster out of plastic bottles with your own hands. The first version of the craft is easy, requires a minimum starting materials and such a cockerel can be made even by children. The second bird turns out to be large, serious and delightfully appearance. If you want to build it, it should also work out without any special problems. A simple and quick craft -
I would like to introduce you to the cockerel Petrunya.
Not a single yard in a village or village can do without this magnificent bird. So I made myself a friend, a bright and majestic owner of the yard!
I will be happy to share with you the stages of its production (based on the idea of making birds from plastic bottles by Alena Zinovieva).

To make the mold we need:
1) 5l. canister (I use it from under liquid soap),
2) 5l plastic bottle,
3) metal-plastic pipe (leg height approximately 30-35 cm),
4) two 1.5 l. plastic bottles for thighs,
5) screws, scissors, stationery knife, screwdriver.

For fastenings, I use these self-tapping screws (I buy them by weight at hardware stores).
Small (about 1.5-1.6 cm) - for attaching feathers and component parts to each other.
Large ones (about 5-6 cm) - for attaching the head to the neck.

1) Move the top of the canister about 3cm.
2) Bend metal-plastic pipe(we give the shape of the legs), in my case, the rooster is walking (the right leg is pushed forward), and we attach it to the canister with self-tapping screws.
3) For the neck, from 5l. bottles, fold the envelope, attach it to the canister with self-tapping screws.
4) From 1.5 liter bottles we cut out two “thighs”, which we attach to the canister with self-tapping screws.

For the feathers, I used bottles of this shape. We cut off the long neck, cut the bottle into 5 feathers (we are guided by the protrusions on the bottom of the bottle), and use the upper part of the feathers.

We begin to cover the body from the “thighs”. Disconnect them from the canister for convenience.
1) attach the corrugated tube to the neck of the bottle,
2) attach the feathers using wire.

We attach the finished legs back to the canister.

Starting from the back, we cover the entire body, except the back, with feathers (we attach it to the canister with self-tapping screws). We leave the back of the neck open because there will be other feathers there.

The next step is to start making the paws. From 2.5mm copper wire (or any other wire, preferably rigid, but not steel, which bends), we bend the shape of the legs (you can see more details in MK Filin). We create the effect of paws from a corrugated tube. We insert the remaining tail between the metal-plastic pipe and the corrugated tube. You can also fill the bottom with glue for strength.

We cut out claws from the bottom of the bottle (photo). They should be narrow and long. We fasten them with glue (I use “Moment of installation - liquid nails”).

We paint the body and legs using spray paint (I use universal enamel from KUDO).

We cut out the head from construction foam using a stationery knife, it is very sharp and the cuts are smooth and not torn. If the cutting process seems complicated to you, cut out all the parts separately! Then they can be glued together with glue.


By using sandpaper(medium) bring to the shape we need.

We treat the surface with acrylic putty, wait for it to dry completely and sand it again until smooth. After that, we treat it with ordinary PVA glue, so the paint adheres very well.

We begin to paint the head (you can use acrylic paints, it’s more convenient). Glue on the eyes (I bought them at a fabric store).

After fitting the head to the body, the husband said that the comb turned out not like a rooster’s, but more suitable for a chicken. I decided to redo it. I made a pattern out of paper (I tried it on for a long time to make it larger). I transferred it to foam plastic, cut it out and glued it in place of the previous one.


Using wire, we begin to attach the long wing feathers. The back remains open.

I cover the top of the wings with these feathers from 1.5 liter corrugated feathers. bottles The last row goes to the bend, into the inside of the wing.

We paint it with paint, let it dry well and attach it to the body using perforated tape (sold at any hardware store) and self-tapping screws. We bend the mesh for attaching the tail (you can increase its length and the tail will turn out richer).

Let's start making the tail.
We cut feathers from 2l or 2.5l. bottles into 5 parts. We paint separately on both sides (first we applied black, after drying a little blue)

We attach it to the mesh using wire. After coloring, I cut the feathers in half again, so the tail turned out to be more magnificent.

For the feathers on the back, I cut feathers of different lengths from transparent bottles (this makes it easier to color yellow), approximately 2-2.5 cm wide. I attached it to the back using self-tapping screws, 3-4 pieces at a time.


Find out how easy it is to make a rooster craft from bottles, coffee beans, and fabric. See how to make a salt dough rooster from egg trays.
Craft rooster from egg trays

This is what you can make a rooster from. This is completely waste material, but it makes wonderful crafts. To work you will need:
- egg trays;
- acrylic paints;
- thin white paper;
- cardboard;
- newspapers;
- scissors;
- glue gun;
- tassels;
- pencil.
Cut out bird wings from cardboard using a glue gun and cover them with leaf-like blanks from egg trays.

Most of your time will be spent waiting for the papier-mâché rooster's body to dry. Therefore, it is better to start working with its formation. Cut newspapers into strips, dilute glue with water in a 1:2 ratio in a container. Dip the paper here, stick it on the inflated balloon. It will take more than one hour for this part to dry. When this happens, poke the ball sharp object, remove it through the small hole left.
This rounded piece needs to be cut into two unequal parts, insert the smaller one into the larger one to increase the strength of the part. Glue these elements together using a glue gun.
While the papier-mâché was drying, you had enough time to form the head and neck of the rooster. To the part that looks like a flower with elongated petals, made using petals from an egg tray, glue two triangular beak blanks and a comb cut out of cardboard.
Insert a second one of the same type into this flower blank, then a third, fourth and fifth. The head and neck of the bird are ready. Glue this piece to the side of the papier-mâché ball half. To do this, use a glue gun to attach a strip of cardboard inside the neck so that it looks out from below. We glue this label to the papier-mâché half of the body.

To make the tail, draw semicircular lines on the egg lid and cut along them.

Glue the tail to the back of the body. That's it, you can paint the cockerel with acrylic paints, when it dries, hand the craft to the recipient or place it in the most prominent place in your home as a bright attribute of the holiday.
You can make a rooster with your own hands not only New Year, but also on Easter. Then you will put colored eggs in its semicircular body, thus decorating the festive table.
Symbol of 2017 made from plastic bottles
If you decide to celebrate the New Year at the dacha, then make a rooster - a symbol of 2017, which is not afraid of either snow or water. Plastic bottles are perfect for this.

To make a rooster with your own hands for the year of the Rooster, prepare everything necessary materials, in particular
- five-liter canister;
- 5 liter plastic bottle;
- metal-plastic tube;
- 2 plastic bottles with a volume of 1.5 liters;
- corrugated pipe;
- thick copper wire;
- plastic bottles for feathers;
- perforated tape;
- acrylic putty;
- fine mesh;
- sandpaper;
- awl;
- construction foam;
- stationery knife;
- glue gun;
- self-tapping screws;
- scissors;
- screwdriver

Bend a metal-plastic pipe to make two rooster legs. Attach them to a five-liter canister using self-tapping screws. To make the animal’s neck, cut a large piece of cloth from a 5-liter bottle, fold it into an envelope, and secure it with self-tapping screws. From one and a half liter bottles, cut off their upper parts below the shoulders, diagonally. Place them on the top of the bird's legs, and also attach these parts with self-tapping screws or a glue gun.
To make bird feathers, cut off the neck of the bottle. Using scissors, cut out 5 longitudinal feathers.

Place corrugated tubes on the rooster’s legs and begin decorating the thicker parts with feathers. To secure them, use an awl to make two holes in each, insert a piece of wire here that needs to be tied to the base.
Cover the bird's body with feathers, starting from where the tail grows. We are not finishing the back yet.

Roll the wire so that you get two paws, each with three fingers, put pieces of corrugated pipes on these blanks.

Cut long and narrow claws from the bottom of the bottle. Attach them to a glue gun or "Moment Montage".

Cover the resulting workpiece with spray paint, using one color for the body and another color for the legs.

Cut out the cockerel's head from construction foam using a utility knife.

Take sandpaper, sand this part with it, then apply acrylic putty.

When this coating has dried, make the surface smooth again with sandpaper, then coat with PVA.
To ensure that the paint adheres well to the cockerel’s head, they use a trick by first covering it with PVA. In this case, the paint adheres well and its layer will be more durable.

From a fine-mesh mesh, cut out a part that will become the wings, back and tail of the rooster, glue long blanks from a plastic bottle to it to decorate this part with feathers. The wings at the top are made from corrugated bottles.

Paint the wings, when the solution has dried, attach this body part using perforated tape and self-tapping screws. Cut elongated feathers from 2.5 and 2 liter bottles, cutting each container into 5 parts. Paint them on both sides, after drying, attach them to the metal mesh using wire.

To make it easier to color plastic bottles light color, take transparent ones, cut them into feathers for the back. Attach them with wire, 4 pieces at a time on self-tapping screws.

Attach the bird's head to its place using long self-tapping screws, cover the already painted parts with plastic, and paint the rest. Make spurs for the rooster from wire, after which you can place it in its designated place in the country house or at home.

It's even easier to make your next bird from plastic bottles.

For this you will need:
- two plastic bottles with a volume of 2–2.5 liters with small necks, and one of the same volume, but with a large one;
- disposable plastic cups in two colors;
- disposable plates;
- wrapping paper or trash bag;
- plastic ball;
- eyes for dolls;
- scotch;
- stationery knife;
- glue;
- scissors.

U plastic cups cut the top into strips 8–10 mm wide. In length they will take up a third of the height of the glass. Place these blanks on the high neck of the bottle, alternating in color. Cut off the bottom of the last glass. Chop this container not only on one side, but also on the other side into thin strips. The middle will remain intact.
Just below the rim of the plates, cut out semicircular feathers from plastic plates, cut them on one side with scissors to make thin feathers. In a bottle that is located with opposite side from the neck, make a cut, insert the tail feathers here, secure with tape.

Place the ball on the top cup and secure it with tape. Cover the cut area for the tail with wrapping paper or a piece cut in the shape of a fan from a colored garbage bag. Cut out wings from plastic plates and glue them to the sides of the bird with tape.

From plastic plates, cut out the comb, beard, and beak of the cockerel. Make three cuts in the foam ball, insert these blanks here, and glue them for a stronger connection. Take ready-made eyes for toys, or make them yourself from a white foam plate, cut out the pupils from a black garbage bag. Glue on the eyes.

If you want to learn how to make a rooster out of bottles even faster, then watch the third master class in this section.

- Cut off the bottom of a large plastic bottle, put it on a fence peg or a stick specially dug into the ground for this occasion.
- If the bird will stand in the house, then cover its lower part with strips of colored paper, make the wings and comb from cardboard in the appropriate shades. If the rooster will be outdoors, then these parts should be waterproof.
- Create stripes from colorful garbage bags (by tying or gluing them), wings, nose, comb, beard from colored plastic.
- Take two white bottle caps, paint the pupils here with black acrylic paint, and glue them to the head.
- The tail is made from bottles different sizes and colors. Cut off their bottoms and use scissors to chop them almost to the shoulders into thin strips. Insert one bottle into another, secure them with wire, tape or glue.
Salt dough rooster
Looks great like this three-dimensional picture, but it is performed in an unusual way.

To make such a panel, take:
- 120 ml water;
- 180 g fine salt;
- 370 g flour;
- 1.5 tbsp. l. vegetable oil;
- acrylic paints;
- rooster template.

- You will make a cardboard image of this bird when you transfer the presented drawing onto paper.
- Mix flour and salt, pour here vegetable oil and water. Knead the dough well, cover it with a cloth to rest for 20 minutes.
- Now you can roll it out into a layer, put a template on top, and cut out a rooster from salt dough using it. Using the same knife, apply feather veins on the tail, wings, and neck to the workpiece.
- If you want the bird to be voluminous, then separately sculpt the wings, buttons, and the upper part of the scallop.
- Leave this creativity to dry. To do this, you need to place the product in a well-ventilated area to give the workpiece greater strength. Dry it for 24 hours using this method, then heat the oven to 50 degrees.
- Using two spatulas, transfer it to a baking sheet lined with paper and sprinkled with flour. Turn the heat to low and dry at this temperature for 2 hours. Take the product out and cool it.
- Now we need to paint ours fire rooster acrylic of different colors, and then varnish.
If you have clear nail polish, it will work great for painting the salt dough rooster.
You can also sculpt a three-dimensional rooster from salt dough. Then the figure needs to dry well for two days.

DIY roosters made from coffee beans

This is not a simple rooster, but a magnet. To make it, you need to stock up:
- a piece of burlap;
- a piece of red felt;
- coffee beans;
- a sheet of cardboard;
- rhinestones and sequins;
- crochet;
- threads;
- glue gun.
Use a brown pencil to color the cardboard body of the cockerel. Below, using a needle with a matching thread, form two legs of a cockerel from it, make the paws from cardboard painted in Brown color, as well as the tail blank, which needs to be glued into place.
Make a beautiful fluffy tail out of threads and glue it onto a cardboard blank. Also glue coffee beans to the body, bypassing the wing, and attach them to the ends of the legs. Glue a magnet to the back of the body. Decorate the wing with sequins and rhinestones.

We sew, knit, embroider rooster crafts
These needlework techniques will also help you create crafts for the year of the rooster 2017. If you know how to embroider, then the following pattern will help you. This way you can arrange a small decorative pillow, a pocket of an apron made of plain fabric, or make a panel.

If you decide to knit a sweater for a child as a gift, calculate the stitches so that this poultry is displayed in the center front.
The diagram shows which colors to use. To make them all look good, knit a sweater from white yarn.
If not yet listed species you are not able to do needlework, then make a cockerel on a stick from the remnants of ribbons, threads, and fabric.

Here's what you should prepare:
- square of linen fabric with sides 15 cm;
- red canvas measuring 5×20 cm;
- multi-colored ribbons;
- soft filler;
- threads;
- jute;
- twig;
- red yarn;
- a needle;
- wooden stick.

- Fold the linen fabric diagonally, trim one corner slightly. Sew one and the other side with a basting stitch, but leave the space between these sides, which is marked with a pencil in the photo, free. Through it you will subsequently fill the figure with filler, and insert a wooden stick here.
- Insert the twig into the cut hole in the corner and secure with twists of red yarn. This is the head and beak of a cockerel.
- Fill the blank with padding polyester. Insert a stick there, secure this part by tying it tightly with red thread.
- Take a strip of red felt, fold it in half, and place it on one and the other side of the cockerel's head. Wrap thread at the top and bottom to separate the comb and beard. Cut the beard at the bottom with scissors.
- Fold satin ribbons of different colors in half, attach them to the tail, and tie with red thread. Also form the wings of the rooster, just sew them on the sides.
- Use black thread to embroider the bird's eyes or make them from beads. After which the wonderful rooster, the symbol of 2017, is ready.

Check out another idea by watching the video. It tells how to make a rooster craft from nylon.
If the children want to learn how to make it out of paper, then show them the second video.