“Making a train from colored paper with your own hands.” Master class with step by step photos
Degtyartseva Natalya Vasilievna, teacher of MAU DO DDTT
Vladikavkaz, North Ossetia - Alania
The work is intended for children aged 7 years and older, teachers and parents.
Purpose: toy, interior decoration, gift for family and friends, exhibit for an exhibition of technical creativity.
Target: make a train from colored paper with your own hands.
Tasks: educational - master the technique of making a steam locomotive and trailer; developmental - to develop practical skills of students when working with scissors, to develop fine motor skills, imagination and fantasy of a child; educational - to cultivate aesthetic taste.
Materials and tools: colored paper, scissors, glue, ruler, pencil, eraser, compass.

Riddles for children.
The brothers are ready to visit,
They clung to each other,
And they rushed off on a long journey,
They just left some smoke.
(Train)
Far, far away
By railway,
Maybe this guy
Take away the entire village.
(Train)
Behind the smoke
Behind the whistle
The brothers run in single file.
(Wagons)
V. Struchkov
The Iron Snake is crawling
It carries passengers into the distance.
(Train)
Iron Snake
It meanders in the steppes.
Lost in the steppes.
The voice is clear
Runs after the drifting snow.
I ran a thousand miles.
She unhooked the long tail.
Fifteen Brothers
They love to ride.
The first one with a pipe
Leads everyone with him.
(Train)
One hundred barrels
Gudochek leads.
(Train)
Steel Mare
It rushes across the azure steppes.
Ran a hundred miles
She unhooked the long tail. (Train)
Along steel tracks
The Centipede rushes.
Knock-knock-knock.
Round heel clicks.
With a funny song
Along the iron ladder.
(Train.)
V. Tunnikov
Back and forth every day
Carries loads carefully.
In rain, snowstorm, heat, frost
The hard worker rushes - ... (locomotive)
Step by step process of making a train.
Making a steam locomotive.Stepping back 1 cm from the narrow edge of the A4 sheet, fold the sheet on both sides of the ruler. Place the ruler with its left edge on the second bend and bend it again. Let's make four bends in this way.

Having received four wide strips, cut off the excess part of the sheet along the last bend. Fold the edge of the sheet, moving 1 cm from the left edge, and then fold the sheet on the other side of the ruler.

Cut off the excess paper, leaving a 1cm margin for gluing in the middle square. Cut the edges of the square to the line, as shown in the photo.

Glue the sides of the square together. Let's shorten the main part of the locomotive cabin by cutting it to the width of a ruler on the right side of the part.

Glue the edges of the long strips together to form a column. Glue the roof to the post. The locomotive cabin is ready.

To make a window, prepare a square with a side of 2.5 cm from colored paper, and a square with a side of 1.5 cm from white paper. For the door, cut out a 7x2.5cm rectangle and a 1cm strip for the handle. For the front part of the locomotive, we will bend a square with a side of 4 or 5 cm, moving 1 cm from the edge at the top and bottom. We cut the folded parts of the sheet for gluing.

Glue the prepared square into a tube. We will glue a window and a door onto the cabin of the locomotive.

Glue a colored strip 1.5cm wide onto a 6x5cm rectangle. On the previously prepared wide pipe we glue strips 0.5 cm wide along the edges.

Glue a small pipe in the center of a large pipe. We glue the large pipe, bending the edges, to the cabin of the locomotive. Glue a square-shaped piece of paper onto the free edge of the large pipe.

Let's make a strip 3x7cm. Use scissors to twist the edges of the strip in different directions, making a figure eight.

Let's make circles for wheels with a radius of 1.5 cm and 0.7 cm.

Cut off the extra edges of the square big pipe steam locomotive, glue the wheels and figure eight, as shown in the photo. The locomotive is ready.

Manufacturing of a carriage.
Stepping back 1cm from the top edge, fold the sheet on both sides of the ruler. Then the sheet on both sides, placing a ruler on the right and left of the edge of the sheet. Bottom part Cut the sheet to the width of the ruler. To do this, draw a line at the bottom of the sheet. Let's make cuts as shown in the photo.

From the second similar sheet we will leave only middle part, cutting off excess bends, as shown in the photo.

Cut small rectangles from the sides of the first part.

Glue the side parts on the first part, as shown in the photo.

Glue the second piece to the top of the first piece.

Glue the side parts of the car to each other.

Let's make a 11x5 cm rectangle for the door and two 7x5 cm rectangles for the windows. From white paper we will make a 3x6cm rectangle for the door window and two rectangles for the carriage windows
3.5x5.5cm. Let's make a 1.5 x 9 cm strip to indicate the direction of the train.

Let's glue the door and window parts to the car.

We will make six wheels according to the previously proposed model. The diameter of the large circle is 5 cm, the small one is 3 cm. Glue the wheels along the edge of the car and in the middle. The carriage is ready.

Let's glue the car to the fastening eight on the locomotive.

Our train is ready.
The train is a frequent character in children's fairy tales and cartoons, a favorite hero of many kids. That is why mothers who do needlework often make crafts in the form of a colorful train. This product can be made from various materials, from almost everyone that surrounds us. For example, from felt, from photographs and even from boxes that are lying around on your balcony. Such crafts can be done with children; it will have a wonderful effect on their mood and hand motor skills. Thanks to this master class you will learn how to make a train with your own hands.
Option from diapers
Young mothers will definitely appreciate such a gift, because diapers are always useful when there is a one-year-old child in the house.
Necessary materials:
- diapers (20 pcs.);
- elastic cord;
- rubber bands for money (22 pcs.);
- corrugated paper;
- skewer;
- satin ribbons;
- stapler;
- glue;
- pins.
To begin, roll the diapers into a tube.
To prevent them from unwinding, secure them in the middle with an elastic band for money.

Make sixteen tubes.


Tie two tubes together, then attach the next ones to them, wrap each one in a circle.
On a note! If you just tie them with an elastic band, they will curl up and will not lie flat and neat.

Then press the cardboard on top of the diapers so that the outermost diaper does not lift up.
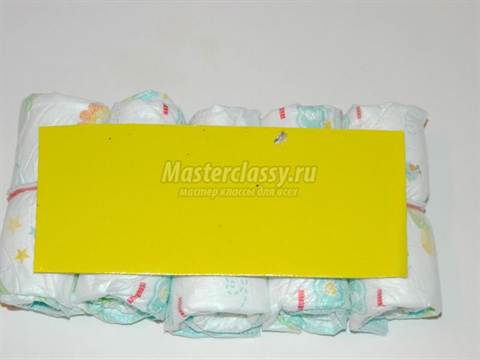
We tie it with a ribbon. You can use any tape as it will not be visible.
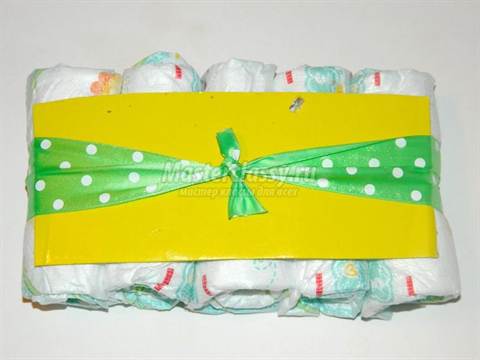
Let's move on to the frame of the locomotive. Tie two pairs of tubes together with rubber bands and place them on crepe paper.

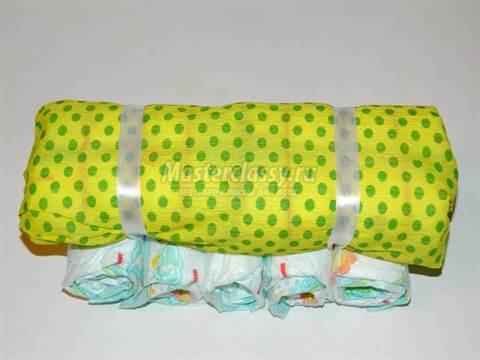
Pack the diapers in paper and glue or staple the seams. Then cut the cardboard so that it does not stick out from under the frame. Secure it with ribbons, first trying it on the wheels.

Make a pipe for our locomotive. Wrap one diaper in crepe paper and glue it on top and at the seams. Insert a tube from a sheet of office paper inside the diaper. It can be replaced with a skewer.

Using a narrow knife, make a hole in the paper between the two diapers and insert the tube.

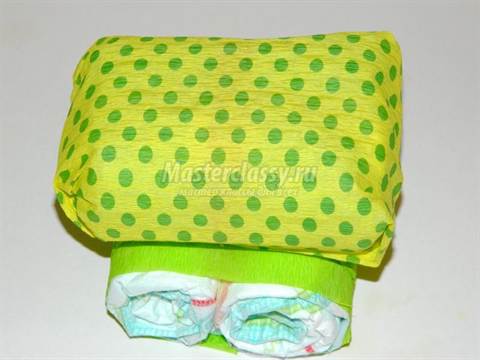
To make a train cabin, fold four diapers in half and stack them on top of each other.

Wrap in paper.

Place the cabin on the locomotive and secure with pins or glue.

For the carriage, make two pairs of knitted diapers. If desired, you can make trailers from cardboard.

Wrap in paper.
Make another trailer, but smaller. Secure all parts with satin ribbon. The diaper train is ready!

Thomas the Tank Engine
"Thomas the Tank Engine" is a popular modern cartoon that many children adore. Thomas is made from many materials: from mastic, from candies, and also from paper. We will consider the latter option.
Flowerbed original design- a train made from boxes for the garden, made with their own hands by those who like to decorate their plots using scrap materials, will really appeal to children. This design element will not leave adults indifferent either. This convenient way get rid of some of the garbage in your dacha, while at the same time decorating it with an unusual garden sculpture.
You can put in the train carriages and ornamental plants, And garden strawberries or spicy herbs. So non-standard design plot will be able to help and save some space in the beds, and bring practical benefits. A cute train can also serve as a sandbox for children’s games if it brings containers with water and sand, scoops and Easter cake molds in the carriages.
To serve as a good flowerbed or sandbox, the locomotive must have spacious carriages. Boxes are suitable for their manufacture different capacities made of plastic, metal or wooden planks. Large containers of various liquids (water-based emulsions, drinking water, fuels and lubricants). In this case, for the trailer you will have to cut off part of the side wall, turning the container into a box.
For wheels, you can use old wheels, round mesh made of plastic, wood cuts, and the actual wheels from carts, bicycles, and other used equipment. Different sizes wheels can be successfully used in a craft by using wheels for a locomotive larger diameter, and for the carriages, selecting many identical round objects (lids from buckets of mayonnaise or paint, bottom plastic bottles etc.)
A locomotive boiler can be made from almost any container of suitable size: a bucket, a large saucepan, a fuel can. If necessary, the container must be washed from any remaining contents and a cylindrical object must be selected for the pipe.
So, to create a train from boxes you will need:
- boxes and various containers from any materials;
- round objects for wheels;
- some plywood or fiberboard;
- scissors, sharp knife, hacksaw;
- screws and drill;
- paints, brushes, additional decor.
To connect the cars, select plastic chains, twine, wire or other similar materials. If the steam locomotive for the garden is installed permanently, then these elements may not be needed.
Wooden container solution
To make a flowerbed locomotive from wooden fruit containers, you will need 2 identical boxes for the locomotive itself. The front part of it (the boiler) is simple to make: turn the box upside down, attach a cylindrical object for the pipe and 4-6 small diameter wheels on the lower edge. Using as a pipe flower pot and by planting green plants in it, the locomotive can be made even more decorative (Fig. 1).

The rear (driver's cab) will require a little more attention:
- 1 You need to remove the middle strips on the long sides and bottom from the box. Place it on one end and measure the distance just above the middle of the long side.
- 2 Cut 2 rectangular pieces from plywood or fiberboard. The length of each will be equal to the measurement taken from the box above the middle of the long side, the width will be equal to or slightly greater than the width of the same wall. Fasten the parts with inside walls with short self-tapping screws. There will be small windows on top.
- 3 At the bottom of the box you can screw a piece of plywood similar to the sides, cut according to the width of the bottom and a measurement slightly larger than the middle of its longitudinal side. If there is not enough plywood, then you can do without this part, since the bottom of the cabin box will be connected to the front of the locomotive.
- 4 Cut out the roof for the locomotive with your own hands from plywood as can be clearly seen in the figure: the length of the part should be greater than the height of the wall to which it will be attached. If desired, you can make small side overhangs of the roof. Secure the part with self-tapping screws.
- 5 Install 2 wheels on the sides of the cab. Their diameter can be significantly larger than those used for the front part of the locomotive.
- 6 Connect the front part (boiler) and the cabin by screwing the screws into the strips.
Cars can be easily made from the same boxes by attaching wheels of the same size to their lower part.
If you make a train from boxes with your own hands as a flowerbed, then it is best to paint it in soft colors in order to highlight the natural beauty of the planted plants.

A train for children's games can be painted as brightly as your imagination allows.
How to use plastic?
The silver train is made of plastic containers(Fig. 2). A drinking water bottle and a box were used for the front part of the locomotive. Before assembly, you need to process the parts from aerosol can so that there are no unpainted areas left.

For the pipe in this case, a large one is used aerosol can. The cap from this item was screwed onto the top of the boiler, after which the cylinder itself was securely attached to it. To install the water container in the box, it was necessary to cut down the front wall to fit the neck. Wheels can be made from disks or caps of different diameters.
To make the cabin, it was necessary to install 2 identical boxes on top of each other. They have special elements that allow them to be firmly connected, but if desired, you can additionally screw in self-tapping screws for fixation.
The double cabin box is connected to each other, and the sawn-off container for the front part can be secured with wire. After this, place the boiler in place so that the pipe is at the top.
Making the cars involves attaching wheels to the boxes and painting each car. If desired, you can make cars of a different type by installing 2 drawers on top of each other, as for the driver’s cabin.
Using the same principle, a locomotive is assembled from other items: a bucket or paint tin can serve as a boiler, and a box or rectangular container will become the driver’s cabin. In conclusion, here is a video where there are many ideas for making a steam locomotive for the garden from boxes and other waste materials (video 1).
Tatyana Gurova
The wheels are knocking, knocking,
Our the train rushes into the distance,
And the smoke from the locomotive -
Whitish veil.
Half the sky closed from us,
And the steam locomotive “Tutu-tu,”
It buzzes, “I’ll be here before lunch.”
I'll bring the kids.
I'll arrive at the station,
Without delay, on time,
Then I'll go to the depot,
And I'll sleep there for an hour"
I. Shevchuk
Take a sheet paper A4 format and fold in half

Then, unfold the sheet and bend both sides towards the middle

Form a rectangle and cut it out of the strip paper window, paste

Then we cut out the circles and also glue them on.

That's it, one trailer is ready. Other trailers are made using this principle.

When we did train, the guys cut out the windows themselves from strips paper, and the wheels are made of squares.

Publications on the topic:
A path runs through the meadow, dives to the left, to the right. Everywhere you look, there are flowers all around, and knee-deep grass. Green meadow, like a wonderful garden, fragrant and...
Making flannelgraph. Master Class. Lushnikova M.V. – teacher. I have long wanted to have a flannelgraph in my group, but I had to get plywood.
Late autumn has arrived. The earth was covered with an autumn carpet. This inspired me to create an autumn gramophone and write a poem Poem.
GOAL: development of creative musical abilities in children. OBJECTIVES: - give an initial idea of wide possibilities noise
For work you will need: scissors, colored crepe paper, a glue brush, glue, black cardboard, cardboard for a template, a board, a stick.