Rutary or driftwood garden has long been successfully used in landscape design. Many parks and squares have pleasant arrangements of flowers and wood that are genuine decorations. A couple of decades ago, the rutarii moved into large halls of the premises. You can see them in office foyers, educational institutions, theaters and museums. And just recently, rutaria began to appear in our apartments.

It’s not difficult to make, you just need to follow some rules, which we’ll talk about in this article.

The uniqueness of any rutaria is that it is practically impossible to repeat. Just as there are no identical snags in the forest, there are no identical rutariums, because it is a piece of wood that is the basis of any such composition.
Driftwood for rutarii can be purchased in stores today. There they have already undergone special processing and are ready for use. If you want to make a rutaria with your own hands from start to finish, then let's start by finding a suitable driftwood.
Roots are best for planting dead trees. They have a more complex and interesting shape. Although an ordinary piece of wood with an intricate shape will do.
The main thing is that it fits well into your interior. After the wood has been selected, we must prepare it. For this there are the following rules:
- Remove soil and bark. Sometimes the bark may seem to impart a certain charm. Only under it can pests hide. And if you really want it, leave it small areas, clean up the rest.
- Next you need to carry out disinfection. To do this, you can scald it with steam or boil it if the piece is small. It’s good to walk over the surface with an antiseptic.
- Next, we cover the surface with a special protective impregnation and pest repellent. They can be purchased at hardware stores and gardening stores.
- We cover finishing material. It can be varnish, drying oil, wax oil. The coating is needed to emphasize the wood texture. At the same stage, tinting is carried out in accordance with color scheme interior
- Installing the driftwood on a stable base is an essential step for the safety of your design masterpiece. The driftwood can be sawed down so that it stands steadily on its own. You can attach it to a heavy pallet that will hold the entire composition. The surface of the tray is usually filled with pebbles or aquarium soil.
- If the driftwood does not have enough cavities for you to plant the plants in, they will need to be hollowed out before the plants are planted. Therefore, think about the composition in advance.

Selection and planting of plants in rutaria
After the base is ready, we move on to selecting and planting plants. The basic rule for the latter is that they must be drought-resistant. Frequent watering moisture-loving specimens will render any wood unusable.
For rutarii, two classes of plants are usually used: epophytes and ampelous e. Epophytes live well not only in the soil; they simply need to attach themselves to a piece of bark or wood. Such plants include:
- Phalaenopsis orchids
- Bromeliaceae
- succulents
The following plants can be classified as drought-resistant hanging plants:
- Chlorophytum
- Cissus
How to plant plants
You can directly into the recesses in the wood. But it is more practical and convenient to care for when plants are planted in small containers with soil, and these containers are placed in recesses.
In addition to stones, forged elements and pottery can become additional decorations for the rutaria.
- Lithops: care and maintenance
- Spider mites on an orchid
- Remedy for flower midges
- Application succinic acid for plants
- Dieffenbachia care
A dacha is a place of solitude for the whole family. Here, many spend their entire vacation, which should be simply ideal, so everything around should create harmony. You can do some little things with your own hands that will allow you to get the most out of your vacation.
Landscaping works
You can create beauty on your site yourself. Below are several ways to landscape a plot of land.
Rockery
To make a rock garden with your own hands in the country, you need to do the following:
- Select location and design. A spectacular look can be achieved by arranging a rock garden on a small slope or uneven surface.

- Next, the soil is prepared. The top layer of soil is removed by 20 cm. Drainage made of crushed stone must be laid at the bottom and broken bricks. Then it is compacted and leveled. A substrate is prepared for laying sand (peat, crushed stone and fine peat are mixed).
- Now the stones are being picked up. They should be of soft colors; against such a background they will look as impressive as possible. Size also matters; large boulders are preferred.
- Stones are being installed. Are located in one direction. Flat stones are mounted horizontally at a slight angle.
- Layout of plants and flowers. The ground between the boulders is covered with PVC film with holes for pots of plants.
Rutary
The central figure of the rutaria can be a large stump. Believe me, DIY dacha gardening is a reality that can be very easily implemented.
Material for the composition can be collected in the forest: driftwood, branches of amazing shape. All material must be treated with varnishes before installation to extend its life.

You can include many decorative elements in a rutary: forging, various figurines, artificial and natural stones.
You can sell it from roots and driftwood. Most suitable place for this composition there will be an entrance to a dacha or a recreation area. You can place a gnome figurine in the center.
Path for the dacha
A path in a dacha with your own hands can be made from logs.
The instructions are quite simple:
- The material is created from cut logs; they alternate small and large dies.
- The effect of spontaneity is given by various “patterns” of wood.
- The basis for such a path will be a sand bed of 10 cm.
- Wooden rounds 20 cm thick are used for covering.
- Next, all these elements are pre-treated with an antiseptic and simply driven into the ground.
We improve the garden
Do-it-yourself dacha projects begin with development detailed plan. It is necessary to select plants, choose a place. The width of the ridge depends only on the size of your plot.

Advice!
9 low-growing plants or 4 tall ones are planted per 1 m2 of area.
Main stages of work:
- The first stage is marking the boundaries of the future object using pegs and rope.
- Remove with a shovel upper layer soil, depth approximately 15 cm.
- A border of stones, bricks or concrete tiles is laid along the edges. The border will allow the composition to look completely complete.
- The fertile mixture is poured into a specially designated place. To prevent water from stagnating after rain, several mounds of earth are poured in the middle of the ridge above the main layer.
- Plants are planted according to the approved scheme.
Rest zone
The recreation area will be a great place for everyone. Some people find pleasure in work, while others enjoy a great holiday with friends, cooking barbecue or smoked meats. Some people just like to sit in a gazebo or lie in a hammock, admiring nature.
The smokehouse at the dacha is built with your own hands from brick and metal. The most important thing in construction is the fact that the chamber in which the smoke is generated must be closed from above and be as airtight as possible; a sheet of metal can also be used as a lid.

If the lid does not fit tightly, then it is simply covered with a clay solution over the entire area. Next, the lid is closed and an electric heater with a power of up to 2 kW is turned on; it should be located in a brick chamber.
For these purposes they use electric stove and an electric oven. Gradually, the wood begins to smolder, resulting in the production of smoke, which enters the smoking chamber.
Advice: If you don’t have enough power, then renting a diesel generator for your dacha can be a real salvation.
A barbecue maker at the dacha can be created with your own hands from bricks.
Construction is carried out in the following order:
- A pit is prepared for the foundation (the fertile layer is removed). The pit is leveled with two shovels.
- The formwork is made from boards and installed 20 cm above the soil level. The cement solution is poured into the formwork and left for a week. The foundation is covered with film.

- 2 rows of bricks are laid on the resulting base (this will be the ash pan). Next, the grates are mounted, then the firebox is laid out.
- The top of the future kebab maker will remain open. If you have a stove, you can cook almost anything.
- 4 columns are made above the firebox and a brick pipe is installed. For convenience, you can make a table-bedside table for equipment.
Tandoor
Do-it-yourself tandoor in the countryside is performed in the following sequence:
- Pouring the foundation.
- The outer circle is laid out with bricks (radius of at least 30 cm). There remains a gap of 20 cm for the blower.
- 8 rows are laid out, then a vault is formed. The 9th row and the next 7 are mounted with an inward shift of 3 cm.
- The internal walls are made of refractory bricks.
- The external coating of the tandoor is carried out, all seams are filled with clay.

- The brushwood is set on fire; as soon as it burns out, the clay is sufficiently hardened.
- The outer lining is carried out, it is carried out strictly vertically. The gaps are filled with clay. Before first use, the inner surface is coated with vegetable oil.
Do-it-yourself garden beds will be an excellent addition to landscape design.
To create this object, slabs, wooden beams, boards are used, and as a tool electric jigsaw and a screwdriver.

Advice!
It is preferable that the slabs are made of coniferous species trees, they are more resistant to precipitation.
- The dimensions of the sun lounger are chosen independently. Two short and two long sidewalls are made from beams. They will become the basis of the frame.
- The outside of the frame is covered with boards.
- At a distance of 5 cm from the corner, the legs of the lounger are attached to long slats; the legs are made of bars up to 10 cm long.
- Now all that remains is to make the base, cut it from the slabs with a jigsaw.
- The slats are attached to the lounger with self-tapping screws.
- The finished bed should be processed with a sander.
Country gazebos
A do-it-yourself summerhouse for a summer residence is built in the following sequence:
- The placement location is selected. Depending on the goals pursued, the gazebo can be built close to the house or erected in a remote corner of the garden.
- The second stage consists of building a solid foundation for the future structure. The best option is columnar foundation, which does not require leveling the site and performing large volumes of earthworks.

- As for the frame of the building, the main material used is wooden beam. As an alternative, you can use reinforcement or a metal profile.
- The main condition for the configuration of this building is airiness and combination with nature, so the walls are made of blank brick or stone.
- The final stage is the installation of the roof and the completion of roofing works. The best option will be used bitumen shingles, which can withstand the negative effects of the environment.
Bench for a summer residence
A do-it-yourself garden bench is created according to the following scheme:
- Prepare 2 pits 50 cm deep.
- The uprights and legs of the bench are connected at an angle, which ensures a tilt of the backrest. The bottom, which is dug into the ground, is treated with resin.
- Legs with inclined bars are dug in.
- Next, only the back and seat are attached.

A do-it-yourself hammock for a summer cottage will be an excellent addition to the relaxation area.
The following operations are required:
- The fabric is hemmed on all sides.
- The fastening is 15 cm pieces of fabric.
- The pieces are folded in half to form a loop, there are 6 of them in total. The loops are sewn to the fabric.
- A cord is passed through the finished loops.
- The ends are sewn together.

- Slings of 70 cm each are formed from the cord, then they are simply tied together.
- The hammock is securely attached.
The price of the hammock will pleasantly surprise everyone; all materials can be purchased at an affordable price.
Conclusion
On suburban area various country houses from a block of containers. To somehow brighten up your pastime, you can independently make various useful little things that will pleasantly surprise all family members. Described above detailed instructions on their creation.
In the video presented in this article you will find additional information on this topic.


The concept of “rutary” comes from English word"root" meaning "root". This is a man-made ensemble consisting of tree roots, stumps, stones and trunks. The composition is complemented by various plants and unusual items. This modern and fashion idea can become the pearl of your garden. Decorated with flowers and vines of green plants, the “root garden” is a real achievement of a skilled designer.
Where is the best place to organize the composition?
The first step to creating your own root garden is choosing a location. Do you have an old tree stump on your property? You can create a rutaria around it, using the stump as the center.
 If you are attracted wild nature, and you want to feel far from civilization when you go out into the yard, select a secluded corner of your site for a wild-style rutaria. If you like open spaces, decorated with cute figurines of fairy-tale creatures and animals, then you can create a composition right in the center of the garden.
 A pond would also be an ideal place. Being near water has a calming effect, and beautiful design the banks with lilies and stump decorations will always please the eye.
Preparing materials
 The next step will be the preparation of materials. First, take a look around. Often you can find a lot right on your site. Old driftwood, stones and branches will do. The rest you can easily find in the nearby forest and by the stream. Let the children collect interesting shaped pebbles. Size in this case does not matter, everything will depend only on your imagination.
Don't throw away the broken one tree bark, it will serve as decor for the future rutaria.
Be sure to add colored bottles, decorative figures of gnomes, tires and any unusual but creative things to the branches and stones.
 An integral part of the rutaria will be low plants, dwarf shrubs, moss and low-growing flowers. You can plant blueberries and wild strawberries; their plantings will look harmonious in the overall composition.
The average lifespan of a rutaria is about 3 years.
Wood and stone processing
 All wooden parts must be doused with boiling water to destroy the larvae in the cracks. Then the tree should be dried and treated with a composition against bark beetles and rotting. It is best to use colorless preparations so as not to spoil the natural appearance of the material.
If we're talking about about a composition in the center of which there is a stump, then the space around it will need to be cleared of weeds and debris, and the rot in the middle will need to be removed as much as possible. Do not touch the moss - this is a beautiful ground cover plant that looks good in a rutaria.
 With stones the situation is simpler. It is enough to select them by size, wash them well and clean them of any remaining vegetation. You can cover them with paint or varnish and surround the central part of the composition with them. Or you can place figurines on the stones fairy-tale heroes by creating a play corner for children.
Layout
 Make a drawing and sketches of the future rutaria. For this you can use special online services, or just draw a plan on paper. Take your time and sketch all the elements sequentially, starting from the center and moving towards the edges.
 Consider growth characteristics and dependence on sun rays the plants you are going to plant. Once your sketches are complete, take another look at your chosen location and surroundings. If you are satisfied with everything, then you can move on to the stage of creating the composition.
Creation of a rutaria
 The largest elements should be placed first. Based on the prepared plan, lay out the driftwood and stones. A little space should be left between them to allow passage for cleaning and adjusting the landscape.
Installing vertical elements Keep in mind that pillars and poles should be firmly dug into the ground so that they do not wobble.
Now it's time for decorations. Use your imagination, there are no restrictions here. and place the figurines among the large components. Come up with a single plot and bring it to life. For example, you can plant a gnome to guard the entrance to the garden, and behind his back you can place birds cut out of tires. 
Planting plants
 When the environment is ready, we plant the plants. A hollow should have formed in the center of the stump, where you previously removed the old rot. We pour soil with a mixture of fertilizers into it and sow it. You can plant ivy and, and between them - asters and cornflowers. Just study first which plants are not recommended to be kept nearby.
 We plant the space among large branches and snags with dwarf coniferous varieties. You can place bright flowers in hollows.
Making borders
The territory of the rutaria must be limited. This is done using stones or bottles placed in a line. We recommend alternating colors, then the border will be more interesting.
 Don't be afraid to make adjustments to your plan and experiment. For example, it would be nice to fill free areas with gravel or pebbles.
It should be understood that wooden elements within a few years they will rot and crumble, so they will have to be replaced in any case. Otherwise, besides caring for plants and cleaning up garbage, taking care of rutaria will not take up much of your time.
Ideas for using old stumps and snags in the country - video
We create a rutary with our own hands - video
Every owner of a private house or cottage wants to embellish their territory. Do it different ways, plant flower beds, use decorative sculptures. All this is beautiful, but it is no longer new. And oddly enough, this concept also exists in landscape design. Today it has become very fashionable to arrange on your own garden plots the so-called rutarium. We’ll talk about what it is and how it can be arranged in this article.
Do-it-yourself rutary
Once very popular Japanese garden stones. Everyone tried to one degree or another to arrange it on their acres. Now the “garden of roots”, the so-called rutarium, has come into fashion.
This word originates from the English root - snag. In other words, this is the use of stumps, snags and tree trunks to create landscape compositions. They are decorated with flowers and creeping plants. You want to create such a design object on your site, where to start? The first step is to decide on the location. The location depends on the style of the composition. If the rutary is decorated garden figurines, it should be placed in an open and more visible place. For a wild style composition, it is better to choose shady places or a corner of the site.

You can also arrange themed compositions. So you can make a rutarium at the bathhouse using an old wooden tub. Or decorate an existing flower garden with branches and roots. In addition, you can use it to decorate an artificial pond on your site, supplementing it with moisture-loving plants. Most perfect option if there is a stump from an old tree in your garden. It is he who will be the center of the entire composition. Next you need to collect the material. For rutaria you will need:
- driftwood;
- roots;
- tree bark;
- branches;
- stones.
Some of the material can be found on your site or you can go to the nearest plantings or forest for it.

Also provide plants. Low-growing flowers, creeping plants, and various mosses are suitable for it. After which it is necessary to process the existing material. This is necessary to extend the life of the wood. As a rule, rutarium is short-lived and can last about four years. After which it needs to be changed. During preparation you must:
- pour boiling water over all wood elements in order to destroy pest larvae;
- dry and cover with several layers of colorless antiseptic.
If you want a more creative composition then individual elements can be painted bright colors. It will be beautiful if they echo the shades of flowers. Now we prepare the place for the composition, clear it of debris. When using stones, they also need to be cleaned and their position planned.

The next stage is planning. You need to be clear about what you want. Mark what plants you will plant and how best to arrange them. Sketch out the plan on a piece of paper, this will make it easier to work on site. Now we move on to the actual construction of the rutaria. First we place large wooden elements, leaving a little space. This is necessary for caring for and planting plants. Then we place the stones, this can be done at the bottom of the composition, this will provide additional support to the planted plants. Small elements can be placed after planting. We pour soil and fertilizer into the voids of stumps and snags, after which we sow seeds or plant seedlings. You can put a pot with a flower, this will add originality to the whole composition. It is best to plant in stumps:
- fern;
- ivy;
- tulips;
- cornflowers;
- marigold.
Then you need to fill the space between the snags and branches. Perfect for these purposes dwarf varieties coniferous trees, low-growing flowers ( pansies, calendula, etc.). After which it is necessary to water all the plants. This composition is very easy to care for. It all comes down to timely watering and weed removal.

Driftwood in landscape design
Snags and stumps are quite often used in landscape design. It's pretty good material, besides, they have a rather interesting shape.

The use of such material will give fabulous view any area. Using driftwood, you can make both large compositions and small decorations for a gazebo or home. For example, a small piece of driftwood can be processed and various mosses can be placed in it. Such a corner of nature can be located even in an apartment. The beauty of this design is the simplicity of the material and no special site preparation is required.

You can also use existing stumps from old trees, and most importantly, there will be no need to uproot them. So you can take out the core of the stump, then place soil in there and plant beautiful petunias. You can simply lay out the branches in the free space and plant various succulent plants, filling free space pebbles or wood chips. Each of these solutions will decorate your site or apartment.
Rutaria root garden
Such compositions can be placed not only on the site or in winter garden, but also to decorate the house with them. It will look quite interesting and new.

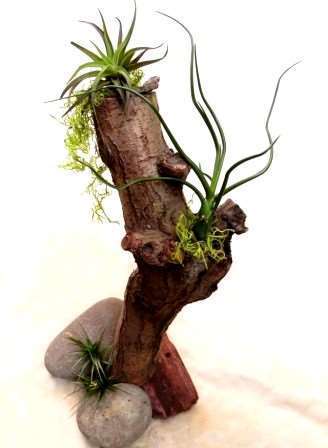
To create such a decoration you will need a small piece of driftwood with indentations. It must be processed as described earlier. Then you need to select the plants. For home rutarium, it is best to choose flora with a small root system; they do not require large depressions. It's best to choose:
- cacti;
- orchids;
- Guzmania;
- billbergia;
They can be comfortably located on the bark or in small depressions. They must be evenly distributed over the snag. The only thing you need to remember is that orchids and plants of the bromeliad family (Guzmania, Billbergia) are moisture-loving and need to be sprayed more often. By completing these simple manipulations you will get a living decoration for your living room.

Creation of a rutaria
Have you decided to decorate your garden? interesting element- rutarium. Prepared everything necessary materials. But rutaria can be of several varieties:
Natural– to create it, stumps, branches and snags are used in combination with living plants. This is the most beautiful type of driftwood garden.

simplest– it is created from driftwood and stumps, but to give beautiful view they need to be modified by cutting off excess parts or making a thread.

Decorative– made from plants and parts of wood. the main role here is given to plants. For example, an old stump surrounded by bright flowers will look very fresh and original.

After choosing the type of rutaria, you need to decide on its location. There are several options for placing such compositions:
- at the gate - this will create a pleasant impression and lift the spirits of the guests who come to you;
- near the recreation area, it can be supplemented artificial pond, or just arrange it near the gazebo;
- if trees are planted on your site, then the rutarium can be placed in the most shady place and decorated with a variety of plants.
After this, you can begin work. As a result, you will receive a unique natural composition that will delight the eye for several seasons.
Rutary photo
Give interesting view his outbuildings everyone can. To do this you will need:
- tree branches;
- flower pots;
- flower seedlings.
The branches must be processed and secured to external wall barn.

After this, we place the flower pots firmly in the space between the wall and the branches. We fill them with soil and plant flower seedlings. Low-growing plant species with small flowers of yellow, red and lilac are perfect for this.

If you have an old tree on your site, it can also be used for rutarium. To do this, you need to cut it into rings of the same height.

Then we take out the rotten core and lay the resulting rings in two rows. After that, we fill them with soil and plant bushes in them. decorative roses. We fill the ground with wood chips. That's all beautiful decoration ready for the site.

DIY rutary with stones
Setting up a rutary is not that difficult. If your site has small pond, around which the path goes can be done interesting decor. For this you will need:
- branches of different lengths;
- rope;
- big stones.
Part of the path must be laid out with branches fastened together. Then we install racks under the handrails on both sides (it is best to choose branches with knots for easy fastening of the handrails). It must be firmly dug into the ground. Next, we attach long branches to them using rope. Now we take large stones and place them in a chaotic order on both sides of the improvised bridge. A simple garden decoration is ready.

If you use your imagination and spend a little time, you can create a sculpture from branches. For this, it is best to select thin and well-bending branches. For convenience, you can make a wire frame. Then we cover it with branches and secure it with thin wire or glue. Such a sculpture can be installed next to the fence. The ground can be covered with crushed tree bark, and nearby stones different sizes lay out the path. It will look very interesting and natural. You will get the feeling that a forest deer has decided to stroll along the path of your garden.

This article talks about rutaria in the areas. A definition of this concept is given and it is explained from what it can be made. Using the advice in the article, you can easily find all the necessary materials and decide on the location of the composition. You will also select necessary plants. Happy creativity.
November 10, 2015Rutaria (or garden of roots) is no longer a rarity in landscape design, but not everyone decides to create it - it can look very unusual! Gloomy driftwood, bizarre roots, pieces of bark or moss-covered stumps give the garden mystery and mystery. At the same time, new residents require a suitable background so as not to look like an untidy heap of country garbage.
Roots and driftwood can be elements of large compositions, or they can become a self-sufficient decoration of the site. Only real landscape daredevils-experimenters can arrange an entire garden of roots on their own plot. It's risky, but incredibly interesting. Moreover, you don’t have to have a huge plot of land to create a root garden. An interesting composition does not mean large-scale. A small backyard, a terrace, an area near the veranda - free meters that you don’t want to leave empty are perfect for setting up a rutaria. And this is done easily and inexpensively!

Why is it accessible and incredibly cheap? Because the material is easy to find in the nearest forest, you develop the design yourself and bring the idea to life with your own hands. You will only have to spend money on an antiseptic for wood treatment.
Another advantage of rutaria is its mobility - elements of the composition can be easily swapped, new ones can be added and boring ones can be removed. The scope for experimentation is immense, even with modest sizes.
Rutarium is always a unique composition. There are no two identical roots or branches, and even if it is possible to find two stumps that are similar to each other, different owners will design them differently.
Simple ideas for rutaria
The roots and stumps of trees themselves can have a unique shape and form an unusual pattern that does not require additional “grinding” by human hands. This decoration is quite easy to install in right place a garden where the beauty of natural creation will be visible and can be appreciated.

By combining several wooden elements, you can get a complex and unusual composition. For example, you can create an entire arch from large roots and stump fragments. In its “uncovered” form it will look quite intimidating, but if you entwine it with delicate vines, it could be transformed.

Such snags look intimidating, like in a dense forest. But if this is exactly the effect you need (for example, to discourage an overly nosy neighbor from frequent visits), use the idea to your health!
Inanimate wood and moving water are a pleasant, harmonious combination. The downside of this neighborhood is the destructive effect that water has on wood. Even if this union is short-lived, it will last at least one season (or maybe two)!

Often wood sculptures need a little help to make them even more interesting. If you are engaged in wood carving, then hemp roots give more room for imagination than necessary.

How to create a rutary. Sequential steps
As a rule, the idea of creating a rutaria happens suddenly - somewhere you saw a nicely curved branch, or after sawing the trees, there were fancy branches that were so good that it was simply a pity to throw them away or burn them. This is where the gardener becomes a designer: he looks at the winding tree, admires it, sees a fairy tale in it and understands that it is no longer possible to leave, he must leave it and come up with a worthy design.
And some gardeners simply know that they need rutarium on their site and deliberately look for suitable material. What is all this for? Moreover, the first stage when creating a root garden is always preceded by a search for interesting material. If at least one stylish driftwood is found, then you can create a rutary!
Although the first stage, as always, is boring and uninteresting - we choose a place and draw a plan for the rutaria - try to take into account several important points.
First, you need to leave enough free space between the large elements of the root garden. There are two reasons for this. One is purely artistic: there must be “air” in the composition, that is, all elements must be visible, each must have its own noticeable place. The second reason is incredibly practical: the owner will have to care for the rutarium, and space is needed to walk between branches and snags.
Don't neglect processing. It will protect the wood from premature rotting and prevent it from drying out from the hot sun. Just a few procedures will prolong the life of the rutaria and make the entire composition more aesthetically pleasing.
Preparation of material for rutaria
To ensure that the wood does not deteriorate very quickly, and the rutarium pleases the eye for as long as possible, it is necessary to properly prepare and process the collected material. You understand perfectly well what lives in the roots, snags and old stumps great amount various insects, larvae, bacteria, etc. All these living creatures must be destroyed, this will prolong the life of the tree and protect your garden from the appearance of uninvited guests. Remove moss and other plants, scald the roots with boiling water (this simple procedure will clean the material well), and then dry thoroughly.
Treat the dried material with an antiseptic. Experts do not recommend covering driftwood and roots for rutaria with varnish, since they become too shiny and the naturalness needed in the composition is simply lost.
Installation of rutaria elements
Have you planned it? Did you draw it? Processed? Now take the largest roots and install them according to the plan. If there are vertical elements in your root garden, let them take their place first, so you can adjust the number of elements by subtracting or adding new ones. The tall components of the rutaria must stand firmly and reliably, otherwise strong wind will destroy the composition.

After arranging the large pieces, start placing the smaller ones. Having placed the tree in its place, evaluate the result. Rearrange if necessary. And don’t be afraid to change something; your imagination and advice from interested friends or relatives can suggest interesting solutions.
When all the non-living elements take their place, start planting plants.
Plants for rutaria
Snags, roots and stumps in large quantities can make the garden gloomy. Plants are designed to soften and revive the appearance of rutaria. No pomp or abundance of colors! Our task is to revive the corner, make its main characters a little livelier and kinder. Various climbing and ground cover plants go well with tree sculptures; succulents look good, as well as simple and cute daisies, nasturtiums, begonias and petunias.
If you create a rating of plants that are suitable for rutarium, then the first place should be given to ferns and hostas. There is more than enough mystery and fabulousness in such compositions!

Any low-growing plants can fit harmoniously into a composition with roots and driftwood. Pay attention to the hole. This baby is often used to decorate rock gardens, and if it can bring life to a rock garden, it will also be good in a root garden. The juxtaposition of trees and dwarf conifers will be pleasing to the eye. You should not refuse to combine wood with mosses. Soft and fluffy rugs will make the lines smoother, delicately add color to the rutaria and “revive” the composition.

Various decorative figures – gnomes, mushrooms, snails, etc. – look natural in rutaria. A standard factory sculpture and even old toys can sparkle in a new way if you place them among suitable driftwood. note that garden figures It is better to install it in the rutaria after the plants have taken root.

The last step in creating a root garden will be the owner’s meticulous look at general form: You finished your work and you should like it.
Rutaria care
Rutaria requires care: some woody elements will rot over time, despite all the measures taken, weeds will certainly appear among the cultivated flowers. While caring for the composition, the owner unwittingly begins to modify and change the appearance of the root garden. And this is quite natural. Even a non-living rutarium will live, thanks to you and your imagination!
Do you think the article is finished? Nothing like this! We return again to initial stage creating a root garden. Often the idea of creating a rutaria for the owners of dachas and suburban areas comes when... a stump appears on the site. The use of stumps, stumps and even small stumps in landscape design is widespread, so we will pay special attention to them.
Stump on the site: to be or not to be

A real gift for a gardener can be the presence of a strong stump on the site. True, the first thought of the newly-made owner is not at all joyful: “Uproot!” This means money, time, nerves... And in the end big hole, with which something urgently needs to be done. Try to relax and postpone the thought of uprooting until the next season, because you can make many interesting compositions from a massive stump. If the tree is rotten with a soft center, but still strong edges, then it can be turned into a flower bed; Give a fresh and full of strength stump a central place in the rutaria.
Stump in flowers
A hemp flower garden is the simplest way to turn a problem into a garden decoration. In such " flower pot"The plants will feel very comfortable. We don’t even mention the aesthetic side, because this is a classic of the genre!

Take out the core, cover it with soil (sometimes experts recommend treating the inner surface of the cleaned stump with anti-rot preparations) and plant flowers. A win-win option There will be petunias, low varieties of phlox, and ferns. Do you want to see a tree stump blooming in spring? Plant bulbs in the ground, then when the weather warms up you will have an excellent reason to sing: “What a wonderful day! What a wonderful stump!”

Your own rutarium
If you want to create a real rutary, and the stump is worthy of becoming one of its main elements, we support this desire. Inspect the stump from all sides and make sure there are no signs of serious illnesses, which can significantly shorten its lifespan and spoil the health of other inhabitants of the garden.
If picturesque moss grows on a stump and the general appearance of this neighborhood suits you, leave them together, let this “decorative” friendship continue.
Don't want to mess with the stump? Then leave him alone, and so as not to accuse you of laziness, plant low flowers next to him. Playing on contrasts is rough old wood and delicate stems with touching flowers - will conquer anyone. The decorative power of this combination is clearly visible in the photo below: a gloomy piece of wood, dark fallen leaves and a bush of fresh snowdrops...

Stump left over from a cut down fruit tree, can be done decorative element garden On next photo the composition is not yet visible, it even seems that it would not hurt to put things in order... Nevertheless, the owners are planning to create a cozy corner - in the center they planted meadowsweet, and on the sides there are small bushes of St. John's wort: on the right is the variety ‘Magical Beauty’, and on the left 'Magical Sunshine'.

Not just roots
Fancy wooden elements make a rutarium a rutarium, but you don’t always need a lot of roots and driftwood. Just one interesting branch can significantly transform a rock garden and complement a flower garden.
Another facet of the Root Garden is a fantastic story with amazing characters and mysterious settings. Designers even create furniture from winding driftwood and twigs, which gardeners with good imagination install in themed corners.

It is impossible to give advice on creating a rutaria on a site simply because each person will see something different in the bizarre bends of branches and roots. One's imagination will prompt him to plant delicate petunias in a gnarled stump, while another will make a guard gnome for his plot out of an old gnarled trunk. You can come up with anything, we can only suggest the direction. We hope that the photos of rutaria presented below will “warm up” your imagination and you will create your own unique root garden, and send us a couple of photos to the address! And on our website you can watch a video about creating rutaries.


