Renovating a bathroom can often be complicated due to the very small dimensions of this room. All repair work in this room is carried out in stages and you need to carefully monitor the correctness of the actions performed. After all, the wrong action or the slightest mistake can interrupt the repair process and force you to redo everything from the very beginning. As for the actual installation of a steel bathroom, it is only possible after you are well prepared and carefully consider your actions. It should be noted in advance that steel bath it must be attached to the walls with three sides
, while cast iron models have a fairly stable support and can be installed anywhere.
Installing a steel bathtub yourself is quite easy.
Preparing the bathroom and assembling future supports Before you begin installing a steel bathtub, you need to thoroughly level the floor, increase its moisture resistance with waterproofing, and also finish it. The best option Floor finishing for a bathroom is considered to be tiles. It should be understood that tiles laid using the ridge-type laying method may not withstand the installation of heavy plumbing fixtures and may crack. That is why a very important factor is correct styling
floor tiles, and they must be laid on solid cement, without the formation of voids.
Also a very important factor is the absence of finishing tiles on the walls. Their finishing should occur after installation and connection of plumbing elements.
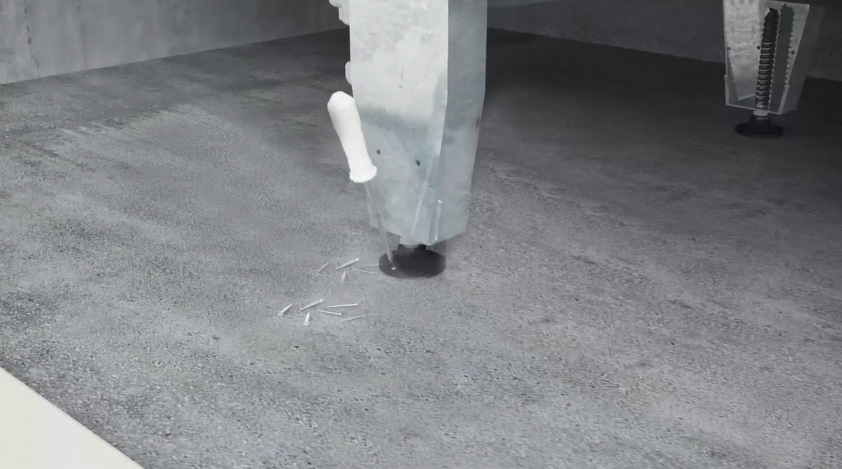
- Now, regarding the supports. They are definitely included when purchasing steel bathtubs. In most cases, the supports have special self-adhesive pads, which greatly facilitate fastening. Much less frequently, bathtub manufacturers offer to secure their products with tightening bolts. The fact is that this type of fastening can significantly reduce the life of your bathroom, since if the bolts are tightened too tightly, the enamel can be damaged. The assembly of supports occurs in three stages:
- First you need to stuff the plastic tips onto the studs.
- Then screw the clamping nuts onto the ends.
In order for you to be able to properly attach the adjusting supports, you definitely need to turn the steel bathtub upside down and in this position glue the self-adhesive pads to its surface at a decent distance from each other. Before gluing, the surface of the bathroom must be degreased. It should be noted that it is best to install one of the supports near the drain hole, while the second one must be sent to the opposite edge of the bath.
Installation instructions steel bath
Self-adhesive pads are very easy to attach. All you need to do is remove the special protective film, then press the pad tightly to the desired location (marked with a marker) as firmly as possible and hold for a couple of seconds. Immediately after this, you can begin screwing the fastening bolt, which is located in the middle of the paired support and the bottom.
Fitting and installation
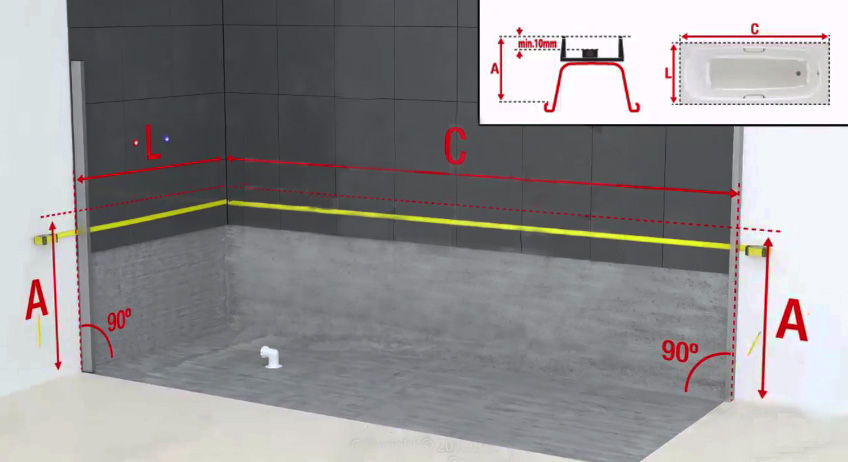
Finally, we come to the most crucial moment - how to secure the bathtub. First, you must bring it into the bathroom and place it on its legs in the place where you are going to install it. After you install the bathtub, you need to use a building level to measure its slope. In case of severe distortion, it is necessary to adjust the legs. Don't forget that the bathroom doesn't have to be perfectly level.
The side in which the drain is located should be slightly lower so that the water in the bath does not stagnate.
The bathtub is attached to the wall only after all fitting and adjustment work has been completed. The edges of the bathtub that will be in contact with the wall are covered with special construction tape, after which the bathtub is moved close to the walls, and the gaps are sealed with polyurethane foam. After the foam has hardened, it must be cut off using a sharp knife (you can use a stationery knife). The resulting seam must be thoroughly treated with sealant. Now you can remove the construction tape and start connecting the drain.
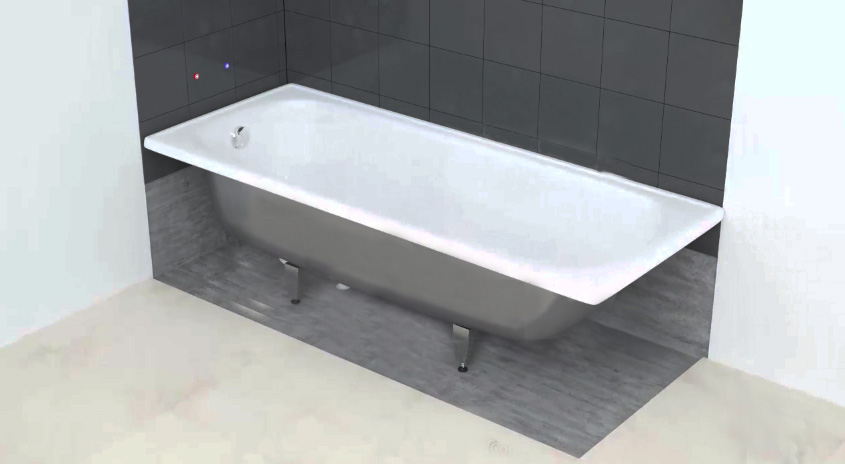
Example of installation of a steel bathtub
Installation on grooves
Options for installing a bathroom on grooves are also quite common today. In this case, the attachment of the bathtub to the walls is strengthened due to the presence of a groove made using a hammer drill. The sides of the bathtub on three sides are threaded into the groove, after which all the following stages of fastening occur in exactly the same way as in the previous case.
Some developers enhance the stability of the bathtub using metal corners, which are attached with dowels to the wall on both sides of the sides. The support of metal corners will prevent not only the bathtub from turning over on its side, but also its bottom from sagging.
A wooden frame may well serve as additional support. It is installed under a steel bathtub, and later covered with a blank screen. Such a system will also be reliable and durable, even taking into account the presence of wood.
When installing the bathtub, all gaps are filled with polyurethane foam.
Installation on brickwork
A more reliable mounting option for a bathtub can be ordinary brickwork under the bottom and brick pillars on the sides. In this case, the bathtub will have support not only on the bottom, but also on the sides.
Before installing the bathtub on brickwork you need to prepare its location. To do this, all the measurements you need are taken from the sanitary ware: these are the width, height and length of the bathtub model you purchased. You need to take everything into account, down to the millimeter. So, the height of the brick columns should be equal to the distance from the inner wall of the sides to the floor. The length and width must be calculated in the same way, otherwise the bath may become uneven. It should be noted that the width and thickness of the brick should be taken into account separately.
Installing a bathtub on brickwork
When installing brick pillars on the wall and floor, special markings are made with a marker; this is necessary so that you can clearly see the boundaries of the future brickwork. The installation of the structure begins with the creation of central supports, after which the distant columns (located against the wall) are laid out, and only after that, the columns are laid out on the sides of the front of the bathtub. Installation of the bathtub itself can only be carried out after cement mortar will harden and the brickwork will become stable.
Weighs steel structure significantly smaller than cast iron, thanks to which it can be lifted and installed on the masonry with the efforts of just two people. It is necessary to adhere the bathtub body to the brick using polyurethane foam, which is applied to the bottom of the bathtub. Until the foam has hardened, you should have time to adjust the tilt of the bathtub towards the drain. Before attaching the bathtub to the wall, you should check the slope of the drain several times by filling and draining water. If suddenly the water does not go away immediately, but stagnates, you need to increase the angle of inclination. That's it, the installation of a bathtub on brickwork is completely completed.
We really hope that our article will help you cope with such a task as fixing a steel bathtub. This task is not at all difficult, but it will require a lot of attention and quality work from you. We wish you good luck!
Installing a bathtub is quite hard work in the truest sense of the word. This is especially true for cast iron plumbing, which can be an almost impossible task to install alone.
For installation of even relatively light acrylic bathtubs, it is better to find an assistant, since any awkward manipulations can lead to damage to the body, coating or drain parts.
What to consider before starting work
Before you start installing a bathtub yourself, critically evaluate your own capabilities - do you have enough skills to install plumbing fixtures practically by touch? Although we note that even very modest skills acquired, for example, during installation kitchen sink, should be enough for successful installation of the bathtub.

When purchasing plumbing fixtures made of acrylic, be prepared for the fact that the work will have to be carried out with extreme care - if handled carelessly, the bathtub can become warped, resulting in the coating cracking. It will also be damaged if the working tool accidentally falls into the bowl. In addition, during installation in the body of an acrylic bathtub, you will have to drill blind holes, and given that this material is extremely easy to drill, it is quite possible to overdo it and hole the bathtub right through.
What you need to know about cast iron baths
Before purchasing a cast iron bathtub, you need to familiarize yourself with its features as carefully as possible:
- It is better to rest such a bathtub on three walls at once, especially if it is installed on open decorative legs, since the latter can easily break from the lateral force applied to the bathtub.
- It is advisable to attach the siphon to the drain hole in advance, but again the heavy bath will have to be moved once again, which can lead to various damages.
- Cast iron bathtubs are quite expensive to purchase, but their operation is also expensive.

When installing cast iron, be careful not to damage the tiles on the floor.
To do this, they usually place bricks under the legs.
Cast iron takes quite a long time to warm up - in order to fill a bathtub with warm forty-degree water, a boiler that heats water to 60 degrees will require about 100 liters of water. For comparison, the same acrylic bathtub will require only 50 liters of water, heated in a boiler to 60 degrees. It should also be taken into account that cast iron releases the heat it receives much faster, so in terms of efficiency, a cast iron bathtub is more than twice as economical as an acrylic bathtub.
Features of acrylic bathtubs
Unlike cast iron, acrylic bathtubs They are quite light, which makes it possible to install them alone. In the production of acrylic sanitary ware, enterprises do not experience any technological difficulties associated with giving the products any complex shape, so you can find the most different samples, but at the same time quite inexpensive.

The thermal conductivity of this material is quite low so that the bath does not cool down for a long time, while heating it occurs almost instantly. This is associated with significant savings in the operation of acrylic plumbing, as mentioned above.

The assembled frame should be attached to the acrylic bathtub in the bathroom,
otherwise it may not fit through a standard 60 cm doorway.
The main disadvantage of acrylic bathtubs is their relatively low strength and service life not as long as cast iron ones. However, with careful use it can last up to 15 or even 20 years. Review - read the next article.
The installation method for acrylic bathtubs also differs from cast iron ones, which is due to the characteristics of the material.
Installation of cast iron baths
A cast iron bathtub, as previously noted, is extremely heavy, and some features of its installation are associated with this circumstance:

Installation of acrylic bathtubs
The first step when installing an acrylic bathtub will be to attach guides for the legs to its bottom, which are attached to the bottom with self-tapping screws.

All markings are carried out in accordance with the instructions, while the supports are installed strictly perpendicular to the longitudinal axis of the bathtub.

The places where the legs are attached usually have an increased thickness of acrylic.
If this is not there, glue it wooden blocks and screw it to them.
It is necessary to drill blind holes for self-tapping screws with a drill with a limiter approximately 3/4 of their length. After this, the legs themselves are installed, and the drain fittings are installed.

Provision should be made for a pipe extension for bypass.
The side of the bath sits on plastic hooks, which are attached to the wall with dowels.

The bathtub is installed on Right place and is adjusted in height using adjusting screws.
Note. There is no need to adjust the slope of the bathtub to drain; it is built in when the tide of the bathtub bowl is low.
All cracks are sealed with silicone, the build-up of which can be removed with a rag soaked in a vinegar solution.

There is also an option for restoring a bathtub - read all the details of this method in a separate article.
When installing important role plays the height to which you can raise the bath above the level of the sewer inlet. It should be raised higher for two reasons:
- The flow from the bath will become more intense. In this case, it is not so much the speed of water removal that is important, but the fact that a powerful drain will almost completely eliminate the formation of hairballs on the drain grid and in the siphon.
- The high location of the bath will make it possible to install a siphon with a deep elbow and, accordingly, a good water seal, which will significantly reduce the likelihood of unpleasant odors and harmful gases penetrating back from the sewer.

Deep elbow - protection against unpleasant sewer odors
The choice of material is also important. In most cases, it is made of polyvinyl chloride (PVC) and polypropylene. Latest material more expensive, but at the same time it is stronger, more durable, its walls are smoother, which minimizes the possibility of blockages.

A few words should also be said regarding the choice of drain. So, siphon models are too cheap, metal grid which are attached to a bolt, can essentially be considered non-separable, and therefore non-repairable. The fact is that after a few months, the rust grabs the bolt so much that it is not possible to unscrew it without breaking the siphon. In this case, it does not even matter what metal the hardware is made of - steel or, for example, bronze or brass. It’s just that in the first case we will observe ordinary chemical corrosion, and in the rest - electrochemical corrosion.
In conclusion, we note that For an overflow in the bathroom, you should absolutely not use a rigid pipe. A flexible corrugated hose is quite suitable for this, which, on the one hand, is extremely easy to install, and on the other hand, due to its larger internal diameter, provides better water permeability, which reduces the likelihood that water from the bathtub will overflow.
Nowadays it is impossible to imagine a modern bathroom that is not equipped with a bathtub. Basically, builders install and fix the bathtub, but over time, the plumbing fails, loses its attractiveness, or becomes deformed. In this case, it becomes necessary to install the bath yourself to replace the old product. In our article we will look at how to fix a bathtub on legs if it is on a tiled floor, and other options for installing it.
Choosing a bath
A bathtub is a large-volume sanitary container used for washing, washing and other household needs. More recently, shower cabins tried to displace this device, but due to less functionality they failed.
There are 3 types of baths:
- Cast iron. This - classic version, which retains heat perfectly and is highly durable. The disadvantage of this product is its heavy weight, since a bathtub made of this material weighs about 80-150 kg. With a large mass, transportation and installation of the product becomes difficult. Also, cast iron containers have a high price and they are limited in the set standard sizes and forms.
- Steel. A product made of steel can retain heat for much less time, but at the same time, its weight is 3-5 times less than cast iron. Mostly steel bathtubs weigh up to 30 kg. The main disadvantage of these models is the large noise that occurs when a stream of water falls. It is very difficult to install a steel bathtub on the floor without it wobbling or playing. However, these models are widely used due to their affordable price, which is 3 times lower than for cast iron products.
- Acrylic. Acrylic from which it is produced modern baths, is a durable polymer material. Products made from it are able to satisfactorily retain heat, and they can be purchased at very reasonable prices. affordable price. In addition, such products have a beautiful appearance. Acrylic containers are easy to install because they are not heavy. A significant disadvantage is low strength, which is inferior to cast iron and steel. Therefore, the significant weight of a person can break an acrylic product.
Important! To ensure that the bathtub does not wobble and stands level after installation, you should choose the correct size of the product. The length of the container corresponds to the distance between the walls minus 4-5 cm. When purchasing a bathtub, you need to choose models that are as close as possible to the calculated dimensions. This requirement helps prevent possible gaps between the bathtub and the walls that may appear after installation is completed. In addition, with the right choice of container, the process of attaching the product to the wall and floor of the room is much easier.
Features of installation of various bathtubs
Many people ask the question: how to fix the bathtub yourself so that it does not wobble or play? When installing a sanitary container, you need to remember some nuances, taking into account which you can independently cope with the task.
To do this, you should take into account the mounting features various types baths:
- The most difficult part of securing a cast iron bathtub is bringing this product weighing about 100 kg into the room and installing it on the floor. To install this container, 4 supports are required, supplied with the selected product. A cast iron bathtub is installed on the floor of the room using legs, which are attached to the bottom of the product with special bolts or wedges. To distribute the load from the weight of the bathroom, a metal sheet is laid on the floor of the room.
- A steel container is much more difficult to install than a cast iron product. Since it has less weight, very often illiterate installation leads to its swaying and sliding. To securely fasten the steel product, it is required that the bathtub adjoins 3 walls as closely as possible. You can install the container on a brick podium or brick supports that come with the bathtub.
- Acrylic products are secured to a podium or adjustable supports to prevent the container from rocking, swaying or sliding. The container must be adjacent to 3 walls of the room. Since acrylic models have low mechanical strength, it is recommended to build a frame around them, which makes it possible to give the product additional rigidity and hide communication elements.
Important! When renovating a bathroom, only after laying ceramic tiles can the product be installed. In order to provide access to the floor under the container, the product must be raised and then installed on wooden blocks or bricks.
Basic rules for installing a bathtub
When purchasing a bathtub, you should definitely pay attention to the fastening system with which it will be equipped. After purchasing the product, you must carefully read the instructions and become familiar with the installation method recommended for this model.
How to fix a steel bathtub so that it does not swing? Basically, the product installation process is as follows:
- Before fixing the steel bathtub, we prepare the site for installation. If you intend to perform Finishing work ceramic tiles, then we lay the tiles on the walls and floor of the room.
- We install the bathtub on its side, then carefully place it on the floor, since this position facilitates convenient connection of the overflow and drain pipes.
- Using a sealant or seal, as well as changing the position of the product, we connect the floor siphon with plastic pipes.
- We screw or glue the legs to the bottom of the sanitary container, while adjusting the height of the supports.
- We place the product in such a way that it is possible to connect the siphon to the sewer system.
- Under the bottom we build a podium from bricks or some other materials. We install a frame that would allow us to hide the pipes behind a decorative screen.
- We seal the joints between the walls and the product using a sealant, moisture-resistant solution or plastic corner.
- After installation is completed, experienced specialists check the reliability and quality of the fastening. To do this, fill the product with water and check that the drain is working properly. We make sure that the product does not swing or wobble.
Fastening with polyurethane foam
Polyurethane foam is used to strengthen the product and simultaneously fix it on the floor and walls of the room. Mounting the bathtub to the wall using polyurethane foam done this way:
- We position the sanitary container in location and height using adjustable legs so that there is a gap of about 0.5-1.5 cm near the walls.
- After this, fill the bath to the brim with water.
- Using polyurethane foam, we seal the gaps between the body of the sanitary container and the walls of the room, as well as between the legs of the product and the floor.
Important! Sealing foam has the property of expanding when it dries, so it must be used in strictly dosed order. Otherwise, unwanted deformations of the structure occur, which reduce the reliability of its fixation.
Application of brick frame
As a rule, a brick frame is used in situations where you secure the product without using legs, while ensuring uniform distribution of the load along the entire perimeter of the support. This installation method allows you to use the option of laying out the frame both across the bathroom and along the room.
Important! When positioned transversely, the product must rest directly on the brick, which implies additional fastening of the frame to the walls using corners made of metal - aluminum or steel. We fix the pre-prepared corners to the wall using dowels. With this option, the free edges of the container have additional support, and when pressed it does not wobble.
How to fix a steel bathtub using a brick frame:
- We unpack the purchased product and conduct a thorough analysis of the dimensions of the product and the room.
- We install the bathtub on spacer bars placed close to the wrong side of the sides.
Important! When installing a bowl in a niche, it is necessary to maintain the required distance between the sides of the plumbing fixtures and the wall on each side, which corresponds to 2.5 cm. This requirement does not apply when installing corner products.
- Using a spirit level, we check the position of the product relative to the horizon. If necessary, change the angle of installation of the spacers, thus leveling the installation of the bowl.
- We lay out brickwork in the intended installation locations for the legs.
- We install the last row of brickwork close to the wall of the container, using pieces of brick.
- When the masonry has dried, remove the spacers, and then check the stability of the bowl using its own weight.
- Using brick, we lay out the screen along the perimeter of all plumbing fixtures right under the edge.
Attention! In this case, creating a screen serves not only decorative decoration, but also provides additional rigidity to this structure. If the strength of the lower supports is insufficient, laying brickwork to the lower segment of the side along the entire perimeter of the bowl prevents distortions of the plumbing.
When performing such work, be sure to provide a small inspection hole that would allow free access to the siphon. As a finish to cover the hole, use a small piece of drywall or install a small plastic door. If you are going to use ceramic tiles for wall decoration, then you can use a ready-made screen that serves as the front panel of such a base.
Installation on a metal frame
This installation method is mainly used when installing acrylic bowls, which are already equipped with a ready-made steel frame. If such an accessory is not available, the steel frame can be purchased separately or created independently.
How to attach an acrylic bathtub to a wall using metal frame:
- When installing such a product, we attach the frame guide strips to the bottom of the product using self-tapping screws.
Important! Fastening must be done in special places that are thickened.
- We install the included legs on the fixed guides, using a bolted connection.
- Lower the bowl into place.
- We mark the points of contact of the product with the walls of the bathtub room.
- In these places we install special strips that provide additional support.
Important! A small gap should be left between the bar and the side - about 2-4 mm, which is taken into account when the product expands after the bowl has been filled with hot water.
Installation of an acrylic corner bathtub on standard supports
To secure a corner acrylic bathtub on legs if it is on a tiled floor using standard supports:
- We remove the purchased acrylic container from packaging.
- To prevent scratches on the bathroom floor, spread a blanket and turn a sanitary container onto it.
- We take measurements of the sides of the product and compare them with the dimensions of the installation location.
Important! For quick and quality installation corner product, it is necessary to check the converging walls of the seat, the angle between which must be right. Otherwise, a gap appears that is very difficult to cover.
- Let's unpack the components needed to make the frame.
- We use plugs for the ends of the legs.
- We screw in the studs onto which we screw the locknuts.
- We assemble the profile to create the frame.
- We screw the adjusting leg pin into the profile hole. We screw one locknut tightly against the profile, and screw the other one towards the leg for stability and strength of the structure.
- We install the prepared profiles on the product and fasten them with the screws included in the kit.
- To assemble the second profile, we prepare a short and a longer pin. Using a locknut, screw in the short stud.
- We screw in a long pin from the protruding side of the product's side.
- We install plastic legs on both sides of the screwed-in long pin so that one leg can rest against the acrylic side of the product, and the other, respectively, against the floor.
- We secure the installed legs with nuts.
Important! After installing the support legs on the profile, you need to check that the plugs are located at the same level. Using a ruler, you can check the location of the extreme points of the support legs, while measuring the distance from the profile plane to the surface of the plugs.
- We turn the assembled structure over and install it in the required place.
- By applying a level to the sides, we check the position of the sanitary container.
- If necessary, align the legs and tighten the locknuts again.
Reinforced fastening of acrylic bathtubs
Strengthening an acrylic bathtub on supporting legs has one significant drawback, which is that in the area formed between the fixed profiles, the bowl crunches under the weight of a person.
To make reinforced fasteners for an acrylic bathtub:
- We select standard brick blocks with a length of 625 mm and a thickness of 250 mm.
- Using the adjusting supports, raise the container to the maximum height.
- We blow foam around the perimeter of the product, on the surface of which we install blocks.
Important! In order for the foam to interact better with the blocks and floor screed, it is necessary to moisten the mounting surfaces with water from a spray bottle.
- We lower the bowl onto the foam and, using nuts, fix the supports.
- After a day, the plumbing stops crunching and becomes motionless.
This method is very simple, since you only need to purchase a bottle of foam and a few bricks.
Inserting a bathtub into a niche
Small-sized apartments very often create difficulties for installing plumbing products in the designated place. As a result, the installation of the bowl is complicated, but on the other hand, it provides the possibility of rigid and reliable fixation of the container in the niche of the room.
How to fix a cast iron bathtub to the floor? To rigidly fasten the product on each side of the wall, it is necessary to prepare grooves having the thickness of the edge of the bowl. For this purpose, a hammer drill or grinder is used. The bowl flaps are inserted into the prepared grooves with a slight “tightness”. The absence of complete play guarantees the most rigid fixation.
Important! If the legs do not have the required rigidity, you can further strengthen the bowl by using special transverse profiles that serve as supports for the lapels of the product.
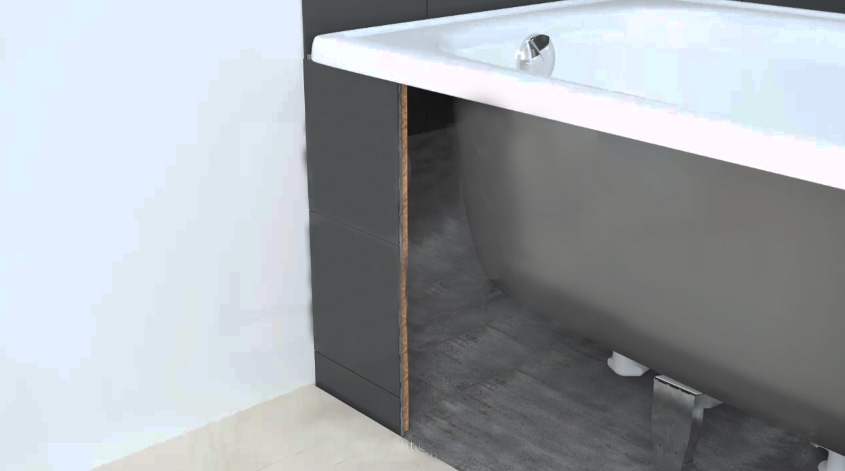
How to seal a large gap near a wall?
Sometimes during the installation of the container there remains a large gap between the wall and the end, which does not allow for rigid fixation of the bowl. In this case, you can turn this disadvantage into an advantage by creating a frame. As a result, a shelf appears between the wall and the bathtub, which can be used to store shampoos, powder and other accessories.
Let's look at some ways to eliminate a large gap:
- We make a frame from profiles that can be sheathed with moisture-resistant material such as plasterboard.
- We create a hatch to have access to the plumbing.
In principle, any installation work can be done home handyman, if he takes the upcoming work responsibly and scrupulously. In this article, we have offered you several options on how to secure a bathtub on legs so that it does not wobble for different models of plumbing fixtures. We hope, using our step by step instructions, you managed to do everything efficiently and reliably.
Ceramic tiles are the optimal flooring solution for bathrooms. It has many undoubted advantages and advantages, which allows you to install plumbing equipment on it various types and sizes. Baths are considered one of the most complex and demanding increased attention accessories. The technology for mounting a bathtub on legs depends on the characteristics of the floor in the room.
Before you begin the actual work, you should briefly familiarize yourself with the differences between floor coverings.
| Type of tiled floor | Description of technical characteristics |
|---|---|
| The most durable coatings that can withstand significant forces. Only on such floors is it recommended to install heavy cast iron or stone bathtubs. The tiles are laid on a leveling cement-sand screed on concrete; there is no insulating layer. If various insulation materials were used to reduce thermal conductivity, then installing heavy containers is not recommended. |
| Ceramic tiles are installed on sheets of plywood or OSB. They are used as load-bearing elements wooden beams. Such a base does not have high levels of physical strength; it is not recommended to install heavy bathtubs on them. The fact is that wooden structures change linear dimensions due to fluctuations in relative humidity. As a result of such movements, the degree of adhesion of tiles and adhesive significantly decreases. Loads from the legs of the bathtub speed up this process and increase the risk of tiles peeling off. |
| In terms of strength they occupy an average position. The thickness and strength of the screed above the heating system cannot guarantee the integrity of the coating; sharp loads from the legs of the bathtub can cause critical damage to the coating. |


Be sure to take into account the features and specifications floors before purchasing a bathtub.
General tips for mounting a clawfoot bathtub on a tile floor
Each type of device has its own characteristics, we will talk about them below. But there is something for everyone General requirements, compliance with which is a prerequisite for proper installation.
Quality of flooring. Before installing the bath long level check the levelness of the floor. Despite the fact that all the legs have their own adjustments, they cannot level out large unevenness. In addition, if the legs have a large variation in height, then this significantly worsens the appearance of the room, especially if the bath is freestanding.

Another important point. Once you have decided on the specific location of the bathtub, make sure that the tiles under the legs are laid according to technology. For this purpose anyone hard object knock on ceramic tiles, the presence of a drumming sound indicates that there is no glue underneath. Such tiles are likely to crack; before installation, special measures must be taken to increase the load-bearing characteristics of the coating.

Make sure the legs are strong. In many cases they are not designed to permanent loads, but should be used as additional elements when setting up the bathtub and installing it on more reliable supports.

Assemble the legs in strict accordance with the manufacturer's recommendations. If you want to make your own changes to the design, then you need to do this competently, otherwise the stability of the bath will deteriorate.

We'll consider detailed instructions for installing a bathtub with legs for several cases: the legs are used as the main support, the legs are used as an additional support, the bathtub is freestanding or mounted in the corner of the room. Each type of work has its own fastening features, pay attention to them.
Prices for Tarkett floor tiles
Tarquette floor tiles
How to fix a bathtub on a tiled floor with legs with an adhesive backing
Read the attached instructions and make sure all elements are complete and in good working order. Check the condition of the flooring using one of the methods described above. This type of bathtub can be mounted on both concrete and wooden supporting structures.
Step 1. Turn the bathtub upside down, make sure that the distance to the drain hole will provide a good connection with the sewer pipe.

Practical advice. In order not to damage the tiles on the floor and the bathtub cover, you need to put cardboard or wooden spacers. Installation work is much easier and faster to do with an assistant.

Step 2. Degrease the bottom of the bathtub where the double-sided tape is located. It is better to degrease with special solvents; if they are not available, you can use alcohol or vodka. After vodka, the surfaces must be thoroughly dried. The locations for gluing the tape are marked on the bottom of the bathtub.

Step 3. Remove the protective oiled paper from the tape on the legs. Carefully place them along the lines and press firmly. Take your time, work with utmost care. If you make a mistake, tearing off the legs will be problematic. In addition, the adhesive surface will significantly deteriorate its original properties and the fixation will be unreliable. You will have to change double-sided tape, but it is quite difficult to find high-quality tape in stores, and you will have to waste a lot of time searching.


Step 4. Screw the adjusting bolts on the legs until they stop and check their position with a level. They should lie in the same horizontal plane, if this is not the case, then adjust them.


Step 5. Assemble and install a siphon on the bathtub; the specific algorithm of work depends on the design features of the equipment.
Step 6. Measure the distance from the legs to the sides, it is needed to mark the location of the side stops of the bathtub.

We have already mentioned that light steel and acrylic bathtubs cannot be attached to the floor with legs alone. This is due to the fact that such structures are very unstable; during use they can tip over or slide on smooth ceramic tiles. It is possible to specifically fix the legs to the floor with anchors only in certain cases for bathtubs installed in the middle of the premises. And it is not recommended to do such work for two reasons: you need a lot of practical experience in installing bathtubs and you have to drill holes in the tiles.
If there is a need to replace or move the bathtub to another location, the drilled tiles must be replaced. This is quite difficult for two reasons. Firstly, most often you will not be able to buy exactly the same tiles to replace; there will be traces of replacement on the floor. Secondly, it is difficult to dismantle well-laid tiles from the base; there is a high risk of damaging nearby ones.
Step 7 On the walls of the room under the level, draw lines at the height of the sides. Make sure all angles are 90°.
Step 8 Temporarily place the bathtub in place and mark the fixation points for the side supports. Move the tub aside and drill holes for the dowels.


Step 9 Apply a layer of silicone sealant along the drawn lines and install the bathtub on the hangers. The thickness of the sealant should be such that all irregularities in the tile are covered. The squeezed-out excess material should be leveled and removed.


Step 10 Finally align the legs and attach them to the floor. If it is made of wood, then just tighten the screws. If the floor is made of ceramic tiles, then for fixation you should first drill holes for dowels and, after installing the bathtub, drive dowel-nails into the plastic parts.
Step 11 Check the tightness of the siphon connection. This can be done under pressure using special equipment or by gravity. Fill the bathtub before the water begins to overflow, place sheets of paper under all pipe connections. Open the valve and wait until the water drains completely. Take out the paper; if there have been minor leaks, wet spots will appear on it. If problems are discovered, they must be corrected immediately.

The final step is installing a decorative screen. It can be made from masonry materials or panels, faced with ceramic tiles or used plastic panels.

How to fix a wobbly bathtub with legs
We have already mentioned that it is not recommended to use legs as the main support. They create significant point loads on the tiles, the surfaces of acrylic bathtubs with thin walls sag, etc. There is another significant problem with such stops. In case of long-term operation and heavy loads, the threaded connections of the legs gradually become loose, over time the vibrations become critical and can cause leaks at the junction of the siphon with the sewer pipes. In addition, the sealing of the joints of the bathtub with the walls is constantly broken, water penetrates into the cracks with all the negative further consequences.
What to do if you have exactly this situation, the bathroom began to wobble on the tiled floor? There is a way to fix the problem without dismantling the bathtub and without damaging the ceramic tiles.
If there is a decorative screen, it should be dismantled. The removal process depends on the materials of manufacture; it is most difficult with masonry materials. The structure will have to be completely demolished. During the work, make every effort to preserve the floor and materials; with proper skill, they will all be reusable.
To complete the work you will need a car jack, bricks or aerated concrete blocks, ceramic tile adhesive or cement-sand mixture, trowel, solution container, electric drill with mixing attachment.
Step 1. Unscrew the nut connecting the siphon pipe to the bathtub drain hole. Remove the hose from the sewer pipe.
Step 2. Using a jack, lift the container 5–8 cm above the set level. In order not to damage the bathtub, place a wooden block or any small piece of board between the jack and the bottom.


Important. Don’t rush to lift the bathtub right away; first find the balance point. If the container tilts to one side or another during lifting, lower the bath and change the position of the wooden support and jack.
Step 3. Lay two rows of bricks along the edges of the bathtub. Select the height of the masonry so that there is a gap of approximately 1 cm between the surface of the bricks and the bottom of the bathtub.
Step 4. Spread the top surfaces of the bricks with tile adhesive or cement-sand mortar and slowly lower the bathtub onto it. Make sure that the container rests on the solution with maximum area and evenly. Check its position with a level, and if any deviations from horizontality are detected, correct the problems.
After the glue or solution has completely cured, attach the siphon drain tube to the sewer. This method of attaching bathtubs with legs is considered universal; it is not necessary to make stationary stops around the perimeter. To guarantee, you can tighten the adjusting bolts of the legs until they stop with the ceramic tiles.
Practical advice. If the bathtub has a decorative screen, it is recommended to also apply tile adhesive to the floor under the legs. The glue adheres tightly to the tile and forms a depression under the legs, which prevents the bathtub from spontaneously moving on a slippery floor.
Next, proceed to sealing the gaps between the wall and the bathtub. If they are large, then they must first be laid with any suitable building materials. Small cracks are covered silicone sealant. Use antibacterial compounds to prevent black mold from appearing on their surfaces.


Practical tips for attaching a clawfoot bathtub to a tiled floor
After securely attaching the clawfoot bathtub to tiled floor Repair work and dismantling of plumbing fixtures become significantly more complicated. In order not to create problems for yourself while using the bathroom, do not rush to start work, carefully study the recommendations of professional plumbers. What should you pay special attention to?
Stack of water. It depends not only on the parameters of the siphon, as many inexperienced builders think. The main condition of the stack is that all curved siphon tubes and the drain in the bathtub must be located above the level of the sewer pipe. The greater the height difference, the faster the water will drain. Fast current liquid automatically cleans the pipelines, as a result, you will have to do preventive inspections and repairs much less frequently. Before attaching the bathtub, raise the adjustable feet as far as possible. At the same time, make sure that the comfort of use does not deteriorate; the distance of the sides to the floor should be within optimal values and not make it difficult to use the bathroom.

If possible replace corrugated flexible siphon connection hoses with smooth plastic pipes.

Working with flexible hoses is much easier; there is no need to strictly observe the dimensions; they can always be bent into the desired position. These are the undoubted advantages of such elements. But they also have significant drawback. Dirt quickly accumulates in the folds of the corrugation; it will not be possible to remove it from there simply by washing; you will have to disassemble the siphon.

Frequent disassembly of the siphon can cause damage not only to the rubber seals, but also to the threaded connections. As a result, serious damage occurs, requiring complete replacement of the device. Carry out this work on a firmly attached bathtub to ceramic floor extremely difficult. It is necessary not only to lie down under the bath, but also to perform all work with extreme caution in conditions of limited visibility and accessibility.
Practical advice. To increase the reliability of using the bathroom, it is recommended to buy siphons without a separate sump. It brings more problems than it is worth. Buy those types of siphons in which the function of a sump is performed by an ordinary bend of the tube. Such a device does not allow unpleasant odors to enter the room, becomes clogged much less often and, if necessary, is simply cleaned. There is no need to disassemble the siphon, just clean the pipe with an ordinary rubber plunger.

Try to buy bathtubs from imported manufacturers. Domestic ones, unfortunately, are often of poor quality. This applies not only to enamel, but also to geometry. Check the corners of the sides with a long square; in domestic products they are rarely straight. An error of just a few tenths of a degree over a long bath length turns into several millimeters. Due to this, between the side and the ideal flat wall a wedge-shaped gap is formed. It is not recommended to seal it with silicone sealant; the errors become too visible. You have to use special plastic or ceramic baseboards for bathtubs, and they should be mounted only on fixed surfaces. At the slightest vibration, the corners come off; re-gluing them without securely fixing the bathtub is useless.


Keep in mind that all repair work in the premises being used is much more difficult and expensive than taking timely measures to prevent problems from arising during operation.
To increase the area of support of the legs on the ceramic tiles, you can use various durable pads. But this mounting option is only suitable for those bathtubs that have decorative screens. It is much safer to lay tiles for outdoor use; they have increased physical strength.
Be very careful when attaching the legs of freestanding bathtubs. The best option for such devices - installation on floors with concrete bases and thick, especially durable tiles. If there is a possibility of the container moving horizontally during use, then the legs can be fixed to the floor with small anchors. But remember that manufacturers do not provide this possibility; the lower parts of the legs will have to be slightly altered, and additional nuts will have to be used to adjust the height and horizontality. These works are very complex, it is better to use the services of professional plumbers. If possible, buy freestanding bathtubs without legs; such models rest against the floor with the entire surface of the bottom.

When marking holes in ceramic floor tiles, be careful not to place the holes at or near tile joints.

In these places, the risk of cracking during drilling increases significantly. Pay attention to the position of all four legs, not just the visible ones. During installation, it is always possible to move the container a few centimeters in any direction and select the desired position of the lower elements of the legs. adhesion rates of tile adhesive to front surfaces are much lower than to working surfaces. Before additionally fixing the position of the legs on the surface of the tile with glue, they should be thoroughly cleaned of dirt, dust and grease. If the fasteners are not visible, then it is recommended to remove the glaze from the surface in several places; this can be done with a grinder with a diamond disc or sharp blows with a chisel. Never rush, cracked tiles will cause big problems.
It is much more advisable to install very heavy bathtubs on a concrete base, and only after that lay ceramic tiles on the floor. The only one possible problem

This technology creates difficulties when replacing an old bathtub model with a new one. But do not despair, no one in the world has yet been able to provide optimal solutions for all occasions. And one last piece of advice. Modern bathroom fixtures often contain live parts. To prevent accidents Steel and cast iron bathtubs must be grounded.

If the house has three-wire wiring, great. If the wiring is old, then proper grounding cannot be done.

Important. Never use metal pipes as grounding; this is strictly prohibited by the PUE.
We talked about the main methods of attaching bathtub legs to ceramic tiles. If you follow professional recommendations during use, no problems will arise.
Video - Installing a clawfoot bathtub
When installing a cast iron bathtub, you usually don't have to worry about accidentally moving it. But how to strengthen a steel bathtub so that it stands still, and is it even possible to do this? It is not easy to achieve complete immobility of a flexible and light container, but it is quite possible, and with your own hands. In this article we will talk about several methods of strengthening the bathtub, which can be used either individually or in combination.
How does a steel bath work?

To figure out how to immobilize a bathtub, you need to familiarize yourself with its structure. Most often, the bathtub itself does not have elements for fastening the legs. This has its pros and cons. The disadvantage is the lack of a sufficiently rigid fixation of the bowl. If the bathtub has elements of rigid fastening of the legs, then under the weight of an adult a steel bowl made of thin metal
will bend, and the fastening may damage the enamel.

The manufacturer equips the bathtub with legs, the quality of which leaves much to be desired, or their design is not conducive to securely fixing the bathtub. This is not a hopeless situation, since you can purchase universal legs with a self-adhesive base.
This is just one of the measures that will somewhat improve the stability of the bathtub, and it can only be considered as the only one if the bathtub stands on its own legs.
If you plan to install this plumbing fixture in another way, for example on bricks, then legs will not be needed.
Mounting methods
If the bathtub is installed separately, you can make a frame from a profile for it or install it on bricks, only then you will need to sheathe the bathtub on all sides. As a rule, such decisions are not made when creating original design large bathroom.
The most common option for fixing a steel bowl is to attach it to the floor and walls. This can be made more convenient when the bath is installed between three walls. We'll look at a few current methods fixing this plumbing fixture:
- Making a brick base.
- Assembling a frame from a profile.
- Construction of a podium from bricks or foam blocks.
- Fastening to the wall.
Brick base

Considering high level humidity in the bathroom and the considerable weight of a container filled with water, the use of durable and moisture-resistant brick will be a practical approach to solving the issue of reliable installation baths. You will need a minimum of tools - a trowel and a container for mixing the solution.
So that you don’t have to redo anything later, you should follow a certain procedure.
- It is important to decide at what height the bath will be installed. Many people want to raise it higher, but if the height of the front side is more than 70 cm, then getting out of the bathtub without an additional step will be very inconvenient.
- To install a bowl at a standard height, you will need no more than 20 ceramic bricks, 2 buckets of sand and 0.5 buckets of M400 cement.
- You need to have a clear idea of where the masonry needs to be done and what height it will be. To do this, you need to install the bath on the legs in the same position as it will then stand with the siphon installed. It is important to check if there is required slope to the drain hole, and if necessary, adjust the position of the bath using the adjusting mechanism of the legs.
- In those places where masonry will be done brick base, you should measure the distance from the bottom to the floor and write it down. Where the side of the bowl adjoins the wall, you need to outline its position with a simple pencil - this will later help you install the bath correctly.
- Now the container can be taken out.
- Let's start preparing the solution. The above components are mixed, after which water is gradually added to the mixture. The solution should be quite soft, but not liquid. To make the mixture more plastic, half the components for masonry mortar can be replaced with tile adhesive. It is more convenient to work with such a solution, and its strength will increase.
- Now let's start laying bricks. Let’s assume that in the front part of the bath the distance from the floor to the bottom is 17 cm, and in the back it is 18 cm. The width of the standard product is 70 cm. We need the top brick not to reach the bottom of the bowl by about 10 mm, and the length of the improvised legs to be less than the width products.
- With a brick height of 7 cm, it is clear that the height of the masonry will be limited to two rows (7+7=14 cm).
- The length of the brick is 24 cm, so its consumption per row will be 2.5 pcs. (24+24+12=60 cm).
- To make a bowl, on top of the laid second row, along the edges, you will need to lay another half of the brick (or a quarter - depending on the shape of the bowl).
- 2 days after the solution securely holds the brickwork together, you can begin installing the bathtub.
- Now we need to form a “bed” for the bath. To do this, a layer of cement is applied to the brick racks so that it follows the shape of the bottom as much as possible. Since the solution will begin to spread under load, the thickness of the applied layer in the center should be at least 2 cm.
- In those places where the bathtub will be adjacent to the wall, you need to apply tile adhesive to its edges, but do not stretch it along the side. It should look like a mound of sorts.
- A footless bathtub must be placed on a bed prepared for it and pressed tightly against the wall. If tile adhesive comes out, it should be removed as quickly as possible by wiping the bathtub with a damp, but not wet, cloth.
- Check its position with a level so that it slopes towards the siphon. Trim it if necessary.
- Under the bathtub there will also be some solution that fell off the bed. When it stops being liquid, it can be returned to its place. Excess solution must be removed and the floor washed.
If the bathtub is long, then you should lay out another brick support in the middle of the tank.
Brick supports

If the bathtub is the same length as the width of the room, then to secure it, you can make supports from bricks, and then install the bowl on them. A combined method is often used - both a bed and supports are made.
Installation on corners

Instead of making brick supports, you can attach 2, or better yet 3 corners to the wall, and install the bath on them. This method is acceptable only if the walls are made of brick or similar durable material.

You can go the other way, leaving the legs intact and covering the bathtub with brick. Then you need to take care of making an inspection window through which you can get to the siphon. Due to the fact that the steel bowl expands upward, in those places where a whole brick will not fit, it will need to be cut off. Moreover, in such a way that when tiling it does not protrude beyond the edge of the side of the steel product.
Wall profile frame

The manufacture of a frame from a wall profile for plasterboard is carried out within a few hours and will help not only sheath, but also strengthen an already installed bathtub.
- The floor is outlined along the contour of the bath. This can be done using a plumb line, making marks on the floor.
- If the cladding is made of plastic panels, then, taking into account their thickness, the mark moves inward. When using plasterboard and tiles for sheathing, you need to take into account not only the thickness of these materials, but also add about 3 mm to the adhesive layer.
- The UD profile is attached to the floor with dowels, and the frame is made from the CD profile. To prevent the bath from wobbling, the profile should rest against the sides of the bowl.
- Additionally, you can use brackets designed for attaching metal bowls to the wall.
The wall profile is not a durable material, but it will successfully serve as a support for a metal container mounted on legs.
Wall mount

You can fix the bathtub more securely by attaching it to the wall. For this purpose, manufacturers produce a wide variety of fasteners. If the sanitary ware stands securely on legs, then it is enough to attach it to the wall. No matter how the bathtub is installed, it never hurts to secure it further.
Making a podium

One of the options for securely fixing a metal bowl is to make a podium for it from brick, foam blocks, timber, profile pipe, metal corner or other building materials.
A multi-level podium in a small bathroom will be inappropriate and uncomfortable. If the dimensions of the room allow, then such a podium will not only be a reliable basis for a steel bowl, but also an original addition to the intended design.
Brick is more durable, but in old houses it cannot always be used due to its low load-bearing capacity interfloor ceilings. The same applies to the frame made of ceramic concrete. Foam blocks and timber are much lighter, but can collapse under the influence of moisture, however, if you follow the recommendations outlined in the article, using the listed building materials you can make a reliable frame for a steel bathtub.
Podium made of foam blocks or bricks

The one-level podium should be such that the bathtub fits into it and its edges rest against the walls. The installation height is determined by the ease of use of the product. When using foam blocks, they must be treated with moisture-resistant compounds that will prevent the destruction of the material and prevent fungus from developing.
Timber podium
When using timber, it must be treated with antifungal impregnation, and twice: the timber is treated once (or twice), and then the entire structure, especially the saw cuts. If the podium is much wider than the bathtub, then thick moisture-resistant plywood is fixed on top, and a hole is cut in it for the bowl.
When assembling the frame, only stainless steel screws should be used. The structure should be strong, but it is better to calculate the installation of the bath in such a way that when immersed in the podium, it rests its legs on the floor or on stands specially made for this case.
Metal construction
The podium can be made from a corner or profile pipes. It will be very durable and not heavy. The disadvantage of this design is the fact that all parts must be welded to assemble it. In an apartment it is not always possible to use a welding machine, and a structure welded outside may not be able to be brought into the bathroom. Here you need to look at the circumstances. Usually, problems do not arise when making a metal frame for installing a bathtub in it.
If the choice is made of a metal product, then the finished structure should be degreased, primed and painted. If possible, the frame should be attached to the wall - this will prevent it from accidentally moving. Only after these steps can you begin installing the bathtub and covering it with plywood.
A lot of free space in the room is occupied by a two-level podium, but if you make niches in it, you can store toiletries there.
The article lists the main ways to secure a metal container, but in the comments you can tell us about your methods and nuances that you have encountered.
Video
Watch a video about installing a steel bathtub adjacent to two walls: