1. Subframe rail profiles.
There are two types of profiles, as shown in the figure. The main requirement for a stretcher is that the canvas does not come into contact with the stretcher and is tightly stretched on it (I wrote about how to stretch canvas onto a stretcher). If the canvas touches the stretcher rail, then during subsequent gluing and priming, it can stick to the stretcher and change its texture.

2. Conventional subframe with fixed corner connection.
This design is reliable and simple. Therefore, it has become most widespread among contemporary artists. Its only drawback is that the stretcher cannot stretch the canvas if it sag in the future (a stretcher with wedges is used for this). If the subframe big size, then its slats may bend under the pressure of the stretched canvas. Therefore, a cross is added to its design, which strengthens the subframe.


3. Classic subframe with wedges.
The design of this subframe is more complex. The corners are connected with a tenon. But in addition to the usual grooves, wedge-shaped grooves for wedges are also added. The wedges are driven into these grooves and push the subframe slats apart. If the canvas sag, the stretcher can increase in size by several millimeters, but this is enough for the canvas to stretch. This design is very convenient for long-term storage works of fine art.


2018-07-29, 21:24
Hello dear DIYers, as well as artists and restorers.
In this article we will learn how to do modular subframe for a painting, and in subsequent ones we will give it an ancient look and stretch canvas over it.
Purpose and functions of a modular subframe
The key feature of a modular stretcher is the floating corner joints, which allow you to stretch the canvas of a painting using wedges, like a drum membrane.
This is especially true on canvases of medium and large sizes, approximately 40 x 50 cm.
When stretching the canvas onto a stretcher of this size and then priming it, unevenness appears on the canvas after exposure to gelatin.
Here, for example, is the canvas before the primer, after it and after tightening it with wedges.


Waviness may appear after further priming with acrylic, and later if the impact is too temperamental with a brush or spatula; in any case, on a modular stretcher, you can always tighten the canvas with special wedges, for which special sockets are provided in the corners.
How to make a modular subframe
We have to make a design like this
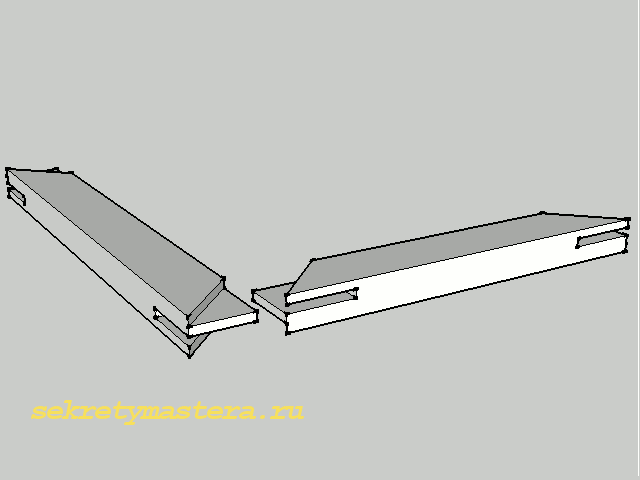
The minimum thickness and width of the bar at which the connection will be reliable is 20 x 40 mm, and these dimensions are relevant for frames with a side length of up to 50 cm.
For sizes larger than 50 cm, a more powerful block is needed. Otherwise gusset will not provide the necessary rigidity when tightening with wedges, and the planks will begin to move towards the tightening, forming a screw along the plane.
The corner may even break and all the work will go down the drain.
The connection should be quite tight, because... loosening will again allow the slats to change position when stretched, which will move away from the overall plane of the canvas.
As you can see, the requirements are quite strict, and this means that making a high-quality connection hand tools it will be very difficult.
It’s expensive to buy special equipment; it’s easier to buy the subframe itself, but to make it on a simple woodworking machine (popularly known as a circular saw), it’s quite possible that you’ll only need to make a rigid ruler for it.
I also used a miter saw, but a regular miter box can replace it.
We will make the first frame measuring 40 x 50 cm from a 20 x 45 mm block.
We choose bars preferably without or with small knots. Large knots are completely unacceptable, and even small ones should remain in the middle part of the plank, as far as possible from the ends, since it is in the area of the knot that a crack or even a chip can occur.


We make 4 blanks exactly matching in length in pairs.


Since the thickness of the bar is 20 mm, and we have to make one groove, one ridge and two cuts, that is, only 4 elements, then each element will have 5 mm.
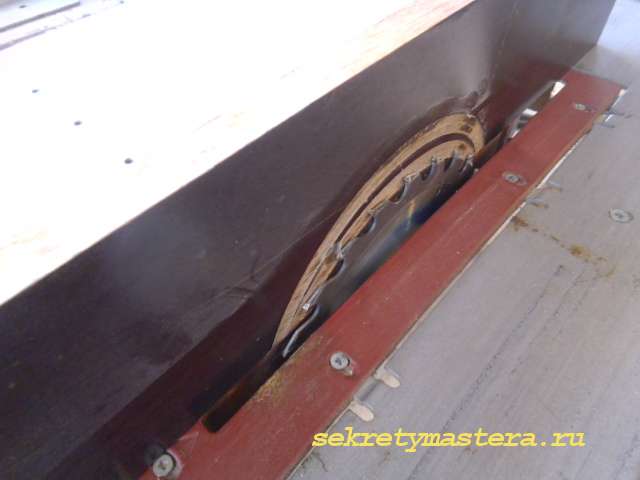
To make a clear groove 5 mm wide. You will need a circular saw with a cutting width of 4.5 mm. Taking into account the natural microbe, the cut will be 5 mm minus.
If it is possible to buy a disk of the required thickness, then there are no questions. I didn’t find anything like that, so I paired two disks with a cutting width of 2.5 mm each. every. The result was the required 4.5 mm.

We set the support frame at a distance of 5 mm. from the disk, and measure the distance on both sides of the disk from the bar to the tooth. The overhang of the disk (cut height) is set according to the width of the block, in our case 45 mm, after which we make identical cuts from all ends of the workpieces (in the picture there are two frames of the workpiece).


For now, let's leave the groove in this form and start making oblique cuts.
In order not to make a mistake, we lay out the frame on a flat plane so that in the corners the groove coincides with the future ridge, that is, the thin part above the groove approaches the thick part of the adjacent plank, and mark the direction of the corners of the sample.


Then we set the miter saw to a cutting depth of 5 mm. minus and cut off the thin part of the joint at an angle of 45° and make a cut in the thick one. The angle of inclination of both cuts should be counter.


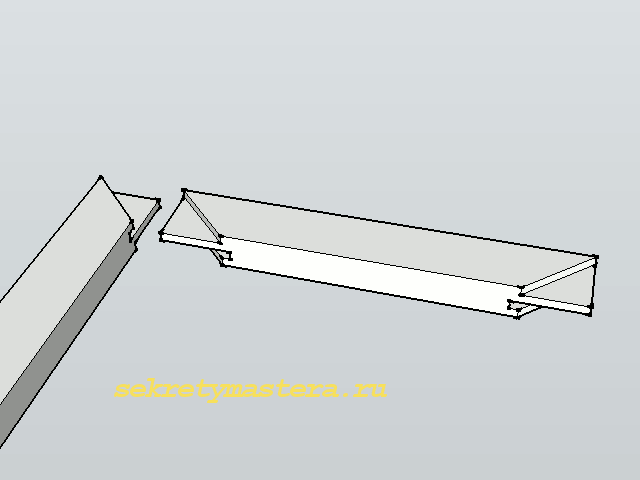
As a result, all the ends of the workpieces should look like this
You can now return to the groove as long as the reference ruler is set to 5mm. from the disk and we already know exactly which surface of the workpieces will be the inner one from which the wedges will be installed.
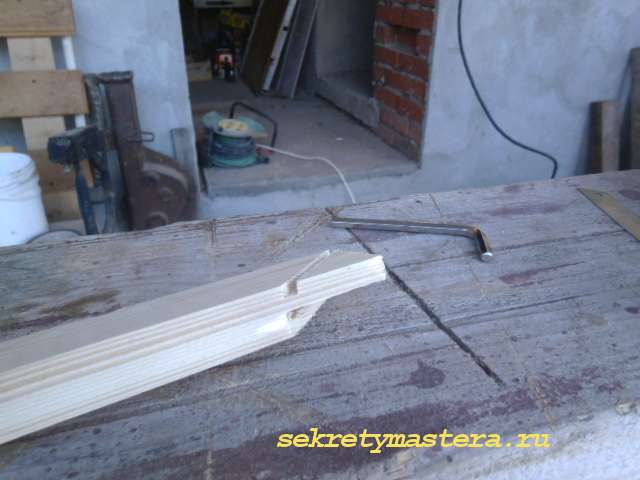
If in the resulting state we bring the workpieces closer to each other in the same way as they will later be connected in a frame, then there is no room in the groove for a wedge, which means we need to make one, and make it with a slope.


To do this, we insert the workpiece with a groove onto the disk until it stops, and then at a distance of about a centimeter from the end of the workpiece, we install a stopper.

Now you can remove the workpiece, turn on the machine, and cut the grooves for the wedges, first on one side, then in exactly the same way on the other. In this case, the grooves turn out to be beveled.
For comparison and better understanding - one workpiece with a groove, the other without.


All that remains is to make the last oblique selection and at the same time the ridge.
To do this, we bring the ruler close to the disk and make selections on one side and the other, bringing the workpiece accordingly to opposite sides disk. We clean up the remains with a knife or chisel.


Now the connection is ready, but that's not all. There is one more nuance. The artist will not like it very much if the canvas touches the frame, but it is 45 mm wide, so on the front part you need to make a side that will provide a gap between the frame and the canvas.
To make such a side, we first assemble the frame; it must be assembled very tightly, with effort, and admire the clarity of the joints and the absence, or almost absence, of any cracks, and then we note the front plane.


We remove the second disk from the machine, and bring the ruler even closer to the first, you can even bite into the ruler a little, about a millimeter, so that you can select a millimeter and a half or two, no more, raise the table to reduce the overhang of the disk to 40 mm, and pass all the blanks along the front side.

After this, you can assemble the frame and admire the finished product again.


A small modular subframe is ready. A large subframe is made similarly from more powerful slats.
If the size of the subframe reaches a meter or more, then it has transverse strips or crosses.
Acceptable amount is from 10 rubles. up to 15,000 rub.
Before you begin painting, you will need to stretch the canvas so that the paint lays flat on it. If you're an artist, learning how to stretch your own canvas can help you save money and do something useful. From this article you will learn how to choose the right everything you need, how to stretch the canvas and how to prepare it for work.
Steps
Preparation
- It is much easier to stretch untreated canvas (not coated with gesso) than prepared canvas. It's best to buy unprimed canvas and gesso it later.
-
Buy others necessary tools. You will need several simple tools for this work. Prepare the following:
- Spray bottle with clean water. You should wet the back of the canvas that you stretch onto the stretcher. As it dries, it will shrink and tighten more.
- Gesso. This primer is often used to treat the canvas after it has been stretched. Gesso represents white mixture from plaster, chalk and other substances that are sold in many art supply stores.
- Special tongs for stretching canvas. They can be bought in almost all specialized stores. These tongs have a flat surface that allows you to stretch the canvas without leaving holes in it.
- Stapler. Regular staplers are not suitable for these purposes. To securely fasten the canvas, you will need a special furniture stapler.
-
Cut the canvas. Cut an area 8-10 centimeters larger than the frame, taking into account the width of the frame. You will need these extra pieces of canvas to hold onto as you pull the canvas. Having purchased all the necessary tools, a stretcher and canvas, cut the canvas out of the canvas the right size using a special sharp knife.
- If you tear the canvas, you will get a straighter line than if you cut it. Cut the canvas with a knife, and then tear it along the grain - you will get an even area.
How to stretch canvas
-
Place the frame in the center of the canvas. Place the canvas on your work surface and place the frame on top. Try to smooth the canvas as much as possible.
- The fibers of the canvas should be parallel and perpendicular to the crossbars of the frame. If they lie at an angle, the frame will become deformed and the edges will begin to bend upward.
-
First, stretch the canvas along the long side. Take the long side that lies closest to you and tuck it inward. Using three staples, secure the canvas to the frame with inside(that is, you need to wrap the frame in canvas and secure it from the inside). There is no need to secure the edges of the canvas yet - you will do this later.
- Turn the canvas with the stretcher or go around the other side of the work surface and do the same with the other side. Stretch the canvas tightly, wrap it around the frame, and secure with three staples.
- You need to secure the canvas from the middle to the edges. Don't start at the edges because otherwise the canvas will warp and sag.
-
If necessary, lightly wet the canvas. If you are stretching untreated canvas, you can spray it with water to help it stretch more tightly once it dries. After securing the long sides of the canvas, lightly dampen the back of the canvas.
Pull the short sides taut. Grab the loose side, pull the canvas tightly, tuck it under the frame, and secure it with two staples to the frame. Do the same with the second side.
Pull the edges tight. Go back to the first side where you started stretching the canvas and secure the edges. Pull the loose section of the canvas towards you, stretch it and clamp it with a staple. Work slowly, trying to pull one at a time. small piece. Continue securing the edges, gradually moving from one section to another.
- You can insert staples near the corners, and then between the center and the corner. Continue working until you have about 10 centimeters of loose canvas left from the corners.
-
Fold and secure the corners. Fold one corner and pull it tightly so that there are no waves anywhere. Hold the canvas firmly. This is the final touch, and it is the most important. Everything must be done so that the canvas is even and tightly stretched.
- Sometimes it is useful to make a small cut diagonally so that the canvas stretches better and lies neatly at the corners. The corners should look even, so trim the canvas if necessary.
-
Finish your work. Go over all the staples with a hammer until they fit snugly against the frame. There should be no sharp protruding edges anywhere. If you feel like you need to add a few more staples, do so.
Buy a stretcher or make one yourself. There are special stretchers with ready-made slats that clamp the canvas. This is the fastest and easiest way. Most artists use stretchers.
Buy a canvas of the appropriate size. The canvas should extend beyond the stretcher by at least 15-20 centimeters (it all depends on the width of the frame). The canvas must be larger than the stretcher, otherwise it will be impossible to stretch it correctly. Measure the dimensions of the stretcher or estimate what size painting you need, and buy a slightly larger canvas.
The subframe is one of components paintings, it is necessary so that the canvas is in constant tension
If the subframe is made of low-quality materials or poorly fastened, there is a high probability that
that the canvas will sag over time, and the painting will lose its former charm.
What should the subframe be like?

A high-quality subframe meets the following parameters:
1. made of dry wood, without unevenness or other defects;
2. match the size of the picture;
3. have high strength, have a cross or crossbar.
Methods for creating subframes
A simple way to make a subframe

There are several ways to create picture stretchers, but this article will describe the two simplest ones.
1. wooden planks or slats;
2. wood glue or any other designed to work with wooden surfaces;
3. roulette;
4. hacksaw;
5. sandpaper;
6. furniture stapler;
7. hammer;
8. screws and angles.
Operating procedure:
|
1) Do necessary measurements, decide on the size of the subframe. Saw off two horizontal and two vertical strips. You can cut straight or at an angle of 45 degrees. If the canvas is large, make two additional vertical slats to make the structure more durable. In this case, 4 planks should be cut at an angle of 45 degrees, the other two - with an even cut; |
|
2) Treat the slats well sandpaper, also go over the cuts to remove sawdust and make the surface smoother; |
|
3) Place all the subframe parts together. Apply wood glue to the edges of the planks, connect them together, and press firmly. Immediately run a furniture stapler over the gluing area to secure the corners. Do this only from the inside so as not to tear the canvas later when you stretch it onto the stretcher. Go over the staples with a hammer. Let the product dry; |
|
4) To make the subframe last as long as possible, you can fasten the gluing points using metal corners. The product is ready. |
The second method of making a subframe

List of materials:
1. wooden planks;
2. hacksaw or miter box;
3. wood glue or PVA;
4. vice;
5. simple pencil;
6. roulette;
7. furniture stapler and staples.
Work order:
|
1) Calculate the dimensions of the subframe. Take a wooden plank, use a hacksaw or miter box to cut off a 45-degree angle (at the edge of the plank), do this on both sides. It is important that the ends of the rail are not parallel to each other. Repeat this step with the remaining three planks; |
|
2) Sand the planks to remove any unevenness; |
|
3) Apply wood glue or regular PVA to the ends of the planks. Glue adjacent bars (if the subframe is square, you can take any two bars, but if the subframe is rectangular, you need to take one long bar and the other shorter). Place both strips in a vice and secure. Repeat the same procedure with the two remaining bars. It is better to have two pairs of vices to glue both pairs of planks at the same time; |
|
4) Give the bars a day to glue. Then connect all the parts of the subframe together. Leave the product for another day; |
|
5) Go over the gluing areas with a furniture stapler to secure the corners of the product. The subframe is ready. |
Get really good product This is only possible if you have experience in this matter and make a product from high-quality wood.
If a stretcher is needed for an expensive painting, it is better to order it.How fun it is to paint pictures by numbers! You can feel like a real artist, even if you don’t know how to draw at all. Therefore, others will surely follow the first one. But paintings lying on a shelf, rolled into a tube, cannot become either a home decoration or an object of joy. You need to frame them and hang them on the wall.
How can you frame a painting?
In general, there are three types of design for paintings:
- simply attach it to a stretcher without any frame;
- can be arranged in a baguette;
- can be issued in a passe-partout.
Painting on a stretcher without frame looks good only if you hang it in modern interior. Frankly speaking, without a frame the picture turns out to be a little under-formed. But some people like it - we have to admit it.
Baguette- This classic design paintings. These frames are made of wood or plastic and can sound both modern and vintage, depending on the type of frame.
Passepartout- This is a wide frame made of cardboard, white or colored. It can give a painting one or another mood, depending on the color and width.
Often in a frame they are combined simultaneously baguette and passe-partout. This looks very interesting:

Where to choose a frame so that it fits in size and at the same time elegantly complements the picture? Perfect option– frame to order.
We stretch the painting onto a stretcher
Suppose you decide to take the simple route and stretch the painting onto a stretcher, leaving it without a frame. How to do it?

Prepare materials:
- stretcher;
- spray;
- hammer;
- stapler for furniture;
- staples.
Lay the picture face down, let it lie down and straighten out. If it does not want to straighten, you can lightly moisten it with a spray bottle.
Once the canvas has straightened, place it on a stretcher. Align. Start fastening from the middle of either side.
Having secured one side, stretch the canvas and tack the opposite side. Carefully secure both sides, being careful not to distort the canvas.
Now secure the other two sides.
That's all.
We frame the picture in a baguette
Maybe you like it better classic version– it suits most interiors modern apartments and houses. How to frame a painting by numbers in this case?

You will need:
- frame;
- canvas staples.
- First, stretch the canvas onto a stretcher as you already know how to do.
- Turn the frame face down. Find out where the frame is top and bottom. Place the painting on a stretcher in it, also face down.
- Connect the frame and subframe using brackets.
If your baguette is not a classic one, but the simplest one (a frame imitating a baguette), the technology is a little different. How to arrange a painting by numbers in a frame with a backing and glass? Not difficult at all!
- Turn the frame over and remove the backing.
- Place the picture on the glass and align it. If necessary, trim the edges slightly.
- Cover with a backing and secure the fasteners.
That's all!
We prepare the picture in a passe-partout
The design of a painting in a passe-partout is no different from the design in a baguette. Except one. If you have the desire and skill, you can make a passe-partout with your own hands!

How to make a picture frame by numbers? For this you will need:
- thick cardboard, thin plywood or a piece of hardboard;
- construction gun;
- scrapbooking paper or colored cardboard.
We will make a backing from cardboard, hardboard or plywood. The format of the backing should be larger than the painting in order to create a wide border.
on her with the help construction pistol Let's fix the picture.
On top of the picture on the backing we place a wide frame made of scrapbooking paper or colored cardboard.
Now just wait until it dries and you will have a wonderfully decorated painting.
Protecting paintings by numbers
Paintings by numbers are painted with paints that can flow if water gets on them. To prevent your creation from deteriorating, it can be protected. But how can you protect painted paintings by numbers?
One of the methods we have already mentioned in passing is glass on a frame. Glass reliably protects normal use, and even when cleaning. The only way to damage a painting under glass is to dip it in water.
If you do not rule out this option, there is another way to protect the painting - varnish. The painting is covered with varnish after it is all painted and has already dried.