The Russian dacha is a cultural phenomenon: perhaps nowhere else in the world country house they don’t treat it with such trepidation, they don’t affectionately and ironically call it “estate” or even “hacienda.” Behind last years people stopped perceiving the dacha as a warehouse for furniture that they were tired of keeping in a city apartment. Country house often built from scratch and often decorated with the help of an invited specialist. But even what you inherited from Soviet era an archaic dacha can be turned into a completely modern country house on a very nice plot. Together with landscape designers and experts from the Houzz community, we’ll tell you how you can arrange and decorate your dacha this season.
Expanded Domains
If your dacha evokes not a feeling of comfort, but an ancient Russian melancholy, then it’s time to renovate the building - or even build a new one in the old place. “If we talk about the appearance of the house, we are definitely in favor of preserving it,” says Sergei Kolchin, founder of the architectural bureau Le Atelier. “We treat even amateur buildings as heritage, which should not be thoughtlessly covered with siding (exterior cladding).”
True, repair an old house better based on the results of professional expertise: “ Bad condition load-bearing structure often prevents the implementation of emerging ideas. In one of latest projects we decided to leave only the walls - replace the ceilings and roof, make it along the contour pile foundation", says Kolchin.
Sometimes next to wooden dachas extensions or even new buildings grow. Is it possible to develop the entire plot? The Town Planning Code stipulates the rule of a three-meter setback from the boundaries of neighbors. However, an interesting amendment gives greater freedom: you can build a house close to your neighbors’ territory if they are not against such a planning decision.
DIY cottage style (Do It Yourself)
IN Soviet time Difficulties with building materials were solved as best they could - the dachas were assembled piece by piece from what was available. Many interiors were moved out of town from being demolished apartment buildings old low-rise buildings.
With the advent of handmade fashion, these architectural hybrids found a second life: the dacha became not only a place of relaxation, but also a platform for creativity, where you can endlessly remake something, paint, sew and make things.
Particularly popular are simple and, at first glance, not the most functional items - from old frames and balusters to barn doors, which, however, are not always used for their intended purpose.
From barbecue to dovecote
As practice shows, the “house, barn and garden” complex is only the inevitable minimum on your suburban area. Depending on the budget, the area can be supplemented with a covered barbecue gazebo, winter garden and even a spa area - or implement even more unexpected ideas.
“One of my customers was going to build an aquarium on the site - he is interested in river fish. I had the opportunity to build dovecotes, stables, and kennels for dogs,” says Ksenia Bobrikova, founder of Xenia Design Studio. “It is important to stylistically link such rooms with the design of the main house and, in addition, take into account many technical parameters - from lighting to ventilation.”
But if a dovecote goes beyond your imagination, then a decent gazebo can become a reality even on a modest budget.
“Sometimes it makes sense to combine a gazebo and a barbecue area - however, if you expect to host large companies, consider how much space such a structure will take up,” notes landscape designer Elena Veselova. — With a small budget and space, a solid gazebo can be replaced with a pergola: it is much easier to build, there are ready-made modules for this, and blooming species they will give it grapes or actimidia.”
Not even enough space for a pergola? Turn a flaw into a romantic advantage: replace a gazebo or pergola with a swing surrounded by shrubs.
They sat on the golden porch
Have you decided not only to repair, but also to improve your country porch? Choose a design solution depending on the side it is aimed at. If the porch faces the courtyard, most likely you will use it as a place to relax and decorate it in a more interior style. If it faces the street, you will have to use a “smart” design.
As always, annuals will help: firstly, seedlings can be bought at a construction hypermarket right on the way to the dacha, and secondly, no one has yet come up with anything more spectacular than boxes of flowers.
On the porch you can not only welcome guests, but also express yourself: this is where numerous crafts that children love so much are appropriate. The porch is under the roof and always in sight - in a word, perfect place for a family exhibition and grandmother's tenderness. If you don't mind joining the younger generation in creative impulses, write front door and porch pillars with moisture-resistant paints: it is logical to accentuate this area, and Painting works- a wonderful leisure time for the whole family.
Cheerful farmer
Even if you are not a real farmer, gardening is a very relevant hobby, especially given the fashion for organic products. “It is important for a beginning gardener to take four steps,” says landscape designer Irina Kumskova. — First, decide on insolation: understand where the sun rises and sets, which areas are in the shade. Secondly, draw up wind patterns: northern currents can destroy southern plants. Thirdly, identify viewing areas - those that are clearly visible from the entrance, windows and gazebos.
Fourthly, understand the functionality - understand whether you want to plant only vegetables or herbs or, say, plant a flower garden, and then draw up a site plan.”
For those who have never dealt with gardening work, it’s better to start with greens: plant salads and spices. Of the vegetables, zucchini and cucumbers are the least demanding - they require almost no greenhouse conditions. Among the flowers, it is better for novice gardeners to choose bulbous ones - for example, daffodils and tulips. True, Irina advises planting them in large batches so that the flowers do not get lost against the background of greenery.
Fun borders with good neighbors
Fashion for simple life increasingly expressed in the purchase of a plot in the village as opposed to a garden plot. No matter who your neighbors are, you will definitely want to isolate yourself from them - maybe not with a three-meter fence, but at least with a lush hedge. True, it is wiser to make friends with your neighbors, if only so as not to duplicate the fence.
This is not always easy, but it is important: a common fence will be cheaper and, most likely, prettier.
“If the budget only allows for a chain-link mesh, decorate it with perennial vines or annual hops, they grow quickly,” advises Elena Veselova. “In addition, the fence does not have to be made the same around the perimeter: the section that faces the main facade can be made of corrugated sheets, and the more secluded and remote areas can be made of mesh with vines.”
Another way to save money is to think ahead: dig in posts, calculating the spacing, so that over time you can replace the mesh with wood or stone sheeting.
Crooked path leading to the house
Garden paths are not a small thing, and landscape designers It is not recommended to save on them: irritating puddles will appear on poor-quality canvas. You should start with planning: evaluate where you go often and where the most beautiful walking route is.
Don’t chase external beauty or symmetry: such designs are not always functional, sooner or later you will start “cutting corners” on the lawn.
Stone paths combine durability and aesthetics, but if you have a modest budget, compromises such as granite screening- usually it has a pinkish-beige tint, but it can also be gray.
"Another option - concrete tiles, which can be bought or even made by hand, although in the second case they will not be so durable,” notes Elena Veselova. In any case, concrete tiles allow you to lay elements with a running start and vary the pattern of the path.
Cozy country interior for pennies!
Background
My sister and I got the idea to buy a small country cottage area, when we were 22 and 25 years old, respectively. We are both passionate about decorating and we wanted to bring to life different interesting ideas, and also have a place where you can simply relax from the bustle of the city and enjoy being close to nature.
The place was not chosen by chance - overlooking an ancient pine forest, on the other side of which our grandparents once lived and with which our happy childhood is therefore associated.
View of the pine forest from the attic
Buying a house
The plots in this SNT are small - only 3 acres, but we were primarily interested not in the vegetable garden, but in the house. Therefore, we immediately rejected proposals with plots turned into one continuous bed.
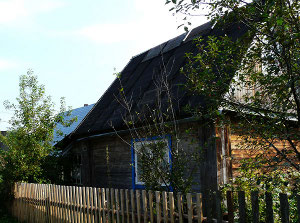
... And finally, luck smiled at us - an elderly man responded to an ad written by hand - his old friend was selling a plot of land with a house. When we saw him (the house, not the man) - it was love at first sight! A plank house with an attic and an overgrown garden! We asked for the owner's phone number and immediately agreed on the purchase without haggling on the price (and it turned out to be much lower than we expected!). So we became his happy owners.
Transfiguration. Start
The house was made with love, but it was already very “neglected”. We wanted to breathe into it new life, having made repairs and without spending large sums. We initially decided that this would be a “budget” renovation, and wanted to prove that beautiful and cozy does not mean expensive.
This is what the house looked like at the time of purchase and the start of cleaning: old wallpaper yellowed from time and stains on the roof, an old bed and gray chairs:

Spring bed USSR

The wall opposite the bed (let’s call this place so that it’s convenient to compare later 😉)

This is what the house looked like from the outside

Even more scary places I won’t show it on the ceiling - so as not to scare you))
Paragraph 1
So, my sister and I started the renovation by cleaning.
We raked out and sorted the trash that was stored in the shelves and “cabinets” - these were old clothes, jars, bottles, etc. We swept up trash, dirt, dust, and of course mouse poop everywhere (tying up our respiratory organs with scarves and wearing masks just in case). Some of the trash was taken to a landfill, some was used for rags, some was sent for washing, and some was left for use or decoration.

We immediately called this place “tea room” - because here, as you can see, there is a small table with a couple of chairs for drinking tea and a gorgeous view from the window (topmost photo of the post)
Point 2
We washed everything with bleach water!
Literally EVERYTHING: floors, walls, ceilings and even furniture.
Point 3
Started painting old furniture in more “cheerful” colors. For example, it was decided to make the bed white.
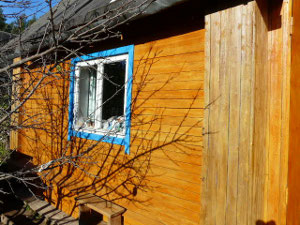
Acrylic paint was used. And for painting window frames We used cheap alkyd enamel.

Painting the bed

The chairs are in lavender!

The paint emphasized the structure of the wood
Gradually, a unique “concept” for this mini-room developed - and we called it “lavender tea room”.
I decided to paint one of the doors here like this:

I write in English “lavender tea room”
By the way, we called the main room in the attic “ blue bedroom" It was decided to use a warm, joyful shade of sky blue and, of course, white for combination (association with white clouds in a blue sky).
Point 4
The plywood on the ceiling in places where there were leaks was replaced with new
Point 5
They tore off old wallpaper from the walls and some paper from the ceiling. We washed the walls again with chlorine, dried them and started wallpapering.
The wallpaper for the main wall of the bedroom was white with a blue flower
“Feodosia” - 200 rub./roll
Blue wallpaper (for combination) - 80 RUR/roll
Wallpaper for the ceiling - free (we found old ones in the barn and pasted them on the wrong side)

View from the bedroom to the tea room

Let's roll it into new wallpaper..

Let's continue...

It’s not easy to paste over the ceiling - your hands get numb, but then your hand gets full)
Meanwhile, the walls in the tea room are covered with the remnants of wallpaper stored at home (pink), and the lilac ones were bought for 70 rubles per roll in the store. The “cabinet” door is painted pink.

I'm at the teahouse
Well, you’re probably tired of looking at phone photos of our “flops” and you want to see what came of it all?
We specially arranged a “photo shoot” of the resulting interior using a camera:

Lavender tea room


Teahouse


And now the blue bedroom.
The photos are arranged as if we were turning to the right:

Blue bedroom

Bedroom

Table by the window

Shelves and suitcase for storing linen (decorated by hand)


Sofa opposite the bed

View from the bedroom to the tea room

blue bedroom
And the outside of the house now looks like this (we painted it mint and pink - we tinted it ourselves).
They painted with rollers, using a folding ladder, and leaned out of the windows to paint where the ladder didn’t reach:

House in autumn:


And here my sister Lyalya and I are in the garden near the house. The peony bush has not yet bloomed, but has already grown - we made a “holder” for it from an old chair with a hole in the seat (which we simply tore off), found in the attic of my grandmother’s village.
My story ends, but the story of the house's transformation does not. The plans are to “furnish” the first floor. We will definitely share the result with you!
We are slowly organizing the garden: we dream of a lawn, flowers, a fence and garden furniture.
Thanks everyone for your attention! We hope that we have inspired at least someone else to be creative and create))
Hello, tell me how to arrange a barn for summer house. We bought a plot of land, on it there is a barn about 3.5 by 4.5 m: logs are dug into the ground and covered with boards, on top there are also boards and old torn roofing felt and two small windows, the floor is dirt. The shed seems to be strong and does not wobble. Our land is elevated and does not flood. Is it possible to convert it into a house: fill the earthen floor with cement, such as a concrete screed, or dig a trench along the logs dug into the ground and fill it with concrete to make a foundation? Is it possible to do this and will the concrete floor be damp from the ground? And how to decorate the walls outside and inside. I would like to go to the dacha with my children this summer, but my budget is small. We will be very grateful for the hint.
Marina, Dzerzhinsk, Nizhny Novgorod region.
Hello, Marina from Dzerzhinsk, Nizhny Novgorod province!
First of all, I wish you great family budget, so that they can build a normal house on a good foundation.
In the meantime, repair what you have.
It is difficult to say how long the renovated barn-house will last. To do this, you need to examine in detail the condition of the walls, roof and, especially, the lower logs, whether they are rotten and, if so, how much.
Because, no matter what the height on which the building stands, the soil always absorbs rain moisture and moisture from melting snow. Accordingly, in the absence of a foundation and waterproofing of the lower crowns of the log house, this leads to rotting of the walls. Torn roofing felt will not provide reliable protection.
The classic repair option involves installing a foundation not next to the logs, but under lower crown log house Given the tolerable condition of this crown and with small sizes For your building, especially if it is located on a dry, elevated place, a shallow foundation with point supports would be sufficient. Which are most often made from sand-cement blocks measuring about 0.2/0.2/0.4 meters or about the same size. The blocks are installed on a sand cushion 0.1 meters thick, and the top is waterproofed with roofing felt in a couple of layers so that the lower log crown does not rot. The distance between supports can be from 1 to 1.5 meters.
But to do this, you need to lift the shed with jacks and gradually lay down temporary technological boards until it rises to the height of the block, or better yet, two blocks installed on top of each other. In this case, the blocks are installed not only under the walls themselves, but also in places where there should be floor joists (for the size of your shed house - approximately one to two supports for each joist).
Because you can lay a floor on the logs from wooden planks. And the flooring option made of concrete screed is used extremely rarely in such cases. It is clear that concrete floors are waterproofed from moisture with roofing felt (options include glass insulation, rubemast, etc.) bitumen mastic. More often used inappropriately concrete screed, and with the addition of expanded clay to create a warmer floor. In addition, the screed is reinforced, otherwise it may crack from the loads of the furniture or simply from the weight of the occupants.
But I repeat once again, for you a screed, even with expanded clay, is not the best option, you are in winter garden house you won't live. And the concrete floor will make it a little cold in the summer. In construction practice, we have successfully used a simple option in cases like yours several times. Leveled the ground under the future floor. They laid strips of roofing felt directly on it, folding them in half along the entire length of the room in the places where the floor joists were installed.
Floor joists (with a cross-section of at least 50/50 mm) were laid on strips of roofing felt with an interval of 0.6 meters between each other and attached to the walls of the room. And then an ordinary edged board with a thickness of 25 to 40 millimeters was stuffed onto the logs. The disadvantage was that there were small gaps between the boards, but for cheap country houses this is quite acceptable. If the soil moisture was high, then an additional layer of roofing felt or any type of moisture-proof film was laid under the entire floor in one layer.
In utility and utility rooms, the board came off without additional planing, but simply after the sawmill. In rooms with a claim for accommodation, the board was polished with grinders with sanding wheels or angle grinders.
The logs and board were treated with an antiseptic solution.
Sometimes OSB (oriented particle boards), in another transcription - . You can have non-moisture resistant ones, they are cheaper. They are 2.5/1.25 meters in size and 9 - 10 millimeters thick. They were fastened with black wood screws in a square-nest method with a pitch of about 15 - 20 centimeters. Then, if desired, you can coat it with clear varnish in a couple of layers. And if it’s also an imported Belinka, it will be like in the best apartments.
5 slabs, a kilogram of self-tapping screws with delivery by personal car will cost a couple of thousand rubles or so. And here good varnish about the same. Paint is cheaper.
As for the sheathing of the walls and ceiling of the shed, it is preferable to use clapboard, class “B” or “C”; you can use a fence board with a quarter of it, or in extreme cases - edged board. The inside is sometimes lined with plywood 6 millimeters thick. With closing of joints with planks. Do not cover it with hardboard under any circumstances; it will warp after the first winter.
This is my vision of the answer to your question. Although other options are possible.
Other questions about the Barn.
In recent years, the trend not only to build new wooden houses, but also to restore houses and already battered buildings. It's no secret that over time wood loses its pristine beauty: golden, warm color this natural material After a few years it fades and becomes dark. And constant exposure to precipitation, temperature changes and other factors lead to the formation of mold and mildew.
How to restore old, darkened wood, returning it to its former attractive appearance? On this moment there are several in various ways solutions to this problem.
Some people prefer to use radical methods such as siding or cladding wooden structure brick. But such options do not initially imply the preservation of WOOD, so we will not dwell on them in detail. Let's consider only those methods that allow you to restore, renew and refresh damaged wood, and not hide it “out of sight”:
| Recovery methods | Advantages | Flaws | Result |
| 1. Grinding – mechanical method, which allows you to remove existing biological damage and remove the top darkened layer of wood |
|
|
The wood will look completely new and fresh, but we must not forget about the need for its MANDATORY further treatment with bioprotective and antiseptic compounds. Otherwise, the result will be very short-lived. |
| 2. Coloring– as a rule, inexpensive enamels or paints |
|
|
A building treated in this way will look refreshed and updated for some time, but, unfortunately, it will no longer look very wooden. And non-breathable coatings that form cheap paints and enamels will lead to the destruction of wood from the inside. |
| 3. Wood bleaching– the most popular currently are chlorine bleaching compounds |
|
|
As in the first case, we will get practically new wood from fresh and light color. But there is still a lot of work ahead - bioprotective treatment and, if desired, giving the wood the desired color. |

|
|||
| 4. Using a restorative composition– for example, Aquatex Restorer
|
|
|
The result is impressive. After applying just two layers of the composition, we get not just renewed wood, but durable coating immediately desired color, providing bioprotection and strengthening the aged tree. |

There can be no consensus on the best way to renew wood that has darkened over time. Radical measures are necessary only in extreme cases; most often the problem can be solved with minimal effort. When choosing a method that is optimal, remember that we're talking about about your home and the comfort in it. Excessive savings are hardly appropriate here. It is worth taking into account all the circumstances and giving preference as much as possible effective remedy, which will allow you to restore wood efficiently and quickly.
|
|
Old, unpainted house | House coated with Aquatex Restorer |
Of course, all of the listed methods of wood renewal are quite viable and have a right to exist. But now it can be argued that the use of a restoration composition, such as Aquatex Restorer, is exactly the way through which we get the desired result with minimal effort.
The product appeared on the Russian market relatively recently, but its effectiveness has already been repeatedly confirmed in practice.