Making a forged fence can be considered almost jewelry work, since only attention, skill and accuracy can help a master or even a novice in this complex task. This task is very difficult, but if you have a desire to independently carry out the plan and fence your territory with an attractive fence, then it’s worth a try. To make a forged fence with your own hands, you need to select not only materials, but also special tools that allow you to realize your plans. Detailed description steps will be given in this article.
Methods for creating wrought iron fences
A wrought iron fence has many advantages:
- luxurious look;
- harmonious combination with any style of site and house;
- clear geometric shapes;
- high strength;
- long service life;
- minimal care.

It’s worth starting any business by studying the chosen area. If we talk about a wrought iron fence, then here Special attention is devoted to the methods of its production. There are currently three of them:
- Welding. Simple and most affordable way with reasonable prices. But it will be necessary welding machine and certain skills to work with it.
- Forging. A complex and lengthy process that will require a lot of effort and time.
- Combined. Combines both the first and second methods. It is also necessary to involve a professional, since a beginner will not be able to make a fence using this technology.

By choosing any of the described methods for creating a forged fence, you can make an original and exclusive element landscape design. It should also be noted that if all requirements are met, as well as with additional protection, such a fence will last forever.
Note! In addition to the advantages, you should also consider the existing disadvantages, of which there are not many. The fence will allow noise from the street and gusts of wind to pass through, which will bring debris and dirt into the area.
Cold forging
Since not everyone has a welding machine and the skills to work with it, the most preferable option when creating a fence is cold forging. In this case, you need to collect special tool to create elements.
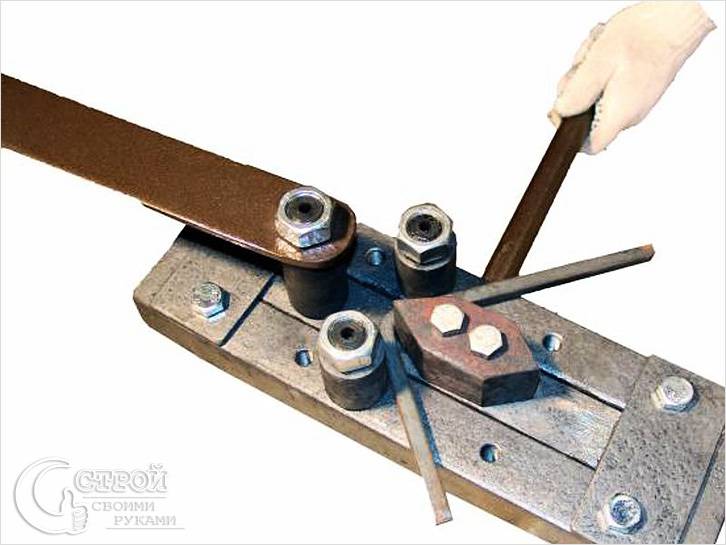
- Gnutik is a basic tool in the forging process. With its help, you can easily bend a metal rod of any cross-section.
- Snail – used for making spiral elements.
- Flashlight - will help in creating intricate patterns. Suitable only for round profile rod.
- Twister is similar to a flashlight. With its help you get metal fragments with torsion.
- Wave – the tool corresponds to its name, that is, it is used in the formation of wavy elements.

In addition, you will need a hacksaw or grinder to cut the rods into pieces. As well as a welding machine for fixing finished elements together.
Note! When working with metal, do not forget about own safety. Eyes, skin and respiratory organs must be protected with a respirator and protective clothing.
Manufacturing of elements

To do everything correctly, you will need drawings and diagrams in which sketches are made and exact dimensions are indicated. This professional approach will allow you to complete all the work accurately and accurately. It should be noted that for beginners it is best to take sketches in real scale in order to take accurate measurements of the nodes.


- After the material has been purchased and the tool has been assembled, you can begin to directly create forging elements.
- Cutting metal into pieces of the required length.
- Dividing the rods into groups - each for a corresponding element.
- Creation of forged fence blanks using special equipment. Pay attention to the need to adhere to the limit point when twisting. This will allow all elements to be identical, with the same diameter.
- The frame for the segment consists of pipes with square section 25–30 mm. 4 frame elements are welded together, forming a rectangle or square, depending on the project.
- The finished frame is placed on a flat surface, a table, and the blanks are laid out inside. Before you start welding them, you need to make sure that all the elements fit together correctly. At this stage, everything can be replayed and the forged blanks can be swapped.
- After welding, all weld seams must be cleaned using a wire brush.

Note! In addition to metal rods, it is necessary to purchase balls that will serve as plugs on the curls.
Fence installation

To secure the finished sections, you need to return to the site. The foundation is built along the drawn lines or pegs with a cord. Let's explain how to do this:
- Holes are dug for supports. The depth should correspond to ¼ of the length of the post. The maximum distance from pillar to pillar should not exceed 3 m.
- The filling mixture includes the following components: water, sand, cement and crushed stone. The resulting concrete is well mixed.
- One by one, fill the holes with prepared concrete and immerse the pillar. It is important to maintain verticality; a building level is used to check. For more reliable fixation of the supports, spacers are additionally used. As a result, all posts must be of equal height, and also be equipped with upper and lower cross plates.
- To protect the metal from atmospheric influences, each pillar is covered with plugs on top. They will add decorative value and also extend the service life of the supports.
After concrete pouring completely dry, you can remove the spacers and attach the sections to the supports. To accurately represent the future picture, use special fasteners for fixation. Holes are drilled in the thickness of the pillars with a drill. To prevent the fasteners from unraveling during operation, after installation work the nuts are welded to the bolts using a welding machine. Apply a primer;
Degreasing can be done with simple white spirit or another solvent. Thanks to the application of a primer, the metal will be additionally protected from rust, and it will also allow the paint layer to lie more evenly and not spread.
Note! When choosing paint, it is worth considering that the fence will be used in a variety of weather conditions.
As you can see, it is possible to make a forged metal fence with your own hands. It is enough to have a great desire, opportunity and a little time to do the job carefully. As a result, your Vacation home or the site will be fenced off from the street and neighbors by an elegant and sophisticated fence that will decorate the entire landscape design.
Video
By watching the following video you will learn a lot useful recommendations for assembling a wrought iron fence:
Process cold forging and welding of a forged fence is clearly shown here:
A wrought iron fence is quite an expensive pleasure, but no other type of fencing can compare with it in grace and nobility. You can make such a fence in different ways:
1. Stamping. The fastest, easiest and inexpensive option. Such a fence will be quite suitable for summer cottage or simple country cottage. Stamped parts imitate hand forging; only a specialist can notice the difference
2. Hand forged. A fence made of real forged parts is the most expensive type of fencing, but for an elite mansion best option can not found. Parts are ordered from the forge and take a lot of time to produce. Like any product self made, a wrought iron fence is truly exclusive: it is their main trump card.
How to make a forged fence with your own hands
 If you wish, you can make a homemade fence that looks like a real wrought iron one. To do this, the master will need enthusiasm, patience and some tools:
- Grinder with a disc for cutting metal
- Device for spiral twisting of metal workpieces in the longitudinal or transverse direction (twister)
- Compressor with a spray gun connected to it
- Vise
- Electric welding machine
- Bench tools: hammer, file, etc.
- Yardstick
- Shovel or drill
- Building level
- Plumb
- Long cord for marking
Stages of work
 When making a homemade forged fence, operations are performed in the following sequence:
- The area that will be enclosed by the fence is carefully measured
- Based on the measurement results, the contours of the fence are drawn on paper. The position of the gate, wicket and all support pillars is marked on the drawing. The latter, of course, should be located as evenly as possible in increments of about 2 m. The gate is made from 800 mm to 1 m wide, the width of the gate is selected accordingly overall dimensions available vehicles
- Now you can start developing sketches of sections of the fence, gate, etc. It is best to take several samples as a basis - already installed fences in the surrounding area or photographs found on the Internet or in catalogs. When developing sketches, it is necessary to take into account the capabilities of the equipment available in the arsenal, as well as the availability necessary materials and parts from suppliers
- By ready-made sketches draw up a specification - a list of all elements included in the design of fence sections, gates and wickets. In accordance with the specifications, materials and components are purchased. To make your task easier when bending workpieces, purchase not the strongest, but medium-thick rolled products. Often supplier companies offer metal balls, they can be used to decorate some curls
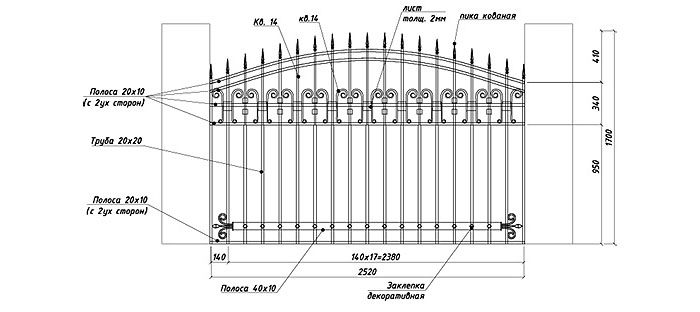 Wrought iron fence drawing
 Manufacturing of sections, wickets and gates

- The twister (twisting device) must be properly adjusted. This operation should be approached with all possible thoroughness; if the device does not work correctly, it will be impossible to correct the defect.
- The blanks are cut using a grinder into pieces of the required length.
- Before twisting the curls, marks should be made on the workpieces, measuring the same length for each of them. These marks will be a kind of guideline: as soon as the installation “gets” to this mark, the bending process will need to be stopped. Thanks to this, all curls will be the same. The master must take into account that the cross-section of straight rods twisted with a twister in a direction transverse to their axis will be increased. For this reason, pre-prepared forgings for decorating these parts may not be suitable in diameter. The right decision will first twist the rods, then, having accurately determined their diameter, purchase forgings
- The patterns of each section are fixed on a welded frame, which is made of metal profiles. The assembly of the section and welding of all its components is carried out on a flat horizontal platform. The frame should be a regular rectangle. To control the geometry, check the length of its diagonals. They must be equal in size
- Gates and wickets are made in the same way.
- Finished structures are cleaned from scale with a metal brush, then the welds are treated with an abrasive wheel mounted on a grinder
 Exists great amount materials for creating a fence. If a wrought iron fence is too tough for you, then you can make one. Ease of installation is one of the advantages of this design.
Find out about metal picket fence for the fence it is possible. It describes the advantages of this material.
Base structure
Sections of the fence can be fixed on supporting pillars, or they can be monolid in a solid base of concrete, stone or brick, up to half a meter high.
Let's consider both options.
Installation of pillars

- At the installation site of each support column, it is necessary to dig a recess under columnar foundation. The dimensions of the recess in plan are 500x500 mm, depth – 700 mm. It can also be made round using a hand or electric drill.
- A cushion of a mixture of crushed stone and sand is placed at the bottom of each recess. It should be compacted well
- A waterproofing material (ordinary polyethylene film will do) is laid along the walls of the recess, which will not concrete foundation absorb moisture from the soil
- The support column is installed in the recess, and its position is adjusted using wedges, controlling the verticality of the installation using a building level
- Pour into the recess concrete mixture consisting of one part cement grade 300 and three parts sand-crushed stone mixture with the addition of water
- The concrete foundation is left for a week to “ripen” and only then the installation of sections, wickets and gates begins
Solid base device
For a continuous foundation, you will have to dig a trench along the entire perimeter of the site. It is mounted in wooden formwork, which is then filled with concrete mixture.
Fencing installation
 Sections of the fence are embedded in the base or welded to support posts. To install gates and wickets, hinges are welded to the supporting elements.
After installing all the components, the welding seams are cleaned and degreased, then all metal elements are coated with a primer and painted with paint for metal surfaces.
Video about DIY forged fences
Video about varieties of pike.
Reading time ≈ 3 minutes
You can make a wrought iron fence with your own hands using 3 methods:
Manufacturing methods
- using welding. This method is the simplest and least expensive;
- using forging. The manufacturing process cannot be called simple. It will take more time, so you must immediately be patient;
- in a combined way. This method is more suitable for professionals as it combines the previous two. It is also impossible to do without the appropriate equipment, but even if an inexperienced craftsman manages to get it, he may simply not be able to cope with the job.
Required Tools

To make a forged fence with your own hands, you need to prepare the following tools:
- grinder;
- spiral twisting device (longitudinal or transverse);
- spray gun with compressor;
- vice;
- electric arc welding machine;
- small tool.
Step-by-step instructions for making a wrought iron fence
If the tools are already available, let’s consider step by step how to make a forged fence with your own hands:

1. We draw a drawing of the desired fence on paper and mark the dimensions on the sketch. When developing drawings, first of all, you need to decide whether the production of this option is possible from a technological point of view, and also whether the metal used in the project is available at bases selling this material.

2. We carry out the calculation required material. First you need to mark the territory with pillars, and also count required amount sections. You should measure extremely accurately; you should not add extra centimeters, since the forging simply may not fit. It is better to write down the calculations made.

3. Now you can buy materials. However, do not forget that you will have to bend the material yourself, so it is better to purchase rolled metal of medium thickness. You can also buy small sizes balls to weld them to the ends of the curls.

4. Set up the twisting device. Here you should be extremely careful, since the marriage will not be easy to fix later. We cut the material into pieces using a grinder.

5. You can start making the pattern. When making curls, it is better to stop in one place as you curl them to get curls of the same diameter. The cross-section of twisted long rods produced using a twister will increase, so if it is necessary to decorate them with additional forgings, as in this illustrative photo, this fact must be taken into account when choosing the internal diameter. First, it is better to make a rod, measure the diameter, and then purchase forgings.

6. Each section should have its own frame. It must be made from a metal profile. Having welded the frame, you can place all the prepared elements in it. For assembly, it is better to choose a spacious, flat place so that your hands do not get tired and the elements are not suspended. The diagonals of the frame should be carefully measured and checked to ensure that their dimensions are equal. This will prevent it from skewing.

7. Assembly should be carried out on a flat surface with the frame in a horizontal position. It is better to start welding with twisted rods, subsequently attaching other elements to them. The video below will help you assemble a forged fence with your own hands.

8. We clean the welding seams using a metal brush. Then we degrease and prime.
Everyone who puts up fences has one common goal- outlining a certain territory, but appearance and the methods of making the fence are very different from each other. Fences in which it is used artistic forging, in addition to the direct function of a fence, they successfully play the role of an addition to the design of the yard and house, and in some cases they are the main design element.
Example original fence with sections made of forged elements
Professional artistic forging has been elevated to the rank of art, and professional blacksmiths never cease to amaze with their talents and inexhaustible imagination. The use of forging elements in the construction of fences, gates, parapets and gates makes it possible to give each site individuality, since the designs born from the imagination of the master are not repeated.
Types of forged barriers

Advantages of wrought iron fences
- Durability: not afraid of moisture, wind, sun;
- It is beautiful. Durable metal rods, decorated with decorative elements, look like elegant lace;
- Uniqueness. Everyone selects the elements of decorating fences and gates to their own taste, so there is practically no repetition of the design.
Methods of creating artistic forging
Artistic forging has been valued at all times, and now decorating gates, fences, courtyard and room furniture with forged patterns has become especially popular.

Unusual chrome-plated artistic forging of a fence
These wonderful objects are created in two ways: hot and cold forging.
Hot forging masters are always worth their weight in gold. They create their parts, like their ancient ancestors, using blacksmith's forge and anvils. The process is quite labor intensive and the cost finished products, let's say, not for the poor.
But artistic forging using the hot method has a great advantage: you can create literally anything - from a simple rod to the smallest curls, roses, leaves, grapes, etc., etc.
The second forging method is cold. It differs in that the equipment for creating objects is less voluminous and expensive, and anyone can learn to use it if they wish. Products created by cold forging are simpler, but the costs are much lower. Fences with elements of cold forging also look rich and elegant.
What you need to create a wrought iron fence
For this you need to prepare the main tools:

Stages of making an artistic fence
Artistic cold forging is a fascinating activity, and if you master its intricacies, it can become a new hobby or even a means of earning money. To begin with, it is advisable to master the basic techniques of working with a welding machine and get down to business.

The work of arranging a wrought iron fence will require a considerable investment of time and effort. In addition, you will have to purchase or rent special equipment for making decorative elements and learn how to work with it. You will learn about all this by reading the presented guide.
Set for work
- with a set of electrodes.
- Grinder with grinding and cutting discs.
- Equipment for the production of decorative elements. There are several types of machines that allow you to shape metal rods different shape. You will learn more about the main units below.
- Vise. A flimsy student setup won't do. You need a powerful locksmith unit. Additionally, prepare patterned yews to give the rods a spiral shape.
- Pliers.
- Roulette.
- Hammer.
- Building level.
- Corner.
- A spray bottle or several brushes of different sizes.
- Steel rods with a diameter of 12-14 mm.
- Sheet steel 2 mm thick. We will use it to make peak tips. We buy the material if peaks are present in the selected fencing design.


Setting up the foundation
The work of making a forged fence begins with arranging a reliable, durable and quality basis. The support will have a columnar-ribbon appearance. The posts will hold sections of the fence, and a continuous concrete tape will bear the weight of the entire structure.
What are the pillars made of?
For the manufacture of supports we use reliable, strong and durable material. Wooden beam It clearly won’t fit - it simply won’t support the weight of the metal sections, and even if it does, then such a design will clearly not look the best.
The pillars can be made of concrete, bricks or metal. Each option has its own characteristics.
| Type of supports | Description |
|---|---|
| Metal supports | They are characterized by high stability, strength and long service life. The material is sold at an affordable price, does not require any complex additional preparation and processing, and is easy to transport and install. The supports can be square or round section. The minimum permissible diameter or cross-section of the rack is 6 cm. For the rest, we focus on the dimensions and weight of the future structure. |
| Brick pillars | Can withstand loads created by a variety of heavy and tall structures, which includes our wrought iron fence. First, the perimeter of the pillar is laid out from bricks, and then the gap inside the masonry is filled with reinforcement and poured with concrete. The reinforcement is also embedded in the masonry. As a result, sections of the fence will be attached to these rods. |
| Concrete supports | They withstand the harshest external influences, serve for the longest possible time and are in full harmony with metal products. However, with all their advantages, concrete racks have a very serious drawback - they can normally withstand loads created by sections up to 150 cm high. When installing more impressive elements, the support may collapse under its weight. |
Most often, forged sections are used in combination with metal stands. This is exactly what we are building. The choice is very good - you don’t have to bother with masonry, formwork, unnecessary concreting and other related activities.
Making the foundation
First step. We mark the area around the perimeter where the fence is installed. By marking we dig trenches. We select the depth and width of the pit taking into account a number of factors, including: the characteristics of the soil on the site, the climate in the region, the height of the fencing sections, etc. The optimal parameters are considered to be a width of 30-35 cm and a depth of 70-80 cm.

Second step. Along the perimeter of the dug trench we mark places for installing racks. We install the pillars with the same spacing. The average step is 1.5-2 m. For the rest, we focus on the size and weight of the fence, as well as the width of the sections and the features of the design idea. We dig the posts into the ground approximately 35-40 cm. The diameter of the hole should be slightly larger than the size of the support. We fill the post holes with a 10-15 cm layer of crushed stone and compact it. We are not pouring concrete yet - we will do this when pouring the tape.
Third step. We compact and level the bottom of the hole, and then fill it with a 5-10-centimeter layer of sand. For better compaction, we spill the sand with water.
Fourth step. Let's do it. To do this, we connect reinforcement with a diameter of 12-14 mm into a mesh with 10 cm and cells. To connect the rods we use binding wire.
Reinforcement is best done in 3 layers. We will lay the first mesh at the bottom of the trench on top of a layer of sand, fix the second mesh approximately in the middle of the pit, and the third almost at the top of the recess. We fasten the grids with dug support pillars using tying wire. It is better not to use welding, because... After pouring the concrete, we will need to level the supports, and the welding seams will not allow us to do this.

Fifth step. We install the formwork along the edges of the pit. You can use boards to assemble the formwork, but if you have a sufficient budget, it is better to make a form from laminated MDF. The use of this material will allow you to obtain a foundation with perfectly smooth visible edges that do not require additional finishing.
Sixth step. Fill the post holes and tape with concrete.

Seventh step. Until the concrete has set, we level the supports and fix them in the given position using wooden stops. We leave them until the concrete hardens completely. This will take 3-4 weeks.
With this, a reliable and durable base for our wrought iron fence is ready. While the concrete hardens and gains strength, we will begin manufacturing sections and decorative elements for the fence being built.
Steel rod will be used to make all structural elements. But in order to give the rods the desired shape, you will have to buy or borrow special equipment. Which one exactly? Read on.
How to make decorative elements?


Such elements are manufactured using a variety of bending machines. The most commonly used types of equipment are:
- "Gnutik." This device allows you to bend metal rods to the desired radius and required angles.
- "Snail". This machine allows you to give the rods a spiral shape.
- "Sample". Bends metal rods into a circle. It is possible to change the radius of the circle.
- "Twister". Another unit for twisting rods into a spiral. Can be replaced with a vice and yews.


You do not have to spend money on buying or renting all of the listed units. Take 1-2 tools (machines) and, focusing on their capabilities, come up with a section design. Or you can choose tools in accordance with the already approved design - be guided by the situation.
For example, a device called “Gnutik” will allow you to create rounded elements and peaks - quite enough to decorate a forged fence. In this case, the rounded products will simultaneously take on the functions of stiffeners.

Manufacturing and installation of fencing sections
We have smoothly approached the most interesting and important stage of the work. We proceed in the following order.


First step. We find a flat horizontal area that can freely accommodate at least one section of the fence. You can use a large work table or do everything right on the asphalt.
Second step. Using chalk, draw a template for the fence section on the base. We draw stiffeners, protective parts and decorative elements. In accordance with this template, it will be possible to assemble all other sections of the fence.
Third step. Using a bending or special devices We create the number of decorative elements we need. At this point, we focus on a project drawn up in accordance with our ideas, requirements and preferences. We make sure that the shape and dimensions of the products match the template we drew. At the same stage, we cut the steel rods to the required length.
Fourth step. In accordance with the template, we grab all the elements of the section spot welding. We check the correctness and evenness of the connection of the parts. If everything is in order, we perform final welding.
In the same order we assemble the required number of fence sections.
Fifth step. We clean the welds and remove traces of corrosion if they are found.
Sixth step. We cover hardware primer and special protective paint. This finish allows you to simultaneously improve the appearance of the fence and protect it from rust.


Seventh step. We install ready-made sections. To attach them to the support posts, we use a welding machine or special clamps. Don’t forget to leave openings for installing gates and gates if they have a different design from the fence.


At this point, all activities for the manufacture and installation of a wrought iron fence have been completed. The process is quite complex and time-consuming, but the result is definitely worth it.

Good luck!
Video - DIY wrought iron fence