How to close the pipes in the toilet so that it is both beautiful and practical - this problem must be solved by everyone who is renovating a bathroom. We will talk about the main options for building a closet in the toilet with your own hands.
By erecting a plumbing cabinet behind the toilet, we solve several contradictory problems:
- Close the pipes in the toilet. The appearance of common building risers is rarely aesthetic. Often they are ugly welded, ugly, perpetually sweating pipes.
- Set up several shelves in the free space behind the toilet for storing supplies. toilet paper and things like that.
- At the same time, maintain access to the pipes for possible repairs, for installation and maintenance of water meters. And in general: you never know!..
Fundamental technical solution Such a cabinet is obvious: a wall is erected behind the toilet, in which an opening of a larger or smaller size is left. The wall is most often finished with the same material as the entire toilet, and the opening is closed with some kind of door.
Let's take a closer look at the most common options...
Louvered cabinet doors
From standard plasterboard profiles The frame is assembled and sheathed in one layer of moisture-resistant plasterboard. The surface is covered with ceramic tiles along with the rest of the walls. In the middle of this partition, a rectangular opening is left 2-3 cm smaller than the pre-purchased wooden louvered door. The door is installed on suitable hinges over the opening.
Pros:
- Low cost louvered doors.
- The cabinet door is installed on top of the opening, so it easily hides dimensional inaccuracies and other flaws.
- This work can be performed by even the least qualified master.
Minuses:
- A louvered door on a tile looks out of place and inharmonious. Especially if the color does not match the surrounding tiles.
- For good access to the equipment inside the cabinet and to the shelves, this opening is too small.
Plastic plumbing hatch
Plumbing hatches come in the most different sizes. Any manufacturer produces a whole line of hatches with a pitch of 5 cm. Thanks to this, you have the opportunity not only to make access to the inside of the plumbing cabinet more spacious, but also to choose the size of the plumbing hatch so that it matches the seams in the ceramic lining.
The plumbing hatch is a frame made of a metal corner with a door. They are usually sold in white, but today there are more and more offers on the market for painting the hatch in the desired color for an additional fee.
Making a wall for installing a plumbing hatch in it is no different from the version with a louvered door: the same frame made of profiles and drywall. After the ceramic tile cladding is completely completed, the hatch frame is glued into place using sealant or any other suitable adhesive.
Pros:
- Large selection of all sizes.
- Easy cabinet making.
- "Universal" White color, in harmony with the color of the sanitary ware.
Minuses:
- Some “flakiness”, which is not to everyone’s taste.
- Simplicity of appearance.
Custom cabinet doors
In this case, the finishing of the toilet is carried out without regard to the dimensions of the commercially available ready-made doors for the sanitary cabinet.
The master builds a wall behind the toilet, guided by the design concept. For example, as in the photo: the closet in the bathroom is made from wall to wall, and from seam to seam.
After graduation tiling works the exact dimensions of the opening left are taken and ordered in a suitable workshop necessary details future wardrobe strictly according to measurements.
Pros:
- Dimensions do not limit the design intent.
- Cabinet of “furniture” quality.
- Maximum access to risers and wiring.
Minuses:
- Really expensive.
- You have to wait a long time for parts to be made (sometimes up to several weeks).
- You will have to look for a workshop that will make custom cabinet doors.
Plumbing hatch for tiles
Such hatches are also called “hidden tile hatches”.
This option is technically the most difficult. And expensive. You will have to pay both for the plumbing hatch itself and for its installation.
The tile hatch is a rigid aluminum or steel frame into which a door made of material suitable for tiling is built in on special hinges. The hinges must not sag under the weight of the glued tiles, so special requirements are placed on their design.
The hatch is built into the frame of the rear wall of the toilet so that after covering the partition with plasterboard, a single plane is obtained. The entire surface is tiled.

The dimensions of the hatch are selected based on the size of the tiles. In our photograph, the hatch is decorated with tiles with a pattern: it is clearly visible that the boundaries of the sanitary hatch exactly coincide with the tile seams on the rest of the wall surface.
To open the hatch, you must first pull it out from the plane of the wall (note the comfortable handle), and then move it to the side on hinges. We talk in more detail about the design of such hatches and their installation in other articles on our website.
Pros:
- Stealth.
- Spacious access to the interior of the sanitary cabinet.
- All kinds of sizes.
Minuses:
- The high price of the hatch itself and expensive installation.
- We need a highly qualified master.
- Opening the hatch requires caution. You won't open it often.
- The hatch design is relatively bulky “in depth”. In some cases, this may prevent it from installing.
Full height wooden cabinet
To conclude this review, we propose to consider the design of the cabinet in the toilet, which, if necessary, can be quickly and completely disassembled.
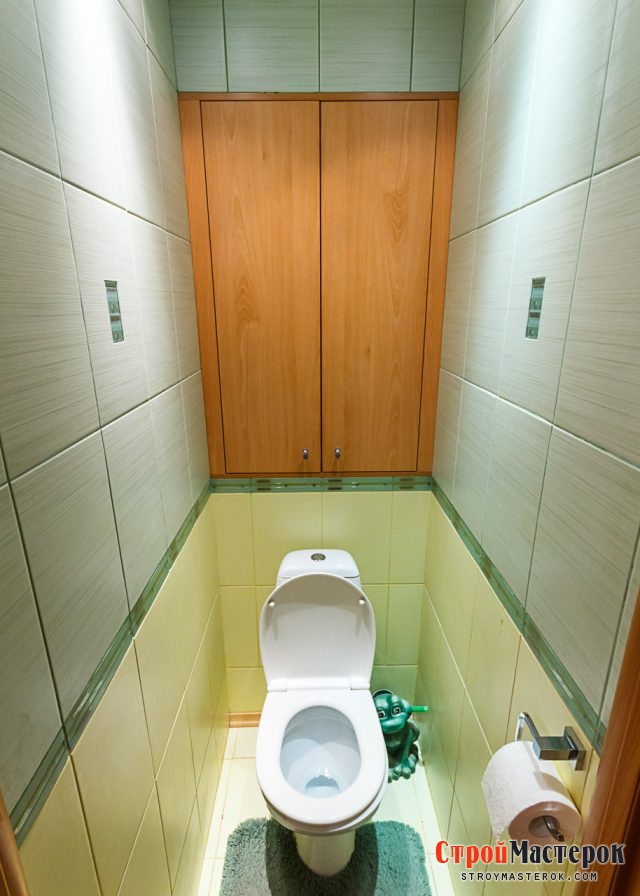
Look carefully at the photo.
The walls of the toilet are lined with amber-yellow tiles. Spruce wood was used to make the back wall behind the toilet and the doors of the sanitary cabinet. furniture panels 18 mm thick.

The edges of the doors are rounded using shaped milling, and decorative grooves are also selected on the front surface using cutters. All wooden parts covered with several layers of waterproof parquet varnish.
The color scheme of the resulting doors matches perfectly with the color of the tiles on the walls.
The doors hang on standard furniture hinges. If necessary, you can remove them in a couple of minutes. After this, the shield behind the toilet is pulled up. It wouldn’t hurt to make a small partition under the ceiling complete replacement risers.
Pros:
- The ability to quickly disassemble and reassemble the cabinet if necessary.
- Maximum access to risers.
- Saving on materials: no need to make a wall of plasterboard and cover it with tiles.
Minuses:
- Not everyone will like the wooden structure.
- To make parts you need a carpenter.
We have analyzed the advantages and disadvantages of five options for arranging a sanitary closet. Of course, there are other solutions.
Weigh the advantages and disadvantages of each and make an informed choice of the optimal cabinet for your toilet. Or come up with your own.
Many apartment owners are concerned about the issue of additional space to accommodate various household items. Numerous containers with detergents and cleaning products, a supply of soap and toilet paper, napkins, hygiene products - all this requires placement. As a rule, in kitchen cabinets There is no room for these things, put a closet in the bathroom - good idea, but this room usually does not have enough space. An excellent option for placing these things would be a toilet with a DIY sanitary cabinet.
Closet in the toilet yourself easy to install, because such work does not require professional skills. A little imagination, exact centimeters of space allocated for the cabinet, plus a completed sketch with the dimensions entered on it - and you can go get the materials.
Materials and tools
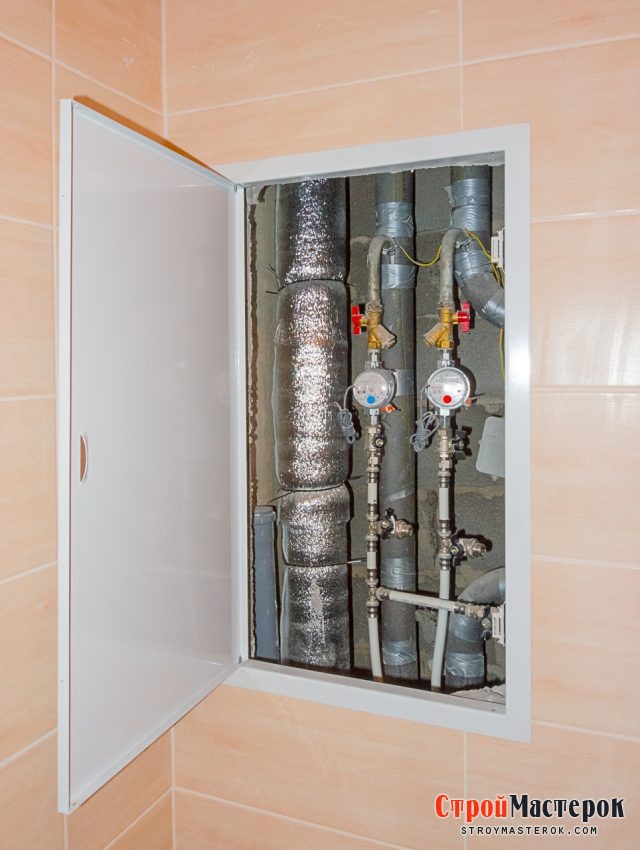
First you need to decide on the exact location for the plumbing cabinet in the toilet. As a rule, they use the space behind the toilet, since more suitable place can't be found, see photo. A properly installed plumbing cabinet in the toilet will not only cope with the task of storing various items, but will also become shelter of all pipes and water meters, while ensuring a free approach.
The choice of material for the cabinet and the shelves that will be located in it should be taken seriously. The fastening of the shelves must be reliable, since the weight of the objects may not be light. If you do not plan to place various weights in it, then shelves made of plywood 8-10 mm thick are quite suitable. But still, shelves made from laminated chipboard will be more practical, because they will withstand any load, see photo.
To give the plumbing cabinet in the toilet beautiful view, for its facade they take laminated chipboard sheets. More economical option The cabinet in the toilet will be made using inexpensive sanded chipboard, then you can line it with decorative tiles that match the shade of the walls of the room. The plumbing cabinet for the toilet should take up everything free space back wall, look at the photo.
So, except laminated chipboard or plywood To install a plumbing cabinet in a toilet you will need:
- Corner profile made of aluminum, its dimensions are 25 by 25 mm. It will be useful for convenient placement of shelves.
- Furniture hinges. Their number depends on the size of the doors and their number.
- Furniture magnets.
- Door handles.
- U-shaped aluminum profile (if the shelves have holes for the fan pipe).
- Furniture corners.
- To create a cabinet frame, timber with dimensions of 30 by 30.
Installation procedure
 First you need to prepare all the necessary parts. The dimensions must exactly match the indicated dimensions in the drawing. If House master If you have difficulty cutting the material correctly, you can ask the craftsmen of the company where it was purchased. Almost every company that sells chipboard provides such assistance.
To make a toilet cabinet you you can't do without the following tools:
- Electric jigsaw and wood saw,
- Roulettes,
- Level,
- pencil,
- Screwdriver,
- Electric drill or hammer drill.
Having prepared all the necessary details, you can start installation locker in the toilet.
- Installation begins with attaching the bars that are intended for the frame. Using self-tapping screws, pre-marked holes are drilled, then dowels are inserted into them. Preliminary markings are made according to the level, since a skew of the frame may occur, which, in turn, will entail a skew of the door. When marking the wall, keep in mind that the toilet tank should not be included in the plumbing closet area.
- The next stage of installation will be to mark out the spaces for the shelves. We select one wall and mark out places for shelves in random order, the main thing here is that the shelves are located conveniently. The second wall is marked by level; you need to ensure that the shelves are installed strictly horizontally. After this, in the places marked with a pencil, we attach the aluminum profile that is needed to install the shelves. We fasten using self-tapping screws and dowels.
Nuances when installing a shelf
 If you're locked up in a locker water pipes, That shelves should not touch them, see photo. Usually the pipes are not positioned strictly vertically, so each shelf will have to be “processed” individually. If the pipes have a small diameter, then the holes in the shelves are made using feather drill, then you need to take a jigsaw and cut through the shelf so that it touches the wall closely.
A hole for the fan pipe is cut with a jigsaw, but before that you need to drill the shelf, this is necessary in order to pass the jigsaw file through it. It is important to determine the size of the hole as accurately as possible so that the files are in place.
It is not necessary to firmly attach the shelves to the profile, as you may need a place to store tall objects. A loose bottom shelf is often used for easy access to meters and valves on pipes. Loose shelves are the easiest way to gain access and do not require the installation of additional hatches and doors.
Doors and fittings
 It is better to hang the doors on the toilet cabinet together. First, you need to attach the hinges to the door, then, after trying them on, determine the location for fastening on the frame. You can use piano hinges, since the doors are light in weight. Their installation will not cause problems; they are attached to the door and frame using self-tapping screws.
After this, the doors are equipped with handles, after which comes series of furniture magnets. The work is carried out in this sequence, since if you attach the magnets first, it turns out that the door cannot be opened.
The toilet is a room with high humidity, so take care of the safety wooden elements, which are included in the design. They need a protective layer of special impregnation. Additional wardrobe added in home interior, can become a container for items that have no place in the house. A masterpiece made by yourself will be an excellent incentive for implementing new useful ideas.
Several bathroom cabinet options

Specialization: master of internal and exterior decoration(plaster, putty, tiles, drywall, lining, laminate and so on). In addition, plumbing, heating, electrical, conventional cladding and balcony extensions. That is, renovations in an apartment or house were done on a turnkey basis with all necessary types works
In most cases, when renovating, you will need bathroom cabinet doors to hide the pipes and water meter. Here you can go in two ways, the first method is to buy such doors from glass, plastic or wood, and the second is to make them from tiles. But I want to talk about all this in more detail and offer a video in this article.
Making a door
From ceramic tiles

1 — frame slats; 2 - water supply; 3 - sewerage; 4 - water meter
To make out ceramic tiles hatch behind the toilet for plumbing, you will need:
- construct a box, internal organization which is shown in the diagram above. Your goal in this case will be a hole through which the water meter will be clearly visible, and there will also be access to the main taps;
- if it is a niche, then your goal will be to create a false wall, and if there is no niche and the pipes run on top, then you will have to make a box;
- for a false wall in a niche I always use wooden slats 50x50 mm is much more convenient than working with metal profiles;
- in the diagram you see that the slats represent the sheathing, but you need to try to make sure that the screwed-on moisture-resistant drywall (GKLV) is flush with the wall;
If you have such a structure that will not occupy the entire wall, then it is better for you to plaster it first so that the sheet comes out flush with the plaster.

- if the plumbing doors will be on the frame, then you do not need to fit the drywall flush with any wall. The main thing here is that the hatch is spacious enough so that you can easily reach the crane.

In this situation (with a box or false wall), the instructions allow you to go in two ways:
- you can make, for example, plastic doors for a closet in a toilet with a metal frame, as shown in the top photo. But you can hardly glue tiles on them - it turns out to be too massive a structure;
- the second option is when the hatch is made exactly to the size of the tile, for example, 200x300 mm, and the tile itself is already held on by magnets. These special magnets are sold in sets of 4 pieces and their price is quite affordable. Personally, I prefer this method of attachment.
You can attach a furniture handle to the removable tile, or you can not screw anything there at all - it can be easily removed by prying it off with your fingernails.
Regular doors

The situation will look somewhat different if you want to have a large closet where you can put all the cleaning supplies, as well as bowls and buckets. Here you cannot get by with a regular hatch, and you can purchase, for example, louvered doors in the toilet that will start from the floor.
Here you should take into account that the bathroom belongs to rooms with high humidity, therefore, if the doors are made of wood, they should be protected with several layers of varnish.
If you wish, you can even make your own canvas from moisture-resistant plywood or OSB - the biggest difficulty is assembling and installing the box, which must be even diagonally. During my practice, I had to deal with real sandwiches - drywall was screwed onto a plywood sheet, and tiles were glued onto it - you can imagine a lot of such a structure!
I am not a supporter of such heavy doors, besides, you will also need powerful canopies, which also need to be secured to something.

But our bathrooms, in general, are not so large, which does not allow us to make a closet from the floor itself - a toilet would interfere with this (imagine such a device in a toilet 75-80 cm wide!). Therefore, you can purchase the same slatted facade in the store as in the photo above and install it a little higher cistern toilet. The flaps will open above the tank, therefore, they will not interfere with you in any way.

For a toilet 80 cm wide, doors with a total width of 40-50 cm will be quite sufficient - such doors look quite impressive not only in the toilet, but also in the bathroom. If you wish, you can choose the size that is most suitable for you - the construction market always has the most different offers. But again, you need to be very attentive to the box - then the whole composition will look like a single whole.

Since there is often not enough space, this can be corrected at least visually, for example, a shallow wall cabinet with mirrored doors. Mirrors will reflect all the walls and all objects in the room, this creates the illusion of space. Of course, in such cases the wall decoration should not be too dark.

As an option, you can use roller shutters, which are made from plastic and metal, but the choice of sizes here, one might say, is simply huge. This is enough modern solution in design and you can easily install them above the toilet with your own hands, without resorting to the paid help of specialists.
Conclusion
I did not mention here this type of barrier, such as curtains, although I did this not out of forgetfulness, but from my personal conviction that such a device is somehow incompatible with sanitary facilities. Firstly, they are fabric and will deteriorate if exposed to moisture, and secondly, for such things you need something tougher and more substantial. Of course, opinions may vary, so I encourage you to speak up and share your ideas in the comments.
August 2, 2016If you want to express gratitude, add a clarification or objection, or ask the author something - add a comment or say thank you!
August 1, 2016Specialization: Capital construction works(laying a foundation, erecting walls, constructing a roof, etc.). Internal construction work (laying internal communications, rough and fine finishing). Hobby: mobile connection, high tech, computer technology, programming.
The photo shows the hero of today's story.
I recently parked my car in the garage and met a neighbor there. He knows that all my life I have been renovating different apartments and I know how to assemble furniture, so he asked me to help make a cabinet for the toilet. This design seems to be invisible and done quickly, but in order for the result to please your whole life, you need to do everything correctly with your own hands.
Of course, you can limit yourself to blinds or roller shutters, but the neighbor said that his wife did not consider this option. She definitely needs hanging shelves behind the toilet, so that there is somewhere to put household chemicals and other small things needed in the household.
Nothing to do! Moreover, after finishing work, I was entitled to a considerable bonus in the form of beer with dried fish. And for those who don’t have a neighbor like me, below I’ll tell you all about how to design a wall-mounted toilet cabinet yourself.
Preparing for work
Material selection and design
The design of any cabinet, like other pieces of furniture, begins with drawing. Believe me, I will say without false modesty, experience. What would be better suited for your toilet, but we decided for our neighbor, after coordinating this matter with his wife, to design hanging cabinet For toilet room, the doors of which are attached to ordinary piano hinges and swing outward (this is understandable).
In principle, it turned out to be not so much hinged as built-in. The fact is that he has a wall hung toilet and an empty space appeared above the installation, which they decided to use rationally by installing a cabinet.

Regarding the choice of material. Here, too, everything depends on your financial capabilities and imagination. You can use boards, plywood, drywall and so on.
I advised my neighbor to use 16mm thick laminated chipboards. In this case, it will not be too expensive and beautiful. To save even more, I can suggest you use plywood or regular chipboard. They will need to be cleaned up sandpaper and cover with decorative film.
Now about the sizes. I have already said that a friend has a toilet with an installation around which a shelf is made of plasterboard. Therefore, we built the toilet cabinet into the resulting niche. Based on this, the dimensions were obtained: depth - 300 mm (from the edge of the shelf to the wall), width 800 mm, height 1600 mm.
You need to plan the dimensions of the cabinet so that it covers everything. engineering Communication at the back wall of the toilet room. At the top there will be cabinet doors, and at the bottom (if the toilet is not installed) you can arrange a separate blind part from the same laminated chipboard, adjusting its dimensions to the location.

One more thing. No matter how much your wife asks you to make the cabinet bigger, a reasonable compromise should be observed. Shelves should not hang over the toilet cistern, and cabinet doors in the toilet should not touch any plumbing elements in the room when opened.
Cutting out the parts
Before making a toilet cabinet with your own hands, it is recommended to stock up on parts for it in advance. To do this you need to buy a sheet laminated chipboard in a construction supermarket and order cutting it there on a special machine. From personal experience I can say that this way you will avoid various chips and damage on the cuts, and the cutting areas themselves will look much neater.

In our particular case, the following details were needed:
- shelves measuring 800 by 300 mm - 5 of them were needed (the size and quantity of these parts will be different for you, since I am based on the measurements I took at my neighbor's);
- sidewalls 1600 mm long and 80 mm wide - they will be installed along the edges on the front side of the cabinet;
- a door with parameters 1560 by 640 mm - in order not to bother with hanging it, you can use blinds on the cabinet, but my neighbor’s wife insisted on the door, and to contradict her is not to respect yourself;
- top cap with dimensions 40 by 800 mm - it will decorate top part locker, since no one makes the door flush with the ceiling (I, as an expert, know for sure).
In my case, that was all there was to it, but if you have a toilet attached to the floor, you will need a false panel to disguise utility lines. You can also make sliding doors, but here it all depends on the size of the restroom.
As I said, the preparations have already been brought from the store. I didn't even need it for this freight car, in mine not very much big car everything fits in.
So that my neighbor’s wife would like everything, I decided to decorate the edge of the shelf with melamine self-adhesive tape. There's not much to do there. You heat the iron to about three-quarters of the power, apply the tape to the sawn end and roll it with the sole of the iron. Excess along the edges is removed with a blade and sandpaper.

Naturally, only visible parts need to be processed in this way. What will be attached to the walls does not need to be decorated. Therefore, the procedure took a little time, and I earned myself an extra bottle of beer.
Additional accessories
If you think that this is the end of my and my neighbor’s trips to the store, then you are deeply mistaken. I, as an experienced furniture designer, who furnished almost my entire apartment with cabinets self-made, took care of fasteners and fittings.
Again, I can tell you with confidence that it is best to screw shelves to the wall using aluminum angle. In the store, the blanks are sold in pieces 2 and a penny meters long, so one piece will be enough for the entire cabinet.

To prevent the entire monumental structure from collapsing on the new one (otherwise they would force you to pay instead of beer), I took larger dowels so that they would sit firmly in the wall. It is especially important to take care of attaching the side insert to which the door will be hung.
Let’s briefly go through other items on the list of necessary parts (you can print or photograph the screen and walk around the store with it, I’ll save you time):
- Furniture handle. This purchase was personally attended to by the wife of my neighbor in the garage. Since she could not trust us to purchase the most important part of the cabinet due to our complete lack of artistic taste (in her words).
- Standard furniture hinges, the number of which depends on the material used and the size of the door. 3 pieces was enough for us. Pay attention to quality as the door will be opened frequently. Save now - you'll have to redo it over time.
- Magnets for fixing the door. Here, too, I advised my friend not to save money, and I also advise you to listen to me, smart person. Any cheap Chinese plastic will not work. It is better to take a high-quality domestic product.
- Furniture corners. They are useful for fixing the side inserts and the top part above the door. They are inexpensive, so I advise you to take them with a reserve. They will be useful later on the farm.

If you use thin plywood, planks or chipboard for shelves, I also recommend purchasing a U-shaped furniture profile that will strengthen the shelf. Its price is not that high. But this way you can even store bricks or dumbbells on it. This is especially important if in the future you will have to choose holes in the shelves for water and sewer pipes passing through the cabinet.
Tools
So that the arrangement of the cabinet does not drag on for years and centuries (after all, this is not Egyptian pyramids), I recommend buying, renting, or asking friends for the following tools:
- electric jigsaw with saw blades for working on wood ( hand hacksaw Nobody cuts chipboard anymore);
- a drill with a screwdriver function or vice versa (you are unlikely to want to manually screw in a considerable number of self-tapping screws);
- hammer drill (drill, which is indicated in the previous paragraph, concrete walls You won’t be able to drill quickly in the toilet, and it will be too sloppy);
- drawing tools and construction level (despite the fact that we brought ready-made parts, we had to do a lot of adjusting the dimensions in place, since tilers - bad people- poorly placed tiles).
If you have to drill holes for water pipes, immediately buy a special file (skirt) of the required diameter. Naturally, the hole under sewer pipe you will have to cut it out with a jigsaw, but I can tell you for sure there is nothing complicated about it.

Do not drill holes for pipes in all shelves at once. I’m sure that the pipes in your toilet (and I’ve made a lot of cabinets, so I know what I’m talking about) will not run strictly vertically, you’ll have to adjust them to the location, cursing the builders apartment buildings for crookedness.
Cabinet installation
Finally, we got to the installation itself. Now listen carefully to how to make an awesome cabinet in the toilet with your own hands. The scheme is as follows:
- Sawing an aluminum corner(the shelves will rest on it) into lengths of 200 mm. There is no need to do it all the way (300 mm), since you will not be able to drill a hole with a hammer drill at the far wall. Although, if anyone can, send me a photo in the comments, it’s interesting to see.
- If pipes will pass through the shelves, select recesses for them. It is recommended to strengthen the cut shelves at both ends with a U-shaped profile, otherwise they may break under load. Especially if the cabinet is not too deep.

- In my case, all engineering communications were hidden under the tiles in the installation, so there was no need to do any additional manipulations with the shelves.
- Then my neighbor and I started working on the side inserts. The secret here is to install them strictly level (even if, as happened with us, the walls are not tiled perfectly).
If you don't listen to my advice, you will later face huge problems when hanging the door. In this case, there is no need to make claims against me, it is your own fault.
- It's time to install the false panel. I have already said that my neighbor has an installation in his toilet with a toilet attached to it. Therefore, a false panel is not needed and I will not describe in detail the process of installing it. But there is nothing complicated there. You need to adjust the dimensions of the panel on site and screw it to the pre-assembled corners.
- Hanging the door. I advise you to take into account that this element will sag over time. Therefore, first attach it with a gap of 3-5 mm, and after a week or two, adjust the final position using loops.

- Fastening the top part. It will also have to be modified with a jigsaw and other tools, since it is unlikely to fit exactly into place (in my practice, for example, this has never happened).
- Installing fittings. First you need to secure the handle, and then the magnetic loops. Under no circumstances reverse order. I did this at the beginning of my career as a builder and then spent a long time racking my brain on how to open the door of a finished cabinet that was firmly stuck to the magnets. Believe me, the task is not easy.
At the last stage we move on to decorative finishing designs. Here the neighbor's wife said that she could handle it herself and we went to drink beer. But in principle, laminated chipboard does not require any additional processing. If, of course, you did everything carefully.
Cabinets made of other materials
I understand that not everyone will use laminated chipboard to make a cabinet (as was the case in my case). Therefore, since today I have good mood, I'll tell you some tips from own experience on how to make a cabinet from plasterboard, wood and plywood.
Plasterboard sheets
I warn you right away, you need to take waterproof drywall. It differs from the regular one in green cardboard (the regular one is gray). In this case, I don’t recommend making a door at all. GCRs are perfect if you want to make the shelves completely open or cover them with blinds.

The design process is easier to describe here, but in terms of labor intensity it is much more complicated. Therefore, before you start, you should weigh the pros and cons.
Be that as it may, here is a diagram:
- To begin with, a frame is constructed from a galvanized profile or wood. You can choose the dimensions and height of the shelves as you wish. I would suggest making them tall enough to fit household bottles. detergents. Otherwise, your significant other won’t thank you for such a locker.
- After this, the frame is covered with plasterboard. First you need to cut the plasterboard into suitable elements (a jigsaw is perfect for this), then secure them to the supporting elements with self-tapping screws (use a screwdriver).
If you don't have a jigsaw, you can cut the sheets of drywall with a knife. To do this, they are cut on the side where the cardboard is glued, after which they simply break off.
- To make everything beautiful, the heads of the screws need to be puttied. To make it absolutely beautiful, it is recommended to do this several times, allowing the applied mass to dry completely each time.
- The next stage is sanding. It is not sandpaper that is used, but a special mesh, with which you can easily get rid of unevenness. Then I always wipe all the shelves from dust and cover them with primer. It makes subsequent finishing work easier, so don't skip this step.
- Then you need to seal the seams. You've probably read that serpyanka is used for this. However, I suggest taking fiberglass (it is sold in special rolls) and gluing it with PVA. This way you can save time on further processing.
- As soon as the seams are dry, they only need to be lightly puttied, applying a very thin layer of putty. It dries quickly and requires almost no sanding (like I said, to save time).
Having made the base of the cabinet in this way, you can begin decorative finishing. Unlike a cabinet with laminated chipboard, you will have to work hard here. I personally know several options:
- Tile. The difficulty here is that it needs to be very carefully cut into parts the right size. After this, glue it with special glue and fill the seams with grout. desired color(the store is full of different options).
- Water-based paint. Easy and fast option. You just need to check that it has a hydrophobic effect. I advise you to use “rubber” paint. I think you will like the result.

If you do not have enough experience in laying tiles, it is advisable to insert plastic corners. It will turn out aesthetically pleasing and neat.
Plywood

This material is not much different from laminated chipboard, except in appearance. Therefore, I will only tell you about a few points that are important in my personal opinion:
- Use FC plywood. Despite the fact that FSF is more moisture resistant, the glue used to glue the veneer layers together contains a lot of formaldehyde, so it will stink in the toilet and is harmful to health.
- If the shelf length is more than 50 cm, I recommend strengthening them. You can also use a U-shaped profile or cut parts 20-30 mm wide from plywood, and then strengthen them along the shelves, placing them vertically. You will get stiffening ribs.
- You can cut plywood yourself, but not with a jigsaw, but with a circular saw. Otherwise, chips will form at the ends, which will spoil the entire appearance closet They are very difficult to disguise with decorative trim.
- When marking the plywood before cutting, try to keep the grain along the long edge. This will add rigidity to the structures. In addition, cutting pieces of plywood along the grain is easier; chipping can be avoided in most cases.
- I always fastened thick plywood sheets together with self-tapping screws, without any corners. And the cabinets are still standing. The only thing is that you need to recess the cap deep into the plywood so that it does not stick out above the surface.
- I would not paint plywood, especially high-quality ones. It is better to sand the cabinet with sandpaper and cover it with several layers of alkyd-urethane varnish. Moreover, after applying the first one, it is advisable to sand everything again so that the cabinet is not rough to the touch.
Wood

Natural wood, unlike glued materials, is a more durable and beautiful material. And after varnishing, you will be sorry that you built such beauty in the toilet, and not in the living room or bedroom. However, the price for the boards will be high. So make your own decision.
The parts need to be fastened not with screws, but with dowels attached to glue. In this case, the result will exceed all your expectations.
Conclusion
As you can see, making a toilet cabinet with your own hands is not that difficult. The main thing is to stock up on everything you need: beer, roach and a few other items. And then you won’t have to blush for the result. If interested, watch the video in this article, which explains a lot useful information concerning apartment renovation and furniture design.
August 1, 2016If you want to express gratitude, add a clarification or objection, or ask the author something - add a comment or say thank you!
August 3, 2016Specialization: professional in the field of construction and repair (full cycle of finishing works, both internal and external, from sewerage to electrical and finishing works), installation of window structures. Hobbies: see the column "SPECIALIZATION AND SKILLS"
A toilet with a cabinet behind the toilet is not just a bathroom, but a type of storage room: of course, you can’t hide large items here, but for storage household chemicals, small tools and not the most necessary utensils, the shelves will fit almost perfectly.
The obvious advantage of this solution is the fact that you can make a cabinet yourself, using not the most expensive materials and tools that almost every craftsman has. How to do this, and what the cabinet could be like, I will tell you in this article.
Types of cabinets
By optimizing free space (this is especially true in small apartments), we often try to adapt unused areas for storing various small items. One such area is back wall bathroom: if there is no boiler on it, then it is usually empty.
One of optimal options The use of this wall will be to install a small cabinet there. In principle, this is quite justified: it is still almost impossible to place the toilet close to the load-bearing surface, which means that due to the tank we have a “dead zone” with a depth of about 30–40 cm. This is just enough so that the rack or cabinet does not fit our needs. interfered.

Analyzing the design options for such cabinets, I came to the conclusion that almost all projects can be reduced to two varieties:
- Mounted module. This option is preferable if you do not plan to do carpentry work. You just need to buy or order a design according to the size of the bathroom, and then hang it on two anchors driven into the wall. The limiting factor here is the strength of the wall: in some houses the partition between the toilets of neighboring apartments is not very thick, so hanging a heavy structure made of chipboard/MDF will be problematic.

- Built-in wardrobe. Since the price of a mounted product can be quite high, many craftsmen prefer not to overpay, but to make the facades themselves. This approach allows us to significantly save on materials: by and large, we will only need shelves and doors, since the niche itself can perfectly cope with the role of side and rear walls.

When planning the reconstruction of the bathroom in my apartment, I proceeded from approximately the same considerations. Looking ahead, I will say that the built-in wardrobe turned out to be quite reliable and functional, so below I will share the recipe for making it.
Manufacturing technology
Design diagram: step 1
The manufacture of a built-in toilet cabinet begins with design. Of course, this product is quite simple, but still its contours need to be sketched out on paper, at least schematically, with approximate dimensions.

In my case, the product looked like this:
- The basis was a frame made of wooden beam 30x30 mm. From these parts the front frame was made, onto which the façade parts were attached.
- The shelves rested on cross bars fixed to the walls. I made them solid, but in principle, this design can be abandoned either in favor of small wooden blocks or in favor of metal corners.
- For long shelves, it is better to make longitudinal guides, as in the image below.

The standard height of the shelves is from 25 to 35 cm, but you can deviate from these values. For example, I made the distance between the last shelf and the ceiling equal to 55 cm, and this turned out to be very convenient for storing large items.
- The front part of the bottom was attached to bottom beam frame, the back - to the support bar fixed to the wall of the toilet. I did not close the structure from above, since I made the cabinet adjacent to the ceiling.
- The depth of the cabinet was 35 cm: I selected it in such a way that the closed doors did not interfere with the person sitting on the toilet.
- Both the front and the shelves were made of 16 mm thick laminated chipboard.
- Standard furniture hinges were used to secure the façade.

It should be noted that this design is not the only possible one. You can experiment with options: the main thing is that the frame is reliable enough and firmly fixed to the walls of the bathroom.
Basic materials and tools: step 2

As I noted earlier, for the work I chose the most affordable materials. The cabinet turned out to be quite cheap, so in the table below I will give the approximate cost of the raw materials used:

As for the tools, the set included the following items:
- hammer drill with concrete drill;
- drill;
- Forstner drill for fastening furniture hinges;
- screwdriver with magnetic bit;
- wood hacksaw;
- level;
- roulette;
- plumb line;
- hammer;
- screwdrivers (flat and Phillips).

In principle, to speed up the work, you can only add a circular or reciprocating saw to the kit, but you have to cut quite a bit, so I managed to handle the hacksaw quite quickly.
Making blanks: step 3

In this section, I will show you how to make all the parts needed to assemble a built-in closet in a toilet. There won’t be many labor-intensive operations here, but they are still present:
- Let's start with the simplest thing - making frame elements. First, we measure the height of our cabinet (the lower edge is approximately 25 cm from the lid, the upper edge is under the ceiling), and from a wooden beam we cut out two blanks for the side parts of the front frame.

- Next, we measure the width of the niche in which the cabinet will be located, and cut out three fragments of the block - the top and bottom of the front frame plus the rear support bar to which the bottom will be attached.
- We select the appropriate depth of the shelves and, in accordance with this size, cut out several pairs of support bars. The lower pair will be intended for attaching the bottom.
- We carefully sand all the parts, after which we impregnate them with either stain or a moisture-proof composition with antiseptic components - this way we will be sure that high humidity the bathroom will not cause wood rotting.

- The next stage is the production of facades. It is necessary to cut two rectangles from a sheet of laminated chipboard, the dimensions of which will correspond to the dimensions of the cabinet. Naturally, we make small gaps on the sides that will allow the doors to open without clinging to the walls.
I ordered chipboard cutting right upon purchase, so I didn’t have to worry about cutting it. It's really perfect option: yes, you will have to overpay a little, but the parts will be a) even, b) without chips in the lamination and c) exactly in size.
- We subject the cut facades to edging: we glue edging tape to the ends of the panels, heating it with an iron. At the same time, the glue melts, and the material reliably covers the cut of the panel, giving it a more aesthetic appearance and protecting it from moisture penetration into the thickness of the chipboard.

- We use the same principle to make shelves, only we make a cut at the corners so that they fit snugly against the front frame. We leave the bottom panel without selection. It may also be necessary to make holes in the shelves through which a riser or other pipes will pass.
Now that we have all the details ready, we will begin installing the cabinet indoors.
Cabinet assembly: step 5
It is better to install the frame for the structure before repairs - this way we will not have to take care of the tiles or other finishes when drilling. But the facades should be hung at the very end, after tiling the bathroom, otherwise there is a risk of staining or damaging them.
The installation instructions require the following sequence of actions:
- First, we attach the frame elements to the walls. To do this, we press each beam against the wall, level it and use a drill and a wood drill to make holes in it. Using a pencil or awl, we mark points for nests in the wall through the holes.
- Using a hammer drill, we drill holes in the concrete at the designated points. The optimal depth is about 60 mm, diameter is 6-8 mm.
- We hammer a plastic dowel into each nest. We apply the beam and fix it through pre- drilled hole locking screw.
- After completing the assembly of the frame, we place it on the side guide shelves. They can be left without fasteners, or they can be fixed with two or three screws on each side.

- We attach a panel to the bottom of the frame, which we fasten with self-tapping screws around the perimeter.
- In the facades we use a Forstner drill round holes for installing hinges. We install the hinges in the grooves and fix them with self-tapping screws. We attach the mating parts of the hinges to the side posts of the front frame.

- We install small handles on the front part of the facades.
- We hang the facades by inserting hinges into the mating parts and adjusting them by rotating the fastening screws.
- To make the cabinet look as attractive as possible, fragments of wooden beams protruding beyond the edge of the facades can be covered with vinyl film in the color of the lamination of the doors themselves.

Conclusion
Make simple shelves in the toilet behind the toilet with your own hands, and even make a full-fledged closet with doors - the so-called secret room- a task quite feasible even for a beginner in carpentry. Still, you should take it on only after studying the tips above and watching the video in this article.
If you still have questions, feel free to ask them in the comments, and I will be happy to provide you with the necessary advice or suggest how best to cope with this or that task.
August 3, 2016If you want to express gratitude, add a clarification or objection, or ask the author something - add a comment or say thank you!