Installing suspended ceilings is not a very complicated process if you have instructions on how to install suspended ceilings. Stretch ceilings are a modern design of the ceiling surface, characterized by a variety of options. They represent a specific design, including sheets of fabric or polyvinyl chloride. Having many advantages, such ceiling coverings are increasingly used in interior design.
In order to save money, many people want to independently master the technology of installing suspended ceilings. At first glance, the process seems labor-intensive, with a lot of nuances. In fact, if you know all the main points, it will not be difficult to install suspended ceilings in an apartment with your own hands.
Stretch ceilings as a ceiling surface finish are very popular due to the following advantages:
- Beautiful appearance.

- Wide selection of color shades and textures. Using the method of photo printing on canvas allows you to solve the most complex design ideas.

- They do not require preliminary preparation of the surface of the rough ceiling.

- They are much easier to install than suspended structures. At the same time, there is no dust or dirt left after work.

- Polyvinyl chloride film is capable of holding large volumes of water, which will help out when the neighbors above lose their vigilance and forget to close the taps.

- Such coatings are not afraid of moisture, so they are suitable for installation in any type of premises.


- Long service life (about 20 years).
How to install suspended ceilings: mounting options
The time to install a stretch ceiling depends on the type of coating and the chosen method of fastening:
- Harpoon - used for installing ceilings made of PVC film. Hooks are welded along the edges of the canvases, similar in appearance to harpoons. During installation of the canvas, these hooks are inserted into a baguette attached to the wall, which holds the main load while the canvas is tensioned.

- The clip type provides for fastening fabric ceilings. Clips are installed along the edges of the canvases, which secure the fabric to the baguette.

- Beading is an alternative to the harpoon method. However, the products included in the design are of lower quality. Due to this, over time, the fastenings weaken and the ceiling begins to sag.

How to install a suspended ceiling: features of tensioning the canvases
The stretch ceiling structure is presented as a kit, which includes fastening elements and the main fabric. The structure must be placed around the perimeter of the room, then material is attached to it, which is subsequently stretched, creating a perfectly flat and smooth surface.
Stretch ceilings are divided into two types:


But the fabric can be painted in any shade and a pattern can be applied. Also, such materials breathe well and are environmentally friendly.
Important! The production of suspended ceilings is carried out based on the client’s order after taking measurements of a specific room.
Installation of canvases on the frame is carried out in one of two options:
- Hot method. Designed for PVC film and involves the use of a heat gun, which heats the coating to the required temperature. The film stretches as it cools.
- Fabric coverings are installed using the cold method. They are attached to baguettes and stretched, after which the seams are decorated with ceiling plinths.
How to install suspended ceilings: measurements
Before installing ceilings, it is necessary to take measurements of the room and order canvases and materials.

The room must be measured in the following ways:
- For a square or rectangular room, measure the lengths of the sides and one diagonal (from corner to corner).
- A polygonal room with a complex structure requires measuring all walls and diagonals from one corner to other corners, both internal and external.
Accurate calculations will not only save financial resources on paying for the ceiling covering, but will also be the key to the durability of future ceilings.
How to install a suspended ceiling correctly: features of the technological process
The installation of a suspended ceiling begins with the installation of a baguette (profile) that holds the entire structure. This stage is considered to be the most important, since it is this stage that ensures the reliability and durability of the future ceiling.

Installation of the profile when installing suspended ceilings includes the following sequence of steps:
- Using a hydraulic level, mark points along the perimeter at a distance of at least 3 cm from the ceiling surface. To do this, you need to determine the lowest corner of the room and take it as a basis. If it is intended to install large-sized lighting fixtures, the distance between the rough ceiling and the canvas is increased to the required level.
- Using upholstery cord, horizontal lines are drawn along the marked points along the entire perimeter of the room.
- The mounted baguette must first be fixed in the most “unruly” and inconvenient corner of the room. In this case, joining profile elements in the corners is prohibited, since the sharp corners of the material will easily tear the stretched film or fabric. To avoid this, in the corners of the room, the baguette is sawed down along the back wall, leaving the front intact. Next, the profile is bent along the cut area. The profiles are attached to the wall with self-tapping screws at intervals of 20 cm. In loose walls, the self-tapping screws are screwed at a distance of at least 8 cm from each other.
- After installing the first plank, move on to the second. It is fixed to the wall close to the previous one, and the joint must be aligned on a horizontal plane. This is done until the entire perimeter of the ceiling is surrounded by baguette.
- To soften the sharp edges of the profile, they must be covered with masking tape.
2. Installation of canvases on the frame

Before attaching the canvas, you need to make sure that there is no peeling of the plaster on the rough surface. Otherwise, the falling parts of the old finish may damage the canvas or create additional load on it, causing the stretch ceiling to sag.
Also at this stage it is necessary to install electrical wiring underneath and check the operation of the electrical system.
- PVC sheets are attached to installed baguettes using a heat gun. The room is first heated to 40 degrees, which gives the film elasticity and pliability in operation. Then the film is unrolled, hooks (harpoons) or clips are welded to the sides of the canvas, and fixed to baguettes in the corners of the room, heating the canvas to a temperature of 60 degrees.
Installation of the canvas begins from the base angle. Typically, manufacturers put a corresponding mark on the film, which is the first attachment point.

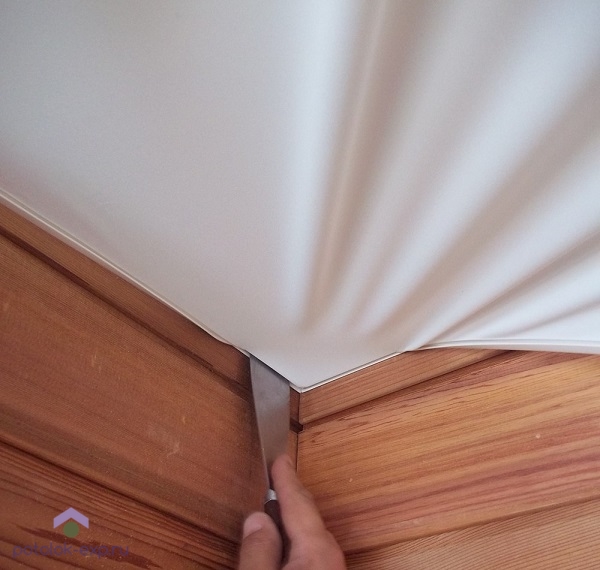
Installing suspended ceilings using the harpoon method, it is necessary to drive the harpoons with the corresponding grooves into the profile holes using a spatula until they click. You need to move from the corner to the middle of the room, constantly heating the film to maintain a temperature of 60 degrees.
With another fastening method, the canvas must exceed the size of the ceiling surface, but the sequence of its tension does not change. The main difference is in the fastening elements (harpoon, clip or glazing bead).
After installation, it is necessary to trim off the excess parts of the canvas. As the film cools, it shrinks, stretching and becoming perfectly flat and smooth.

- Installation of fabric stretch ceilings does not require preheating. According to the method of fastening, the installation of such a ceiling is somewhat different from. First, it is necessary to fix the canvas in the middle of the supporting profile, while parts of it 5-7 cm long remain as a reserve at the edges. Therefore, fabric fabric must be purchased to install a ceiling larger than the surface.
Important! Fabric coverings are inserted into the corners at the very end of the process, unlike PVC sheets.
The folds are straightened with a hair dryer. To do this, the jammed areas need to be warmed with rotating circular movements. The temperature should not exceed 200 degrees, and the distance between the coating and the hair dryer should be 20 cm.
Upon completion of the installation work, the excess edges are trimmed and the plugs are fixed.
After the installation of suspended ceilings is completed, they proceed to the installation of lighting fixtures.
Installers mainly use two fastening methods - harpoon and clip. They provide the possibility of subsequent, in contrast to the glazing bead method.
Installation of stretch ceiling. Detailed video instructions
Once upon a time, installing a suspended ceiling was considered solely as a way to hide a hopelessly uneven permanent ceiling. But by now they have learned how to make these structures so impressive that they are often installed even with the slabs lying absolutely flat. Let's see what kind of ceilings there are and how to install them correctly with your own hands.
Types of suspended ceilings
Stretch ceilings can be classified according to several criteria.
According to the material of the panel
There are two varieties:
- PVC film;
- textile.
Polyvinyl chloride (PVC) film
It has a smooth surface that can be matte, glossy or satin. The latter, just like the glossy one, has a reflective surface. But the reflection turns out soft and blurry.
The color of PVC film can be almost any, including pearlescent and chrome-like. It is possible to apply images using photo printing. In addition, the canvas can be made translucent.
The surface of the PVC film can be matte, glossy or satin
In addition to the variety of colors, the following advantages can be noted:
- low cost;
- the ability to wash away dirt;
- waterproof (if flooded from above, the canvas will stretch and hold water);
- there is an antifungal coating;
- The “harpoon” fastening method is used, which is characterized by high reliability.
However, it must be taken into account that PVC films:
- cannot be installed in unheated rooms (they crack at subzero temperatures);
- easily damaged by sharp objects;
- do not have soundproofing properties;
- can attract dust due to electrification;
- serve only 12 years.
Polyester or polyester fabric impregnated with polyurethane
To impart moisture resistance, the canvas is additionally treated with varnish. The fabric ceiling is rough and resembles very high-quality plaster. The surface can imitate satin, suede; Also popular are two-layer fabric ceilings, which are made by laying embossed fabric on a mesh base. It is possible to apply images using photo printing.
The fabric panel can imitate suede or satin. Any image can be easily applied to its surface using photo printing
In terms of design diversity, a fabric ceiling is inferior to its PVC counterpart, but it has its own advantages:
- can be painted with acrylic paint (4 layers are allowed);
- gives the impression of expensive material;
- contributes more to creating a cozy home environment (PVC film has an unnatural cold shine);
- considered a fireproof material (treated with impregnations that prevent fire);
- has a service life of 20–25 years;
- has high strength (not so afraid of sharp objects);
- does not electrify and therefore does not attract dust;
- easily tolerates low temperatures down to -40 0 C;
- installation does not require heating of the canvas or the room;
- has higher sound insulation properties compared to PVC.
This type of fabric cannot be washed, so it is not recommended to install it, for example, in the kitchen. It is also not suitable for rooms with high humidity, as it allows steam to pass through (mold will grow on the main ceiling due to dampness). When flooded, the fabric ceiling will not hold water - it will seep through it. If the impact of water is too strong, such a canvas may break from the fastening due to low elasticity.
Fabric ceilings are best suited for rooms with expensive interiors.
By type of canvas
Two options are also available:
One-piece (seamless)
These are usually fabric ceilings, since a roll of this material can reach 5.0 m in width. From wide-format rolls, you can cut out a blank for a ceiling of any configuration - as long as one of its sides is no larger than the width of the roll. Stretch ceiling structures that do not have a seam can be installed within 4–5 hours.
Using a wide panel, the ceiling can be made perfectly flat, regardless of the condition of its base
Installing a seamless ceiling does not require the use of a heat gun.
But ceiling systems of this type have a significant drawback: at the slightest damage to the canvas, it has to be completely replaced.
Wide PVC films are now also produced, but the transverse size of such a panel is only 4.5 m.
Composite (there are seams in the design)
Usually, PVC sheets have to be made into composite sheets, since the film is mainly supplied in narrow rolls - up to 130 cm. The seam connecting the strips of film to each other is carried out using a high-frequency welding machine. The connection line must be strong, since large loads are applied to it, and at the same time invisible. The process of obtaining a seam with such characteristics is complex; it is better not to undertake such work without experience.
The equipment is equipped with a set of electrodes for the blade and harpoon
Designers have long turned the problem of narrow panels into an advantage, practicing multi-colored ceilings when zoning a room or to create an unusual atmosphere in it.
Seams are most noticeable on glossy materials. The more lamps on the ceiling, the more striking the joints of the stripes are. Seams on matte and satin surfaces are almost invisible.
The thickness of the seam is directly proportional to the thickness of the base material
You can mask the joint lines by placing them perpendicular to the windows. And the chandeliers are placed at the same distance from the seams.
By design
Several types of stretch ceilings are used:
- Regular single level. The most ingenuous option is when a single fragment of canvas is stretched under the ceiling.
Despite its simplicity, a stretch ceiling located in one plane gives the room elegant restraint.
- Multi-level. The ceiling is divided into several sections, each of which is at a different height. This design looks very interesting, especially if you choose the right lighting.
A multi-level stretch ceiling will reliably disguise large unevenness in the ceiling and give the room originality
- 3D ceiling. It works something like this: a canvas is stretched, say, with an image of a cloudy sky, under it is a transparent canvas with an image of a flying bird. We get a three-dimensional picture that makes an unforgettable impression on the viewer.
The effect of a three-dimensional image is achieved by installing a two-layer stretch ceiling, the lower of which is made of transparent material. The main image is applied to it - a bird, a butterfly, a flower, etc.
- Starry sky ceiling. Many LEDs or light guides are installed behind the canvas, “distributing” light from the lamp. We get the illusion of stars overhead, which, if LEDs are used, also twinkle.
The “starry sky” ceiling is appropriate in the bedroom
Photo gallery: stretch ceiling options
Calculation of the quantity of canvas and components
To make the calculation, it is necessary to measure the room with great accuracy (the maximum permissible error is 5 mm), which is a prerequisite for the correct preparation of the baguette slats. Their total length will be equal to the perimeter of the room, that is, the sum of the lengths of all its sides: P = a + b + c + d.
Opposite sides are not always equal in length, since the room may have a plan shape other than an ideal rectangle. Therefore, when taking measurements, you need to determine the length of each of the 4 sides.
For a round ceiling, the perimeter is determined by the formula P = π x D, where π = 3.14; D is the diameter of the room.
In addition to the main baguette, which is attached around the perimeter, you may need a so-called separation profile. It is used if the length of the room exceeds 8 m. With such dimensions, it is impossible to avoid sagging of the canvas, so the ceiling is divided into two parts with a separation profile. Usually its length is equal to the width of the room.
The area of the canvas in the simplest case, when the room is strictly rectangular, is determined by the formula S = a x b, where a and b are the lengths of adjacent walls. But the fact is that the conditions, as already mentioned, are not always so ideal. Here is an example of a room that, due to the curvature of the walls, actually received a pentagonal shape.
The total area of the stretch ceiling is determined as the sum of the simplest polygons
In such cases, the floor plan is drawn to scale and divided into simple shapes, in this example into a triangle and a square. The area of a square is determined by the product of the lengths of the sides, and of a triangle - by the formula S = √(р x (р - a) x (р - b) x (р - с)), where the letters a, b and c indicate the lengths of the sides, and the letter P - semi-perimeter (P = 0.5 x (a + b + c)).
If this triangle were rectangular, that is, its two sides intersected at an angle of 90 degrees, then the area would be calculated using the simpler formula S = (a x b)/2, where a and b are the lengths of the sides intersecting at right angles.
For a round ceiling or an element on a two-level ceiling, the area of the canvas is calculated using the formula S = 0.25 x (π x D 2).
In the case of using glazing bead or cam fastening, the dimensions of the blade must be taken with some margin.
In addition to the profiles and the canvas, you need to purchase dowels with which the profiles will be attached to the wall. The fastening pitch is usually 8 cm, that is, to determine the number of dowels, the perimeter of the room, taken in meters, must be divided by 0.08. For a reserve, you need to add 7% to the resulting value.
Tools
To install a stretch ceiling, the installer will need:
- water level (two glass tubes connected by a hose);
- dyeing cord;
- a drill with an impact mechanism or a hammer drill;
- screwdriver or screwdriver;
- folding protractor;
- heat gun (for PVC ceiling);
- assembly spatula (can be replaced with a spatula);
- marker.
The following tools are used for dismantling:
- spatula: in order not to damage the canvas, you need to grind off the sharp corners with an abrasive tool, and then wrap the working part with reinforced tape;
- pliers with extended jaws: burrs, if any, need to be cleaned and polished so that the working surfaces are smooth;
- mechanic's knife;
- screwdriver with a curved tip;
- heat gun (for dismantling PVC ceiling);
- stepladder or sturdy table.
Methods of fastening the canvas
All suspended ceilings, regardless of their type, are attached to a special profile (baguette), which is installed around the perimeter of the room. But the methods of fixing the canvas on a baguette are different:
Harpoon
Only PVC ceilings are attached using this method. A soft profile with a protrusion is welded onto the edge of the canvas. If you look at the bar in cross-section, then thanks to this protrusion it will resemble a harpoon, which is why this type of fastening received its name. Being inserted into the baguette, the bar clings to it with its protrusion and thus holds the stretched canvas.
Diagram of a harpoon fastening device for a stretch ceiling sheet
The harpoon method of fastening is the most reliable.
Beading
To fasten a stretch ceiling using glazing beads, a U-shaped baguette is used. First, the edge of the canvas is inserted into it (for this it must have some reserve), and then a narrow strip is driven in - a glazing bead. After stretching, the excess canvas is cut off, after which the baguette is closed at the bottom with a decorative cap or ribbon.
The glazing bead method is usually used for installing fabric ceilings, the material of which does not allow welding of a harpoon profile. But it can also be used to install PVC panels.
The bead method of fastening a stretch ceiling is used for materials to which it is impossible to weld harpoons
The advantages of the method are:
- low cost (the cheapest method of all);
- the ability to get by with a minimum distance from the main ceiling: usually 1.5–2 cm is enough;
- quick installation;
- when measuring a room, high accuracy is not required;
- a minimal set of tools is used.
The disadvantages are the following:
- when dismantling, part of the canvas has to be cut off;
- the method is not suitable for creating multi-level or combined ceilings;
- in some situations it is not possible to stretch the canvas evenly, which is why it may sag over time.
Cam
In this case, a baguette of a special design is used - a cam, in which there is a movable spring-loaded element. The folded edge of the film is tucked with a special spatula or spatula into the gap between the fixed and movable elements. In this case, the latter bends easily.
You can tuck the canvas into the clip using a spatula or a special spatula
When the film, under the influence of tension forces, tends to break out of the cam, it acts on the protrusion of the moving part and it is pressed against the stationary one, blocking the film. The cam is therefore a self-clamping gripper. In everyday life it is also called “clothespin”.
Step-by-step instructions for DIY installation
The set of operations for installing suspended ceilings is divided into:
- preparatory;
- basic.
Preparatory stage
By the time installation begins, the following work must be completed:
- laying lighting wires under the ceiling;
- leveling the walls (special attention should be paid to the upper part where the stretch ceiling molding will be attached);
- wall decoration, while the facing material must be secured sufficiently firmly;
- garbage collection;
- if a PVC ceiling is installed, remove wooden furniture and plastic items from the room, protect the frames of PVC windows with thermal insulation made of fabric folded in several layers (all these items can be damaged when the room heats up).
Installation of PVC ceiling
Operations are performed in the following sequence:
- Determine the lowest angle of the ceiling. To do this, using a water level, you need to mark marks in the corners of the room that lie in the same horizontal plane. Next, measure the distance from each notch to the corner of the ceiling located above it. The angle closest to the corresponding mark is the lowest.
- Having retreated 2-3 cm from the lowest corner, which is necessary for the convenience of attaching the profiles, put a mark with a marker, after which, using a water level at the same height, make marks in other corners and along the walls.
For greater marking accuracy, it is advisable to use a laser level
- Using a folding protractor, measure the angle at which each pair of adjacent walls intersects. This is necessary in order to trim the profiles correctly.
- The ends of the profiles are cut at an angle equal to half the angle between the walls, after which they are screwed with dowels to the walls along the marks made using a water level.
All trimmed profiles are processed with a file to remove burrs. This operation will help maintain the integrity of the panel
- Wooden blocks are screwed to the main ceiling for mounting chandeliers and other lighting sources. The thickness of the bars is selected so that their lower surface touches the canvas once it is installed. In the same way - through wooden blocks - all other elements provided for by the design of the room are attached to the main ceiling.
- Lay lighting wires to the location of the lamps.
- The room is heated using a heat gun to a temperature of +60 0 C. Under such conditions, the PVC film will become plastic and can be stretched greatly.
The air temperature in the room when installing a stretch ceiling should be 60 degrees
- Unroll the PVC sheet and begin installation. The corner that needs to be fastened first is marked. Having fixed it in the baguette using a harpoon or bead, the opposite corner is fastened in the same way, and then the remaining two.
The panel is fixed at opposite corners, and then attached around the perimeter in the direction from the corners to the middle of the side
- Fasten the sides of the panel, moving from the corners to the middle.
- At the bottom of the baguettes, plugs or special tapes are installed to hide the place where the canvas is attached.
- Now you need to wait for the room to cool down. When the film cools down with it, it will stretch tightly and the stretch ceiling will become perfectly flat. After this, in the places where the lamps are supposed to be installed, special rings are glued to the canvas. Once the glue has set, you can cut a hole inside the ring.
The installation of the stretch ceiling is complete.
Video: installation of a stretch ceiling - what you need to know
Installation of fabric ceiling
To install the textile panel, heating, as already mentioned, is not required. After installing the baguettes (carried out according to the same scheme as for the PVC ceiling), proceed as follows:
- Using a spatula or spatula, the edge of the canvas is inserted into the baguette on the short side of the room.
- The canvas is secured with temporary fasteners every 50–70 cm, while the outermost ones should be located at least 30 cm from the corners.
- Fasten the canvas on the opposite side, stretching it at the same time. You need to move from the middle of the wall to the corners.
- Sequentially fix the canvas on the long sides of the room.
- If there are folds, they need to be warmed up with a regular hairdryer - synthetic fabric shrinks when heated.
- The excess edges of the canvas sticking out from the baguettes are cut off.
There is no need to completely cut off the excess fabric - you should leave a couple of centimeters. If you happen to remove the canvas and then reinstall it, it will be impossible to tighten it without such a reserve.
Finally, rings are glued to the canvas and holes for the lamps are cut.
Video: installation of fabric stretch ceiling (single-level)
Rules of care
If during operation the PVC stretch ceiling has become heavily covered with dirt, it can be washed using a special detergent. The sponge should be soft, but it is not allowed to press hard on the surface. The use of abrasive detergents is also unacceptable.
A slightly dirty surface can be simply wiped with a damp cloth, also being extremely gentle.
If the surface of the canvas is glossy, it should be periodically wiped with glass washing liquid or polish - these compounds restore shine. A similar effect is produced by treatment with a solution of ammonia.
If possible, clean the fabric ceiling using the dry method - with a soft brush or a special vacuum cleaner designed for delicate cleaning. Wet cleaning is used only as a last resort; in this case, you need to use mild detergents and try not to rub the same place for a long time.
How to remove a suspended ceiling yourself
If it is necessary to replace the communications located behind the suspended ceiling or if the baguette is damaged, as well as to dry the ceiling space after flooding from above, the structure must be removed. This must be done correctly, otherwise you can damage the canvas, so all that remains is to throw it away. We will consider the technology of dismantling, as well as installation, separately for PVC and fabric ceilings.
Dismantling PVC ceiling
The harpoon fastening, which in most cases is used to fasten PVC ceilings, allows for dismantling quite easily. Here's what to do:
- As before installation, plastic and wooden objects that could be damaged by heat should be removed from the room. If PVC windows are installed, the frames should be covered with improvised thermal insulation made of fabric rolled up in several layers.
- Then you need to heat the room with a heat gun to a temperature of +60 0 C.
- Dismantling the canvas should begin from the corner. The decorative plug is removed, after which you need to grab the harpoon profile with pliers with long jaws and pull it out.
- Next, you need to put the pliers aside and continue removing the canvas from the baguette by hand. When touched, heated PVC film may leave marks, so you should work with gloves.
The canvas on the other sides is disconnected in the same way, each time moving from the corner to the middle of the wall.
You cannot grab the canvas with pliers - only the harpoon profile: if you grab the film, you risk tearing it.
Removing the fabric ceiling
The bead fastening, by which the fabric sheet is often fixed, is generally considered disposable: dismantling and subsequent installation is not provided. Indeed, removing the glazing bead without damaging either it or the canvas, so as to maintain the possibility of reuse, is quite a difficult task. If such a need arises, it is better to contact an experienced technician. The process of disassembling the mount looks like this:
- In the middle of either side, the spatula is very carefully and carefully driven into the gap between the bead and the profile, after which the profile shelf is slightly bent. Thanks to this, the force with which the glazing bead is held will decrease.
- The bead is removed using a screwdriver with a curved end. It must be blunt, otherwise the baguette or canvas is likely to be damaged.
- In the same way, the bead is then removed, moving from the middle of the wall to the corner.
The cam mounting is much easier to disassemble. To do this, just insert a spatula into the cam and press the moving part with it. In this case, the blade will slip out of the self-clamping grip.
Video: how to remove a suspended ceiling with your own hands
A stretch ceiling is a very effective solution from a design point of view, but the process of its installation, as has been shown, has a number of features. The canvas is quite expensive, so if you lack experience, it is better to turn to specialists. If you still decide to install the ceiling yourself, carefully re-read all the recommendations again and act as carefully as possible.
– an excellent finishing option for any kitchen, because this cladding is practical, durable and aesthetically pleasing. And it is natural that everyone who makes a choice in its favor is interested in the question - how to install the ceiling with your own hands? And is this even real? The answer is clear - yes, the tension fabric can be installed without the help of professionals. The main thing is to know the technology and understand all stages of work. Next, we invite you to learn about these rules, as well as watch the accompanying photos and videos of the installation, which will greatly facilitate your task of transforming the kitchen.
Installation tools
To install a stretch ceiling in the kitchen you will need the following tools:
- heat gun;
- building level;
- perforator;
- gas cylinder for a gun;
- ladder;
- screws and dowels;
- Screwdriver Set;
- hammer
- locking locks;
- a knife with a set of blades of different formats;
- spatula

After preparing the necessary tools, proceed to selecting materials. First, calculate the area and perimeter of the kitchen ceiling, and then go buy baguettes, ceiling canvas and soundproofing materials.
Baguettes are plastic or aluminum strips that together form a fixing profile. If you want the ceiling in your kitchen to delight you with its functionality for as long as possible, do not skimp and choose an aluminum profile - it is stronger and more reliable than a plastic one.
The ceiling canvas is a fabric or vinyl material that will be stretched over the profile. Vinyl is better suited for the kitchen, as it is more practical.
Soundproofing materials are mineral wool or slabs that will protect you from noise from the neighboring upper apartment. It should be noted that sound insulation is only a matter of comfort, since even without it the ceilings will successfully cope with their immediate functions.
Preparatory work
The second stage of arranging a suspended ceiling in the kitchen is the roughing procedure. First you need to clear the room of furniture and equipment that will not withstand the effects of a heat gun. Then you need to clean the ceiling of old coating and various types of dirt.
If there are tile joints, they should be filled with foam. The entire surface of the ceiling must be treated with a primer - it will protect the surface from fungus and mold. If the ceiling is too deformed, it is better to cover it with plasterboard - this way you will get a perfectly flat base for the tension fabric.
At this stage, sound and heat insulation is also installed, if necessary, and air ducts for ventilation and other communications are installed.
Advice. Decide in advance where and how the ceiling lamps will be attached - it is important to install the embedded parts for them at the stage of the roughing procedures, so that in the future there will be no problems with the installation of the lighting fixtures themselves.
Setting up a profile
The third stage is installation of baguettes. They can be installed in two ways: to the wall or to the ceiling. We recommend choosing a wall mount, since with a ceiling mount it is impossible to hide the necessary kitchen communications and wiring under the tension structure.

The installation procedure for baguettes includes the following work:
- decide on the height of the future ceiling and, using a building level, make markings on the walls around the entire perimeter of the room;
- According to the finished markings, attach the first baguette to the surface of the wall and drill holes in it for self-tapping screws;
- install the dowels into the prepared holes and secure the strip with self-tapping screws;
- install the second baguette end-to-end to the first and also secure with self-tapping screws;
- install all subsequent strips in the same way.
Advice. To ensure that the ends of the planks fit together as tightly as possible, file them in advance at a slight angle - approximately 30 degrees. And the ends of the corner baguettes need to be sawn at 45 degrees.
Ceiling panel installation
The fourth stage of work is direct tensioning of the canvas. Before starting the procedure, be sure to warm the room with a heat gun to 40°C. Further work is performed in this order:
- Unpack and straighten the material. Warm up the panel with a gun.
Attention! If you are using fabric rather than traditional PVC canvas, you cannot heat it!
- Secure the first base corner using “crocodiles” - special clips covered with soft material that prevents the canvas from deforming. Which ceiling angle is the base one is indicated in the instructions for the suspended ceiling. The kit should also come with clamps.
- Fix the second angle - opposite to the base one.
- Secure the third and fourth corners.

- Gently heat the canvas again. Remove the clamp from the base corner. Insert the spatula into the blade shell through the special groove. Begin to slowly insert the canvas into the baguette and secure it with locking locks. Insert the canvas into the profile at all other corners in the same way.
- Secure the canvas in the profile along straight sections, using the same locks and spatula.
- Unfold the canvas and check all fastenings.
- Install the lamps: in the right places where the embedded parts are prepared, carefully cut the holes and install the devices.
As you can see, installing suspended ceilings in the kitchen with your own hands is not an easy task, but absolutely doable. Stick to proven technology and do not neglect installation rules - this is the only way you can get a high-quality result that compensates for the effort, money and time spent.
Installation of a stretch ceiling: video
Do-it-yourself stretch ceiling: photo


Stretch ceiling technology was developed in Europe for interior decoration. In essence, a stretch ceiling is a thin membrane sheet stretched over a durable profile frame. The form of installation is determined by the profile, the overall appearance depends on the panel itself, which is made in any color, finish and degree of gloss.
Advantages of a stretch ceiling
Installing a stretch ceiling involves fixing a lightweight, durable film or fabric made from high-quality material in a framing structure that will hold the panel taut. Depending on the material of the panel, stretch ceilings are made of fabric or polyvinyl chloride (PVC) film.
- Plain weave fabric looks like canvas and can be made using seamless technology up to 5 meters wide. B O A larger width will require stitching of fabrics or the use of a special dividing profile. The fabric is made from polyester and treated with a special polyurethane coating. This material is lightweight - one square meter of fabric weighs from 180 to 250 grams. The thickness of this fabric is 0.35–0.44 mm.
- U PVC films many more color options, it can be matte or reflective, multi-level and include decorative lighting elements. The thickness of the film membrane reaches 320 mm, the width is less than that of fabric and reaches 2.5 meters. Wider panels are welded, forming an almost invisible joint. Often a printed image is applied to the material. A backlit ceiling can create the impression of a starry night, a stained glass window or a southern sunny sky. This cloth is modern and high-tech; it will retain a fresh, glossy look for many years.
Stretch ceilings are an environmentally friendly design with waterproof, dust-resistant, and anti-allergic properties. The material is non-flammable, easy to clean, allows for later repainting and additional installation of sound-absorbing materials.

Membrane fastening profiles are created in a variety of shapes, including rectangular, oval, curved, and three-dimensional. The profile for tensioning the membrane is usually made of rolled aluminum or PVC with a special fastening system that ensures smooth, wrinkle-free tension of the membrane. A 3D ceiling will require the installation of a specially designed curved frame. The flexibility of installing such a ceiling gives freedom to express creativity, allowing you to create an arbitrary design.
Stretch ceilings are suitable for installation in premises from living rooms to large commercial centers. Such ceilings have a thermal insulating function, forming a layer of air insulation in the ceiling space, thereby reducing the heating and cooling needs of the room. Modern technology improves indoor air by preventing dust and bacteria from settling from a plaster or concrete ceiling, which justifies the demand for such ceilings in medical institutions.
Another advantage of this design is that it improves the acoustics of the room.. After installation, the canvas can withstand significant loads without breaking - up to 100 kg per square meter. If the membrane is stretched under the influence of an external force (for example, water has accumulated from a broken pipeline), it will completely restore its shape after the external load is removed.

The characteristics of suspended ceilings compared to other types of ceilings are shown in the table. Considering the short installation time and the lack of specific installation equipment, you can install a suspended ceiling with your own hands.
Table. Comparison of suspended ceilings with other types of ceiling structures.
| Characteristic | Stretch ceiling | Paneling | Suspended ceiling | Sheathing with plasterboard | Boarding |
|---|---|---|---|---|---|
| Moisture resistance | Yes | No | No | No | Yes |
| Installation time (20 sq.m.) | 2 hours | 4 hours | 15 hours | 20 hours | 5 o'clock |
| Loss of room height | 2.5 cm | 1.5 cm | 10 cm | 5 cm | 5 cm |
| Update | Not required | 2–3 years | 3–4 years | 2–3 years | 3–4 years |
| Life time | 10 years | 3 years | 2 years | 15 years | 3–4 years |
| Possibility of multi-levels | Yes | No | No | Yes | No |
Selecting a fastening profile for PVC film
The choice of frame for tensioning PVC film is determined by its size and thickness. Several different profile types can be used.
Prices for suspended ceilings
suspended ceiling


Types of profiles for a frame for a suspended ceiling: 1 - Universal aluminum profile, 2 - Wall aluminum profile, 3 - Ceiling aluminum profile, 4 - Dividing aluminum profile
The listed types of profiles use the so-called harpoon fastening of the panel, which requires preliminary welding of the ceiling membrane with a special clamp.
When installing a stretch ceiling yourself, you will have to use other types of mounting profile with wedge or glazing bead fastening, or order welding with harpoon fastening from the PVC film manufacturer.

When choosing the size of the panel, you should also take into account that PVC film stretches up to 6% during installation. This ensures that the ceiling remains flat and does not sag.
Prices for fabric stretch ceiling
fabric stretch ceiling
To find out about all this, read. You may also be interested in material about which ceiling is better -.
Selecting a fastening profile for fabric fabric
The fabric ceiling is produced in the form of a wide-format panel, the weight and elasticity of which differ from the properties of PVC film. Therefore, to install such a ceiling, a different type of frame is needed. Most often, two types of profiles are used for fabric suspended ceilings.
- Plastic AR profile used for linear perimeter sections and provides a very thin air layer between the membrane and the ceiling slab (1 cm). This profile guarantees the stability of the panel in the event of drafts and gusts of wind. The profile is attached with the wide side to the ceiling and may have a thin plastic part on the profile on the wall side, which seals the space and prevents the accumulation of dust, moisture and bacteria.
- Plastic AM profile used if additional space is required between the membrane and the ceiling. The height of this profile is 30 mm. One of the most common uses of this profile is for additional acoustic insulation of a room using sound-absorbing materials.

The fabric fabric is prepared 10–15 cm larger than the width of the ceiling and secured in the profile grooves without a harpoon using a special plastic wedge or glazing bead. Excess fabric is carefully trimmed after installing the entire panel.
Preparing for installation
Installing a stretch ceiling does not require much effort. The only mandatory condition for preparing the premises is electrical wiring must be completed before ceiling installation begins. The location of the lamps can be marked with a marker on the floor under the corresponding lamp position on the ceiling.
Prices for a stretch ceiling kit
stretch ceiling kit

The ceiling slab, which will be located behind the membrane, does not require additional processing. Finishing work after installation is also not needed, since the ceiling does not require the use of adhesives, plaster or painting. If there is furniture in the room, it is better to remove it when installing a PVC ceiling, since the room will heat up to at least 40 degrees, which can have a bad effect on the condition of some materials.
Installation of a stretch ceiling will require the use of some construction equipment.
- A spatula or spatula for attaching the ceiling panel to the profile - several spatulas of different shapes may be needed.
- Fastening profile along the length of the perimeter of the room.
- Clamps according to the number of corners in the room for initial stretching of the panel.
- Hammer drill, screwdriver and self-tapping screws for attaching the profile to the wall or ceiling.
- Stepladder providing height access to the ceiling.
- Level, water or laser, for marking the location of the mounting profile.
- Air heater (only for PVC ceiling) - specialists installing the ceiling bring a heat gun and a gas cylinder for its operation. When installing the ceiling yourself, you can use a room heater to heat the room and a hot hair dryer to smooth out wrinkles on the canvas.
- PVC mounting rings are used to strengthen the ceiling panel around pipes, lamps and other utilities.

It is recommended to provide ventilation grilles in the stretch ceiling panel, which will provide exhaust in the interceiling space and protect this area from the accumulation of condensation and the development of mold. The location of the ventilation grille is usually chosen in an inconspicuous corner of the room.
Preparing the profile and panel
Before directly installing the ceiling, it is necessary to prepare a profile for attaching the panel.


Video - Preparing the room before installation
Installation process
As a rule, the entire installation process takes about two hours and leaves no construction waste. The essence of the installation is to tension and fix the membrane to the attached profile.

Installation of lamps
Lighting fixtures, fans and other objects hanging from the ceiling must have an independent suspension mechanism that is attached to the ceiling tile so that they do not rely on tension fabric support. A suspended ceiling is an interior design element, not a structural component.
To decorate the lamp you will need:
- PVC mounting ring;
- cyanoacrylate glue;
- sharp knife.
After installing the ceiling, you need to make holes for the lighting fixtures. If there are several lamps, it is better to make projection markings on the floor directly under the lamps in advance. Apply glue to the mounting ring and glue it to the film in place of the lamp so that the centers of the ring and the lamp coincide.
Prices for ceiling lamps
ceiling lamp

Installation of lamps in a suspended ceiling
Once the ring has set to the film, carefully cut out the film inside the ring. Adjust the height of the lamp so that it is level with the ceiling panel and screw in the lamp. Use regular lamps with a power of no more than 60 W or halogen lamps with a power of up to 35 W to avoid strong local heating and deformation of the panel in the area of the lamp.
Video - Installation of stretch ceiling
Speed of installation and minimum waste - these are the main advantages of installing tension fabrics
Stretch ceilings are a special design that includes sheets made of polyvinyl chloride or synthetic fabrics. Moreover, regardless of the material, the principle of its installation is to tension the canvas along the entire perimeter of the ceiling surface. This is in general. And if you want to learn in more detail how to properly install suspended ceilings, you will have to study all the sequential steps of this process.
But first, let's look at the advantages of this ceiling covering. How does it differ from other types of finishing?
Advantages of a stretch ceiling
There are many of them, so let's highlight the most important ones:
- Unsurpassed appearance. It is ensured thanks to the quality of the material, as well as the variety of colors and patterns. The latter are applied to the canvas using photo printing.
- Installation of the structure does not require repair of the base ceiling, which saves time and money.
- Fast installation. It will only take a couple of hours to install the tension fabric in a small standard room in an apartment.
- PVC fabric can withstand a large volume of water - up to 100 liters per square meter of area.
- Tension fabrics can be installed in any room for any purpose.
- Practicality. Such ceilings can be washed with any liquid detergents. In addition, they are environmentally friendly and have antistatic properties, so they repel dust.
By the way, the service life of suspended ceilings reaches 20 years. Now think about whether it’s worth sparing money if, after installing the canvas, your apartment will become the owner of a magnificent design. And for a long time.
Installation of tension fabrics
So, back to the question of how suspended ceilings are installed.
The installation technology for all types of canvases is the same. The only difference is that fabric materials do not need to be heated. Therefore, we will consider the most complex process, which concerns the installation of PVC sheets.

We determine the contour along which we will stretch the fabric
First of all, you need to determine the contour along which the canvas will pass. To do this you will need a laser level. You can also use a hydraulic level, but the first one is more accurate and easier to work with. Therefore, we will focus on laser.
From the surface of the base ceiling in the lowest corner of the room you need to go down a distance of at least 3 centimeters. At this point you should place a laser level, which will show light lines on the walls. This is the outline for installing a PVC ceiling.
Now along the entire perimeter, exactly along the contour, you need to attach baguettes to the walls with self-tapping screws. To do this, every 30-40 centimeters, holes are drilled in the walls with a hammer drill into which plastic dowels are inserted. These will be the installation locations for the self-tapping screws.
Blade installation diagram

Blade installation diagram
Now you need to mount the canvas itself. To do this correctly, you need to follow a clear pattern, without deviating one step from it:
- The canvas is unrolled and one of the corners is hung in any corner of the room. This can be done without securing it in a baguette, but using special clips-clothespins. They are very similar to the mouth of a crocodile, which is why experts call them “crocodiles.”
- Now all corners of the canvas are gradually hung around the perimeter.
- Then the canvas itself is attached to the baguettes, but not from the corners, but in the center of each wall. The result is a kind of tent.
- Now move on to the corners and secure the material into baguettes. And, gradually moving towards the center of the wall, insert the edges of the canvas into the baguette.
- Everything happens with constant heating of the stretch ceiling.
- The final touch is the installation of a plinth that will cover the junction of the walls and the tensile structure.
How to attach suspended ceilings
Installing a suspended ceiling correctly means properly securing it in the baguettes. There are two types of fasteners, differing from each other in different design approaches. In addition, the mounting option depends on the material from which the canvas is made.

Scheme of the harpoon method of fastening the canvas
Let’s make a reservation right away that it can only be used for installing PVC sheets. Where does this name come from? The fact is that two parts are involved in the connection:
- The first is an aluminum profile that is installed on the walls. There is a special groove in it.
- The second is a harpoon, a polymer (PVC) product that has a spike.
Fastening is carried out as follows - the canvas is fixed to the profile and a harpoon is inserted into it. It snaps into place to create a strong and secure connection.
Clip fastening method
How is it different from the first one?
- Firstly, a clip-on baguette is a single product. No additional devices.
- Secondly, it is made of durable plastic that can withstand quite serious loads. Most often, this installation option is used for fabric canvases.
Bead or wedge fastening method

After completing the preparatory work, we proceed to fastening
The distinctive element in it is the baguette itself - it is U-shaped and made of aluminum. A special glazing bead is used to secure the fabric. It can be made of plastic (most often) or wood.
The edge of the canvas is simply inserted into the groove of the baguette and the glazing bead is attached there. After which the open edge is covered with a plinth. By the way, this is the simplest and most reliable installation option.
Summary
Installing suspended ceilings may not seem difficult to you. But this simplicity is apparent. We did not go into the nuances associated with heating PVC sheets. And this, frankly speaking, is a difficult and responsible moment. A small deviation from the temperature regime, and all the work will go down the drain. Hence the conclusion:
Only professionals should install a stretch ceiling. And there is no point in arguing with this.
Of course, this only applies to PVC ceilings. And you can handle fabric ones yourself. The only thing that is required of you is strict adherence to the sequence of the process.