Even the most thoughtful and designer kitchen requires additions in the form interesting elements decor. Using simple arts and crafts methods, you can create unique items with your own hands and update slightly worn furniture in the kitchen.
Any kitchen requires additional decoration

Beautiful crafts you can make yourself

Any little thing can decorate the kitchen and create a pleasant atmosphere
How to make crafts for the kitchen with your own hands? You can always get decorating ideas by looking at the works experienced craftsmen. At the same time, perfect repetition is not required; you can add a touch of individuality by using decorative techniques as a basis.
Textile decor
To bring newness to the interior, sometimes it is enough to sew a new curtain or chair covers. With your own hands, using a needle, thread and fabric, you can create a unique kitchen atmosphere in a given style.

There are a lot of ideas for crafts, you can find examples on the Internet or give freedom to your imagination

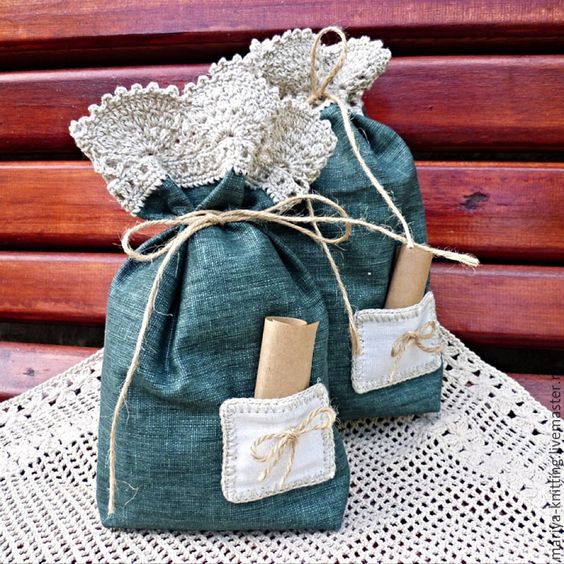
Jars decorated with textiles will bring newness to the kitchen interior
The most common fabric products
|
DIY tablecloth |
To make it you will need a piece of fabric, a sewing machine and perseverance. You can decorate it by finishing the edges with ribbons or lace. |
|
Chair covers |
You can complement the look with capes or pillows made from the same material. |
|
DIY potholders |
Sewing them does not take much time and helps create comfort in the kitchen. The patchwork technique is often used to make them. |
|
Curtains for windows |
Making a set of curtains will take a lot of time, but will justify the cost. They can become the highlight of the interior or its integral part. |
|
Patchwork style panel |
An original addition to the kitchen can be a picture made from scraps, assembled in a bizarre sequence. It will not only become a decoration, but will also take up empty space on a plain wall. |
It should be remembered that interior elements made of fabric will need to be washed quite often, so it is better to immediately take care of having several sets. For each season you can sew your own unique set.
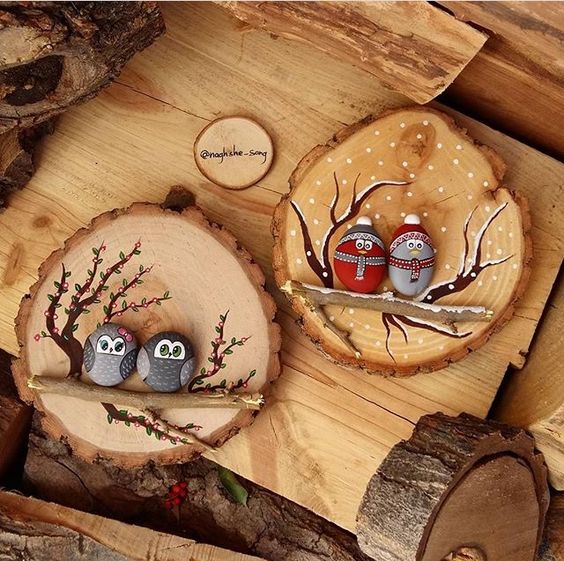
And also, as a decoration, you can make decorative birds from fabric. They will require textile scraps different colors and with different patterns, pattern, needle and thread.
According to the selected pattern, two parts of the bird are cut out, which will subsequently be sewn together and stuffed with filler. Two wings on each side, crest. All elements are sewn together and a rope or ribbon is attached. Such birds can be seated on a tree branch, pre-painted in the desired shade.

This doll will perfectly complement the kitchen interior

Any thing made independently will update the kitchen interior

Decorative elements made of fabric will have to be washed very often
Wall decoration
The need to decorate the walls may arise when they have one shade or there is a lot of empty space that creates the effect non-residential premises. Wall decor can range from stickers to paintings. dining area, from placing shelves to decorating with old dishes.
Fill up empty space with an open shelf that can hold painted plates, homemade vases or decorated bottles.
Apron between table top and top shelves can be updated using decoupage of existing tiles. Modern motifs will be relevant for a city apartment, and for country house You can use drawings with chickens - the guardians of the hearth.
Also, painted plates that are hung randomly or in a certain order will look appropriate in the empty space.
Stylized film stickers, which can be purchased at finished form or cut out the necessary elements yourself.

You can make a cup hanger from wood

Wall decoration is necessary if it is completely empty
Decoration of furniture and equipment
If the kitchen has a small area or wallpaper with colorful designs, then you can start decorating the furniture. For these purposes, you can buy a film with a specific print or “decoupage” the facades of a kitchen unit.
Since technology has become an integral part of our lives, it should also participate in the decoration process. You can cover the hood or refrigerator with film or paint it yourself.

You can sew beautiful capes on chairs

Painted plates on an apron near the stove will look very nice

A vase decorated with artificial flowers and chestnuts will perfectly complement the interior
Furniture restoration
Restoration old furniture, which can still perform its functions, but has a shabby appearance, will require a significant investment of time and effort. But the result is worth it.
To give new life to your kitchen furniture, you need to follow these steps.
- Remove the doors and check the awnings for functionality. Replace if necessary.
- Clean the surface with sandpaper.
- Paint all parts in desired color. You can create an artificial aging effect.
- After the paint has dried, apply a layer of varnish (transparent, for baths and saunas), onto which a napkin with the selected pattern or a special decoupage card is glued.
- The picture is covered with a brush and varnish diluted with water (1:1) and leveled at the same time.
- After control opening with varnish and drying, the furniture is assembled and new handles are attached.
To restore a kitchen set with your own hands, you can use painting with further gluing of shaped elements made of plaster.
Glass can be replaced with mirrors. This will visually expand the space and fill the room with light. Or decorate them with stained glass paints.
Using an old curtain and white enamel, you can create an interesting web design. A piece of fabric is attached to adhesive tape and painted over the surface of the glass, after which it is removed.

This lamp will fit perfectly into the kitchen interior

Such a basket with flowers will excellent option kitchen decorations
Accessories and kitchen items
It’s a pleasure to create crafts for your kitchen interior with your own hands and they can be an excellent gift for family and friends. Little things that create coziness can be done by knitting or sewing, decorating dishes and bottles.
Old bowls or cut-off wine bottles can serve as new chandelier to the kitchen. Containers from strong drinks can be used as candlesticks, decorated with the help of flowing paraffin.
Textile, stylized toys can become towel hangers if hooks are attached to them. Clothespins screwed to the wall are also useful for these purposes.

Flowers in the interior always bring positive energy

You can embroider covers for cups

You can make a craft for the kitchen with your child, he will be very interested in it
Hot coasters can be made from wooden clothespins:
- first they are released from the spring;
- glued in pairs;
- A snowflake is laid out from the blanks and coated with glue.
You can also create unique coasters from newspaper tubes.
- Newspaper sheets are cut into strips 10 cm wide.
- Twist it onto a skewer at an angle, securing the edge with PVA glue.
- The finished vine is twisted into a circle.
- Each turn is coated with glue.
- After drying, paint or decorate with a napkin.
The finished circles are coated with acrylic varnish and used.
Cutlery can be useful for making hangers or coasters for plates. To create an improvised hook, they are given bizarre shapes by bending the tines of the forks in different directions.
A plate stand made from a fork is made in a similar way, only the teeth are bent at right angles to its handle. The extreme ones are lifted up, and she herself is bent in an arc.
Spoons from an old set can be screwed in place of handles for kitchen shelves.

You can make smaller copies of dishes from cardboard

These stands will definitely come in handy in the kitchen.
Photo in the bank
DIY jar photography is easy to do and looks good on open shelves. To create it you will need a 0.5 liter jar, photo, sunflower oil. Liquid is poured into the container (to the limit), a picture (black and white) is placed and the lid is closed. A collection of photographs in oil will become a unique decoration that will surprise and delight guests.
Fresh flowers in a jar
To create an ever-living bouquet you will need:
- jar with lid;
- flower bud;
- glycerol;
- water.
The flowers in the jar are glued to the bottom, filled with a solution of boiled water with glycerin in a ratio of 1 to 2. The jar is tightly closed. In this composition, the bouquet can live for more than six months. It is better to use flowers with thick petals, as the liquid slightly discolors the buds. If the solution becomes cloudy, it can be changed.

Small copies of fruits will perfectly decorate the dining table

You can make something like this on a textile napkin using coffee beans

Such paintings will fit perfectly into the interior of the kitchen.
Tableware decor: candlestick
Old cups are often used as a candlestick, into which melted wax is poured and a wick is placed in the center. For these purposes, you can paint old dishes in advance or make decorative threads with your own hands.
Glasses with jars can also serve as a candlestick. They are decorated with painting, decoupaged or wrapped with twine. After decorating, they are ready for use; all that remains is to put a candle-tablet inside.
Painted plates
You can decorate your dishes yourself by painting old plates. From dishes of different diameters, you can create a unique collection of miniatures that will serve as decoration for empty walls or shelves. To make them you will need:
- dishes;
- acrylic white paint;
- PVA glue;
- palette of multi-colored paints.
The improvised canvas is painted in a suitable shade. This can be achieved by adding paint of a certain color to a white base. Prime with glue and coat with varnish. The selected pattern can be applied to the dried workpiece. Children can also be involved in the work.

Try to make crafts that match the style of the kitchen

There are a lot of options for crafts for the kitchen
Provence style for the kitchen
DIY, French country style decor is not impossible. To recreate a similar design, you don’t have to buy new furniture. You can restore an existing one.
Relevant for Provence style floral motifs, birds. The colors must be pastel shades. Wooden floors and aged white furniture with unusual, rounded shapes. The design should be delicate. The use of textile products is relevant.
Making your own kitchen decor is not difficult. The main thing is that the crafts match the style and color to the overall design of the room.
Video: Craft ideas for kitchen interiors
If you have a couple of free evenings, why not start making crafts for the kitchen and home? After all, you can create a bunch of useful or simply beautiful little things with your own hands from improvised, natural and even waste materials. In this material we presented 50 inspiring photos and 12 super ideas with step-by-step master classes for the production of decorative items, storage accessories, kitchen utensils and not only.
Idea 1. Tablet stand made from a cutting board
Watching your favorite TV series on your tablet or peeking at a recipe book while cooking will become easier if you make a special stand for this from... an ordinary cutting board. Making this kitchen crafts DIY it will take no more than two hours, and it will be used every day.
To make a holder for a recipe book or tablet you will need:
- You can use an old cutting board or buy a new one (wood is best, but bamboo will work). Its size should not be much larger or smaller than the tablet.
- A small wooden plank, or better yet, a piece of molding (this is what will hold the tablet/book).

- Another block of wood or plywood from which you can cut a sharp triangle;
- Paint or stain in the desired color, for example, to match the countertop, facades or kitchen apron ;
- Paint brush or staining rag;
- Jigsaw or saw;
- Wood glue or any other strong adhesive.
Instructions:
- Using a saw or jigsaw, shorten your strip or molding to the right size(the width of the board), sand the edges with sandpaper, then simply glue to the bottom of the board.

- Cut a support for the stand from a piece of wood in the shape of an acute triangle with a right angle as in the photo below and glue it too.

The angle of inclination of the holder will depend on the inclination of the hypotenuse of the triangular bar

- Paint the entire piece following the paint manufacturer's instructions and leave to dry.


- If desired, the handle of the resulting stand can be decorated with jute rope or ribbon. This way, when the stand is not needed, you can hang it on a hook.
Also, the craft can be further decorated - for example, by artificially aging it as in this master class, by drawing inscriptions, by burning a design, or by covering it with slate paint. In the following selection of photos you can get ideas for decorating original cutting boards.


Idea 2. Jute coasters
If your kitchen (or, for example, a country or summer kitchen) is decorated in a rustic, Mediterranean, rustic or marine style, then you will probably like this kitchen craft idea. In just a couple of hours you can make coasters for plates for the whole family and guests with your own hands.


To make one substrate with a diameter of 33 cm you will need:
- 10 meters of jute rope 1 cm thick (sold in construction and hardware stores);
- Hot glue gun;
- Scissors.
Instructions:
Just start rolling the rope in a circle, applying glue one at a time. small areas and fixing them for a while. Once the mat is formed, cut the end of the rope and glue it down.

Idea 3. Organizer for cutlery and kitchen utensils made from cans
Tin cans cost nothing, but they are durable, easy to clean, and their shape is just right for storing all kinds of spatulas, ladle, forks, spoons and other utensils. If you put in a little effort and creativity, you can make a convenient and cute organizer out of them, which, even if it doesn’t fit into the interior of a city kitchen, will definitely fit in at the dacha. You can also use an organizer made with your own hands from cans to store tools, brushes, felt-tip pens and other small items.

Stand for spoons and forks made from cans
To make such a stand for spoons and forks, you will need:
- 4 or 6 clean and dried cans, without lids or burrs;
- Acrylic paint for metal or enamel paint (it will protect the cans from rust);
- Several wood screws and a screwdriver;
- Thick nail and hammer;
- Furniture handle or leather strap with fittings;
- A small wooden plank.
Instructions:
- Paint the jars inside and out and let them dry for one day.
- File if necessary wooden plank to the desired size, sand, clean and finally paint (not necessarily to match the cans).
- Take a nail and a hammer and make a hole for the screw in all the cans.
Tip: To make this process easier and not damage the paint layer, place a small block on the table using a clamp, then wrap the block in felt and only then put a jar on the block (see the picture in the lower left corner in the next photo collage)

- Place the cans against the board and align them the way they will be mounted later. Mark the location of the holes on the board with a pencil.
- Make small holes in the board where the marks were marked, using a hammer and nail.

- Screw a screw into the hole of the first can to attach it to the board. Repeat the procedure with all remaining jars.
- Finally, install on the end wooden board furniture handle or leather strap using the same self-tapping screws. Ready!

Here are a few other deco ideas and modifications to the design of cutlery stands made from cans.


Idea 4. Topiary for kitchen or home decor
Topiary is a small decorative tree that decorates a dining or coffee table, chest of drawers or mantelpiece. And topiary is an excellent addition to a gift, especially if you decorate its crown, say, with candies or flowers. Making such a craft with your own hands does not take much time, does not require the use of expensive materials, and even beginners can do it. Once you master the basic principle, you can create topiary for any occasion, any shape and design. Take a look at our selection of DIY home decor photo ideas, you're sure to find something you'll like!


Kitchen Decor Idea for Halloween


To make this craft you will need:
- Base made of polystyrene foam, plastic or floral foam in the shape of a ball or other desired shape;
- Trunk (a straight tree branch, a pencil or any other small stick);
- Decorative elements for creating a crown: coffee beans, artificial flowers, pine cones, colored beans, etc.;
- Decor to disguise the pot filler, for example, moss, pebbles or sisal fiber;
- Flower pot;
- Filler for a pot that will fix the trunk. For example, it will do cement mortar, still the same polystyrene foam or alabaster (the best option);
- Thermal glue in a gun;
- If necessary, you will need paint to decorate the trunk, base or pot. The trunk can also be decorated with ribbon or twine.
Basic instructions:
- To begin with, it is advisable to paint the base in the color of the crown elements so that possible bald spots are not noticeable. You can also paint the trunk and pot and leave them to dry.
- Cut a hole at the base of the crown, a couple of centimeters deep, for the trunk, fill it with glue and secure the trunk.
- Take the base of the crown and start gluing the decorative parts one by one. The principle of action at this stage is simple: first, large parts are glued, then medium-sized and, finally, small elements fill in the bald spots. You need to glue the decor quickly, before the glue is absorbed into the base.
- Dilute the mixture to fix the trunk in the pot according to the manufacturer's instructions and fill the pot with it, not reaching a couple of centimeters to the edge. Next, insert the barrel, hold it for a while and then leave it to dry for a day.
- Disguise the filling of the pot with a decorative “cover” (you can fix it with a little glue).
Idea 5. Serving board-tray
But the idea of an unusual serving board-tray, which, although not a cutting board (intended for displaying food only in dishes), can nevertheless be very functional. For example, it can be used to beautifully serve snacks, drinks (olives, pistachios, nuts, chips, etc.), sauces, honey, sour cream, jam. Thanks to the slate part, while the board is not being used for its intended purpose, it can simply be hung on the wall and used for writing.
To make this DIY kitchen craft you will need:
- Wooden board 5 cm thick;
- Stain of the desired color (for example, to match the countertop);
- Sponge, rag or brush;
- Chalkboard paint;
- Two furniture handles and wood screws for fastening them;
- Jigsaw or saw;
- Screwdriver or screwdriver;
- Ruler, pencil.
Instructions:
- Cut your board to the desired size using a hand/power saw or jigsaw. In this master class, the board is 60 cm long, but you can make it shorter or longer.
- Stain your board according to the manufacturer's instructions and let dry.

- It's time to paint the inside. To do this, first apply masking tape along the edges of the board to limit the painting area. Next, apply slate paint (in this case, you use paint in a can) and let it dry.


- Screw the handles to the edges of the board.

You can replace furniture handles with leather straps, paint the board a bright color, burn a design onto it, or attach two “legs” to the back of it.


Idea 6. Stand for mugs and glasses
If you're the type of person who collects wine corks (either for fun or in the hopes of one day making something useful out of them), then you'll love this craft idea.

To make one mug stand you will need:
- 8 corks (accordingly, to make a set of 4 stands you will need 32 corks);
- A roll of cork board, mat or coaster (for cutting out the base of the coasters);
- Hot glue;
- Leg-split.
Step 1: Lay out your corks in pairs in a square format as shown in the photo below. Using hot glue, apply a bead of glue between the two corks and press them together for 30 seconds. Repeat the procedure with all other pairs.

Step 2. Cut a square from sheet cork (board, rug) corresponding to the size of the future stand. Next, apply thermal glue on it, wait 15-20 seconds. and glue your blanks.

Step 3: Fill the gaps between the corks with glue and let it dry. For better adhesion of the glue to the corks, you can put some kind of press on the workpiece.
Step 4. Wrap the craft with twine and tie a knot.

Handmade coasters for mugs, glasses and glasses can be beautifully packaged and given to a friend
If desired, the stands can be made round, triangular or hexagonal by cutting off the excess with a knife.

Using the described principle, you can make such a hot stand with your own hands. By the way, an old CD will work as a basis in this case.

Idea 7. Wall panel
Another craft idea for the home and kitchen that you can make with your own hands from wine corks– a wall panel for decorating the interior and storing notes, memorable photos and postcards.

Framed cork panel from Ikea


To work you only need beautiful frame(from a painting or mirror), paint the color you want, hot glue and a big pile of corks. Corks can be laid out in a herringbone pattern, in a checkerboard pattern, in even rows, and in other ways that you like. If necessary, for example, if there are not enough corks, they can be cut lengthwise or crosswise. To make the corks easier to cut, you need to soak them in hot water for 10 minutes.

Other interesting ideas for making wall panels with your own hands.
Idea 8. Universal knife holder
A knife holder is a very useful kitchen gadget that helps keep your workspace tidy and keeps your knife blades sharp for longer.


Making a knife holder with your own hands is very easy - just pick up a small vase and fill it tightly with bamboo/wooden skewers, colored beans or... colored spaghetti, as in our master class.

To make a knife stand, prepare:
- A container or vase is the height of the blade of your largest knife. The shape of the container can be any, but without any bends;
- Spaghetti, lots and lots of spaghetti;
- Several ziplock bags big size(or just large bags that can be tightly tied in a knot);
- Alcohol (for example, vodka);
- Liquid food coloring in the desired color (or several colors if you want to make a multi-color filling);
- Baking trays;
- Aluminum foil or old oilcloth tablecloth;
- Paper towels;
- Kitchen scissors.
Instructions:
- Make sure your container is clean and dry, then fill it tightly with spaghetti. When the container is full, remove the spaghetti and add a couple more bunches of pasta to the pile as a reserve (in case you make up for broken sticks).
- Divide the spaghetti evenly between the bags and pour enough alcohol into the bags to wet all the sticks. Next, add 10-40 drops of food coloring to each bag.

- Seal or tie your bags, then place them in additional bags to avoid leaks. Slowly shake and turn the bags to mix the coloring into the alcohol and pasta. Next, place the bag on one side and leave for 30 minutes, then turn the bag over again and leave it for another half hour. Continue soaking the spaghetti in this manner (no more than 3 hours) until it reaches the desired shade.
- Cover your baking sheet with aluminum foil, then paper towels(or oilcloth). To protect your hands from staining, it is advisable to wear gloves. Remove the spaghetti from the bags, after draining all the liquid, place them on a baking sheet in a single layer and leave to dry. From time to time, the spaghetti needs to be sorted to dry evenly.

- Once your spaghetti is COMPLETELY dry, start placing it in the container.
- Shake the filled container and smooth out the spaghetti. Insert your knives to determine the optimal filling density, adding pasta or removing excess if necessary.
- Now, using kitchen scissors or other very sharp scissors, trim the spaghetti to required length without removing them from the container (it's best to do this over the sink). It is important that the spaghetti does not exceed the height of the container by more than 2-3 cm, otherwise it will break quickly.

Idea 9. Jars for storing spices and bulk products
Today we will talk about an express technique for making a paper basket, which can be used to store small items (keys, stationery), yarn, as well as for an unusual presentation of fruits, Easter eggs, bread or baked goods. festive table or as a gift.

Even a child can weave such baskets quickly and easily

You will need:
- About 15 sheets of thin A3 paper, cut in half lengthwise (this can be printer paper, a full sheet of newspaper, or even baking paper);
- A container of suitable size with straight sides (for example, a jam jar);
- Glue in stick;
- One skewer;
- Spray paint (optional).
Instructions:
- Starting at one corner, begin to roll the sheet of paper tightly around the skewer to the diagonally opposite corner to create an even and long tube. Once the tube is ready, add a few dabs of glue to the corner of the paper to hold it in place and remove the skewer. Do the same with all the remaining sheets. In this master class, 30 tubes were required to weave 2 baskets.
- If necessary (for example, if you used newspaper sheets) or if desired, paint the tubes with acrylic paint.
- Take an even number of tubes and connect them together as shown in the photo in the upper left corner. In this master class, for a basket the size of a jam jar, 6 tubes were required, for a larger basket - 8 tubes.

- Start braiding: Take one of the outer tubes (which is under the grate) and lay it over the adjacent tube, then pass it under the next tube, then run the tube again over the next tube, etc. Continue weaving by lifting the already entwined tubes vertically (from now on we will call these tubes stands).
- When 2-3 cm remains from the first working tube, increase its length. To do this, apply glue to the new tube and insert it into the remaining “tail”. Continue weaving over and over again, adding paper tubes as needed.
- Once you have weaved a base of the desired diameter (the same size as the container), place the container on it and begin weaving around it, pulling the stand tubes close to the walls.
- Having weaved the basket to the end, remove the jar and carefully wrap the end of the working tube into the weave.
- Tuck the ends of the posts inside the weave and trim if necessary. Next, you can spray paint from a can as in our master class.
Idea 11. Wall holder for towels and kitchen utensils
From an ordinary grater you can make such a convenient and beautiful holder for a towel and storage of kitchen utensils or even live or artificial plants.


From a flat grater you can make your own kitchen decor in a country, Provence or shabby chic style

To make a heated towel rail and a tray for small items you will need:
- A grater (preferably an old one, but a regular new grater will do, as long as it is metal);
- Patina for metal (for artificial aging of the grater);
- A small cutting board or just a wooden board;
- Wooden die (for the bottom of the grater);
- Glue.
Instructions:
- Following the manufacturer's instructions, cover the grater with a metal patina, for example, green as in this master class.

- Install a wooden bottom on the inside. It must first be cut to the size of the upper part of the grater. As a rule, at the top of the grater there are protrusions from metal handles; it is on them that the bottom will be attached.
- Screw the grater to the board using self-tapping screws, after making holes in it with a nail and hammer.
- Place the board on the wall near the sink, hang a towel on the handle, and put your spatulas, ladles or flowers inside.
Idea 12. Flower vase
Glass bottles for wine, milk or other drinks are almost ready-made vases that are just waiting to be painted with acrylic paints and/or trimmed.


Any housewife dreams of a comfortable, beautiful and unusual kitchen. Most people want to learn some of the secrets and subtleties of decorating a room themselves: decorating kitchen furniture, dishes, wall decoration, making textiles and DIY crafts.

Furniture decoration
There are many ways to decorate kitchen furniture with your own hands. You can sew covers or mats for chairs yourself. It's easy to give standard furniture unique facade.

Original ideas will help you realize:
film application;
use of original fittings.
all kinds of linings made of plastic, polyurethane, foam;
painting;

Sometimes you need to restore old, shabby furniture. For self-repair kitchen unit, you need to remove the doors, clean them with sandpaper, and paint them. For painting, it is best to use cans of paint. They do not spread and lie in an even layer.

After drying, you need to coat them with varnish and stick on suitable pictures. Apply another layer of varnish on top. Ready-made shaped borders and overlays imitating wood carving are available for sale. You can use them during restoration.

Then it is advisable to attach new handles. If you decide to leave the original handles, then before painting the furniture they should be carefully covered with masking tape to protect them from paint. You can do it yourself original pens from cutlery or from miniature metal cups.

Often a ready-made print is applied to furniture. Available in stores big choice napkins for blending. It is customary to place various patterns and contrasting stripes on the doors of kitchen units. To give furniture an “aged” look, use craquelure varnishes with cracking effect. You can choose the appropriate ornament to reproduce the ethnic theme.

The countertop is usually updated by gluing a film on it. When distributing the film over the table surface, you need to glue the ends well. This is where peeling can begin.

DIY textiles
Properly selected textiles bring comfort to the room. Using needle, thread and fabric you can create a unique style.

You can make the following products with your own hands:
tablecloth decorated with lace, ribbons, embroidery;


practical napkins;


chair covers and soft foam pads covered with the same material;


potholders;


bags and pockets for storing small items;


window curtains sewn on sewing machine;


patchwork panel.


It is advisable to sew all products from the same fabric. You can come up with a textile design yourself, or use various kitchen ideas found on the Internet. If you decorate an ordinary piece of fabric with coffee beans, you will get a wonderful napkin.

Bright and unusual interior it turns out if the patchwork technique is used to create kitchen products. All textiles can be made from scraps beautiful fabric. And in the same style, choose ceramic tiles for the “apron” above the work surfaces and floor tiles. This technique should be treated carefully. It does not tolerate an overabundance, in which strong variegation can serve as an irritant to the eyes. Textiles made from shreds look best against the backdrop of monochrome interiors.

They can bring novelty to the kitchen interior original curtains or chair covers. It is recommended to make such sets for all seasons, especially since textiles require frequent washing. It is advisable to sew products from linen fabric, you can use thick cotton. Then the textiles will absorb moisture well and wash well.
Compact curtains are best suited for the kitchen. A wide variety of decor is allowed. Curtains with photo printing are in fashion. Any model of curtains is suitable for its application. The romantic and rustic style looks modern. The trend is a curtain-skirt that can also replace cabinet doors.
Napkins and chair covers can be crocheted, cutwork and macrame can be used, fabric can be used and cross-stitched on it.
Unique crafts any housewife can come up with. Using a template, draw on colorful shreds Sew the halves of the piglet's body together and stuff with stuffing. Then build two ears by placing triangular pieces of cardboard in the fabric. Instead of a patch, you can sew a button with two through holes. The tail will be a spring or a wire covered with fabric.
The same technique is common for making soft chickens and cockerels, which are considered the guardians of the family hearth. You can often see silhouettes of chickens on kitchen towels and potholders.
Painting and decorating dishes
It’s easy to decorate saucers and cups to your own taste. You can decorate any dish yourself. In stores for artists you need to buy pens and markers for ceramics. Acrylic paint is suitable, which after drying is covered with a glossy or matte sealant. There are special kits for painting dishes at home. This kit always comes with instructions for use.


We sell very convenient stencils for painting dishes. You can make a stencil yourself from very thick cellophane or cardboard. Before you start painting, you need to degrease the dishes. It is enough to wipe it with alcohol.


It’s easy to make a simple design with a brush: apply peas, stripes, stars, and various strokes to the surface of the vessel. You can make inscriptions on plates and cups. Errors can be easily corrected with a cloth soaked in water. Some people stain dishes with a sponge. It turns out original.
You can paint old plates, creating a collection of dishes of different sizes. Subsequently, it is recommended to decorate the walls with them. First you need to apply acrylic white or colored paint. Then it must be primed with PVA glue and varnished. Place the drawing on the dry surface.


The effect of white graphics is achieved if you scratch a design or inscription on a painted surface with a toothpick or a needle.
How to decorate the walls?
You can fill empty walls with paintings, stylized stickers, plaster figures. Sometimes beautiful vases, original dishes, and a collection of porcelain are displayed on open shelves.

Collages, photographs, portraits framed in clay or salt dough, serve as an excellent wall decoration.
Wall clocks give a great look to the kitchen. Some housewives decorate the kitchen walls with flower pots indoor plants or place pots with plants on open shelves or racks. Saintpaulia, chlorophytum, nolina, aspidistra and other plants with their foliage and flowers can purify the air, so they are recommended to be grown at home.

Plaster stucco, bas-reliefs, decorative panel- the most unexpected decisions may arise if you want to use some kitchen tricks to hide uneven walls. Some hosts hang fancy masks that may come from Africa, Mongolia, China or any other country.
The paintings look great on the kitchen walls. Images of fruits, berries, vegetables, drinks and other food go perfectly with the kitchen theme. Photo wallpapers and three-dimensional wallpapers bring uniqueness and unusualness to the interior design. Some people make their own panels from acorns, cones, autumn leaves, and feathers. Dense branches, which are coated with copper and varnish, are used for towel hangers.

It's good to hang mirrors in the kitchen. They visually increase the space of the room. Mirrors with convex edges will allow you to feel the reflections of sunbeams and will bring unprecedented novelty.
The subject of wall decoration can be a set of knives, cutting boards, cutlery, potholders, and kitchen towels. Beautiful cutting boards are hung along the wall, especially since every housewife is required to have at least four of them. Potholders in the shape of fruits, butterflies, and animals often take their rightful place on the kitchen wall.

Edible decor made from... dried vegetables, mushrooms, spices, dried fruits, combined into a wreath or garland. Often, owners purchase artificial decorations that imitate garlic, onions, peppers, berries, fruits and flowers.
Transparent jars with spices, cereals, canned fruits and vegetables are placed on neatly placed wall shelves. You can buy ready-made containers with seasonings, but it is better to assemble a suitable collection of jars yourself and fill them with the bulk mixture.

Sometimes peas, corn, beans, lentils, hot peppers, small apples, cherries and other fruits and berries are placed in transparent containers for beauty. An appetizing decoration is created using a glass jar, thoroughly washed and baked in the oven (about 7-10 minutes). For decoration, whole beautiful fruits are selected, which are carefully placed in containers and filled with formaldehyde or ethyl alcohol. You can pour a strong saline solution. It is advisable to fill the lid with wax.
IN last years Vinyl stickers are very popular. They can be selected to suit every taste. The stickers are durable, easy to maintain and affordable. A great way to decorate a wall with your own hands is to apply a design using a stencil, which you can purchase in a store or make yourself.

To create a stencil, you need to take thick cardboard or thin plastic. With its help you can apply any ornament or design. Butterflies stenciled or cut out of polystyrene foam look wonderful on the kitchen wall.
The “apron” area is often decorated with decorative ceramic tiles, which should be glued to a perfectly flat surface. The trend is a glass “apron” for the work area.

In recent years, it has become fashionable to decorate kitchen walls with slate or chalk boards. They are convenient because you can always leave them important message or a reminder to household members to record necessary recipes or write inspiring aphorisms. In addition, children have a legal opportunity to paint walls. Sometimes such boards are placed in the “apron” area.
Beautiful examples
Very often the refrigerator and hood are decorated with their own hands, sometimes covered with a special ready-made film. The topic is chosen according to your taste. Floral, marine, fairy-tale motif can be an excellent design solution household appliances. You can attach various magnets to the refrigerator.
Often an ordinary refrigerator is turned into an original item. You can put any image on it yourself. It is not difficult to draw a giraffe, a zebra, a cat. People without artistic abilities often transform old refrigerator vinyl stickers.


Sometimes some little thing can add unusualness and brightness to the kitchen. A bouquet of fresh flowers can be stored in a glass container for at least six months. Flowers should be glued to the bottom of the jar, filled with a solution consisting of water and glycerin in a ratio of 1: 2, and tightly closed with a lid.

Various jars, vases and bottles wrapped with thick threads and ropes are often an integral part of the kitchen design. Old CDs are used to frame windows, furniture, paintings and walls. They create a mosaic from broken dishes and decorate tables, an “apron” over the stove or a window with it.
A cutting board can easily be converted into a tablet stand. It is necessary to glue a small wooden or bamboo strip with wood glue to the bottom of the board. On the back side of the stand you need to attach a triangular support. Then it is advisable to paint the device.


You can fit a regular grater under the towel holder by hanging it with the handle down. It is recommended to make a wooden bottom in the inner part. You can store spatulas or a bouquet of flowers in it, and hang a towel on the handle.
Unusual vases, jugs, artificial fruits and vegetables often decorate kitchen cabinets and tables. They buy dummies in stores and create all sorts of compositions on their own. You can make your own fruits and vegetables from wax, plastic or fabric with foam rubber.

Origami created with your own hands fits perfectly into any interior. The whole family can be involved in making paper fish, birds, animals, flowers. You can weave a small basket from paper strips to store keys, matches or other small items.
Handmade art, a very popular trend in interior design today, not only allows you to decorate the kitchen, but also make its decor individual and unique. Useful crafts DIY kitchen requires only free time and imagination, and interesting ideas great multitude.
A lot of useful and inexpensive little things can add charm to any interior. Let's try to conduct a small handmade master class, focusing on the most interesting and unusual solutions.
The materials for decoration can be chosen in a variety of ways, but they must be combined in color and texture with the rest of the decorative elements and style of the kitchen.
Let's imagine using textiles

Crafts made from fabric for the kitchen, of course, must match the texture of the fabric and the design of the decor and be harmoniously combined in color with the rest of the interior items.
From the simplest fabrics or unnecessary scraps you can create many useful and stylish kitchen accessories:
- Of course, the most diverse interesting options curtains;
- Potholders(see also the article Crocheting potholders for the kitchen - creativity at home);
- Interesting and unusual dolls for a teapot;
- Elegant napkins and tablecloths for festive tea parties;

- Beautiful and stylish covers for chairs and stools.
Advice. For needlework, it is better to take new fabrics, or scraps left over from previous works.
Although the country of craftsmen sometimes advises using old unnecessary things for crafts, they are unlikely to look beautiful and stylish. An old, worn-out item will never become new and elegant.

Let's take a closer look at how you can simply, without having professional skills, create creative and unusual product. On our website you can see detailed video instructions for sewing curtains for the kitchen, so we will not dwell on this point in detail.
Original oven mitts for hot dishes

Let's conduct a small master class on sewing little things that are so necessary in the kitchen.
We will need the following materials for sewing:
- Pattern pattern;
- Fifty centimeters each of cotton fabric, batting and fleece.
Advice. It is better to choose a dark, non-staining fabric with a pattern and color that is in harmony with the dishes and kitchen decoration.
- Ribbon for edging, you can also use bias tape, which is sold in sewing stores;
- You will also need a marker, scissors, and thread.
Detailed instructions for sewing potholders are as follows:
- We measure the size of the hand by placing it on transparent paper and tracing it with a marker;
- Based on the resulting stencil, we make a pattern by folding the fabric in half;

- We will need the following number of such parts: two from fabric, two from batting and four from fleece.
Important. We cut out one part with the thumb turned to the right. And one with a thumb to the left. This rule should be followed if the piece of fabric is small and cannot be folded in half.
- We put the fleece pieces and one batting piece together, fasten them with pins and sew them diagonally;
- We do the same with the other two parts - we have the inside of the glove;
- We sew it together using a stencil and cut off the excess. Do not forget to leave the hole unsewn in order to put on the glove;
- To make the mitten comfortable to use, we make a small cut in the palm in the center of the product. Now the fabric will not “pull” and the potholder will bend easily;
- Turn the product inside out. We pin the bias tape or ribbon with pins, as shown in the photo, and carefully sew it on the machine;

- We do the same with the second potholder;
- Cozy, comfortable, and most importantly, completely exclusive oven mitts are ready for the kitchen.
Of course, the price of this accessory is low, and it can be purchased in any store (see also the article Do-it-yourself kitchen mitts - the occupation of our grandmothers). But it’s difficult to choose even such a small detail according to the color and texture of the fabric.
Covers for chairs and stools

If you decide to decorate your kitchen in French classic or rustic style Provence, then you can’t do without covers for chairs and stools. Many people think that DIY kitchen crafts are a difficult and painstaking task.
Let's try to convince the skeptics. With the help of pins, beautiful fabric and a few machine stitches, you can complement your interior design with a stylish and personalized accessory.
To complete the work we will need:

- Centimeter;
- Sharp scissors;
- Chalk or soap;
- Sewing pins;
- Rubber;
- Gold-colored safety pins;
- Lace or stitching;
- Cotton or flowing synthetic fabric, depending on the chosen design style. As you can see in the photo, the texture of the fabric can be very diverse.

Advice. The style of the Provence province involves chintz or satin fabrics with a small floral pattern in a muted violet-blue shade. A classic french style requires light flowing fabrics with gold or silver embroidery, depending on the details of the kitchen interior.
The sewing process consists of the following steps:
- First, we measure the dimensions of our chairs or stools; the pattern for the chair and stool will be different. Let's consider a simpler option - a stool;
- We take measurements from the seat of the stool. To hem the edge of the product, add ten centimeters on all sides;
- We sheathe the resulting square around the perimeter. We take into account that the hemmed edges must have a distance for stretching the elastic;

- We stretch the elastic around the perimeter and tighten the fabric with beautiful folds on the seat of the stool from below;
- The country of craftsmen also advises sewing lace or stitching around the perimeter of the cover, which will make the cover on the stool more elegant and flirty;
- If you plan to decorate the back of the chair and the seat, then we make two covers - for the back and for the seat, having previously taken the dimensions.
Important. When making a cover for a chair seat, the fabric must be folded in half and sewn around the perimeter, leaving only one narrow side of the product unsewn so that it can be put on the back. The bottom is also tightened with an elastic band.
The question arises, why are silver and gold safety pins needed? With their help, you can attach a flirty bow made of organza or colored ribbon in a contrasting color to one corner of a chair or stool.


DIY kitchen crafts can be made from almost any available materials, you just have to use your imagination.
For example, it is very convenient to make hangers for kitchen utensils or cups from ordinary old forks:
- The side tines of the fork are bent at an angle of ninety degrees, creating a kind of original hook;
- Next, using a screwdriver, we attach the fork by the handle to the screws or to the wall or to some interesting part. An unusual piece of driftwood or a curved piece of chrome pipe;
- This gadget will highlight the design of a kitchen in a new wave or high-tech style.
- For example, for a country-style kitchen, an ordinary round electronic clock can be made from an ordinary colorful ceramic bright flat plate in an ethnic style. Drill a hole in the center and insert a pin for the arrows into it. And from the wrong side we use glue to fasten the entire mechanism of simple electronic watch and don't forget about the fasteners.
- And a watch like the one in the photo will complement the interior in a modern techno style.
The pattern on the plate is selected according to the design of the entire interior or in bright contrast with other items in the kitchen
Conclusion
The topic of handmade is almost endless. On our website you can see a lot of interesting photos and videos with interesting and avant-garde gadgets.
The variety of decor options that DIY kitchen crafts can have is limited only by the author’s imagination. Because even from the simplest items you can come up with a stylish and original accessory for the kitchen or dining room.
Nowadays, finding a design studio specializing in interior design of private houses and apartments is not at all difficult, or rather very simple. And every year the number of such companies increases. There is only one reason for such enormous popularity - it is a fairly profitable business. After all, those people who have at least once encountered prices for their services know that this is not a cheap pleasure and is not suitable for everyone. But thank God there are no hopeless situations. Today, with the Internet, determination and fresh ideas in your head, develop small project to transform your interior, everyone can do it.
Kitchen makeover on a minimal budget
Probably for many the most important room in the house there is a kitchen. Place where it is held a large number of time for cooking, intimate conversations with family and close friends, as well as watching football at night when everyone is sleeping. And, of course, it is very important that functionality, appearance and the practicality of this room met all these needs.


A simple hint can serve as an impetus for new ideas, interesting photo or videos, which are full on the global network.


Kitchen decor ideas: photos of the best designs
Give the interior new look Can different ways: change the color scheme, flooring, decorate the apron and facades, transform the nondescript appearance of furniture and much more. The word “transformation” in no way means that everything old needs to be replaced with the new.
Decor- translated from Latin means "compatibility", therefore, the main task is to combine the boring interior with new creative ideas.


It happens that for various reasons, it is not possible to decorate the walls in the kitchen or furniture. In this case, it is necessary to use a different arsenal of creative weapons of decorative elements: handicrafts, various accessories and decorations. There are plenty of ideas for self-realization; the main thing is to direct them in the right direction to obtain the desired result.
Bright and rich shades will give the interior freshness, individuality and an atmosphere of constant celebration. This topic is especially relevant if there are small children in the house.


If you have any bright colors against its background they will look much richer. Although White color goes well with any other shades; pink, purple, light green, orange and blue are best suited to it.


The kitchen is exactly that place - where nothing superfluous happens
Unusual wall decor in an interesting design
Using various stencils or artistic skills, monochromatic and boring walls can be given a new elegant and unique look, which will not only update your interior, but also make it much more interesting and varied.
If you are creative person and don’t know where to spend your energy, pick up a brush and paint. Ask where? Yes, right on the walls! Throw out all your emotions on them, trying to convey your inner world through various images.


Painting is not the only way to decorate the walls in the kitchen. A favorite technique of many designers is to decorate walls by gluing various items of plates, forks, spoons, etc. on it. You can, of course, go the other standard route and use , or as a material, but an individual style risks becoming ordinary.


Bright colors on the wall - an indicator of inspiration
How to give your kitchen interior a new look
If the appearance of your furniture has become boring and faceless for you, it’s time to transform it. Having a small amount of tools and minimal carpentry skills will help you say goodbye to your boring interior.
By designing a kitchen interior, in addition to material benefits, you will acquire useful knowledge that may later be useful to you in future renovations.


Making a kitchen set with your own hands is quite simple. It is only important to know the required dimensions and make the necessary cuts in the marked places with pinpoint accuracy. After which all that remains is to fasten all the elements together single design and coat it with varnish.


When decorating your interior, try to duplicate each color in different places. For example, if you have a red refrigerator, use a tablecloth on the table or wall shelves of the same color. This way you will achieve the perfect color combination.

Crafts for the kitchen and other little things
Nothing will decorate the kitchen interior better than homemade decorations from scrap materials. It is these small objects that give a unique and unique style interior and create a truly homely and warm atmosphere in the house.
- Glass bottles and vases with interesting shapes and unusual filling;
- Spice jars decorated with ribbons;
- Beautiful mittens and potholders embroidered with bright patterns;
- Original shelves and homemade chandeliers;
- Painted in various colors clay pots with flowers.
As you can see, there are a huge number of ways to transform the kitchen interior. All that's left is to pick a couple original ideas and you can start creating something beautiful.


Like any other room, the kitchen should have good lighting. But unfortunately, most lamps have an ordinary and boring appearance, which is unlikely to add sophistication to your interior. And here ingenuity can come to the rescue, which will help create original design without incurring unnecessary costs.


The kitchen is the place where women dominate. And what weaker sex doesn’t love beautiful, fresh and fragrant flowers? Therefore, this moment should be given Special attention. As a couple, you can’t even imagine how many suitable flower vases are standing right under your nose. You just need to use your imagination.


A beautiful bouquet - a beautiful vase

The source of creative ideas is limitless. Create, try and experiment
Use as many small things as possible as interior decoration. Arrange them in such a way that they do not interfere with the main functions in the kitchen, but are always visible.


Modern solutions for individual style
The new look of the old interior is entirely in the hands of the owners. You just need a little time and patience to realize all your ideas.
Think over everything thoroughly, try not to miss a single detail that could overshadow and negate all your efforts. Remember that only complete dedication will help you achieve the desired result.


To ensure that the magical transformation of your kitchen meets all your expectations, use only those design techniques in which you are absolutely confident. Nothing should disturb the overall harmony of the room. All your crafts and accessories should fit organically into the overall concept.


Bright wallpaper on the wall - The best way get away from the simplicity of the interior


As you have already seen, kitchen decor is an amazing and creative process in which the most important thing is a sense of proportion. If you go too far with the implementation of ideas, you can end up with an ancient museum rather than a cozy kitchen.
While chasing aesthetics, don’t forget about functionality. After all, first of all, this is a room for cooking and only then everything else.
And remember that the best decoration is only the one you made yourself...