Since ancient times, decorating a wall with cold steel has been considered very in an effective way decorating the room. Swords or sabers can be hung on a beautiful silk carpet. This will bring oriental, exotic notes to the interior. A helmet or crossbow will decorate the surface lined with artificial and natural stone. This decor is suitable for rooms belonging to young men. Compositions made from edged weapons look very interesting. They are usually used to decorate walls above fireplaces, low shelving or sofas.
Types of swords.
Now without special labor you can buy decorative sabers, axes or armor. But such interior items are usually not cheap. Besides, what can better emphasize the masculinity of the owner of the premises than a weapon made independently? Moreover, making a sword with your own hands is not as difficult as it might seem at first glance. But, of course, you will need basic metal processing skills.
Preparatory stage of work

To make a sword with your own hands, you will need the following materials:
- Strip of metal. Its thickness depends on the type of weapon you want to make. People occupying historical reconstruction, usually used car springs with a thickness of 5-10 mm are used for these purposes.
- Wood for the handle. For these purposes, durable species are used, for example, beech or oak. But if you are making decorative weapons, then any material will do.
- Strips of leather for wrapping the handle.
- Headband and guard of the sword. They can be cut from the same metal from which you will make the blade, or cast, for example, from lead. Of course, such elements are too soft and easily deformed. But for the sword whose main function is to decorate the interior, they are quite suitable. In addition, lead can be easily given any, even very elaborate and complex shape.
- Epoxy glue or rivets to attach the handle.
For processing parts necessary tools It's wiser to prepare in advance. This:
- corner Grinder(Bulgarian);
- a set of cutting, grinding and polishing wheels;
- drill and set of metal drills;
- carpentry tools.
Don't forget a measuring tape and a square. They will be useful for determining the size of the future sword. You can mark metal using an ordinary marker. Such marks can be easily erased and will not damage appearance your weapon.
Return to contents
Decorative weapon drawing

Before making a sword, carefully consider its future appearance and draw up a drawing indicating all the necessary dimensions. This will help you avoid mistakes that will be difficult to correct.
Image 1 shows a drawing of a simple sword, the prototype of which was the Norman weapon. This is enough simple design, which is easy to repeat on your own.
If you want to make a sword in a fantasy style, you can complicate the shape of the blade, for example, by tapering it in the middle or cutting continuous patterned fullers into the canvas (but this work will require some skills).
When making decorative weapons, craftsmen great attention are given to the guards.

It is made curly, with several “tails”. Sometimes this element is welded from several strips or woven from fairly strong wire.
The hilt of the sword can be wrapped in strips of leather or decorated with carved wooden plates. In the first case, the weapons will be more similar to their real counterparts. The headband, or, as it is also called, the “apple” of the blade, can be made flat or shaped like a ball. Swords with a headband in the form of a dragon or a wolf's muzzle are popular. But in general, the appearance of the weapon depends only on your imagination and skill.
Return to contents
Making decorative weapons

There is a lot of information on how to make a sword. But most of the materials describe the manufacture of reconstruction weapons. And such technologies involve hardening the metal. For decorative sword this is not required.
Clean the metal from which the blade will be cut from dirt and rust. If you use a spring to make a weapon, then you must first cut a piece of it to the required length. The fact is that this car replacement part It has a curved shape and is not uniform in thickness, which will not add beauty to the future sword.
Mark the contours of the future blade with a marker. Do not forget that the blade is cut together with the shank, onto which the handle and guard are subsequently attached. This tang must be thin and short, otherwise the sword may be considered not a decorative weapon, but a bladed weapon. Its length should not exceed ½ the length of the handle, and its width should not exceed 1/5 of the width of the blade.
After the contours of the sword are marked, the blade needs to be cut using a grinder. The guard and headband are cut in exactly the same way. Next, all the details need to be given their final shape. To do this, they are carefully polished, eliminating all irregularities and undercuts. When grinding, at least 2-3 mm of metal is usually removed, and if the material is soft enough, then this must be taken into account when cutting weapon elements. The surface is processed until it becomes completely smooth. The tip of the blade must be rounded.
For many people, the sword is primarily associated with knights, or with the Middle Ages, where it was an integral part of warriors. Indeed, for many centuries, this type of weapon served as the lot of conquerors of territories and protected them from enemies.
The origin of the sword still causes controversial conclusions from scientists. However, what they are completely united in is that this type weapons appeared at the moment when people learned to handle iron, or rather, began to smelt it. So, the first swords were made of copper, but they were so unstable that they soon found a new use: people began to add another metal alloy called tin to copper, and this is how a bronze sword was obtained. Such a weapon was very durable, with all its pros and cons. One of these features was that the blade could easily be deformed, but it could be straightened by hand. In general, bronze swords are the most common on our planet; they are found in completely different parts of the Earth, from Europe to Asia. They have a distinctive shape and size, but all this suggests that the technology for processing a bronze sword was the simplest and at the same time successful.
With each century, humanity discovered more and more new ideas and technologies. All this also affected the improvement of weapons. Starting around the 6th century, people learned to make the most iron swords, but such weapons were directly corroded and quickly broke, especially if they were involved in battle. Soon it was the turn of swords that were made from steel casting. This metal required careful forging of the blade, and at the same time, such a sword was much lighter than its previous counterpart - a bronze sword. It was actively used Germanic tribes, Celts, nomads, etc. The steel sword itself subsequently became more notorious, lighter and more convenient. Today we know of three types of sword blades: straight, curved and curved in front. For many warriors, this weapon is a symbol of valor and honor. In Great Britain, for example, knights of the Order of Glory were knighted with the help of a sword, and they continue to do this today. In the 21st century, swords, for the most part, are the lot of private collectors; they are carefully stored in museums and are given very close importance.
Type of swords: area of their use
Because the general concept We have already received information about a weapon called a sword; it will be interesting to find out what types of it exist, of which there are actually many. The sword called - Akinak, is of ancient Scythian origin and is distinguished by its small size. Enshakubo– a sword similar in size to the Akinaka sword, but originally from Japan. Xiphos– this sword became a real property of the ancient Greeks. But there are also swords, the shape of which, in a certain way, attracts attention.
Banya- a sword that has a long and at the same time narrow blade, with an extension at the end (like a rhombus), India is considered its homeland. On the contrary, a tapering blade, similar to a syringe with a needle, is characteristic of a sword called - Anelas, it belongs to medieval European culture.
Another interesting specimen sword, which also comes from India, is called - Bhelkheta, it has a very interesting handle, but, most importantly, the long narrow blade at the end goes into a guard, somewhat reminiscent of a bowl. Brightsax- the sword of the ancient English, it also gave its name to the Saxon tribes. Jutte- a Japanese sword that resembles a round stick and does not have a blade on the blade. Pamdao- a sword from Nepal with a wide blade base and curved in two directions. Katana– probably the most recognizable type of sword in the whole world. Its shape has a relatively straight blade base, and the handle is designed so that it can be grasped with two hands. And also a saw sword, a sword with a wave-shaped blade and many others.
As we see, almost every single nation has its own characteristics in approaches to edged weapons. And this is far from full list that we have listed, however, the swords of the most different types, are available on all continents of the Earth and they have their own separate history.
The use of swords in Ancient Rus'
It just so happened that Ancient Rus' was constantly drawn into some kind of military conflict. The Slavs used edged weapons, such as spears, maces, axes, etc. But the shield and sword gradually became the main and most significant attribute. Although, in fairness, it must be said that the sword was available only to heroes and governors (a privileged part of the population), but, in general, it personified the entire army of Rus'.
The most sophisticated swords of that time were considered to be the blades of the Carolingian group. Their base combined a blade made of steel welded on metal base. The length of such swords could reach almost a meter, although gradually they became shorter and shorter. These weapons were made by blacksmiths from Western Europe, belonging to the then Carolingian Empire (the current part of France, Germany and Italy), and was delivered to Ancient Rus'. In Rus', there were also blacksmiths who easily smelted steel and iron swords, but all this was not put into production. Wealthy warriors, feudal lords and other nobility Ancient Rus', most often chose steel swords, and those who were poorer chose iron ones. Although in Rus' there was another type of bladed weapon, albeit less common, it was called a damask sword. Despite its bulky appearance, it was rarely used in battle; mainly, it served for beauty and grace, which is why patterns and ornaments were often drawn onto it. And all this continued until the 10th century, when sabers replaced swords in Ancient Rus'.
How to make a sword from wood
Many children, especially boys, love to play with swords (fake ones) on the street. To feel like a hero, to overcome evil - this is not the cherished dream of boys. This was the case in the USSR, and now in Russia. Children's stores today are full of plastic swords, one better than the other. But sometimes, for various reasons, some fans of “knighthood” become enthusiastic and want more realistic actions. A plastic toy in the shape of a sword is no longer interesting, and buying or smelting a sword from metal is expensive and tedious. IN  In this case, there is only one option left - to make a sword out of wood. The advantage is that this type of pseudo-weapon can be made completely to your taste, as you want. Small child, due to his physiological state, is unlikely to be able to make a beautiful wooden sword, so it’s best to seek help from an adult.
All you need is a board (preferably level) with a solid base. Based on it, a sketch of the future wooden sword with measured edges is made. Then, either manually - using a hacksaw, or using a special machine - we cut out the outlines of the figure. The resulting imperfect material, of course, will have to be ground, and this applies to the entire base. A file or sandpaper is good for this. We remove all roughness and make the handle round and smooth. If it has a so-called “apple” (a bulge at the bottom of the handle), then it should also be sharpened. But, if this element is not there, then you can take some semicircular material as a basis and use a self-tapping screw to screw it to the handle of the sword.
We pay special attention to the blade - it should be a little flat from the original version and at the same time aligned at the ends of the edges. It is better to make the tip of the blade a little dull to avoid unpleasant consequences. The final phase may be coating the wooden sword with varnish, or painting it, for example, in a silver color to match a real sword. But in general, you can make a curved sword from wood, an analogue of a Japanese katana, and many other interesting things.
In this article I tried to show how to make a new wooden covering for the handle handle, cover it with leather and wrap it with thread for reliability. For convenience, in what follows we will simply call this wooden lining a handle. What the hilt of a sword consists of is written in the article Anatomy of a sword, sword, saber.
This project consists of two parts. Part I deals with adding new wood pieces, and Part II deals with wrapping the grip handle in leather.
Part I of this project deals with the hilt of a sword of type XIV according to Oakeshott. The sword came with a crossguard that was a little uneven, so I decided to fix it and at the same time adjust the grip to my hand. The picture below shows the hilt on the sword and you can see that the crosspiece was not installed correctly, not much to the side of the fuller. I also couldn’t get enough of the fact that the crosspiece is quite ordinary, and a little small for my taste.
Cheren doesn't look too bad, but that's not enough for me, and I want to destroy her to fix the sword. To change this handle the way I want, I will need to remove the skin and wood core and start over.
Disassembling the sword hilt

I removed the skin and then split the wood and threw it away. The wood was glued together from several parts, but it held tightly. It was possible to carefully remove it by removing the pommel, but to do this I would have to grind off the tip of the shank and pick out the pommel, but I didn’t want additional damage.

Then I gave the pommel a little tap with a hammer and it slid down as shown in the picture below. As you can see, there was some metal at the top of the tang and it flared out towards the blade. It was impossible to remove the pommel without damaging it without splitting the wood beforehand.


The following picture shows only the pommel and the tip of the shank. The hole in the pommel goes all the way to the end and they had some glue applied to the bottom.

Assembling the sword hilt
to the begining
After I remade the crosspiece, I widened the hole in the pommel, shortened the tang to reinforce it, and made an additional recess at the top of the pommel.

First of all, I got the crossguard aligned with the sword's fuller. (See picture below) ..looks much better.

I also re-made the blackboard with wood lining and covered it with leather, but this will be covered in more detail later. Below in the picture is the original state of the pommel.

The next shot shows the pommel after I've milled out the hidden area for the tang.

The following illustration shows the pommel after I installed it (you can see the ugly blob). I probably nailed it too hard, but it turned out really strong. I'm sure everything is done very tightly.

In the photo below, the pommel and tang are cleaned, this is how it looks and is holding securely at the moment!

Below is a picture of the polished shank and pommel. The tip of the shank is barely visible.

The picture below shows the finished sword with the new hilt. I'm very happy with how it all turned out. Everything fits very tightly and now he has a lot more metal shank in the pommel.

Wooden parts of the sword hilt
to the begining

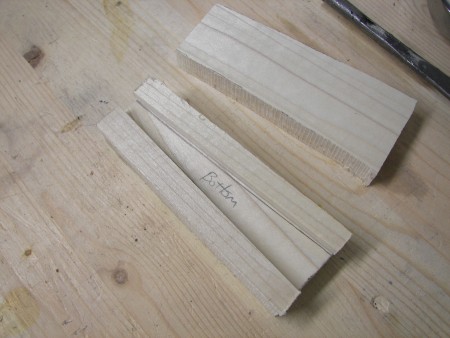
I deleted the old ones wooden parts handles and I have some small pieces of poplar wood on hand to make a new handle. I cut the first piece a little larger than the final size of the piece. This gives some permission for processing and grinding. I laid the shank on a piece of wood and marked it by drawing some lines on the wood. Then I took some small pieces of poplar that would end up being the sides of the handle. They will be 6mm (1/4") thick, while the top and bottom pieces will be 13mm (1/2") thick.

The picture above shows how I glued (using any good wood glue) two 6mm pieces of wood to the bottom. Clamped them and let them dry for an hour.
The picture above shows two side pieces glued to a top piece identical to the bottom piece, cut out and ready to be glued together.

I have generally been able to form a solid wooden handle and fit it onto the tang, but may have some trouble fitting it to the tang. It is much easier to attach the handle if it consists of two parts. So I use old trick carpenters: gluing two pieces (top and bottom) through a sheet of paper between them. This creates a firm pressure and allows me to adjust the shape and size of the handle and then separate the handle before installing it onto the tang.. The picture above shows a piece of paper being glued to the bottom. It's best to use something a little thicker than standard paper. Here I'm using a piece of cardboard.

I mentioned earlier that the two pieces were 6mm (1/4") thick. But the tang on this sword was closer to 4.7mm (3/16"), so I planed part of the underside so that the gap was only slightly larger than 4.7 mm so that there is some space for the epoxy glue that we will use to glue the handle to the pommel. Slowly here...don't remove too much wood...it's better to remove too little than a little more!
Apply a little glue on the other side of the paper and on the top of the pen. The picture above shows all the parts clamped, so they should hold for about an hour. Use only wood glue here.
 |
 |
| If you have everything glued together, then you are now ready to turn the stock into nice rounded handles from a square piece of stock. Again, go slow here. Grinding machine really convenient for turning, but it can be done manually. I tried to grind so that the top and bottom of the handle matched the thickness of the tang and cross. | After careful grinding I got a handle. I sanded it down so it was pretty smooth. You'll need to do some final sanding after you glue on the shank, but for the most part you can finish it at this point. |

In the picture above I just showed what happens at the end. Again, I repeat: I tried to make the handle correspond to the thickness of the pommel in the upper part, and the crosspiece in the lower part. In addition, I am sure that I made a handle that is comfortable for my hand.
If your pommel is not yet riveted to the tang, make sure that the handle fits snugly and puts even pressure on the tang, cross and pommel.

I'm happy with the shape and finish of the handle and I'm now ready to split the handle into two halves. Simply insert a screwdriver and gently lift the two pieces away from each other along the line on the paper. When you split in two, you will need to sand a little to remove any paper that is left on the wood. The picture above shows that my torment is coming to an end and that it will all work!

I keep the workpiece glued for 5 minutes epoxy glue, so that wooden handle adhered evenly to the shank. Make sure the shank is clean and free of any oils. Mix and apply epoxy to the tang and both parts of the handle. Make sure you don't plan too much of a gap on the sides or ends. Make sure when you clamp them that they do not fall out and are properly aligned. You may want to check them a few times to ensure they remain aligned while the glue dries. Epoxy takes approximately 20 minutes.
Also make sure that the handle fits flush against the guard so it won't dangle. I usually add a little epoxy around the guard for good measure.
My handle was taken apart and I widened the tip of the tang a bit. The epoxy remains slightly flexible for several hours, so after gluing, I attached the pommel to the shank. Thus, the pommel should also sit firmly and hold the handle. Everything will completely harden within a few days.
The picture above shows the finished sword. You will probably need to touch up by sanding any glue that may have leaked, or just for a final clean up. Just be careful not to scratch metal parts doing this.
And now you can take the sword in your hand. But that is not all.
We make it today from scrap materials. To get the weapon of your dreams, you just need a lot of free time and a little persistence.
DIY lightsaber
Since childhood, each of us remembers the phrase that a real Jedi sword must be made with our own hands. Indeed, why not feel like a real Jedi, holding the legendary weapon in your hands.
The Jedi's dueling tool consists of a hilt and a glowing blade. The basis of such a sword is a transparent tube (PVC or polycarbonate). An LED strip is inserted into it, which is mounted on a special rod. It creates an illusory glow characteristic of weapons of this type. In order for the blade to glow, the LEDs are connected to a power supply - you can make it yourself or “borrow” it from a regular flashlight. When choosing such a block, consider its size - it must fit into the handle.
If you want to have a weapon not just with light, but also with a characteristic sound, try making it on Arduino (special board, batteries, mini-processor and MP3 player). This is a fairly high-tech filling that will give your product maximum similarity to the original DIY product. Particular attention should also be paid to the hilt of the sword - it business card every hero of the star saga. For example, Count Dooku has a special crescent shape. But the weapon of the main villain Darth Vader does not stand out in anything special - an ordinary straight one, but with horizontal notches for ease of handling (this is evidenced by the more than twenty-year history of the sword). But the guard of Kyle Ren's weapon simultaneously served as both a decoration for the sword and ventilation.
When arranging a light weapon, make sure that it not only matches the chosen hero as closely as possible " Star Wars", but also had strong and durable connections. To do this, recess the polycarbonate tube into the handle by 5-10 cm.
How to make a sword out of paper with your own hands?
For theatrical productions or children's matinee weapons can easily be made from paper. True, the usual one will not work here - it is better to buy whatman paper or cardboard. But even the thickest paper folded in two layers will bend, which means your sword will not look natural at all. Therefore, the strip of the material you choose should be of such a size that it can be folded like an accordion into 7-10 layers (each of them needs to be glued with PVA). This is the only way to make an excellent blade out of paper - all that remains is to attach the guard and handle to it. A paper sword can also be made using a pattern, but its assembly will be more complex and multi-step than in the version we presented.

You can also make a blade using the origami technique. By repeatedly bending a sheet of paper according to the diagram you have drawn up, you are sure to get a very beautiful sword. However, it is worth considering that it has a purely decorative purpose.

DIY wooden sword
Unlike paper options, wooden blades are quite suitable for both training battles and friendly battles. Before you start making such a weapon, it is worth considering that it simply requires the correct drawings. This is primarily necessary so that your work is conscious and you can accurately imagine the end result. In addition, with the help of a drawing you can break down all preparations into successive stages.
To make a wooden blade you will need wooden beam, from which the blade of the blade is turned. Using a jigsaw and wood cutters, give it the desired shape. You can also add different designs to the blade if you wish.
The handle of the sword should also be carved from wood - it can be either a solid structure or a prefabricated one. The material for the handle can be the same wooden beam, honed in a special way. You can also add a beautiful guard made of plywood in the form of wings or simply carved from a thin board. Whatever option you choose, remember that wood is a specific material that urgently needs sanding (otherwise you will not be able to avoid splinters).
How to make a sword out of iron with your own hands?
You can easily make a good fighting sword from a spring by processing it properly on an anvil. Of course, ideal option Blade manufacturing remains forging to this day, but this method is not always available. But if you have the opportunity to forge a sword yourself, don’t even hesitate. A blade made in this way is incredibly reliable and durable, and will certainly not let you down at the most inopportune moment. However, it is worth noting that such edged weapons have quite an impressive weight and their use is available only to real masters. For beginners, there is a lighter alternative - an aluminum blade.
You can also make miniature copies of famous swords from a nail or a file. Of course, you are unlikely to be able to duel with such blades, but they can serve instead regular knife, and as a training base.
Types of swords and features of making them yourself: a brief overview of the swords of heroes and other heroes
Each blade has its own characteristics, which make him part of the hero's image. A pirate's sword has a wide blade, sharpened on one side (falchion or flamberge), which is convenient for inflicting lacerations and chopped wounds during boarding. In addition, the sword was also a pirate weapon - it was used during close combat.
It’s strange, but weapons can sometimes create. An example is the so-called Kolesov sword, which is intended for planting forests. However, calling it a “weapon” is a stretch.
But let's return to the types of swords that are widely represented in popular games. In Minecraft, a double-edged blade with a guard is most often used. There are similar forms of weapons in The Witcher, but there you can also find elven models that have a one-sided sharpening and a forbidden sword with a specially shaped blade.
Since time immemorial, the gladius has earned honor among weapon connoisseurs - a short Roman sword, the center of gravity of which is shifted due to the counterweight on the handle. It was also recreated in the games along with the titan weapon (a blade with a very wide blade).
If you want to recreate the Slavic swords that were used by epic heroes, be prepared for the fact that the weapon, forged from iron with a heavy double-edged blade, will not be so easy to even move - with an average length of 80 cm, it can weigh up to 10 kg. By the way, the Spartans’ weapons were up to 60 cm and weighed 1.5 kg, which can be considered a very significant example.
Also, if you have the skill, you can try to build a Corvo sword, which, although it consists of thin metal plates, has the excellent ability to fold.
DIY katana sword
The samurai katana sword has a long, thin, slightly curved blade. Its blade is sharpened only on one side, which, however, does not reduce its lethality (which is very useful for a samurai). You can make it from a thin steel plate by sharpening and polishing it. Don't think that it will be easy - it will take you two to three months of hard work to perfect the katana. Next, the blade should be hardened and polished again to a shine. But you don’t have to bother with the handle - just wrap it with regular lace or twine.
DIY sword for a child
For a child, you can make a sword from absolutely any material except iron. Even for a teenager, a metal sword is a potentially dangerous toy that can hurt yourself or someone else. Lightsabers are perfect for children, but they don’t have to be as close to the original as possible. For this type of weapon, it is enough to take two PVC pipes And LED strip and simply decorate unsightly details. But you shouldn’t make a chain laser sword for a child with your own hands - you’ll waste a lot of time, and the child can break all the bells and whistles like Arduino in no time.
A toy wooden or paper sword will appeal to schoolchildren who like to arrange comic duels. However, when handing your child even a toy wooden blade, do not forget to talk to him about the rules for safe handling of it.
DIY sword sheath
The scabbard is a kind of case for your weapon, from which the braid of the handle peeks out. They are made from wooden plates with an iron mouth and tip, which are held together with thin leather strips.
In general, creating a sword with your own hands is a rather labor-intensive process, but the result will definitely please you.
Battles, warriors - this is what can really attract the attention of small children, especially boys. They long to be like strong warriors, to fight for good and win. The sword is one of the main attributes of real warriors, without which you simply cannot do in battle. Every boy in childhood dreams of a cool sword with which he will fight his “enemies.” Today, you have the opportunity to please your son and make him a sword with your own hands. And the best thing is to do this business with him.
How to make a sword with your own hands?
There are many materials from which a sword can be made, but as we know, some are harder to work with, while others are easier. If you want to make a sword for a child, it is best to make it from wood or paper, since metal will be very heavy.
Eat different shapes sword, so first, decide which one you want to make.
All swords are made almost the same. We will need a piece of hardwood.
1. We draw the shape of the sword on the timber and begin to cut it out.
2. When the timber begins to take on the shape of a sword, it should be rubbed very well sandpaper. First coarse-grained, then fine-grained.
3 . After grouting, for better preservation, it can be varnished.

This way we will get a beautiful and light sword.

You can also make it more attractive if you change the shape a little. We recommend reading -