A boat is an indispensable thing if you want to go fishing or just spend time with friends or family on the river. This is a great accessory for a walk or even a whole water adventure that you can do yourself.
If you are interested in the technology according to which a do-it-yourself punt boat is made of plywood, the drawings presented in this article and the recommendations will come in handy in your work.
Making a simple plywood boat is the cheapest way to get a boat. To do this, you just need to stock up on everything you need, including tools and drawings, as well as show a little patience and diligence. Otherwise, it will not be difficult for you to make such a product, the main thing is to strictly follow the prepared drawing.
What do you need to work
The material on the basis of which the structure is created is, of course, plywood. It consists of veneered layers glued with phenol glue, which are pressed in production. There are several types of it, but not every type of plywood is suitable for making a boat with your own hands.
Note! The highest quality and water-resistant plywood is marked with FSF. It is usually made of birch veneer. When using it, you can achieve reliability and quality from your future product. As a result, you will spend significantly less effort on the procedure of grinding and finishing your boat.

If for some reason you are unable to get plywood of high quality trademark, buying not too high-quality products, pay Special attention execution of end parts on sheets. The absence of through cracks, knots, holes and defects is a sign of a worthwhile material.
The quality of the selected plywood will depend on:
- the quality level of the product itself;
- operational characteristics of the boat;
- the cost of finishing work;
- time spent on finishing work;
- the amount of material needed;
- the number of seams in the finished boat.
Therefore, you must take the choice with the utmost responsibility. Parts of your flatboat may require blocks or planks, preferably dry and completely free of any flaws or damage.
For the lining of the boat, fiberglass is used, sold in rolls. You can cut it into pieces of the required size, which will be convenient to glue the joints and seams. One piece would be more appropriate for processing the bottom.
Lacquer, glue and paint are used to protect the boat from moisture. It is best if the varnish is shipborne, and the paint is not water-based.
To make the brackets for your boat, you can use plastic clips and copper wire. Any other material will do, which can then be easily removed.

List of tools:
- jigsaw electric action and a set of files for him;
- grinder;
- hammer and planer;
- clamp;
- a measuring tape, a metal ruler and a simple pencil for marking;
- brushes for applying varnish and glue;
- spray gun for working with paint;
- a spatula that will help level the fiberglass during the gluing procedure.

Boat building work: splicing method
After you have selected the appropriate drawings, prepared everything necessary tools, you can start making a boat.
Note! In the event that you cannot find plywood of the size required for your boat, it can be joined together using plywood splicing technologies.

Sheet splicing technology:
- Sheets of material must be laid on top of each other, outline the line of the mustache (its length is ten to twelve thicknesses of the plywood sheet).
- To obtain an even and high-quality result, it is recommended to fix the material with clamps and a restrictive bar. It is along this bar that the mustache will form. Make sure that you do not have sharp drops along the length of this line.
- The formed mustache must be polished with a machine to an ideal state, constantly combining and adjusting the sheets.
- Apply to the mustache area adhesive composition, after which the plywood sheets must be stacked on top of each other with treated surfaces and secured with clamps, placing weights on top to ensure full gluing.
- Excess glue must be removed immediately, without waiting for it to dry.
- After the glue has dried, you can remove the clamps and keep the product at rest for a day until the final solidification of the glue.
Residues of glue must be cleaned sandpaper to even out the seam and make it less visible.
First you need to mark the bottom on plywood, after laying it out on a flat surface. Focusing on your drawing, draw the center line of the boat, after which you can place the grid, on the basis of which the contours of the future product are marked.

For a snug fit of the joints, chamfers can be made at the edges of the adjoining plywood. Suitable for this Grinder. After that, it will be possible to stitch the parts using staples and clips. You should start the procedure from the stern, gradually moving towards the bow of the boat, slowly bending the plywood. Both sides and transom are fixed.
The next step is verification geometric dimensions designs. After that, you need to tighten the clamps more tightly, place spacers at the mounting points of the frames to fix all the details.
Seam gluing is carried out from the inside of the product. To do this, you need to take glue and fiberglass, which must be pre-cut into strips 7 cm wide. Using a brush, apply the adhesive to the joint, glue the fiberglass and smooth it with a spatula, removing bubbles and wrinkles. Seams need to be glued two or three times.

After the seams have dried, it is necessary to fix the fenders, which should pass along the upper edge of the structure. A with inside frames are fixed. The transom should be reinforced with overlays. WITH outer side fasteners are removed from the bottom, the design is finalized with a grinder and glued at the joints with fiberglass.
Finally, let the boat dry, paint it and cover it with a layer of varnish.
In fishing and hunting shops you can find anything you want, and boats are no exception.
But many people want to make their own watercraft, because it is interesting and inexpensive.
Do-it-yourself boats have a number of advantages over factory options:
- Ease of construction. Such a plywood fixture will be much lighter than wooden or metal structures;
- Water stability. For such a boat, solid sheets of plywood are used, and its shapes are ideal for launching;
- Low cost. You will only need to spend money on plywood pieces, glue, varnish and boards;
To ensure the safety of the structure, you only need to use quality materials. Plywood must be solid, without damage. The price of the first varieties is slightly higher, but reliability is also important.
For people who have a skill in carpentry, the work will be easy. It will take a week and a half, if you make a boat in your free time, then a couple of full days.
But only a professional can do designing with his own hands, because you need to accurately calculate the carrying capacity, capacity, nose shape and other nuances.
Construction assembly

When there are materials and drawings, then you need to start work. The first step is to cut out the details from plywood. For this, it is best to use a jigsaw. It is important to accurately cut to size, otherwise the design will not converge.
Then the frames are glued to the tailgate, these parts will be very heavy. If a boat needs a motor, then the tailgate is strengthened.
The next step will be the fastening of the transom with the sides and bottom. Sheathing parts must be fixed with glue.
After assembling the structure, you need to prepare aerosil and epoxy resin. These substances are mixed 1 to 1. The resulting substance is used to seal the seams. Also for this purpose, inside the boat, the seams are sealed with fiberglass strips.
Important: this work uses very toxic substances, so you need to work on the street, or in a ventilated area, and using special means protection.
When the glue dries, you need to put the frames. Then you need to install seats, luggage compartments and other elements. After the vessel dries, it is necessary to proceed to the final stage, this is grinding and sealing with fiberglass and epoxy mortar.
This is followed by the process of painting the structure, this will help to further protect the vessel from the influence of water and give a good appearance.
Painting consists of:
- Degreasing of all parts of the vessel;
- Processing wooden elements impregnation;
- Surface putties. This will mask all defects;
- Primers. To do this, you can use boiled drying oil;
- Applications paintwork materials. To do this, you can buy any paint, but special waterproof materials for plywood will help increase the life of the boat;
Prices
Building such a craft with your own hands is an interesting and creative activity for people who like to do things on their own. The main thing is to adhere to the dimensions indicated by the drawings.
It is possible that during this process, there will be errors that need to be redone. But, the result is a great and inexpensive boat. It is best to store such a tool on dry land. This boat is perfect for use on calm lakes and rivers.
It is forbidden to go out to sea or raft down mountain rivers. You also need to carefully monitor the seams and the integrity of the structure, if there are problem areas, then they need to be sealed.
With a thrifty attitude and proper storage, such a watercraft will last a long time, and will help you have a great time fishing, or just while walking along the pond.
The decision to build a small boat, as a rule, is made on the basis of different reasons. The difficulty of buying a new boat, the limited budget, the peculiarity of the reservoir, the desire to realize your old dream are a few of the reasons that push amateur boaters to take up pencil and paper and start drawing projections of their new boat.
The creative, exciting process of building a ship from calculating the dimensions to the final painting of the hull allows not only to realize the potential of creativity, but also to create with your own hands suitable for various kinds ship application.
It is quite possible to create a small, stable, capable of lifting 2-3 people on board and at the same time a light vessel that has the ability to walk, both with the help of oars and a motor or a sail, without special training, because boats of this class can be created by beginners . And it is for such homemade products that use the most simple tools and limited in means, most available material is plywood.
Robust and at the same time easy to work with both electrical and hand tools plywood is very widely used not only in construction small boats, but also quite solid sea yachts.
At the same time, for a small vessel, plywood is the best way to realize the possibility of installing outboard motor, capable of developing quite decent speeds.

Oddly enough, for the self-building of a boat by the most necessary condition is a properly selected room in which you can freely position the boat, while prerequisite is the presence of ventilation and, when working in the cold season, heating that can maintain comfortable temperature for operation and avoid fluctuations in air temperature.
When making drawings, you will need:
- drawing accessories:
- pencils;
- gum;
- patterns;
- long metal rulers and large triangles;
- T-square;
- cardboard and drawing paper;
- glue for paper;
- calculator;
During the construction process you will need:
- electric jigsaw;
- hammer;
- axe;
- clamps (and most likely a lot - at least 10 pieces);
- brushes, metal spatula, rubber spatulas;
- screwdriver;
- hand planes or electric planers;
- screwdrivers;
- chisels;
- stapler;
- hand saws and electric circular saw;
As materials for manufacturing it is recommended:
- plywood standard sizes 1.5m *1.5m;
- boards - pine, oak:
- fabric for pasting the body;
- putty for sealing cracks and joints of sheets;
- special waterproof glue;
- drying oil natural or water-repellent impregnation for wood;
- oil paint (in case the owner is a follower traditional way hull coloring) or special enamel for ship hulls;
- nails, screws, self-tapping screws;
- metal strip, metal for oarlocks and fasteners;
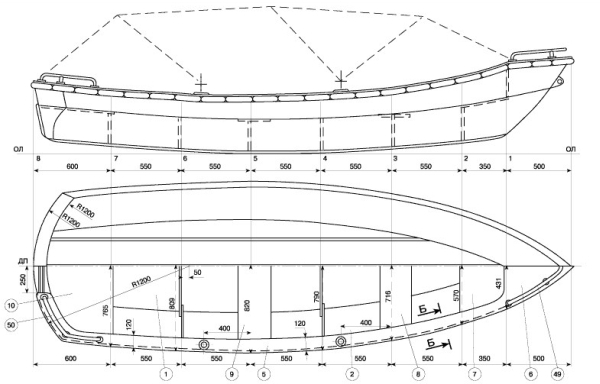
Parameters of the future boat
The optimal parameters for a boat made of plywood 4-5 mm thick are:
How to catch more fish?
For 13 years of active fishing, I have found many ways to improve the bite. And here are the most effective ones:- Cool activator. Attracts fish in cold and warm water with the help of pheromones included in the composition and stimulates their appetite. It's a pity that Rosprirodnadzor wants to ban its sale.
- More sensitive gear. Read the relevant manuals for the particular type of tackle on the pages of my website.
- Lures based pheromones.
- the total length of the hull from the bow to the transom is 4.5 meters;
- width on top at the widest point of the body - 1.05 meters;
- the depth of the boat is 0.4 meters.

The main element of the frame of the boat is the keel - the base on which all other parts of the hull are attached.
The bow of the boat, formed by the stem, is attached on one side, and in the stern there is a sternpost. These are the elements responsible for the longitudinal rigidity of the structure. They can be either solid wood or composite - glued in separate parts, and fixed with nails or screws.
Hull bends and transverse shapes are formed due to frames - transverse elements of the hull, giving it additional rigidity. The boards on top of the stem and the stern, connected to the frames on both sides, form the sides.
The frame thus obtained is sheathed on top with plywood.
A flooring is made inside the boat - a slant, it acts as a lower deck in order not to stand on the bottom of the boat.
Boats for using a motor do not fundamentally differ from those designed for oars or sail. The main difference here is that the stern has been modified to mount the engine - they have a transom board or transom made of plywood that can withstand the engine mount.
Some more modern boats may have other elements of small vessels of this class - cockpit, deck stringers, side stringers. To ensure buoyancy in such boats, sealed niches are provided for filling with foam capable of keeping the boat on the surface in case of capsizing.
Drafting

Drawing up a drawing is actually the most important stage in the construction of a ship. In some cases, it is recommended to use drawings posted on sites and located in open access. But here, too, it is necessary to exercise maximum care and represent all stages of the work and constituent elements ship.
The stage of constructing a general sketch of a drawing can be represented by the following algorithm:
- an axial or diametrical plane is drawn, this is a line dividing the body lengthwise into two equal parts. Since the boat has a symmetrical image, the drawing requires a perfect fit of all elements.
- the diametral plane (DP) is divided into equal segments, these will be the locations of the frames;
- a vertical projection of the boat and a top view projection are drawn;
- plans for frames are drawn along transverse lines;
- the consistency of the location and scale of all elements is checked.
- The drawn up sketch of the frames is drawn on a scale of 1: 1, it is recommended to draw a drawing on such a scale on hard paper or cardboard, this is done to facilitate transfer to plywood or wood.
- The smoothness of the bends is recommended to be made at the marked points using a metal ruler, from the side to the keel.
The resulting drawing is then folded along the diametrical plane and checked for symmetry. Both sides should ideally follow the contours of each other.
How to transfer an image from templates to a tree
After checking the symmetry of all the details, they are transferred to cardboard. Such a cardboard template is necessary to facilitate the manufacture of wooden elements. Templates are transferred to the tree with exact observance of the contours, while adding additional allowances and increasing sizes is not allowed.
When transferring templates to boards, you need to follow the order of the fibers so that they go as little as possible across.
The only exception would be to increase the size of the futoxes, they can be made longer, as they will later be cut off at the top.

Conventionally, the manufacturing process contains the following steps:
- transferring the drawing to templates;
- drawing frames, transfer to a tree;
- keel laying;
- stem installation;
- fastening of frames;
- fastening the sternpost or transom board (for motor boats).
- lining the bottom with plywood;
- board lining;
- gluing joints of sheets, stringers;
- putty, body painting.
boat hull
The skeleton of the boat, its hull is assembled from ready-made parts, while the process itself requires the accuracy of fitting all elements both in the horizontal and vertical planes.
The fastening of the frames to the keel is carried out first temporarily, and after the final check, finally, so that during the installation of the skin, when the hull is turned over with the keel up, all elements are securely fastened.

The rigidity of the boards largely depends on how firmly they are fixed to the futoxes, and how the futoxes themselves can provide structural rigidity. Structurally, the frame of the boat consists of three main parts - a floor timber and two futoks.
Floortimber - part of the frame, which is the basis for fastening the bottom and attached to the keel of the vessel. Futoks are the side parts on which the sides are attached. The junction of floortimbers and futoxes is made a little wider, this solution benefits the strength of the structure. Such a solution is necessary, first of all, for ships intended for engine installation, in order to ensure a safety margin.

The complex shape of the stem must provide not only excellent shape, but also strength, because the bow of the vessel experiences additional loads during movement. best material for the stem is oak, you can also use elm as a very durable wood.
The best option may be an element with a natural bend, but if there is none, you can also use a part assembled from several parts glued along the longitudinal axis of the boat or across. The manufacturing technology is simple; first, the element is manufactured according to the shape of the hull, and then the edges are turned for a snug fit of the sides.
Making a keel
The keel in such a model of a watercraft is the simplest design - it is an ordinary board 25-30 mm thick, 3.5 meters long.

The side boards are selected even, without knots and places of fungus and rot. The width of the board is 150 mm, the length is 5 meters.

In various models, the transom is made to mount the motor. The transom board or transom is assembled from a board with a thickness of 25 mm, or multilayer plywood, reinforced with a bar on top. This reinforcement allows you to more firmly clamp the engine mount clamp.

Frame assembly sequence:
- keel laying;
- installation of stems;
- marking along the keel of the places for installing frames;
- installation of frames;
- connection of frames, stems and transom with side boards;
- checking geometry, final fixing of parts.
- It is recommended to treat the joints of parts with a water-repellent composition or impregnate with drying oil before fastening.

According to the cut out templates, the details of the bottom and sides are cut out of plywood sheets.
- the frame is turned upside down with a keel;
- the outer surfaces of the keel and frames are cleaned, making the surface perfectly flat;
- the joints of the keel, frames, stringers are coated with glue;
- lay the details of the bottom, fix with a stapler, and then pierce with nails;
- the side elements are first tried on, and then, by analogy with the bottom, they are glued and nailed, so that there is no gap between the bottom and sides.
- When installing the sheets, it is necessary to ensure that the fibers of the outer layer of veneer are directed along the body and not across.

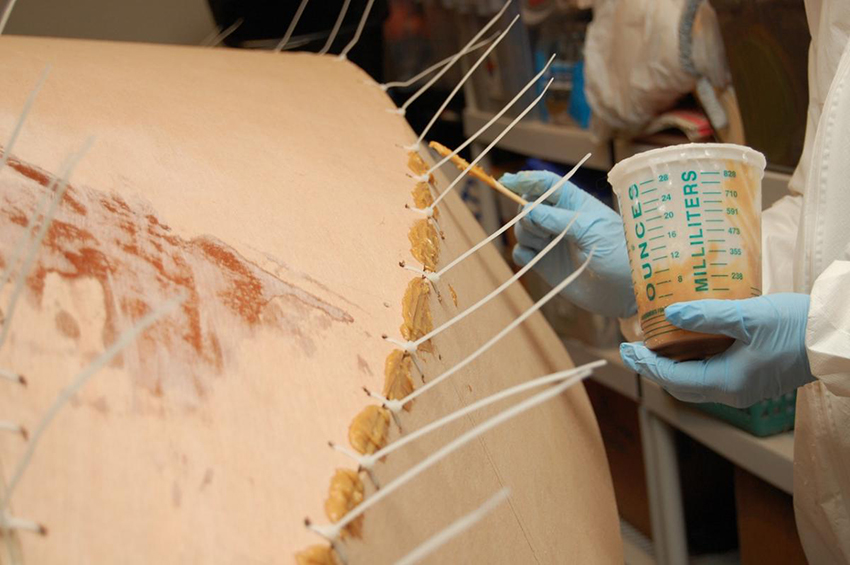
Adhesive work carried out on different stages the construction of the vessel is associated with the creation of a strong connection of the parts to be glued, filling the cavities between the parts.
During hull sheathing, the sheets are glued to the keel and frames, and after fixing with nails, additional glue is used to seal the cavities in the places where the plywood sheets fit.
To improve the protection of the plywood sheathing from the effects of water, fiberglass is glued on top of the plywood. This solution allows you to significantly extend the life of the boat. The fabric is evenly smoothed over the surface, while leaving folds of the fabric and air bubbles is not allowed. Gluing occurs from the keel to the side boards.
After complete drying of the fabric, the surface is puttyed and then painted. For putty, modern ready-made putty mixtures on a synthetic basis are recommended. Painting can take place in two stages - priming and painting with paint, or coating with two layers of paint.
Vessel registration
Self-built boat registration has some peculiarities. During the initial registration of a watercraft, it is necessary to submit to the State Inspectorate for Small Vessels:
- passport;
- individual tax number;
- the Certificate of primary technical examination for the ship, agreed and signed by the inspector, with a conclusion on recognizing the ship as fit for operation;
- checks for materials used in construction;
- receipt of payment of the state duty for registration;
- registration card;
- registration application.
Samples of all documents with online calculators for calculating the amount of payment can be found in the public domain on the Internet.
Building a boat from plywood for a craftsman, as a rule, does not end with a simple test of the boat in high water. As practice shows, this is such an exciting and exciting process that after the first construction there will definitely be a second one, while the experience gained during the first construction will not only be enriched with new techniques and technologies, but also improved with new ones. technical solutions in boat design.
Many, especially avid fishermen, want to have good boat, but not everyone has the opportunity to purchase it. So the question arises: how to make a boat with your own hands? To those who consider such a task impossible, we immediately answer that it is not. The main thing is to apply strength and diligence.
Boat from planks
Thinking about how to make a boat, first of all, you need to decide on the wood. Alder, willow or spruce is perfect for this, but, as they say craftsmen, No better boats made from simple pine boards. Maybe such a boat is a little heavy, but the resinous tree practically does not rot.
Plus, you don't have to paint it. Masters believe that under a layer of paint, the wood is steamed and melted. It is enough to impregnate the boards, and used motor oil is suitable for this.
Wood preparation
At the sawmill, cut the boards to a thickness of 30 mm. After that, they need to be planed to a thickness of 25 mm. This will be enough. Moreover, they are cut only from the side that will be inside the boat.
For those who are not quite sure how to make a boat, you should know that the length of the boards will be the length of the hull. You must choose it at your own discretion. It can be from 4 to 6 m.
When making a boat, consider the fact that the wider the boards, the fewer gaps there will be in the boat, and this, accordingly, will reduce potential leaks. When connecting and bending the boards, there will be gaps in any case, which is why they must be immediately caulked. To do this, use moss or a construction harness, and then additionally coat with silicone.
Fastening all elements of the boat
If earlier the boards were fastened together with nails, now they have been replaced by self-tapping screws, which makes it possible to do this reliably and quickly.
Thinking about how to make a boat, do not forget about the shape of the sides. They can be both inclined and vertical. Although the latter are easier to manufacture, the navigable qualities of the boat deteriorate from this. Therefore, many prefer to bend them. This is not to say that it is easy to do this, but it is absolutely possible. The main thing is to know which devices to use for this device. It is good to do this with the help of special clamps, and it is necessary to bend slowly, gradually increasing the load. Boards should be periodically moistened with water. This gives them flexibility.
For greater reliability, the boat is equipped with stiffeners. They are usually made from oak board. It is also used for the device of the pointed bow of the boat. The boards of the sides and the bottom are inserted into it, and in special grooves. Self-tapping screws are not used here for fastening.
When deciding how to make a boat, you should immediately estimate the width of the front and stern. Usually, in the bow part, the width reaches 80 cm, and in the stern area it decreases to 30–40 cm. In this case, it is better to make the sides no more than 40 cm high.
This shape of the boat makes it easy to control it from the stern, using one oar.
rubber boat
Many fishermen prefer to use inflatable rubber boats for fishing. They have a number of advantages over wooden ones - they are compact and weigh little (no more than 6 kg), and if taken care of, they serve for a very long time.

Those who do not have the opportunity to buy a factory-made boat are thinking about how to make a rubber boat on their own. With certain skills, this is a completely solvable problem.
Necessary materials
The best material for making rubber boat- rubberized BCC fabric. It is used for the production of military equipment personal protection. It is very thin, light, durable, does not rot and is rubberized on both sides.
To sew the main elements of the boat, nylon thread (No. 30) is used. Stretch them on sewing machine. To fasten the elements, rubber glue 4508 with natural rubber is used.
Manufacturing process
- Drawings of a rubber boat are taken as a basis.
- Patterns for boat elements are cut out of thick cardboard.
- On big table lay the fabric face down, put patterns of parts on it and circle them, and make an allowance for the seams of 1 cm.
- The finished parts of the boat are first baited with a nylon thread, and then sewn on a typewriter.
- Then, strips 50 mm wide are cut from the fabric and all seams are glued on top of them.
- In this way, the bow and stern parts, as well as the side cylinders, are assembled.
- After assembling the entire structure, an inflation valve is installed. For it, you can use a small piece of rubber hose or buy ready-made factory-made.
- Then proceed to the manufacture of the bottom. For this, an already made boat balloon is pumped up. A fabric is spread on the floor, a balloon is placed on top and circled around it.
- For the bottom, you need to make two patterns. They are glued together and the resulting double bottom is glued to the bottom of the boat.

Such short instruction gives general concept how to make a boat yourself, as well as decide on the materials and scope of work. We hope that our advice will be useful to you, and you will special efforts You can make your own boat.