A gazebo on the estate is an integral part of modern landscape design. The beauty is that a gazebo with your own hands can be made in absolutely any style. Many people ask the main question after they decide to build a gazebo with their own hands - where to start? We will give a clear answer to this question in today’s material, and will also analyze equally important points regarding the construction of a wooden gazebo with our own hands.
Before starting work, you need to realize that a gazebo is a fairly simple structure that does not require special skills and knowledge in the field of construction. If you understand simple technology and the sequence, which will be discussed below, then a gazebo can be erected in a couple of days, with a minimum of effort, because in the end, you don’t Vacation home gathered to build.
Moreover, by studying the detailed guide to building a gazebo with your own hands from wood, you will save not only time and effort, but also money. If the gazebo design below is not to your liking, you can choose a slightly different shape, because you will now be familiar with the main stages and principles of construction. Who knows, maybe you will be able to make such a masterpiece with your own hands, shown in the photo below. The main thing is to believe in yourself.
DIY gazebo. What to make it from?
Let’s immediately decide on the material for the future design. Majority experienced builders They assure that the best gazebos are made of wood. This choice offers a lot of advantages:
· natural look;
· ease of construction of the structure;
· simple wood processing;
· You can make a design of any style.
In addition, during the construction process you will need the most common tool, which lies in every owner’s garage. Just as little materials will be required for the construction, which will save significant money. Don’t forget that if you wish, you can build a gazebo out of wood that, at the sight of it, guests will not want to leave your site. This is of course sarcasm, but there is some truth in it.
What about the foundation?
The wooden gazebo is quite plastic, elastic and weighs little. Thanks to these qualities, you can begin its construction without a previously prepared foundation. It is enough to treat the wood with special chemicals to protect it from contact with the ground. This will protect it from the effect of rotting. Moreover, there are types of gazebos, for example, wicker ones, which would be simply stupid to place on a foundation.
Initial stage of work
The first thing that needs to be done is to work out in detail the plan for the future construction. If you can’t get your bearings regarding design, then today there are a lot of magazines and websites dedicated to construction topics. There you can consider examples of the most unusual, and at the same time the most simple gazebos for the estate. Drawing up a plan includes:
· purpose of the building;
· gazebo shape;
The shape of the structure can be square, round, rectangular, octagonal, hexagonal, and so on. Site owners with creative thinking and wild imagination can experiment by building a gazebo in the shape of Baba Yaga’s house, a fairy-tale palace or a spaceship. Below is a very creative and unusual example gazebos.

Or you can give preference to a more classic style that will look simple and tasteful.

Gazebos also differ in their purpose. You need to decide from the very beginning whether you just want to relax in the shade on fresh air or a large group will have fun in the gazebo.
If the first option, then you can start building a regular gazebo with your own hands with several benches.

If you plan to build it for a fun time for a company, give preference to a large platform and a canopy.

For those people who cannot imagine a holiday without outdoor barbecue and field kitchen, ideal option there will be a gazebo with a Russian stove or.

Advice! Before choosing the shape of the future structure, you should pay attention to the existing buildings on the site, as well as the landscape design in general. The chosen style of gazebo should be in harmony with the surroundings.
Deciding on a place
Once you've made your final decision on the design, it's time to choose appropriate place. Regarding the proximity of the gazebo to the house, this question remains at the discretion of the owner. Based on the following: do you want to take a break from the hustle and bustle of your home or do you want to spend time sitting outside with your household.
Do not locate the building in a low-lying area; this cannot be done for obvious reasons - it is in the low-lying areas that water will accumulate over time, which will lead to rotting of the wood.
Advice! Place the gazebo near trees, flower beds or other vegetation. This way you will achieve the maximum aesthetic effect, because it’s nice when you have a view of the wonderful plants from the gazebo.
DIY gazebo. Photos, drawings
After the above preparatory activities, we proceed to design. The drawing will take into account:
· height;
· size;
· components;
· methods of fastening, etc.
The drawing should also take into account the amount of necessary building materials that will need to be pre-purchased.

As an example, we settled on the standard square shape of a structure with a roof. This is the design that will be discussed in today's practical guide. We remind you that taking into account the information and examples below, you can choose any other gazebo design you like.
Required tools and materials
To begin construction, you must have the following materials:
· concrete for the installation process of racks;
· timber 15x15 cm for making the base and racks;
· timber 10x10 cm for roofing elements and top sheathing;
· beams for logs 5x15 cm;
· board for flooring;
· plywood or roofing boards;
· roofing materials, depending on your choice, it can be metal tiles, slate or corrugated sheets;
· boards for railings and other decorative structures;
· lining for side cladding;
· frames with glass (if these elements are provided for in the plan);
· paint, varnish;
· self-tapping screws, screws, nails.
It is worth remembering that changing the project will also affect the list of materials; it can either decrease or increase, remember this.
Also make sure you have the tools you will need during the construction process:
· hatchet;
· shovel;
· wood hacksaw;
· electric or chainsaw;
· hammer with nail puller;
· planer;
· chisel;
· roulette;
· ladder.
Armed with the above tools, you can build almost any wooden gazebo on your site.
How to build a gazebo with your own hands
After all of the above recommendations have been completed, it’s time to start the main thing - building a gazebo with your own hands. To begin with, it is necessary to treat the wood used with moisture-proof and antiseptic agents. This must be done to protect the tree from rotting.
The next step is to install the supports. Use pegs and ropes to mark the location of the future building.

Advice! In order to get a perfectly even rectangle or square, it is necessary to maintain the symmetry of the diagonals.
We will focus on the option when the foundation is not poured, but. This option is much easier to implement. Dig holes about a meter deep for the posts.
Compact the bottom of the holes with gravel, approximately 5 cm, and then fill with a 10 cm layer of concrete. Wait until the concrete hardens a little and place the anchors in it. It is on them that the racks will subsequently be attached.
You can do it a little easier. Place the post vertically in the hole and fill with concrete. It is important to ensure that the stand is installed level and strictly vertical. The posts must be dug into the ground in such a way that their piping forms a perfect square.

After installing the racks, it's time to start building the frame. This action must be started from the bottom harness. Can be used for flooring ordinary timber, which must be laid every 50 cm. This design is guaranteed to withstand the weight of the flooring.
Next, install the remaining frame structures - racks. They are responsible for supporting the roof and the top trim. The location of the racks must be strictly symmetrical, the number of which depends on the dimensions of the gazebo.

After erecting the frame, we begin laying the floor. Batten fastened using ordinary screws or nails.
Installing the roof is a critical stage of construction. First of all, the top trim of the entire structure is made of beams, which must be attached to the supports with nails. Subsequent construction depends on what roof shape you have chosen for your future gazebo. More often, a four- or gable roof is chosen due to its practicality, reliability and ease of execution.
The hipped roof looks very original; we will focus on it as an example. To make the structure stronger, it is necessary to install additional rafters fixed to the top and main frames. You should ensure the symmetry of the rafters, this is very important.
Important! It is necessary to fasten the material to each other every 20 cm along the entire length of the rafters.

It is worth drawing your attention to the fact that you should follow safety regulations when working at height. Make sure that the stepladder does not wobble and that there are no sharp or dangerous tools underneath you.
The final stage is decorative design. It's time to show your imagination and decorate the walls, roof and railings of the gazebo. Usually they use a standard beam for the railing, then covering the structure with clapboard.
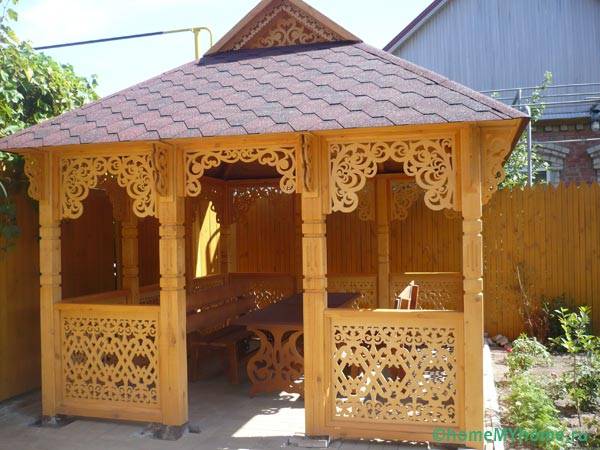
If you get a little confused, you can apply carvings to the wooden surface of railings and walls. This adds color and originality to the finished structure. However, for wood carving to look truly impressive, there must be certain skills in this matter.
Afterwards you can open it wooden surfaces varnish or paint them.

Further actions depend on your preferences. You can fill the gazebo with comfortable and roomy sofas, install a chaise longue in it, or give preference to ordinary benches and a table.
By the way, you can also decorate tables, benches and chairs for the gazebo yourself. This will complement general design. Wire the light, set mosquito nets, take care of the path from the gazebo to the house and enjoy the outdoors with close friends and family.
Weaving from twigs - simplifying the process
If you like things simple but tasteful, then you'll definitely love our next idea. Moreover, it will significantly simplify the construction process. A gazebo made of twigs is very popular today. It not only looks impressive, but is also quite practical.

The process of building a gazebo from twigs with your own hands is quite simple. It is necessary to drive the rods into the ground to a depth of 35 cm. The main thing is that the rods form a symmetrical square or rectangle, although the structure can be made in the shape of a hexagon or octagon.
You can also sheathe the installed wooden posts of a regular gazebo with wattle. This also looks impressive. If your gazebo is located near the sea or river, you can use ordinary ropes for weaving; it will look quite appropriate.

It is worth emphasizing that weaving is a very painstaking process, although not expensive. Based on the above weaving patterns, you can choose the most suitable pattern for your gazebo.
DIY gazebo made of wood step by step video
Surely you are convinced of own experience that it is not difficult to build a gazebo with your own hands from wood on your site. We figured out how to build a gazebo with our own hands. Choose the gazebo design you like and decide on the construction site. The main thing is to adhere to the above recommendations and use our methodology. Don't worry, you will definitely succeed. We recommend watching the following video of the process of building a gazebo yourself, for a better understanding of the construction process.
We will send the material to you by e-mail
B A gazebo is an indispensable attribute of a private house, a country cottage and just a dwelling that has a separate plot of land. It will protect from sun rays, rain and other adverse weather conditions. Under the roof of the gazebo it is always comfortable to spend time with friends or sit down with your family during an evening tea party. However, not everyone knows how to make a gazebo with your own hands from wood step by step. Let's look at the rules for constructing a gazebo: what to make it from, what materials are needed, and, finally, the stages of its installation.
Wooden gazebo
Wooden gazebo: what are the advantages?
Today there are many materials from which you can make a gazebo. The most common of them are metal and wood. In this article we will look at how to make gazebos with your own hands from wood step by step. Why made of wood? Because this material has a lot of advantages:
- easy to install, since wood is a relatively light material;
- Wood is an environmentally friendly material, so it will not cause harm to the environment;
- Wood is a fairly durable material: it is impervious to ultraviolet rays. To prevent the wood from rotting from exposure to moisture, it should be coated with a transparent wood varnish;
- Wood goes well with stone, concrete, metal and other materials. In terms of decor, it is universal;

- Wood carving is also popular now. Exquisite relief designs will become a unique decor for the gazebo.


- Iron or wooden pegs - pegs - will be needed to mark the area where the gazebo will be installed. Also, for convenience, a fishing line is used, which is pulled between pegs installed along the intended edges of the structure;


- Auxiliary materials: saw, plane, nails of different sizes, etc.
The amount of materials needed depends on the size of the planned gazebo.
Stages of constructing a wooden gazebo
Selection of design and drawing of the gazebo
Before construction begins, you need to decide what kind of gazebo you want. Here the flight of imagination is unlimited. Designs can be rectangular, hexagonal, round, square, etc. Having decided on the shape, you need to set the dimensions of the future building.


Below is a plan for the construction of an octagonal wooden gazebo. This design is very convenient because inside the gazebo it will be comfortable and convenient: it can easily accommodate up to 12 people. Its area may vary depending on the location and your desires. The height of the gazebo is 2.5 meters.
Construction stages
Marking
The site selected for construction is cleared, and in accordance with the above dimensions, iron pegs are installed in the corners. The fishing line is pulled at the corners. Mark the location where the entrance will be located.

Foundation preparation
According to the markings, he digs holes, at the bottom of each of them we make a sandy base. It is highly advisable to compact the sand before laying the foundation to avoid excessive settlement. We place concrete blocks or bricks at the bottom, fill it with gravel, compact it and fill it back with soil. All blocks must be set strictly according to level.

Instead of blocks, you can make formwork in each hole and pour cement mortar.

Base structure
After the foundation is ready, we install the wooden base in accordance with the drawing. There are two ways to do this. The first method: we set up a base of wooden blocks using internal jumpers, sew up the floor and only after that we set up wooden posts, securing them to the floor with nails and metal plates.

The second method involves placing wooden posts directly on each foundation pillar between the foundation lintels.

The beams are fastened using metal corners.


To ensure the reliability of the structure, at the stage of constructing the foundation, you can place a metal rod in each post, onto which the base of a wooden post will be inserted.

Installation of harness
Next, along the edges of the gazebo (except for the place where the entrance to the structure is planned), we install the trim from wooden beam, made in the form of some kind of pattern. We fix the beams with nails and screws. We leave the entrance area open.

Roof structure
Now we are equipping the roof of the gazebo. If you want to make a roof with an oblique slope, install 8 rafters on supporting pillars, connect them with a horizontal cross member. The result will be a structure in the shape of the letter “A”. If you prefer a lean-to wooden gazebo with your own hands, step by step, then we arrange one continuous rafter on the pillars.

We lay the roof, and only after that we lay the tiles on its surface.

To understand how to make a wooden gazebo with your own hands step by step, a drawing is simply necessary. Having calculated and planned the entire structure from the very beginning, the installation process will be easy and fun.
A gazebo is an integral attribute of modern suburban areas. Where else, if not in the gazebo, can you relax, breathe fresh air, and admire your garden. Since the gazebo is a light structure, in some ways, even airy, the scope for creativity when constructing a gazebo opens up limitless. But everything should be in moderation, as they say - without fanaticism. The design of the gazebo should correspond to the general spirit and style that reigns in the suburban area. Of course, the gazebo in the shape of a Chinese pagoda is very beautiful. But then, to match it, you will have to build a rock garden around it so that it is a complete composition, and the pagoda-shaped gazebo does not discord with the surrounding environment.
An important element is the size of the gazebo. And here we must proceed from the principle of proportionality. How smaller garden, the more elegant and lighter the gazebo design should be. In some cases, a lightweight collapsible design can be used.
The location of the gazebo also plays a big role. If you install it in the sun, you won't get much pleasure. The optimal location of the gazebo is a place next to trees, or under the canopy of trees, which will bring coolness. A good option for locating a gazebo is to install it next to a body of water, natural or artificial. And it is advisable that the place for the gazebo be chosen in a place where there are no sources of noise.
Classification of gazebos
Gazebos are classified according to different criteria. Gazebos are divided into stationary and portable. Stationary gazebos include gazebos built on a foundation, which makes them difficult to move from place to place, and built from durable materials. Portable gazebos are lightweight, mainly collapsible structures, which are installed in those places where it is needed at the moment.
Gazebos are classified according to the type of material from which they are made. The most commonly used material is wood. Metal is also used in the construction of gazebos. In this case, metal gazebos are divided into forged and welded.
Stone, both natural and artificial, and concrete are also used for the construction of gazebos. These are massive structures that are rarely seen.
Gazebos are divided into open and closed. Outdoor gazebos include mushroom gazebos, tent gazebos and pergolas. Mushroom gazebos are used by site owners who do not want to clutter their site with unnecessary structures. Tent gazebos are a structure consisting of a table, chairs or benches and covered with an awning on top. Pergolas are special structures designed for growing climbing plants. They have solid foundation and structure to withstand wind loads. Pergolas come in a variety of shapes - round, multifaceted, linear, fan-shaped.

Closed gazebos are a type of terrace. Such gazebos are usually glazed, often insulated, heat is supplied to them or internal heating is used. In such gazebos the winter cold is not scary either.

In addition, gazebos are divided according to the type of roof used. On gazebos, spherical roofs are used, domed, single-slope and gable, hip (four-slope), hipped, pseudo-Chinese.

Gazebo with grill or barbecue

It will not be an exaggeration to say that all people living or traveling on holiday suburban areas and dachas, they really like to cook food outdoors. And the main dish, which is especially often prepared in this case, is fried meat. These are shish kebab or steaks made from meat or fish, cooked on a barbecue. It would seem, what is the difficulty here? Place the grill in the gazebo and talk with friends while the barbecue is being prepared. But this decision is fundamentally wrong. It will be inconvenient to talk, and it will be inconvenient to monitor the grill. Most gazebos are built based on healthy minimalism, and are designed to accommodate a table, chairs or benches. And usually there is no additional space in them. In addition, smoke from burning wood or coal will remain in the gazebo, and no one will get any pleasure from it. 
To avoid these inconveniences, it is necessary, even at the design stage of the gazebo, to provide for the placement of a barbecue and a hood. It would seem that everything is obvious, but such thoughts come when the gazebo has already been built. How to get out of this situation? One option is to build an additional extension to the gazebo, but in such a way that the design of the gazebo does not deteriorate, and place a barbecue with a hood in this extension. Thus, we sort of divide the gazebo into two zones - a relaxation area and a work area. In this case, fire safety is increased and the possibility of burns to guests from a nearby barbecue is eliminated.
If you want to build a stationary barbecue from brick, then when building a gazebo, it is necessary to provide for the construction of a foundation for the barbecue, since in this situation there will be no floor reliable support. In addition, you will need a place to store firewood or charcoal, for fireplace accessories, and shelves for other accessories.
Polycarbonate gazebos
Recently, a new material has appeared on the market, gaining increasing popularity among owners of dachas and suburban areas. This new material is called cellular polycarbonate. It has outstanding physicochemical and mechanical characteristics, which ensure its popularity. Polycarbonate is a very durable material (10 times higher than plexiglass), transmits sunlight well, while providing protection from ultraviolet radiation, resistant to aggressive chemicals, provides excellent sound and heat insulation, and can withstand extreme temperatures without changing its properties: from -50 to +125 degrees Celsius. And, what is very important for summer residents, it can be processed perfectly without breaking.
Below are several examples of the use of polycarbonate in summer cottages and suburban areas.


Building a gazebo with your own hands (1 option)
Next we will talk about the construction of a wooden gazebo measuring 3 by 3 meters. After determining the location of the gazebo and marking the territory, the foundation of the future gazebo is built. You can learn more about the types of foundations from the article “Types of foundations for building construction”
In this case, a columnar foundation made of bricks was used. All pillars are displayed on the same level. Iron rods with a diameter of 10 mm are mounted in four corner posts. Their height is approximately 200 mm.


The finished foundation looks like this.

Beams measuring 100x100 mm make the base of the gazebo. At the junction points, the beams are fastened “half-wood”. First, holes are drilled in the beams for attachment to iron pins.

Don't forget about waterproofing between the foundation and the beams. A piece of roofing felt is quite suitable as insulation.

Then pillars are made from 100x100 mm beams. Their height is 2.3 m. They are processed with an electric planer. Before installation, a cut is made in the middle of the post for future diagonal strapping. The cut size is 40 width x 80 height x diagonally through the post. (for use in tying 40 mm boards with a width of 100 mm)

Holes are drilled at the lower ends of the posts for attachment to the rods. After this, the pillars are aligned vertically and secured with temporary struts. Additionally, they can be secured with screws to the base beams.


The intersection of the boards can be reinforced with 40x40 mm bars.

At the edges of the bundle, a part of the board is selected with a size of 20 mm in height and 100 mm from the edge of the board.

Then the diagonal strapping is inserted into the cuts and secured with nails to the ends of the pillars.

After this, the external tying of the pillars is done.


The roof of the gazebo is supposed to be hipped. A block 80 cm long (roof height) is cut from a 100x100 mm beam, in which a cut is made into which the first two rafters will be inserted.


After this, the post with the rafters is installed so that the post rests on the middle of the diagonal tie, and the rafters rest on the vertical posts. The rafters extend beyond the gazebo to a distance of 40-50 cm. The rafters are secured with 200 mm nails or screws. After this, two other diagonal rafters are fixed. They are attached to the post with an overlay.

Then the rafters are fixed, which lie on the outer frame of the pillars. Secure with nails and screws.


To make the entrance, two columns 90 cm high are prepared from 100x100 mm timber, in which a hole is drilled in the lower end.

Pieces of reinforcement are driven into the lower beam, pre-sharpened onto which bars are placed.

Then the short railings of the gazebo, located on the side of the entrance to it, are attached to the bars with screws.

After this, the roof sheathing is done.

For the pillars of the gazebo, stationary struts are made from 40x70 mm timber. They are secured with screws, and the temporary struts are removed.

From the entrance side, the struts are made crosswise to strengthen the short railings and low posts. At the intersection, the struts are connected “half-tree”.

To enhance the load-bearing capacity of the gazebo, between bottom beam and railings, and between the railings and rafters, additional posts are installed. The entrance is also strengthened. The result is this.

Then 30x40 blocks are nailed under the railing and onto the lower beam, to which the lining will be attached.

The lining is nailed to the bars, both outside and inside.

After this, the roofing material is laid. Yes, don’t forget to treat the surface with a moisture-repellent impregnation. This will prevent the formation of mold and rotting of the wood. As a roofing material, you can offer soft tiles or any other roofing material.

You can learn more about the variations of roofing materials in the section "Roofing Materials".
In the upper part of the gazebo (from the railing to the top frame of the pillars) a decorative sheathing is made. In addition to its purely decorative function, it strengthens the structure of the gazebo.


It will also be possible to grow climbing plants along this trellis. Then the pediment is installed, which is attached to the rafters.

All surfaces must be treated with stain or other moisture-repellent composition. This can be done both as the gazebo is being built and after its construction is completed. And now the gazebo is ready.

Do-it-yourself gazebo with entrances from the end, with benches and a table (option 2)
This type of gazebo is the most common. It is often offered for sale in various construction markets. This is an option when you have a canopy over your head, benches are attached to the walls, there is a sun in the middle, and there are two entrances (exits) to the sides.

First we assemble the frame. Initially, you can install spacers technological ties, they can be removed later...

And sheathing for corrugated sheets

attach the corrugated sheet to the sheathing

Naturally on both sides

This is the view. Now the technological ties can be removed.

We are starting to make benches.


Now the table

Everything needs to be sanded from skidding and unevenness... Without automated tools it won’t be easy.

That's general form the resulting gazebo. All that remains is to cover it with paintwork, which imparts color and protective properties.

Now the next option for making a gazebo.
Do-it-yourself gazebo from ready-made modules (option 3)
An example of this gazebo is a modular design. In fact, the floor and walls are made in the form of panels that are assembled. Rafters are mounted on them, flexible tiles. In the end, a porch is made. More on all this below.
First of all, this gazebo requires modules - shields. They consist of a platform with windows at a certain height (3 pieces) and one module with an entrance door.

The edges of the modules are attached to a beam that will be installed vertically. There is also a modular, assembled floor.

In fact, the floor is the base of the gazebo installed on a columnar foundation. Let's start with the foundation. We install pillars from bricks or pour them from concrete.

Then we cover them with a sand cushion and let them settle.

Next, we install the floor and beams at its corners. We install the floor through insulating material so that it does not pick up water from the stone. The boards can also be pre-treated with a corrosive compound. Between the vertical bars coming from the floor we place walls - shields.

Now you need to install the rafters on the roof.

We put boards on the rafters. In our case, the gazebo will be covered with soft tiles, so the boards are mounted close to each other.

We cut off excessively protruding rafters after installing the roof boards

Now it's the turn of the tiles. We unfold it and fasten it on four sides.

You can also make a small staircase to make it easier to reach the height of the gazebo floor

We treat all visible parts with stain and varnish. Our summerhouse from modules is ready.

DIY hexagonal gazebo (option 4)
And we will consider one more option for the gazebo. This time the gazebo has a hexagonal base. As always, it all starts with the foundation. In our case, it is completely “none”. It is preferable to make at least a columnar foundation at each corner of the gazebo floor.

We assemble the hexagon at the base. The timber is best secured with a tongue-and-groove joint.

Place a floorboard on the floor.

We install vertical bars at the corners of the floor

We connect them from above with rafters and ceilings.

We make a sheathing for the corrugated sheet that will cover the roof of the gazebo

We install corrugated sheets and ridges on the roof bends

Let's take on the railings. We mount the lintels from below and above, and nail the railing boards onto them.

We clean up the trash. If necessary, we make a small porch from bricks or boards.

The hexagonal gazebo for the dacha, where you can spend time pleasantly and carefree, is ready!
Photos of gazebos for an example of construction


If you have decided to make an open gazebo with a swing and a fireplace, then we have such an option."
Any summer resident would like to have a beautiful, spacious gazebo on his property. You can have tea parties in it, invite guests to a summer barbecue, read your favorite book, or just relax after working day, enjoying nature.


Build wooden gazebo with your own hands on your own plot of land It’s not difficult, the main thing is to stock up necessary materials and strictly follow technology.


Features and Benefits
Any gazebo is characterized by a number of utilitarian and decorative properties. The practical function of a canopy is to protect from rain and scorching heat. sun rays. TO decorative qualities include an attractive appearance, a harmonious combination with landscape design and other buildings. It’s worth building a wooden gazebo with your own hands, taking into account all of the above.


When choosing a building material for the construction of an object, it is worth considering the positive and negative aspects of a particular material. So, wood and a gazebo made from it have a number of advantages:
- simplicity of design and ease of processing allow you to build a canopy or a more complex object alone;
- you can choose projects of different styles and execution;
- environmentally friendly material, safe for human health;
- Compared to brick, wood is a budget and affordable material;
- lightweight design does not require a reinforced foundation;
- with proper care of the wood, the gazebo will last for many years;
- Any building made of wood has an attractive appearance and fits perfectly into any landscape design, combined with other materials (brick, stone, iron).


But this material also has disadvantages. It is unlikely that their list can force one to abandon the construction of a wooden gazebo, but these features should be taken into account when constructing a building and caring for it:
- Wood rots easily and often grows mold, especially in humid climates. To avoid destruction of the material, even before the start of construction work, each wooden element is treated with antiseptics and special impregnations.
- This material is highly flammable and supports fire. When installing an outdoor fireplace or barbecue next to the gazebo, it is important to follow the technical rules fire safety on site: do not leave an open fire unattended, always extinguish the coals after finishing cooking, and even during the construction stage limit the possibility of sparks hitting the wood.


Kinds
You can select different kinds gazebos They differ in functionality and design. From a practical point of view, the gazebo can be equipped with various additional options, which will allow you to expand functionality the buildings.
Gazebo and summer cuisine in one building - this is possible, because a spacious shed can be equipped with a real kitchen.


A cutting table, an electric stove, a sink and a refrigerator are the necessary attributes for the arrangement. Directly for the feast you will need a dining set, which is best chosen from the garden furniture options. Such a building will provide comfortable cooking in the fresh air, and you can immediately gather your family around the table. This option is perfect for those who do not like to stand at the stove in a stuffy kitchen at home.


Care should be taken in advance to provide communications to the construction: light, water, sink drain. Such an object is quite massive, so the construction of a reinforced foundation will be required.


Another option for comfortable outdoor cooking is canopy with outdoor oven or fireplace. For those who like to have a barbecue in any weather, this option will come in handy. The hearth itself, of course, is made of refractory, heat-resistant brick, but a canopy in the form of a gazebo can be made from wooden structure. For this type of construction, a general reinforced foundation is desirable.


Gathering for a barbecue outdoors in winter - what could be more tempting? Insulated building with barbecue grill inside will help to implement the idea in warmth and comfort, while remaining in the fresh air. The extensive glazing of the winter gazebo will help you merge with nature. Typically, such buildings have a hexagonal or octagonal design, a barbecue made of bricks or stone is erected in the center, and an exhaust pipe is installed in the roof. Guests sit around the fireplace, fry meat, talk and warm themselves.


Such an object requires a reinforced, insulated and waterproofed foundation. Insulate mineral wool followed by walls and a roof. The gazebo is designed for use all year round. In the warm season, you can open the windows and enjoy nature. Mosquito nets will get rid of mosquitoes and flies.

Gazebo-solarium is a semi-closed summer garden space. The most popular type of such gazebos are pergolas. Such solariums first appeared in the south of France as supports for vines, thus they served as a kind of corridors on plantations for farmers. The shade from the abundant foliage created a pleasant coolness, and, thanks to the ease of construction, pergolas became widespread throughout the world.


There are other types of tanning beds.
Partial shade can be created through additional fabric draperies or with the help of climbing plants - roses, hops, girl's grapes, honeysuckle, clematis and others.


Gazebo swing- this is a small architectural form with narrow functionality, but, one way or another, every guest, and even the owners, will enjoy swinging on a homemade wooden attraction. The canopy will protect from direct sunlight and light rain; pillows and a mattress will give the gazebo-swing coziness and comfort.


Design form
In addition to the functional diversity of buildings, there are different types of gazebos in style and shape. This also includes objects made from wood that has been processed different ways, and the possibilities of roof design or structural features of the frame.
Square and rectangular gazebos are the simplest forms. This kind of construction can be done as a simple canopy, without railings or sheathing, and even without flooring - just dig in stable pillars, fill them with concrete, and build a roof. The structure looks almost transparent and weightless, but it also protects from rain and sunlight.


It is better to build a spacious square or rectangular gazebo in the classic way - on a foundation, with a floor and railings. Then it will have a finished look, and also meet all the requirements from the practical side of the issue.


Frame hexagonal or octagonal gazebos are more durable than the simplest forms, therefore they can withstand the thickness of snow and winter glazing. In addition, such space is much more spacious. The gazebo looks light and relaxed. However a large number of material goes to waste, so this type of construction will cost more.


Rotunda gazebos round shape look luxurious, often unusual. Due to the structure of the roof, they have a rather complex roof covering technology. It is not easy to find a real wooden gazebo in the shape of a circle in summer cottages; craftsmen mainly make hexagonal or octagonal awnings.


Wood is a universal material for supporting any stylistic idea of landscape design. Various ways wood processing and the possibility of using paint coatings will help you create an object in a classic or any style on the site modern style, for example, hi-tech, minimalism, country or rustic. In addition, you can build an object with different designs roof frame - with pitched roof, flat, gable, hip, dome, conical, hipped or multi-gable.


Gazebos can be completely open or semi-open.
So, part of the walls or one wall of the canopy can be closed, and the rest left open. It is important to first track the wind rose, and then install a blank partition on the windward side. This way you can avoid drafts.


Self-production
Many companies carry out their own production of wooden gazebos. The finished structure is installed by company employees at the dacha or on the site country house. But making a wooden gazebo with your own hands is not difficult, the main thing is to follow the technology step by step, without neglecting separate points. A considerable part important work falls on those stages that must be completed before the actual construction of the object.
Preparation
As soon as the idea of building a gazebo appears, it is necessary to determine its type, functionality, style, and place on the site. For such a recreation area, it is better to choose a picturesque corner of the garden in order to be able to enjoy nature. In this case, the building may have a free design style. However, if the object is located in close proximity to residential building, then the buildings should be in harmony with each other, creating a single architectural ensemble.


The size of the gazebo is determined by its functionality. For a short rest in the shade, you can limit yourself to miniature forms, for example, 1x1.5 m. The interior can be equipped with a bench mounted on vertical supports and a small table. For feasts with family and friends, you should think about a spacious building of about 3x3 m. It is important that a dining group can be placed under the canopy, and that guests have the opportunity to freely leave the table without disturbing anyone.


Stove and kitchen options should be even greater. It is necessary to ensure safety - do not place the table and chairs too close to the hot stove, so as not to create a fire hazard, and also so that no one can get burned. A size of approximately 4x4 m or more would be optimal.

For buildings with increased functionality, all communications should be laid in advance. For any gazebo you should consider an organized option garden path. In the event that the project does not include its own floor covering, an extension of the path can be its replacement.
This way you can create unity on the site.


Selection of materials
A wooden gazebo can be made in different ways. Each of them assumes various options wood processing. There are several types of treated wood from which gazebos can be built:
- From a log house. This is a massive building made of thick and durable pine or birch trunks. Log gazebos look fundamental and can become the basis of a rustic or country style. Decorations in the form of carvings on the pier, valance, railings and lining of the lower part will add Russian flavor. Such structures look best in simple shapes - square, rectangular.


- Alcove from timber built using frame technology. Such a building is much weightless, and also cheaper. An economical option - instead of ready-made boards, use unedged material for cladding the lower part, which can be processed independently, or used in the original, as is, as a stylistic device.


- From the trunks. An unusual alternative to log gazebos. The difference is that knots are deliberately left on the material; they do not try to process the wood into a perfect cylinder. Sometimes they use trunks without removing the tree bark from them, or choose a material with a deliberately curved shape. The forest style can be massive if you choose voluminous trees to build the supports of the gazebo, but the structure can be graceful and subtle if it is made from young plants.


Calculations
Before making calculations and starting construction, it is necessary to draw up a project in the form of a drawing of the future object. The schematic drawing should show the size of the future building to scale. Separate drawings should depict complex structural work in more detail, for example, the installation of roof supports. If the gazebo has an outdoor fireplace, then the structure of the chimney, firebox, and foundation are also depicted separately with careful drawing.


Let's look at the example of drawing up a drawing for a 3x3 frame gazebo, and also make calculations required quantity building material.
Such a building is budget option for a country house or summer cottage, while it looks simple and beautiful.


So, the main ones technical features object:
- size – 3 by 3 meters;
- height – at least 2 meters, optimally 2.10–2.30 m;
- lightweight columnar foundation on brick or concrete blocks;
- for the frame it is used: as vertical corner supports - timber 150x150 mm in the amount of 4 pieces, as central supports along the perimeter - timber 150x100 mm in the amount of 5 pieces;
- roof - hipped, laid on rafters;
- as a roof - soft tiles;
- floor – wooden (27 boards of 6 meters, size – 25x150 mm), laid on logs, installation of stairs is possible;
- for floor joists, rafters, railings and railings you will need 25 boards of 6 meters 50 x 150 mm.


The cost column of the estimate should also include such construction attributes as screws, nails, corners, antiseptic impregnations for wood, terrace oil, costs for cement, sand, as well as transportation of all materials.

Construction
Before starting the actual construction of the object, it is worth preparing the necessary materials during the work Building tools, intended for wood processing:
- an electric circular saw that will help trim the tree so that the cuts are smooth and beautiful;
- a jigsaw and hacksaw are useful for small cuts;
- a miter box will help you cut wood at the desired angle evenly and accurately (a circular saw only makes straight cuts);
- electric drill and drills for it;


- screwdriver;
- hammer;
- construction tape and level, plumb line;
- pliers, wire cutters;
- bayonet shovel;
- stepladder or ladder.

Construction of the foundation
For spacious, heavy buildings, e.g. winter gazebos with insulation and glazing, a reinforced foundation is best suited. The most common type is tape. If the future gazebo will also be equipped with a stove or outdoor fireplace for barbecue, this type of base should be considered. For a lightweight gazebo using frame technology, a columnar foundation is more appropriate.
It is less expensive and easy to install, does not require formwork, and allows for easy repair of flooring.


The installation instructions contain the following important points:
- At the site of the future construction, markings are made according to the size of the object. To do this, you need to drive in 4 pegs and stretch a thick thread between them.
- Along the perimeter, at an equal distance from each other, 8 holes are dug in the shape of a square, and 1 hole is in the middle, to the depth of the bayonet of a shovel. In the center of each hole, except for the middle one, a long reinforcing rod is installed, which will connect the building frame to the foundation.
- The holes are filled with sand and gravel mixture, moistened and compacted well.
- Next are laid out brick pillars, the elements of which are fastened cement mortar and are aligned relative to each other. It is important that the surfaces of the supports are laid out level, regardless of the topography of the site, because this is the only way to ensure that flooring subsequently it was smooth.
- A sheet of roofing felt is laid on each post for waterproofing.


The height of the columns depends on the ground topography on summer cottage. Somewhere you will have to build a pillar of 4 bricks, and somewhere 2 elements may be enough. You should also take into account the desire and possibility of making a ladder.
It is important not to neglect the arrangement of the sand and gravel cushion - this is the stage that will allow the building not to settle. The worst thing is if the settling occurs unevenly, which is why it is important to compact the pillow well.


Wood preparation
While the cement hardens, you need to prepare the wood. Using a circular saw and a miter box, according to the drawn diagram, we cut the wood to the required dimensions. Next, it should be treated with special antiseptics that prevent the formation of mold, and impregnations against rotting.


If the building has additional options in the form of an outdoor fireplace, you should not choose oil-based antiseptics - this composition is more fire hazardous, but a solution with fire retardants will protect against fire. If the tree is damp and recently felled, products that contain alcohol are better suited. It should also be taken into account that there are antiseptics with pigments that can change the color of the wood. The compositions, depending on the manufacturer, are applied with a brush or spray; some elements can be soaked in the solution.


The impregnation is applied with a special brush according to the location of the wood fibers. It is important that at the time of application there is no strong wind, rain, scorching sun.
The weather should be moderate so that the solution does not dry out prematurely and wash off.
By neglecting work to protect the wood, you can wait for the gazebo to begin to rot and collapse, the wood may begin to swell, the paint or varnish on the surface may chip and peel off. To make the building last longer, it is better to take care of this in advance.

Bottom harness
It will take 3-4 days for the columnar foundation to harden, and another 1-2 days for the impregnations and antiseptics to dry. After this, you can begin to create the bottom trim.
For the bottom trim you need four beams 150x150 mm long, three meters. At the end of each beam, a groove measuring approximately 75 mm is cut for fastening the elements together in a “half-tree” manner. The beams are laid on top of each other around the perimeter and placed on reinforcing bayonets, fastened with screws or nails.


Frame and top trim
In the center of the base of the beams intended for the frame, holes for the reinforcing rod are made from the end using a drill and a thick drill bit. More massive beams (4 pcs.) are installed in the corners, and thinner ones (5 pcs.) around the perimeter. On the front side of the gazebo, you should consider an opening for entry. It is formed using two beams on convenient distance from each other. Therefore, 5 pillars are allocated to the frame around the perimeter, and not 4.
The vertical elements of the frame are leveled using a building level and secured with scraps of wood. This is a temporary measure, because the trimmings are removed after installing the top trim. The latter is installed on top of vertical supports “overlapping” from 150x100 mm beams, by analogy with the lower trim. All elements are fastened with screws or nails.


Floor
To install the logs you will need beams 150 by 50 mm in the amount of 5 pieces. They are installed flush with the bottom trim using special corners. The floor surface itself is covered with boards 150 by 50 mm. It is important that small gaps of 2-3 mm in size remain between the elements for water drainage. At the junction of the floor with the vertical supports, it is necessary to make slots so that the surface becomes uniform.


Roof
For the roof, it is necessary to prepare a separate sketch that will help create a reliable, stable structure. The roof frame is a classic hip rafter system. For the rafters it is necessary to prepare beams 150 by 50 mm.
The structure should be assembled in advance, on the ground, and only then raised to the top frame and secured. The roof frame must be assembled immediately after the installation of the lower frame.
Due to the fact that the lower trim is identical to the top, you can make the necessary slots in the rafters, guided by the dimensions of the finished structure.


Four beams come together to form 4 triangles hip roof. Each triangle is divided into three parts from top to bottom by three additional boards, which are necessary for laying the roofing material. In places where the rafters intersect with the frame, slots are made that help seat the structure on the upper level of the frame. The structure is mounted on top.
After securing the roof frame, the triangles are sheathed with boards. For soft tiles the sheathing must be done tightly, for more lightweight material Significant gaps can be left, but it should be taken into account that the roof must fit tightly to the rafters.


Next, you can cover the roof frame with a membrane material that will not allow moisture to seep into the building. You can attach it to the rafters with a furniture stapler. Installation of roofing material depends on its type. The tiles are laid out from bottom to top, the joints are covered with spine tiles.
Decorative finishing
The frame, roof and floor are ready. Such a canopy can already be used, but in order to complete the work and achieve external attractiveness and completeness of the object, it is necessary to install railings, fences, and possibly make sheathing and stairs.


Railings are made from thin boards that can be planed into round or irregular shapes, and are installed below the middle of the frame. Slats are also used as fencing, which can be laid out in classic patterns - rectangle, flower, triangle, braid. The railings can be tightly covered with clapboard or have a combined pattern.
If the gazebo is high, then the foundation should be hidden with boards, and a ladder should be placed at the entrance. Garden furniture and textiles will add comfort. Curtains, pillows and even a rug in dry weather will be an excellent addition to outdoor recreation in such a gazebo.


Beautiful examples for inspiration
Wooden pergola-type solariums look elegant and weightless. Textiles can be used to create shade. Mediterranean style in the garden of a country house will bring pleasant thoughts about the sea, giving a feeling of complete relaxation and bliss.

Oriental style is too demanding in terms of design. For example, a Chinese gazebo should stand in a garden that will fully meet all Eastern traditions - these include rock gardens that will support the idea, and paths paved according to all the rules of the East, and the calming surface of artificial reservoirs.
But you can also add an oriental flavor to a European country estate: you just need to slightly modify the structure of the roof and raise the lower parts of the rafters upward, like a pagoda.

A forest-style gazebo appears as a kind of shelter for a real hunter. For such a construction, you can actually use materials from the forest without purchasing ready-made bars or round timber. This building looks unusual and authentic.

Even when decorating your site in a modern style, for example, hi-tech or minimalism, you can use wood material. The main thing is to properly process the wood and find the necessary form for the future building.

Boards are the cheapest building material, which can be used for the construction of any wooden structures in the country.
A gazebo is no exception, so in this publication we will look at options for using boards for a gazebo, its step-by-step construction and ideas for a summer house. We will also look at the types of boards that can be used for construction.

We will build the gazebo from tongue-and-groove boards, since the process of its installation is significantly simplified thanks to convenient connections. The price for the edged and tongue-and-groove version does not differ that much, so you will have to overpay a small amount.
For walls, you can even use material of class B and C, because they will not be particularly used (except perhaps by the environment).
Characteristics of the gazebo
- Dimensions: 3 by 3 m.
- Foundation: foundation blocks.
- Bottom harness: timber 100 by 100 mm.
- Lags: 50 by 100 mm.
- Frame: tongue and groove board 45 mm.
- Floor: tongue and groove board 32 mm.
- Roof: hipped, hipped.
- Roof: soft tiles.
- Railing height: 91 cm.

Finished construction
Foundation, piping, logs
For the base, the cheapest option is used - 20 by 20 by 40 cm in the amount of 9 pieces. They are located around the perimeter of the gazebo, as well as directly in the center to support the joist system.

The lower frame consists of a 100 by 100 mm beam, which is connected into half a tree. A layer of roofing material is laid between the blocks and the frame to prevent the wood from rotting from moisture.

View from above
The joist system is made of “fifty” boards measuring 50 by 100 by 3000 mm. The store usually sells boards 6 meters long, which is ideal for our gazebo - they will be cut in half and left over for logs. In total you will need 6 boards, that is, you will need to purchase three pieces of six meters each.
Frame, walls, railings, floor
Unlike the classic one, we use only tongue-and-groove boards, from which we construct the entire frame. Thanks to the tongue and groove, you should not have any installation difficulties. It is important to lay the first “layer” of material evenly, and simply lay the rest at a higher level.
 Finished frame without roof
  Frame
Frame 
At the level of 91 cm it will be necessary to make a railing, since our building will be open window openings. They can be closed if desired. wooden sheathing, but this project does not provide for this.
 Floor
Floor 
Roof, roofing
Square roof of the classic hip type with 8 rafter legs, lathing and laid on top with soft tiles. A wooden spire with eight edges is placed in the center, to which the logs are attached (they are cut in advance to the angle of the spire so that the connection is even).
The optimal slope angle is 30 cm. It is convenient to first install four straight rafters, and the remaining four diagonal ones.


Video instructions for construction, price for a finished gazebo
Initially, this project was conceived as a ready-made gazebo from the Neogarden company (St. Petersburg). You can order it at price 46 thousand rubles, they will make it for you in a week, and assemble it within one working day.
However, we are primarily interested in the video instruction, which was recorded Sergei Chicher on Youtube, probably an employee of this company. The author provides photographs phased construction and shows the main components of the gazebo - foundation with logs, walls, structure rafter system etc.
Drawings with dimensions
Since the gazebo project is commercial, we have access to excellent drawings that show absolutely all the dimensions of the future building. You can use them for your own construction at your dacha, since they clearly show everything important areas designs.
Important point: the presented dimensions of the structure are 4.5 by 4.5 meters. Since the company can make a gazebo in any scale (from 2 by 2 to 4.5 by 4.5 meters), it was decided to take the maximum size.
If you want to make your building smaller, then proportionally reduce all the presented parts.


Board gazebo ideas
Many summer residents prefer boards because of their low cost. Thanks to this, a large number are made from them, therefore there are a large number of ideas for construction. , ... For every taste and color.

With sheathing
Below is a small selection that you may find interesting. If you have already decided that you will definitely build your recreation area from boards, then you need to prepare a project that will meet the capabilities of the summer cottage.
It is to solve this problem that we are laying out ideas for gazebos, one of which may well be used for your dacha.


For the construction of which parts can boards be used?
Wall cladding
One of the main (from an aesthetic point of view) parts of the gazebo are the walls. They are the ones that first attract attention when looking at the structure. boards are available in several variations:
- "Tightly".
- At the railing level.
- In sections.
Any of the options looks quite aesthetically pleasing. The main thing is not to block the excess light in the gazebo and not to make the structure too open.

Flooring
The most standard board is a “magpie” 40 by 100 by 6000 mm made of pine. If for some reason this tree is not suitable for you, then you can use larch - it is harder, more reliable and more expensive.

Using tongue-and-groove boards for the floor in a gazebo is not always advisable. During installation, it is necessary to leave a gap of 1-2 mm so that it goes through the floor into the joists. Because of the tongue and groove, it will not always be possible to do this smoothly.
Lag system

Roof sheathing
In addition to the rafters, the roof must be sheathed with additional slats so that the roof does not sag and is fastened in one plane. In some situations, boards will not be appropriate at all, for example, for soft tiles. In this case, oriented strand board OSB is used.

Decorative lattice
Small boards are appropriate to use for. Recently, the absolute majority of finished buildings are equipped with this decorative element. Despite the fact that it costs extra money, this decoration looks very impressive on any building.
