We have all dreamed of doll houses. but making them yourself was quite difficult. Today, there are many different materials that allow you to quickly and, most importantly, create a high-quality dollhouse for your child. Beginning needlewomen strive for the perfect creation of houses, so those who have not been able to master “construction” will learn a lot of interesting things today. We will tell you how to make a dollhouse with your own hands and what materials will be needed to make every girl’s dream come true.
How to make a barbie house with your own hands?
We all know that dollhouses are especially necessary for Barbie, so today we’ll talk about how to create this magnificent house so that your child will love it. It will be especially fun if kids join in the creation process themselves. The most important thing is to think over an action plan that will help you build an unusual and bright house for dolls.
There are several models of doll houses that are especially popular:

Materials for doll houses
- Dollhouse fiberboard(if you have ever carried out renovations, then it’s time to pay attention to the remaining pieces of drywall. They will make a particularly beautiful house.
- Dollhouse made of cardboard boxes(It turns out not so bright and unusual, but if you put in a little imagination and work, you can create a house that will be no worse than a building made from fiberboard. In fact, the main thing is to make an effort and in a few hours you will be able to recreate such a doll house , which every Barbie will envy.
- Plywood house(It is better to make such a house with the help of dad, since to create it you will have to work hard with a hammer and nails)
- House from old furniture (if you had old drawers and chests of drawers in your house, then it’s time to pay attention to them. Just a few hours are enough to see an unusual house for Barbie, but it will turn out to be quite massive, and it will take up a lot of space, but if you omit these moments, durability and similarity to a real house are undoubted advantages.
So, each of these houses undoubtedly has its own diagram, which you can see on our website.
We provide house plans for Barbie and Monster High dolls so that you don’t have to waste time on calculations, but simply create ready-made layouts and arrange them to your liking.
Materials and tools:

Each house requires different tools, but there is a list of standards that are required to create each of the above houses. If you keep such tools at hand, you can quickly build a house for your daughters.
- PVA glue(necessary in cases where you need to paste wallpaper, as well as various small parts)
- Nails(useful if you are going to build a house from plywood, since using nails you can conveniently and quickly fasten them together.)
- Stapler(when building a dollhouse from thin plywood or old boxes, it is better to use it, since gluing is not always reliable, but a stapler will be an excellent solution for every parent)
- Double sided tape(necessary for small parts, various accessories. If you want to create a balcony, then double-sided tape is an excellent solution for fulfilling your desires)
- Fabrics, wallpaper(would you like to give your home more real view? It's time to pay attention to the fabrics. Tulle and organza will look especially beautiful. Try adding a little imagination and decorating the windows with tulle curtains, you'll see, it will look very unusual)
- Colored paper, cardboard(for finishing roofs, walls, floors and other parts)
- Magazine clippings (additional accessories, allowing you to add liveliness to your house)
- Curly and regular scissors
- Various accessories for home decoration( artificial turf sponge and other interesting materials)

Now let's get down to the process itself. In fact, there is nothing difficult in building a doll house. The main thing is to be patient.
Do-it-yourself plywood dollhouse.

If you want to make a house out of plywood yourself, then prepare a hammer and nails. In addition, you will need a jigsaw, since you can cut necessary details It will be very difficult, but with a jigsaw it will be much faster. So, first of all, you will need to think about the layout of your house and cut out the necessary parts. On our website there are diagrams that will help you create a doll house.
Plywood is best sharpened sandpaper so that the child does not get hurt by splinters. Next, I coat each of them with varnish or paint, depending on how you want your future home to look. Next, we assemble the parts according to the diagram indicated on the website. Be sure to think about where the window will be located and, observing all the parameters, calculate the angles at which the roof will fall.

As for fastening, PVA glue is definitely not suitable here. It won't hold enough pieces together, and if it does, it won't last long, so it's best to use nails. As for the bayonets, cover them with a diluted solution of cement or soil.
Cover the inner surface with wallpaper and add furniture that you can build yourself from scrap materials. In our previous articles you can learn how to properly create furniture for a dollhouse. Use matchbox and other materials that will make the building comfortable. By the way, you can easily make a house out of laminate. Houses made of plywood and laminate are characterized by increased strength and ease of finishing.
Dollhouse made of fiberboard.

In order to create a doll house for monster high from fiberboard, sketch out small sketches where you can calculate the dimensions you need. We will provide you with ready-made calculations, based on which you can build your house.
Working with fiberboard is much easier, since it is softer than other materials and can be easily cut with scissors. Just cut out the necessary parts and glue them together with regular PVA glue. If you doubt the reliability of the glue, use hot gun or glue moment.
Pay special attention to the roof. It can be trimmed with a variety of cardboard for naturalness or used natural materials, like leaves and other details.
By the way, it is better to attach the house itself to plywood to make it more stable. So, he will not lose his balance and will not break.

Also, decorate the area near the house with various accessories and additions. Decorate your walls with magazine signs. By cutting out various pictures, you can make a kitchen and other interior items without wasting time on creating furniture.
Thus, a fiberboard house is made much faster than a plywood house. You can easily glue it together, and it will last for a very long time.
Doll house made of boxes.

If we talk about a dollhouse made from boxes, then everything is much simpler here. Gluing the boxes together is quite easy. The most important thing is to find suitable and strong ones that can maintain strength and beauty for a long time. Do not forget that interior items and dolls will be located inside the house, so try to choose stable and thick boxes.
On our website you will find a video where you will learn how to make a house for Barbie from polystyrene foam, cardboard, plywood and other materials. We also provide you with the necessary diagrams and drawings, based on which you can create a beautiful and cozy home together with your children.
Also, the lists contain photo projects of doll houses, as well as various examples that you can use as a guide when constructing a structure. In the video you can learn how to make a light in a dollhouse and what materials are needed for the project.
Conclusion.

As you can see, making a dollhouse is not at all difficult. The most important thing is to choose the necessary materials and tools with which you can quickly create a doll house for Barbie with your children. You'll see, in a few days a beautiful and slender building will show off in the corner of the child's room, the most important thing is to pay more attention to the process and watch various video lessons.
Every needlewoman can create a dollhouse step by step, so we will be glad if you try to make a dollhouse based on our diagrams and will provide a lot of information for the following needleworks.
A beautiful dollhouse is one of the best gifts for a little girl, which will bring a lot of positive emotions. At self-production it will be possible to take into account many important points, which will make it even more interesting for the child. It is best to create a dollhouse from plywood, since it has all the properties necessary for the product.
Benefits of DIY
Making a dollhouse yourself, compared to buying one already ready-made version, has a lot of advantages. And you don’t need to have any special skills to create a product. Any dad can cope with the task.
Advantages:
- individuality– the house will be unique, my daughter will not see exactly the same in any of her friends;
- taking into account personal wishes– everything will look in accordance with the child’s wishes, and inside there will be a place for all the toys;
- savings - material costs are several times lower than the cost of a similar finished product.
While creating children's house for plywood dolls, you can involve your child in the work. This will strengthen the relationship between father and daughter, and will also allow you to have fun and receive positive emotions.
Material selection
Having decided to make a house, parents first think about what material to use. Several types of sources can be used for the design:
- Laminate.
The main advantage of using the material is its durability, which is ensured by its special strength. A house made of laminate holds its shape well when gluing or joining with screws and lends itself to any type of decoration. Instead, other wood options (OSB or chipboard) are sometimes used, but they are less durable.
- Drywall.
The material is durable and cheap, but the structure can break under strong pressure, and the elements can only be fastened together using small self-tapping screws. Often, pieces of drywall remain after repairs, which is why you don’t even have to spend money on buying them.
- Styrofoam.
The use of the material is considered a budget option for making a house. The advantages of polystyrene foam are ease of gluing and very low weight. But compared to other materials, it stands out due to its increased fragility, which is why it was given the title of least reliable.
- Cardboard.
The material is the cheapest. Making houses for Barbie out of cardboard is very simple, and you can even use double-sided tape, without the need for classic glue. The big disadvantage of the design is its fragility. The product can easily tear due to careless actions.
- Textile.
A fabric-based playhouse is convenient because it can be folded and put away in a closet when the child is not playing with it. You can use cardboard to strengthen the walls, which will increase the reliability of the product. But the process of sewing and securing the design can be difficult, especially if the father is doing the work. This option is more suitable for mothers.
- Furniture.
Instead of ordinary materials you can use old cabinets, chests of drawers or shelves. You only need to do decorative works by making an attractive house out of unnecessary furniture. The downside of this option is the inability to change the shape of the base structure.
You can make a doll house from any materials that seem most attractive. They all have their pros and cons, but they do their job well. However, there is an option that is superior to all others - plywood.
Advantages of plywood
Plywood sheets are made by gluing together several layers of veneer. This is what provides it with special properties that make it stand out against the background of laminate, chipboard and OSB. Plywood is ideal for creating a house with your own hands.
Main advantages:
- Beautiful appearance – upper layer plywood has a nice color shade and stands out with a unique textured pattern;
- high strength– the house can last for several years until the child loses interest in it;
- ease of manufacture– collect necessary design very simply, using available tools and materials that are found in almost every home;
- reasonable cost– the price of plywood is quite attractive, and very little of it is required;
- low thermal conductivity– the material always remains warm, which is very important for the child.
All the advantages contribute to such a wide popularity of plywood as the basis for creating a house where little girl dolls will live. When choosing this material, the final result will depend only on the quality of workmanship.
Important! Plywood must be marked E0 or E1, indicating low formaldehyde content. Their volume should not exceed 9 mg per 100 g of material.
Manufacturing stages
The dimensions of the DIY Barbie house are special meaning. They need to be determined before the main work begins, and only then proceed to drawing up a drawing and manufacturing the structure. It is important that the house does not take up too much space in the room, but at the same time its dimensions should provide a certain amount of space. The ceiling level should be made twice as high as the height of the dolls. The depth should be from 30 to 50 cm. The width is determined individually, taking into account the number of rooms.
Preparing a sketch
After determining the dimensions, you should begin creating a sketch. The drawing of the Barbie house should reflect the future layout and dimensions of the main parts. It is very important not to violate the proportions in scale if you need to change the size of one of the components during the work.
What to include in the drawing:
- back wall;
- side walls;
- base;
- floor of each floor;
- interior partitions;
- roof components.
If some parts consist of several separate elements, then each of them should be displayed separately. This is especially true for the roof, since most often it is created from two rectangles that are connected to each other, forming a triangle.
Important! The front wall can be installed as desired. If you refuse it, then it will be much more convenient for the child to play.
Required Tools
You can build a house only if you have necessary tools. Some of them can be replaced with analogues.
List of tools:
- electric jigsaw;
- wood glue;
- mounting tape;
- self-tapping screws;
- sandpaper;
- roulette;
- ruler;
- pencil.
We must not forget about materials. Plywood should be correctly calculated using a drawing in order to immediately purchase required amount and not face its shortage in the process of work. In most cases, one sheet measuring 1.5 × 1.5 m will be sufficient. For decoration, you need to prepare a special self-adhesive film, wallpaper scraps, cardboard, paint and various parts for creating furniture. It is advisable to purchase special legs so as not to spoil flooring and make the house more stable.
Image transfer
Using the created dollhouse diagram with your own hands, you need to transfer the parts to plywood. It is important to maintain clarity of lines and the ratio of all sides. To do this you will need to use a ruler and pencil. When transferring a drawing, it is recommended to save space and place elements close to each other.
At this stage you need to draw windows and doors on the house. Their dimensions and location should be measured so that they have the same appearance in all rooms. It is important to consider the location of the furniture to eliminate the possibility of overlap window openings. If the house does not have a front wall, then you can refuse to cut out windows.
Assembly
When the drawings are transferred to plywood, you can proceed to the main stage. It includes cutting out the parts and assembling the house itself. It is important to do everything carefully so as not to encounter the need to prepare the elements again.
Step by step steps:
- Use a jigsaw to cut out the elements transferred to plywood from the drawings, and windows and doors. Sand all edges with sandpaper until completely smooth.
- Connect the base of the structure with the side walls using glue, tape or self-tapping screws. In the first two cases, you can glue the internal corners with slats.
- Fix the floors inside the structure, as well as interior partitions, using the same connection methods.
- Create a ladder by gluing it from a wooden ruler cut into rectangles or by gluing accordion-folded cardboard onto a stick and install it.
- Secure the back wall by connecting it to the main structure. Assemble a roof from two slopes or several elements in the form of tiles. You can use cardboard.
After assembly, the house must be left for several days so that the glue sets and the structure acquires the necessary strength. If the elements are connected using self-tapping screws, then no waiting is required.
Important! Gable roof needs to be strengthened with a special partition, which will need to be installed at the junction of the two main elements.
Window and door decoration
The windows and doors of the finished house must be decorated. If desired, they can be made swinging. To do this, you need to attach thin plywood to the cardboard base and install it on small metal door hinges. It is allowed to cover the windows with regular cardboard with a pattern. The child will be especially interested in wire bolts, which can be used to close doors.
Internal passages between rooms can be closed with special curtains. Enough to cut from beautiful fabric a small piece and secure it in doorways. It is permissible to use other options that your imagination suggests.
Furniture and decor
Creating furniture and decorating is the most interesting stage in creating a house, which will arouse genuine interest in any girl. There are no instructions for this, and everything depends solely on the child’s imagination.
First you need to decide what will be used for the main finishing. You will have to choose between wallpaper and paint. In the first case, it is recommended to use wallpaper without a pattern, since large patterns will look rather ridiculous. The paint you should choose is one that is approved for use in children's toys. More unusual design can be made using cardboard, special film, pieces of fabric, beads, artificial flowers and various boxes. They are also suitable for creating furniture and objects that should be arranged immediately after assembly.
Lighting
With the help of lighting, you can make the house even more attractive for your daughter. Thanks to the light bulbs, she will perceive it as realistic as possible and will be able to see much better the entire interior, which she worked so hard on together with her dad or mom.
It is recommended to use small battery-powered LED bulbs for lighting. Their power is enough to provide light to every room. They are extremely safe and easy to install. Just insert the batteries and secure the light bulbs with double-sided tape. After this, the house can be considered completely ready. All that remains is to please the child by giving him new way entertainment.
Every dad can make a doll house from plywood with his own hands if he has necessary materials and tools. The fascinating process of creating it will give you a lot of positive emotions if you do it with your daughter. However, it is important to stick to the plan and carry out the main steps carefully so as not to harm the final result. In this case, the house will last long years. When the child grows up, you can even give it to friends or kindergarten.
Every little girl dreams of her own dollhouse. Nowadays you can find a lot of them in stores, but they are all of the same type and expensive. From this article you will learn how you can make an original dollhouse without spending big money. Such a house will become unique, the child will be able to furnish it the way he wants. Your whole family can have a great time creating their own masterpiece.


Popular master classes
There are many different workshops on making dollhouses. The materials used are very different: wood, plywood, drywall, laminate, boxes, bookshelves, document folders. This is by no means a complete list of materials offered.

8 photos
The front wall of the house is either not made at all, or made in the shape of an opening door. This is necessary for the convenience of the game. We invite you to choose what suits you and get to work.
From plywood, laminate
The option of making a dollhouse for girls from wood is one of the most popular. The undoubted advantages of such a house are its strength and durability. It is easy to decorate both from the outside and from the outside. inside. However, for making wooden house will need male help.


If the house is built with high quality, it will be indistinguishable from the one purchased. You can make the drawings for building such a house yourself, or you can use ready-made ones. You can attach wheels to such a house and then it will become mobile.

What will be needed:
- Laminate or plywood, it is better to choose a thickness of at least 7 mm;
- jigsaw;
- glue – wood glue, PVA;
- self-adhesive film, which we will use to cover the floor in our house;
- wallpaper, they are useful for covering walls in rooms;
- a simple pencil;
- roulette.

Step-by-step instruction:
- We cut out the walls of the house from sheets of plywood, according to the dimensions in the drawing.
- We mark where the windows and doors will be located and cut them out.
- Using wood glue, we assemble the structure as shown in the figure. You can use small nails to secure the structure.
- Make a roof. Cover it with corrugated cardboard and paint it to imitate tiles.
- Glue ready house on a piece of plywood larger in size than the floors in the house. This will give it more stability. You can make a lawn on the plywood that remains on the sides of the house.
- Now we cover the walls in the rooms with wallpaper, and the floors with film.
- We arrange the furniture.
- We decorate the interior with textiles: curtains for windows, rugs, tablecloths for furniture.


Watch the next video for a master class on making a dollhouse from plywood.
See the necessary drawings from the video below.


From plasterboard
Many of us, after renovations, are left with pieces of drywall that are no longer needed. Why not put them to work and please your little princess? You can make a wonderful doll house out of it.
A house made of plasterboard has a lot of advantages, including: ease of working with it, its lightness. Even if you don't paint the walls of your house after assembly, they will still look neat thanks to it. white color. A significant disadvantage of such a house is its fragility. As soon as you put a little pressure on any part of the house, it will immediately break.
In order to make a house from plasterboard, you can use the diagram given above, or you can simply make cross-shaped partitions to save space in the nursery. These partitions will separate the rooms from each other, external walls and there will be no roof.


From large sheets using plasterboard you can make a full-fledged beautiful house. Watch the master class in the next video.
From foam plastic
If you have sheets of packing foam lying around the house, you can build a house out of them. To work you will need:
- foam sheets;
- glue gun;
- toothpicks;
- wooden rulers;
- bamboo sticks;
- corrugated cardboard;
- pieces of wallpaper;
- acrylic paint;
- foam sponge;
- pieces of ceiling plinths;
- necessary accessories for the interior: pieces of carpet, curtains, furniture and everything that your imagination is capable of.

Step-by-step instruction:
- First you need to think about what your house will be like and make a drawing. To save space in the apartment, the house can be built in height.
- We cut the foam according to the drawing. It is convenient to do this with a hot knife, so the foam does not crumble.
- We are thinking about where you will have windows and doors, you can make a staircase between floors. We cut out the necessary openings.
- We begin assembling the house. Z We break the cleaners in half. We will need them to create a more durable structure. Glue the foam sheets together using glue gun, having previously connected them using toothpick halves.
- To strengthen the floor and ceiling we use bamboo sticks from Chinese napkins. We glue the sticks to foam sheets as beams. After this, the sheets intended for the floor-ceiling can be glued to the side walls.
- We glue the interfloor stairs separately. It can be made from polystyrene foam or wooden rulers. We use toothpicks as railings. After this we glue in the finished staircase.
- The roof can be glued together from foam or corrugated cardboard. Shingles can be imitated by cutting cardboard into small pieces and gluing it, then painting it.
- On external wall you can make a balcony. We glue it together from polystyrene foam and use bamboo sticks as railings.
- Outside paint the house acrylic paints using a regular sponge.
- We cover the walls of the rooms with wallpaper and cover the floors with carpet. From ceiling plinth We cut out the baseboards and window sills and glue them. We create coziness with the help of curtains on the windows.
- We arrange the furniture, which can also be glued together from foam plastic, and we invite new residents.

Home decoration can be very diverse. You can use a clear plastic box and make printouts underwater world and put an aquarium in the house. You can print out pictures, lay tablecloths on tables, add toys to dolls. Let your imagination run wild and you will have the most wonderful dollhouse for girls.
From a bookshelf/rack
You can make an excellent dollhouse from a bookshelf or shelving unit. It's very easy to make, because you already have ready base. To decorate the house, use cardboard, wallpaper, self-adhesive paper, and wrapping paper will also work.

Involve your daughter in this creative process. She will be able to act as a designer for her dollhouse.
If the house is located permanently against the wall, then you can make the roof of the house using black electrical tape, gluing the contours. Glue the chimney in the same way. If you need to move the house to another location, you can easily peel off the tape without damaging the wallpaper in the room. You can purchase furniture for dolls ready-made or use your imagination and make it yourself.

From an old cabinet or chest of drawers
Your daughter asks for a dollhouse, but it's gathering dust in the garage old chest of drawers? You can breathe a second life into old, no longer needed furniture. Delight your child by making a dollhouse from an old cabinet or chest of drawers . Such houses are very convenient for those whose children play with large or tall dolls.
First of all, you need to know the height of the dolls. This is necessary so that the dolls can be placed in rooms in full height. You may have to combine 2 shelves by removing unnecessary partitions. Work carefully, being careful not to break the inside walls of the cabinet or chest of drawers. In place of the partitions that we removed, a void we do not need will appear. It can be sealed with thin slats that fit in size.
After waiting for the glue to dry completely, treat the walls of the chest with putty with a thin layer. After this, the chest of drawers must be sanded, then it will become even and smooth. You can use a jigsaw to cut out windows.

The last step will be decorating your house. The outside can be painted. You will most likely have to paint it in several layers to cover the old color of the dresser. The walls inside can be covered with wallpaper, colored, packaging or self-adhesive paper. Or you can just paint them too. We arrange furniture, hang pictures and mirrors on the walls, curtains, lay out carpets and invite dolls to a housewarming party. Now your daughter's room will always have dolls tidy!
From cardboard
Budget option Making a dollhouse is corrugated cardboard. With its help, you can create a wonderful toy that will delight your girl for a long time.
We will need:
- corrugated cardboard for the frame of the house;
- decorative cardboard for decorating a house;
- templates for parts that will depend on the size of your future house; sweeps;
- stationery: pencil, ruler, eraser, scissors;
- knife, paints, brushes, felt-tip pens;
- glue gun;
- colored, packaging and self-adhesive paper;
- textile;
- decorative elements - beads, rhinestones, stones, artificial flowers.


Let's start making the house:
- If you have a large sheet of corrugated cardboard, you can apply a reamer to it. Select the dimensions based on the size of the house. If there are no large sheets, then each part needs to be cut out separately. There is no need to do the front wall.
- To make the cardboard easy to bend, you need to make a groove at the bend by running a ruler along it. If all your parts are cut out, glue them at the junctions of the cardboard.
- We cut out and glue the interior partitions. In such a house they are simply necessary. They will perform a load-bearing function.
The structure is assembled. You can start decorating.
It is better to cover the inside walls with decorative paper or fabric. This way you will hide the seams in the gluing areas. The outside walls can be decorated to your taste: painted, covered. Decorate your home with beads, rhinestones, stones or other elements of your choice. Make sure that the decorative elements adhere well to the cardboard, otherwise the house will lose its attractiveness during the games.
Arrange the furniture and invite your child to play.

See below for master classes on making a dollhouse from cardboard.
From boxes
A very easy to make dollhouse from boxes. For it you will need to choose boxes of suitable size. The size will depend on the height of the dolls for which this house is being made. The number of boxes will depend on the number of rooms you are going to make. One box - one room. Such a house can be made multi-story by gluing boxes on top of one another. This will save space in the room.
It is necessary to fasten the boxes together so that the top is on its side, revealing the interior of the room. This can be done different ways: using a stapler, glue, double-sided tape. We cut out the windows. We decorate the house according to your taste. We furnish the furniture and make the girl happy new toy, on which you spent a minimum of money and effort.


Watch the following master class, which shows in detail the process of making a beautiful dollhouse from a box.
It’s quite easy to make a great house out of boxes! See the following videos for more details.
From document folders
If there is very little space in the children's room, you can make a folding dollhouse.
For such a house we will need 4 document folders. We cover each folder inside with beautiful paper - this will be wallpaper for the walls. Decorate the folder clip with fabric, making it into a kind of curtain. Print out interior items and stick them on the walls. The house is ready. All that remains is to open the folders and place them vertically. Add the necessary furniture.

Every girl’s dream is a large beautiful dollhouse, equipped with all the interior items, a very expensive pleasure.
Not everyone can buy it in a store.
However, you can make a dollhouse with your own hands, and if you involve your daughter in the process, then collaboration will bring pleasure to the whole family.
In order to begin manufacturing, you must first resolve the issue of the dimensions and material of the future structure. Then draw up a house project, make drawings for sawing or cutting, think through and select finishing materials, consider options for fastening and installing the entire structure. It is important that it is stable and can withstand small “shocks”.
The size will depend on the height of the dolls that will “live” there, as well as on the capabilities of the room. After all, an apartment for half a room will take up too much space, limiting the owner.

At the same time, a very small structure will be more difficult to manufacture and finish, because working with small parts is not easy.
For ease of use, the ceiling height is set at twice the height of the doll, then it will be easy to move it around the rooms and install it inside. Higher ceilings are welcome, they will make the game even more interesting.
The depth of the rooms is determined based on the height of the dolls and the need for free space for items inside the house. On average it is 30-45 centimeters, but it can be more. The width is calculated based on the number of rooms for dolls and the volume of the room.
The shape of the house usually resembles a rectangle, elongated in height or width, it all depends on the imagination of the manufacturer. For large structures, you can use furniture wheels, which are screwed from the bottom and make it easy to move the doll housing to any place.
You can create a project on paper or using modern technologies, in a program on a computer that will itself calculate the amount of materials needed for the building.
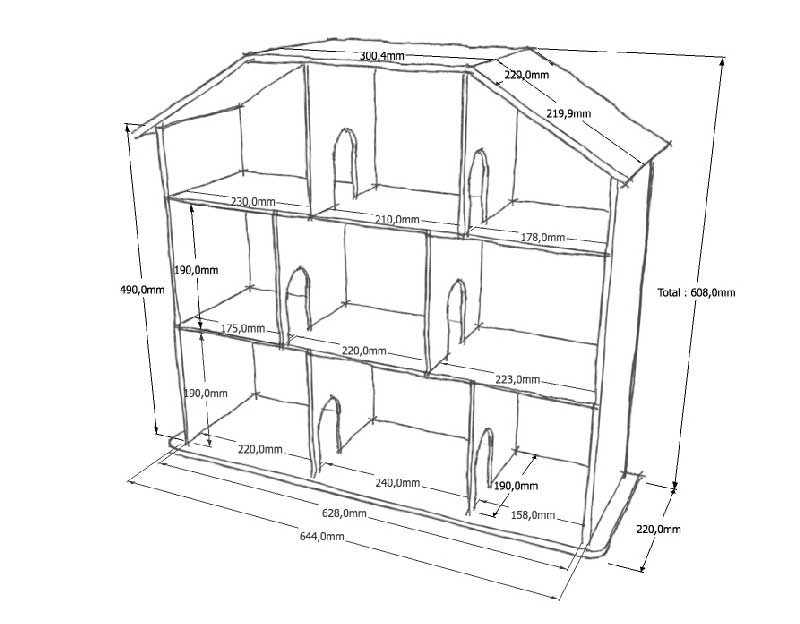
An example of a standard doll house design:

The size largely depends on the material, since not every raw material is able to maintain its shape and withstand the load. Let's try to look at houses made of different materials.
Plywood or laminate
Plywood is very a good choice for making a dollhouse. It holds its shape well, is strong enough, and is easily fastened with glue or self-tapping screws. It is convenient to work with it using standard tools; only after completing the work it is advisable to clean it with sandpaper to make it smoother.
Plywood is easy to decorate with paper or fabric, and it is durable. Laminate has similar properties, which is also often used to create a doll’s apartment.
An example of a dollhouse diagram:
To create you will need:
- laminate or plywood, with a thickness of at least 7 mm;
- PVA glue, it can be replaced with carpentry glue;
- jigsaw;
- remnants of wallpaper that will be used to decorate walls, pieces of furniture, and for the floor you can use self-adhesive film;
- pencil for making notes;
- tape measure or centimeter.
The manufacturing process consists of the following stages:
- Cutting out the wall of a plywood structure according to the dimensions in the drawing.
- Selecting places where windows and doors will be located, cutting them out.
- Assembling the structure using wood glue or small nails.
- Construction of the roof, its design. The roof of the house can be covered with corrugated cardboard and painted, thus simulating tiles.
- Fastening the structure to the base - a piece of plywood with a little big sizes. This is necessary to give the structure greater stability and the possibility of additional decoration. For example, on a wide surface in front of the house you can organize a veranda or flower beds.
- Decoration of interior and external sides walls, floor. Sometimes it is more convenient to paste over interior walls before assembling the house, then the joints will not be visible, but in this case it is important not to make large overlaps, violating the proportions of the structure.
- Furniture arrangement.
- Interior decoration with small details: curtains, rugs, tablecloths, etc.
An example of step-by-step construction of a house in the photo (instructions for dad):
Project Marking the future house Drilling Drilling Finishing with a file Putty Grinding Finished walls Painting Painted parts Marking for fasteners Assembly Assembly Finished structure Interior Balcony Room
Drywall mockups
Drywall is also a popular material because of its durability and low cost, because often after repairs it remains in the form of small pieces that have nowhere to be attached. House for Barbie – perfect option for this. However, it is more difficult to fasten, glue is not suitable here, it will be necessary to align the cut points to reduce the consumption of the product.
Self-tapping screws screwed into metal corners will be more effective. But you will need to take them in small sizes or then saw off the ends protruding from the outside.
The scheme for working with drywall is similar to that of plywood; the same tools are required for it. Therefore, you can use the diagram above.

Styrofoam
This material is also a budget material that remains after purchase. household appliances or other goods. Its only drawback is its fragility, so you should work with polystyrene foam carefully.
To work you will need:
- polystyrene foam, preferably in large sheets;
- toothpicks, bamboo sticks (left over from sushi sets);
- glue gun;
- several wooden rulers;
- corrugated cardboard;
- wallpaper remnants;
- foam sponge;
- remains of ceiling plinths;
- accessories for creating an interior.

Let us present the manufacturing process in stages:
- Project development, drawing up.
- Cutting the foam according to the drawing, it is better to do this with a hot knife, then the foam will crumble less.
- Cutting out future windows and doorways.
- Assembly. To do this, you will need toothpicks, which you need to break in half, fasten the pieces of foam with them, apply glue between them and press them tightly.
- The ceiling and floor are also glued using a glue gun, only to strengthen the structure they need to be strengthened. For this, bamboo sticks are used, which are glued to the foam in the form of transverse beams.
- Separately built interfloor staircase, it is made from wooden rulers or the same foam, and the railings are made from toothpicks or bamboo sticks. After which the finished one is glued into the structure.
- Making a roof, the material for which can be foam or corrugated cardboard.
- Exterior finishing includes painting the entire building acrylic paint, which is convenient to apply with a foam sponge with light tangential movements. A balcony can be made outside, which is assembled in the same way as a staircase.
- Finishing from the inside uses pieces of wallpaper and colored paper; window sills and other interior details can be cut from the ceiling plinth. Curtains, carpets, and small decorations will add coziness to the design.
- Furniture arrangement, check-in.
Bookshelf or rack
It is not at all necessary to purchase materials to make a home for dolls; sometimes it is enough to use interior items that are no longer in use. Yes, old bookshelf or the cabinet may well become a home for Monster High or a little princess.
In this case, the amount of work required is minimal: you will only need to seal the back wall of the house and arrange the internal contents. Details such as the roof and chimney, for a structure standing against a wall, can generally be drawn or depicted with adhesive tape.

Old cabinet or chest of drawers
Old bedside tables, chests of drawers, and wooden cabinets gathering dust in the attic or basement can also be put to good use. They are much better suited for larger dolls and require minimal processing.
Internal shelves and drawers can be removed, thus creating large rooms. Or, conversely, add partitions between high ceilings to match the height of the dolls used. And of course, finishing that will give the product a finished look.

Cardboard
The popularity of cardboard is understandable; it is inexpensive, easy to assemble, and always available. True, this design is short-lived, since the cardboard breaks and tears. Therefore, it is better to use corrugated cardboard, which is used for packaging.
The house can be assembled quickly and easily from scrap materials:
- corrugated cardboard itself;
- finishing elements;
- fabrics and other things.
Tools you will need for work:
- drawings, parts templates;
- knife, brushes, paints, pencils, felt-tip pens;
- glue gun;
- ruler and others.
Photo of the scheme:

Photo of the house:

The assembly process is simple and similar to other designs, but cardboard has some special features: it bends easily, so you need to crumple it carefully. It is better to fasten with glue; the edges are not cut off, but are bent inward and act as a fastening element.
To correctly bend the cardboard at this point, you need to draw something pointed, but not cutting, for example, a pencil. A groove is formed along which the material can easily bend.
It is better to cut out details like windows using a stationery knife along the marked lines.
Boxes
Cardboard boxes are the easiest way to assemble a dollhouse for a girl. To do this, you will need to go to the back exit of the nearest store and pick up boxes that are similar in size. This will make it faster and easier to assemble the house.
Then you need to fasten them together using glue or double-sided tape. Cut out windows and create an environment. Exterior finishing can also be made from boxes, for example, a balcony or terrace.

Fabric
A fabric house is a good option for small room, since it can be folded and stored away for a while. To make it you will need thick fabric with various patterns and the ability to sew.
The structure is assembled from fabric according to the diagram. Each element is sewn separately, then turned inside out and fastened together. single house. To seal the walls, you can use cardboard or plastic mesh, which is placed inside, they will not allow the walls to bend and will make the entire product more durable. However, a house with cardboard cannot be washed.
Video tutorial on creating a house from fabric and cardboard:
How to make a staircase for a house or castle?
Staircase in doll house– one of the most difficult elements, a real task for dad. The easiest way to make it is from cardboard or foam. The first one can simply be bent into the desired position, and then reinforced with intermediate parts using the same foam.
A wooden staircase can be made from two rulers and several blocks. On the rulers, you need to make small cuts at regular intervals, into which steps from small pieces of wood are inserted at an angle of about 45 degrees, which are attached with glue to one and immediately to the second ruler. Wide rulers can serve as railings.
A foam ladder can be cut from a piece if you have a large enough block. It is placed at an angle and the steps are sawn through with a hot knife. Real craftsmen can build a staircase from wooden blocks according to special drawings.
Examples of stairs in the photo:
Interior design - toy furniture and decor
Interior design is a real holiday for a girl, so it’s worth inviting her to help with interior design and furniture making. The latter can also be very diverse. Most affordable option– cardboard.
Everything that is in the house will be used for finishing:
- wallpaper remnants;
- pieces of fabric;
- beads;
- artificial flowers;
- toothpicks;
- cardboard boxes and so on.
Everything depends only on the imagination of the manufacturer. Beautiful curtains, bedspreads, tablecloths, even paintings for the walls can be made yourself. This will not take much time, but it will be fun and will help to attract the girl to housework and sewing.
Video tutorial on creating furniture from plywood:
Video tutorial on creating foam furniture:
Lighting
Making lighting in the house seems almost impossible, because connecting to the network and the presence of wires is far from safe. Especially if the home is made of wood or cardboard. In the event of a short circuit, a fire may occur.
However, there is a simple, safe solution - small LED bulbs that run on batteries. Their voltage is very low, and fastening is simple - using double-sided tape.
Creating lighting in a doll's home:
Making a dollhouse is a fascinating and long process in which not only parents, but also their children should participate. Can even make small parts or hold tools Small child. At the same time, working together brings people together, and children will learn the acquired skills much faster and the process will be interesting.
Examples of doll houses in the photo.
Buying almost anything now is not a problem. But the beauty of making a dollhouse from plywood with your own hands is that you can also involve a child in this process. Suitable as source material use plywood - the durability of the structure, its wonderful appearance at relatively low costs are guaranteed. And cutting sheets and processing fragments will not cause any difficulties; All you need is a simple household tool.
What is a dollhouse? The banal answer that this is a spacious box in which a favorite toy and its outfits are stored is unlikely to be correct. You can make it yourself various options houses, differing in their configuration (vertical, horizontal), complexity of layout (several levels-floors, with many compartments-rooms). External design is a completely separate matter. If you turn on your imagination, you will be able to make do with what you have at hand. In addition to glue and colored paper, in any house there is always something left over after another renovation - pieces of wallpaper, film, fabric, and so on.

What plywood should I use? About making a dollhouse out of it - optimal solution, partially said. It should only be noted that it is being assembled for a child’s toy. It is the strength of the structure itself and its “ecological cleanliness” that should be the main criteria to be guided by when choosing products.

One of the problems that is solved in the process of making something with your own hands is reasonable savings. Consequently, there are practically no options for which plywood to choose - inexpensive, moisture-resistant and “environmentally friendly”. These criteria are fully met. By the way, they are often confused with FSF products, since it is difficult to distinguish these plywoods externally even for a specialist.

- When choosing plywood, you need to pay attention to its markings. The safest products are those that have the letter E0 in their designation. Such sheets contain a minimum of formaldehyde, and they are the most suitable for making a dollhouse.
- The optimal plywood thickness is 5 mm. This choice combines light weight, structural strength and the convenience of strengthening it with nails.
Options for size charts
The linear parameters of the house depend on which doll it is being made for (and maybe for several) and where it will be installed. Therefore, it is more correct to familiarize yourself with the photos and drawings available, for example, on the Internet, and on the basis of this, inspired by your own ideas, draw up your own original diagram, most suitable for local conditions.


Features of making a dollhouse
Any dad can cut plywood into fragments of certain dimensions and configurations and connect them together according to the developed diagram. By this process no step by step instructions not required. But there are a number of nuances in working with FC, which House master should know.
To avoid “production” errors (and errors are inevitable even in measurements), similar parts of the house should be made according to the following scheme. First, one part, and then make sure it matches the required dimensions. And only then, using the workpiece as a template, cut out and process the rest. Otherwise, after assembly, it will turn out (more than likely) that the house will be somewhat skewed, and you will have to redo some things.
It is better to cut plywood electric jigsaw. WITH hand tools problems will arise - uneven cuts (not along the line, especially if it is figured), “tattered” ends of parts, partial peeling of the veneer in the working area.
Given the relatively small thickness of plywood, the joints practiced for solid wood blanks (saw cuts, tongue and groove) are unacceptable. Therefore, only by gluing with subsequent fixation at individual points with small nails. In terms of safety for the child’s health, it is better to use a casein composition. Such carpentry adhesives are most often used in modeling and making furniture with your own hands, and it is quite simple to buy a dry mixture and prepare the solution yourself. .

Both at the stage of assembling the dollhouse and after its manufacture, it is necessary to carefully process all the edges of the parts. Even if no defects are identified, it’s worth going through the “sandpaper” once again. Microscopic fractions, visually and imperceptible, are potential thorns. Don't forget about the tender hands of children!
Dads should take into account that girls (like all women) have their own secrets. Therefore, in the lower part of the dollhouse or on the side, you should provide drawers or boxes with doors in which you can hide something. Mini hinges are suitable for fastening the sashes (it’s easy to choose required sizes in any furniture shopping center).

If the size of the dollhouse is significant, then it is more advisable to first mount a frame from bars of a small cross-section, and then cover it with pieces of plywood.
When drawing up a diagram, it is worth considering that you plan to assemble not just a box for storing toys. Even himself small house will need some internal filling. What it will be - a mini-table, a crib - is another matter. But already at the design stage it is necessary to provide possible options and choose sizes so that the rooms are spacious enough.

Advice. When deciding how to decorate a dollhouse, do not forget that here, when choosing materials, you should take into account their component composition. Selected species stains, oils, paints, varnishes contain toxic substances.

If you really get excited about the idea, plan everything carefully and prepare in advance, then you can make a dollhouse with your own hands in just a few hours. Even half a day off is enough for the child to enjoy a home for his toy for a long time.