Wooden building material, despite its fragility, is constantly used in buildings. Used as a base for fences, decoration of extensions, as foundation parts. During work, the tree must be periodically attached to the concrete. Many questions immediately arise: how to properly install wooden poles, how to extend their durability? Answers to them require preparation.
At first glance, the situation is complicated, but there are tricks that help you cope with the work without much difficulty. Before you begin installation, you should choose what kind of wood the future base will be made of and carefully process it. Wood processing is an important process, because when exposed to environment she's spoiling.
Processing is carried out on the prepared post. The support is divided into two halves, each of them is treated differently chemical preparation. The part that is underground is more susceptible to moisture; it is treated with bitumen-based solutions twice, maintaining an interval of a day. The second part of the post is usually coated with varnish, protecting the wood from wind, sun and moisture.
Important! Before processing, the wood must be dried, and careful sanding will help save bitumen impregnation.
Installation methods
The base is a box for installing supports.After completed preparatory work let's move on to installation. We mark and prepare the place for the supports. Options for installing poles are determined by the design features and the nature of the work. Installation means concreting a support or fixing it to concrete. There are main methods:
- universal concreting of the base;
- use of concrete stepson;
- installation on concrete;
- use of frame;
- special connection;
- platform with a box.
A versatile method - concreting
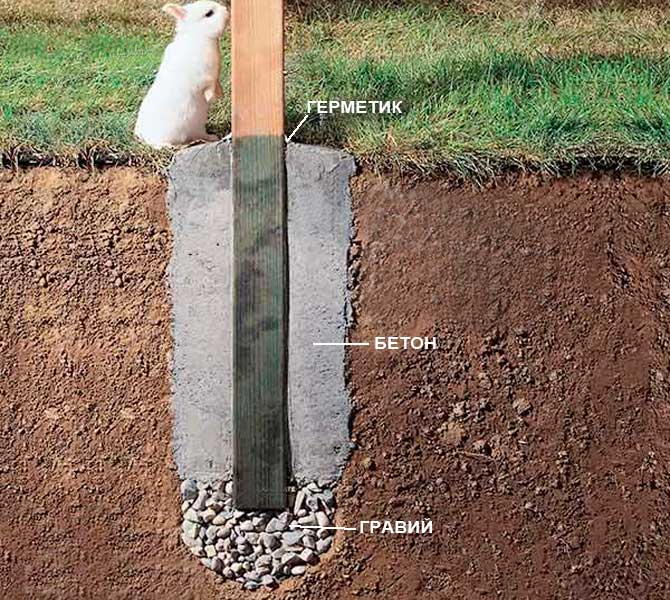
Installation of wooden poles using concreting is well suited for soils with high humidity. The installation method assumes preliminary preparation holes for the base, installing pillars in them and filling the remaining space with concrete.
To increase efficiency when digging holes, the ground is watered; the ground becomes soft and easy to work with. When the height of the pillars is 1.5 m, the depth for the hole is 0.5 m; for higher ones, the depth is increased to 0.8 m. The pillar is deepened by 1/3 of its length.
At elevated level groundwater The supports are deepened below the soil freezing level and the bottom of the holes is covered with a layer of crushed stone up to 15-20 cm, which acts as drainage. The bottom of the supports is wrapped with roofing felt, fired, and treated with resin to better protect the wood.
Having completed the preparation, they begin to compact the holes. The holes are filled with crushed stone, pieces of brick mixed with soil, and compacted tightly. We leave 15-20 cm to the top of the hole, and the empty space is filled with concrete. After the solution dries, the pole holds tightly and will not bend under the load. The joint between concrete and wood is treated with a sealant, which prevents moisture from getting between them.
Concrete stepson
The second way to install a wooden pole is to use a concrete stepson. The essence of the concreting procedure is to use not the entire log, but a small column. The sequence of the procedure is as follows:
- before installation, the support is treated with an antiseptic, the part of the stepson that will be in the ground is covered with bitumen and wrapped with roofing felt;
- crushed stone is poured onto the bottom of the hole;
- vertical fixation of the support with spacers;
- be sure to fall asleep wooden post crushed stone, gravel and compact well. Maintaining a compaction interval (every 30 cm), adding sand and water will help increase the density of the backfill;
- 15-20 cm to the top, the hole is filled with a concrete solution, which ensures stability.
After the concrete has hardened, it is necessary to secure the log with wire to small posts.
Concrete base
Installation of a wooden support using concrete base easy to do in several ways:
- Special mount embedded in concrete. By special fastening we mean a pin with a special fastening in the form of the letter P at its end. The cross-section of the beam must correspond to the dimensions of the fastening so that the tree fits easily into the device. The inserted beam is attached with screws and bolts. The method has its drawback - only timber is used as a wooden support.
- Fittings. In the absence of a specially prepared connection, ordinary reinforcement is used. The inserted iron pin into the concrete should protrude 20-25 cm above the surface. A hole is drilled on the support, the diameter of which corresponds to the diameter of the reinforcement. A seal is applied to the concrete to protect the structure from water penetration. The size of the seal is smaller than the wooden support. The joints between the pillars and concrete are covered with mortar. If necessary, the upper and lower harness will help connect all the pillars in general design. This option is more often used on a strip foundation.
- A box with a platform is used for hardened concrete. Wood material placed in a specially made box, to which a platform is welded from below. Dowels are screwed into the holes on the platform, with the help of which the box is attached to the concrete.
Fixing wood to concrete is not difficult if all technologies are followed. It is worth taking care not only of reliable fixation of the material, but also of minimal environmental impact on the wood. Then the wooden supports will serve you for many years.
Wooden posts and racks are the main element of most structures of canopies, gazebos, pergolas, fences and other light structures on the site. We'll tell you how to install them correctly so that they last as long as possible.
Often, a pergola or fence has to be repaired only because the wooden poles on which they are supported, buried in the ground, have rotted and become lopsided. To avoid such unpleasant phenomena, it is necessary to install wooden poles on anchors.
This applies even to poles after autoclave impregnation, not to mention those independently treated with bioprotective preparations. In this case, contact of the pillars with the ground is eliminated, which significantly increases their service life.
But if you bury the pillars themselves in the ground (which is much cheaper and less labor-intensive), then you should protect the wood from the effects of moisture contained in the soil. So, after installing the post, it is better to fill the hole not with excavated soil, but with gravel.
For extra protection bottom part The pillar in the ground surface area can be wrapped with film or roofing felt.
Gate posts subject to high loads should be concreted.
All these protective measures concern only the lungs wooden structures- fences, small gazebos or pergolas.
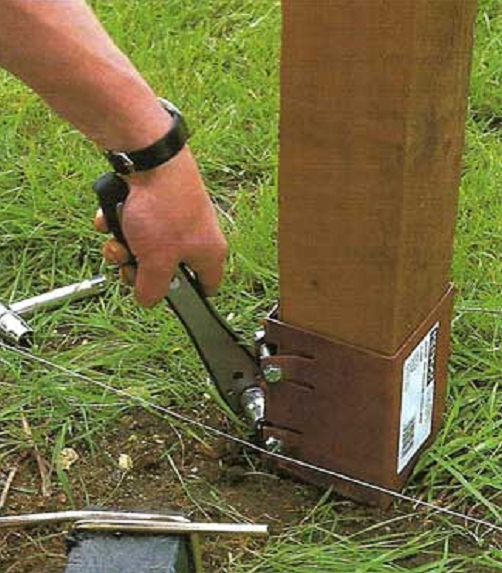
Racks and poles for them can also be installed above the ground - for example, on U-shaped load-bearing shoes (anchors) made of galvanized steel. Anchor rods made of corrugated steel rods are poured into pits with concrete or cemented into ready-made concrete plinths.
All wooden posts that bear high loads, for example on the roof of semi-open garages, extensions for winter gardens, should be installed on heavy anchors. The most common among them are anchors H-shape, designed for racks with a thickness of 70-140 mm. Anchors are placed in holes and filled with concrete or cemented into the holes of finished concrete plinths. There are anchors of other designs.
1. After installing the stand, it is better to fill the hole with gravel rather than with excavated soil.
2. Before installation, the stand in the part that will be in the ground and slightly above it is treated with bioprotection agents and wrapped with film or roofing felt. The upper edge of the film is secured with perforated tape, staples or nails.
3. The protruding edges of the film or roofing felt can be covered with pieces of boards for greater reliability. The latter are treated with bioprotection agents and screwed to the rack.
4. Wooden gate posts should be concreted in holes measuring at least 30 x 30 x 60 cm. Above the ground level by a width concrete pouring It is advisable to make a small blind area with a slope from the rack.
5. Widely used anchors for fastening poles and racks: at the top left - a light anchor with a width of 71 mm, next to it - an anchor with an adjustable width up to 141 mm, to the right - a heavy anchor with a tubular rod and an anchor with two jumpers 600 mm high, at the bottom - two anchors attached to the base with bolts.
6. Ready-made concrete plinths. For the construction of lightweight structures, plinths with a height of 30, 40 or 50 cm are used, for heavy ones - with a height of 60 or 80 cm.
7. When installing an anchor in a plinth, install the plinth in the ground, and then insert the anchor rod into the hole, placing pieces of timber under the anchor as temporary support. After this, the anchor is filled with mortar.
8. Heavy anchor under the rack pitched roof suspended on two bars with a cross-section of 35 * 35 mm and a length of 60 cm above the foundation pit, after which they are filled with concrete.
9. Place a stand in the anchor, level it and secure it with a clamp. After this, through holes are drilled and the rack is secured with bolts.
10. On the right are concrete plinths 80 cm high with a cavity for heavy anchors. On the left - ready-made concrete blocks with anchors built into them.
11. Anchor made of galvanized steel with a base for fastening with dowels and bolts to a concrete slab.
12. The rack is placed in the anchor, leveled using a level, then secured.
Taking into account wind loads
For the construction of simple wooden structures, lightweight anchors are quite suitable. However, this only applies to racks for garden fences up to 1 m high, free-standing pergolas and other light structures. When erecting structures subject to high wind loads, for example screen walls with a height of about 180 cm, only heavy anchors should be used, including those mounted in concrete plinths.
Anchors for installing wooden racks and poles - photo
 6 colors Beauty and the Beast red rose in Glass dome…
289.86 rub.
Free shipping★★ ★★ ★★ ★★ ★★ (4.80) | Orders (943)
 4 Knot Christmas Train Painted Wooden Christmas Decoration for Home...
Most correct option porch - this is when its foundation is cast along with the house. In this case, there are practically no problems. Sometimes when planning a building it is forgotten. Then a porch is added to the house. An extension is made mainly from three materials: wood, metal and concrete. If the house is brick, they can build it out of brick. Another option is to make it from building blocks and then finish it. In any case, when planning to make a porch with your own hands, you must immediately decide what kind of foundation to make and whether or not to connect it with the base of the building.
How to calculate parameters
First you need to decide which way the steps will go. They can be on one, two or three sides. You determine this based on personal preferences and the finances that you can/want to allocate for construction. The height of the porch depends on the height of the plinth and should be 50-70 mm below the edge door leaf. This small step prevents precipitation from getting inside the house. Perhaps more importantly, it prevents the doors from becoming blocked if the porch rises up due to frost heaving (if the doors open outward).
Determining the dimensions of the upper platform
The layout of the porch begins with determining the size of the upper platform. If the doors open outward, you should be able to stand on the landing to open the doors. That is, its depth should be 30-40 cm greater than the width of the door leaf. According to GOST recommendations, the dimensions of the platform should be 1.5 times the width of the doorway. More is possible - less - undesirable - inconvenient.
If your doors are 80 cm wide, then the depth of the upper platform at the very minimum is 120 cm. Its width is determined based on the tastes and proportions of the house, but it should definitely be greater than the width of the doorway.
We count the number and sizes of steps
You know the height of the porch: 50-60 mm below the door leaf. The recommended height of the step (riser) is 15-20 cm. Divide the height of the porch by the height of the steps, you get the approximate number of steps. The number rarely turns out to be a whole number. The remaining centimeters can be divided between all steps or one of them can be made higher. Another option is to create a small step at the bottom, although this may be awkward.

The optimal width of the step (tread) is 25-30 cm. Knowing the number of steps, the depth of the upper platform, the depth of the steps, you can calculate the full dimensions of the porch. Using them you can already develop the foundation for the porch.
When choosing the parameters of the steps, you must adhere to the recommendations of SNiP: the sum of the tread and double riser should be in the range of 600-640 mm. For example, you calculated that the height of the step (riser) is 17 cm, the tread (depth) is 280 mm. After performing the calculations we get: 170 mm * 2+280 mm = 620 mm. We fit into the recommended parameters, which means there is no need to change anything.
What kind of foundation is needed?
If the porch is planned to be light - wooden or metal - the foundation is most often made of piles or columns. Specifically chosen based on geological conditions. On well-draining soils with low level groundwater enough, if you are prone to heaving, you may need it already.
For a heavy porch - made of brick or monolithic concrete- do strip foundation or . The type of foundation is most often similar to the one on which the house is built.

Next, you need to decide whether you will connect the porch foundation to the house foundation or not. Decisions are made based on the planned mass of the extension and the type of soil. Both options have disadvantages. If there is no connection, cracks often form at the junction of the porch and the house; due to frost heaving, the porch may become warped. Owners often face this problem. summer cottages- Mostly the porch to the dachas is made of wood and disjointed. After the ground thaws, it may “sit” in place on its own, or it may require some additional measures.
When installing connections, it is also possible for cracks to form, but not only at the joint, but also in the “body” of the extension. This happens if the reinforced connections installed cannot compensate for the uneven load, created by the house and an extension. Therefore, a connected foundation for a porch is made if it is attached to a heavy house and is itself heavy and massive, made of reinforced concrete. The second difficulty with this decision is to make the connection high-quality. To do this, use ribbed reinforcement with a diameter of 12-16 mm, for which holes are drilled in the foundation with a given diameter. Reinforcement is hammered into them and a frame for the porch is knitted on its basis.
There are two main designs of stairs: on bowstrings and on stringers. They can be made of wood or metal. There are also combined options - metal + wooden steps or metal + concrete steps.

Staircase designs - on bowstrings and on stringers
On the bowstrings
Stairs on bowstrings are the simplest. For a porch - a good option, especially if the house is wooden or a small country house. TO inside support bars are attached to the bowstrings. If you are working with metal, the bars are welded horizontally (you can minimum slope 1-2° so that water flows from the steps). In the case of wood, support bars can either be nailed to which the step will then be attached, or recesses can be cut into the bowstring (no more than 1/2 the thickness of the board), into which the step boards are inserted.
On the stringers
A staircase on stringers can also be of a simple design - with open supports. In this case, triangles are cut at the required angle in the upper part of the board. Their lower part serves as a support for the steps.

When cutting the stringer, set aside the height of the step and the width of the tread. They are connected at right angles. Using the applied markings, a template is made, with which all steps are marked.

The number of stringers in a staircase depends on its width and the thickness of the boards used for the steps. The thinner the board for the steps, the more often you need to install stringers. If you use 25 mm boards, then there should be a distance of no more than 50-60 cm between the two supports. If you need a larger staircase width and don’t want to install three stringers, use thicker boards. It is important that they do not bend under your feet.

If you decide to weld a ladder on stringers from metal, you will need to be patient: you will have to weld many small sections, but the formation principle is the same.

Methods of fastening parts
The lower edge of the porch stairs can sometimes rest directly on the ground. This option is simple, but unreliable. Firstly, the soil may settle and the stairs will begin to collapse. Secondly, upon contact with the ground, both wood and metal are destroyed faster. There are special impregnations for wood (Senezh and Senezh Ultra, for example), and metal is well prepared with a primer and painted in several layers. However, it is better to make a base - pour a shallow tape on which the bowstrings or stringers will rest.

To iron concrete base There are two ways to attach a staircase for a porch - to a beam - a beam with a cross-section of at least 75 * 75 mm or to an embedded beam of a smaller cross-section (pictured on the left).
Difficulties may also arise with the installation of porch posts. There are several ways. There is one very simple and effective one that works great even on heaving soils(clays and loams). Holes 50-60 cm deep are dug under the pillars. A bucket and a half of sand is poured into them at the bottom and compacted well. Half a bucket of crushed stone is poured on top of the sand and compacted too. They put up a pole, level it, put spacers that will hold it in a given position. The space between the wall of the hole and the pillar is gradually filled with crushed stone, tamping it thoroughly. The hole is filled flush with the ground, the top can be concreted (so that precipitation does not drain), but not spilled to the very bottom. Pillars installed in this way do not lead even with severe heaving. A significant part of the water goes into the sand, and the remaining forces of frost heaving are absorbed by the rubble, neutralizing them.

If piles, strip foundations or monolithic slab, the columnar base is folded, then to secure the wooden posts, studs or special glasses are walled into the concrete. After the concrete has matured, the rack bars are attached to them with wood grouse or bolts.
If the racks are metal, a corner with a wall thickness of at least 3-4 mm is placed in the concrete so that it can be easily welded to it later.
When building a wooden porch with your own hands, questions may arise about attaching the railings and balusters. They can be assembled using ordinary nails, but if desired, you can use bolts or wood grouse. In this case, holes are pre-drilled, then fasteners are installed in them and tightened using an angle wrench. Such a connection is certainly more reliable than simply using nails.

If the porch is attached to a freshly cut wooden house, in which the shrinkage has not yet been completed, and the design of the porch provides for the presence of a canopy, the racks must be attached to special adjustable plates.


Please note that both the metal and wood that you will use to build the porch require careful processing. The porch is exposed to all climatic influences and the materials require good protection.
Monolithic concrete stairs
The most durable stairs are made of monolithic concrete. They take longer to manufacture than metal or wood ones, but their service life is calculated in decades. The types of concrete stairs are described in detail in the video. The basics of calculation are also given.
How to make a concrete staircase on stringers with your own hands, see the following video.
Wooden porch
A wooden porch is one of the most common options in our country. Wood is plastic, easy to process, costs relatively little (in our country), and forgives many mistakes. That is why it is a favorite building material.
It also has disadvantages: it requires good protection before construction begins (antibacterial impregnations and fire retardants), as well as regular care- security updates paint coating. Then it looks attractive for a long time, otherwise it quickly loses its decorative effect.
One of the options for building a wooden porch with a ladder on bowstrings can be seen in the video. Please note that the porch is being built on sandy soil, so the method used to install the pillars is not suitable for everyone. Everything else is clear.
Brick porch
Since brick is a dense and heavy material, a brick porch requires a serious foundation. Usually this is a monolithic slab, with double reinforcement and it is better if it is larger in size than the planned porch.
When calculating the parameters of the steps, it is necessary to take into account the dimensions of the brick and the thickness of the seam between them. Then the laying work will be easier - no need to cut the brick. If you are not going to cover the porch, use for the outer rows quality material. The inner rows - backfilling - can be made from scrap or building blocks and their remains.

Brick porch with wooden steps
If the house is on a high base, making a monolithic brick porch is too expensive. Then the columns or walls are folded, leaving empty space inside. It can then be used for household purposes or covered with decorative panels. If an upper platform is needed, these columns/walls are covered from above with a concrete slab - homemade or ready-made - this is your choice. Then a staircase is attached to the resulting base. It doesn't have to be brick. It can be metal, concrete or a combination.
Photo report: wooden porch on a metal frame
A theory is just a theory, and in construction too. You always understand the essence of the matter better if you observe the process yourself, because you can see how others do it and learn something for yourself.
At the request of the parents, an exact copy of the old porch was made. The only difference is that the new one has a welded metal frame.

In place of the demolished porch, a pit with a depth of 25 cm was dug. Sand was poured and compacted into layers at the bottom, crushed stone was placed on it - 10 cm each. A metal mesh with a mesh of 10 cm was laid on top and the whole thing was filled with concrete.

Welded according to the previous dimensions of the porch metal carcass(from a corner 70*5 mm). The sidewalls are set vertically and secured with studs. Next, the base for the benches is welded to them. All metal is treated with a rust converter, primed and painted twice.

The wood used for construction was dry. Planed boards were cut to size (the width of the porch) and treated with impregnation for direct contact with the ground.

We lay the dried boards on the frame. You have to drill a hole for each fastener - you can’t just take a corner.

At this stage, two mistakes were made at once. The first is that the sheathing did not start from the sides. They immediately began laying the steps. As a result, water constantly flows into the joints of the side paneling and steps and warps the wood. It is necessary to start the cladding from the sides, and make the steps a little longer so that they protrude beyond the side cladding by at least a couple of centimeters. The second mistake is that the boards on the porch are laid close to each other. With high humidity they swell and the surface becomes uneven. When laying porch sheathing, make gaps of at least 5-8 mm.

After all the boards are secured, they are sanded. First tape grinder with coarse grain, then disk with fine grain. The process is long. At the same time, the task is being solved - to remove green color impregnation. It is not covered even by three layers of tint.

After sanding, we begin painting. We apply it three times. Each layer after the previous one has completely dried. The resulting color is dark mahogany.


While the paint dries completely, we begin making the benches. We cut boards for them, grind down an oblique chamfer (for beauty), and cover them with impregnation.

We make the backs with a small decor - roundings at the edges.

We saw along the marked lines with a jigsaw, then sanded to a smooth edge.

The sides are covered with plywood, which was painted the same color. The porch is ready.

Ready wooden porch do it yourself - side view
DIY brick and concrete porch: photo
The walls of the staircase landing were pre-built from brick, on top of which a monolithic concrete slab. Along the edge, a frame of corners is embedded into it so that the stairs and railings can be welded.

Porch plan: how everything should look

From a corner 70*70*5 mm we cut blanks of the required length. After which we treat them with a rust converter. We start cooking after the reaction has stopped and the metal has dried.


We welded the first metal string.

The finished sidewall was attached to the concrete base with two pins.

Attaching to a concrete support support
We cook the second string in the same way and secure it. When working, make sure that the two bowstrings are in the same plane.

We begin to weld the support bars. Here it is important to constantly monitor the horizontality so that the steps are not oblique.


We weld transverse pieces of the corner to the support bars to form a shelf.

The corners are welded so that they form a frame. We put a piece in it slate sheets. We lay out the reinforcing material on the slate metal mesh. We weld the edges of the mesh to the frame.

We pour concrete into the prepared steps. We make it high-quality so that the steps do not wear out longer.

While the concrete gains strength, we begin to work on the posts that will support the canopy over the porch. For them we take a profiled pipe 70*40*3 mm. We cut four columns from it. Two are slightly longer - they will be near the wall of the house, two are 15 cm shorter - they stand on the outer edge of the porch, creating the necessary slope - so that the water and snow melt off normally. For railings and crossbars we use profiled pipe 40*40 mm.

All metal is also treated with a rust converter.

First we set up the racks, grab them, install temporary stops
To avoid lateral stresses, it is important to position the racks strictly vertically. We set them up, grab them, use short seams in several places, and check again whether they are positioned correctly. We weld the temporary stops and only after the next check we weld them according to all the rules.

Once all the posts are aligned and welded, you can assemble the railings. At the required height they are fixed strictly horizontally.


Then we proceed to install the roof. We also cook it from profile pipe 40*40 mm. First, strapping around the perimeter - at the level of the shorter posts, then - the rest of the structure. It's not complicated, but it takes a lot of time - a lot of intersections.

Then it was time to do the railings and decorations. And again, there are no difficulties, it can be done easily if desired.

That's it, the porch is ready for finishing works. On the steps and landing purchased rough tiles for outdoor use. The sidewall of the monolithic slab was also trimmed with it.

The metal was painted with paint that matched the tone, and the corrugated sheeting left over from the installation of the roof was used on the roof. The DIY porch turned out pretty good.

Photo ideas for porch design


Porch to wooden bath or dacha - a staircase made of logs

Porch covered with WPC - wood-polymer composite


Wooden building material, despite its fragility, is constantly used in buildings. Used as a base for fences, decoration of extensions, as foundation parts. During work, the tree must be periodically attached to the concrete. Many questions immediately arise: how to properly install wooden poles, how to extend their durability? Answers to them require preparation.
general information
At first glance, the situation is complicated, but there are tricks that help you cope with the work without much difficulty. Before you begin installation, you should choose what kind of wood the future base will be made of and carefully process it. Wood processing is an important process, because when exposed to the environment, it deteriorates.
Processing is carried out on the prepared post. The support is divided into two halves, each of them is treated with a different chemical. The part that is underground is more susceptible to moisture; it is treated with bitumen-based solutions twice, maintaining an interval of a day. The second part of the post is usually coated with varnish, protecting the wood from wind, sun and moisture.
Important! Before processing, the wood must be dried, and careful sanding will help save bitumen impregnation.
Installation methods

After completing the preparatory work, we proceed to installation. We mark and prepare the place for the supports. Options for installing poles are determined by the design features and the nature of the work. Installation means concreting a support or fixing it to concrete. There are main methods:
- universal concreting of the base;
- use of concrete stepson;
- installation on concrete;
- use of frame;
- special connection;
- platform with a box.
Versatile method - concreting
Installation of wooden poles using concreting is well suited for soils with low humidity. The installation method involves preliminary preparation of holes for the base, installation of pillars in them and filling the remaining space with concrete.
To increase efficiency when digging holes, the ground is watered; the ground becomes soft and easy to work with. When the height of the pillars is 1.5 m, the depth for the hole is 0.5 m; for higher ones, the depth is increased to 0.8 m. The pillar is deepened by 1/3 of its length.
When the groundwater level is high, the supports are deepened below the soil freezing level and the bottom of the holes is covered with a layer of crushed stone up to 15-20 cm, which acts as drainage. The bottom of the supports is wrapped with roofing felt, fired, and treated with resin to better protect the wood.
Having completed the preparation, they begin to compact the holes. The holes are filled with crushed stone, pieces of brick mixed with soil, and compacted tightly. We leave 15-20 cm to the top of the hole, and the empty space is filled with concrete. After the solution dries, the pole holds tightly and will not bend under the load. The joint between concrete and wood is treated with a sealant, which prevents moisture from getting between them.
The second way to install a wooden pole is to use a concrete stepson. The essence of the concreting procedure is to use not the entire column, but a small column. The sequence of the procedure is as follows:
- before installation, the support is treated with an antiseptic, the part of the stepson that will be in the ground is covered with bitumen and wrapped with roofing felt;
- crushed stone is poured onto the bottom of the hole;
- vertical fixation of the support with spacers;
- Be sure to fill the wooden post with crushed stone, gravel and compact it well. Maintaining a compaction interval (every 30 cm), adding sand and water will help increase the density of the backfill;
- 15-20 cm to the top, the hole is filled with a concrete solution, which ensures stability.
After the concrete has hardened, it is necessary to secure the log with wire to small posts.
You cannot find a more traditional material for building a fence than wooden beams. And even today, in times of new building materials and construction methods, every third fence is built on wooden posts and slats. There are many reasons for this popularity, first of all, it is very attractive appearance and a material that is relatively easy to process and install. Wooden fence posts can reduce the time it takes to construct a fence and at the same time make it much cheaper, which is important for owners of summer cottages and suburban areas.
Advantages and disadvantages of a fence on wooden posts
In a row building materials the tree stands apart and is in a privileged position:
- The use of special mastics and protective impregnations allows you to reveal the beautiful texture of the wood;
- Wooden stands for making the right choice the cross-sections of the supports and the completed installation can provide high strength of the fence at relatively low cost;
- Wooden posts can be easily combined with metal, corrugated sheets, wooden slats and any other material for cladding the fence.
Wooden poles, unlike concrete or steel poles, can be easily installed with your own hands, while the light weight and good workability of wood allows you to manufacture and process the poles almost at home.
Important! Wooden posts are extremely sensitive to excess moisture and putrefactive microflora, so the quality of the material processing determines how long the posts will last in the ground.
There are quite a lot of ways to process the material, but not all recipes give a stable and long-lasting effect, so the application method protective coating must be selected in accordance with the composition of the soil and the type of wood.
How to Protect Wooden Fence Posts from Rotting
The durability of a wooden support depends primarily on the type of wood. The wood that is most resistant to rotting is larch, oak, and walnut. Pine, spruce, and fir withstand the putrefactive environment worse. Poplar, birch, and aspen are considered unsuitable for use as poles. Experts recommend that before installing poles, provide protection against the development of putrefactive microflora by the following means:
- Impregnation in two or three doses with antiseptics based on organic solvents;
- Treatment with salts of iron, copper, chromium, nickel, lead, creosote;
- Coated with protective waterproof compounds, for example, epoxy or pentaphthalic varnishes.
Advice! Processing is usually carried out in several stages, with each layer drying. To install wooden posts in the most aggressive peaty soils, the lower part of the support can be wrapped in sealed plastic bags.
All kinds of drying oils, organic oils, impregnation with used machine oil, kerosene, and diesel fuel are considered ineffective for protection.
Installation of wooden fence posts
Any construction wooden fences begins with the installation of supporting elements. For fencing up to 2 meters high, use square or round section with a maximum transverse size of 90-100 mm. Higher fences of 2.5-3.0 m must be installed with concreting of the base; the cross-section of supporting elements for blind fences must be proportionally increased by 25-30%.
For fencing a dacha or country house The following pole installation schemes are most often used:
- Concreting in a well drilled with an auger drill to the installation depth;
- Fixing wooden poles by filling the well with crushed stone, rubble, broken brick, gravel screening;
- By driving a wooden support into the ground. Such schemes are often used as temporary ones, with subsequent replacement with metal or concrete supports;
- By installing a wooden beam inside a steel glass or pipe section driven into the ground.
For your information! Small specific gravity wood makes it relatively easy to install wooden poles even alone; it is much more difficult to solve the question of how to align the supports in one plane without resorting to the help of neighbors.
We install wooden fence posts in concrete with our own hands
If you have to install wooden supports with your own hands, without helpers, then the most in a simple way There will be concreting or filling with rubble stone. This method allows you to easily align the pillars using a marking cord and a couple of building levels.
You will need to drill along the marked contour of the fence required amount wells with a diameter of 10-15 cm more maximum size in the cross section of the support. The easiest way is to use a garden auger with a diameter of 15-20 cm. Before drilling, stretch a steel or paper non-stretch rope or twine and hammer in pegs 20-25 cm high. After drilling, the bottom of the well is covered with fine gravel screenings, the layer thickness is 5-7 cm. The screenings must be well compacted and leveled to form a flat bottom. Next, install the corner or outer fence posts.
Before concreting the well, the outer supports must be leveled most carefully, since all the other pillars of the wooden fence will have to be placed on them. To align the position of the support, three main parameters are used:
- The distance from the marking cord to the head of the post, so that there are no errors in height, the stretched thread must be leveled horizontally using a building level;
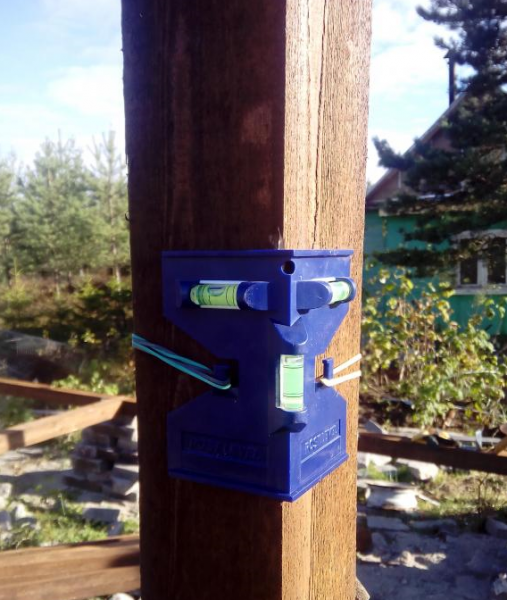
- Indications of two building levels in mutually perpendicular planes.
If possible, it is better to use the device shown in the photo. If it is not available, you can take two building levels and fix them on the planes square timber with an elastic band. After aligning the pillars, the position is fixed with wooden spacers or pieces of building material. Concrete is poured into the well in small portions so that the mass does not hit the wooden beam of the support.
Leveling is performed in the same way when using a layer of gravel or rubble material instead of concrete. The fastening mass is poured and compacted in small portions, 5-6 kg each.
How to hammer and level a wooden post
For low wooden fences, it is easier to drive the supports into the ground than to fool around with drilling and concreting. When using oak beams, you only need to sharpen the lower end by symmetrically chipping, and you can hammer in. In order not to break or split the top of the support, it is necessary to attach a board made of soft wood, linden or poplar to the head.
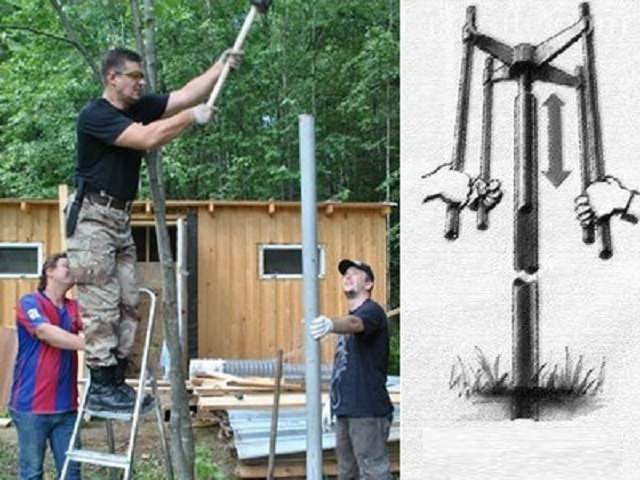
As the timber is hammered and settled, the position of the support must be periodically monitored using a building level. Until the fence post is buried more than a third into the ground, the tilt can be corrected by simply knocking out the side surface; after this, the soil around the post is compacted with blows of a sledgehammer.
Wooden posts made of larch cannot be driven directly, like oak ones, due to the high tendency of the wood to split. In this case, they are first hammered into the ground. steel pipe or crowbar, and thus obtain a thin guide hole, after which you can install and drive a larch fence post.
Conclusion
For heavy and dense loamy soils before drilling or driving wooden supports the soil has to be artificially “soaked”. In this case, a hole is punched to a depth of 30-40 cm and periodically filled with water. After about a day, you can drill the hole by hand or hammer wooden beams in the order described above.