Recently, raised beds have become increasingly popular among gardeners and gardeners - an original technology that came to us from Canada. Although, in fairness, it should be noted that such structures used to be found everywhere. They were called manure beds and cucumbers were grown there.
Raised beds: what are they and what are they for?
A high, or raised, bed is a box-shaped structure with a height of 0.15–0.2 m to 0.5–0.6 m and a width of 0.5–1.2 m. Its length is limited only by the dimensions of the site. But these sizes can vary in any direction depending on the desires and needs of the owner. A nutrient substrate is placed inside the box and plants are planted.
Do-it-yourself raised beds can become the highlight of garden design
It is best to prepare the bed in advance in the fall so that the soil has time to settle and compact. In addition, in the spring there is no need to waste precious time on this, and with the arrival of warmth, the soil will warm up very quickly and sowing can be done 2-3 weeks earlier.
Video: why do we need high beds
How to make a raised bed
The sides that hold the ground are made from a variety of materials and available materials:
- wood;
- metal;
- plastic;
- slate;
- brick or stone;
- concrete;
- plastic bottles, etc.
Photo gallery: what you can use to make a raised bed
A bed of horizontal logs can be made very quickly A bed of vertical logs will require the application of great forces Such beds can also be made from wood High beds are most often made from boards Gravel in a mesh frame looks very unusual Often high beds are made from cinder blocks The fencing can be straw The mesh frame can be filled with any decorative material Even mesh plastic containers are used. The bed can be made from flat slate (OSB)
In some cases, high ridges may not have a side fence at all and are simply earthen hills.
Raised beds are also available without fencing
Video: what are raised beds made of?
Made of wood
For the manufacture of frame structure You will need support bars and boards for the walls from wood.
Wooden boxes for high beds can be tinted in any color and coated with paint
The work is carried out as follows:

Video: making a bed out of wood
From stone
Stone structures are built to last for centuries, they look monumental, but it is extremely difficult to move them to another place.
A high bed made of stone or brick will fit well into a classic design
The work technology consists of the following stages:
- Along the perimeter of the selected location, they dig a trench 0.3–0.4 m deep under the foundation.
- A layer of waterproofing (roofing felt, polyethylene, etc.) is laid at the bottom of the trench.
- Pour a sand cushion to a third of the depth.
- A layer of stones is placed on top.
- Fill with concrete mortar.
- After a few days, the stonework is laid out.
Complex masonry work is best left to professionals
A brick bed is built by analogy with a stone one.
Video: making a brick bed
Made from slate sheets, metal or plastic panels
To build a frame structure, any pieces of old slate or metal removed from the roof will be used.
A bed whose walls are made of sheet metal can have very different shapes
The sequence of actions is as follows:
- The plates are cut to the required size.
Slate sheets are cut to the required size
- Dig a narrow trench around the perimeter of the future bed.
First, dig a trench
- Sheets of material are installed in the dug ditch.
- The corners of the plates are connected using metal corners.
Slate sheets are connected using ordinary wire
- The trench is filled in and the soil is compacted thoroughly.
To give greater rigidity, stakes are driven into the corners, to which a wooden frame made of bars is attached.
One of my good friends makes the sides of her beds from 1.5 liter plastic bottles. She digs them in around the perimeter with their necks down, trying to press them closer together. The frames intended for different crops are painted using spray paint in various colors. It turns out very lively and unusual.
A raised bed can be built from empty plastic bottles
Video: making a bed from sheet material
From the branches
The branch structure is constructed as follows:
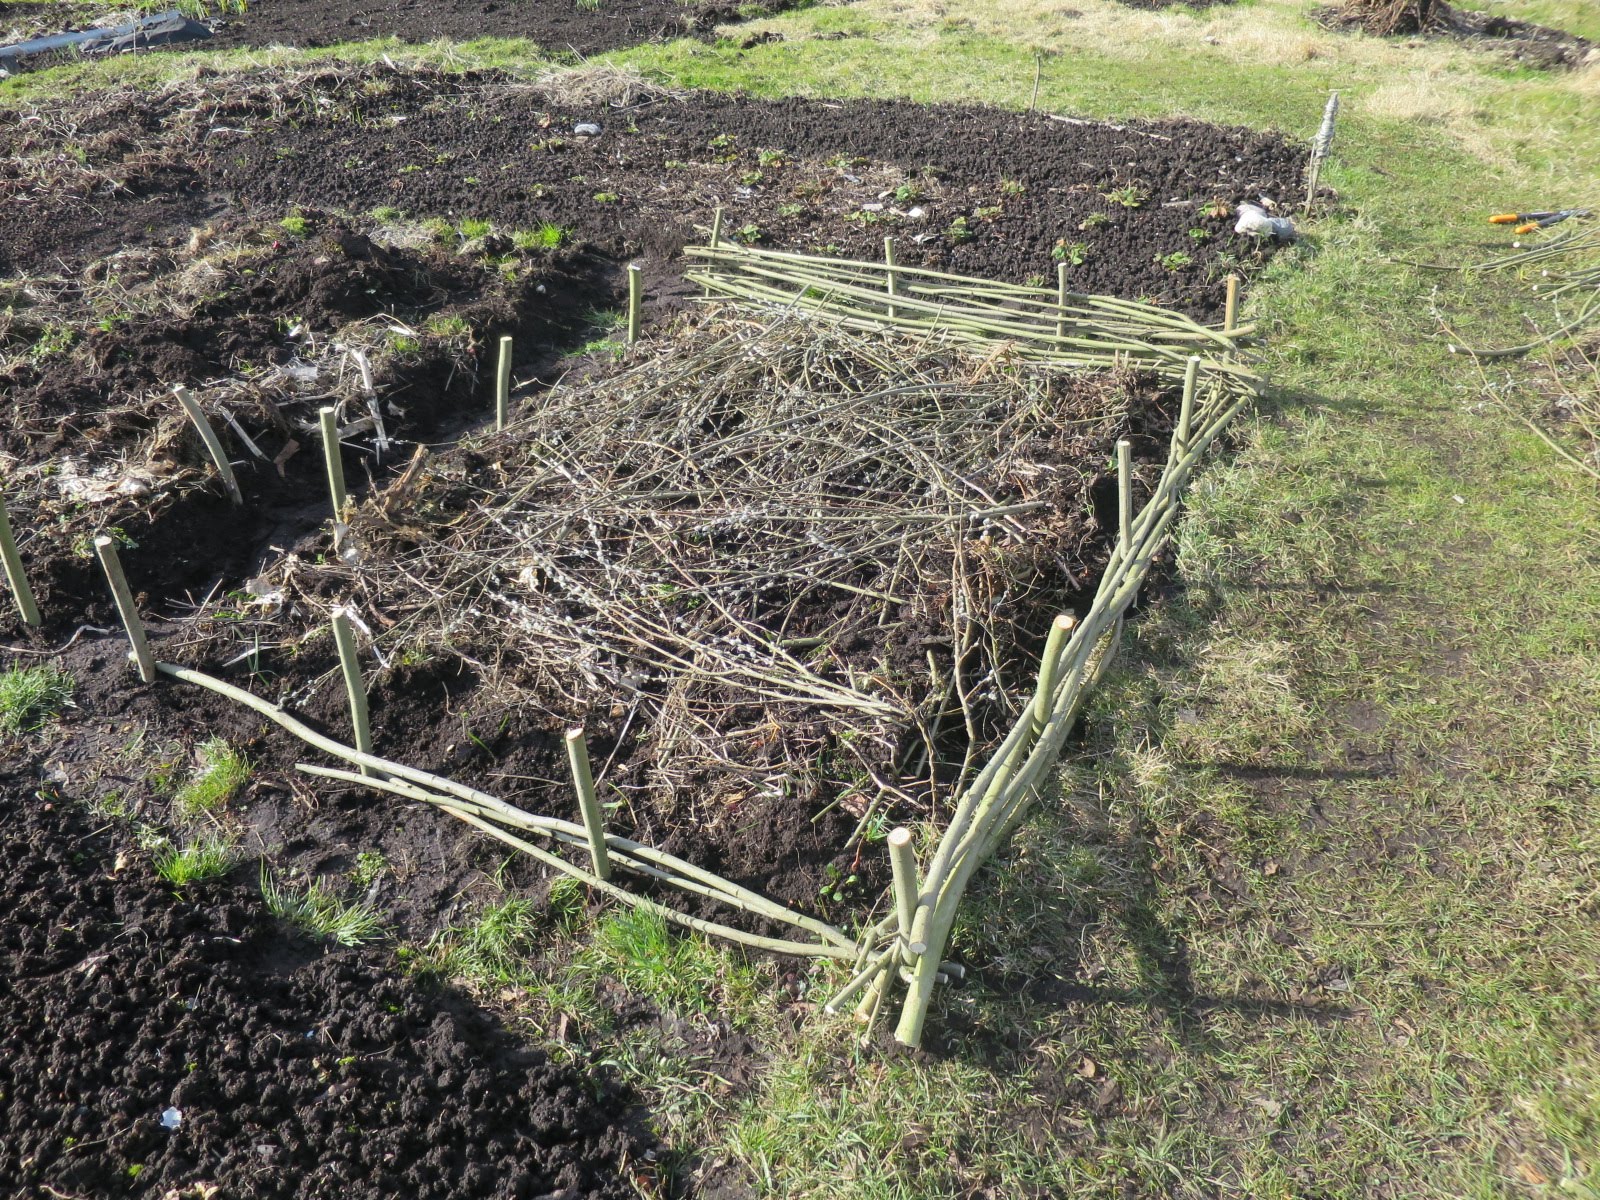
Plastic containers can be placed inside the wicker box
You can simply stick several rows of branches into the ground and secure them with wire.
Branches in the wall of the bed can be placed vertically
Video: making a bed from twigs
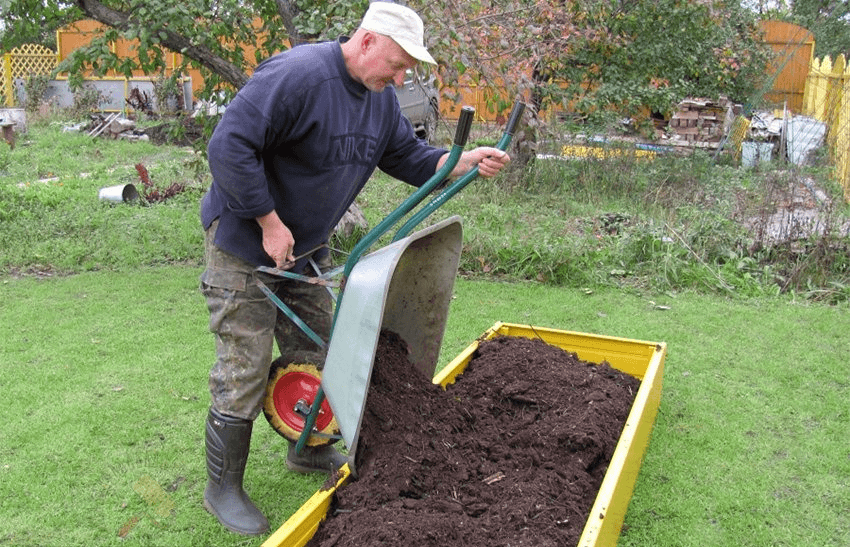
High bed: what to fill it with
After installing the frame, the bed needs to be filled correctly:
- The bottom is lined with a fine-mesh metal mesh (to prevent rodents).
Cardboard will prevent weeds from growing
- Drainage is poured (especially if the area is wet) from stones, broken bricks, shards, crushed stone, etc. In hot southern regions, large wood cuts, branches, and lumber waste are placed, which, on the contrary, will retain moisture.
Then thick branches, logs, branches, etc. are laid
- Then smaller plant residues are laid:

- The last topmost layer is fertile soil with the addition of humus and complex mineral fertilizers.
Video: filling the garden bed
Fences for raised beds can be found commercially. They are prefabricated modular structures, most often made of plastic. But it’s not difficult to build such a box with your own hands.
The productivity of plants depends not only on the time of planting the seeds and their germination, but also on the planting location and the height of the embankment. We hope that our tips for building garden beds at the dacha with your own hands will be useful not only to novice gardeners.
Selecting a location
Some vegetable crops, for example, peas, dill, sorrel, lettuce, can grow in partial shade. But most plant species are not able to fully ripen in the absence of light.
Therefore, when placing beds on a garden plot, they are primarily guided by their illumination - it is advisable that they be warmed by the sun from the very early morning until 6-7 o'clock in the evening.

Decorative garden plantings
When choosing a landing site, it is necessary to take into account the following requirements:
You should not plant plants in lowlands or on northern slopes, where the soil freezes deeper than on flat areas; the yield in these places will be low; plus the water in this place will constantly stagnate, which can lead to rotting of the roots
The site should not have a strong slope, otherwise water will simply drain from it when watering, and the plants will not receive enough moisture
There should be no large trees, buildings or fences near the plantings that could shade the plants.
It is advisable to place them north to south so that they are evenly illuminated by the sun throughout the day.
To grow vegetables for a family of 3-4 people, about 1 hectare is enough; the rest of the territory can be planted with potatoes, berry crops and flowers
To make the plot look neat, try to make “correct” beds of the same width and length; standard dimensions – 3.5x0.8 m
Don’t forget about plant compatibility: some of them don’t get along well with each other
Dimensions

In principle, you can make a bed of any length – up to 10 m. We agree, such beds look original. But constantly bypassing them when watering is very inconvenient. It is better to prepare an embankment 3.5-4 m long. This size is considered optimal. Or break a long bed into two using a small path. This will make it much easier for you to move around the area.
Standard width 0.8 m. Do not save space (!) and under no circumstances make it wider. You may be able to reach the center of the bed when planting and scatter the seeds, but weeding will turn into a real pain. Don't believe me? Try an experiment and prepare a small but wide mound. Believe me, next year you will lose the desire to make beds of this size.
A more compact version, only 0.45 m wide, is made for carrots. This crop does not like dense plantings - the sprouts must be well ventilated. For the same reason, try not to place it next to carrots. tall plants. Otherwise, you will significantly reduce its yield. In dense plantings it will grow small.
Shape and height
When designing a plot, we can decorate it with beds of different shapes, from standard rectangular to triangular, trapezoidal or oval. ideas for unusual beds there are plenty on the net. The main thing is that it is convenient to approach them from either side for watering and weeding.
The height of the embankment depends on many factors, including the type of site. In most cases, it is enough to raise them to a height of 35-50 cm. This will be enough to prevent the roots of the plants from rotting. Too high beds - up to 0.8 m - are usually made in very swampy areas.
But such structures are very labor-intensive. Plus, they will need to be brought to the site not less than a couple KamAZ trucks of fertile soil. For one small bed you will need at least half a ton of it.
Raising beds is often required for growing heat-loving crops, for example, cucumbers. After all, in high beds the earth warms up much faster. It is often impossible to get an early harvest without this.
Sometimes they raise beds just for their own convenience.
In this case, caring for plants is much easier. Just keep in mind that in high-altitude beds the soil dries out much faster, so you will have to water the plants more often. Experts also advise raising the planting area in areas located in the shade. The optimal height of the embankment in this case is 50 cm.
To prevent water from rolling onto the path when watering, the bed should be slightly concave inward.
Arrangement of a high bed

A box for it can be made from available materials: boards, plastic, metal or stones:
It's better to put it on the bottom metal mesh– it will protect the plants from the ubiquitous rodents.
Crushed stone, expanded clay or broken brick are used as drainage. The thickness of this layer is 10-15 cm.
It is better to pre-treat the prepared soil with agents against pathogenic microbes and insect pests. If you don't want to use chemicals, mix the earth with a small amount wood ash– it will protect plants from harmful bacteria.
You should not fill the garden bed with soil up to the very edges - it will constantly spill out onto the path. You need to leave about 5 cm.
Drainage

When the site is located in a lowland or swampy area, growing many types of crops on it becomes a problem. Even if vegetables and berries ripen on it, due to excess moisture they quickly deteriorate during storage.
Their taste also changes - much less sugar accumulates in them. To prevent this from happening, take care of the drainage of the wetland.
Most gardeners know that cabbage, melons, zucchini and cucumbers require more moisture to grow than other crops. But it turns out that it is also possible to grow massive heads of garlic only in areas rich in moisture. On dry soil, even with abundant watering, it is rarely large.
For the above types of plants, drainage is not required (unless, of course, the stagnation of water in the beds is insignificant). It is better to drain the area for growing other crops.
To build multi-tiered beds, you can knock down special boxes from wood. It is highly undesirable to use metal - it heats up quickly in the sun, and the soil in them will dry out even faster. If necessary, paint metal containers with light paint - light surfaces heat up less.
Ready-made boxes, racks or containers of suitable size are often used for such structures. You can also place large containers filled with soil on the shelves.
Lazy beds

Such mounds are used when planting a large number of plants. They are small in height and externally look like bulk trapezoids without the use of a box. True, such embankments will have to be made every season - they settle during the winter.
Make a shallow ditch in the area of the path, throwing the earth onto the ridge. Level the soil with a rake. The bed is ready.
Let us repeat - the drier the soil on the site, the lower the height of the embankment should be. In swampy areas, dig paths as deep as possible and make the bed higher. On sandy soil you don’t even need to do this - just trample the paths on the dug up ground well with your feet, thus marking the location of the paths.
Boxes for beds
Decorative options, limited to a box, are a favorite technique of many gardeners. After all, caring for them (watering and weeding) is greatly simplified. Using boxes is a good way to protect against soil erosion. In addition, the paths between them will always be clean, without streaks and puddles.
As a rule, paths are covered with wood, tiles or concrete so that grass cannot break through the ground.
Before you begin installing the box, the place for the garden bed must be prepared by digging up the ground, carefully removing all weeds. Level it thoroughly with a rake so that water can be evenly distributed over the entire surface when watering or raining.
When digging, you need to cover a slightly larger area. Otherwise, the roots of perennial plants will again emerge from the ground. Getting them out from under the box will be problematic. Neglected area It is better to pre-dig twice in spring and autumn.
It is simply unrealistic to get rid of the roots of perennial plants in one go. To make the job easier, simply turn the sod over with a shovel so that the plant roots are above the ground. Gradually they will dry out under the sun's rays and die.
Wooden box

Wooden box
The simplest wooden box is assembled from 4 long and 8 short boards of suitable size. They are connected in pairs using bars. Nails, screws and metal corners are used as fastening elements.
You will also need 4 pegs or cuttings of reinforcement 0.6 m long - they are driven into the ground from the outside to enhance the strength of the structure. To ensure that the bed is perfectly level, its walls are aligned horizontally and vertically with a building level.
Stone or concrete box

Stone or concrete box
Such structures are characterized by high strength and long service life. However, they will not be cheap.
Plus, the procedure for their construction requires a lot of time. And moving the bed will be a serious problem - the structure will have to be broken up.
Metal boxes

Metal boxes
If you have scrap metal on hand, you can make beds from it. Such structures are light in weight and, if desired, can be easily moved to another place. They can be easily painted in any color, so they look quite decorative.
However, to create such products requires the ability to work with welding machine. You can cut the metal at your nearest scrap metal collection point.
Slate fencing

Slate fencing
It is quite resistant to rotting, even when buried in the ground, and can last a long time.
The disadvantages of slate structures include increased fragility - when assembling and cutting them, high accuracy and accuracy.
Plastic structures

Plastic structures
If you have several left after repair plastic panels, you can make a fence out of it. Bright, they stand out against the background of plants.
Moreover, plastic can lie in the ground indefinitely - it is not afraid of moisture. However, under the bright rays of the sun, this material quickly fades and loses color.
Mulching
Weeding often takes gardeners a lot of time. If the area is large, this becomes a serious problem. You just have to spend the day and night in the garden.
To reduce the time spent on endless weeding, prepare so-called smart beds. The principle of their manufacture is simple. To protect plants from weeds after planting, cover the gaps between the sprouts with sawdust, pine needles, straw or dried last year's tree leaves.
Mulch the soil and cover it with a dark film. It is spread out before planting, making small holes for the plants. Transparent film is not suitable for these purposes - weeds will continue to develop when exposed to light.
It has been proven that mulching significantly (almost 30%) increases productivity
After all, covering the top layer of soil protects the fertile layer from weathering and rapid drying out. Plus, under a layer of organic matter, beneficial microorganisms and earthworms multiply faster.
Using this method, you can quickly put even abandoned areas in order - just cover the ground overgrown with weeds with mulch for a couple of years.
Unfortunately, in wetlands, mulching often leads to a sad result - covering the soil leads to stagnation of water in the beds, and as a result, rotting of plants. But even in this case, mulching can be useful.
The only difference is to cover the ground for the winter and in early spring do not do it. Wait until the soil dries well.
Mulch should not be used during rainy seasons. If the summer turns out to be hot, with the help of mulch you will get rid of not only weeding, but also frequent watering. The moisture underneath will evaporate much more slowly. In wet areas, be sure to prepare drainage around the perimeter of the beds to remove excess water.
Warm beds
Achieve early harvest It's not that easy in our climate. At the very first return frosts, tender sprouts planted in open ground, they will simply die. Surviving plants will be stunted and diseased. The ideal solution for growing in this case is warm beds.
They can be used for many types of crops: first greens and radishes, heat-loving cucumbers, zucchini, pumpkins, eggplants, tomatoes, etc.
Let's look at the basic rules for creating warm beds and how to grow each crop on them:
They can rise above the ground or, on the contrary, be built below ground level.
They are buried no more than 0.5 m into the ground. This is quite enough to protect the sprouts from spring frosts. At greater depths, the plants will be in the shade and will be pulled together.
They are raised to a height of up to 0.5-1 m. In principle, they can be made even higher - caring for them will only be simplified.
Lay first drainage layer from fine crushed stone and sand. You can replace it with broken brick, but remember that over time this material can decompose when exposed to moisture.
Next layer - vegetable waste. The heat released during their decay will serve as natural heating. It is better to prepare such a bed in the fall, during harvest. You can use cut tops or any weed left after weeding as a “warm layer”. The most important thing is that it does not have time to form seeds.
For cucumbers, pumpkins and zucchini, manure is often used as a warm layer. When overheated, it heats up much more. For crops such as tomatoes, manure, as well as pure humus, is contraindicated. The plants on it will only increase their green mass. You may simply not be able to wait for a harvest made from manure - the ovaries will immediately fall off. Therefore, to warm up tomatoes, use ordinary vegetable waste.
The last layer is fertile soil. It is poured at least 30 cm thick.
Novice gardeners sometimes complain that their neighbors have high yields in their warm beds, but for some reason nothing grows in theirs. Indeed, if a layer of grass or manure is only slightly sprinkled with soil, it will simply be impossible for the plant’s roots to gain a foothold in it. And the food for the sprouts will clearly not be enough. Overheated plants serve only as a layer of insulation. Therefore, without a solid layer of soil, you will not achieve a harvest.
Next, arcs are placed over the bed and covered with film. Covering material such as spunbond (agrofibre) should not be used for these purposes. It can be spread directly on the ground in case of return frosts or used as additional shelter. Unlike polyethylene, agrofibre has many holes through which precious heat will freely escape.
This bed “works” for about 4 years. After it is completely depleted, a new one is prepared, and the rotted plants are used as fertilizer when digging up the beds. The first two years, the most heat-loving crops are planted on a warm bed - cucumbers, pumpkins, zucchini, eggplants, etc.
In the third or fourth year in this place you can plant any garden crops– from carrots, beets, onions to potatoes.
When it gets warm, the plastic film is folded back on both sides during the daytime so that the plants get a little air. Otherwise, they will simply “burn” from the heat. At night, the plants are again completely covered with film.
Read also:
Paths between the beds

The French way of planting crops
French version- one of the ways to decorate a site. Unlike traditional planting methods, such a garden always has a strictly symmetrical shape. Moreover, it is absolutely not necessary to make the beds rectangular. They can have the shape of rhombuses, ovals or semi-ovals, etc. The most important thing is that each of the segments is strictly symmetrical to the neighboring one.
As a rule, for ease of caring for crops, French beds are located at a certain height.
It is advisable (but not necessary) to plant plants symmetrically. For example, radishes are located along the edge of all the beds, lettuce is in the center, and red cabbage is on the other edge.
Unlike the French, English do not require strict symmetry. The main emphasis in them is on lawns, with the help of which the site is decorated. Against the background of sown grass, plantings of even ordinary garden plants look ornamental crops. Essentially, it is a mixture of a vegetable garden and a flower garden.
garden house at English way planting looks like a huge vertical bed. At its walls they plant climbing plants. Pots and vases of various shapes are placed along the structure. Each of the plants is carefully cared for - despite the riot of vegetation, there is no smell of “wildness” here.
Whether you are a keen gardener can be easily determined by looking at the fencing for your garden beds. Ideas for such design can be very different, as well as the materials used for these purposes. And the beds themselves can be very original. Review possible options and practical recommendations on this topic have been prepared for you by the HouseChief editors together with the authors who are constantly looking for creative ideas.
A vegetable bed can become a real decoration of the landscape if you approach its design correctly
PHOTO: dm-st.ru
Read in the article
Why do garden beds need fencing?
Not everyone uses fencing for their garden beds. If you have a very large garden and you grow vegetables for sale, you use various mechanisms for processing. In this case, you will have to abandon aesthetics in favor of practicality. Such areas are plowed with mini-tractors and require mechanized weeding and fertilization.
 Any obstacles to the operation of the mechanisms in this case are unacceptable
 PHOTO: wetzavet.ru
But if you have a small garden, which mainly uses manual labor, then the most convenient option will be . They are easy to handle. This is noted by everyone who has tried such designs. There is less strain on your back because you don’t have to bend all the way to the ground. And the higher the site, the easier it is to process and weed it manually.
 Raised beds are convenient for older people and those who suffer from back problems
PHOTO: avatars.mds.yandex.net
Raised beds are often used if there are problems with soil fertility on the site. You can pour imported humus soil into a raised box, add compost, or use other popular methods that increase the yield of plantings.
 This is a smooth or wavy material in rolls, which is sold in specialized gardening stores.
 PHOTO: roomester.ru
Border strips come in different lengths and widths. They differ in the density of the plastic. Soft and low ribbons are considered the most impractical. They serve more as a decorative fence for a flower garden, but are not suitable for a full-fledged garden bed. If your choice falls on curb tape, choose the thickest possible plastic and take a height of 30 cm, since for a stable position you need to dig the tape into the ground to a depth of at least 15-20 cm.
 The border tape will not be able to hold a large mass of earth; such beds can be raised by a maximum of 10 cm
 PHOTO: ozon-st.cdn.ngenix.net.
On sale you will also find ready-made sides for. They look very neat and attractive, but for the price they are not the most the best option. In addition, when purchasing such fences, you will be bound by the size suggested by the manufacturer.
 Otherwise, these sides are very practical: they last a long time, are not afraid of precipitation and temperature changes, and are not damaged by insects
 PHOTO: the-first.info
Finally, borders can be made of polycarbonate. This is very convenient, especially if you have leftovers after building a gazebo or greenhouse. Polycarbonate can be mounted on metal corners or on timber posts.
Fences made of bricks, blocks or stones
If you do not mind capital construction in your garden, consider using bricks or blocks. Not everyone decides to take such a step, because later it will be difficult to remake the finished beds in size or location. Therefore, before deciding on this option, think carefully about everything: the location, size of the beds and their watering system.
 Capital beds are usually made after many years of experience in gardening in one area
 PHOTO: lateres.ru
In principle, it is not necessary to build for such structures, because they do not bear any load. But there is a danger that even a couple of rows can crack during seasonal soil movement. To prevent this from happening, the masonry should be mounted on columnar foundation from concrete or even wooden poles and grillage.
The same principle underlies the construction of a border made of cinder blocks or foam concrete blocks.
 Hollow blocks can also be used for construction.
 PHOTO: united-fellowship-chapel.com
But remember: foam concrete blocks can accumulate moisture, so it is better to cover them with a layer of waterproofing, at least from the inside of the masonry, so that the moistened soil does not destroy the blocks.
Masonry is also from the field of capital construction. Stones can be laid by fastening cement mortar. Such fences look very massive and will last a very long time.
 An interesting idea: use a mesh as a frame and fill it with pebbles
 PHOTO: vodakanazer.ru
Important! Anykindscapital masonry retains moisture in the bed. So that your plantings do not die, need to think over the drainage system. To do this, the space under the bed is deepened by 15-20 cm and a sand and gravel cushion is installed. And so that the soil does not spill through it, the pillow is covered with a layer of geofabric.
Metal borders
Metal fencing is perhaps not the best option. First of all, it's not cheap. It is not worth purchasing metal specifically for such purposes. And one more thing - iron, when in contact with the ground, rusts very quickly and loses its attractiveness and, finally, integrity. In addition, it cannot be called warm. It makes sense to use such borders only if you have pieces of metal profile left after building a fence or roof. The metal profile is coated with a special polymer composition and only the cut area remains vulnerable, which you can protect with paint or varnish.
 On sale you can find galvanized curbs that are assembled using bolts
 PHOTO: msk.by
Available materials for fencing
You can use scrap materials that you have at your disposal to make fences.
Plastic and glass containers
Plastic bottles are trash that constantly accumulates in any home. They can be reused as material for numerous crafts. There is an option to use them for the construction of borders. To do this, “one and a half” are dug into the ground with their necks no less than halfway. To make such a border durable and not fly away with the first wind, it is better to fill the bottles with sand or at least water. And to make the fence look like one whole, it can be painted.
 Such fences can have the most intricate shapes
 PHOTO: avatars.mds.yandex.net
Glass bottles do not need to be filled, they are already heavy. And they dig them in the same way, with their necks in the ground.
 In the process of collecting material for such a border, it is important to protect your health
 PHOTO: 1000000diy.ru.
Plastic pipes
Plastic sewer pipes can also be used for borders. They, like bottles, are dug into the ground, and to strengthen the structure, you can fill them with the same soil. The result is a strong and durable fence.
 The pipes can be cut lengthwise and installed this way
 PHOTO: 1.bp.blogspot.com
Car tires
Tires are another popular option for fencing flower beds and beds. They are cut in half and dug into the ground. Such a fence is purely decorative, so it is unlikely to be able to hold the soil. But here, too, you can use geofabric to hold it.
 You can complicate the task a little by cutting the tires into strips and fastening them together
 PHOTO: roomester.ru
In addition - a short video course on modern material for fencing: wood-polymer composite.
What kind of borders are in your beds? Maybe you can recommend some other materials for making them? Write about it in the comments, it's very interesting!
We will send the material to you by e-mail
City dwellers love to spend time at their dachas, where some organize only a recreation area, while others plant flowers, vegetables and grow fertile trees. Spending several hours a day or a week in the process of cultivating the land, the question arises of how to make beds with your own hands, not like everyone else. Interesting ideas come to mind for many summer residents and owners of private houses. Let's look at original photographic examples and several instructions for creating such beauty.
A beautiful flower garden without any hassle
How to create beds with your own hands, not like everyone else: interesting ideas for ready-made options
When decorating their garden, many people think about how to create beds with their own hands, unlike everyone else. Interesting ideas come to mind, but the process of implementation becomes difficult and not everyone succeeds.
There is no need to despair, you can take it as a basis ready-made option, and use his drawings to bring your own original creation to life. Keep in mind that not only the structures themselves will decorate the site, but also the combination of garden paths and the grown crops themselves will be included in the overall landscape design.
Here are a few interesting photos designing beds in the garden:


- Big. The area of this design exceeds 12 m². In such open spaces, plants are planted that practically do not need weeding: potatoes, beans or pumpkins.
- Hilly option. Height is from 80 to 100 cm, and there are no requirements for length. To create, the top layer of soil is cut off and fencing is made of metal or chipboard. A small depression is made in the middle of this structure, where water accumulates during irrigation.
- High. For this design it is worth choosing sunny areas. It is advisable not to exceed 1.5 m in width. The height of the ridges varies, but do not forget that this option requires frequent watering.

- Deep. Instead of a hill, you make a trench where you place peat, compost and manure, and lay soil on top of everything, the height of which does not exceed 25 cm.
- Narrow bed for vegetables. Most often used in greenhouses. Also suitable for open ground. Plants with small shoots on top but a strong root system are planted in such structures.

When choosing a garden bed option, you should take into account the characteristics of the crops you plan to plant. Some plants prefer moist soil, so high beds are rarely chosen for them.
How to arrange garden beds at your dacha with your own hands with photo examples
To arrange your garden, it is worth considering not only the shape and subtype of the bed itself, but also choosing the material for its framing, as well as arranging the paths. Why make a planting area around it? There are several reasons for this:

- Aesthetic side. Such designs look neater and more interesting.
- Less weeds will grow. For their development, the free area is reduced, and weeding is much more convenient.
- The ridges do not crumble from rain or watering.
- Soil moisture remains longer after watering.
Important! Select the right material for making beds. It must allow air to pass through and not emit toxic substances.
Good options come from:
- flat slate for beds: an inexpensive option that will serve as additional decor, but do not forget that it is quite fragile;

- wood: natural and easy to install, but short-lived and requires treatment to prevent rotting;

- galvanized steel with polymer coating: long service life, but not cheap;

- stone or concrete: durability and beauty, but this option incurs material costs and also requires a certain skill in masonry;

- border tape: the easiest and most affordable way to register.

The paths between the beds can be left as is, sprinkled with small pebbles or covered with paving slabs. This depends on the garden decor option you choose.
How to make a fencing for garden beds with your own hands
The most simple options for fencing that does not require a lot of time and has an affordable price: flat slate and border tape. The second method allows you to create any form for planting fruit crops.

To do interesting decor on your site, you first need to buy flat slate for the garden bed. The average cost is from 300 to 500 rubles. depending on the thickness of the material. The classic size of one element: 100 by 150 cm.
The installation of flat slate itself will come down to a few simple steps:
| Photo example | What to do |
|---|---|
 | Having chosen the location and dimensions of the place for planting vegetables, cut the material to the desired height and length. Along the perimeter of a flat ridge, dig a trench half the depth of the purchased slate. |
 | Place the workpieces in the prepared trenches and fill them with soil. Be sure to compact the soil to stabilize the structure. |
 | Use metal pegs to secure the structure. And pour fertile soil inside. All is ready. |
To make it easier, watch the video on the topic:
It’s even easier to use your own borders for garden beds. The softness of the material allows you to make any shape, and for strength, the material is not only dug into the trench, but also plastic pegs are used. Here are some interesting photo examples of finished works:


Related article:
In the article we will look in detail at why it is useful, what types of garden border strips are on sale and how to properly install this device?
Photos of unusual beds at the dacha with your own hands
It is not at all necessary to spend a lot of money on fencing for planting fruit crops; you can use the simplest and most affordable materials that you have left over from construction or other work. Often used are scraps from boards, bricks or pieces of corrugated slate.

Those who like to do everything themselves, as well as decorate the garden with fancy shapes, often make things from scrap materials. Photos of some works are presented below:


Related article:
Photos of do-it-yourself strawberry beds: features and examples of creation
Strawberries are planted in almost every garden. The juicy and unpretentious berry is a favorite delicacy of adults and children. But for it to really turn out delicious, you need to properly prepare the bed.

Today there is a wide selection of materials that can accelerate the growth and productivity of bushes. For example, the price per meter for spunbond is only about 100 rubles, but such a fabric has many advantages:
- creates unique conditions for berry growth;

- has excellent ability to pass air and water;
- does not allow weeds to develop;
- the soil under the canvas warms up faster;
- the extra whiskers do not take root and there are virtually no slugs.

If you don’t want to spend money even on such a simple and convenient material, you can make beds from plastic pipes. Here are some interesting photo examples:


Interesting do-it-yourself strawberry beds made from car tires
When coming up with an option suitable for planting delicious berries, various available materials come to mind. Including beds for strawberries made from tires. Moreover, you can create a unique vertical structure that takes up little space in the garden and produces a large harvest.

The tires of the required size, a chisel, a wooden block and soil with seedlings will be useful for the work. An additional frame is not required, since the tires have a metal cord that ensures proper structural strength.

Holes for seedlings are made with a chisel, and the tire itself can be placed on a block. Make a few holes and simple design ready. Here is a video on one of the creation methods.
Video: growing strawberries in tires
Instructions on how to make a strawberry bed from a pipe with photo examples
Planting strawberries in a tube (horizontally) is a common option in areas with little free space. Moreover, the material itself can be either metal or PVC. Here are some interesting examples:


You can even use a sewer pipe for a strawberry bed. Let's take a closer look at how to make a design for a delicious berry:
- Prepare two pipes with different diameters, the thin ones should be 20 cm shorter than the thick ones.
- In the large one, drill holes with a large diameter (7 cm) at a distance of 15 cm. And in the small one, three rows of holes are made with a diameter of 0.5-1 cm and an interval of 8-10 cm.

When preparatory work completed, assemble the structure. To do this, place plugs on the pipes. You dig the thick one into the ground, and attach a small pipe for watering into it in the center. The soil is filled in and bushes are planted. To make it clear, watch the video on the topic:
The designs of vertical beds for strawberries made from plastic pipes are interesting. Here are some photo examples:


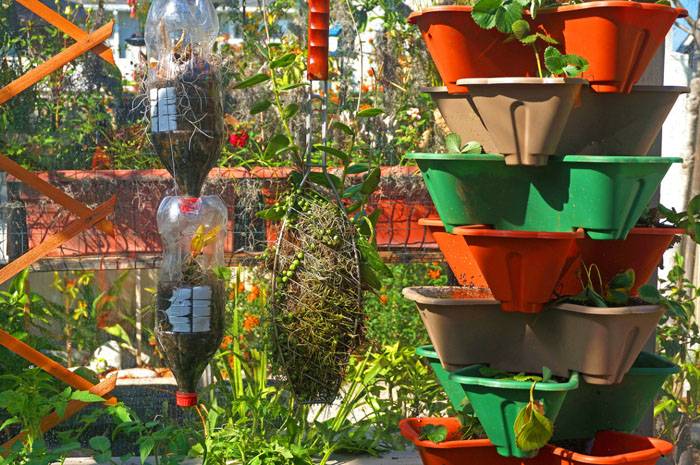
How to make multi-tiered strawberry bed structures with your own hands
Modern materials, as well as available tools, allow you not only to do it yourself, but also to recreate real pyramids with beautiful bright bunches of strawberries from photos. And also make multi-level “houses” for flowers.

Making a pyramid for growing strawberries on your own is not that difficult. Can be used various material for fencing: wood, metal, plastic. As well as all kinds of improvised means:
- flower pots;
- car tires;
- cutting pipes of different diameters;
- boxes of vegetables and fruits.

There are no exact criteria for the shape of the base. You can make it round, square, rectangular, polygonal or even a wavy line. Let's look at a simple way to make a multi-tiered bed for strawberries:
| Photo example | Sequence of work |
|---|---|
 | Let's take the classic pyramid as a basis, but with a sharp tip. We will assemble from wood, since it is easier to fasten. |
 | Assemble the first tier. It should be the biggest one. The width of the bed for strawberries should be 40 cm. A stainless steel mesh can be laid down, it will protect the roots from pests and prevent waterlogging. |
 | At the bottom of each tier, pour sawdust and shavings, as well as dry grass. That is, you get a mesh - sawdust - grass. Then a layer of earth. It is advisable to leave the total height of the pyramid at one meter, otherwise it will be inconvenient to care for the berries. |
 | It is better to make the sides of the levels at an angle, and before planting, treat the entire structure with varnish or paint to protect it from rotting and increase service life. |
To make your work easier and faster, watch the video on the topic:
Photo of strawberry beds made from bags
Vertical beds for strawberries are an ideal option for a small plot. You can buy them ready-made at the store or make them yourself. Moreover, the second method is a real flight of fancy. In addition to the considered methods of constructing beds from pipes, tires and wood, you can make a unique decor with fruitful bushes from bags.

The process of growing strawberries in bags is no different from a classic or vertical bed, but the results are very interesting options for creating beds is not like everyone else.


Advantages of do-it-yourself slate beds with photo examples
The use of flat slate for beds has been known for a long time. Every gardener has seen such structures at least once. The material for the sides has a number of advantages:
- durability due to the absence of corrosion and rotting processes;
- looks beautiful and neat;
- easy to mount tall structures, and even multi-level options;
- affordable price;
- Available for open sale in any city or online store.

Despite the ease of installation and undemandingness in additional processing, slate has negative aspects that must be taken into account when choosing fencing for a place for planting strawberries:
- gets very hot in the sun, so the beds should be watered more often;
- vulnerability to mechanical damage: If you accidentally hit it with a shovel or cart, the slate will crack.

But the wavy material makes very neat and beautiful beds:


How to make wavy beds from slate with your own hands
From the photos above, you can see that creating a bed of wavy slate does not have to be even and rectangular. You can make structures in several levels or bevel corners, choosing the best option for your site.

Sometimes slate scraps left over from the roof are used. This is the cheapest option for arranging a vegetable garden, since it does not incur additional costs, but there are inconveniences in working with different pieces. The easiest way is to buy corrugated slate sheets of equal thickness and length. Moreover, the average price for them varies between 200-300 rubles. for 7-8 waves. Average dimensions: length – 1.75 m, width – 1.13 m.

To lay such a fence in the ground, it is enough to dig a small trench along the perimeter of the future ridge. Place the slate in even lines in this hole, about half the total height, and cover it with earth. To understand the sequence of actions, watch the video on the topic:
Features of do-it-yourself flat slate beds
Many summer residents prefer to fence their beds with slate, as it is affordable and simple. It also does not require any specific skills or abilities, as is the case with laying a stone border.

At the same time, such a practical and harmless material has several recommendations for installation as a fence for flower beds or beds:
- For convenience, a full sheet of flat slate is sawed in half or divided into parts of 1 and 0.75 m.

- The elements should be secured to each other using metal corners, painted with a special anti-corrosion varnish. This prevents the ridge from spreading.

- If you want to change the color of the material used, do it in advance and not after installation.
Also, follow safety precautions and carry out installation wearing construction gloves so as not to injure your hands on sharp corners or screws. The result may be a beautiful vegetable garden that stands out from the neighbors’ beds:


Price for slate for beds
If you don't have any leftover pieces from your roof repair, you can buy slate bed strips. The price for them varies, depending on the thickness of the material:
It is easier to work with ready-made strips, since the need for cutting is eliminated. At the same time, you can find very cheap options with or without delivery, and also order a kit through online stores.

The installation of flat slate for beds itself will not take much time. Watch the video instructions to understand all stages of the work:
How to make beds in a greenhouse: photos of interesting works
A greenhouse is a place where summer residents like to plant heat-loving fruit-bearing plants. You can see peppers, tomatoes, cucumbers and much more in them. Some people arrange the area for a greenhouse or insulate the structure so that they can harvest crops all year round.

For whatever purposes the greenhouse is used, it is a small space, if you do not take into account commercial options where several beds need to be placed.
Advice! Try to think in advance about how many plants will be placed in the greenhouse in order to calculate the number and width of the beds.

Borders that protect fertile soil from spreading are assembled from a wide variety of materials. There are beautiful creations made of wood or neat designs made of metal, and border tape and improvised means are also applicable. Here are several options for arranging a greenhouse:


Related article:
Option for successful placement of beds in a 6x3 greenhouse with photo
There are many design options, one of the common ones is 3x6 greenhouses. How to arrange beds in a long and narrow space is a question that worries many. There are several general options for the location of planting sites in a greenhouse:
- Two large ridges with longitudinal and transverse passages. There is less space for planting, but there is free access for careful care of the plantings.

- Long, wide two beds along the walls of the greenhouse. In the middle there is a passage with a width of 50-70 cm. This arrangement allows you to plant different crops, adjusting the distance between them, and calmly take care of them.
- Three identical parallel ridges. Usually the structures are narrow, which makes it easy to weed the entire area around the plants.

- There is a wide place for landing in the center, and narrow places along the walls. Easy to care for, but it turns out a little usable area for plants.

When choosing the location of planting sites in greenhouses, keep in mind that the beds near the walls should not be more than 1 m wide. And the dimensions of the central one cannot exceed 3 m. This is due to the need for free weeding and loosening of the soil.
How to make a bed in a 3x6 greenhouse: photos of practical methods
Most often, gardeners choose a large ridge in the middle and small ones on the sides. This is the best way to plant several varieties of plants in one greenhouse so that they do not interfere with each other’s growth and fruiting.

If you choose a 3-meter wide bed in a greenhouse, then place it exactly in the center, leaving enough space for passage. The path can be covered with small pebbles or covered with film to prevent unnecessary weeds from sprouting.
It’s not difficult to make a bed with a width of 3 meters yourself. First, you need to decide on the material of manufacture. And then dig a small trench around the perimeter and deepen the structure. Be sure to compact the soil on top.

It is worth making a layer of organic fertilizers under the soil and laying out drainage to prevent the soil from becoming waterlogged. Here is a video example of how to redo the beds and make 3 narrow identical stripes:

- Natural material. Components are selected depending on the type of soil and laid on top for a natural greenhouse effect. Files, thick fabric, leaves collected from autumn, humus and much more are used.

When there is no need for heating, since the greenhouse is located in a warm or moderate climate climatic zone, others use unusual options for planting plants. For example, you can organize vertical placement of beds in a greenhouse. In this case, everything depends on the imagination of the author and the crops to be planted.

Below are beautiful photos beds in a greenhouse that you can recreate on your own:


Autumn and spring preparation of beds: how to increase productivity
Professional gardeners know the need to prepare any soil in the fall and spring. Such prevention prevents large weed growth and increases productivity.

First of all, the area for planting is dug up. Moreover, in the fall this is done as late as possible: almost before the onset of frost, and large lumps of earth are left so that the roots of weeds and pests freeze. In the spring, on the contrary, they loosen it to enrich the soil with oxygen and quickly dry out after the snow season. If there are perennial fruit-bearing shrubs on the site, then the need for wrapping for the winter depends on the planted variety. For example, girlish grapes do not need insulation.

Important! For any crops and plants that will decorate the garden or provide benefits, it is worth following individual care recommendations.
Let's take a closer look at the features of preparing the soil for winter and spring planting.
Spring preparation of beds for planting: basic recommendations
Spring is the most active period in the life of any summer resident and owner of a vegetable garden near the house. Seedlings are already growing on the window, which very soon should be transferred to open ground or a greenhouse. But you can’t just “poke” the plants into the ground, otherwise they will die or not bring the desired harvest. That is why spring training soils take a lot of time.

- The soil should be kept loose. To do this, the garden and garden are dug up. On large areas used to facilitate the work process. In modest gardens and greenhouses, summer residents still have a shovel in their hands.

- Feeding the soil before planting. During constant digging in spring and autumn, microorganisms necessary for fertility die. To replenish their balance, you can purchase the following drugs in specialized stores: “Emochki”, “EM-1”, “Baikal-1” and others.

- It is worth taking care to protect the crop from pests already at the preparatory stage, and not after the appearance of the harvest. For this purpose, drugs are purchased, for example Metarizin, and applied to the soil along with other types of fertilizers.

It is worth considering the characteristics of the crop that you will sow in the selected area. For example, preparing a bed for carrots in the spring includes several stages:
- Despite its unpretentiousness, carrots do not like poor soil. At the same time, you shouldn’t overdo it with fertilizers either, since the taste of the vegetable and its shape change.

- You should not add manure to the garden; for carrots it and compost are the worst growth aides.
- The bed must not only be well dug up, but also loosened using a hoe or rake. The better and deeper the soil is dug, the better the harvest will be.
- Before sowing, the seeds are soaked for a day and then dried a little before planting.

- Don’t forget to moisten the bed well for vegetables that love moisture. Don’t forget about watering during the growth period.
- It is advisable to change the place for planting carrots every year and avoid clay soil.
By following these recommendations, the harvest of orange vegetables will be excellent. There are fewer requirements for preparing a bed for onions in the spring. The main criterion for obtaining a good harvest is the choice of planting site. The vegetable grows best in sun or partial shade, but bulbs should not be planted in swampy areas of the site.

Watch all the details about growing onions in the video:
Autumn preparation of beds for winter: features and rules for planting garlic
Autumn is not only a pleasant time for harvesting, but also the process of preparing the soil for the next season, as well as wrapping non-frost-resistant plants and removing dried branches in anticipation of winter.

- Loosening the soil. It is not necessary to dig deeply; it is enough to remove the remains of plants and loosen the beds to a depth of 3-4 cm. But this should be done before frost.

- Deep digging is not useful for all types of soil. If your garden is dominated by sand and loose soil, then you can’t dig in the fall. But in clayey soil, digging is necessary.

- It’s worth feeding the “tired” soil before the cold weather. You can add manure, humus or other organic fertilizers, which are also selected according to the type of soil.
By following the three suggested tips, it will be easier to dig the ground in the spring, and the first shoots will appear much earlier.

But work in the garden before the onset of cold weather comes down not only to digging and removing old plants, but also to planting some crops. For example, to prepare beds for garlic in the fall, you should follow certain rules:
- A bed for garlic is best made using fencing. For example, you can make a structure from slate or wooden boards. This will help avoid spreading in the spring, after the snow melts.
- The height of the ridge should not exceed 20 cm. This norm is derived from the rate of soil heating by the first rays of spring.
- Pour black soil into the prepared structure. If there is no special soil, be sure to apply fertilizers to enrich the soil for a high yield of garlic.

- Keep a close eye on which crops sprouted in the past. this place. If you have collected beans, cucumbers or tomatoes, be sure to process copper sulfate before planting garlic.
- Bulbs should be planted before the cold weather, at the end of October. It is better to cover the ground with any suitable material after planting. And the cloves themselves must be placed vertically in the soil, bottom down. The distance between the garlic is 8 cm, and 25 cm should be left between the furrows.
To make it easier to grow garlic on your own plot, watch the video
It takes a lot of time and effort to cultivate the beds. You have to dig up the soil, loosen it, and remove weeds. But there is a simpler option for cultivating the land - a high bed. It has a lot of advantages.
A raised bed will save the gardener from hard work. But first you have to work hard...
Raised beds, which have numerous pros and cons, are becoming increasingly popular. This is due to the following advantages:
- You don't have to dig up the site every year.
- Weeding is easy to do, because The size of the high bed is limited. Weed control doesn't take much time either.
- If the soil on the site is excessively moist due to groundwater, then high structures will solve this problem.
- You can even arrange it in a place in the yard that is not at all suitable for a vegetable garden.
- The harvest ripens faster. This is due to the fact that the soil heats up better. In high, bulk-type beds, the soil temperature is 10°C higher. Due to this, you can start harvesting faster. Particularly suitable for areas where summer is short.
- The passages between high beds can be made of brick, tiles, crushed stone, gravel. You can plant a lawn between them. Thanks to this, the site will look neat, and in rainy weather it is convenient to move between the beds along clean paths.
- The use of drainage layers has a beneficial effect on the further growth and fruiting of plants, because More oxygen comes through the roots. Overmoistening is not allowed.
- The frame of raised beds can be made from inexpensive and available materials. In general, it is simple to equip and dismantle the structure.
- To protect the plantings from frost, the bed should be additionally insulated using agrofibre.
But there are also disadvantages to raised beds. These include the following:
- The soil dries out faster after watering. This is caused by higher ground temperatures. Because of this, you have to water the plants more often.
- There is a high probability of mole crickets appearing in the beds, because their favorite habitat is fenced areas with humus.
- Since the amount of soil is limited, its composition can become depleted. Because of this, it is imperative to regularly use mineral fertilizers.
Before making a raised bed, you need to weigh all the pros and cons of the structure.
Fencing materials
A high bed is a frame of selected dimensions, which is filled inside with soil mixture, fertilizers, and compost. The standard high bed is shaped like a rectangle. Various materials are used to design the frame.
The most common material is wood. The material is environmentally friendly and easy to use.
To create the frame, logs, beams, and boards are used. The downside is that protective treatment of the material is required, otherwise the wood will not last long. All this does not concern decking boards, but its cost is quite high.
The second option is to use twigs and vines. The material is also inexpensive, and the frame will look unusual, but beautiful. Wicker walls can be given any shape. But building a frame requires skill. Another disadvantage is that the service life is short.
Plastic fencing is easy to assemble. The material does not require pre-treatment, and it will last a long time. But some varieties contain toxic substances that will get into the soil and then into the grown vegetables. Therefore, you need to carefully select the appropriate parts.
Concrete fencing is made in cases where the frame and support must be as strong as possible. For example, this applies to situations where the vegetable garden is located on the very slope, as well as if the beds will have several floors. This type of frame takes the longest to build.
The metal fence has long term services. This is a reliable and mobile design, it can be easily moved to another place if necessary. But the metal needs to be treated with anti-corrosion agents.
Fences made of brick and stone are standardly made in classic style. Installation takes a lot of time, and without the skills to work with these materials, you won’t get beautiful and neat high beds.
Slate fencing does not take much time to build and will last a long time. But when installing the material, you need to act carefully - slate is distinguished by its fragility.
Optimal sizes of raised beds
Everyone chooses the shape and size of a high bed for themselves. But there are also optimal dimensions. The height from the ground should be from 30 to 70 cm, width - within 90-120 cm.
It is recommended to select the height of the high bed so that you can work comfortably on it without bending over. This height is just below waist level. In such cases, you need to take into account that you will need not only more materials for the frame, but also filler. This will lead to an increase in the cost of a raised bed.
If there is no consensus among gardeners and gardeners regarding the choice of bed height, then there is usually no debate about the size of the width of a high bed. If the bed is too wide (more than 120cm), it will be inconvenient to process. It is recommended to make the width such that it can accommodate 2 rows of plantings. Plants will be able to receive an equal amount of air, light, and the yield will be equal.
As for the length of the high bed, this parameter does not play a special role, because The only limitation is the dimensions of the site itself. Experts advise making high beds of 3 m each. This is convenient due to the compactness of the structures.
If the high bed is located on fertile soil, then it is enough to make it up to 30 cm high. This will ensure good yield. If the soil is not suitable for agricultural work, then it is necessary to raise the structure to a height of 30-50 cm. When the choice fell on compost-type beds, they should be 50-70 cm.
Choosing a place for beds
The location of high beds plays an important role in productivity. It is best to choose a flat area with good lighting during the day. Most plants need a lot of light, but a little shade in the afternoon will benefit.
It is best to study the site for a while before choosing a suitable location for a raised bed. It is imperative to take into account how the lighting changes there during the day, how the light is distributed. Take into account the placement of trees and various buildings, both on your own site and on your neighbor’s. This is necessary in order to determine the size of the shadow and where it is located.
If the site was inspected in winter, this does not mean that the lighting will be the same in summer. The trees already have dense foliage, which will affect the formation of shade.
It is best to choose a location that is sunny during the day. It is permissible to locate a high bed where shade occurs only in the morning or at lunchtime. If the area is dark throughout the day, then it is not at all suitable for the location of the bed.
Layers of tall raised beds
Fencing is not the whole job. Filling raised beds also needs to be done correctly. The height of the entire structure depends on the thickness of the layers. In addition, the plants themselves that will be located in this place have an impact: some need a 5-centimeter fertile layer, others need more.
The arrangement of the layers from bottom to top is as follows.
Metal gridIts cells should be minimal. Instead of a mesh, you can use special geotextiles. Cardboard is allowed.
This layer is designed to protect against various rodents.
For example, branches and bars are suitable. It is used for drainage, as well as to accumulate moisture, since wood has this property. If the climatic conditions are dry, then more such material should be placed.
As for other layers of wood, this rule also applies to them.
Concerns chopped branches, bark. They even use straw and corn stalks.
This layer accumulates moisture, and when decomposing, it releases not only heat, but also useful substances into the soil. But if straw and corn stalks are involved, it must be remembered that the soil level will drop over time as they rot. You will need to add fertile soil on top. At the same time, the yield due to this trick is high.
You can use cardboard, but thin one. Glossy paper is strictly prohibited as it contains lead paint. This substance can get into the soil and then into the fruit, which will lead to human poisoning. Instead of paper, you can use old burlap.
Plant remainsFoliage, grass, sawdust will do. As for the latter, you need to be careful, as they acidify the soil. They are best used for plants that prefer such soil. You can neutralize the acidity level by sprinkling everything with ash.
Turf layerIn the end, all that remains is to fill in the fertile soil.
This technology for filling the structure is optimal. You can add compost to the last 2 layers.
More in a simple way filling high beds is as follows:
- geotextiles are placed on the ground;
- then pressed straw is laid to the desired height;
- last layer covered with black soil or compost.
Proper arrangement of a high bed made of boards: pros and cons
A frame made of boards for high beds is the most common. To build it you will need:
- shovel;
- roulette;
- drill;
- saw;
- self-tapping screws;
- primer;
- building level;
- hammer;
- mesh for construction purposes.
You also need boards with dimensions of 2.5x20 cm (or 5x20 cm - the thicker the board, the longer the high bed will last) and a 5x5 cm rail.
The disadvantage of structures of this type is that they quickly rot. To prevent this, it is necessary to protect the boards from rotting by treating them with a special product.
Experts do not recommend using antiseptics, because During watering or rainfall, harmful particles can enter the soil. The best option- painting or varnishing.
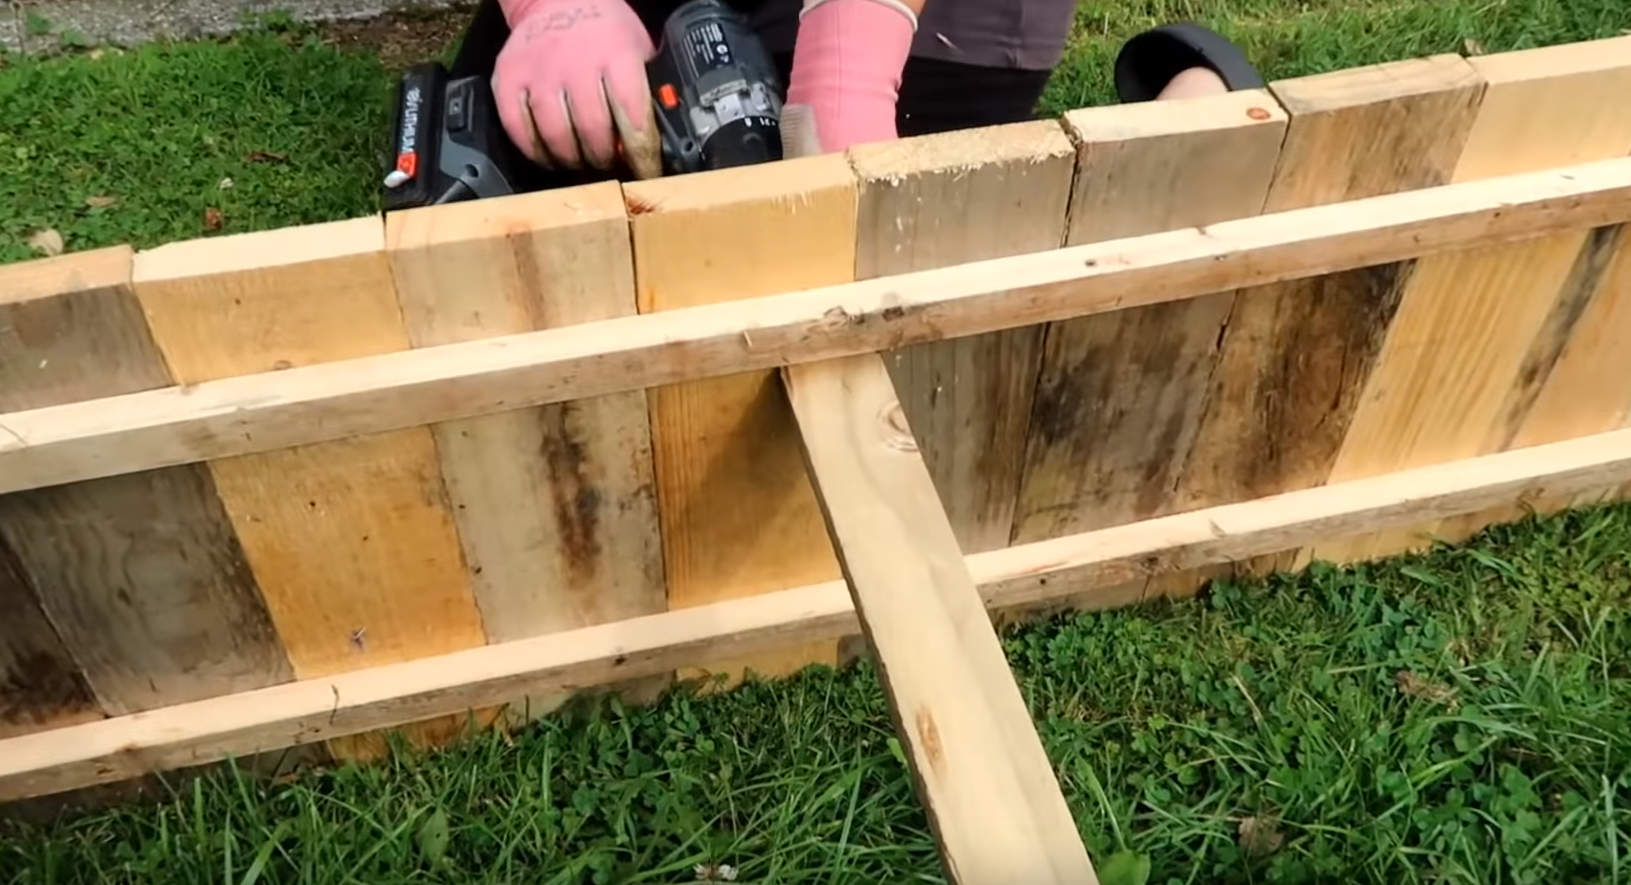
To reduce the cost of constructing a high bed made of boards, you can use used wooden pallets
Step 1 - wood processingThe boards need to be cut and parts made of the sizes needed for the frame. Afterwards you need to impregnate them with an appropriate anti-rotting agent. You can use oil that has already been used. But to prevent toxic compounds from penetrating into the soil, it is necessary to cover the wood with a film on one side.


Particular attention should be paid to the boards that are located below and will have direct contact with the soil. This also applies to bars.
Step 2 - site preparationIt is necessary to mark the edges of the high beds on the site. This place needs to be cleaned: remove branches, stones, remove perennial plants that were there. If you wish, you can dig up the soil. Moreover, this is allowed to be done together with small blades of grass growing on the site.
If the soil is too dense, then a small layer of turf can be removed within the area where the bed will be located.
Step 3 - assembling the frame for the bedThe boards that have had time to dry need to be assembled several at a time into panels. They are secured together with beams. The height of the boards should be the same as the planned high bed.

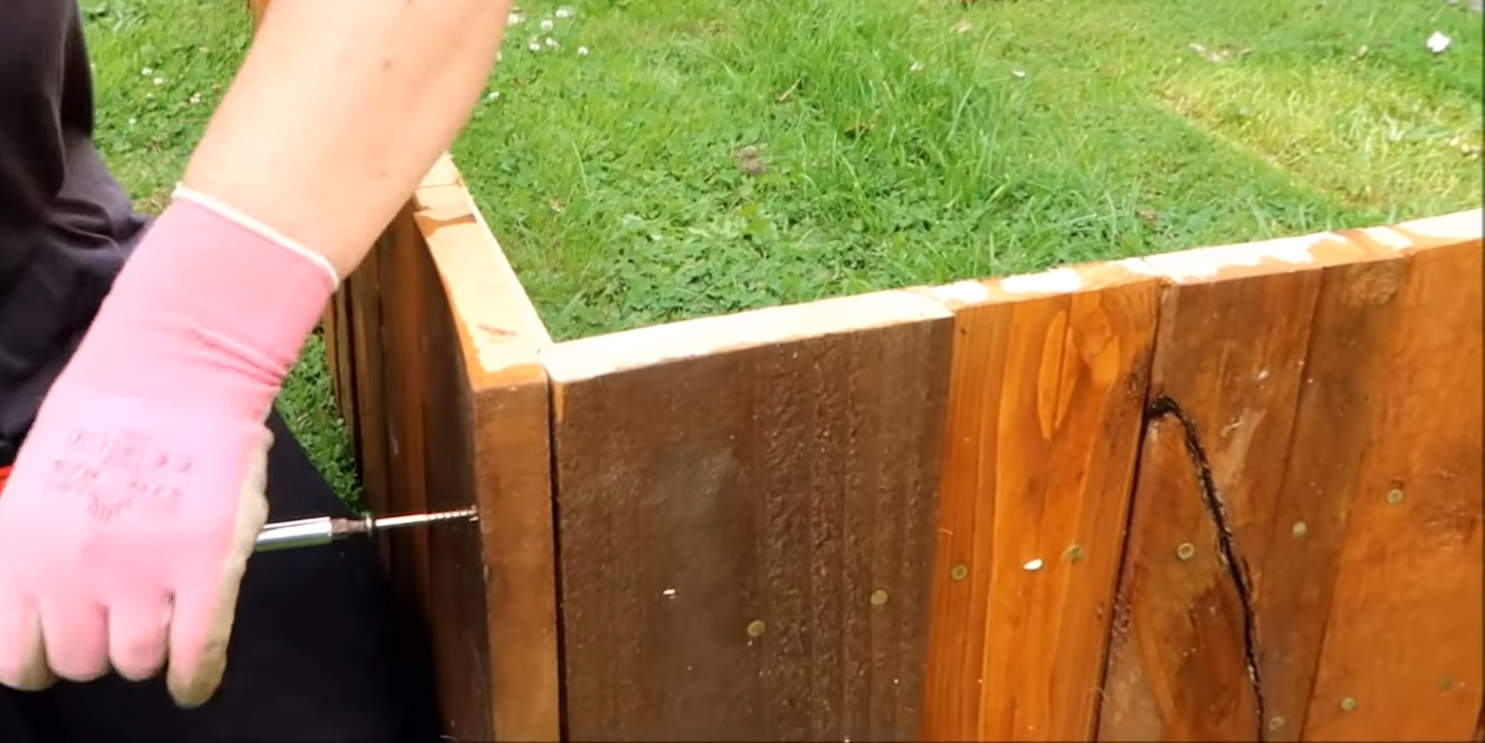

The bars should protrude 10-20 cm above the frame (these will be the legs). To make the structure look more beautiful, it is necessary to install boards flat around the perimeter of the entire frame, and cut their edges at an angle of 45°. The outside of the frame can be painted any color.
Step 4 - installation of the structureThe frame, which is completely ready, must be moved to the selected location. The structure must be installed clearly according to the previously marked markings on the site.
Small holes are made for the legs. The location of the high bed should be additionally checked using a building level. If necessary, additional stakes are placed to level it. All corners should be at the same level, and the structure itself should be level.


At the end, when the frame is finally installed, it is necessary to sprinkle the perimeter with soil and compact it.
If the length of a high bed is more than 2 meters, it is recommended that the opposite sides be fastened together inside the bed either with a lath or steel wire. This should be done every one and a half meters. This will prevent the bed from spreading when it is filled with soil.
Step 5 - Filling the BedThe bottom layer will be made of construction mesh. It is necessary to secure its edges around the perimeter of the frame. Next comes plant residues of different fractions, compost, mineral fertilizers, and soil.


It is best to make each layer 10 cm thick. The raw materials, arranged in turn, must be leveled and compacted. If the land on the site is of poor quality, it is recommended to purchase it at the store.
When the raised bed is full, you need to water it and leave it for 2 days. During this time, all layers will be completely compacted.
Construction of beds made of slate: pros and cons
For arranging a high bed, slate of both flat and wave types is suitable.
For installation you will need, in addition to slate sheets:
- shovel;
- Bulgarian;
- hammer;
- drill;
- roulette;
- level;
- stakes made of wood (or rods, metal profiles).
- self-tapping screws;
- wire;
- net;
- rope.
A slate frame is inexpensive. At the same time, it is strong, quite rigid, durable, looks good and is chemically neutral.
As for the disadvantages, such a frame will get too hot on hot days, so the plants in the garden need to be watered more often.
Step 1 - markingBefore you start marking the border of a high bed, you need to decide which slate you will use: wave or flat. They have different sizes and therefore, in order to save material, it is better to build on them standard sizes. The wave slate has a length of 1.75 m and a width of 1.13 m. Flat slate can be 2.0m or 3.0m in length, and 1.5m or 1.2m in width. Based on this, for wave slate, the recommended width of a high bed is 1.13 m, and the length is either 3 m, 4 m, or 5 m. For flat slate, the recommended bed width is 1.0m, and the length is either 2m and 4m, or 3m and 6m.
At the selected location, you need to mark the boundaries of the structure and drive it into the ground along the vertices of the resulting rectangle. wooden slats or metal profile. At a certain height, pull the cord around the entire perimeter. This must be done to ensure that the sides of the high bed are level. The long side of the high bed must be divided into equal sections, so that they are no more than 1 meter. For example, if the length of the bed is five meters, then it is better to divide the side into 5 sections of 1 meter each. Using the resulting markings, drive wooden slats or a metal profile into the ground so that their edges touch the stretched cord and run strictly along the same line. The slats or profile must be driven into the ground to a sufficient depth (usually 30-50cm) so that they can impart a certain strength to the structure of the high bed. The height of all slats or profiles must be in the same horizontal plane. Using the building level, the height is adjusted.
If the soil is fertile, then the top layer should be removed and collected nearby for further use on a high bed.
Step 2 - preparing the materialThe slate needs to be laid out evenly and the required length measured depending on the height of the future bed. For wave slate, our recommended cutting length is 35cm; in this case, the sheet is cut across its length into 5 equal parts. You can make the bed higher at 43cm, then you need to cut the sheet into 4 parts, or 58cm, then you need to cut the sheet into 3 parts.
The cutting site is marked with chalk. Then the slate is cut with a grinder.
The stakes (wooden slats) need to be impregnated with bitumen mastic. If metal rods (profiles) are used for racks, they must be painted with an anti-corrosion agent.
Step 3 - installing the frameThere are two ways to install a frame for a raised slate bed. The first is budget, the second is durable. In the first method, the slate is directly attached to stakes driven into the ground or metal profile. Its disadvantage is the possible bending of the slate under the influence of earth pressure. In the second method, a 25x75mm or 25x100mm board is attached along the upper edge to stakes driven into the ground or a metal profile, to which the slate is attached. Its advantage is the increased reliability of the structure, but at the same time there is a slight increase in the cost of a high bed.
There is no need to attach boards to the bottom edge, since the bottom edge of the slate will rest against the ground
We place the first sheet of slate outside the constructed wooden frame, placing it near the corner of the future structure, and screw it to it with self-tapping screws.
It is advisable to mark the places where the slate is attached to the board with self-tapping screws and drill holes in them with a drill.

Then you need to put the next sheet, making an overlap in one wave and also attach it to the frame. The bottom edge of the sheet should rest against the ground. We install all other slate sheet blanks in a similar order. The sheets should be located on the same level. If necessary, you need to add or remove soil. After installing the structure, the soil near the walls of the frame should be compacted.
Then you should tighten the stakes or profiles together with wire inside the bed at a height slightly above the middle. This will prevent the high bed from splitting under the pressure of the earth after it is filled.


Filling an already constructed high bed of slate is carried out according to the recommendations given above.
Stone construction: advantages and disadvantages
The stone is suitable for any site design. This material is not only beautiful, but also durable. The fence will not crumble. Stone makes luxurious raised beds that are durable. In addition, the material does not require pre-treatment.
The disadvantages of building a high bed made of stone are the need to lay a concrete foundation, as well as the duration and complexity of the work, especially if you have no prior experience in laying stone. But you can save on the cost of stone if you live near a river with a rocky bank.
For the garden bed you can use the following natural stones:
- Sandstone. Has different colors.
- Limestone. Is porous.
- Granite. May cause soil acidification.
- Basalt. Has a decorative appearance.
- Pebbles. Comes in different colors and shapes.
The stones are laid out in several levels to achieve the required height. First you need to dig a 30 cm trench and lay roofing material in it.


Then fill it with sand and make concrete foundation. Only after this can stones be laid. To do this, it is advisable to use appropriate construction adhesive.
Brick construction: pros and cons
A brick frame for a high bed is suitable for a yard decorated in a classic style. Tall structures will look beautiful and neat.
The material is strong and durable. The walls of the frame will last a long time without deformation and will not crumble. Thanks to the use of bricks, multi-tiered structures can be made.
A high bed made of brick has the same disadvantages as one made of stone, but here you will not be able to save on the cost of the main material - brick. Therefore, the cost of such a design will be high. In addition, it will not be mobile, that is, it will no longer be possible to disassemble and rearrange it.
You need to pour sand into the dug trench and compact it. Then the construction of the formwork begins, into which concrete is poured. After the concrete has hardened, you can begin laying bricks. To build a frame, first stakes are driven into the corners of the structure, and a cord is pulled between them. Thanks to this, the masonry of the walls will be even.


Masonry is carried out in the same way as when constructing walls. In the end, all that remains is to cover the bottom and side walls with roofing felt.
Plastic device: advantages and disadvantages
To decorate the fence you need to use thick plastic. For example, the following options are suitable:
- polymer-type corrugated sheeting;
- plexiglass;
- polycarbonate (cellular is also used);
- plastic pipes(diameter 10-20 cm);
- plastic containers.
They are installed different ways. To the benefits plastic fencing refers to the fact that this material is durable. It will not rot, delaminate, or decompose. It is resistant to water and the effects of insects and pathogenic microorganisms.
Plastic items are easy to handle and convenient to install. They have different shades, so they will decorate the garden.
The only downside is that in winter plastic products become more fragile, so during this season of the year you need to handle them carefully.
For gardeners who grow vegetables in areas with frequent interruptions in water supply, a good solution is to use a high bed made from a plastic container measuring 1x1x1m.
To make two high beds you will need one plastic container, which must be cut into two equal parts with a grinder. You get two containers 50 cm high.

After this, we take a polypropylene sewer pipe 50x1500mm and make slits on it with a grinder. Perpendicular to it we attach a second pipe 50x500mm, using a single-socket sewer outlet. sewer pipe 50x1500mm with slots wrapped in geotextile and placed on the bottom plastic container. In this case, the upper edge of the pipe should be higher than the edges of the container.


We fill the container with gravel or pebbles 10-15 cm thick, so that the pipe is not visible. Then we fill it with soil 15-20cm thick and compost 15-20cm thick. There should be 5-10cm left to the edge of the container so that you can mulch the high bed.


We cut a faucet into one side of the container at a distance of 20-25 cm from the top level of the filled compost.

We plant vegetables. We pour water into the resulting high bed through the pipe until it begins to pour out through the faucet installed on the side.


In the future, you just need to periodically add water to maintain the required level of soil moisture.
The given procedure for making a high bed from a plastic container will allow you to get a good harvest of vegetables even in the driest summer with minimal water consumption.
Construction of beds from WPC: pros and cons
In most cases, the frame for a high bed is made of boards. But wood quickly rots in the soil. Wood-polymer composite (WPC) has a longer service life. Besides, appearance it does much better than the boards.
The advantages of WPC structures include the following:
- You can quickly assemble the fence. The sides are fixed with special fasteners.
- Beds made from this material will last a long time, since the material is resistant to mold and fungal organisms. Thanks to this, it will not rot. Insects will not spoil the duodenum either.
- WPC has an aesthetic appearance. The manufacturer makes a pattern that looks like wood. The products do not need to be painted.
- The material is considered environmentally friendly.
- The fencing is easy to maintain and resistant to climatic conditions.
The disadvantage of high beds made of WPC is that they are more high price compared to others.
To build a high bed made of WPC, it is advisable to use one of the many offers from manufacturers who sell them in different sizes with a complete set of fastening elements. Typically, the kit contains detailed instructions for collecting high beds.


DSP device: advantages and disadvantages
For the frame of a high bed you can use cement bonded particle boards(DSP). DSPs are made from wood fibers bonded with Portland cement and hydration additives.
DSP is an environmentally friendly material that does not contain toxic substances such as phenol and formaldehyde. High degree The moisture resistance of the material makes it possible to maintain its properties even with an unlimited amount of wetting and drying; the material of the boards does not rot and harmful microorganisms do not multiply in it. The slabs do not emit foreign odors and are highly durable. DSPs are able to withstand even constant exposure to a humid environment.
Despite the fact that Portland cement is used as the main binding material for the production of CBPB and flat slate, there is a difference between them. It lies in the fact that in the case of slate, various formed fibers of considerable length (organic or inorganic origin) are used as the main modifying additive, while for the production of CBPB thin wood chips are used, which do not create an internal fibrous-intertwined structure in the finished product, so characteristic of slate sheets.
Standard dimensions of a DSP sheet can be: 2700 x 1200mm or 3200x1250mm, and thickness 8,10,12,16,20,24mm. To make the frame of a high bed from DSP, you can use sheets 8 or 10 mm thick. Based on this, the recommended width of a raised bed is 1.35m, and the length is either 2.7m and 5.4m, or 3.2m and 6.4m.
Manufacturers of CBPBs claim that even with active contact with external environment their service life will be at least 15 years.
One of the additional benefits of using CBPB to build raised beds is that the material will not get very hot in hot weather.
The construction of a high bed from DSP is carried out in the same way as using slate (see above).


Cinder block construction: pros and cons
Raised beds made from cinder blocks have a number of advantages, and therefore are increasingly becoming popular among gardeners and gardeners:
- The cinder block frame is quickly assembled.
- The beds will last a very long time, and no additional care is required for the cinder blocks.
- The material does not heat up in the sun, is resistant to climatic conditions and is environmentally friendly.
- If necessary, the bed can be quickly disassembled.
- The construction requires a minimum amount of additional materials and construction tools.
- Can easily be converted into a greenhouse or greenhouse.
- You can assemble it yourself, even if you have no experience in laying cinder blocks.
- No need to make a concrete foundation. Due to the greater weight of the blocks, the structure is quite stable.
The main disadvantage of high beds made of cinder blocks is the large weight of the unit. source material. In particular, for a high bed with dimensions of 310x120x57 cm, the total mass of cinder blocks will be 600 kg.
Before you begin building a high bed, you must consider the following requirements for the cinder block:

Next, depending on the size of the high bed, you should calculate required amount cinder blocks. We recommend the following dimensions: height 57cm x width 120cm x length 310cm. In this case, you will need to lay three rows of 20 blocks - a total of 60 pieces will be needed. As additional material, you will need to buy 20 meters of A1 12mm reinforcement, when purchasing which you need to ask that it be cut into one-meter pieces.
If the bed of cinder blocks consists of one or two rows, then the reinforcement may not be used. Due to the block’s own gravity, the structure will already be stable.
The area where the bed will be installed is cleared of vegetation and leveled. It is advisable to string a cord along the outer edges of the future high bed.

We begin laying cinder blocks directly on the ground from one of the corners. Using a building level, we control the horizontal surface being formed.

Then, perpendicular to the width of the bed, we begin to lay cinder blocks in length. To ensure that the angle of the bed is 90 degrees, we use a construction angle.

Laying the first row usually takes longer than laying the remaining rows. If the first row is not laid evenly, then you will not be able to avoid the appearance of gaps between the cinder blocks.
After the first row has been laid, it is necessary to fill each cinder block with inside drive reinforcement into the ground to stabilize the structure. In this case, the reinforcement should be placed as close as possible to the inner edge, so that after filling the earth, its pressure does not allow the cinder block to move.

We lay the second row overlapping the first row to increase the stability of the structure.


After laying two rows, we lay geotextiles on the ground, while tucking its edges up to the second row. The third row of cinder blocks is laid on top.


Cover the last layer with compost or soil. Water it generously, let it sit for a few days and start planting vegetables.

If necessary, inserting plastic pipes or fittings into the edges of the bed can be done without special effort receive GREENHOUSE.


This design of a high bed made of cinder blocks will serve you for a long time. If you need to remove or move it, it will take a few minutes to disassemble.
Device made from scrap materials
The frames of high beds can be made from any materials. For example, use 2 steel mesh, and fill the space between them with medium and large stones. You will get an original design.
The advantage is that the soil inside will be well ventilated. Due to this, plants receive more oxygen, and excess moisture disappears faster.
If there are no suitable building materials, then you can use any that are at hand. For example, even plastic bottles will do. They can be painted any color, thereby decorating the yard. But the containers need to be filled with sand before installation.
The frame can be made from logs that are hewn. For example, they construct both long sides from them, and the short sides from boards. To protect the structure from insects, it is recommended to whitewash it.
Using spunbond (agrofilm) for beds
As a standard, film is used as a covering material on high beds. She misses well Sun rays, supports optimal temperature. But its disadvantage is that the film breaks quickly.
Instead, it is best to use a special non-woven polypropylene fiber. It is called spunbond. The service life is about 7 years.
There are 3 main types of such agrofibre:
- Black non-woven material with high density. Suitable for weed control.
- White spunbond with medium density. It is used as insulation - covering beds in the cold season.
- Lightweight, whitish material. It is used to protect against frost in the spring, as well as against heat in the summer.
The material is supposed to be pulled over the frame arches. Direct contact with plants should not be allowed. During watering, such shelter is removed.
If you use dense material, you get a small greenhouse. But in the summer it should be removed so that condensation does not form.
Caring for raised beds
When shoots appear, you need to thoroughly water the soil and then lay out a layer of mulch. If weeds grow through it, they are pulled out. After harvesting, the soil needs to be loosened and sown again, but now using green manure.
Before it gets too cold, you need to mow down all the plants and level the soil in the high bed. Additionally, cover the top with fertile soil, because the earth gradually subsides along with the remaining layers. Before the start of winter, you need to cover everything with black film.
The walls of the frame need to be checked periodically. If necessary, carry out repairs - replace parts with new ones. The soil between the beds can be covered with gravel, crushed stone, and straw. Another option is to simply seed with grass. You will get a lawn.
Thanks to this organization, the area will look beautiful, well-groomed, and weeds will not appear, and dirt will not stick to the shoes. If desired, you can arrange paths made of bricks or slabs. Another option is to fill them with concrete.
Features of making high beds for strawberries
The difference between a strawberry bed is that on top of all the layers that fill the frame, it is necessary to spread a special covering material. Holes are made in it where strawberries are planted.
In this case, the moisture will evaporate less, and weeds will not appear between the rows. In addition, the berries on the covering material will not be stained with soil. Another design option is to mulch the soil.
The peculiarity of strawberries is that their roots are located close to the surface of the soil. Because of this, the fertile layer can be made small in thickness. But at the same time, this feature also has a drawback: when severe frosts culture is dying. If the bed is not insulated and covered with snow on top, then root system will freeze.
Arranging a bed for cucumbers and tomatoes is no different from that described. The only thing is that you need to stretch a wire along the edges of the pillars, where you can tie the branches so that they continue to weave.
Key points when arranging garden beds
When arranging raised beds, the following points must be taken into account:
- Location. Depends on the plants grown. Some need more light, others need partial shade. The terrain is also taken into account. If the site is located in a low area, moisture will collect. In this case, you need to arrange the beds higher.
- The shape of the beds. Depends on the wishes of the gardener. They are usually made rectangular or square, but unusual shapes are also possible.
- Selecting plants for planting. Some vegetables will not be able to live together, so they will have to be planted separately. Many crops can be combined, that is, make a couple of rows with the main one, and in the places between them - additional plantings.
- Skills. Your own skills should also be taken into account. Beginners should not think of a complex design, because... it's difficult to deal with. Various mistakes will be made. It's best to start with simpler options.
Comparison of the cost of raised beds made from different materials
To get a complete picture of all the advantages and disadvantages of building high beds from different materials, there is not enough comparison of their costs. The comparison is made for a raised bed with dimensions: 300cm x 120cm x 60cm (length x width x height). The costs include only the cost of the main material and components without taking into account their delivery as of January 2019. at average prices prevailing in Moscow. The costs of constructing a high bed are not taken into account for obvious reasons (we will assume that we are building a high bed with our own hands). An indicator of the effectiveness of the costs incurred for the construction of a high bed is the ratio of the total amount of costs incurred to the period of its operation. Thus, we will find how much it costs to use a raised bed for one year. The lower the value of the obtained indicator, the more effective the costs we have made in the high bed.
The results of a comparative comparison of the construction of high beds from different materials are presented in the table.
| Indicators | Main material | ||||||
| boards | slate | brick | cinder block | DPK | DSP | ||
| wave | flat | ||||||
| Total costs for materials, rub. | 3315 | 2050 | 3025 | 16405 | 3155 | 13195 | 3225 |
| Service life, years | 5 | 20 | 20 | 40 | 35 | 25 | 20 |
| Efficiency indicator, rub/year | 663 | 103 | 151 | 410 | 90 | 528 | 161 |
According to the table, it can be seen that in the end, the most economical option for constructing a raised bed is to use cinder blocks, and the common method of making it from wood is the most expensive. Using the table data, you can adjust the calculations for a specific settlement or region, by adding the cost of shipping materials and the cost of carrying out the work of constructing a raised bed. You can also change the service life if you think that a high bed made of a certain material will not last that long in your garden.
Having weighed all the advantages and disadvantages of using different materials to build a raised bed, you can now make your choice.
Very important point– I have not yet met a single gardener who, having tried to grow vegetables in high beds, returned to traditional way their cultivation.
7 ratings, average: 4,86
out of 5)