The comfort in the house is “assembled” from little things. It is the small details that give a home its originality and coziness, making living much more pleasant and comfortable. One of these small things is a wall key holder. If there is nowhere to put the keys, then you have to look for them for a long time. It ruins your nerves and makes you nervous. A key holder is far from a complicated thing; it is easy to make with your own hands. By the way, a homemade key holder can be an excellent gift.
A little about the boring: types of key holders
As you probably understand, there is no strict or official classification. But the whole variety of key holders can be divided into several categories or types. Depending on the location or method of use, there are wall-mounted and pocket key holders.
Pocket ones are a case made of leather, fabric or other similar materials. This case has loops (metal or made of durable cord) to which the keys are attached. Pocket key holders are needed more for convenience and safety of pockets or bags: metal keys can easily tear the thin lining fabric. The second function is to have all the keys in one place. It’s easier to look for them even in a woman’s bag.
Key holders for pockets and bags are one of the profitable and necessary gifts
Wall mounted key hangers can be open or closed. Closed - small boxes with a hinged door with hooks stuffed inside. Doors can also be hinged or lifting. Closed key holders are suitable for keys that are rarely used. Constantly opening and closing the door is not very convenient.

Wall key holder closed type May be different shapes...at least make it round if you want))
Wall-mounted open key holders are more common and can have a very diverse appearance. The most famous and simple one is a board with small hooks. Any hooks: furniture hooks, nails or screws, pieces of thick copper wire, wooden knots. You can use old forks, furniture handles, and the same old keys bent into a hook. In general, your imagination is not limited; you can secure anything that the key ring fits on. And you don't have to use everything the same. The combination can be very interesting.

Much simpler... but it has its own shine
Wall-mounted key holders are also made from various, sometimes unexpected things or materials, but the most common are wooden or sheet material type of plywood, etc. Wood is especially often used to make key holders with your own hands. It is easier to work with wood or plywood and the result is more or less guaranteed, even if you are doing something yourself for the first time. Do wall key holder DIY - a good experience for beginners.
Open wall key holder: ideas and options
If you decide to make a key holder, it is better to start with something not too complicated. First, decide on the place where you plan to hang the product. This will make it easier and faster to choose a model - long and narrow or closer in shape to a square, circle, etc. Then it's a matter of technique. Most of the models are quite simple, even if you are doing something with your own hands for the first time.

From wooden planks
As we have already said, wall-mounted wooden key holders are one of the most common options for DIYers. Now you’ll understand why... Probably, it’s not a problem for anyone to find a few planks. Planks of any format and thickness are suitable. You can use long thin strips - 20-30 mm wide, medium ones - 40-70 mm or even wide. They can be connected to each other, folding them into the shape you need/like. Three samples in the photo below. Once you decide on the shape, you can begin processing.

Processing the wood is also not a problem. Can be used different ways. If you want to have something classic and strict, take sandpaper or grinder and sand the surface until smooth. Next, you can cover it with paint, oil, stain with or without varnish. All this gives different types of surface, and therefore looks different.

If you want a more informal look - a loft or something like that, you can take a wire brush (you can use a drill attachment) and remove some of the soft fibers. A clear wood grain will appear. This is quick and easy to do with pine. You just need to find a board with an interesting design. Next, you can again go through wood oil, stain, varnish on water based with coloring pigment. They all give a different effect, but the protruding parts are painted worse and the wood shows through. The soft part turns out darker. As a result, the wood grain appears more clearly.
Approximately the same effect, but more “harsh”, is obtained by processing with a blowtorch. The soft fibers burn and the structure becomes clearer. But here you have to be careful not to overheat. It will no longer be possible to restore...
In combination with a shelf
A wall-mounted key holder just for keys is not very practical. We usually don’t have enough ligaments to fill a dozen hooks. Therefore, combined models often appear - with a small shelf for small things, which also have a place not far from the door.

Sizes and formats, as you can see, are different. Difficulty level too. Take your pick. You can make an L- or T-shaped structure and attach hooks at the top or bottom.
There is a lot in the photo interesting idea— a magnetic key holder without hooks (on the left in the photo above). There are small magnets glued into the bottom of the shelf that attract keys. It’s convenient to use - you don’t have to “aim”, everything happens very quickly. Magnets - if they are the same and look “civilized”, they can be glued to the front surface; if the sizes are different, it is better to make recesses according to the shape. The magnet itself should protrude slightly above the surface - 1-2 mm. This is enough to find it by touch (if necessary).
From plywood
In some ways, plywood is easier to work with than wood. The surface has already been treated, all you need to do is cut it to shape and run sandpaper along the edge. Then paint, and you can proceed to the final step - attaching the hooks.

What's great about plywood key holders is that you can cut out any shape. Any shape, style. For key holders, images of keys are often used, but it can also be a dog, a bird, a mouse... whatever.
From picture frames
If you have a picture frame or can make one, it would also make a very nice wall key holder. On the reverse side you need to secure some kind of base, for example, a piece of fiberboard or hardboard. It is more convenient to fasten with staples from a construction stapler. As a last resort, use all-purpose glue.

Inside the frame, the surface can be painted, a picture can be pasted, plain paper, a piece of wallpaper... Whatever you want or come up with. The hooks can be attached to the frame or to the inside - again, as you wish. The point is their type and the load that is planned.
Wooden and without hooks
You won’t believe it, but there is a wall-mounted key holder without hooks or magnets. It is usually made from natural wood, since this material is the easiest to implement the idea. After all, you can not hang the keys by the ring, but stick them into something. For example, into a gap. All that remains is to make these gaps, and this is not at all difficult.

Moreover, as you can see, the cuts can be either horizontal or at an angle. They can be made using, for example, a milling machine. This is the most accurate and safe way. You can also use a circular saw. Even a regular saw. It is only important to stop in time and then process the cut well.
Dashboards of various devices are also useful
If there are old non-working appliances in the pantry that have panels with sockets into which plugs were once inserted, you have a chance to make an exclusive key holder. Carefully cut out this panel and insert the plugs with key rings into the sockets. All is ready. Can be hung on the wall.

It works just as well using the headstock of a guitar/violin/cello or any other stringed instrument. You can use pegs, you can add hooks. By the way, no one bothers you to make an imitation if it’s a shame to spoil the instrument. This could make it even more interesting.
Key holder hooks
Hooks can be made from a variety of materials. For the classics, you can start by going to a store that sells furniture fittings. There's plenty to choose from. There are furniture hooks, overhead hooks that are attached to the surface.

Hooks can also be attached to plywood, but to do this they must be glued. The main thing is to find a suitable glue with good adhesion to wood and the plastic or metal from which the selected hooks are made.

There are different kinds/types of self-tapping screws/screws with hooks at the ends. They need to be screwed into the board, so this is not an option for plywood.
There are also picture hooks (pictured below). They are made of plastic and have several metal pins in the body. These pins can be driven in with a hammer and even penetrate concrete without any problems. The only disadvantage of this option is the considerable price. And so, they look good and hold up well.

It's just standard options hooks In general, it can be made from knots, old keys, forks, wire... anything that has a small thickness and a suitable shape, or which can be given this shape.
How to make a wall-mounted key holder with your own hands: photo report
To make a wall-mounted key holder, the following materials were needed:
- Photo frame of a suitable format. The door is made from it.
- Wooden blocks 20*40 mm.
- Hooks, hinges, door handle.
Tools: saw, jigsaw, stapler with staples, drill and screwdriver. Well, and a tape measure with a pencil. This is the first thing we did with our own hands, so there are a lot of mistakes.

Making a frame
First of all, the bars were cut to fit the frame. They were connected using staples from a stapler. The result is a frame for the part that is hung on the wall. A piece of fiberboard was cut to size and also attached to the frame with staples.

There are two here best solutions. The first is to connect the bars by sawing them at 45°. It looks much better, although it is more difficult to implement. If you are not sure that you will be able to cut it smoothly, you can do it as in the photo. But to fasten the bars better with self-tapping screws. And this is clear. Let there not be a heavy load on the key holder, and fiberboard gives rigidity to the frame, but it is more secure to secure the bars with self-tapping screws.
If the connection is as in the photo, screws - two pieces for each joint - are screwed from above, perpendicular to the top board. To make the screw go easier, holes are pre-drilled. The diameter of the drill is 1-2 mm less than the diameter of the screw.
Installing crossbars under hooks
From the same bars we saw off two sections - each internal size boxes We put them in the case and secure them on the back side with staples. Let's take it furniture hinges, mark their position on the body, mark the holes for fasteners. We make holes with a drill, screw on the hinges and place a furniture magnet to fix the door closed.

There is also something to be done “more correctly” here. It is better to secure the planks through the walls of the frame with the same self-tapping screws. To prevent them from moving, they can be fixed with staples, but then it is better to screw in two self-tapping screws on each side. To prevent the caps from sticking out, select a drill whose diameter is slightly larger than the diameter of the screw cap. Make a hole for the self-tapping screw (the drill is 1 mm smaller than the diameter of the screw), then make small recesses with a large diameter so that the head can be hidden.
Assembling the door and installing hinges
Next we design the door. From the same fiberboard we cut out a piece of a suitable size and fasten it with staples. We drill a through hole on one side and install the handle. On the other, we mark where the hinges need to be secured, unscrew them, attach the mating parts, and mark the place for installing the fasteners. Having made the holes, we put the hinges in place, connecting the two parts.

As usual, description best option. As you can see, there is a decent gap between the door and the body. This is inevitable when installing hinges this way. To avoid it, trace the loop around the perimeter with a sharp pencil (it’s better to scratch it with a knife blade), then use a chisel to remove a certain amount of wood - the thickness of the loop plate. Its surface should be flush with the frame. A similar operation is performed with the counterpart. A hinge installed this way will not create a gap, although more work is required.

In general, not bad for a first experience. But to make the wall-mounted key holder look more presentable, it is advisable to trim it. Finishing- this is a matter of taste, but it needs to be at least polished. If not, you can do this with sandpaper attached to a block. To begin with, take a medium grain, then finer ones.

Non-standard homemade key holders on the wall
Making a wall-mounted key holder does not necessarily have to be long and arduous. And no one said that non-standard materials cannot be used. As always, in needlework, everything is possible, sometimes even what is prohibited. A few ideas that may please you with their simplicity and unusualness.
The first number is the use of connectors and suitable plugs. We make key rings from the plugs, and screw the connectors “in vain” near front door. All in all - about twenty minutes.

Connectors and plugs - and almost nothing needs to be done
An ordinary stick can also be turned into a key holder. Make hooks from aluminum wires, wrap them around a stick, decorate it with colored twine, and paint it with paints. Fixing it to the wall is also not a problem - the rope is tied at both ends and clings to a nail or hook.

Throwing away wine corks is an unheard of waste. They make a very interesting key holder. The corks are glued together, and then screws with hooks are screwed into them. Stylish and unusual, minimum time and cost.

If you just have a piece of good wood, you can polish it and coat it in several layers of wood oil with pigment. It's already turning out beautiful. Finding or making small hooks is not a problem, and the board itself can be decorated with something.

The photo above is a stylized key, but it could be anything. Some interesting thing that resonates with the interior or reflects your hobbies. At least glue a couple of magnets you brought from your travels. It’s already unfashionable to hang them on refrigerators, but here they will be just right.

If you cut a tennis ball about halfway, it will hold small objects perfectly. From several of these “holders” you can make a key holder in a sports house. The second option is in the picture on the right. If you can secure the balls to the rod (with glue, for example), inserting small hooks is not a problem. The problem is that they will most likely spin. To prevent this from happening, you can pour a compound inside the ball, which will become hard after drying/polymerizing. The first thing that comes to mind is tile adhesive. You just have to fill it in carefully. If it gets on the surface of the ball and hardens, you won’t be able to wash it off.
Ideas for inspiration

If there are a lot of keys, you can make a “multi-page”. This option is suitable for hotels, holiday homes


If keys are more expensive than money... there are key holders with a combination lock


With a separate “built-in” keychain for each family member

The main thing is not to confuse it with a regular outlet.

If you master the inlay technique, you can turn even rot in wood into advantages. In fact, everything is not difficult - place stones/pieces of ceramics on the cleaned voids and fill everything with epoxy glue

Wall-mounted key holders fit perfectly into the hallway - plus you don’t have to look for keys throughout the house. This is the main advantage of any key holder: saving time. In a couple of weeks, you will develop the habit of hanging the key on it in the evening when you come home from work, and taking it off in the morning when you leave for work. As a result, you no longer need to search the apartment in search of missing keys, and you are always aware of who is at home from your family - just look at the key holder and see if all the keys are in place.
The practical side is not the only advantage. There is also aesthetics, because the key holder can be decorated in any style. Do you have an eco-friendly hallway? Nothing will fit into it better than a key holder made from a tree branch. High tech ? A small stylish metal key holder will go well with it. Provence? Decoupage with flowers or birds. Classic? Wooden varnish board of strict shape.
You can find something that suits your needs at any home improvement store. But there is another approach: make a key holder with your own hands.
It has advantages:
- Originality. A thing made with your own hands will always be different from a similar one, but produced on an assembly line. Features of processing inherent in each master, interesting design solutions - even when making a key holder according to the instructions, you will know for sure that no one else has the same one.
- Diversity. At home, even without experience, you can make more than a dozen different key holders. From a cut of wood, from a box, from wire, from a branch, even from forks - there will always be material, you just need a little patience to handle it carefully.
- Harmony. The key holder you bought may be perfect for your hallway, but you need to find it first. If you made it yourself, it will fit like your own - after all, you will work on it, coming up with a design and knowing how it will fit in.
- Interesting experience. Making something with your own hands is not only useful, it’s also fun. If you have kids, you can team up with them, turning the simple act of making a key holder into a real adventure. And if there are no children, you can simply enjoy the process.
Homemade key holders come in different varieties - from different materials, different designs. Before you get down to work, you need to figure out what kind of work you need.
What types of key holders are there?
There are two ways to classify key holders.
The first is by design:
- Open. These are usually made by hand because they are easier to make. They are any kind of hooks on which you can hang keys driven into anything. Board with nails? Open. Branch with twigs? Open. Leather cut with pockets? Open.
- Closed. These are more difficult to make - some carpentry skills will be required. They are a cabinet that closes with a door. The door will have to be hung on hinges, otherwise it will quickly fall off. They allow you to hide what exactly is inside and protect the keys from prying eyes. Shelves can be built into them useful little things, hang a mirror on the door and expand the practical use in another way.
The second method is based on the materials that were used.
Wine bottle corks can be considered a type of wood - they can also be used to make a beautiful key holder. But you can’t make it out of paper - it will wear out too quickly. It will also not come out of glass or stone - the material is difficult to find and even more difficult to process.
Advice
When choosing a material, focus on three indicators: what will be easiest for you to work with, what will fit best into your hallway, and what you will definitely be able to get. Having decided, proceed.
How to do it yourself?
Before starting work, it remains to remember the basic rules that guide all masters:
- You should not be disturbed during the process. Ask your family to give you a couple of quiet hours, close the door and avoid distractions.
- The work place should be well lit. Doing something with your hands in the light of a dim light bulb is not only harmful to the eyes, but also simply inconvenient.
- Everything should be in its place. This is important when you are working with sharp objects. When you finish cutting plywood or metal sheets, you should put the jigsaw or knife in a visible place, where you won’t lose it. Otherwise you might get hurt.
The simplest: cardboard key holder
Cardboard is the simplest material from which you can make a key holder. You will need:
- sheets of thick cardboard - regular gray, can be found in the house, or you can buy a set;
- a suitable drawing on photo paper - you can print it in any stationery store, and choose it according to your taste by searching on the Internet;
- decorative screws with beautiful heads, an awl;
- a piece of wire, brushes, varnish, glue, sponge.
The instructions for performing the work are simple:
- cut out the desired shape from four sheets of cardboard - a circle, a square, a heart, it all depends on your imagination;
- use an awl to pierce two holes in the upper part of one blank figure - for a loop;
- insert the wire into the holes, twist it so that it does not fall out;
- Glue the remaining pieces to the side where the twisted wire remains;
- On the front part, mark the holes for the screws and pierce them with an awl.
At this point, the key holder itself is prepared. The rest is essentially decoration:
- put the photo face down, wet the sponge, soak it upper layer, and then roll it up, pressing lightly;
- dry the photo, coat it with glue using a brush and stick it on the workpiece;
- coat everything together with varnish to achieve greater strength;
- insert screws.
The result is a simple key holder. It is not very durable, it is afraid of moisture, it can tear if you pull it hard, but it is easy to make, the materials cost almost nothing and the result looks decent. Especially if you like bright lacquered designs, and you have a simple renovation in the hallway, without designer frills.
Advice
This key holder is a good gift for older relatives. Grandparents will be delighted to receive a little thing with a photo of the faces of their beloved relatives and at the same time useful in the household.
Ideal eco-style: made from a branch
A branch used as a key holder is fresh, original and fits perfectly into eco-style. You can find it in the nearest park (you may have to spend several days), and it won’t be difficult to apply for it. Will be needed:
- dry branch - a wet tree will quickly begin to rot and lose its appearance;
- stain, jigsaw, drill, sandpaper, hooks (you can buy special ones in the store, you can use thick nails).
If desired, you can place a varnished design above the branch that will complement it. You can hang beads, feathers and decorative keys on bright threads from it. You can carve anything on wood - from a few letters to a simple design.
For connoisseurs of strong drinks from corks
It’s good to make a key holder from corks together with children, since this process is most similar to trying to assemble a mosaic without a picture that shows the end result.
You will need:
- photo frame - you can glue it yourself, or you can buy it;
- about twenty wine bottle corks;
- PVA glue - not a pencil, but in a jar;
- nails with beautiful heads or hooks.
What follows requires only skill:
- take a cork, coat the sides and ends with glue, insert it inside the photo frame so that it fits against the frame from the inside;
- take the next cork, spread it with glue, and attach it to the first one.
The process is close to meditation: you need to fold the corks so that they perfectly fill the space of the frame. The resulting result should be left to dry overnight, and then varnished and hooks for keys inserted into soft cork wood.
The advantage of such a key holder is its uniqueness. Just as no two branches are alike, no two photo frames are equally filled with corks. To make the design chic, you can paint the corks different colors, burn or cut out letters on them.
A simpler option, more suitable for eco-style, is to find a thin stick and hang corks from it using bright threads. Drive a hook into each plug and hang the key on it.
Advice
A simple option with traffic jams will look appropriate only in a minimalist interior or in a hallway that is full of fun accessories. It has no place in strict styles - the same classics and hi-tech.
Classic beauty: made from sawn wood
Despite the impressiveness of the result, the process of making such a key holder is no more difficult than working with a tree branch. The only problem you may encounter is the difficulty of finding pine cuts when living in the city. But you can either find a fallen tree branch and cut off a piece from it, or turn to village relatives.
You will need:
- a round cut of a tree - a circle two to three centimeters thick, cut from the end of a log, and it is best if it is pine;
- stain, sandpaper of different grain sizes, varnish;
- wide brush, hooks, drill, screwdriver;
- printout of an image that has previously been flipped as a mirror image.
It all comes together simply:
- sand with sandpaper - first medium grain, then fine, and exclusively along the fibers, otherwise unsightly scratches will form;
- moisten with water so that the wood swells slightly, leave to dry;
- cover with stain (preferably water-based, since it hardens longer and all mistakes can be corrected in the process) three times to get a beautiful bright color;
- coat the prepared printout with varnish, then cover the front side of the back with it, press the printout to it, carefully smooth it out so that there are no bubbles;
- after the print has dried (this will take two to three hours), moisten it with warm water, slowly remove it until the design appears - clean off the remaining white;
- On the back side of the key holder, use a drill to drill holes for the hook on which it will hang, and on the front side - holes for the hooks on which the keys will hang.
The drawing can be anything, the main thing is that it is black and white - the colors can be conveyed using varnish, but they will not be as bright as on the original. You can do without it altogether, then the hallway will be decorated with the noble texture of processed wood.
Advice
Wooden sawn fits well classic interior. A good solution would also be to choose its shade so that it matches the color of the furniture. As a last resort, you can go over it with a dry brush and acrylic paint to get the desired color.
Quality for decades - made of metal
Working with metal is difficult, especially if you have never done it before. But if you start with a key holder made of ordinary wire, it will become clear that perseverance will overcome any difficulties. You will need:
- thick wire - several millimeters in diameter;
- sharp scissors - best for metal, but regular wire cutters will do;
- pliers, hammer.
The manufacturing process is simple:
- find an interesting contour drawing on the Internet - for starters, something simple, like an intricate spiral, square, circle, stylized cat;
- try to repeat the pattern using wire - you should bend it by holding one end in pliers and fixing the other with your free hand;
- sharp corners can be obtained by pressing them with the head of a hammer; smooth lines can be simply curled with pliers;
- When the figurine is ready, you need to attach hooks made of the same wire to its lower part, and attach a thin wire to the back, on which you can hang the entire structure.
An interesting variation of this same idea is the use of a hanger. It does not need to be bent with pliers or hit with a hammer. You just need to hang it on it bottom part hooks, and decorate the main part with anything, from the gears of an old watch to banal flowers made of colored paper.
A more complex way to make a metal key holder is to use a thin sheet of metal, which can either be found in renovation scraps or purchased at a hobby store.
You will need:
- thin metal sheet;
- sharp scissors, nail, sketch drawing, hand drill, hooks;
- a product that will make the metal airtight and protect it from rust.
The design cannot be anything - only the kind that can be cut out of metal. Silhouettes are best - animals, fish, plants, castles. Any fairly simple forms. You can show your imagination and come up with an abstract figure.
Before what remains is:
- cut out a silhouette from a sheet with a pattern;
- attach the silhouette to a metal sheet, circle it with the tip of a nail;
- carefully cut along the contour, making sure that no unsightly jagged edges remain;
- use a hammer to bend any sharp edges that may arise during the process;
- use a drill to drill holes for the hooks;
- coat the resulting base with a sealing agent and let dry;
- Insert the hooks into the holes and secure the mount at the back.
It is better if the metal sheet is black, this will make it more stylish. You can, however, use shiny, polished options, but they tend to fade over time, losing all their chic appearance.
Advice
Do not use metal that is too thick; it will be difficult to cut. In addition, the nail on which it will hang may not withstand the weight.
This may be of interest to you:
Decoupage technique - made from a frame
If you like simple paintings of flowers, birds, animals or landscapes, you will also like this method. You will need:
- frame from old painting or photographs - you can even glue it together yourself;
- a piece of plywood - always of good quality;
- acrylic paints, varnish and primer, plus a wide brush;
- sandpaper, decoupage drawing, file, stationery PVA;
- hooks, drill, jigsaw.
The technique for making a key holder is more complicated than the previous ones. You will have to not only glue, drill, use sandpaper, but also cut out with a jigsaw.
The sequence looks like this:
- measure the dimensions of the frame, cut out the plywood with a jigsaw so that it coincides with them and can be inserted inside - you need to act carefully, otherwise it will crack;
- drill holes in the plywood through which the self-tapping screws will go in, which will fasten it in the frame, cover it with acrylic primer and leave for several hours;
- sand the plywood first with medium-grain sandpaper, then with fine sandpaper;
- place the decoupage design face down on the file, moisten the inside with water;
- coat the plywood with glue, attach the file, smooth it out properly so that there are no bubbles left, carefully remove;
- dilute acrylic paint, cover the frame with it so that it matches the color of the picture;
- Insert hooks into the holes drilled in the plywood and attach it to the frame;
- varnish the result.
Instead of plywood, you can use thick paper or fabric with embroidery. You can even leave the frame empty, attaching hooks directly to it - this will also be beautiful in its own way.
Advice
It is important to ensure that the design matches the interior. For high-tech, birds with flowers will be foreign, for rustic style the city of the future will not work either.
Artistic cutting from plywood
The most difficult of the open key holders is perhaps this one. Plywood that you might have left after renovation, in the form of a shelf from unnecessary furniture or back wall from anything, the material is cheap, but capricious. If you work with it carelessly, it can crack, after which it will not look as beautiful as you would like.
But you can give it any shape, cut out any silhouette or word from it.
You will need:
- jigsaw, drill, spatula, wood putty, varnish;
- hooks for keys, directly a piece of plywood.
You will also need a sketch. As is the case with metal sheet, simple silhouettes are best: a cloud, a cat, a word, a flower, even an ordinary circle that can be turned into the Moon. You can go further and make a double key holder: give it a shape, and then cut out the individual elements.
This idea can often be found: a house-shaped key holder, separately cut elements in the form of human figures. Each one has a key attached to it. When a person wants to take it, he takes out the figurine and leaves with it in his pocket. By the remaining voids, you can easily understand who is at home and who is not.
Regular hooks - an economical option
The technology, however, is the same:
- take the plywood and secure it well so that it does not slip out;
- start cutting, carefully removing a thin layer of plywood - the movements of the jigsaw should be directed in one direction, intensifying from beginning to end;
- drill holes for hooks;
- sand the edges; if cracks appear, seal them with putty;
- coat the product with varnish and let dry;
- insert hooks into the holes.
To make the key holder brighter, you can paint it in any color using acrylic paint before varnishing. You can put a design on it, you can cut out a simple pattern with a jigsaw. The main thing is that the result looks harmonious and matches the main interior.
Advice
A plywood key holder can suit any style. The question is how you design it.
Elegant simplicity: uncomplicated models
The cardboard key holder is simple, the design made from a branch is also not complicated, but there are simpler ones:
Cutlery. If you have unnecessary spoons and forks around the house, they can make excellent key holders. Simply bend them to form hooks and secure them to a wooden or plywood board using a drill and self-tapping screws. The teeth of the forks can be beautifully bent, twisted into a spiral using pliers, or bent so that they resemble bent fingers. Spoons can be engraved, drilled or decorated in some other way.
Leather. Leather key holders are an excellent solution for those who like to sew rather than work with a jigsaw. It is enough to take a large piece of leather, give it a shape using scissors (from an abstract spot to the silhouette of a cat or bird), and then either drive small nails into it or sew leather pockets onto it. You can even sew in bright threads so that they hang down, and the ends are provided with small hooks. Embroidery, decoupage, ribbon bow, badges or buttons - all means will be good for decoration.
Lego is a creative and interesting way to diversify your interior
wooden plank. It does not need to be sawed with a jigsaw, like plywood, and treated with stain, like sawn wood. You just need to attach hooks purchased from your nearest hardware store to it. For beauty, you can burn a picture or a few words on wood, cut out a simple pattern or apply a drawing - either guided solely by your imagination, or by translating it using carbon paper.
Watch. Old, non-working beautiful watch- an excellent basis. They can be attached to a board, drilled holes in it, and secured with hooks. Or you can use a clock without a board, if it is old and there is enough space to screw in the screws.
Threads. You need to drive nails into the board in a random order, and then connect them with bright threads so that you get something like a pattern. You can form it point by point, like a constellation, or you can leave it abstract, just intertwined bright colors. Drive the hooks in at the bottom and calmly hang the keys on them.
In addition to the shape, it is also important to position the key holder correctly. It should be approximately at the height of your chest so that it is convenient to reach .
If there are children in the house, you need to either substitute a chair for them or hang the structure lower.
It should be placed so as not to interfere with anything, and at the same time close enough to the door so that a person standing with shoes on the rug can easily reach it. Do not place anything additional under the key holder; do not overload the hallway with accessories.
Everyone is familiar with the problem of searching for keys before leaving the house. And it seems like we always try to put them in their usual place, but every time they disappear somewhere. How to solve this problem? There is one proven method, or rather a means or household item - a key holder. It is she who will ensure the safety of your keys.
Now, before leaving the house, you don’t have to check all your pockets or handbags; you just need to look at the wall or bedside table, and the problem is solved. But another problem immediately arises: how to decide on its model. The modern market for goods for this purpose is very large, so making a choice can be very difficult. The ideal solution we will make a key holder with our own hands, but first, let’s figure out what types of these necessary interior items there are and where is the best place to hang them?
In most families, it is customary to keep keys in the hallway. This means that there should be no issues with the placement of the key holder. Choose a wall or bedside table for this and secure it in the designated place.
The location of the key holder should be chosen taking into account the wishes of all family members, taking into account the capabilities of each.
If you decide to purchase a key holder in a store, then think in advance about the place where it should be located. Based on this, you will choose the dimensions of the product. It’s another matter if the key holder is made at home, then you can “try on” it on the wall or on the bedside table while working.
If you have not yet chosen a key holder model for your apartment or house, then we will help you with your choice by describing the most popular varieties and listing their advantages and disadvantages.
Desktop key holders
If your hallway has bedside tables or shelves, then you can easily place a table-type key holder on them. If purchasing a finished product turns out to be problematic, then you can take an ordinary vase or box, which will be convenient for taking keys. There are also a lot of ready-made products of this type; just visit the stores. 
Wall-mounted key holders
 The simplest and most popular option for key holders are wall-mounted models. They are a rigid base on which there are several hooks. This option is often used by home craftsmen; just use your imagination and your apartment will be decorated original item interior
Such key holders can be different types and forms. Therefore, when choosing them, you need to focus on your interior design.
The key holder should not stand out in the interior; it is better if it becomes an original addition and a convenient household item.
Key holders in frames
 Such key holders look very aesthetically pleasing in any apartment or house. Their background can even be a photograph, not to mention beautiful landscape. The only thing you need to take into account is that a painting or photo can get scratched over time, so they need to be protected with something.
If instead of a picture you install a more rigid base and attach several hooks to it, then you will get an excellent key holder design. You can use another option, when hooks for keys are attached directly to the frame, and a beautiful picture is placed inside. But for this you need a frame made of a more durable material; a cast or overlay bar will not withstand such an onslaught.
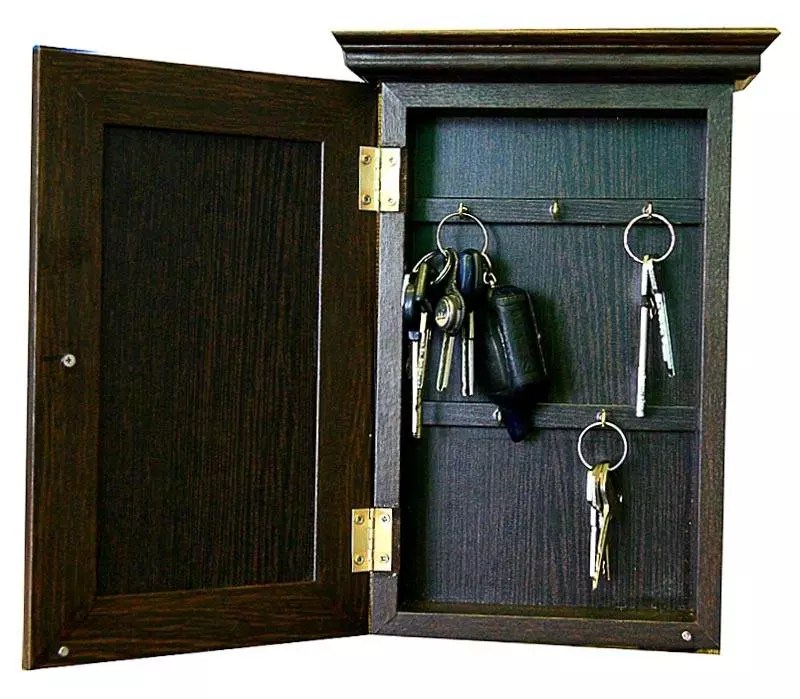
Key holder locker
 This is another option for a wall-mounted key holder. If you are not a fan of the fact that the keys are freely available to everyone, then you can try to find a more secluded place for them. A key holder in the form of a locker will do the job perfectly. If you are a supporter of handmade products, then so much the better, because there are a lot of ideas for implementation.
The cabinet can be such that it can accommodate not only keys, but also other items that are in frequent use. The cabinet itself is decorated with beautiful paintings, photographs or decorative elements. A clock may be located on the front part.
The next advantage of this option is the ability to install a secret lock on the cabinet. Of course, this is already overkill, but for some it is a way out.
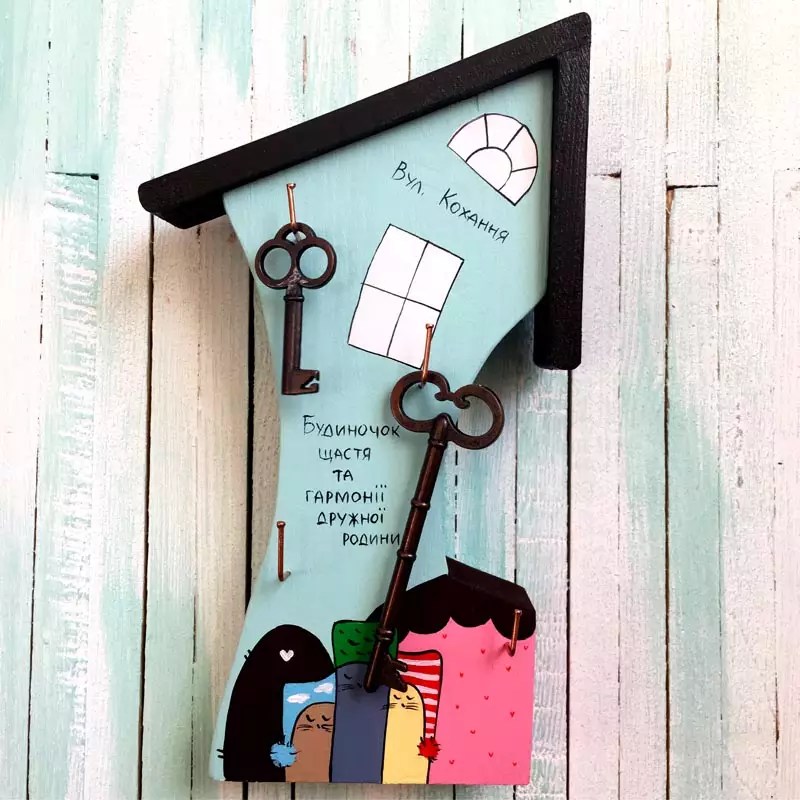
House key holders
 This version of the key holder is a variation of the locker model. And although the model is somewhat rustic, its roof gives it a special charm, which is why the product is very popular.
This design has several advantages. For example, compact dimensions, you will agree that a cabinet on the wall takes up quite a lot of space. But most importantly, the house key holder fits perfectly into any interior, especially since when making it at home, you can use fragments and details to decorate it that were used during the renovation of the hallway.
Key holder organizer
Organizers became popular not so long ago, but now they are making our lives easier and more planned. Oddly enough, key holders can also have this function.
All family members will be able to appreciate this model, except that the keys will be in permanent place, you can place other useful items in it - reminders, receipts or notes about upcoming purchases.
If you wish, you can also place a reminder board there, on which you can write something and then erase it. Several shelves or pockets are useful for storing other things, glasses or pens for writing. 
Decorative key holders
Decorative key holders include all models made by yourself. Agree that it is very difficult to repeat a purchased product based on its design, and why, but making something according to your own design will be much more interesting. Especially if a person has a good imagination and a sense of proportion.
Here are a few examples of wild imagination:

How to make a key holder from a photo frame
If, after reading our article, you were inspired by the idea of making a key holder with your own hands, but there was nothing suitable at hand except a photo frame, then do not despair, and feel free to get to work, this is exactly the material that you need. 
What you need to prepare for work besides a photo frame:
- several hooks;
- glue;
- 2 brushes;
- dye.
The work can be divided into several stages:
- First of all, you need to choose the color of the key holder. To do this, compare the design of your interior with one or another option. Experts recommend not making an exact reference in the design, otherwise you will have to look for another key holder in case of renovation in the hallway.
- If the frame already has some kind of coating, but it is very old or peeling, then it needs to be cleaned, sanded and re-coated with the chosen color.
- After the paint on the frame has dried, you can start hanging hooks on it.
- Now your main task is to decide where and how such a key holder will be attached. The place for it is chosen in such a way that it is convenient for all family members to use it. Therefore, the height of the frame is calculated depending on the height of the smallest in the family.
If you have a lot of knowledge in carpentry, you can use your knowledge and make a key holder yourself from leftover wood. And we will analyze a simpler version of the product, made of plywood. 
How to make a key holder from plywood
To create a key holder from this material you need to put a lot of effort. But first, draw on paper what you want to get in the end. Look for implementation ideas on the Internet or think over a diagram of plywood blanks.
There is only one way to simplify this task. In order not to have to cut out plywood blanks, you can purchase them at finished form. Then all you have to do is find a base for the key holder and skillfully distribute all the elements on it.
If you don’t like easy ways or you enjoy the work itself, then all the blanks can be made according to your own drawings and diagrams. To do this you need to prepare:
- plywood or fiberboard;
- acrylic paint;
- cloth napkins;
- paper napkins;
- tassels;
- glue;
- several hooks;
- sandpaper.
The process of making a key holder can be divided into several stages:

It is no coincidence that acrylic paint is used for these works. It dries very quickly, which allows you to start further work after a short period of time.
You can choose any technique for decoration. Some people like decoupage, while others prefer mosaic or painting, but in one case or another it is better to give preference to a proven option so as not to spoil the product.
We will analyze the design option using decoupage.
If this is your first job, then take it as a basis small drawings, which will not occupy the entire surface of the future key holder. Let these be the key fragments of the drawings that receive all the attention.
How to decoupage a key holder:
- Cut out designs from a napkin using your hands required sizes. Carefully separate the two lower layers, and apply the first layer with the pattern to the surface of the key holder.
- Take decoupage glue. If you don’t have it on hand, you can always replace it with regular PVA diluted with water in a 1:2 ratio. Mix these two components and, using a brush, carefully begin to apply it to the design attached to the plywood blank.
- Work begins from the central part of the fragment to eliminate wrinkles in the material.
- After the adhesive composition has dried, the entire surface is coated with varnish in several layers. When applying the next layer, the previous one must dry.
- After the last layer has dried, you can begin the process of attaching the hooks. How they will be located will depend on your imagination.
All that remains is to attach the key holder to the wall and the work is ready. Now your keys will always be in their place. There are many more options for making key holders, you can watch one of them in the video presented:
In conclusion, we can say that the key holder is an indispensable piece of furniture in every family. To eliminate everyday searches for lost items, it is better to take care of their storage location, especially since the key holder can effectively complement the interior of your hallway with its appearance. There are a lot of options for this product, from banal decorated jars on the bedside table to cabinets with secret mechanisms. What you want to see in your hallway is up to you, especially since such a product can easily be made with your own hands.
Key holders can be wall-mounted or pocket-mounted. Pocket cases are made of leather or fabric. There are hooks for keys inside the case. This type of key holder contributes more to the convenience of carrying keys in a bag and teaches neatness and organization (keys in a case are inconvenient to carry in pockets).
Key holders that hang on walls come in open and closed designs. Closed key holders are not very convenient if you have to use them frequently (the doors of the structure will have to be constantly opened and closed).

Open key holder design
The shape of the key holder largely depends on the place where the key holder will be nailed. Perhaps it will be long and narrow, or shaped like a square or a circle. For the first time, you can come up with a sketch of a simple model and feel free to start working.

Wooden planks are a favorite material to work with.
Wood planks are the most favorite material for crafts. First of all, they are easy to find. Secondly, planks of any length and thickness are suitable. Thirdly, the planks can be folded into any shape and connected to each other in any sequence. Another important argument is the fact that wood is easy to process. For example, using sandpaper You can sand the surface until smooth. The surface of the wood can be coated with paint, varnish, or stain. Each time it will be a completely different appearance of the wooden surface. But still, the base of the key holder will be in a strict classical style.

If you want to enhance the wood pattern, then use a metal brush to break the even surface of the boards. After this, varnish, paint, and stain are applied. Again, the pattern will be different each time, but the soft spots become darker after coating and this is how the wood pattern appears on the surface.

After it has completely dried, hooks are nailed onto the treated wooden surface. You can use the same hooks, but hooks that are different in color, shape, or material will give your key holder some uniqueness.

It's easier to work with plywood
Using plywood will reduce working time. The main task is to come up with an interesting figure for the key holder. You can cut out a large key, a dachshund, a mouse, a sleeping cat. The surface of plywood, unlike wood, does not require treatment. All you need to do is sand the cut areas (edges of the plywood). To make them smooth, they are coated with paint. Last step– attach hooks in a strict order or randomly.

An original way to use picture frames
You can make an unusual key holder using a picture frame. Hooks can be attached to the frame itself to the top bar on the back side. It is also recommended to attach the chipboard base with brackets on the reverse side. It can be decorated with wallpaper or small multi-colored mosaics, painted, or simply glued on a design. Hooks can then be attached to this base.

Key holder made of wood and without hooks
It will be unusual to see a key holder without hooks. Wood is used to make it. The trick is that the keys are not hung, but inserted into the slot. It is not difficult to make such a gap in a wooden base. You can cut the gap exactly along a horizontal line, or you can make it with an acute angle towards the wall. To do this you need a milling machine or a circular saw. You can carefully achieve a good result with a regular saw. The cracks made must be carefully processed.

Key holder in youth design
If you have non-working panels of any instruments, then they can be used to decorate an unusual avant-garde key holder. It is important that the panel has sockets for plugs. A carefully cut panel from the device is screwed to the wall. The key is connected to the ring, a plug is attached to the ring, which can be inserted into the socket of the new key holder. So the key, with the help of its unusual keychain-plug, will be attached to its new place.

An interesting key holder will be in the form of the neck of any stringed instrument, for example, a guitar. If it is inconvenient to hang the keys on the neck pegs, you can attach additional hooks.

Unusual options for key holder models
Nobody says that creating key holders is necessarily a long and painful process. You can take a non-standard approach to this issue. Then the key holder will be ready in 5 minutes.

- The connectors will play the role of a key holder, and the plugs will act as key fobs. The new key holder-connector is simply screwed to the wall in the selected location. By inserting the plugs into the sockets, the keys are hung in their places. The work will take 20 minutes.
- Hooks are hung on a straight stick with aluminum wire. The stick can be painted or wrapped with multi-colored woolen thread. A rope is tied at both ends of the stick. The original key holder is hung on it by nailing a nail or hook into the wall.
- A key holder is made quickly and originally from wine bottle corks. Wine corks connected to each other using glue. You must wait until it dries completely. You need to buy hooks and screws on sale. Such a screw is screwed into the cork surface along with the hook. Minimum costs and original design housekeepers

The required number of hooks and the size of the structure depend on your wishes and, to a greater extent, on the number of household members. If the family is large, you need to make sure that the model is durable. It is recommended to hang the key holder at eye level of the youngest family member (not counting, of course, the tiny baby). The key holder needs to be decorated so that it fits harmoniously into the interior of the corridor. Invite the children to design a model of a key holder and let them show their creativity.
To avoid being in difficult situation When leaving home, you should take care of a permanent place to store your keys. For this purpose, most people use a key holder with a sufficient number of places. Having placed it in a convenient place, it is difficult to forget your keys when leaving for work or for a walk. When you return, you can quickly secure the ligament in its designated place. If you make a wall-mounted key holder with your own hands, it will definitely become a stylish element. You just need to show your imagination and carefully read the master class on making a specific model.
Read in the article
Wall-mounted key holder: a photo will help you find an idea
Having decided to make a wall-mounted decorative key holder on your own, you should decide on the size and design. Numerous photos presented by the authors are so useful device, will allow you to find suitable idea for subsequent implementation. You just need to decide which model deserves attention.

Can be used to make key holders various materials. Depending on the stylistic design of the corridor, preference is given to metal, wood, plastic, leather, their combination, as well as a number of other materials. The shape and design of the product is selected individually.

Wall-mounted key holders for the home have Beautiful design, and therefore can become a stylish element. You just need to show your creativity, come up with an interesting shape and choose non-standard design.
Most often, the wall key holder is made open. In this case, you can quickly place the key in the designated place. Closed models require a special door that must be opened before taking or hanging the key. On the one hand, you don’t have to worry about accidentally falling the ligament. On the other hand, you will have to spend a little time opening/closing the door.

The functional purpose of products can be broader than simply storing keys. A wall-mounted key holder with a clock will allow you to control the time. When you are late for work, you can appreciate this opportunity. You don't have to waste precious minutes constantly checking the remaining time.

Product size may also vary. It all depends on their purpose. Key holders can be:
- Wall-mounted. Located on the wall closer to the exit;
- Pocket. Prevents keys from being lost inside the bag;
- Tabletop. Closed models installed in the corridor;
- Cabinets. A suitable option for those who have . By using closet doors, it will be possible to more rationally manage the limited space of the hallway.
The purpose of the product affects its dimensions. As a rule, wall key holders are large, and pocket key holders are small. This allows the latter to be carried not only in a purse, but also in a trouser pocket, reducing the risk of rubbing the fabric.

Various materials can be used to make all types of products. Each option deserves special attention during the selection process. It is worth studying the features of each material separately, so that later you can make right choice.

Making a wall-mounted wooden key holder yourself
A do-it-yourself wall-mounted wooden key holder is made from wooden elements connected using nails and screws, as well as hooks. The most simple option can be wooden plank small width into which a certain number of hooks are screwed. The manufacture of such a product requires a minimum of time. Make beautiful product possible even if you have no experience in carpentry.

If you cannot make the product yourself, purchasing a wall-mounted wooden key holder can be the optimal solution. You can always choose the best option for a particular one by choosing an open model of an interesting shape.
Wall-mounted metal key holder for high-tech interiors
Metal products are highly durable and have large capacity. They are in demand in offices, schools, and business centers. IN residential buildings fixtures can add solidity and give uniqueness to the interior. They look especially advantageous in ones decorated in the Techno style, or.

Making a beautiful metal product on your own is quite difficult. The lack of special equipment will not allow the formation of a strong connection individual elements. It is best to buy a metal wall-mounted key holder in an online store. Here the price is usually lower than in regular stores, and the assortment is larger.
Metal products have a number of advantages. They:
- They don't burn;
- Do not melt;
- They retain their shape well even under significant mechanical stress;
- They can withstand temperature fluctuations even if there is a special protective layer.
DIY plywood key holder: simple and tasteful
Good for cutting. It allows you to create a product of any shape and size. It is enough to use it to become the owner of a stylish and functional product.
The advantages of plywood products include:
- Dimensional stability. The material is manufactured in a factory, and therefore its characteristics are known in advance;
- Light weight. The finished product can be mounted on any wall;
- Easy processing that can be done at home;
- Smooth surface, which reduces the requirements for subsequent finishing.
You can make a wall key holder with your own hands at the same time as key rings. They can be used instead of hooks. It is enough to align the keychain with the groove prepared for it.

To make such a product you should:
- Purchase plywood with a thickness of less than 10 mm and rings with chains;
- Prepare a jigsaw;
- Cut to life size. The key holder itself will consist of an upper, lower part and key rings;
- Transfer the contours of the template onto the plywood;
- Using a jigsaw, cut out the elements of the future product;
- Use sandpaper to polish the cut line;
- Drill holes in the key rings for the rings;
- Connect the upper and lower parts of the key holder. PVA glue can be used as an adhesive;
- Finish the product and key rings.
Making a key holder with your own hands from cardboard
To ensure that the finished product holds its shape well, you should use thick cardboard for its manufacture. It is not necessary to purchase it specifically. You can use a box of cookies or any other product. This will significantly reduce the cost of making a key holder.
The photo will help you understand how to make a wall-mounted key holder with your own hands from a box. Based on the images presented, you can develop a sketch of your own product. It will help you understand what materials will be required to make the product. In addition to the cardboard itself, it is worth preparing hooks and materials that will be needed for decoration. Considering the low resistance of cardboard to mechanical stress, it is possible to provide plywood overlays.

Examples from other materials: take advice
Combined designs, in the manufacture of which using different materials. Plastic products are popular. They can be used in any conditions. When making wall-mounted key holders with your own hands, photos on the Internet will come in handy, allowing you to choose the appropriate design.

DIY key holder: master class
The sequence of work will depend on the purpose, type of product, material used, as well as the desired design. You should work carefully, carefully completing each step. Special attention should be paid to the design of the product. The decoupage technique will allow you to form beautiful drawing on the surface even in the absence of specialized education.
Making a pocket key holder
If the product is planned to be carried in a purse or pocket, its size should be relatively small. You should focus on the dimensions of the largest key in the bunch. The material from which the key holder will be made must be durable and soft at the same time. Most often, preference is given to natural or artificial leather.

Do-it-yourself pocket key holders are made in the following sequence:
- We prepare the material and tools: leather, ruler, awl, strong thread, scissors, preferred fastener. We are working on a sketch of the future product. Attention should be paid to the smallest details. It is better to depict the sketch in full size;
- We cut out two parts: large and small. The width of the larger one should exceed the dimensions of the bunch by 2 cm. In this case, the keys will be conveniently placed inside. The length should be twice the length of the largest key + 8 cm, of which 5 cm will be for the parts of the one-piece valve. The small one will be the internal part of the valve, to which the mating part of the fastener will be attached. It should be 1 cm narrower than the wide part, and the length should be 4.5 cm. This is 0.5 cm less than the valve itself;
- Sew on the fastener. The length of the Velcro should correspond to the dimensions of the front of the key holder. It should be fixed on a piece of thick fabric. To form stitches, use an awl to make holes in the leather. The Velcro should be located 2 mm from the edge. The main and counter parts are sewn on. The last one is to the inside of the valve;
- We apply decoration. The product can be decorated using embroidery or decoupage. The applique also looks beautiful;
- We connect the inner part of the valve with the main part. We make holes around the perimeter of the product in 3 mm increments. Sew from the inside to sewing machine or by hand, using a needle-forward stitch;
- We cut out a narrow strip of leather with which the keys will be attached. Sew one end to the bottom corner. We fold the other end into a loop and secure it. The ring will be used to attach a ring intended for a key ring.

Making a wall key holder
You can make a wall-mounted key holder with your own hands in different ways. One option would be to use a branch of any tree. Preference should be given to oak, larch or other wood. It is advisable to select a workpiece original form. The work is performed in the following sequence:
| Photo | Description |
 | Use sandpaper to sand the wood. It is advisable to completely get rid of the bark, as it can cause insects. |
 | Drilling into a piece of wood required amount holes that will be used to attach hooks and fix the finished product to the wall. The diameter of the hole is selected smaller than the diameter of the hook thread. |
 | Using stain finished product the desired tone is given. After the composition has dried, the raised fibers are removed from the tinted surface using fine sandpaper. |
 | The surface is coated with varnish, which gives the product a characteristic shine. Depending on the desired result, preference can be given to a matte or glossy composition. The choice will depend on the desired shine. We attach the key holder to the wall and screw in the hooks. |
A housekeeper for the hallway with your own hands made of wood will look beautiful in or. For a room decorated in a modern style, this option may not be the best choice. Various designs applied by electric burning can be used as decoration. Other options are also possible. For example, drawing a picture.
Decorate using decoupage technique
You can decorate a wall-mounted key holder with your own hands using the decoupage technique as follows:
 | The table on which the work will be performed is being prepared. The tabletop can be covered with old oilcloth or a standard garbage bag. Prepare a blank for the key holder to be decorated, white acrylic paint, sponge. |
 | We dip the sponge into the paint and use a blotting motion to paint the workpiece. Using a sponge instead of a brush allows you to add a unique texture to the surface. If there are unpainted areas, you can use a brush. As a rule, the area where the hooks are attached is painted in this way. |
 | Let the workpiece dry. The paint should not remain on your hands. It takes about an hour for the painted surface to dry completely. Apply a second coat and let the product dry for two hours. If the formed layer turns out to be heterogeneous, the base is visible in some places - another layer of acrylic paint should be applied. |
 | Cooking adhesive composition, consisting of an equal amount of water and PVA glue. With its help, the napkin will stick to the base. |
 | We are preparing a napkin. If it is three-layer, separate the top layer. The rest will not be needed for work. Extreme care should be taken not to damage the decor. |
 | Using a fan-shaped brush, apply the adhesive composition to the key holder. Carefully glue the napkin in the direction from the middle. Carefully tear off the excess. Apply an additional layer of glue along the edges. Leave until completely dry. |
 | Apply a layer of acrylic varnish using a brush. Let the layer dry. To ensure a sufficient level of protection for the formed decor, a minimum of five layers of varnish should be applied. This will allow you to securely fix the pattern on the surface and give the surface a characteristic shine. To give clarity to the formed contour, black acrylic paint can be applied to the edges of the product. After complete drying, any irregularities on the surface of the product can be removed using sandpaper, and then several layers of varnish can be reapplied. |
Article