Here it is behind rough work By . It's over pleasant stage− finishing. After multiple shopping trips, the ones I liked were found. All that’s left to do is stick them on the walls. It is important to do this without mistakes, so that you can then enjoy the fruits of your work for several years. Today in our review detailed instructions about how to glue wallpaper correctly.
Beautifully and evenly hung wallpaper always changes the interior and makes it more comfortable
In order to get started, in addition to the equipment itself, you will need a number of devices. They will help you complete this process easily and with best result.

What you will need:
- Painting spatula 35 cm wide for trimming excess.
- Painting knife with snap-off blades. It’s better to buy a quality one, it will stay sharp longer.
- Rubber roller for wallpaper joints. To work in corners you will need a narrow version.
- Fleecy paint roller. It is needed for applying glue to the surfaces of wallpaper, walls and ceilings.
- Painting bath. It is useful for evenly distributing the glue on the surface of the fleecy roller.
- Container for dilution. A plastic bucket is perfect for these purposes.
- Painting plumb line with thread. You can build it yourself from a weight and strong thread. It will help you draw a perfectly straight vertical line on the wall.
- Paint brush. You will need a brush 6 cm wide. Use it to apply glue to hard to reach places, where the roller is missing.
- Roulette. For measuring the wallpaper to be cut.
- Scissors with long blades. Not every beginner is comfortable using a paint knife to remove excess wallpaper. This is easier to do with scissors.
- Wallpaper pressing spatula. If air bubbles collect under the glued sheet, they can be easily removed using this tool. It will also be indispensable in hard-to-reach places.
- Stepladder and a simple pencil. It’s clear what the stepladder is for, and the pencil is for marking the direction of the wallpaper.
Related article:
If you are thinking about a stylish and elite interior decoration, then we recommend that you view various wallpapers for walls, a catalog of photo ideas in the publication of our portal, what will help you do right choice canvases, and give your apartment or house an unusual look.
The preparatory stage before sticking wallpaper on the wall with your own hands

Before you start gluing yourself, it is important to prepare the surfaces. They must be perfectly smooth, without chips or bumps on. Even the most invisible defects will appear and be visible to the naked eye. If it is not possible to level the walls, the best option There will be thick wallpaper with a corrugated pattern.
How to remove old coating from walls
Wallpaper is often re-pasted, creating so-called “cosmetics” in the apartment. Children have grown up drawing pictures on the walls, the corner near the stove in the kitchen has darkened, on the corners, there can be many reasons why the appearance of the wallpaper loses its color and freshness.

To glue new ones, you first need to remove the old ones from the walls. You will need a soap solution and a spatula. We wet the old wallpaper well with a rag, wait a little and carefully peel it off. If the walls under the old layer are painted. There is a special wash for this.
How to level walls and sand the surface

Basic principles of wallpapering
Let's take a step-by-step look at the basic principles of wallpapering:
- Removing old wallpaper and paint.
- Plastering and sanding walls.
- Primer.
- Purchasing the required quantity. Rolls must have the same batch number. By purchasing required amount rolls, do not forget about a reserve of 10-30 cm. The larger the pattern, the larger the cut.
- The ideal room temperature is about +20°C.
- Indoor air.
- There should be no drafts or direct sunlight in the room.
- Using a plumb line, a perfectly straight vertical line is drawn. The entire result of the work will depend on how smoothly the first strip is glued.
- The rolls are cut into pieces of the required size with a margin.
- The glue is applied, left for 5-10 minutes (depending on the type of wallpaper), and after that the wallpaper is pressed against the wall, away from the ceiling.
- The wallpaper pressed to the wall is leveled with a wallpaper spatula in the direction from the center to the edges.
- Paper wallpaper is glued overlapping, end-to-end.
- Wallpaper should be glued from the window on both sides towards the door.
Related article:
Pros and cons of canvases from different materials, criteria for the right choice, customer reviews, how to properly glue and paint canvases, tips and recommendations from experts.
Where to start gluing wallpaper and how to adjust the pattern
You need to start gluing wallpaper in the direction from the window, gradually moving towards. Thus, the joints between the canvases will be invisible.

If the wallpaper is plain, then cutting the pieces of canvas correctly will not be difficult. But with the drawing it will be a little more complicated. To match the pattern, you need to cut off the first strip, then match the next one with it, and so on. You can fold cut wallpaper. The main thing is not to forget the order.
How to apply glue to wallpaper and stick wallpaper on flat areas
Please note that different glues are used for different types. Which one you need depends on the type of wallpaper. Another trick - it’s better to stir the diluted glue with a special construction mixer, then it will turn out homogeneous, without lumps.

For uniform application we need a medium-width fluffy roller and a paint bath. Distribute the glue on the strip from the center to the edges and wait the required time for impregnation. Usually this is 5-10 minutes. Paper and thin wallpapers are soaked for no more than 5 minutes. Then we fold the strip in half, with the front side inward, avoiding bending, and press the wallpaper against the wall, focusing on the vertical line made using a plumb line.

After the upper half of the strip is pressed, release the second one down and also press it against the wall. We remove the resulting bubbles with a wallpaper spatula, moving from the center to the edges. If it has a relief pattern, go over it with a rag. Excess wallpaper near the ceiling and floor is cut off using a paint spatula and a knife. It is important that it is as sharp as possible, so you need to change the blades as often as possible.
How to properly glue wallpaper in corners
Basic steps for gluing an internal corner, which are also suitable for finishing an external one.
| Illustration | Description of action |
 | We prepare two strips according to the height of the walls and the pattern - one is solid, the second is approximately 10-15 centimeters wide. Apply glue to the wall and strip. |
 | We apply the first full strip according to the pattern to the wall. We press the wallpaper well, and cut off the free edge using a paint spatula and a knife. |
 | Please note that it is best to glue this strip with a slight overlap at the corner. After which it needs to be cut along the contour of the corner, even if it is crooked. |
 | We glue the second strip to the wall and overlap it at an angle of 10-15 mm, press the wallpaper well against the wall with a wallpaper spatula, without going over the edge located on the adjacent wall. |
 | We go through the joint in the corner with a narrow rubber roller. Remove any remaining glue. The perfectly glued corner is ready. |
If you have any questions about wallpapering, watch the video below.
How to glue wallpaper near windows, doors and behind the radiator
Places near windows and outside are considered difficult to reach, and in order to cover these areas, you will have to get creative. We glue the wallpaper behind the radiator according to the following instructions.
| Illustration | Description of action |
 | We measure the strip in height from the floor to the window sill. If it is impossible to remove, then we make cuts in the places where the radiator is attached and the pipe connections are located. Apply glue to the strip for the required time. |
 | Glue the strip behind the battery. |
 | Carefully insert the strip behind it and press it against the wall. Smooth the fabric using a rag from the center to the edges. |

We glue wallpaper near windows and doors:
- Preparing the stripes required length along the height of the walls or from the ceiling to the window and from the floor to the window with a margin.
- Apply glue to the strips.
- We press the canvas against the wall so that there is an overlap of several centimeters on the door casing and the window slope.
- In the corner where the door casing is located, we make a cut at an angle of 45°, then cut off all the excess, and push the remaining couple of centimeters behind the casing with a wallpaper spatula.
- In the case of windows, leave a margin of 2-3 cm around the slopes and press the wallpaper well with a special spatula. After drying, carefully cut off the excess with a painting knife.
How to make joints invisible
Why do gaps appear between panels glued end to end? Most often this occurs due to application large quantity glue. Wallpaper gets very wet, and its width may increase by several millimeters. When dry, they return to their original size, and a thin gap forms between the sheets. What to do if this happens? Take an unnecessary piece of wallpaper (with which the room is covered) and use sandpaper remove the front layer. Mix the resulting powder with PVA glue. Use this homemade grout to go through the seams. You can also use paint if the wallpaper is plain.

It happens that the seams are visible due to glue getting on the front part. Then you need to use a special liquid to remove glue stains, but if it doesn’t help, you just have to re-glue the wallpaper. If the edges of the wallpaper are loose and bent, use special glue for the joints and go over them well with a roller again.
How to properly apply different types of wallpaper
We looked at the basic techniques for wallpapering. But they can be of different types - paper, vinyl, non-woven, photo wallpaper, . Working with them has its own nuances and features that are important to consider. For different types various glues are used, different time needed for impregnation after applying glue, the method of gluing it to the wall is different, etc.
How to properly glue paper wallpaper

Paper wallpaper is good for its breathability, environmental friendliness and price. That's why many people choose them. Pasting algorithm:
- We cut the roll into strips of length equal to the height of the wall, not forgetting about the reserve depending on the pattern.
- Using a plumb line and a ruler, mark the wall.
- Apply glue to the wallpaper and wait 5 minutes, no longer, as paper wallpaper gets soaked quickly and can be damaged.
- Press the canvas against the wall from the ceiling using a wallpaper spatula and smooth it from the center to the edges to remove air bubbles.
How to properly glue paper wallpaper with your own hands is described in detail in the video.
How to properly glue vinyl and non-woven wallpaper

Rolls of vinyl wallpaper are cut in the same way as paper ones. The following steps follow:
- The wall is coated with a thin layer of glue, which dries in 15-20 minutes.
- The glue is applied to the strip for 8-10 minutes.
- We press the canvas against the wall from the ceiling using a spatula and smooth it from the center to the edges.
- Vinyl wallpapers glued end to end.
The process of gluing non-woven wallpaper is the same as vinyl. Only in this case, the glue is applied exclusively to the wall, since the underside of the canvas is covered with a special binding polymer. The same technology answers the question of how to properly glue vinyl wallpaper on a non-woven backing.
How to glue photo wallpaper
Very popular in finishing apartments and houses. With their help you can create unique interior and visually expand the space of the room. What you need to remember when gluing such wallpaper:
- You should use special glue for photo wallpaper.
- First, lay out the fragments on the floor so that you can understand how to properly place them on the wall to ensure the integrity of the design.
- The surface of the walls under the photo wallpaper must be perfectly flat.
Let's look at how photo wallpapers are glued.
| Illustration | Description of action |
 | We apply glue both to the wall and to the first sheet of photo wallpaper. We fold them in half so that the glue is well saturated, but no more than a couple of minutes. Let's expand. |
 | Carefully smooth out the photo wallpaper with a rubber spatula. We go through the joints with a rubber roller. Under no circumstances do we use various fabric scraps. |
 | We apply the second part of the wallpaper and carefully, literally down to 1 mm, join the pattern. Smooth everything with a rubber spatula. Please note that many wallpapers are trimmed between the joints. |
 | When the wallpaper is glued, you need to cut the joint and remove the unnecessary strip. |
 | We look at the joints again, trying to fit them as close as possible. Apply glue and go over it with a roller. |
 | Now you will need a whole palette of pencils to retouch the drawing. We select desired color under the drawing, chop the lead with a blade. |
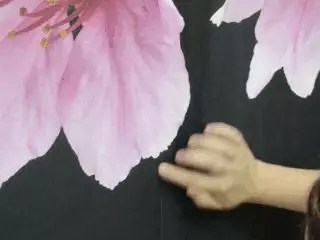 | Take the crumbled stylus and carefully cover the joints and resulting scratches with your finger. |
The video below will tell you how to glue photo wallpaper correctly.
Article
Wallpaper dates back to the 16th century and is still popular way decorations home interior, bringing personality to the living space.
To bring fresh breath into your interior, you need to approach the issue of wallpapering with skill and even a certain skill.
Let's figure it out how to glue wallpaper correctly.
What wallpaper is better to glue?
Non-woven wallpaper(non-woven wallpaper) are more environmentally friendly than vinyl wallpapers. At the same time, when gluing non-woven wallpaper glue is applied to the wall, whereas when gluing vinyl wallpaper The glue is applied to the wallpaper itself.
There are non-woven wallpapers that can be paint after pasting with water-dispersion paints.
When choosing wallpaper, you need to take into account the humidity of the rooms in which you are going to glue the canvas, as well as the condition of the walls.

Vinyl wallpaper can be used in the toilet, bathroom or kitchen. For minor stains, they can be wipe with a damp cloth, soaked in a weak solution with detergent. For dry rooms, such as a corridor, any type of wallpaper is suitable.
However, there are also expensive non-woven wallpapers that can also be wiped with a damp cloth.
If there are unevenness on the walls, then they can be covered embossed wallpaper, wallpaper with a dense pattern or with a large cell.

As you can see, there are many factors what wallpaper better to glue, Therefore, in each individual case you need to approach the issue individually.
Remember that there are several visual patterns of wallpaper patterns:
- If the pattern is in the form of vertical stripes, then visually the room becomes tall and narrow.
- Large patterns or cross stripes create a feeling low ceilings and a wide room.
- Rooms with dark ceilings make them look low.
Wallpaper in light colors gives a feeling of spaciousness.
How to properly glue paper wallpaper

It is very important when gluing wallpaper to comply with all technology. All tools must be cleaned and washed. Brushes must be absolutely clean.
We prepare the surface (walls) for gluing.
Some experts recommend gluing additional wallpaper or newspaper if there are uneven surfaces on the wall. to smooth out unevenness.
If your surface flat, then you can safely glue wallpaper on it.
If there are sufficiently large irregularities on the wall from paint, old wallpaper and other repair work should additionally level walls. This is done using a pointed object, such as a spatula or sandpaper.

You can use special solution for removing wallpaper. There is also a special steam cleaner for these purposes.
Cracks and large depressions are puttied or cemented.
Ideally, you need to plaster the surface to proper wallpapering.

After this it is better to saturate the walls special primer, which can be purchased at any hardware store, which will prevent the appearance of fungus and mold in the future. A primer is also necessary for good adhesion of the wallpaper to the surface.
After the walls are prepared for gluing, we move on to preparing the wallpaper itself. Firstly, you need measure surface to be glued and roughly calculate how many rolls of wallpaper you need.

Length standard wallpaper amounts to 10 m, therefore, each roll will need to be cut into approximately 3-4 parts (depending on the height of your ceilings).
If you have wallpaper with a pattern, then you need to purchase a canvas with reserve, because you will have to cut them to “fit” the drawing correctly.
Wallpaper glue

For each type of wallpaper it is necessary to select the correct glue. Paper wallpaper is glued universal glue.
For vinyl, embossed and heavy wallpapers used glue for vinyl wallpaper.
Non-woven wallpaper is glued glue for non-woven wallpaper.
It should also be noted that if you are going to paint the ceiling in addition to wallpapering, it is better to do this first.

Follow precise instructions on a pack of powder or concentrated wallpaper glue when diluted with water. If there is not enough water, the glue will be too thick and if there is a lot of water, the glue will become too liquid and as a result, the wallpaper will not stick to the wall.
Already exist ready-made adhesives. In this case, you only need to shake the glue and it is ready for use.
A few tricks on how to glue wallpaper on walls

Before you start gluing the first sheet, you should hang plumb to the ceiling, to draw an exact landmark.
A must prevent any drafts, so we close all the windows and doors.
At gluing vinyl (paper) wallpaper It will be more convenient to apply the glue on the table, but you can do this manipulation on the floor. We apply the glue with a brush or roller in a thick layer so that they can be moved on the wall. Excess glue already on the glued canvas can be squeezed out using a damp sponge.
After you have applied the glue to the wallpaper, you can fold the glued strip into two or three layers and let the glue soak in, and in the meantime apply glue to the next canvas. Wallpaper on paper based should be soaked for 5 minutes, and other types of wallpaper should be soaked for 7-10 minutes (depending on the density of the wallpaper).

It will be much more convenient for you to study sticky wallpaper with a partner. After all, it is much more convenient when one feeds the roll, and the other, standing on a stepladder, glues it, clinging the wallpaper from top to bottom and carefully applying it to the joints.
Here's another tip: glue the wallpaper from the windows to the doors on each side of the room so that the joints are less noticeable.
If you have thick wallpaper (no matter what type or material), then glue it end-to-end, and if thin - overlap

If there are bubbles on the wallpaper that cannot be squeezed out, then carefully pierce Place a pin in such places so that the air comes out. Perhaps your wallpaper will still have bulges - this is not a problem, because when the wallpaper dries, the bulges will disappear. If the bulges have not disappeared, you should re-glue such canvases.
After the wallpaper has already been placed on the walls, you need to smooth out the joints with a small roller. If you are dealing with textured wallpaper, then use a clean rag instead of a roller, which will prevent damage to the structure of the wallpaper.
Excess edges on the ceiling and curved walls should be trimmed with a knife until the glue dries. Over time, glue will harden and accumulate on your knife, so rinse the knife periodically in hot water.

You may encounter a problem like gluing wallpaper near the radiator. Near the radiator mounts and pipes, you can simply cut the wallpaper and cover hard-to-reach places in this way. To glue the canvas behind the radiator, you can use mop, having previously wrapped dry and clean material, such as a rag, around it.
Important! When performing wallpapering work, be sure to turn off the power supply in the room where the work is being carried out (sockets, switches).
Before wallpapering it is necessary Remove the housings from sockets and switches.

Wallpaper can be glued directly to the holes where the electrical wires are located, and after the canvas has dried, it can be done in the place of the electrical wires knife cut crosswise
Wallpapering is the most common option when renovating premises. Ease of installation and availability of materials allow you to do the work yourself. In this article we will tell you in detail how to glue wallpaper with your own hands, starting with the choice of materials and glue, ending with the tricks and advice of experienced experts.
Preparing the walls
The preparatory stage should begin with clearing the walls of all unnecessary objects. Sockets and switches, baseboards, as well as door panels must be dismantled to simplify the work.
Let's do everything ourselves!
We carefully prepared this article before publication, and therefore we will tell you about all the nuances of gluing walls yourself: how to choose glue, how to apply it, how to glue it, etc.
It is recommended to de-energize the room to prevent damage electric shock during wet work. If this is not possible, it is necessary to carefully insulate the wires of switches and sockets and hide them in socket boxes.
Old wallpaper
Then you should start preparing the walls. If the walls are decorated with old wallpaper, they will have to be torn off. First they are removed by hand, and if you're lucky, the strips will come off entirely, but usually they come off poorly, in separate pieces. It is recommended to moisten the remaining fragments on the walls with warm water and clean them off with a spatula.
Difficulties may arise with vinyl samples with a moisture-resistant coating on the front side. It must be removed so that water can penetrate to the base and soak the glue. This will take a lot of time, but then the material will become more pliable and without special labor clean off with a spatula.
Paint Cleaning
If the walls are painted or whitewashed, the cleaning job becomes more difficult. The whitewash should be moistened generously with water and gradually removed with a spatula. Oil paint is more difficult and takes longer to remove, but there are ways to speed up the process. Firstly, you can use special chemical compounds To remove paint, secondly, use construction power tools.

The chemical method of removing paint will not be cheap and will require the use of personal protection, due to harmful fumes. As auxiliary tools To remove paint, a grinder or a hammer drill with special nozzles in the form of metal brushes. In this case, a respirator and safety glasses are also necessary due to the abundance of dust.
Alignment
When the room is cleared of old finishing, they begin to level the base. The amount of work at this stage depends on the condition of the walls. A wall with a small number of chips and minor defects will require only local leveling. Minor defects should be corrected with finishing putty, having previously treated the wall with a primer for better contact.

Pronounced wall irregularities will require more attention. You will need to putty in two layers - a starting putty to correct the main defects, and a finishing putty for final leveling. At the end, the walls are sanded with an abrasive mesh and cleaned of a layer of dust.
Types of wallpaper
Now on the finishing materials market there are many wallpaper options that have certain performance characteristics, advantages and disadvantages. Let's highlight the main types:
- Paper wallpaper. The most common type, characterized by low cost and ease of pasting. Paper wallpaper is environmentally friendly and great for bedrooms and children's rooms. On the other hand, they cannot be washed and do not retain their original appearance for long;
- Non-woven wallpaper is made on the basis of paper with the addition of non-woven fibers. They are durable, wear-resistant and not afraid of water. Gluing non-woven wallpaper is simple - the glue is applied directly to the walls. This finishing material is able to hide minor unevenness in the walls, which simplifies the process of leveling the base;
- Vinyl wallpaper consists of paper or non-woven backing covered vinyl covering. They are easy to clean and do not lose their brightness for a long time. Before gluing vinyl wallpaper on a non-woven backing, it is worth considering that they “do not breathe”, and it is not recommended to use them in children’s rooms and bedrooms;

- Acrylic finishing material is paper coated acrylic composition. Unlike vinyl wallpapers, they have a thin outer layer and are not as durable, but they allow air to pass through better;
- Natural. This type of wallpaper is environmentally friendly, exclusive and has a high price. They contain natural cork, straw, reed, etc. Application to walls requires some skill;
- Fiberglass material is ideal for office spaces. It is durable and strong, is not afraid of water and does not burn. After application, it is painted with paints on water based, and this can be done dozens of times;
- Textile samples consist of natural fabric material applied to a paper base. They look chic and expensive, and cost accordingly. They are sensitive to moisture and mechanical stress, and also absorb odors well;

- Metallized wallpaper has an outer layer of aluminum foil, is not afraid of external influences and is easy to clean. Ideal for modern interiors;
- Liquid wallpaper is the most unusual type of all of the above. They are based on cellulose, supplemented with decorative dyes, fibers, and glitter. The walls may not be leveled before applying such a coating. It is not recommended to glue them in damp rooms due to their hygroscopicity;
- Photo wallpapers are self-adhesive film, on which a certain design is applied. You can depict everything on the wallpaper, from ornaments to photographs, which allows you to make the room unique.

As a rule, wallpaper for a room is selected based on taste preferences, but in order for it to last longer, it is also necessary to take into account its characteristics.
Wallpaper glue
Selecting glue causes difficulties for many who have started repairs with their own hands. In fact, the variety of options presented should not scare anyone, because in order to make the right choice, it is enough to focus on the type of wallpaper used. There are several types of wallpaper glue, differing in composition:
- methylcellulose glue;
- CMC glue, based on carboxymethylcellulose compounds;
- starch based glue.

The choice of glue is made based on the following features:
- type of wallpaper;
- room microclimate;
- wall material.
First of all, you should decide on the type of wallpaper. Manufacturers of adhesives offer a wide range of products on the market from which to choose necessary option does not seem to be a difficult task. Depending on the type of compatibility with wallpaper, the glue can be:
- for light wallpaper (paper);
- heavy wallpaper (fiberglass, textile);
- non-woven wallpaper;
- vinyl samples;
- universal, suitable for all types.

How to choose the right glue taking into account the microclimate of the room? Materials for wet rooms must be resistant to moisture and retain their properties under all conditions. In addition, damp rooms contribute to the spread of fungus and mold. The adhesive composition must contain antiseptic substances to prevent their appearance.
How to glue wallpaper with your own hands
Decorating walls with wallpaper is a procedure that you can easily do with your own hands, but it is important to adhere to certain rules so that the result is of high quality, and the process itself does not take a lot of time and effort.
Final preparations
Before gluing wallpaper you need to go through the last preparatory stage– priming the walls. Priming allows you to achieve better adhesion between the base and finishing material. To carry out the work, you can choose an acrylic primer or use glue. Manufacturers of adhesive compositions indicate on the packaging how to properly dilute it for gluing or priming walls.
The composition is applied to the walls with a roller, and the corners are treated with a brush. It is recommended to prime immediately before work, so that dust does not have time to settle on the walls, which could impair adhesion. It is also worth providing the necessary conditions in the room itself. During the work, until the glue has completely dried, the windows in the room must be closed.

The most optimal temperature indoors – 20 degrees. It is also necessary to restore order and wash the floor so that when manipulating the wallpaper, it does not spoil its appearance.
Where to start gluing
Which wall the gluing process will begin with is, by and large, unimportant. The main thing is to stick the first strip strictly vertically. If you don’t want to break the level, it is permissible to take some obviously vertical object (window slope or doorjamb). You can start gluing in the corners. The remaining strips will be glued according to the first reference strip and the fitting process will be simplified.
How to prepare glue correctly
All modern adhesives have instructions on the back of the packaging on how to glue the wallpaper. It is necessary to study it carefully before gluing wallpaper and follow all recommendations. As a rule, the preparation process comes down to diluting dry glue in water in the proportions indicated on the package. To prevent the formation of lumps, it is necessary to add glue to the water in small portions, thoroughly stirring the resulting composition.

How to glue wallpaper
First of all, you need to find information on the rules for applying glue on the wallpaper packaging. If the glue should be applied directly to the strips, then they must be rolled up with the coated side inward. The edges are folded towards the middle several times. The folds should remain rounded and the strip of wallpaper should resemble a scroll.
If, according to the technology, glue is applied to the wall, then it is necessary to coat the base along the width of the glued strip with a margin. To apply glue in the corners under the ceiling and floor, use a brush.
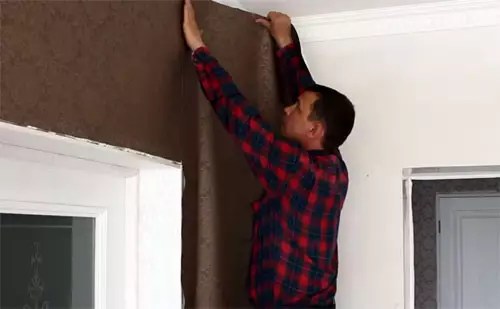
Climbing onto a stepladder, you need to run a few centimeters of the glued strip onto the ceiling. The edge of the strip must be aligned with the marked vertical or landmark. Then, using smoothing movements from the landmark to opposite side you should glue the strip near the ceiling.
 with a special soft spatula. When gluing wallpaper, you need to watch for the formation of air bubbles, be sure to expel them with excess glue to the edges.
The remaining parts are glued in the same way, you just need to focus on the already glued strip. Finally, you need to trim off the excess parts in the corners of the ceiling and floor. The easiest way is to use a wide spatula and a utility knife. The spatula is applied to the corner, and the resulting margin is trimmed along its edge. As a result, the edges are smooth.
Separately, it is worth mentioning how to paste wallpaper in the corners. There are two ways. The first one involves gluing one strip overlapping to the other side of the corner with a margin. The second strip is cut at the corner and pasted directly onto the stock. If the material is thick, the joint will be very noticeable, and it is better to use the second method.

To achieve a more invisible joint in the corners, the strips on both sides are glued overlapping and cut off using a spatula sharp knife. If the corners were glued tightly, the stripes will fit perfectly evenly. External corners the premises are glued in the same way, using one of the methods.
How to glue wallpaper when there are obstacles
For those who understand how to glue wallpaper, difficulties may arise in areas near doors and windows. If the window or door is located flush with the wall, it is enough to trim the strip of wallpaper along the trim or jamb with a small margin. Then, up to the corner of the casing, the strip is cut at an angle of 45 degrees. The resulting parts must be hidden behind the structure of the door or window, and the excess remains must be cut off.
If the door or window is located in different planes with the wall, the work becomes somewhat more complicated. First, you need to seal the slope by placing a small margin on the wall, which is trimmed along the edge using a spatula. Next, you need to seal the wall in a similar way.
Difficulties may also arise when bypassing sockets and switches. If they were dismantled before carrying out the work, then only installation boxes with wires should remain on the walls, located flush with the wall, which will not interfere with the work.
If for some reason it was not possible to remove the electrical installation parts, then you need to apply the strip to the obstacle and mark its edges. Using a knife, cut out the required fragment according to the marks, leaving a reserve that can be hidden behind the overhead decorative frame.
If you need to seal the wall behind the battery, it is not necessary to remove it. It is enough to have a certain supply of wallpaper from all over the world. You may also need information on how to properly bypass heating pipes. If they hang on clamps, you can dismantle them for convenience and put them back in place after finishing the work. Holes in the walls will not be difficult to find.
How long does it take for wallpaper to dry?
The drying time of wallpaper depends on its type. Non-woven wallpaper takes at least a day to dry, and the thicker it is, the longer you need to wait. Vinyl wallpaper dries for about two days, provided the room humidity is no more than 60%. Drying time for paper wallpaper varies from 24 to 72 hours. It is important to remember that you should not open windows at this time, and generally allow drafts in the room. By following these rules, you can hope for a high-quality result.

FAQ
- Is it possible to glue wallpaper onto wallpaper? - This is allowed to be done only in certain cases. If the old samples are thin, then most likely they will sit firmly on the walls, therefore, they will be a good basis for new finishes. However, how long such wallpaper will last is a big question;
- How much do the services of craftsmen cost? - On average, finishers estimate their work from 150 to 170 rubles per glued square meter;
- What to do if the wallpaper peels off? — You can use a brush to glue the detached part with the remaining glue, or use a special glue for seams;
- What happens if you ventilate the room during and after work? — It may happen that in a draft the glue dries too quickly and the material does not have time to stick.
Tsugunov Anton Valerievich
Reading time: 7 minutes
There are many wall decor materials available, but wallpaper is still the most attractive option. The procedure for working with them depends on the type of canvas chosen. However, there are basic points that are the same for all types. Let's find out how to properly glue wallpaper on flat areas of walls, on the ceiling and in hard-to-reach places.
What do you need to hang wallpaper?
When starting to decorate the walls, you need to prepare everything you need:
- Wallpaper rolls and glue.
- Water and a spatula.
- Putty, plaster (needed if you need to level the surface of the wall).
- A screwdriver to unscrew sockets and baseboards.
- Stationery knife or scissors.
- Level, tape measure, ruler.
- A brush for spreading glue.
- Two pieces of clean cloth. The dry one is useful for smoothing the canvases, the wet one is useful for quickly removing excess glue from the surface of the wallpaper.
Instead of a traditional cloth, you can use convenient modern devices to remove air bubbles from under glued sheets: a plastic spatula for smooth fabrics, such as silk-screen printing, a rubber roller for embossed ones.
Many people imagine the gluing process, but not everyone knows the important subtleties and tricks. We invite you to familiarize yourself with the step-by-step instructions with photos and a block of 4 videos, which clearly show all stages of work, from preparing walls to pasting difficult areas.
Surface preparation
The first step after choosing the type of wallpaper, glue and purchasing everything you need is preparing the walls, which begins with.
- Paper-based wallpaper can be treated before removal soap solution with the addition of a small amount of glue.
- Dense and washable fabrics need to be cut, thereby allowing the solution to pass deeper to the base for quick softening. After soaking, the old coating can be easily removed with a metal spatula.
- If the wallpaper does not come off completely, it is better to wet it again. Areas that are still difficult to clean can be ironed through a wet cloth.
- Non-woven wallpaper should be removed as follows: make a horizontal cut and remove the first layer. The bottom one can be left: it will provide a solid base for gluing new ones.
- If the old coating is water-based or Oil paint, you need to go over the surface with sandpaper, and completely clean off the weak and swollen areas. it is written when wallpaper can be glued directly to painted walls, and in what cases old paint will have to be removed completely.
- Chalk whitewash or water-based emulsion is soaked in a soap solution and removed with a spatula. If the whitewash layer is small, it is easily washed off with warm water and a sponge. The lime is removed in the same way, but you can glue the material directly onto the whitewashed wall.
- Preparation for gluing has its own specifics. OSB boards. They are first sanded, then primed, plastered or puttied, and finally coated with primer again. Important point– correct sealing of joints between slabs. Plywood and chipboard are processed in a similar way. Details - .
It is important to remember that wallpaper should only be applied to a flat, dry and clean surface. To remove dust from the base, you can cover it or mix a weak solution of liquid wallpaper glue or PVA.
The nuances of wall preparation are in the video below.
Measurements and cutting of material
Before you start directly gluing the walls, you need to prepare the material itself.
- The wallpaper roll is rolled out on a flat surface so that the front side is at the bottom.
- A strip is measured, the length of which is equal to the height of the wall plus a few centimeters.
- If there is no pattern on the wallpaper and it does not need to be joined, several strips of the required size are cut at once. If there is a need to select a pattern, cutting occurs with the addition of a pattern to match. The dimensions of the repeat - a repeating image - are often indicated on the packaging. It is worth remembering that canvases with a pattern that needs joining will require more consumption than without it.
Where to start?
Traditionally, gluing is done from the window and goes towards the doors, but you can choose another starting point from several options described in. Using a plumb line or level, mark a vertical line in the selected location. It will become a guide and point of reference.
- After applying the glue, the strip is folded in half with the edges together. This way the coated side will be on the inside. It is important to prevent wrinkles from forming. The strip should be left for a short period of time indicated on the roll packaging. As a rule, for simple paper types it takes 5 minutes, and for thick ones - about 10. When moistened, the wallpaper can stretch a little, so they need to be soaked for the same amount of time. This way you can avoid the material from lagging behind the walls and the formation of bulges.
Important! When working with glass wallpaper and non-woven fabrics adhesive composition applied to the wall, and not the material itself.
- The first strip is applied to the wall, aligned along the marking line, and the next sheet is glued end-to-end. There is no need to overlap when working with vinyl, non-woven, fabric types of wallpaper. It is only allowed when attaching thin paper products. If there is a pattern on the wallpaper, it needs to be combined correctly. WITH special attention It is worth considering the joining of the offset pattern.
- The strip that is glued is gently pressed with a dry cloth or rolled with a roller. You need to move from the middle towards the edges, as well as from bottom to top.
- If the plinth is removed, the lower edge of the canvas after gluing must be cut so that it is hidden behind it. If removal is impossible, the strip is cut at the level of the baseboard. Instead of a ruler, it is convenient to use a wide metal spatula.
- The top edge is removed along the edge ceiling molding, and the lower one is aligned with the baseboard on the floor. It is also convenient to use a wide spatula and a very sharp knife for this. Trimming is carried out immediately after leveling the strip; in this case, it will be smooth and without burrs.
Important! If the wallpaper sticks after installation stretch ceiling, trimming must be done very carefully so as not to damage the film.
- Now all the edges along which you need to go with a rubber roller are carefully checked. Areas that do not stick are coated with glue again and pressed tightly against the wall.
How to glue strips in difficult places
Let's start with the inner corner. Most often, the wall joints in rooms are uneven, which leads to the formation of folds or inconsistencies between the panels. In order for the coating to fit as needed, you should measure the distance from the previous strip that was glued and add 2 cm. Then cut it along and evenly glue the corner and a small piece of the adjacent wall. Use a special rubber spatula or brush in the very corner to make the coating adhere better.
When working with heavy wallpaper, you need to stick a piece, allowing it to overlap the adjacent wall vertically. Using a knife with the sharpest blade possible, cut through both strips using a ruler. Carefully remove the trimmings and press the edges. As a result of correctly performed manipulations, the bend of the wall is smooth and clear.
Working with thin paper wallpaper, you just need to attach the remaining piece from the corner, overlapping the previous sheet and strictly observing verticality.
To properly paste the outer bend, you need to cut a strip whose width will be 2.5 cm greater than the distance from the already glued canvas to the corner. After attaching the cut, you need to bend it to the other side. If the angle is right, the rest of the canvas is glued end-to-end; if not, it is overlapped, oriented towards the vertical markings.
After this, both layers are cut with a sharp knife using a ruler or rule. The remains are carefully removed, and the seam is rolled with a roller. Any protrusions are covered in the same way.
If the corner is uneven, you need to proceed as follows: while the canvas is still wet, cut it with a knife where the folds appear and secure the edges.
Difficult areas also include sections of the wall behind radiators, sockets, door and window openings. To get a clear idea of the work in these places, we recommend watching the video.
Pasting the ceiling
The technology for gluing the ceiling is not fundamentally different from gluing wallpaper to walls. The difference will be in the following points:
- First of all, you need to decide on the direction of the stripes: along or across the room, along the line of incidence of the light.
- When attaching canvases to the ceiling, it is difficult to do without an assistant. If you need to work alone, you should choose non-woven wallpaper. They do not need to be coated with glue, so the strip can be rolled into a roll and raised to a height without any problems.
Wall finishing is one of the most important stages of renovation. In search of an answer to the question of how to hang wallpaper, we turned to experts for advice. So, proper wallpapering of walls is the topic of today’s article.
Surface preparation
Your attention! Before starting work, it is necessary to treat the surfaces that will be used for this purpose. This is the first condition - high-quality finishing.
Walls and ceilings must be level, smooth, dry, clean, free of cracks and of normal porosity. Previously pasted sheets must be removed and a primer applied to the surface.
Plastered walls
The surface of the walls should be dry, clean and bright, as it becomes after plastering. If you are in doubt whether the surface is dry, stick plastic film to it and leave for 12 hours.
After this time, look at inner side films, the presence of drops indicates the need for drying and ventilation of the room.

If the plaster absorbs moisture well, be sure to apply a primer. Before pasting with canvases, everything concrete surfaces needs to be primed.
If there are surface defects:
When cracks appear, they need to be widened, a strip of fabric should be applied to the layer of putty, and covered with another layer of putty on top.
If the walls are covered with paint
Advice! First of all, check how firmly the paint layer adheres to the surface. You can use adhesive tape - stick it to the surface and tear it off sharply. If small fragments of paint remain on the tape, the old finish must be removed.
Otherwise, you need to treat the surface with an alkali solution and rinse well with warm water. The wall must be plastered, then the adhesion of the glue to the surface will be much stronger and easier.
Wallpaper preparation process
The first rule is a mandatory check of the rolls for batch identity and color tone.

After making sure of availability suitable material, you can start cutting the canvases. The length is determined based on the height of the room. 7-10 cm is added to the resulting figure.
If you purchased canvases without a pattern, all stripes may be the same length.
If you need to combine a drawing, carry out the following work:
- The first canvas is cut with a wallpaper knife.
- Before cutting the second panel, check that the pattern matches. If you get a direct fit, all the other strips will be the same for cutting and the pattern just needs to be combined with each other.
- When cutting wallpaper with alignment, the pattern on each strip will shift by half the pattern, while every second strip will be the same. It is important that the rolls unwind in the same direction.
- To prevent the canvases from getting mixed up, number them and mark the top.
Today, most canvases are glued end-to-end - they do not overlap each other.
Applying glue
Application rules:
- Place the canvas pattern down on a clean, dry surface.
- Apply glue from the center to the edges. For even distribution, use a figure eight motion. Be sure to carefully work the edge of the strips.
- Fold the canvas with glue inward and repeat the procedure with the second part.
The wallpaper should remain folded for some time to soak. And the heavier the strips, the longer it takes to soak.
Pasting
Advice! Start the sticker process from the window. The first strip is glued using a plumb line strictly vertically so that the remaining strips are level. Leave a reserve near the ceiling.

Applying glue
- To prevent bubbles from appearing, press down the strips well and smooth them thoroughly with a soft wallpaper brush or roller from the middle to the sides.
- If stains appear on the front side, blot the surface with a damp sponge.
Make sure there is no draft. It is possible to organize ventilation in the room only after the coating has completely dried.
- from the light, starting from the window and moving inside the room.
- Be sure to find yourself a companion who will hold the other part of the canvas.
And the final stage is gluing the borders.
Have you used embossed canvases and are wondering how to apply borders? In this case, after gluing the border, the canvas is adjusted to the height of the room. For smooth wallpaper this rule is irrelevant, so you can glue the border directly on them.
To make sure that the edges of the panels are tightly adhered, run a roller along the joints.
Summing up
This article provides tips that will help you complete all the work correctly and as quickly as possible. We hope our article was useful to you. In order to more accurately understand the technological and practical issue, our website provides detailed photo and video instructions in which you will find useful information on this issue.