Wooden coffered ceilings have recently become increasingly popular in modern architecture. Nowadays, coffered ceilings serve more of a decorative function, so the design and decoration of the ceiling are of significant importance.
The carpentry workshop "Amurles", based on many years of experience, is ready to make any custom-made wooden ceilings for you. The total cost of manufacturing and installing a wooden ceiling will depend on the type of wood chosen. Without a doubt, buying coffered wooden ceilings in Moscow will be the right decision, which you will never regret.
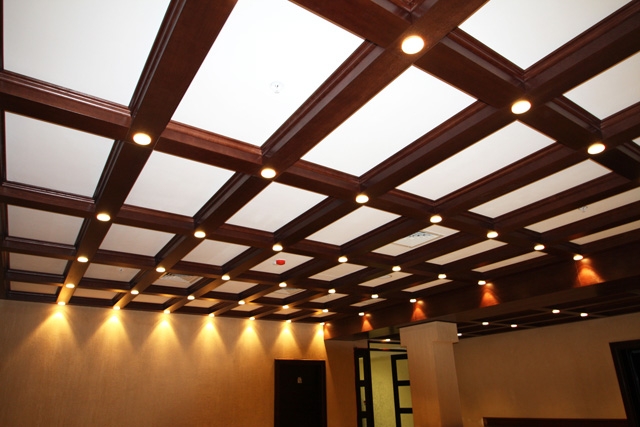
Coffered ceilings are considered the most efficient and ergonomic solution using a unique architectural design. The main element of the ceilings are square or polygonal recesses - caissons, forming general style and ceiling design. Caissons may occur various forms and sizes with appropriate design decorative elements- molded rosettes, ornamented beams, decorative painting.
You can buy custom-made wooden coffered ceilings from any material: MDF, solid oak, pine, ash, walnut, beech, larch and other valuable types of wood of your choice.
Wood ceiling trim

Our workshop uses modern technologies for finishing the ceiling with wood. We can make any wooden ceilings using modern construction materials Decoration Materials, unique design and design style.
Finishing wooden ceilings can be supplemented with glass, decorative inserts, carved elements (gypsum, polyurethane stucco), silvering, gilding can be used, additional elements decor (sockets, borders, platbands, cornices, etc.)
Among the obvious advantages of coffered ceilings, it is important to note the quality, environmental friendliness of the materials used, resistance to deformation, the ability to mask unevenness or other visible imperfections on the ceiling surface, as well as the unique expressive appearance, emphasizing the status of the owner of the house.
Wooden coffered ceilings should not be installed in rooms with poor lighting or with a lot of dark and massive furniture. It is recommended to install coffered ceilings with a shade as close as possible to color scheme furniture.
The cost of manufacturing coffered ceilings includes the following stages of work:

Formation of the project, taking measurements of the premises;
Formation of a sketch (at the request of the customer);
The process of manufacturing components for a coffered ceiling and decorative elements;
Preparing the ceiling surface before installation;
The process of installing coffered ceiling components.
We can also produce coffered wooden ceilings for you, using both standard and individual design solutions:
- Coffered ceiling from clear edges: the main idea is to highlight the main element in the ceiling decor (end or horizontal plane);
- The compositional center, the main element of which is a circle from which rectangular caissons will diverge;
- Solid wood coffered ceilings in chalet style, used mainly in furnishings country houses, the main element of which is the use of roughly processed wooden beams in the form of intersecting structures;
- Solid wood coffered ceiling in a modern style: the main element of this style is the use of simple and concise wooden profile;
- Coffered ceiling in diagonal design;
- Honeycomb-shaped coffered ceiling;
- Coffered ceiling using lining made of valuable wood.
It is possible to design a coffered ceiling using contrasting colors, but before choosing a paint, it is important to consider the lighting in the room.
The following decorative elements can be used in ceiling decoration:

- molded rosettes;
- cornice elements;
- curbs;
- transitions to walls made of profiles;
- ceiling painting.
Manufacturing of coffered ceilings
The design of wooden coffered ceilings includes the following elements:

- frame;
- transverse, longitudinal beams;
- diagonal elements (installation is carried out if essential);
- finishing guides;
- fasteners;
- decorative elements (rosettes, borders, cornices, etc.)
The manufacturing process of wooden coffered ceilings includes several stages:
- Formation of the initial project. It is very important at this stage to draw up detailed drawing premises, indicating all required dimensions; take it into account functional purpose;
- Design of the sketch: the decoration of the interior space of the ceiling recesses should be thought out using textured fragments of stucco;
- Preparing the ceiling surface before the main installation work. It is important at this stage to correct all significant irregularities and pre-treat the surface (putty, primer);
- The process of installing coffered ceiling components using individual wooden modules.
Our company is ready to complete the project, manufacture and install coffered ceilings in Moscow, components, and other necessary decorative elements from any type of wood.
Maybe decorative design coffered ceilings using hand-carved elements according to our samples or according to your sketch plans.
What material is used in the manufacture of coffered ceilings?
| Oak | Ash | Maple |
 |  |
|
| Alder | Beech | Larch |
 | ||
| Pine | Red tree | MDF |
 |
Production time from 45 calendar days, any type of wood and veneer of your choice.
It is possible to paint products according to RAL catalogs in any color, a huge selection of effects and patinas.
Cost of 1 sq.m from 15,000 rubles
We have been working since 1999.
Product and installation warranty 5 years,
own production and showroom in Moscow.
Order a calculation
Our specialization is complex and exclusive projects. We make coffered wood ceilings of any size, shape and design. A variety of finishing options (tinting, brushing, painting, varnishing, gilding, aging, waxing and others) will allow you to choose and buy the most suitable option.
Do you want to receive exclusive interior? Order wood ceiling decoration from Avorio! We design, manufacture and install structures in any premises. As a direct manufacturer, we form Better conditions for cooperation and guarantee the declared quality of products.
Wooden coffered ceilings are structures consisting of individual niches, beams and cells of different configurations. Previously, they were used as a load-bearing partition between floors, while performing decorative functions. Today, such luxury is available to almost everyone - custom-made coffered solid wood ceilings will allow you to turn any design idea into reality. Structurally, such a system consists of a frame and a substrate on which platbands, cornices and rosettes are attached. Additionally, it is possible to decorate with ornaments, stained glass windows and lamps.
Timeless beauty
Finishing the ceiling with wood is one of the few solutions that will make the interior truly luxurious. Natural material will give any room an exclusive appearance and respectability. Its nobility, combined with original lighting or designer carvings, diversify the design, making it exclusive. To produce custom-made coffered solid wood ceilings, we use valuable types of wood that will significantly expand your style horizons - you can choose a majestic Empire style, elegant style Baroque, or strict Renaissance: the number of ideas is limited only by your imagination.
Coffered wooden ceilings are the most expensive option and not available to everyone. The environmental friendliness and unique texture of the material has no equal in aesthetic appeal. To decorate the ceiling with wood, we use only valuable species, which, if properly processed, will last for a hundred years or more.
However, aesthetic expressiveness is not their main advantage. Exclusive ceiling systems also perform a number of important practical functions:
- help solve issues of heat and sound insulation of premises;
- allow you to hide elements of engineering communications;
- perfectly mask visible floor defects;
- improve acoustics.
Coffered wooden ceilings take up a lot of space, which makes their installation relevant only in spacious rooms with a ceiling height of at least 3 meters.
Advantages of purchasing custom-made solid wood coffered ceilings from us
We offer our clients best options wood ceiling decoration. We work with exclusive materials, including especially valuable species, rare trunks and root sections. We work exclusively for own equipment with raw materials from trusted suppliers. The team consists of only experienced specialists with a high qualification level. All this allows us to guarantee exceptional product quality while maintaining the best price.
Modern and stylish coffered walls are an opportunity to make the design of your home truly unique and luxurious. Ceilings often play a huge role in the interior. The larger the room, the higher the ceiling, the more spacious the room will appear visually.
Every year more interesting and laconic ideas come into place. In a room where the ceiling height exceeds 2.70 m, ideal solution will be the production of coffered ceilings made of wood. Caissons are mounted recesses or niches that are made by joining beams. The main advantage is that the shape and ornament can be completely different:
- square;
- rectangular;
- rhombus;
- honeycomb;
- triangles.
When creating a project for ceilings with coffers, you need to be prepared for the fact that they will steal 10-25 cm from the entire height. Coffered wooden ceilings, the price of which always depends on the chosen material and the cost of the wood, have a variety of shapes and patterns.
What types of coffered ceilings are there?
Types of ceilings can be made from the most various materials. Wood, of course, looks the most noble. Execution options:
- Classical. The most pleasant and stylish ceiling design is made of wood. For the most harmonious combination of such a ceiling with the interior of your room, you need to think in advance about the shapes when making it. After creating the layout, the master will install the ceiling, which will be entirely made of wood.
- A combination of wood and MDF. This technique is as similar as possible to the classic one, the only difference is that not the entire ceiling will be made of wood; it also uses MDF board. Even with high-quality manufacturing experienced master will not always be able to determine what type of work it is. Visually, this type is no different from the classic version.
- Caissons from and. This option is certainly the most budget-friendly, but it is not suitable for self-assembly. This work is quite difficult to perform, and only a professional can handle it.
Design decision in choice
The classic production of a coffered ceiling from wood and its traditional look will give your room a unique design. But another advantage of such ceilings is the originality of their design. Here you can realize your most bold decisions, create a ceiling according to your own sketch and taste. Here are some ways you can create unique option for your premises.
- Clear edges. When choosing this option, the emphasis is on highlighting one element: the end or the entire horizontal surface can be highlighted with a shade. In such coffered wooden ceilings, photos of which can be viewed on the website, the main task is to create a clear distinction.
- Center of composition. Starting from the layout large room, you can create an original center of the entire ceiling composition. The starting element can be a circle or square, from which the main lines of the ceiling will diverge. The placement of an object on the floor of the same shape, like a reflection, will look especially beautiful and interesting: or.
- . Caisson options are not only a destiny. They look quite interesting and or chalets, then roughly processed beams are used, natural look. For maximum response to the design of the room, textile elements can be mounted in the ceiling, which are used in the design of the room.
- Honeycomb shapes. This option is quite complicated in the technique of execution, but the result will be wonderful and interesting. The main thing is to choose the right color and size of the honeycomb, which will help create maximum harmony.
- . This type is perfect when you plan to deepen up to 15 centimeters, while volume and richness can be compensated by a skillful combination of contrasting colors.
- A combination of wood and lining. If you plan to adhere to, when creating a coffered ceiling, you can use lining, which can be painted in a noble white color.
Self-installation of a coffered ceiling
Caissons are elements of ceiling manufacturing that are very diverse in their design. They will fit equally beautifully both in and in, where the height of the ceilings allows it. The basic rule of manufacture is the correctly selected material and shape that will fit into the interior as beautifully as possible.
In cases where you do not want to leave the work to professional builders, you can make the ceiling yourself. To do this, you need to carefully prepare and follow the basic rules and publicly available instructions. It would also be useful to consult a specialist who can tell you what exactly is needed for your premises.
A do-it-yourself wooden coffered ceiling contains several stages of manufacturing: preparatory, selection of materials, manufacturing of the frame and the actual installation of the finished slabs.
Stages of preparatory work
First, you need to evaluate the room in which you plan to install coffered ceilings. Do not forget that on a low ceiling such a design is not always appropriate. Minimum height ideally should be at least 2.5 meters. When designing, you need to adhere to the following rule: the larger and higher the room, the greater the number of beams that can be used in design. For optimal performance, universal and standard strips of 12-15 cm are used.
In a room with relatively low ceilings place beams stands in the openings of a window or door, pushing apart and expanding the space. You should not plan coffered ceilings in a room where furniture is located and the walls are dark in color, as they will only make the interior heavier.
Secondly, there are several secrets in choosing colors. For example, when choosing white and shifting the flow downwards, you can accidentally achieve the effect of a “falling ceiling”, so you need to be careful in choosing colors and shades. If you want to create coziness in the room, then you should choose, and the wallpaper will be suitable with a delicate ornament. At the same time, in the center of the ceiling you can safely make an accent in color, appliqué or original choice figures.
Building materials required for work
After choosing the color and shape, you need to decide on the general composition and draw an exact sketch, which should include all calculations, take into account the height from floor to ceiling, since everything should turn out as beautiful and harmonious as possible. In order to correctly calculate the required amount of materials, the sketch must be as accurate as possible.
When purchasing materials, have the drawing with you. For universal option They are best suited with or without a pattern, which will be glued to the base of the ceiling. The simpler the wallpaper, the more interesting the tree will look against its background.
Next, pay attention to the selection of blanks from which the entire structure will be created. The simplest option to work with with my own hands There will be a purchase of ready-made individual modules that act as caissons when directly placed on the ceiling. The pitch of the caissons themselves varies from 80-100 cm, taking into account the fact that the height of your ceiling is standard.
If we're talking about about large rooms, then the best solution will be the purchase of pine or any other light wood. Of course, processing with natural beech or spruce or oak veneer can also be used, then additional attractiveness and style will be acquired. In addition to wallpaper and wood, adhesive paint and nails are also useful.
Creating a frame for the structure
For maximum strength and reliability when installing the material, the surface is primed; for rapid absorption and drying, 2 layers must be applied. Then wallpaper is being glued: It’s more convenient to do this with two people for the most even tension.
Next, markings should be applied to the wallpaper that needs to dry: finished wood structures will be applied to them. It is best to start from the center, from the central beam. The main part of the entire structure is the support beam, which has a complex box structure. It is attached to the ceiling in the required order, thereby achieving the desired ornament. Having decided on the installation location of the main part, you need to begin creating the box beam. To do this, cut a bar along the length of the bar, on the side of which they carefully stuff small boards at an equal distance.
Next, the assembled frame is attached to the ceiling with nails, strictly following the prepared markings. Next, the strip covering the side of the structure is measured and cut out. Having finished working with the frame, close it at the bottom with a board as tightly as possible. The main thing is to strictly follow the instructions and the intended drawing, and also choose high-quality materials.
The next step is to create the box beams and place them to the installed central structure parallel, following the sketch. After fastening all the longitudinal elements, you need to proceed to installing the transverse structures. Everything must be applied strictly according to the marks, especially paying attention to the corners, because it is accuracy that creates the final beautiful result.
To process narrow gaps, the thinnest slats are used, which help not only to close the gap, but also to give the structure additional volume. Installed ceiling you can paint it completely with one color or try a composition of several shades, creating contrast and volume general design ceiling.
The thickness of the slats should be such that they can cover all imperfections and possible indents. This will help, allowing you to find the necessary atmosphere. If you want to complement the composition with plaster elements, it is best to attach them using self-tapping screws, but for cardboard elements, construction adhesive is suitable.
IN modern world artificial ones predominate for the most part Construction Materials, which would seem to have great benefits ahead of natural ones in terms of ease of installation, accessibility and versatility. However, connoisseurs still prefer to see products made of wood, genuine leather, stone, textiles and other things in their homes.
The same applies to caissons - volumetric figures, decorating the offices and bedrooms of real aristocrats. Today we will talk in detail about these products, talk about their advantages, mention their disadvantages, and also see how a ready-made solution from the manufacturer is assembled and installed.
Caisson as it is

The word “caisson” itself came to us from French, and translated means “box”. And indeed, the shape of the element is very reminiscent of this object.
- Externally, caissons can be different, but more often we are talking about a surface divided into equal sections by beams and lintels between them.
- Such designs look great in rooms with high ceilings, bringing elegance, classicism and the spirit of aristocracy to them.
- When caissons are made of wood, and not materials like MDF or plasterboard, they look very rich. Such a ceiling will last a very long time, but the price for its purchase and installation will be appropriate.
Advantages and disadvantages

The first coffered ceilings appeared in France back in the 17th century, but at that time they served a load-bearing function. Today this element is purely decorative.
However, coffered ceilings owe their popularity not only to their beauty:
- Wood is a good sound insulator;
- Like anyone suspended ceiling, caissons can hide laid communications - wires, ventilation, pipes;
- Wood can “breathe” and naturally remove excess moisture from the room;
- Before installation, minimal preparation is carried out - the rough surface does not need a good finish;
- The acoustics in the room become very comfortable;
- Such ceilings can be made very original, complementing it with all kinds of rosettes, flutes, planks and more.
The disadvantages include the following:
- Firstly, the very high price, which makes many people pay attention to more available options like the same MDF. Installing a ceiling is also expensive, since the process requires good tool And high precision in fitting parts.
- You should not buy such a ceiling if the height in your room is less than 3 meters. In this case, they will hang heavy from above, which not everyone will like.
Advice! Alternatively, in such a situation, you can choose white coffered ceilings, which will not have such an effect.
- Installation of the structure requires experience, as it is very complicated.
Installation of a coffered wooden ceiling
We have already seen the beauty of such a solution, now let’s see what you need to know and be able to do when installing it.
How to prepare
If you want to try to assemble such a ceiling on your own, then we will try to help you with this with our instructions. We will mention the highlights and subtleties, so don't miss anything.

- There can be no talk of any work if you don’t have quality preliminary design. Here, of course, you can try yourself, but it is better to invite a specialist who will take into account many nuances that you will not even suspect. He will determine the optimal number of beams and the distance between them so that it all looks neat, without getting out of place. general concept interior
Advice! Many designers advise reducing the distance between beams in spacious rooms so as not to create the effect of an unfinished ceiling. And vice versa, in small rooms place them less often, so as not to create visual overload of the space.
- If you want to do everything yourself, then consider the following points.
- The distance between the beams usually varies between 60-120 centimeters, but depending on the requirements of the interior and the dimensions of the room, you are free to change these values for yourself - there is no rigid attachment.
Advice! The last point does not matter if you purchase finished ceiling, requiring only installation.
- The next classic rule states that when drawing up a sketch, the caisson lattice is oriented strictly in the center of the room so that the additional elements on the sides have the same dimensions.
- If for some reason it is not possible to obtain a uniform division, or you simply do not want to see the cut elements on the ceiling, we advise you to install plasterboard box, making its dimensions such that all the caissons are located inside
- After creating the mesh, be sure to mark the locations of all lighting fixtures, wiring lines and other communications, as well as the locations of their terminals. All this will be very useful during the installation stage.
Now we will give some advice regarding the shape and color of the ceiling, because all this is also taken into account at the design stage.
- We have already written that very important role The height of the room plays a role. Look what it is like for you. If it's small, you can do the following. Frame the door and window openings with similar beams in the same color as the ceiling; make the beams themselves not very high - sometimes people simply install planks, simulating a full-fledged caisson; choose light shades for the ceiling, which will visually raise it above your head; Place built-in lighting around the perimeter of the ceiling, the light from which will fall on the walls - you will get a visual effect similar to the previous one.
- Also, don’t skimp on the light in the room. The darker the room is, the more depressing and pressing on the psyche it will be.
- Please note that on white coffered ceilings it is necessary to perfectly fit the details, otherwise shadows will form in the cracks, which will create the illusion of a falling ceiling and will negate previous visual effects.
- It is better not to illuminate such ceilings, but rather to direct the light from them into the space and onto surrounding furniture and walls.
- We use dark ceilings only in spacious and high rooms. They will add neatness, warmth and comfort.
We think it will not be a revelation to anyone that the caissons should be correctly combined with the rest of the interior. For example, if your walls, floor and furniture are chosen in a high-tech style, then such wooden elements will look ridiculous in it.
Although, as an option, you can use mirror surfaces as panels, install some new-fashioned spotlights, track systems or built-in lamps in the beams, and paint the wood in an unnatural color, for example, gray, and make the beams themselves strictly rectangular in shape.

Tools, material for frame and caissons
Now let's see what we need to have available. So that installation can begin.
|
|
Any suspension system communicates with the main ceiling and walls. If the ceiling is concrete, then for work you cannot do without a hammer drill, which effectively drills holes in it. |
|
|
We will use it to connect caissons and frame elements. It is advisable to have two pieces - one for the bit, the other for the drill for convenient and quick work. |
|
|
When assembling the structure, you have to cut the material at an angle of 45 degrees. It is quite difficult to do this quickly and accurately by hand, but such a saw will help out a lot. |
|
|
For rough and longitudinal cuts you will also need a jigsaw with high-quality files. |
|
|
We will make a frame for the ceiling from a metal profile. To trim it, metal scissors are required. |
|
|
You will also need a tape measure, a carpenter's square, a pencil and, optionally, a stationery knife. |
|
|
Good laser level will help us quickly and accurately determine the plane of the ceiling. If the tool is not available to you, you can use a water level. |
|
|
The dyeing thread will help to draw the actual walls and ceiling, according to the project. |


We buy the following materials for the frame:
|
|
The frame will be very similar to what we usually make for drywall, and for it we need guides, which are PPN profiles. |
|
|
The basis of the frame will be PP profiles. |
|
|
We connect the frame to the ceiling using direct hangers. Buy hard products, 0.6 mm thick. The same applies to profiles. |
|
"Crab" - single-level connector |
We will use this intricately shaped thing for the cross connection of PP profiles. |
|
|
We will use them to connect the frame parts together. You can also use LN type self-tapping screws, popularly called “bugs”. |


We will assemble the ceiling from the Start company.
It includes the following set:

- Long guide rails;
- Short guide rails;
- Curb cornices;
- Caisson units;
- Additional elements.

The installation of such a ceiling occurs in several stages, the sequence of which is very important to follow.

- First of all, we mark the ceiling, dividing it into sections. As we have already said, you need to start marking strictly from the center of the room so that the distance for additional elements is opposite sides was the same.

- Don't forget that maximum length additional element should not exceed 40 centimeters.
- The distance between the center lines (cell size) should be 66 centimeters.

- Next, using the level you have, we determine the height of our frame. It is very important to remember that the design distance from the ceiling must be set back from its lowest point.
- You can find it using a tape measure, which measures the distances from the level line to the base. The smallest value will be the desired point. Step back here as much as the project requires, and from the resulting point, draw a horizontal line along the entire perimeter of the room.

Interesting to know! For this ceiling, the distance from the base is 120 mm. This is required in order to install caissons into the structure without any problems.
- To do this, you can use the level again, or adjust the values according to the first marking using a tape measure.
- We draw lines on the walls with a tapping cord.

- Next, using the received markings, we attach the PPN profile. For fixation, we use wood screws on a suitable base, or anchor wedges in the case of a concrete or brick surface.
- The fastener installation step is 40-50 centimeters. If the reliability of the profile is in doubt, then the fixation points can be increased.

- We attach straight hangers along the main longitudinal marking lines, as shown in the photo. We use the same fasteners as for the guide profile. The installation step is 60 centimeters.

- Next, using 4.2*16 self-tapping screws, we attach the PP profile to the hangers. Here it is worth paying attention that the profile is not installed in the same way as when installing drywall, but upside down.

- The profile is attached to the suspension at a distance of 10-15 mm from its upper part. In this case, the distance from the ceiling to the top of the profiles must be at least 120 mm.
- When it is necessary to lower the ceiling lower, the suspensions can be increased or corners made from PPN profiles can be used.

- The crossbars are connected to the main belts of the frame at one level, but due to the fact that the profile is inverted, the “crabs” need to be “fixed” a little.
- We also turn it upside down and bend its mounting ears in the opposite direction. The connection is made using self-tapping screws with a press washer.

- Trimming the cross profile requires an oblique cut at an angle of 5-10 degrees. If this is not done, then when installing the longitudinal guides in the corresponding profiles, there will be nowhere for it to bend, and the part may not sit in its place.

- Next, work begins with wooden elements. The transverse guides are installed first. They are shaped in such a way that they simply snap into place. metallic profile. Everything is simple and intuitive.

- Next, we bring coffered units into the resulting cells and lay them horizontally, on top of the transverse guide rails.

- We install longitudinal guide rails. They are attached in exactly the same way as the transverse ones.

- The niches at the edges of the room that remain uncovered by coffered units are filled with additional elements. They require additional cutting after the fact - we do this using an electric jigsaw.

- The installation of a decorative border completes the work. It is attached with self-tapping screws to the PPN profile, in the center of the recess in its body.
- To hide the screws, a decorative fillet is glued on top using “liquid nails” glue. These elements in the corners of the room are cut at an angle of 45 degrees.
This is where the installation actually ends. Someone will say, what’s so complicated about it, but don’t forget that we were talking about finished products. The most elegant and beautiful ceilings of this type are completely assembled by craftsmen on site, turning and milling every detail, and this is not only very difficult, but also takes a long time.