Frame houses are now very popular - inexpensive and easy to build, energy-saving and environmentally friendly. Many people take up construction frame house with his own hand. The next step after they are finished construction works, must be interior decoration frame house. It is worth considering that each of the walls of such a house is load-bearing, and before making a hole for a window in it, it must first be strengthened.
For interior decoration of a frame house, you can use wooden lining, plasterboard, PVC lining and OSB boards.
Preparation for finishing work
The process of interior finishing of the walls of a frame house is practically no different from similar work in standard structures. Before you begin finishing, you should draw up a work plan that includes the project. They should contain a list of all upcoming work, markings of fastenings and much more.
Interior decoration can be done in any way sheet material– this will reduce the time and money spent on finishing work. For example, for these purposes you can use plasterboard - an environmentally friendly and inexpensive material. It is noteworthy that its low cost is also due to the fact that it is a domestically produced material. For this purpose, you can use a block house or decorative lining.
The interior decoration of any private home has great value for the comfort of its inhabitants. It is especially important for frame houses, which have recently become increasingly popular in our country.
Interior decoration - rules and features
High-quality interior decoration allows you to give all rooms of a frame residential building a cozy and residential look. This operation is usually performed in two stages. First they are made rough work. They represent a set of measures aimed at properly preparing ceiling, floor and wall surfaces. In practice, this means that it is necessary to level all the specified bases, free them from old coatings, and install window slopes and floor screed. After the rough work, they begin the finishing cladding using the selected materials.
Interior finishing of a previously used or newly built frame house should be carried out taking into account the following recommendations:
- 1. Repairs should begin from the furthest room (relative to the entrance to the home).
- 2. It is not advisable to complete finishing in all rooms at once. It is better to act sequentially - sheathe one room, then the second, and so on.
- 3. It is necessary to finish the premises only after laying new ones or replacing old ones utility networks(electrical wiring, sewer pipes, water supply, ventilation).
- 4. Separate areas of the room in which finishing will not be done must be protected from construction waste And possible contamination. Simply cover all surfaces with thick polyethylene film.
- 5. Finishing is almost always done from top to bottom. First of all, sheathe the ceiling. Then move on to the walls and floor. This scheme is not applicable in cases where installation is planned stretch ceiling. It is installed last.
It also makes sense to draw up a plan for all work in advance and stock up on the required quantity. necessary materials. Then the interior decoration of any frame house, done with your own hands, will take place without any force majeure situations. When using modern cladding materials, a dwelling with an area of 55–70 square meters completely finished in 45–60 days. Invited builders carry out such work faster. But why pay experts if it’s quite possible to do all the activities yourself?
Sheathing materials – what to choose?
Finishing of frame buildings from the inside is carried out different ways. The choice of specific cladding materials is determined solely by the individual preferences of the home owner and the budget allocated for repairs. most often carried out using OSB boards or plasterboard sheets. Such products reliably hide any flaws in walls and ceilings and make it possible to prepare surfaces for the implementation of complex configurations. design solutions. And most importantly, drywall and OSB are easy to install with your own hands.

For finishing The following materials are usually used:
- Facing ceramic tiles. In construction stores it is easy to choose tiles with any texture. Ceramics are highly decorative and highly wear-resistant. But here you need to remember that such products are mounted on perfectly leveled bases. Walls with bends, height differences and other defects are best finished with other materials.
- Wallpaper. For gluing frame houses, you can use any of their varieties - vinyl, paper, non-woven, acrylic, fiberglass, liquid.
- Lining - plastic or natural wood. Artificial products are easy to install, they are not afraid of microorganisms, insects, and are inexpensive. Plastic lining is easy to care for. But its noise and heat protection indicators are quite low. Lining made from natural wood is free from all disadvantages plastic materials. It gives living spaces a real home comfort. True, its cost can be steep. If you are planning a budget interior lining, it is better to use plastic lining.
- Decorative plaster. Material with excellent mechanical and fire retardant characteristics. This plaster looks great on the walls of a frame house. It is applied without serious difficulties.
If you want the interior lining of residential premises to be original and at the same time as practical as possible, pay attention to the newest finishing materials - flexible stone and. The first one mentioned has unique flexibility and great appearance. Flexible stone is made in the form of decorative slabs different sizes and wallpaper. It is resistant to mechanical stress, environmentally friendly, and easy to install. Magnesium glass sheets are made from a special mesh (fabric plus glass), wood chips and chemical additives, which give the products high moisture and fire resistance.
When you decide what is best to sheathe frame house inside, take a building level, a spatula, a tape measure, purchase the required fasteners and proceed to repair work. About the rules of home decoration different materials we'll talk further.
OSB boards and drywall - impeccable rough finish
Gypsum board sheets (GKL) are ideal for leveling walls in new frame houses. Their installation is carried out on a frame made of metal profiles according to this scheme:
- 1. Do it, install the UD profiles (they are called starting) along the line marked on the surface and the remaining elements of the skeleton.
- 2. Place electrical wiring in flexible corrugated pipes or plastic boxes.
- 3. Fill the free space between the profiles and sheets with thermal insulation material.
- 4. Attach the gypsum board to the frame (it is advisable to use metal screws).
- 5. Treat the gaps between individual sheets of drywall with putty using a spatula.
- 6. Use fine-grain sandpaper to give the surface a perfect appearance.
- 7. Wallpaper can be glued to installed gypsum boards, plastered, or finished with other materials.
OSB boards are mounted according to a similar principle. But in this case it should be taken into account that they have large mass. Therefore, they are attached to a wood frame using special 5-centimeter long spiral nails. These hardware are driven in every 0.15 m. If OSB products are mounted on the floor, they are laid perpendicular to the joists.
After installing the slabs, they should be treated sandpaper(fine grain) and apply three layers of varnish alternately to the surface. Important point! Each layer must dry completely under natural conditions (do not use hair dryers or electrical appliances to speed up drying). If the rough base is planned to be finished with decorative plaster or painted, a primer is used instead of varnish. It provides the required level of adhesion and protects the boards from moisture.
It is recommended to finish floors in frame houses wooden coverings. A special board or laminate is well suited for these purposes. More a budget option– linoleum. Its price is affordable for everyone, and its functional characteristics are quite high. The disadvantage of linoleum is that it is not environmentally friendly due to the synthetic origin of the material. For this reason, in most cases it is installed in utility and non-residential rooms.
Floors in bathrooms and kitchens are often finished with ceramic tiles or porcelain stoneware. Such products resist moisture and various chemical influences well, are easy to clean, and have a long service life. They are fixed to the floor using special glue.
Walls in frame buildings lined with clapboard. Plastic panels attach without the slightest difficulty. Unfortunately, visually such finishing looks unnatural and is not always aesthetically pleasing. The use of wooden lining solves such problems. Especially if you purchase and install Extra grade products, the surface of which does not have the slightest defect. However, in bedrooms you can use lining of categories A and B. There may be small cracks, knots, chips, dark spots on its surface, which cannot seriously spoil the beauty and elegance of natural cladding. But grade C lining is suitable only for utility premises. It has quite a lot of visible defects.
To reduce construction and repair costs, instead of natural wood panels, some home craftsmen use imitation timber for wall cladding. This material is very resistant to external influences, is considered environmentally friendly, and does not lose its attractive appearance for many decades.
Wallpaper is glued to the walls of a frame house using standard technology. Nuance. If textured products intended for painting are used, after gluing they must be given 24 hours to properly adhere to OSB or gypsum boards. Applying paint to wallpaper in less than 24 hours is prohibited.
AND last tip. In cases where you want to install it in a frame house, carefully study the technology for installing it yourself. Better yet, seek help from specialists. To perform such finishing, special equipment is required, which the home craftsman may not have.
After erecting the frame and insulating the walls, installing the roof, installing windows and doors, you can finally proceed to the stage called “interior finishing of the frame house.” Working on the interior is probably the most creative part of the construction process, not only of a frame building, but of any other residential building. And, naturally, it will be reasonable if the interior and exterior are organically combined.
Since one of distinctive features frame house is its relative cheapness, it hardly makes sense to carry out premium-level interior finishing. After all, no one would think of covering the doors of an adobe hut with gold leaf! Therefore, it makes sense to talk about inexpensive, but quite high-quality interior decoration.
In order to spend a minimum of time and money on interior work, especially if you do them yourself, and to get maximum satisfaction from bringing your ideas to life, you must adhere to the following rules.
- First of all, all communications should be laid: water and heating pipes, ventilation wiring, electrical wiring, etc. Only after this is it possible to begin other work.
- First, the “dirty” work is carried out. For example, laying tiles. They should be performed immediately in all areas of the house where it is necessary.
- The interior decoration of a frame house should, if possible, be carried out room by room, that is, do not touch the remaining rooms until work in one of them is completely completed.
- Finishing work should begin from the farthest room, and finish in the closest one. front door. This rule will help you save significant time and money on protecting the results of work already performed.
- We strongly recommend finishing from top to bottom. That is, first the ceiling, then the walls, and finally the floor. Although exceptions are possible here. So, you should wallpaper the walls after sanding and varnishing the parquet floors.
Preparatory work
To ensure that the walls and ceiling of your home are perfectly smooth, the wallpaper does not peel off, and cracks do not form in the floor, you need to properly prepare these surfaces. Builders call this rough finishing. It is necessary in order, firstly, to eliminate defects that inevitably arise when building walls, laying the floor, ceiling, etc. of a frame house with your own hands. Secondly, the finishing materials you will use to complete the repair have their own requirements for the surfaces on which they will be attached (nailed, glued, etc.). For example, in order for the wallpaper to lay flat on the wall and stay firmly on it, the surface must be puttied and primed. That is, the main goal of the preparatory work is to level the internal surfaces of the house.
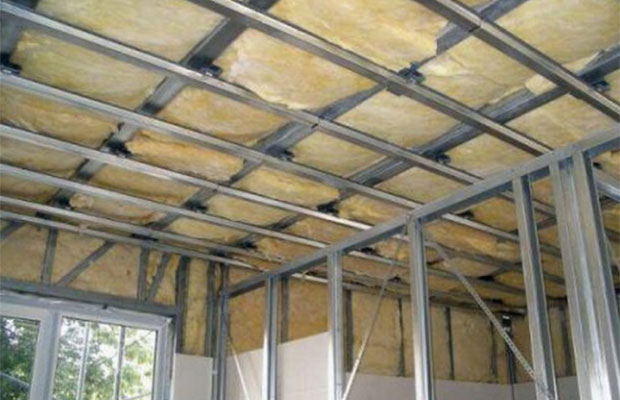
Plaster of walls and ceilings in frame houses is practically not used (except for decorative). This is due to their very design. Instead, surfaces are leveled with plasterboard, oriented particleboard (OSB), particleboard (chipboard), fiberboard (fibreboard), and plywood.  This work can be done with your own hands, but for ceiling work in this case you will need either the help of 1-2 people or supporting stands. Otherwise, it will be very difficult for one person to cope with large and rather heavy sheets.
Frame for wall and ceiling tiles is installed in the same way as during renovations in other types of houses. With one exception. If in monolithic buildings (brick, reinforced concrete, cinder block, etc.) the functions of heat and sound insulation are performed by the material of the enclosing structures itself, then the walls, partitions and ceilings of frame houses cope with such protection unsatisfactorily. Therefore, they are soundproofed in the most careful way and provided with a heat-protective layer. Therefore, the frame for attaching plasterboard and other facing sheets should not be made too small. After all, between the main wall and the sheets you can place a sufficient amount of insulating material. In addition, the starting profile should be secured through damping (rubber, silicone, etc.) gaskets, which will serve as an acoustic decoupler.
All defects from fasteners, as well as the joints of the sheets must be thoroughly puttied and, after drying, cleaned with fine-grained sandpaper. Dust formed after grinding is removed with a vacuum cleaner. The final stage of rough finishing is priming the entire prepared surface.
Preliminary preparation of the floor consists of leveling it. Depending on the design, this can be either laying concrete screed, or planing a rough plank floor. In any case, after these operations it is recommended to cover the floor with plywood or oriented - particle boards. Naturally, this recommendation does not apply to ceramic tile floors, where leveling occurs due to a rather thick layer cement mortar or tile adhesive.
DIY finishing
For the final (final, finishing) finishing of the walls and ceiling of a frame house, the same materials and technologies are used that are used for other buildings. However, the following types have gained the most popularity.

We believe it would be useful to remind you that the walls and ceilings of a frame house must be equipped with a vapor barrier layer. Otherwise, the interior decoration of a frame house can be seriously damaged during the operation of the building, and quite quickly.
Floor finishing
 It is possible to make any finished floor in a frame house with your own hands. The only question is what kind of coating is suitable for such a house? Because frame technology based on widespread use natural wood, it would be quite logical to use the same material for flooring. This is what often happens. The most common material is batten from coniferous, less often - deciduous wood. Mostly finished floors are laid from pine tongue-and-groove boards 35 mm thick. Then the floor is sanded over the entire area and, depending on the preferences of the residents, painted or coated with transparent polyurethane varnish.
Flooring made from piece or panel parquet is less commonly used, but this is significantly more expensive than a regular floorboard. We believe the best option According to the price-quality criterion, flooring made from high-quality laminite. In addition, the laminate has one more important advantage: Like the entire frame house, laminate floors are assembled very quickly. So, the floors in a house with an area of 100 square meters. m. are laid with your own hands in 3 days.
But we do not recommend installing ceramic tile flooring. The fact is that such floors require a massive and very rigid base, which is in no way consistent with the concept of a frame house. Better in rooms with high humidity lay floors with linoleum.
Which facade to choose for a frame house?
Exterior finishing of a frame house - not an easy task, mainly due to the variety of facade finishing materials.
Exterior finishing of a frame house. Which material to choose?
________________________________________________________________________
Frame house - wooden house. Finishing a frame house is quite an interesting matter.
Due to the versatility of its design, the facade of a frame house can be anything: from wood to a “wet facade” and even real brick. The exterior decoration of a frame house can be almost anything depending on the wishes and financial capabilities of the person.
In this article we will look not only how to choose a facade for a frame house, but also what it should be pie wall frame for high-quality execution of a particular facade.
1. The facade of a frame house made of vinyl siding.

Vinyl siding how exterior finishing of frame house installed quite often, this is probably the most popular and affordable option. This is a budget option and looks quite decent. I decorated my own house with it, albeit vertically, I liked it better as it was quite unusual option— you’ve probably already seen the photo in other posts.
Vinyl siding façade pies:
A. Ventilated
Interior finishing (often gypsum plasterboard) - vapor barrier film- frame with insulation - OSB-3 - hydro-windproof membrane - counter-lattice 50×25 (counter, because it runs parallel to the racks, and not perpendicular to the sheathing) - siding.
It should be clarified that in Canada itself, judging by the reviews of construction specialists, they almost never do this, but in Russia the climate is slightly different, so it is recommended to make siding with a ventilated facade for insurance.
B. Non-ventilated(Canadian version).
Interior finishing (often gypsum plasterboard) - vapor barrier film - frame with insulation - OSB-3 - hydro-windproof membrane - siding.
Siding installation:
The price is from 350 rubles per sq.m. for the most budget siding, but with more or less normal siding, all 500 rubles per sq.m. will come out.
2. Facade of a frame house made of painted facade boards (Swedish-Finnish version)

Typically in Scandinavia, the exterior finishing of a frame house is high-quality wooden boards or imitation timber good quality. Moreover, the front side of the board should be with a pile for better absorption of paint, and all other parts should be planed. Such exterior decoration
The frame looks very decent, although the installation of such a board takes quite a long time.
There are several important subtleties with wooden board for facade and frame finishing:
— Needed grinding one side (as I already said). After that, you need to apply a primer to the entire board during the first two days, while the pores of the wood are open.
- After primers, before attaching the board to the facade, you need to paint it on all sides in one layer.
— We fasten the board to the facade, 2 nails 60 mm (galvanized) into each lathing through the board (or flush if you want to hide the nails)
— The gap between the boards should be about 2mm (nail)
— Apply 2 more layers of paint.
If everything is done exactly according to the technology, such a board can stand without additional painting according to 8-12 years(only high-quality paint is needed, for example, Nordica Eco 3330, Tikkurila or Teknos).
Wooden facades on a frame They are almost always ventilated, otherwise they will rot.
That's why frame house facade pie with imitation timber or facade board it usually looks like this:
Interior finishing (gypsum plasterboard or lining) - vapor barrier film - frame with insulation - OSB-3 (the Finns install soft fiberboard instead and then do not install a membrane) - waterproof and windproof membrane - counter-lattice 50x25 - facade board.
In the case of a vertical board on the facade, after the counter-lattice it also goes on top horizontal lathing approximately the same cross section.

IN Russian version wooden facade
how to finish a frame house, imitation timber is often replaced with a regular one edged board or lining. This doesn’t change anything fundamentally, except that the lining is often installed in a “herringbone” pattern, like this: 

There are also several options for wooden vertical boards on the facade “with a strip.”

Minuses: flammability, need to be repainted after a certain number of years.
The price turns out to be about 650 rubles per sq.m.— (price for 2017) with your own hands (with 3 layers of paint and a primer not made by yourself).
3. Finishing the facade of the house with fiber cement siding

One of the most famous - fiber cement siding Eternit. Feels like ceramic tile to the touch. There is also Latonit, it is cheaper, but not as high quality. Exterior finishing of frame houses from Eternite looks rich.
pros: durable, durable (longevity is promised to be about 30 years). It is painted in the factory, so it does not fade for decades.
Minuses: high price, non-trivial installation (150 page instructions), difficult to do it yourself if you don’t have experience yet. Misunderstandings with additional elements. Corners are often sealed with metal or wood.
Per sq.m.= 1000-1500 rubles
4. House facade made of clinker tiles or artificial stone using the “wet facade” system

Exterior finishing of a frame house according to the “wet facade” system requires high level training and skills. But to put it briefly:
Attach OSB-3 to the posts of the frame house. Attach 50-100 mm polystyrene foam to it (it’s better to use a special fastener rather than glue it). Then you make the first reinforcing layer, screws and clamping bushings, the second base reinforcing layer, and then attach the clinker tiles to flexible glue or fake diamond weighing up to 44 kg/m2.
This results in a so-called “wet façade”. Wet facade It is needed so that there is something to attach the trim to; it is not recommended to attach it directly to the foam.
Price 500-800 rub/m2, but for the work another 1200 rubles/m2.
To my house = with my own hands 150 thousand rubles, strangers 250 thousand rubles.
5. Plaster facade of a frame house
5.1. According to the “wet facade” system
Everything is the same as in the previous paragraph, only instead of tiles or stone there is paint.
Non-specialists will not distinguish your house from a stone one.


Components of this façade:
— Baumit KlebeSpachtel glue
— Valmirovskaya façade mesh
— Baumit UniversalGrund
— Baumit SilikonPutz plaster coat 2mm
- Styrofoam
5.2. Plaster facade using DSP
For this option use cement bonded particle board followed by a joke.
Layers by DSP: primer - Knauf Sevener on fiberglass mesh - primer - Knauf Diamant
Knauf Diamant is already painted in White color. No paint needed.
6. Brick facade. Really?

Brick facade Recently they have also actively begun to use in the finishing of a frame house. When cladding frame houses, you can use both “solid” and “hollow” bricks.
Attached brick to frame wall
done like this: 

Read more at brickwork like the facade of a frame house and (search the page for the word “brick”).
7. Facade of a frame house made of fiber board under half-timbering

- a slab made of cement (most of it) and wood. It doesn't burn. It is practically not afraid of moisture (especially if you soak it in drying oil).
Among the disadvantages of DSP: the slabs are very heavy, and it is also very difficult to cut them + dust flies a lot from this. In addition, you can’t just nail it down; you need to drill holes first. Also, according to eyewitnesses, the DSP in the frame often cracks, so better than crack cover with wooden planks “under half-timbering”.
But many people simply install DSP and paint water-based paint. And it seems like nothing bad happens.

Price per sq.m.= 215 rubles.
8. Finishing the facade of a frame house with metal siding

I saw several people on the forum who decorated their house metal siding and very satisfied. Metal as an exterior finish for a frame is still rare. The price is cheaper than vinyl, because... it does not require almost any additional elements, and for vinyl additional elements make up 50% of the cost.
The benefits of metal siding: strength, ease of fastening, speed of operation
Minuses: shields, aesthetics are not for everyone, can be subject to corrosion, easily scratched, overheats, condensation may form.
Must be installed with ventilation gap in the facade, like regular siding.
Price per sq.m.= 500 rubles
9. Finishing LP Smart Side siding panels based on OSB.


The material is new for Russia and is made on the basis of OSB-4. Some praise him, some criticize him. In terms of price, it is midway between regular siding and fiber cement. You can read reviews and opinions about it.
It is known that the cake needs a ventilation gap for it.
Video comparing its strength with the strength of fiber cement siding
Smartside Plus is that you only need to paint one side of the siding, and not 4 sides, as is the case with boards. They paint acrylic paint, in two layers. The joints need to be coated with acrylic sealant (A la Titan for siding).
Another plus is durability: they promise 50 years.
Minuses the fact that smartside is 2-3 times thinner wooden board and unnatural.
Price approx. 1100 rubles per sq.m.
Price for my house = 180 thousand rubles.
10. FSF plywood painted to look like half-timbered timber on a frame house

You may read reviews of this technology on the forum; topics appear quite often.
FSF plywood is attached to the frame and painted with 3 layers (primer + 2 layers of topcoat). Inner side covered with one layer of soil.

And here estimate for the facade frame house in the photo:
Coniferous plywood FSF 9 mm, 1220x2440 mm, grade 2/3, NSh - 56 pcs - 35,784.00
Tikkurila Pika-Teho paint, white, matte, - 18 liters - 9,908.00
Primer composition Tikkurila Valtti Phyuste - 18 liters - 7,508.00
Galvanized self-tapping screws 4x50 3 kg - 615
Paint brush 1 pc – 90.00
Sealant gun 1 pc – 106.00
Frost-resistant silicone sealant 5 pcs – 540.00
Total 54,006.00(at 2018 prices)
Price per sq.m. it turns out to be only about 300 rub.
11. Finishing the frame with shingles (shingles).

Original, beautiful and very expensive. Price approx. 1200 rubles per sq.m.
Personally, I met in person very rarely.
It is done with a ventilation gap. You also need to make a gap between the shingles itself.

When carrying out interior decoration of a frame house, it is worth considering several important points: correct sequence stages, preparatory work, features of materials and rules for their installation.
After the walls and roof have been erected, it is time to decorate the interior of the frame house. In order not to make mistakes in the process of carrying out repairs and finishing works, we recommend that you familiarize yourself with their features in the field of frame construction.
Stages of interior finishing
To ensure high comfort of living in a house, it is necessary to pay attention to each of the three stages of interior decoration of a frame house.
Aligning Posts and Beams
To make subsequent finishing stages easier, you need to prepare the premises. Assuming high-quality construction, all racks and beams in the room must be level. You can check this using a building level.
If the floor is laid poorly, it is leveled using wooden wedges driven into the places where the beams are attached.
Insulation and sound insulation
The process of insulating the floor of a frame house

Recently, these two concepts are increasingly used as one whole, since modern materials have both noise and thermal insulation properties. Popular are mineral wool, polystyrene foam, polyurethane foam, foam rubber, expanded clay (for flooring).
If your house is located on open area, it is recommended to lay a layer of wind protection before laying the insulation - this way you will ensure more high temperature in the house in winter.
Usually they start from the floor. A subfloor is laid on horizontal beams, the surface of which, in turn, is covered with the selected material. Another layer of flooring is laid on top, usually these are boards with an aesthetic appearance with special impregnation or treatment (if you do not plan to do finishing floor), or ordinary boards.
The walls and ceilings are insulated in the same way; insulation sheets are laid between the beams and then covered with rough finishing material.
To insulate the ceiling, you can purchase polystyrene foam; its weight is much lighter, so for ease of fastening you can use a hot glue gun.
In a bathroom, toilet, boiler room, bathhouse or sauna, it is imperative to install a vapor barrier.
Rough finish
How to properly fix drywall

For rough interior finishing of frame houses, plasterboard boards are most often used for wallpaper, plaster, tiles or painting. It's economical quality material, which will create a perfectly flat surface for finishing.
At this stage you need to cover plasterboard boards walls and ceiling, as well as erect the planned plasterboard structures(partitions, niches, arches).
It is recommended to fasten sheets of drywall according to the pitch of the frame: each sheet should begin on the frame and end on it. The sheets are attached to self-tapping screws using a screwdriver at a distance of 20-30cm from each other. You need to leave a gap of 2-3 centimeters to the floor (then it will be covered with a plinth).
Before moving on to the next stage, the joints must be puttied in 2 layers (after each layer has dried, it must be leveled with sandpaper), and the walls must be plastered.
In rooms with high humidity, it is necessary to use special moisture-resistant plasterboard for rough finishing of walls and ceilings.
There is another option for rough finishing of a frame house - this OSB boards. Their characteristics are similar to drywall, but have a more environmentally friendly composition. However, they are quite heavy, so you should not choose this option if you do not have the skills to work with it.
Finishing
The final stage of finishing involves laying finishing materials, or wallpapering, tiling or painting walls. Let's take a closer look at the types possible materials for interior finishing of a frame house.
Types of wall materials
Wallpaper has been the most popular finishing material for several decades. They are inexpensive, and even an untrained person can glue them on - the main thing is to follow the instructions.
Wallpaper

Types of wallpaper and their characteristics:
- Paper - the most economical look wallpaper, ideal for budget or temporary renovation. Their main drawback is instability to moisture and drafts.
- It is recommended to glue photo wallpapers in rooms without windows or small rooms to create the illusion of a larger space or give the interior a more original look. The characteristics are similar to paper counterparts.
- Vinyl wallpapers more durable and strong than paper ones, but their price is higher.
- Acrylic wallpaper suitable for rooms with high humidity.
- Non-woven wallpaper creates perfect surface for final painting of walls.
- Fiberglass wallpaper is the most fireproof type, which is ideal for finishing a frame house, both finishing and for painting.
When purchasing wallpaper, pay attention to the type of glue that is most suitable for it. For different types Wallpaper requires certain types of glue.
Ceramic tile

Finishing in a bathroom, toilet, kitchen or swimming pool requires finishing material high strength and moisture resistance. The perfect combination These characteristics are represented by ceramic tiles. This material has a low price, but at the same time the variety of shades and textures will allow you to bring even the most daring design ideas to life.
Tiles can be used to decorate both walls and floors. It easily attaches to any plastered surfaces, including drywall.
Lining

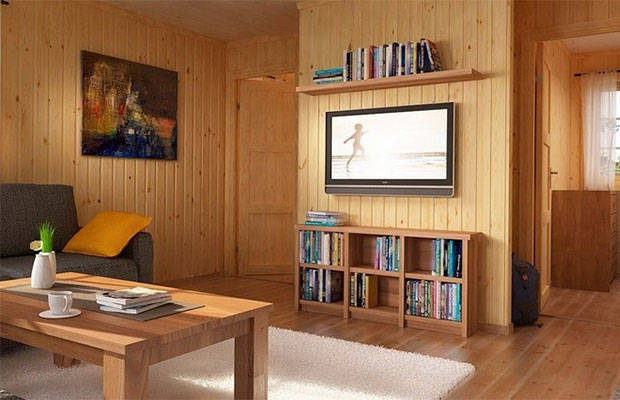
A popular option for interior decoration of a frame house is. Due to the high heat and sound insulation characteristics of this material, it is excellent for cladding the walls of a frame house. In addition, finished with natural wooden clapboard the walls look very cozy and aesthetically pleasing, especially if the house is countryside.
There is also a more budget option - plastic lining. It is very easy to install, and it will serve for many years. Plastic lining You can finish the walls and ceiling in the bathroom if tile seems too expensive an option. It should be borne in mind that such a finish will look simple and without frills.
Liquid wallpaper

One of the recently invented finishing technologies, which has already won many fans, is liquid wallpaper. They are good for their decorative component and ability to hide minor flaws and unevenness of the wall. However, their application method is difficult and time-consuming.
Decorative plaster
If you want to create an original designer wall covering in your frame house, consider finishing it with decorative plaster. Thanks to various textured rollers and ease of application, decorative plaster is perfect creative people who do not have special repair skills. In addition, an important advantage of this material is its low price.
To make the interior more original, you can combine several types of finishes, for example, painting and decorative plaster, or wallpaper and wall panels
The main thing is to know when to stop: additional decorative material It is best used for zoning individual objects: the head of a bed, a TV, etc.
Types of floor materials
If you want to combine rough and fine finishing of the floor, while saving time and money, you can cover the floor with tongue and groove boards. This natural material will serve you for a long time and correct processing will have an aesthetic appearance.
tongue and groove board

The best option would be a board made of larch: it has higher moisture resistance than a board made of spruce or pine, but at the same time, unlike oak or ash boards, it is not as attractive to beetles.
The tongue and groove board is laid on a screed or joists.
After purchasing tongue and groove boards, bring them into your home and leave them there for 2 weeks. This way you will ensure ideal moisture content of the material, and the new floor will not change in size after installation.
Parquet

One of the most environmentally friendly, high-quality and durable materials, especially if it is natural. However, it is expensive, but at the same time it is very susceptible to high humidity.
Laminate

The material is average in almost all respects. It’s difficult to call it environmentally friendly, and it’s not resistant to moisture, so it’s better to choose some other option for a child’s room. At the same time, laminate lasts quite a long time if handled with care, is inexpensive and easy to install. It is perfect for the floor in the living room or hallway.
The laminate is laid on a special underlay, which gives the floor elasticity and reduces the likelihood of damage.
Tile

Ceramic or cork tiles are most often used for interior decoration of a home.
Ceramic tile Separately suitable for decorating the floor in the bathroom, kitchen, as well as the island at the front door. This is the most wear-resistant material, and one of the easiest to care for.
Ceramic tiles are the most the best choice in the event that you are making a “warm floor”.
This material has high heat transfer, but does not deform from constant exposure to heat, like laminate or parquet.

Cork tiles are a fashionable trend for connoisseurs of all things natural. It is quite expensive, but its main advantage is environmental friendliness.
In rooms with cork floors Even a chronic allergy sufferer can live comfortably. Its main disadvantage is its vulnerability to heels.
Linoleum

The most budget option flooring, widely used in finishing houses in the USSR. Its main advantages are good heat dissipation and moisture resistance, but other characteristics are inferior to competitors: it is susceptible to chemical attack and is easily damaged.
Carpet covering

If you want to be able to walk barefoot comfortably in your room, then feel free to buy carpeting. It is inexpensive and very easy to lay. Carpet covering has the highest heat transfer and good moisture resistance, but at the same time it is not very practical: any stains will be visible on light shades, and it is also very easy to damage the surface.
Whatever materials you choose for interior decoration, you must carefully read the instructions for them. If you are going to decorate the house yourself, be sure to study step by step instructions finishing online to avoid mistakes.