At a certain stage in the process of renovation in a bathroom, toilet or kitchen, the need inevitably arises to drill technological holes in ceramic tiles.
Regardless of the cost of the tiles, you don’t want to disturb the beauty and evenness of the finish, but at the same time you need to hang a shelf or install an outlet.
The ideal option is to drill holes in the tiles before installation, but this procedure is not always possible. Let's look at how to drill tiles, glued to the wall, avoiding the risk of cracks and chips.
Difficulties in working with ceramic tiles
 Tiles may crack when drilled
 Tile is one of the most durable finishing materials. It is resistant to aggressive environments, withstands operating conditions high humidity, has a hard and often slippery surface. The tile successfully withstands constant physical pressure, while the material is quite fragile to break.
All these properties create certain difficulties in working with tiles. Glossy surface tiles also create additional problems: the drill can slip and scratch the surface of the material, and if, when laying the tiles, voids were allowed in the adhesive solution, then when drilling such a tile will most likely crack.
To make holes in tiles, it is necessary to use nozzles made of a material stronger than ceramic tiles. You need to know the technology of working with tiles, follow some rules and use the right tool.
Tool
Several tools are suitable for drilling a hole in a tiled wall:
- mechanical or hand drill;
- electric drill with the ability to adjust the number of revolutions;
- screwdriver with speed mode selection function.
 It is important that the drill has the ability to adjust the number of revolutions
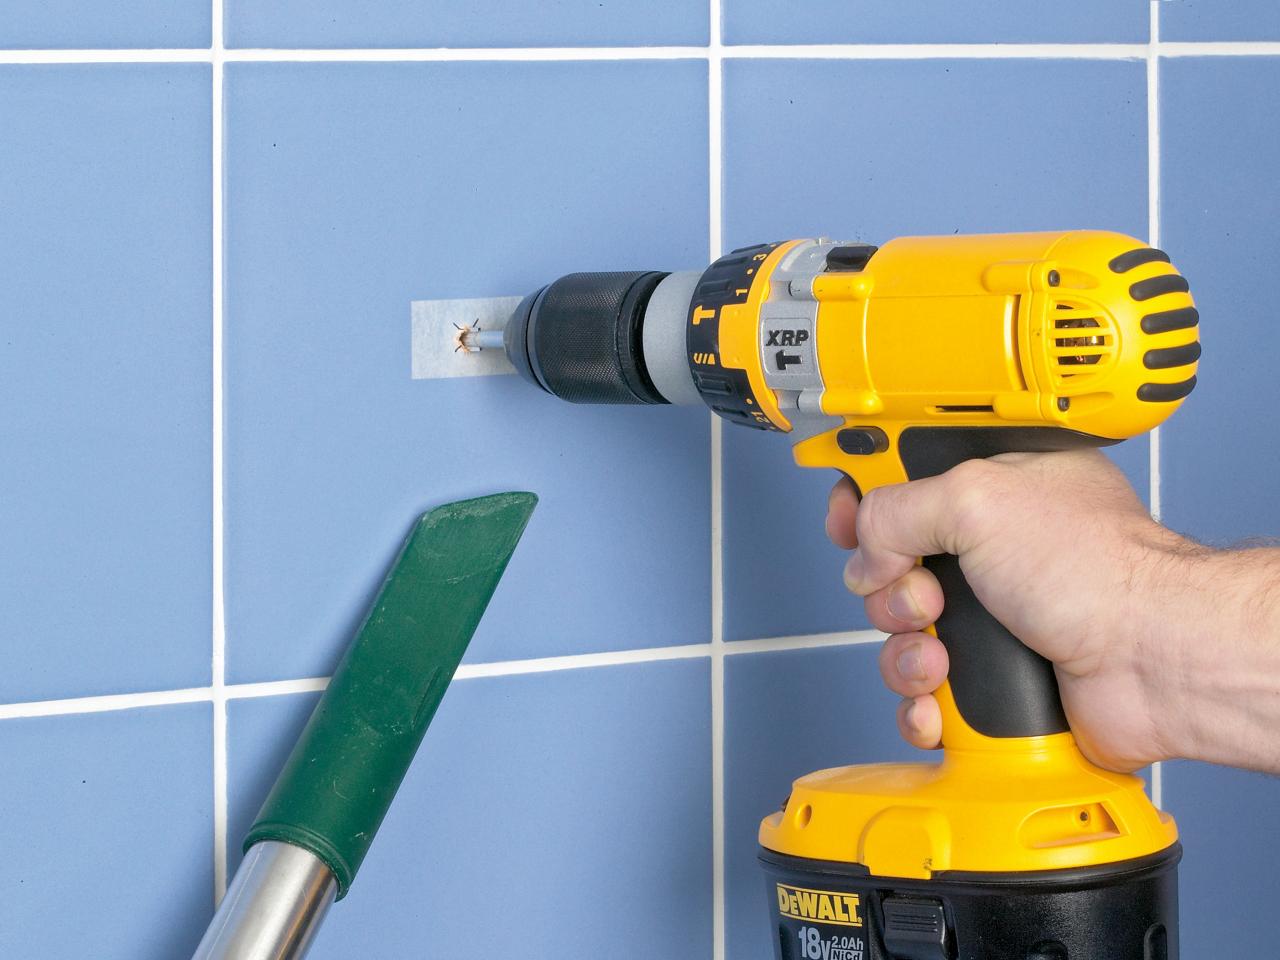
 You can use a hammer drill provided that the tool has a function to turn off the impact mode. Moreover, it can be useful for drilling holes in concrete or brick wall behind the tiles.
Depending on the modification of the selected tool, an adapter may be needed.
It is fundamentally important that the working tool has the ability to work at low speeds, because you should start drilling from a low mode, increasing the speed to 200 rpm.
To make a couple of holes, a hand drill is ideal: you can control the amount of pressure, and the tool will not vibrate.
Bits and drills
Once you have decided on the tool, you need to select a drill or attachment. The choice depends on the size of the hole required and the number of drilling points. You should not use ordinary drills for concrete: you will ruin both the tile and the drill, and the result will be disastrous. 
Possible types of drills and attachments for working with tiles
| Type of device | Nozzle material | Recommendations for use |
|---|---|---|
| drill | Will win | Most a budget option. Suitable for working on a couple of holes. |
| crown | Will win | Can be used for drilling holes with a diameter of no more than 150 mm. 1 nozzle is designed for a maximum of 20 drillings. |
| Spear-shaped (feather-shaped) drill | Wolfram carbide | Suitable for drilling a small number of holes. More expensive than pobeditovy, but somewhat more effective. |
| drill | Diamond sputtering | Expensive instrument. The hardness of the tip material exceeds the strength of the tile surface. Convenient to work with any type of tile. |
| crown | Diamond sputtering | Speeds up the work process. It is worth drilling as carefully as possible, starting from low speeds. |
| ballerina | Consists of a central pulley, a guide drill, a cross rod and a cutter with a carbide tooth. | Possibility to drill holes various diameters.The cutter is set to the size of the radius of the required hole. |
Drilling technology
Having prepared necessary tools and nozzles, you can proceed directly to the drilling process.  The sequence of actions, regardless of the hole diameter, is the same:

If you use a power tool for drilling, you need to monitor the heat level of the drill. If you smell smoke, stop work and let the drill cool. The drill overheats due to increased friction, which means the load is too high and the tool cannot cope. The efficiency of work in this case is quite small. For more information on how to carefully make holes in tiles, watch this video:
Before you start working on ceramic tiles, soberly assess your skills and abilities. Drilling a hole in tiles is not difficult, but if the walls are lined with expensive material, perhaps the best solution would be to hire a professional who is guaranteed not to spoil the finish and will do the job well.
When undertaking renovations in the kitchen or bathroom, many owners choose ceramic or glass tiles. This is a fragile and hard coating. If handled incorrectly, chips and cracks may appear on it. Therefore the drill for ceramic tiles must be of a certain type. After all, sometimes it is necessary to make holes in the material, both thin and very large.
For example, in the bathroom, ceramic tiles are often drilled for hooks for towels, and in the kitchen, space is left in the covering for gas or water pipe. Before work, you need to choose the right drill bit for ceramic tiles.
Drill tool
To choose a drill for ceramic tiles, you must first decide on the tool. The correctness of all work depends on this.
To do not large holes on glass or ceramic tiles, you will need thin drill and Using this tool, you can control the pressing force and rotation speed.
A drill for ceramic tiles is also used in screwdrivers that have a smooth movement function. The tool should not have any sudden jerks or vibrations during operation.
A hammer drill or drill with a drill for ceramic tiles and glass will not work. They will split the material. They can only be used after the covering has been completely drilled, when it is necessary to make a hole in the base of the wall.
Professional drills
Drills for ceramic tiles, photos of which are presented below, have one distinctive feature.

Their top is harder than glass or tile. There are professional drills and tools used at home.
If you have to use them often, then you should purchase a cutter with diamond coating. It is considered the most expensive. But in the work, drills for drilling ceramic tiles with diamond coating are the most effective.
A professional repairman, using such a tool in his work, will quickly pay for the cutter. But at home, such equipment is considered unprofitable.
Milling cutter for home use
In the case when you need to drill several holes yourself, purchase a diamond drill for home use it will be expensive. Therefore, manufacturers produce cheaper equipment intended exclusively for infrequent use.

Their top has a pobedite tip. The hardness of this cutter is enough to make holes of various diameters in tiles. However, work using such a drill takes longer.
Actions will need to be performed carefully. Also today, manufacturers present others. Their tip is made not of Pobedite, but of other heavy-duty alloys. Therefore, when purchasing a tile cutter, you should pay attention to the purpose of the tool.
Drill for large diameter holes
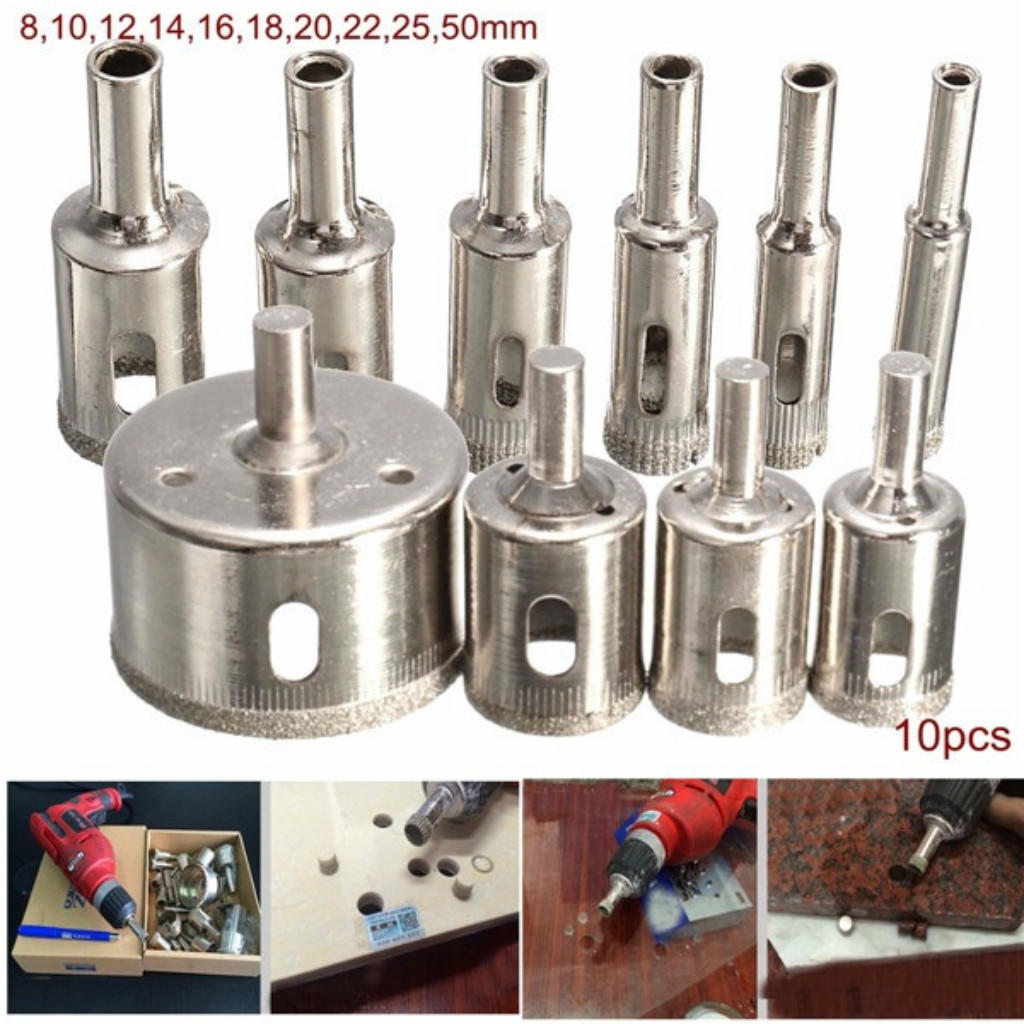
In order to determine which drill to drill into ceramic tiles, you need to take into account the diameter of the hole. Sometimes you need to make a place in the tile for an outlet, for a faucet or a pipe. In this case, a certain type of cutter will be required. It is commonly called a crown.

This is a tubular drill with diamond coating. It also happens different sizes. A set of crowns will be quite expensive. It is beneficial to purchase it for professional repairmen.
However, this tool is capable of providing best result work. At the same time, the time required for carrying out actions is reduced, and the efforts of the master become minimal.
Using a tubular drill, you can make holes in tiles up to 15 cm in diameter.
This type of cutter should not overheat. Therefore, it should be immersed in water more often. The drill or screwdriver should be operated at minimum speed.
How to use a diamond bit
Drills for glass and ceramic tiles similar to crowns require correct operation. This method is suitable for tiles that have not yet been glued to the base.
Before starting work, you need to make a mark where the future hole will be located. Drilling is carried out from the front side of the tile. In this case, you should not press hard on the drill.

If the diamond bit is new and sharp, you can drill through the tiles in 2-5 minutes without much effort.
You should also remember that this type of drill does not tolerate overheating. Otherwise, it will quickly become dull and worn out. Therefore, work with his participation is carried out at low speeds, and the cutter itself is periodically cooled (immersed in water).
Tungsten core bit with center drill
If the tile is already laid on the base, then drill a hole in it large diameter very problematic. For this purpose, a cutter such as a tungsten bit with a centering drill is used.
The work must be carried out very carefully. After all, a drill for ceramic tiles, used incorrectly, can cause the replacement of an entire block of coating.
When using a tungsten crown, you can get an excellent result, even if the coating has already been installed.
To prevent the cutter from sliding on the surface of the tile, you should use a template with a suitable diameter. He is pressed against the wall. Then the drill with the crown is pressed against the wall and the drilling process occurs. In the case of already laid tiles, the master has to act especially carefully so as not to damage the masonry.
Ballerina drill
If you need to make a hole non-standard sizes, builders often use a ballerina drill for ceramic tiles. Its cost will be less than a tungsten or diamond crown. But with the help of such a cutter you can work even on the surface of an already installed coating.
A drill for ceramic tiles called “ballerina” is shaped like a compass. Therefore, the hole diameter can be adjusted.
This drill for ceramic tiles, the photo of which is presented below, has a cutter made of durable alloys.

The cutter in the middle serves to determine the alignment.
The disadvantage of this equipment is the difficulty of holding it when creating large diameter holes.
Drilling for dowels
The holes for the dowels will need to be drilled, most likely on the already installed covering. This work is performed if it is necessary to hang a shelf, mirror, towel hooks, lamp and other accessories.
For dowels, a number of features should be taken into account. Ceramic tile surfaces are usually quite slippery. Because of this, the cutter may move. This will damage the coating and the result will be unsatisfactory.
To prevent this from happening, apply masking tape to the tiles. This will make the job easier.
It is also necessary to remember that a concrete drill is not suitable for tiles. To prevent it from splitting, you must use only special tools. There are recommendations for carrying out such work.
In order for drills for ceramic tiles and glass to perform the task assigned to them in the best possible way, it is necessary to listen to the advice of specialists in the construction and repair business.

You need to retreat at least 15 mm from the edge of the tile to prevent it from splitting. Before starting work, the tiles can be soaked in water for an hour. This will also prevent chips and cracks from forming. You can simply moisten the drilling site with water.
The safest place to create holes in an already installed covering is the tile seams. If possible, dowels should be installed here. Although such a choice of drilling location is not always possible. Therefore, when carrying out work, you should always maintain a low speed of rotation of the drill, and you should not press hard on the surface.
If you use the wrong approach to drilling, you can damage the coating. It happens that when a tile cracks, you have to change several elements of the coating.
After reading the recommendations regarding what kind of drill bit for ceramic tiles should be, choose necessary equipment won't be difficult. By performing all the steps correctly, even at home and with the coating installed, do required holes even a non-professional can do it in tiles. When performing work, you should take into account the recommendations of professionals about the technology of its implementation.
When finishing the walls and floors of some rooms, the material of choice is ceramic tiles. You cannot do without tiles in rooms with wet processes and where the floor is subject to heavy loads and often has to be washed. So, in the bathroom, kitchen and hallway, ceramic tiles on the floor and walls of the room are not uncommon. But if covering surfaces with this waterproof, hygienic, durable and beautiful material is not difficult, then drilling holes in ceramic tiles requires some experience and knowledge. Since it will not be possible to do without holes, because you will have to hang shelves, conduct communications and install sockets, information about the technology of drilling tiles will be useful to every owner.
Measures to protect tiles from chips and cracks
To ensure that drilling ceramic tiles is hassle-free, try drilling holes on unnecessary tile scraps. Only after everything works out perfectly can you proceed to finishing work.
To avoid the appearance of cracks, chips and other defects during drilling, adhere to the following rules:
- Very often, a well-sharpened drill slips off the smooth surface of the material, so it is difficult to start drilling at the precisely designated point. To prevent this from happening, the surface of the tile at the drilling site is sealed with masking tape.
- To protect against cracks, it is recommended to soak the tiles in water for an hour or spray them on the back side.
- Drilling holes in tiles is best done at low speeds. The optimal range is 100-400 rpm. The exact number depends on the diameter of the drill, its type, material and thickness of the tile. The required frequency is determined experimentally.
- Before drilling into tiles with a hammer drill, make sure this option is turned off.
- If cutting tool will become very hot during operation, this will lead to cracks in ceramic material. It is better to do the work slowly with periodic cooling of the drill in machine oil. But this cooling method is not suitable for laid tiles on the wall, since oil drops are difficult to remove from the grout. Professional craftsmen They use a conductor with forced injection of liquid for cooling.
Tip: when drilling horizontal surfaces, use the “local cooling” method. To do this, make a plasticine board around the future hole and fill the resulting container with water.
- Position the drill bit perpendicular to the surface of the material. It is easier to use special supporting devices for these purposes, since it is difficult to monitor the perpendicularity of the drill yourself.
- Select the optimal pressure on the drill. If it is very weak, then drilling a hole will not be possible. And if you use too much force, the tile will crack.
- Do not use reverse mode when drilling tiles. The tool should only rotate clockwise. Otherwise, there is a high probability of defects appearing.
- If drilling holes in tiles is done close to the seam, then it is better to move its center into the seam, since the drill will slide off the edge of the product. Due to the fact that the protective layer at the edges of the tile is very thin, chips appear.
- Start drilling at minimum speed, gradually increasing it as the tool deepens into the coating.
- If, to make a hole for fastening, you need to drill not only the tile, but also part of the wall under it, then first carefully drill through the tile, then install the drill for concrete surface and drill further. When drilling concrete, it is allowed to use impact mode.
- When making a hole in the tile (before laying it on the floor or wall), we place it under the product. wooden board or a piece of drywall.
Basic Tools
Now let's talk about how to drill tiles on the floor and wall. To work you will need some tools from the following list:
- Electric or hand drill. Instead, a high-quality screwdriver with an independent power source is suitable.
- Spear drills for tiles Ideal for making small holes. The tail of these products can be cylindrical (for a drill chuck) or hexagonal (for a screwdriver).
Important! Spear drills are not very durable. In ordinary tiles you can drill up to three dozen holes, and in porcelain stoneware – no more than three.
- Carbide drills with an acute sharpening on one side. They are quite durable and cope well with the dense top layer of material.
- To install sockets and switches you will need drill bits in ceramic tiles. This professional tool is suitable for porcelain stoneware and tiles. The cutting edge of the crown is coated with corundum or diamond. Professional crown sets are also available for sale. different diameters with tungsten carbide coating.
Advice: for one-time work it is much more profitable to purchase a ballerina. Using this product, holes with a diameter of 3-9 cm are made. Some tile cutters have a built-in ballerina.
- Conductors are special devices that are attached to the surface of the tile using suction cups. They are needed to accurately make neat and even holes. The jigs do not allow the drill to move to the side at the beginning of work.
- Coolant blowers required when the tool overheats during operation. They supply water under pressure to the drilling site.
Drilling small diameter holes

To hang mirrors, shelves, kitchen or bathroom accessories on the wall, use dowels with a diameter of up to 1.2 cm. In this case, drilling ceramic tiles on the wall is carried out provided that the glue under the coating has already hardened.
Important! Choose a mounting location attachments so that the holes are located no closer than 1.5 cm from the edge of the tile. This will avoid chips and cracks.
We carry out the work in the following sequence:
- the diameter of the drill should be 1-2 mm larger than the diameter of the dowel;
- place the drill exactly in the center of the marking and start working at low speeds;
- after passing the tile, the drill is removed and replaced with a tool for perforating walls (its diameter must correspond to the cross-section of the dowel);
- it is important to ensure that misalignment of the drill does not cause damage to the tiles;
- then carefully drive in the dowel and screw in the self-tapping screw.
Drilling large diameter holes

Drilling holes with a diameter of 2 cm or more is often performed before laying the facing material. First, the future hole is marked on the tile, after which the product is laid on a lining of plasterboard or wood.
Drilling technology depends on the type of drill used:
- If a ballerina is used for work, then the sequence of actions is as follows:
- in the center of the future hole, a through hole is made with a small cross-section drill (3-4 mm);
- Using the ballerina’s moving leg, we set the required size (it is equal to half the diameter);
- we tighten the locking screw very firmly so that the leg does not move under the influence of centrifugal force;
- We place the drill perpendicular to the tile and turn it on at low speeds, while ensuring a slight, uniform downward pressure of the tool (excessive forces will lead to jamming of the drill or rotation of the tile);
- monitor the depth of the cut along the entire circumference, it should be the same;
- If necessary, the edges of the hole are sanded with sandpaper or smoothed with pliers.
- When working with a core drill, the process is greatly simplified:
- if the crown has a guide central drill, then it is installed at the intended point and drilling is performed at low speeds with little effort (you will receive a hole with smooth edges that do not require additional alignment);
- small crowns do not have a central drill, so work is carried out using a jig; it is attached to the ceramic surface with suction cups so that the future hole is located exactly above the marked center.
Important! Instead of a conductor, you can use a template cut from plywood. It is secured with tape to the tile. After the crown goes a couple of millimeters deep into the tile, the template is removed and further work is carried out without it.
- If you can’t find a crown of the required diameter, use the “folk” method of drilling large holes:
- a series of small diameter holes are drilled along the marked circle;
- after this, the central fragment is carefully broken out;
- The edge of the circle is finished with a file, sandpaper or needle files.
Common Mistakes

To prevent drilling tiles from leading to annoying mistakes in the form of cracks and chips, start learning from the mistakes of other craftsmen. Try to avoid the following mistakes in your work:
- There is no need to mark directly on the tiles with the power of a pencil or marker. Firstly, not every pencil can leave a mark on smooth ceramics. Secondly, such a mark can be easily erased with an awkward movement. It is best to first seal the drilling area with masking tape and apply markings over it.
- Some craftsmen try to core the center of the future hole so that the drill does not slide off the surface. But even if this is done with a sharp file or a hardened dowel nail, there is a risk of damaging the tile and causing cracks or even chips. If the surface is sealed with masking tape, the drill will not slip.
- Do not use traditional carbide-tipped drills. They hardly pass the top, most durable layer of tiles and are designed to withstand shock and rotational loads.
If the question arises of how to drill tiles, you need to carefully select the tool, because the quality of the future coating will depend on this.
This material is quite fragile in processing, so there is a possibility of chipping. The easiest way is to turn to a professional, but we will tell you in detail how and how to make it yourself this type works
Overview of tile drilling tools
To make a hole in ceramic tiles, you can use:
- Electric drill and drills, and the tool should operate at low speeds, and the best solution will use a special (spear-shaped) drill for tiles, however, it will also work standard option, but you should first sharpen it;
- A screwdriver is used to drill holes, and the battery device must have a maximum speed (number of revolutions up to 1,000), but drilling tiles using an analogue operating from the mains will be correct at low speed;
- Mechanical drill – less effective solution, and in addition, with the help of such a tool it is possible to drill holes no more than 12 mm.
Different cutouts require the use of specific equipment and components. For example, to prepare ceramic tiles for installing an outlet in a bathroom or kitchen, a diamond crown is useful.
Measures to protect the material from chips and cracks
When dealing with questions of how to drill tiles, we must not forget about precautions during work, thanks to which it will be possible to avoid deformation and complete destruction finishing material. First of all, to prevent the tile from cracking, it must first be soaked in ordinary water for 1 hour. If there is not enough time for such a solution, you can moisten the area where the holes are being drilled with a spray bottle.
To make it easier to start drilling large holes, you can cut out a stencil from fiberboard or plywood, then press it tightly against the tile to start drilling.
It is quite possible to reduce the likelihood of cracks if you step back at least 15 mm from the edge of the ceramic tile to the cutout. It’s better to calculate the installation point of the socket/shelf so that the hole under fastener located on the connecting seam.
How to drill tiles for laying dowels
This problem arises if it is necessary to make a hole in the wall of a bathroom or kitchen in order to install a lighting fixture/shelf. In this case, you need to work directly on a vertical surface with ceramic tiles already attached to it.
What is special about drilling?
The surface of the tile is smooth, which means that drilling the tile will be difficult if you are not prepared for this process. The main difficulty is that the drill slides along the surface of the material.
 We paste paper tape at the marked point, which is capable of holding the drill in place at the initial moment of drilling.
Therefore, you should use one of the following methods to avoid damaging the finish:
- The hole is drilled over the adhesive tape glued to the ceramic tile;
- It is necessary to slightly disturb the integrity of the coating of the finishing material at the point where the lamp/shelf is attached to the wall in the bathroom/kitchen;
- To prevent the drill from sliding, a jig is used - this is a certain type of plate made of metal or wood, with holes of different diameters.
The last of the methods requires effort and increased care, since you will need to simultaneously hold the jig and also control the accuracy of drilling. Otherwise, you may make a mistake.
What to drill with?
To work with different materials use certain tools, as well as components for them. When considering how to drill tiles in the kitchen or bathroom, you should immediately exclude the option of using a drill for brick/concrete.
This option is completely unsuitable for working with tiles and in this case there is a high probability of cracks forming. You should only choose it as a last resort.
 For drilling tiles, it is best to use special spear-shaped drills with a sharp tip or diamond coating.
Correctly use drill bits for tiles of the following types:
- Diamond coated;
- Pobeditov tip.
The first option is very expensive, and it is advisable to purchase it only in conditions of regular drilling, otherwise the tool will not pay for itself. Often, a special tile drill with a pobedit tip is used, which is sharpened enough to reduce the likelihood of cracking the material.
 First, drill through the tile with a diamond tip or stylus. Next, change the drill to one that is more suitable for the concrete surface.
Operating procedure
The procedure for attaching hanging furniture, as well as lamps on the wall:
- At the dowel installation point, apply masking tape and make a mark with a marker where exactly the fastener will be located.
- Using a suitable drill bit, you need to make a hole. The drill should operate at low speed.
- After you have made a through hole in the tile, you should replace the drill with a suitable analogue for working with concrete/brick.
- The surface is cleaned of crumbs and dust, after which the dowel is laid. Moreover, it should be recessed into the tile by several millimeters.
By using this method You can drill a hole no larger than 15 mm.
Selecting a drill for installing a socket box/pipe
In this case, a simple drill is the least suitable solution. To prepare the cutout big size, most often a crown is used, but it is also used special type drill - ballerina.
Exist different variants to solve this problem: these are special drills (centering), drills with a diamond tip and crowns with a similar coating. However, the price of highly specialized components, in particular, diamond crowns, is quite high. You need to work with them very carefully, regularly moistening them with water. The drill starts at low speed.
 The drills themselves must be made of high-strength materials, have appropriate sharpening, and are capable of passing through a dense structure.
Analogue for more affordable price- with pobedite teeth. It costs less, but is less effective. If desired, you can choose crowns of different diameters ( maximum size 15 cm). But drilling 20 holes in a row will lead to complete failure of the tool.
Reasonably priced and relatively easy to use, this is a type of ballerina drill. It contains a bracket with another sharp-angled drill.
Hammer and diamond core bit
Drilling directly on the wall in your bathroom or kitchen is unsafe for the finishing material. Therefore, it is better to prepare holes on the floor. It is recommended to place the product on a hard surface. Having outlined the hole on the front side, you can immediately proceed to drilling.
Drill with diamond bit
The actions are similar to the previously discussed option. Marking is done on the front side of the tile. A hole is drilled using a crown, but it is not recommended to put too much pressure on the tool.
 Buy a crown with a center drill. When working with tiles, it is quite difficult to use crowns without a centering drill, as they slide along the material.
Application of a ballerina
The drills are placed at a distance half as large as the diameter of the hole for the socket/pipe. First, marking is done, then drilling is done. You need to work with the tool at low speed.
 The ballerina is not very expensive, so every home master can buy it.
Drill and drill bit with diamond tip
In this case, it is necessary to make many holes. Their extreme point should slightly extend beyond the intended contour for installing the socket/pipe.
 Drill tubular type is a diamond coated tube with which you can create small diameter holes.
Then the middle is knocked out, and the uneven edge is removed with nippers, after which the edge is sanded.
This is a more labor-intensive method than using a crown. Therefore, it is recommended to use it if you have some experience in such work.
Drill and tungsten core bit with centering drill
This solution is suitable for treating tiles laid on the wall in your bathroom/kitchen. To avoid the crown slipping, it is recommended to use a prepared template, which has a hole of a suitable diameter (according to the size of the crown). Next, all you have to do is attach a tool and drill in the bathroom or kitchen for an outlet/pipe.
Video: Master Class, various ways drilling holes
Ceramic tiles have deservedly become popular facing material. Durability, moisture resistance, high aesthetics, variety of colors and formats are just some of the advantages of tiling.
As part of their work, each tiler drills holes in the ceramic. Incorrect drilling will ruin the tile and it will crack.
How to drill through tiles correctly? What tool will help with this? These issues will be addressed in the article.
What's the difficulty?
Ceramics are fired at high temperature. This achieves high density and strength of the material.
But the lack of ductility and bending strength makes drilling problematic. Inaccurate drilling and strong pressure will result in cracked tiles.
The surface of the tile is covered with glaze; when drilling, it can be damaged, so that the cladding will lose its attractive appearance. How to avoid sad consequences?
First you need to prepare workplace and evaluate the quality of installation. Tap the tile you want to make a hole in. If the sound is “boomy,” then there are voids under this tile. It is better not to drill into it: the tile may crack. 
Why do you need to drill tiles?
Tiling the surface will not be complete without trimming and drilling. The reasons are different:
- You need holes for plumbing elements, such as pipes or a faucet.
- Arranging a hole for a socket.
- Installation of hooks, shelves, decorative elements and other things.
Tools used
Without special equipment, drilling ceramic tiles is almost impossible.
- Electric drill. Drill bits come in different diameters, allowing you to drill through ceramic tiles and make the hole you need. Required condition: There must be speed control. First, work at low speed to get through the layer of glaze. Then the speed increases.
- A screwdriver is a tool with less power, but it should be enough to drill several holes. A screwdriver is not suitable for large volumes of work.

- Hand drills. Not the most popular and forgotten option. Hand drills are practical due to their adjustable rotation speed; they are quite suitable for drilling several holes.
For high-quality drilling, you will need special drills that work well on ceramics.
Spear-shaped tile drills, which are popularly called “feathers,” are popular. They easily pass a layer of glaze and cope with ceramics. Disadvantage: after 4-5 dozen drillings, the “feather” wears off and becomes unusable. But the more durable porcelain stoneware “feather” can be mastered no more than 10 times.

Core drills are designed for drilling holes large diameters. The set will include several crowns of different diameters. Diamond or tungsten carbide coating ensures the durability of the crowns. Tungsten carbide coating can cope not only with ceramics, but also with natural stone, granite or marble.

Let's start drilling
How to drill tiles correctly? What should you remember?
- Practice on pieces of tile that you no longer need. This way you can get better.
- Make precise markings: a hole made in the wrong place cannot be repaired with anything. The mark is made with a marker on the surface of the tile.
Note!
A pencil or pen will not write on the glazed surface of the tile. Use a marker to mark. Experienced builders It is recommended to stick a small piece of masking tape on the tile and make markings along it. The mark will be clearly visible, and then the tape will be removed.

- If you are using a drill, make sure the jackhammer function is turned off. Set the drill to drill into the tiles, otherwise you will crack the tiles.
- Never start drilling tiles at high speeds. First, you need to use a punch to designate a place for the hole, then easily go through the layer of glaze, and only then increase the speed.
- The tool will heat up, so you need to soak the drill in water and rest the tool every 10-15 minutes. This is assuming that a lot of holes need to be drilled.
- You need to work perpendicular to the tile, this is the only way to make a beautiful and neat hole.
- Drilling tiles is always done from the front side, if you drill from opposite side, then the result will be a lot of chips and microcracks. This will ruin the appearance of the ceramics.
Don't forget about safety precautions. During drilling, small chips and pieces of ceramic break off from the tile. They may injure your hands or get into your eyes. Wear gloves and safety glasses.
Small diameter
Small diameter holes will be needed if you need to hang a shelf, hook, decorative element, etc.
How to drill a hole in tiles:
- Make precise markings: use a marker to mark where you need to drill.
Note!
There is no need to drill near the edge of the tile, step back 15 mm from the edge: during work, the tile may crack from pressure or the drill will jump off and get into the seam, so that the tile will be deformed.
- The drill is selected to match the width of the dowel that will be driven into the hole in the tile.
- The work is carried out at low speeds of the tool in order to pass the glaze layer. Afterwards the speed increases. When you feel like you've gone through the tile, you can remove the drill bit through the tile to avoid dulling the expensive tool.
- Continue drilling into concrete or brick.
- Once past the ceramic, switch to drilling mode to make a hole of the required length.
- Then hammer in the plastic dowel, and then insert a self-tapping screw, hook or other fastener. Do not make sudden movements or strong blows so as not to damage the ceramics.
Large diameter holes
Necessary for installing sockets and switches to bypass pipes. 
Such manipulations are performed with crowns coated with diamond or corundum. The kit includes a shank that is mounted in a drill chuck, as well as bits of different diameters.
Most often, crowns have their own guide drill, which is inserted into the center of the future hole.
- Make markings and determine the center of the hole. Choose a crown that suits your diameter.
- Pre-drill a small hole in the center. Apply the tips from the previous paragraph. It is good to use a special “feather” tile drill.
- A core drill of the required diameter is inserted into the hole.
- We start working at low speeds, then the speed increases.
- If the hole is chipped and burred, the inside of the circle can be sanded with sandpaper.
Note!
Crowns quickly overheat, so to extend their service life, you need to frequently wet the crowns or take a “break.”
If there are no crowns
How to drill tiles in the bathroom if there are no special crowns? In such cases the following is used simply folk way.
- A circle is drawn. The markings must be accurate and clearly visible.
- In a circle with a regular drill Small diameter holes are drilled along the tiles.
- The holes are close to each other. Then you break out the fragments inside the circle with wire cutters or pliers.
- Beautiful and smooth edges without chips are achieved by grinding.

It is best to drill a hole in large diameter tiles first, before installing the tiles on the walls or floor. Therefore, it is important to arrange your workplace before starting work.
The tile lies on level base so that it does not crack when drilling. It is better to place the tile on a wooden plank so that the drill or crown, when it passes through the tile, does not hit the concrete or brick.
Don't forget about the funds personal protection: You will definitely need glasses and gloves.
Unconventional methods
If there is no special equipment, and holes need to be made near the edge of the tile, you can use a grinder. You need to mark the diameter of the hole, and then carefully use a grinder to scrape off the parts of the tile that need to be removed.
Five proven ways to cut a hole in a tile - video
With a grinder you can achieve good result, the main thing: do not rush and work carefully. The end of the cut can be sanded with sandpaper. The advantage of this option: the ability to make a hole of any diameter.
Drilling tiles is a feasible task for a novice tiler. Required special tool and a little practice. The article drew attention to points that need to be taken into account.