During the construction of private houses, many mistakes are made, due to which the walls become cold in winter, and funds for heating have to be lost. Installation helps resolve the issue. proper insulation. For installation, you need to know how to insulate the walls of a house from the inside and select the necessary materials.
Insulation can be placed both outside and inside the house. The home will become much more comfortable: about 30% more heat will be retained in the room, which would have gone outside.
Before starting work, you should familiarize yourself with certain disadvantages of insulation inside the house:
- After installing insulation, the walls stop receiving heat from the home. Increases the likelihood of cracks appearing.
- Many insulation materials contribute to the accumulation of condensation.
- The free space at home is decreasing.
- It will not be possible to insulate the ceiling, so a cold bridge will remain.
Due to the listed disadvantages, it is recommended to use insulation inside the house when it is not possible to implement other options.
Before choosing how to insulate a house from the inside, it is necessary to carry out preparatory measures. This includes items:
Sealing cracks in walls and insulation
Wooden beams are dried according to certain rules, microscopic cracks appear that are visible to the human eye and must be removed. Sealants, resins, etc. are used for sealing. Assembly is widespread. If a synthetic sealant is purchased, there should be no acrylic substance.
When using silicone compounds, it is important to purchase a substance with high degree frost resistance. Any mixture is introduced to the maximum depth into the cracks; as soon as it hardens, the application areas are leveled. Polyurethane foam is used in places where there will be cladding.
Wood shavings are mixed with an adhesive composition. The gap is cleaned in advance, and the prepared composition is poured into it. After drying, sanding is required for leveling. This method can be used to seal small cracks.
A budget option is to use tow, moss, and other similar compounds. When using them, it is important to treat the cracks with an antiseptic solution and a mixture to eliminate fungus and mold. If the walls are wooden, the joints are sealed only with such mixtures. To prevent the cracks that can grow in the wood from increasing, you need to constantly inspect the beams.

Installation of sheathing
If a private house is made of wood, use wooden materials. Metal elements can be installed if the walls are covered with moisture-resistant plasterboard. Activities are carried out in a certain sequence. First, markings are applied to install the sheathing.
Its width is selected taking into account the width of the insulation. You need to subtract 3-4 mm from the figure. Insulation elements must be installed against the sheathing. This action is not necessary for all types of materials.
Installing racks in corners
To make the corners of the room even, this action is required. The height of the beam 50x100 mm is chosen equal to the height of the room. A small beam is secured to the edge with self-tapping screws large timber to make a right angle. The steps are repeated for each corner.
Lathing
For the sheathing, boards are prepared that are installed vertically. After they are secured, the correct installation is checked with a level. The sheathing is installed first in the corners, moving towards the center.
Installation of vapor barrier and waterproofing
Use polymer films for this; a foiled surface is possible. Fastening is done using a stapler. Definitely overlap. The joints are sealed with tape. Actions are performed over the entire insulated surface.
It is attached to the sheathing; there should be room for ventilation. Roofing felt is most often used. It helps to get dry walls and prevents condensation.
Important! Any wooden elements, installed to insulate a house, must be impregnated with compounds against mold and mildew.
Choice of insulation
Each insulation material has special properties. To choose the right composition that has all the required parameters, it is worth familiarizing yourself with the features of each of them. One of the popular materials is extruded polystyrene foam. It is dense, has a thickness of 20-40 mm. It is attached to the wall using adhesive mixtures. Then the surface is treated with plaster, you can glue wallpaper directly on top.

Insulation using expanded polystyrene is carried out in the following sequence:
- the wall is leveled and treated with an antiseptic;
- the material is fixed with tile adhesive. To increase adhesion, you can apply it with a roller. adhesive composition to the surface. Be sure to coat the entire surface to the edges;
- It is advisable not to use dowels - steam penetrates through them, leaving pores;
- after hardening, the seams are filled silicone sealant to prevent steam penetration;
You can glue wallpaper on top of the fixed material. If finishing is required, reinforcement with fiberglass mesh using glue is necessary.
Fiberboards
This material is most often used for external wall insulation. Can also be used inside the home. Its advantages are good heat retention and noise absorption. During the production process, the products are treated with mixtures against insects and rodents. Temperature changes do not render the insulation unusable. To cut into pieces, you can use any suitable tools, there are no restrictions.
To secure fiberboard to the walls, nails longer than 3.5 cm are enough. It is advisable to drive them in in a checkerboard pattern. One sheet is pierced with approximately 16 nails. After additional treatment with plaster, you can cover the surface with wallpaper, lay wires, making the required channels. When using this material, there is a possibility of condensation.
Insulation with mineral wool and glass wool
Before insulation with mineral wool begins, mandatory installation of sheathing is required. The thermal insulation characteristics of the composition are high, it is easy to install, and has a long service life. It is important to secure the material between the boards so that there are not even the slightest gaps left. For more secure fastening, you can use dowels.
The composition is laid from the bottom of the walls, moving upward. To ensure a higher sealing density, the edges are pressed down and trampled. You need to lay it in an even layer, without kinks. You can do several layers. After installation, the vapor barrier layer is installed.
Glass wool should be laid using protective equipment.It crumbles, glass particles can damage the respiratory tract, so you need a respirator. It is important to mount protective structures after laying the insulation. You can use fiberboard.
Ecowool insulation
The answer to the question whether it is possible to insulate a house from the inside and with what cannot be called unambiguous. The process is carried out in one sequence, but the selection of materials and wall features will be individual. Ecowool is a natural insulation material. It is made entirely of paper (cellulose). It contains antiprenes and boric acid, not capable of releasing harmful volatile compounds.
Advantages of the material:
- no restrictions on geometric dimensions;
- All cracks are closed, which ensures high sound insulation;
- the material has low thermal conductivity;
- does not rot due to antiprenes, is protected from pests by impregnation with boric acid;
- releases moisture well, dries quickly in case of waterlogging;
- the composition is not flammable.
Cons of ecowool:
- high price;
- relatively complex installation process.
Insulation with foil
When figuring out how and with what to insulate a house from the inside, it is important to analyze the pros and cons of each insulation. Such insulation materials have a number of advantages that are not available in other materials.
Among positive qualities highlight:
- High degree of heat reflection. Up to 95% of thermal radiation is retained inside the house.
- Moisture is repelled because hydrophobic material.
- The installation process is simple and does not take much time.
- External influences do not affect the quality of the insulation.
- High degree of noise absorption.
- Ecological cleanliness. The composition does not contain impurities harmful to humans.
- Long service life. The foil does not corrode for a very long time.
- High elasticity. You can easily give the necessary shape to the insulation.
There are materials on sale that are covered with foil on one or both sides. There are no restrictions on use: you can insulate not only the walls, but also the ceiling and floor. To prevent heat from leaving the house when heating with radiators, polyethylene insulation is installed between them and the wall. It is important to leave about 2 cm of free space.
Comparison of insulation materials. Thermal conductivity table
| Izover | Rockwool | Expanded polystyrene | Ecowool | Foam concrete | Polystyrene concrete | Mineral wool | Expanded clay | MPB - basalt mats | |
|---|---|---|---|---|---|---|---|---|---|
| Thermal conductivity W/m°C | 0,048 | 0,045 | 0,039 | 0,038 | 0,18 | 0,13 | 0,038 | 0,18 | 0,045 |
| Required layer thickness | 253 mm | 233 mm | 200 mm | 200 mm | 550 mm | 300 mm | 200 mm | 950 mm | 240 mm |
| Condensate | Forms, needs a vapor barrier | Forms, needs a vapor barrier | Not formed | Forms, needs a vapor barrier | Forms, needs a vapor barrier | Not formed | Forms, needs a vapor barrier | 10,1 | 8,16 | 7,18 | 9 | 302,5 | 135 | 9,1 | 4,75 | 4,8 |
| Ecological cleanliness | Phenolic binder | Phenolic binder | Styrofoam granules | Wood fiber | Modifying additives | Styrofoam granules | Phenolic binder | Clay | Phenolic binder |
| Fire safety | Does not burn, but binders do burn, combustion products are toxic | At 80 degrees Celsius releases toxic substances | Inflammable, combustion products are harmless | Does not burn | Does not burn | Does not burn | Does not burn, but binders do burn, combustion products are toxic | ||
| Biostability | Rodents won't start | Rodents won't start | Rodents won't start | Rodents won't start | Rodents won't start | Rodents won't start | Rodents won't start | Rodents won't start | Rodents won't start |
| Approximate cost per 1 m2 | 230 rub. | 490 rub. | 280 rub. | 235 rub. | 227 rub. | 1200 rub. | 430 rub. | 807 rub. | 350 rub. |
Technology for insulating walls from the inside
For each type of wall there are specifics on how to insulate a house from the inside. For frame houses it is necessary to first check their condition. If defects are found, they must be eliminated before insulation work begins. The first step is to remove foreign objects from the walls and clean the surface. It is important to eliminate any gaps present on the surface. This is done using polyurethane foam.

If the walls are damp, they must be dried with a hair dryer. A waterproofing layer is installed. It is worth cutting it in advance into strips that will be equal to the size of the walls of the house. Next, the material is attached to the surface. Thermal insulation is installed and secured between the pre-installed sheathing. To increase the efficiency of insulation, you can lay the insulation as tightly as possible, if its structure allows.
Insulation of a wooden house
Do not confuse how to insulate a house inside with methods of external insulation. Work should begin by installing the sheathing. It is fixed on load-bearing walls. It is worth using timber for this purpose. Metallic profile should be used only if the cladding is made using moisture-resistant plasterboard. To do straight corners, it is necessary to prepare corner posts, for which a timber with a section of 50x100 mm is used. In height they are equal to the height of the room.
Walls must be pre-treated special compounds, preventing burning and rotting of the material. Next, the bars are installed at a distance of 50 cm, and the process of fixing the sheathing is considered complete. Afterwards it is attached insulation material. The most popular is mineral wool. The material is adjusted to size, the width must exceed the distance between the vertical wooden structures by a couple of centimeters.
Mineral wool is fixed using anchor bolts. You can lay it in a couple of layers, placing a film between them. Upon completion of installation of the material, 30x40 mm bars are installed. Sheathing is carried out, for example, with clapboard. If the named material is used, this will additionally insulate the home.
Insulation of a panel house
To create suitable conditions For comfortable stay, mainly in panel houses mineral wool is used. In addition, you can use fiberboard or penofol. You can insulate the house from the inside with polyurethane foam. The first step in the insulation process is the removal of the old coating. A vacuum cleaner is often used to remove dirt.
The cleaned wall is treated with an antiseptic solution and primer. After each applied layer, the wall must be allowed to dry. Further uneven surfaces cover up plaster mortar, the joints are coated with mastic or sealant.
The next stage is installing insulation. The material is installed according to the rules given above. These rules are slightly different for each lineup. The final stage is the final finishing.
Insulation of brick houses
Having figured out how to insulate the inside of a house, you can begin to study the insulation features of each type of wall. Brick dwellings are distinguished by their durability and strength. But the thermal conductivity of brick is high, heat goes outside quickly, compared, for example, with a dwelling made of timber.
To create comfortable temperature indoors, insulation is required. If we analyze the insulation process using mineral wool as an example, it is worth considering that the material cannot be left open. It will begin to emit dust, which is harmful to human health.
Picture 45. Insulation brick house.
It is necessary to waterproof the thermal insulation layer - materials usually easily absorb moisture. In this case, their properties are lost. To secure all the required layers, you first need to prime and plaster the walls. There is no point in making the surface flat - it will be covered with lathing. When the walls are completely dry, a layer of waterproofing is attached to them.
The sheathing is installed if the insulating material requires it. It can be secured with screws. The insulation is fixed. A vapor barrier layer is installed on top of it. You can cover the outer layer with plywood or drywall. The joints between the sheets are sealed with putty.
Common mistakes when insulating walls
The rules on how best to insulate a house from the inside or outside should be sorted out in advance. Incorrect actions lead to rapid deterioration of the walls and retention of moisture in their surface. If the walls are not insulated, when there is dampness and sub-zero temperatures outside, they will distribute incoming moisture and cold over the entire surface. The insulation process helps save money on heating. Don't think that interior decoration walls are insulated. This is mistake.
Typical mistakes when insulating walls:
- Wrong combination of wall material and insulation. Foam concrete blocks, polystyrene foam does not combine with wood. You need to use mineral wool or other materials that trap moisture outside.
- Laying of mineral wool slabs takes place only in dry weather. The material is able to absorb vapors and remain damp for a long time, losing its properties. You can cover the insulation with finishing material only after it has completely dried, and plaster it as quickly as possible so that it does not have time to become damp.
Important! When insulating with expanded polystyrene or other similar materials, you need to apply glue not pointwise, but over the entire surface. Condensation will form in the layers of the “thermal coat”.
At the end of the insulation process, the walls can sometimes freeze even more and not become warmer if you make serious mistakes. Many questions are asked regarding whether it is possible to insulate a house from the inside. From a technological point of view, it will be correct. This will keep the walls from freezing. At least 70% of the heat from the external walls of the building is retained. Therefore, carry out insulation work inside the building only if there is no other way out.
September 7, 2016Specialization: facade finishing, interior finishing, construction of summer houses, garages. Experience of an amateur gardener and gardener. We also have experience in repairing cars and motorcycles. Hobbies: playing the guitar and many other things that I don’t have time for :)
If you want to insulate your house, then any specialist will tell you that it is better to do it outside. However, in some cases it becomes necessary to insulate the walls from the inside, for example, if the facade is already finished or external insulation is not enough. Therefore, below I will tell you how to insulate a house from the inside so that this measure is effective and does not lead to mold and destruction of the walls.
Features of insulating a house from the inside
Many people who have not previously encountered insulation are interested in whether it is even possible to place insulation on interior walls Oh? Of course, this is quite acceptable, and if the procedure is performed correctly, the house will become much more comfortable and economical in terms of heating.
- after installing the insulation, the walls of the building will no longer be heated, resulting in the possibility of cracks;
- Condensation occurs under the insulation;
- decreases effective area premises;
- there is no way to insulate the ceiling, resulting in a cold bridge remaining.
Therefore resort to this method should only be done in cases where it is truly impossible to implement other insulation options. If, despite these disadvantages, you still decide to insulate from the inside, you must strictly adhere to the technology, which we will review below, especially when it comes to wall insulation.
If you insulate an extension, for example, a veranda, you can increase the living space of the house. The only thing is that before insulating the extension, you need to eliminate the gaps in the windows and doors.

Insulation technology
Materials
So, if you take on this work yourself, then the first question that will arise in front of you is what is the best way to insulate the walls inside. The most common materials are the following:
- mineral mats are an environmentally friendly fireproof material that is vapor permeable. The cost of mineral wool is 1500-5000 rubles per cubic meter, depending on the brand and manufacturer;
- expanded polystyrene - lightweight and slightly cheaper - its price ranges from 1000-3000 per cubic meter. True, expanded polystyrene is more fire hazardous and does not “breathe”, unlike mineral wool, however, with good ventilation, this disadvantage does not matter.
In a wooden house, it is better, of course, to use mineral wool. If the house is brick, you can also insulate it with polystyrene foam.

In addition to insulation, you will also need other materials:
- wooden slats with a cross section of about 20x20 mm;
- wooden beams or profile for installing drywall;
- adjustable brackets;
- vapor barrier film.
It makes sense to insulate your house not only if you will be living in it in the winter. If you insulate a garden house from the inside, then in the summer it will become cooler and more comfortable for relaxation. This is especially true for the thermal insulation of the roof, which gets hot under the sun during the day.
Floor insulation
It is necessary to carry out insulation from the inside of the house in a comprehensive manner, i.e. In addition to the walls, the floor and ceiling should also be insulated. Therefore, first of all, I will tell you how to carry out this procedure with the floor.

If the floor is wooden, the instructions for insulating it are simple:
- first of all, you need to dismantle the floor and place bars with a cross-section of approximately 15x15 mm near the joists;
- then the base is laid on the bars. To do this, you can use thin planks, and they do not have to be fixed to the bars;
- Next, the resulting panels should be covered with a waterproofing film, which should be laid directly on top of the logs. At the joints of the canvases it is necessary to provide an overlap of about 10 cm;

- after this, insulation is laid on the film, which should fit tightly to the joists, leaving no gaps. It must be said that not only foam plastic or glass wool can be used as insulation, but also bulk materials, for example, expanded clay, ecowool or even sawdust;
- A waterproofing film is laid on top of the insulation. It also needs to be laid with an overlap, and it is advisable to glue the joints with tape;
- after this, you can lay the boards on top of the joists or other rough material.
You can also use it to insulate a wooden floor. natural material- reed. To perform reed insulation with your own hands, you need to stock up on it with the onset of the first frosts. The stems should be thoroughly dried before use.
If the floor is concrete, you can make a dry screed yourself. To do this you need to do the following:
- First of all, a waterproofing film is laid;
- Next, beacons are installed to level the surface dry. Special aluminum profiles are used as beacons, which are laid on lumps of cement. To install beacons, you must use a level so that they are located in the same horizontal plane;

- A damper tape is laid around the perimeter of the room, which prevents floor squeaks and other unpleasant moments;
- after that, expanded clay is poured into the space between the beacons and leveled with a rule or simply a board along the beacons;
- sheets of plywood, chipboard or plasterboard are laid on top of the expanded clay, on which the finishing floor covering is subsequently laid.

Another technology for floor insulation is to pour screed directly onto mineral mats. This is done as follows:
- the base is waterproofed with film;
- then mineral mats are laid;
- then waterproofing is spread over the mats;
- Beacons are mounted on top of the waterproofing and screed is poured. In this case, it is advisable to use fiber for reinforcement rather than metal mesh so as not to damage the waterproofing film.
On our portal you can find more detailed information on how to install beacons and pour screed.

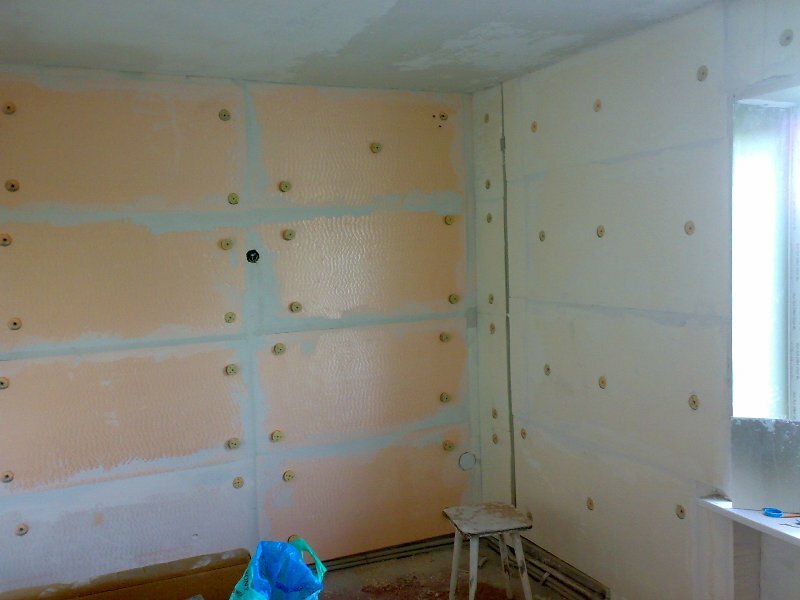
Wall insulation
Carrying out insulation inside the house Special attention it is necessary to pay attention to the thermal insulation of the walls, since the effectiveness of this measure largely depends on them. The process of wall insulation is as follows:
- First of all, it is necessary to fix slats with a cross section of 20x20 mm on the wall. Most often, the slats are placed horizontally in increments of a meter and a half. To fasten the slats, you can use dowel nails;
- then the film is stretched over the slats. I note that it must be tensioned so that between the wall and the insulation a ventilation gap. The latter is necessary to remove condensation, which will certainly form in winter.
To fix the film, you can use a construction stapler; - then you should attach it to the horizontal slats vertical racks, between which the insulation will be located. The most difficult thing at this stage is to install the racks correctly so that they are positioned strictly vertically and in the same plane. This determines how smooth the walls will be.
The pitch of the racks is the width of the insulation. Moreover, the latter should fit tightly so that there is no need to further fix it;

- after installing the frame, you need to fill the space between the racks from the floor to the ceiling with insulation;
- after filling the frame with insulation, another layer should be attached to it vapor barrier film;

- To complete the work, finishing material is attached to the frame. If you are insulating a country wooden house, you can sheathe the walls. If you want to wallpaper or use other finishing materials, you should use drywall.
If the house is built from KBB, aerated concrete or other material that does not hold ordinary dowel-nails, you should use special “butterfly” dowels or chemical fasteners.
Here, in fact, are all the nuances of thermal insulation of walls. However, the insulation of the house is not yet completed.

Attic insulation
Finally, I’ll tell you how to properly insulate an attic. This procedure is reminiscent of floor insulation, however, it has its own nuances.
It must be said that ceiling insulation can be done both from the inside with your own hands and from the attic. From the inside, the work is done as follows:
- you need to start work by attaching the vapor barrier film to the floor beams and attic flooring;
- then insulation is placed in the space between the beams and fixed with slats;
- Another layer of vapor barrier is attached to the beams from below using a construction stapler;
- At the end of the work, the ceiling is hemmed with plasterboard or other material.
The attic is insulated using the same principle.
It must be said that it is very difficult to insulate a ceiling from the inside with your own hands. Therefore, it is better to call an assistant to perform this operation.

Insulating the attic from the outside is carried out according to the same scheme as insulating the floor. In particular, you can use bulk thermal insulation materials, which are mentioned above.
The heat insulator can also be placed between the floor beams if the house is two-story. This will provide sound insulation.
Here, in fact, are all the main nuances regarding insulating a house from the inside. Finally, I note that to achieve the maximum effect from insulation, you need to pay attention to windows and doors. If they are poorly sealed, it will escape through the cracks. a large number of heat, which can be seen if you look at the house through a thermal imager.
Conclusion
Insulating a house from the inside, although it contains a number of disadvantages, nevertheless makes it possible to make housing much more comfortable and economical. Moreover, if you do the work yourself, which, as we found out, is not at all difficult, then this will not entail large financial costs. The only thing, as mentioned above, is to adhere to the technology and perform thermal insulation carefully, without leaving cold bridges.
See the video in this article for more information. If some points are not completely clear to you or difficulties arise during the process of insulating your home, leave questions in the comments and I will be happy to answer you.
September 7, 2016If you want to express gratitude, add a clarification or objection, or ask the author something - add a comment or say thank you!
It is best to insulate walls immediately, when building a house. However, there are times when walls need to be insulated from the inside. As a rule, apartment owners face this when harsh winters are stronger than the developer’s insulation. Professionals say that insulating walls from the inside is not recommended for several reasons.
- This will “steal” some of the space. The fact is that in addition to the insulation, which in itself is quite voluminous, space will also be taken up facing materials, which you can’t do without. You can insulate walls from the inside yourself, without resorting to the services of professional builders.
- At temperatures below -18 degrees concrete walls V apartment buildings freeze, the ice comes into contact with the insulation, and this affects the main characteristics of the insulation materials.
- At temperatures from 0 degrees to +10, condensation forms in the gap between the insulation and the wall. This can also degrade the quality of the insulation system.
Therefore, when insulating, you must adhere to the two most important rules:
- It is imperative to create a vapor barrier. This will protect against the formation of condensation and all negative consequences associated with him.
- It is necessary to consider the ventilation system. If the ventilation is poorly done, then the moisture that should be removed through it will settle in the corners of the room. Because of this, a whole colony of unwanted and harmful microorganisms can form in the room.
You can insulate walls from the inside yourself, without the help of professional builders. However, in order to do this, you need to study a sufficient amount of information in order to avoid mistakes.
The point is that for different walls There is different types insulation materials. What works well for a concrete wall may not work at all for a brick or wood one.
Today we will look at three types of materials that are suitable for keeping your home warm and cozy. Each of them is good in its own way and has a number of its own shortcomings.
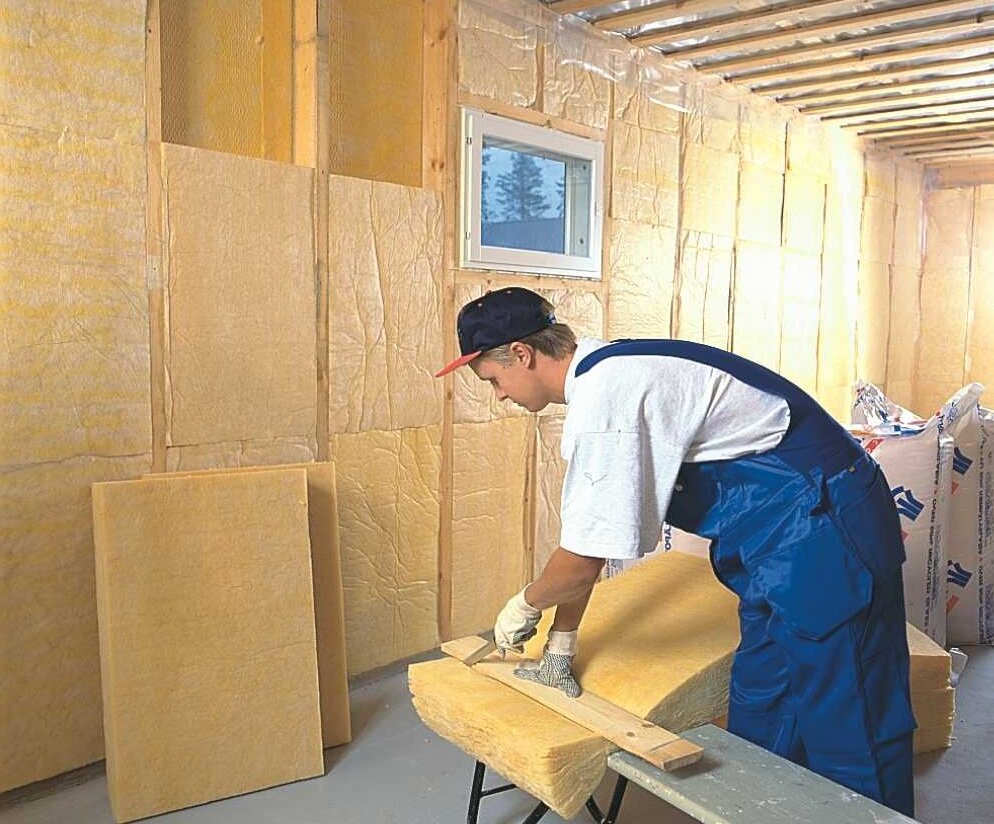
In everyday life, this type of insulation is often called simply mineral wool. This is a synthetic insulation with a fibrous structure. It is also called stone because it is made from basalt minerals. During construction modern buildings Heat and sound insulation is usually carried out using mineral wool. Mineral wool has a number of advantages that consumers rely on:
- Mineral wool is cheaper than many other materials, and this is an important factor, especially when carrying out large volumes of work.
- The length, width and thickness of mineral wool can be different, which means that you can choose the option that you need and not have to adapt to the characteristics of the insulation.
- During operation, its structure reduces atomization.
- Mineral wool is packaged in small, neat bales, which simplifies its transportation.
- Possesses low level thermal conductivity.
- It exfoliates well.
- Resistant to chemicals.
- Does not change shape under pressure.
- Minvata – non-flammable material, resistant to temperature influences
- Water repellent.
In the end, mineral wool is very easy to use and therefore perfect for insulating a room with your own hands.
However, it should also be taken into account negative qualities mineral wool for thermal insulation of the house. When exposed to strong heating, toxic substances are released: phenol-formaldehyde, carcinogenic fractions, etc. It is also not at all beneficial for the body to inhale mineral wool particles from the air.
From what is written above, it is clear that working with mineral wool is unsafe for your health. Therefore, prepare thoroughly before you begin. The room that needs to be insulated must be separated from other rooms using a partition. Try to make sure there are no drafts around. Be sure to use a protective respirator, rubber work gloves, and safety glasses. Keep children and animals away. When finished, clean up immediately and thoroughly, and change all your clothes to clean ones.
Before starting work, you need to choose the material that suits you to achieve your goals. Mineral wool is divided into several types and types.

Types of mineral wool:
- Lungs. Density – 10-90 kg/m3. Used to insulate structures with a frame.
- Heavy. Density over 90 kg/m3. They are used to insulate frames, as they are resistant to heavy loads.
- Technical. This type is of no interest to us; it is used for insulation of technical equipment.
Types of mineral wool depending on the materials from which the insulation is made:
- Stelovat
- Stone wool
- Slag wool
Internal wall insulation with cotton wool is always done in the same sequence. With experience, you will cope much faster.
So, let's begin.
The first stage is preparation
It is necessary to clean the surface of any remaining paint, wallpaper and other materials, and remove all protrusions. Then treat the walls against mold. It is not at all necessary to level the walls; all unevenness can be eliminated during thermal insulation.
The second stage - installation of the frame
Assemble the frame itself from metal strips at a distance of 5-10 cm from the wall. The frame may well be wooden, but wood, as builders say, “walks” and therefore this option is undesirable. The profile pitch in the vertical direction is from 60 to 100 cm.
Stage three - vapor barrier
Sheets of foil film with the shiny side are laid overlapping in the room. It is better to secure the joints of the film with special adhesive tape.
Stage four - laying mineral wool
We place cotton wool between the slats of the finished frame. Lay it as tightly and carefully as possible, because the quality of thermal insulation in the room depends on this.

The last stage - facing work
Cover the frame with drywall or plywood. Thoroughly plaster the surface.
Ready! In an insulated room you can begin finishing works. Create! Nothing will limit your imagination, since such insulation will withstand any materials.
Drywall
Drywall (GKL) a good choice when insulating the room. It itself has an insulating effect, which will be enhanced by the air cushion that forms behind it.
How to insulate a room from the inside with plasterboard with your own hands?
This operation can be easily carried out without the help of professionals in several stages.
Measure the room and estimate how many sheets of gypsum board you will need during the work process.
Then clean the walls of any remaining wallpaper, paint, stucco and other debris. Be sure to carry out mold treatment; such walls should never be covered with plasterboard. Putty the walls and let the putty dry completely, only then can you move on to the next stage.
Build the frame. Of course, you can sculpt drywall directly onto the walls, but such insulation will not be of much use due to the lack of an air cushion between the wall and the gypsum board. It was already mentioned above that wooden frame is subject to deformation and it is better to give preference to metal. It is necessary to lay a tape made of foam materials under the hangers and guide profiles. This prevents cold penetration from the external wall.
We sew sheets of drywall onto the finished frame.
That's all, you can start finishing work. Drywall not only insulates the room, but also improves the microclimate in it.
Penofol
Penofol insulation with a base of polyethylene foam of different densities, covered with a thin layer of polished aluminum foil. Foam thickness varies from 2 to 40 mm, but 4 cm is used only in harsh climates. The thickness of the foil layer is only 20 microns. In essence, penofol is the same thermos. For the first time it was used for the manufacture of spacesuits. Later these technologies were used in construction.

This material has a lot of positive qualities:
1.Environmentally friendly. The same materials are used for storage food products. According to some reports, penofol even protects against radiation.
2. This insulation is very thin, so it practically does not hide the living space. And this is a strong argument in favor of penofol for insulating walls from inside the house.
3. Additional vapor barrier will not be required, which means that thermal insulation with your own hands will be easier to do.
4.During operation, penofol will not crumble or break; it is easy to cut and does not require any additional complex tools or special clothing.
- It will not be chewed by rats and mice. This is especially true for private houses, in the thermal insulation of which rodents often gnaw passages.
- It is easy to transport due to its small thickness.
But, like any insulation, penofol has its disadvantages:
- It is impossible to apply finishing materials to it, because... it is very soft and will simply bend under their weight.
- It is difficult to attach, although there is a type of penofol with a self-adhesive film. It is not worth nailing it, this will worsen its basic characteristics.
Therefore, penofol, with all the variety of its advantages, is often used as additional material, which will protect the walls from moisture and reflect thermal energy.
How to insulate walls from the inside with penofol with your own hands?
Check the quality of the electrical wiring where you will insulate the room. The fact is that the aluminum foam layer is an excellent conductor, which means it should not be allowed to come into contact with bare wires.
The frame on which the insulation will be attached should provide 2 cm after and before the penofol. The step between the vertical slats of the frame should not exceed 1 meter.

Penofol is attached to the frame end-to-end (if it is attached overlapping, it can form condensation) using a furniture stapler. The seams are taped with aluminum tape.


After the introduction of a new standard for the thermal protection of buildings, insulation has become relevant even for those houses that were previously considered “safe”. Owners of older buildings don't have to do anything, but they must be prepared to pay rising energy bills. And designs for new houses will not be approved if they do not meet the requirements of SNiP 02/23/2003. There are several technologies that make it possible to ensure standard indicators for buildings made of any materials. The main thing is to choose the right insulation for the exterior walls of a house in each case.

The house must be kept warm
Why external insulation and not internal
The most understandable argument for a non-specialist sounds very convincing, although this is a secondary factor - insulation from the inside “takes away” the useful volume of residential and office premises.
Builders are guided by the standard according to which insulation must be external (SP 23-101-2004). Insulation from the inside is not directly prohibited, but it can only be carried out in exceptional cases. For example, when work on the outside cannot be carried out due to the design features or the facade “belongs” to a house that is classified as an architectural monument.
Video description
The result of proper internal insulation of a house in the video:
Internal insulation of walls is allowed provided that a durable and continuous vapor-tight layer is created on the side of the room. But this is not easy to do, and if warm air with water vapor will enter the insulation or onto the surface cold wall, then the appearance of condensation is inevitable. And this is due to the “dew point”, which will move either inside the layer of thermal insulation material or to the boundary between it and the wall.

Even such protection from the inside will not provide a 100% guarantee against the wall getting wet - water vapor will find its way into the film joints and fastening points
That is, when deciding how to properly insulate a house, in the vast majority of cases, the answer will be based on clear regulatory recommendations- outside.
Popular thermal insulation materials
From a large list thermal insulation materials We can highlight several of the most popular ones and those that are used if the budget allows or for other reasons. Traditionally, the popularity of materials is determined by a combination of good thermal insulation characteristics and relatively low cost.
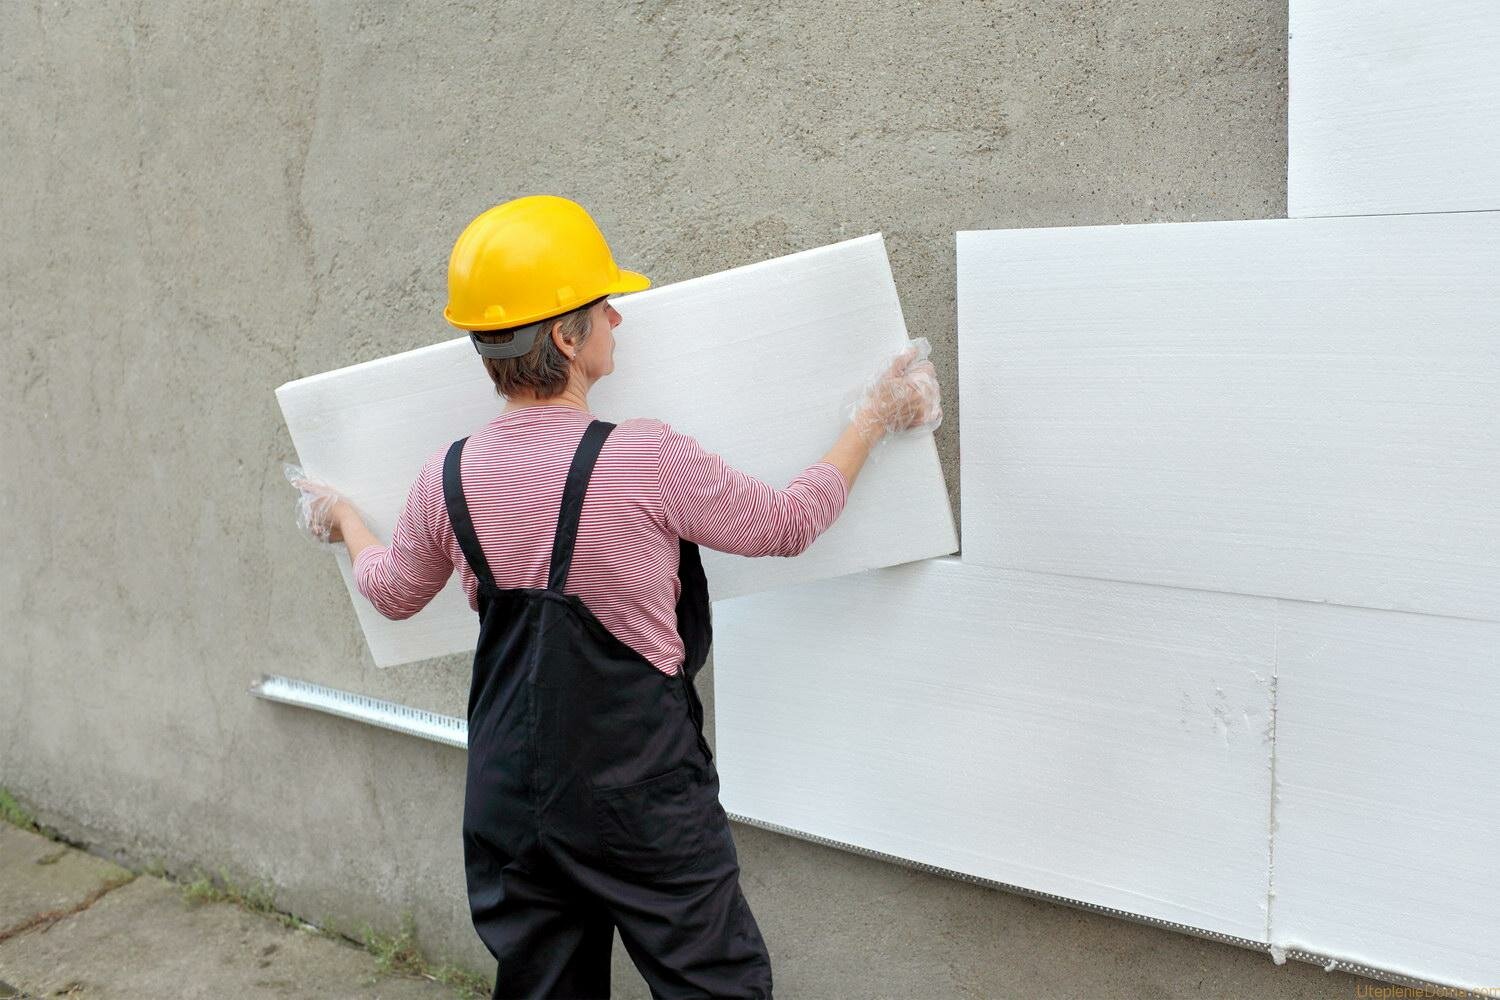
- Expanded polystyrene
Better known as "foam". To be precise, in addition to slabs, this material is also used in granular form as bulk thermal insulation.
Its thermal conductivity varies with density, but on average it is one of the lowest in its class. Thermal insulation properties are provided by a cellular structure filled with air. The popularity is due to accessibility, ease of installation, good performance compressive strength, low water absorption. That is, it is cheap, quite durable (as part of the structure) and is not afraid of water.
Polystyrene foam is considered low-flammable, and those marked PSB-S are self-extinguishing (does not support combustion). But during a fire, it emits toxic gases, and this is one of the main reasons why it cannot be used for insulation from the inside. Its second drawback is low vapor permeability, which imposes restrictions on the use of “breathable” materials when insulating walls.

Insulating the outside of a house with foam plastic
- Extruded polystyrene foam
It differs from polystyrene foam by a fundamentally different manufacturing technology, although the raw material is the same polystyrene granules. In some respects it is superior to its “relative”. It has the same percentage of water absorption (no more than 2%), on average, thermal conductivity is 20-30% lower (Table D.1 SP 23-101-2004), vapor permeability is several times lower and compressive strength is higher. Thanks to this set of qualities, it is best material when insulating the foundation and basement, that is, the walls of the basement and the “zero” floor. The disadvantages of EPS are the same as those of polystyrene foam, and it costs more.

Eps is usually made “colored”
- Stone, also known as basalt, cotton wool
This is a subtype of mineral wool, the raw materials of which are rocks of stone (most often basalt). A completely different type of thermal insulation material, the low thermal conductivity of which is ensured due to its fibrous structure and low density. It is inferior to foam plastic and EPPS in terms of thermal conductivity (on average 1.5 times higher), but unlike them, it does not burn or smolder (flammability class NG). Refers to “breathable” materials - according to the new standard this sounds like low “breathing resistance”.

Mineral wool mats for wall insulation must be “hard”
But there are other materials for insulating a house outside, which, although used less frequently, have their own advantages.
Thermal insulation materials - new products on the market
Additionally, you can always consider new options - they are a little more expensive, but often somewhat more effective than traditional ones.
- Foamed polyurethane
Common polymer material"household use". Also well known as foam rubber for furniture (in the form of “soft” mats) or as polyurethane foam for sealing cracks. When insulating, it is also used in the form of slabs or sprayed insulation.
Polyurethane foam slabs have low tear-off holding properties, so they are not used in “wet façade” systems.
But this is a common thermal insulation material for making sandwich panels. The same technology underlies the production of thermal panels for facade cladding. Such a panel is a heat-insulating board with a decorative layer (clinker tiles or stone chips) already applied at the factory. Two types of insulation: polystyrene foam and polyurethane foam. In the first case, the thermal panel is two-layer, in the second – three-layer (OSB or moisture-resistant plywood is used as the supporting base). Two mounting options: dowels/anchors ( open method) or your own hidden fastening system.

Three-layer thermal panel
Sprayed polyurethane foam is in demand if it is necessary to create a seamless layer of thermal insulation on complex surfaces. Until recently, there was only one technology for applying such a layer - using professional installations working with a two-component composition (mixing occurs during spraying).

Spraying polyurethane foam onto the base of a house
Now in Russia for household use production of one-component polyurethane foam has been launched, which is produced in aerosol can capacity 1 l. As manufacturers assure (there are two competing companies), insulating 1 m2 with your own hands is much cheaper than concluding an agreement with specialized enterprises that use professional equipment. And this option for insulating a house from the outside is quite attractive if literally 2-3 cm of the thermal insulation layer is missing.

Insulation using sprayed polyurethane foam "Teplis"
- Ecowool
A relatively new thermal insulation material. The technology for insulating enclosing surfaces is based on cellulose fiber material, which is applied to the walls using a special installation. There are two options for insulation: filling the plane between the wall and the cladding, spraying with an adhesive binder onto the wall with installed sheathing (and subsequent installation of facade panels).
From traditional materials we can mention glass wool (a subtype of mineral wool), but due to its fragility and the formation of tiny “dust” with sharp edges during installation, it has been replaced stone wool, safe both during installation and operation.
The better way to insulate a house from the outside - standards for the number of layers
If you follow regulatory documents, there are two options for how to insulate a house from the outside based on the number of structural and thermal insulation layers: two-layer and three-layer. And in the second case external finishing panels or plaster are not considered an independent layer, although they thermal insulation properties are taken into account. In three-layer walls, the outer (third) layer is the structural material.

Brick cladding with insulation
In addition to this classification, there is also a division based on the presence of a ventilated and non-ventilated layer.
- brickwork, reinforced concrete (with flexible connections), expanded clay concrete - all types of solutions;
- wooden houses– enclosing structures with two-layer, three-layer walls and with a ventilated air gap;
- frame houses with thin-sheet cladding - three-layer walls with thermal insulation in the middle, as well as with a ventilated and unventilated air gap;
- blocks of cellular concrete– double-layer walls with brick cladding, as well as with a ventilated or non-ventilated layer.
In practice, for insulating low-rise buildings, such a variety of solutions comes down to the choice between a “wet” or a curtain wall. Although, it is those recommended by the standard that are considered as thermal insulation materials - mineral wool or expanded polystyrene (EPS as an alternative).
But each case has its own preferences.
Video description
The video shows how to choose how to insulate a house from the outside:
The better way to insulate a house from the outside, depending on the wall material
For insulating a brick house, there are no restrictions when choosing technology. Different variants can only be considered depending on the chosen method finishing facade:
- Facing brick. This is a classic three-layer wall construction with flexible ties. Even using polystyrene foam, it is necessary to provide a ventilated air gap to ventilate water vapor and prevent wall materials from getting wet.
- Wet facade. You can use mineral wool and polystyrene foam. The first option is preferable - ceramic bricks have higher vapor permeability than foam plastic. And according to clause 8.5 of SP 23-101-2004, the arrangement of layers should facilitate the weathering of water vapor to prevent moisture accumulation.

"Wet facade" scheme
- Ventilated facade. With lining wall panels or large-format porcelain tiles on the sheathing. Traditional insulation for everyone curtain facades- mineral wool.

Scheme of a ventilated facade
Wooden houses (logs or beams) are insulated exclusively with mineral wool using curtain façade technology.
For them, you can find examples of using polystyrene foam and plaster using the “wet facade” method. In this case, a ventilated gap is created between the wall and the foam boards using spacer sheathing. Although in this case the main advantage of the “wet facade” is lost - simplicity of design and installation.
How to calculate the thickness of insulation
If you look through SP23-101-2004 or a similar but later set of rules SP 50.13330.2012, you can see that calculating the thickness of the insulation is not so easy.
Each building is “individual”. When developing a project and approving it, such thermal calculations are made by specialists. And here it is taken into account the whole complex parameters – characteristics of the region (temperatures, duration of the heating season, average number sunny days), type and area of glazing of the house, heat capacity flooring, roof insulation and basement. Even the number of metal connections between the wall and the cladding matters.
But if the owner of a previously built house decides to insulate it (and the new standards introduced in 2003 are much stricter than the old ones), then he will have to choose between three parameters of the “standard thickness” of insulation - 50, 100 and 150 mm. And here the accuracy of calculations is not needed. There is a diagram that shows the equivalent dimensions of the thickness of different materials (in average form), the wall of which will meet the new requirements for thermal protection.

Only the house from aerated concrete blocks with a thickness of 45 cm does not require insulation
And then it’s simple. They take the thickness of a wall made of a certain material and see how much is missing from the standard. And then they calculate in proportion what thickness of the insulation layer of the outside wall of the house should be added. Taking into account that a wet façade also has a layer of plaster, and a ventilated façade has an air gap, plus the interior finishing of the façade walls, you can be sure of sufficient thermal protection.
And the question of insulation of the roof, floors and choice good windows decided separately.
It’s even easier - use one of the many online calculators. The figure here, of course, is approximate, but rounded up to the nearest standard insulation thickness, it will give the required result.
How to properly install insulation on a facade
Before installation, the facade must be prepared: cleaned of old finishes, removed dirt and dust, dismantled hanging elements engineering systems, remove ebbs and canopies (you will still have to replace them with wider ones), remove signs, plates and façade lamps. Then the surface of the wall must be strengthened - cracks and chips must be repaired, crumbling areas must be cleaned, and a deep penetration primer must be applied.

Application of primer
For securely fastening polystyrene foam or rigid mineral wool mats in the system wet facade The surface of the wall should be as smooth as the unevenness can be smoothed out with an adhesive solution. If the height difference is up to 5 mm, the solution is applied over the entire insulation slab, with unevenness from 5 to 20 mm - along the perimeter and in the form of “cakes” on 40% of the slab surface.
The first row of slabs is mounted with emphasis on the starting bar, which also sets the horizontal level. The second and subsequent rows are placed with a vertical seam shift (at least 200 mm), leveling the surface of the insulation in the area of the joints so that the height difference is no more than 3 mm. When insulating the walls around the openings, make sure that the seams of the slabs do not intersect in their corners. Each slab is additionally secured with umbrella dowels at the rate of 5 pcs. per 1 m2.
Before applying plaster, the surface of the slabs is reinforced with fiberglass, fixed in the middle of a layer of adhesive solution with a total thickness of 5-6 mm.
The density of polystyrene foam is chosen to be 25-35 kg/m3.
Video description
Visually about mineral wool insulation in the video:
Russian mineral wool mats brands for the “wet facade” system they must correspond to index 175, imported ones must be marked “facade” and have a density above 125 kg/m3.
Attention. In the “wet facade” system, the insulation is installed in only one (!) layer. A vertical surface made of two layers of “soft” slabs with a load in the form of plaster behaves unpredictably, especially with changes in temperature and humidity conditions. Do not be fooled by arguments that the second layer of slabs overlaps the seams of the first and eliminates “cold bridges”.
The ventilated facade uses rigid mineral wool mats with a density of 80 kg/m3. If the surface of the mats is not laminated, then after attaching them to the sheathing, the surface is covered with either fiberglass or a vapor-permeable membrane.
The spacing of the lathing is chosen 2-3 cm less than the width of the mats. In addition to fastening to the sheathing, the insulation is additionally fixed to the wall with umbrella dowels.
The size of the air gap between the insulation and the cladding should be in the range of 60-150 mm.
Important. The size of 40 mm is standardized for non-ventilated air spaces.
To ventilate the layer in the cladding, inlet openings are installed in the base area and outlet openings are installed under the roof eaves. The total area of the holes must be at least 75 cm2 per 20 m2 of wall.

Ventilation grilles in the wall
As a result, is it worth insulating?
Insulating your home is a profitable investment even in the short term. The investment will quickly pay for itself by reducing heating and air conditioning costs.
Our website also presents companies specializing in facade and finishing materials, which are presented at the exhibition of Low-Rise Country houses.
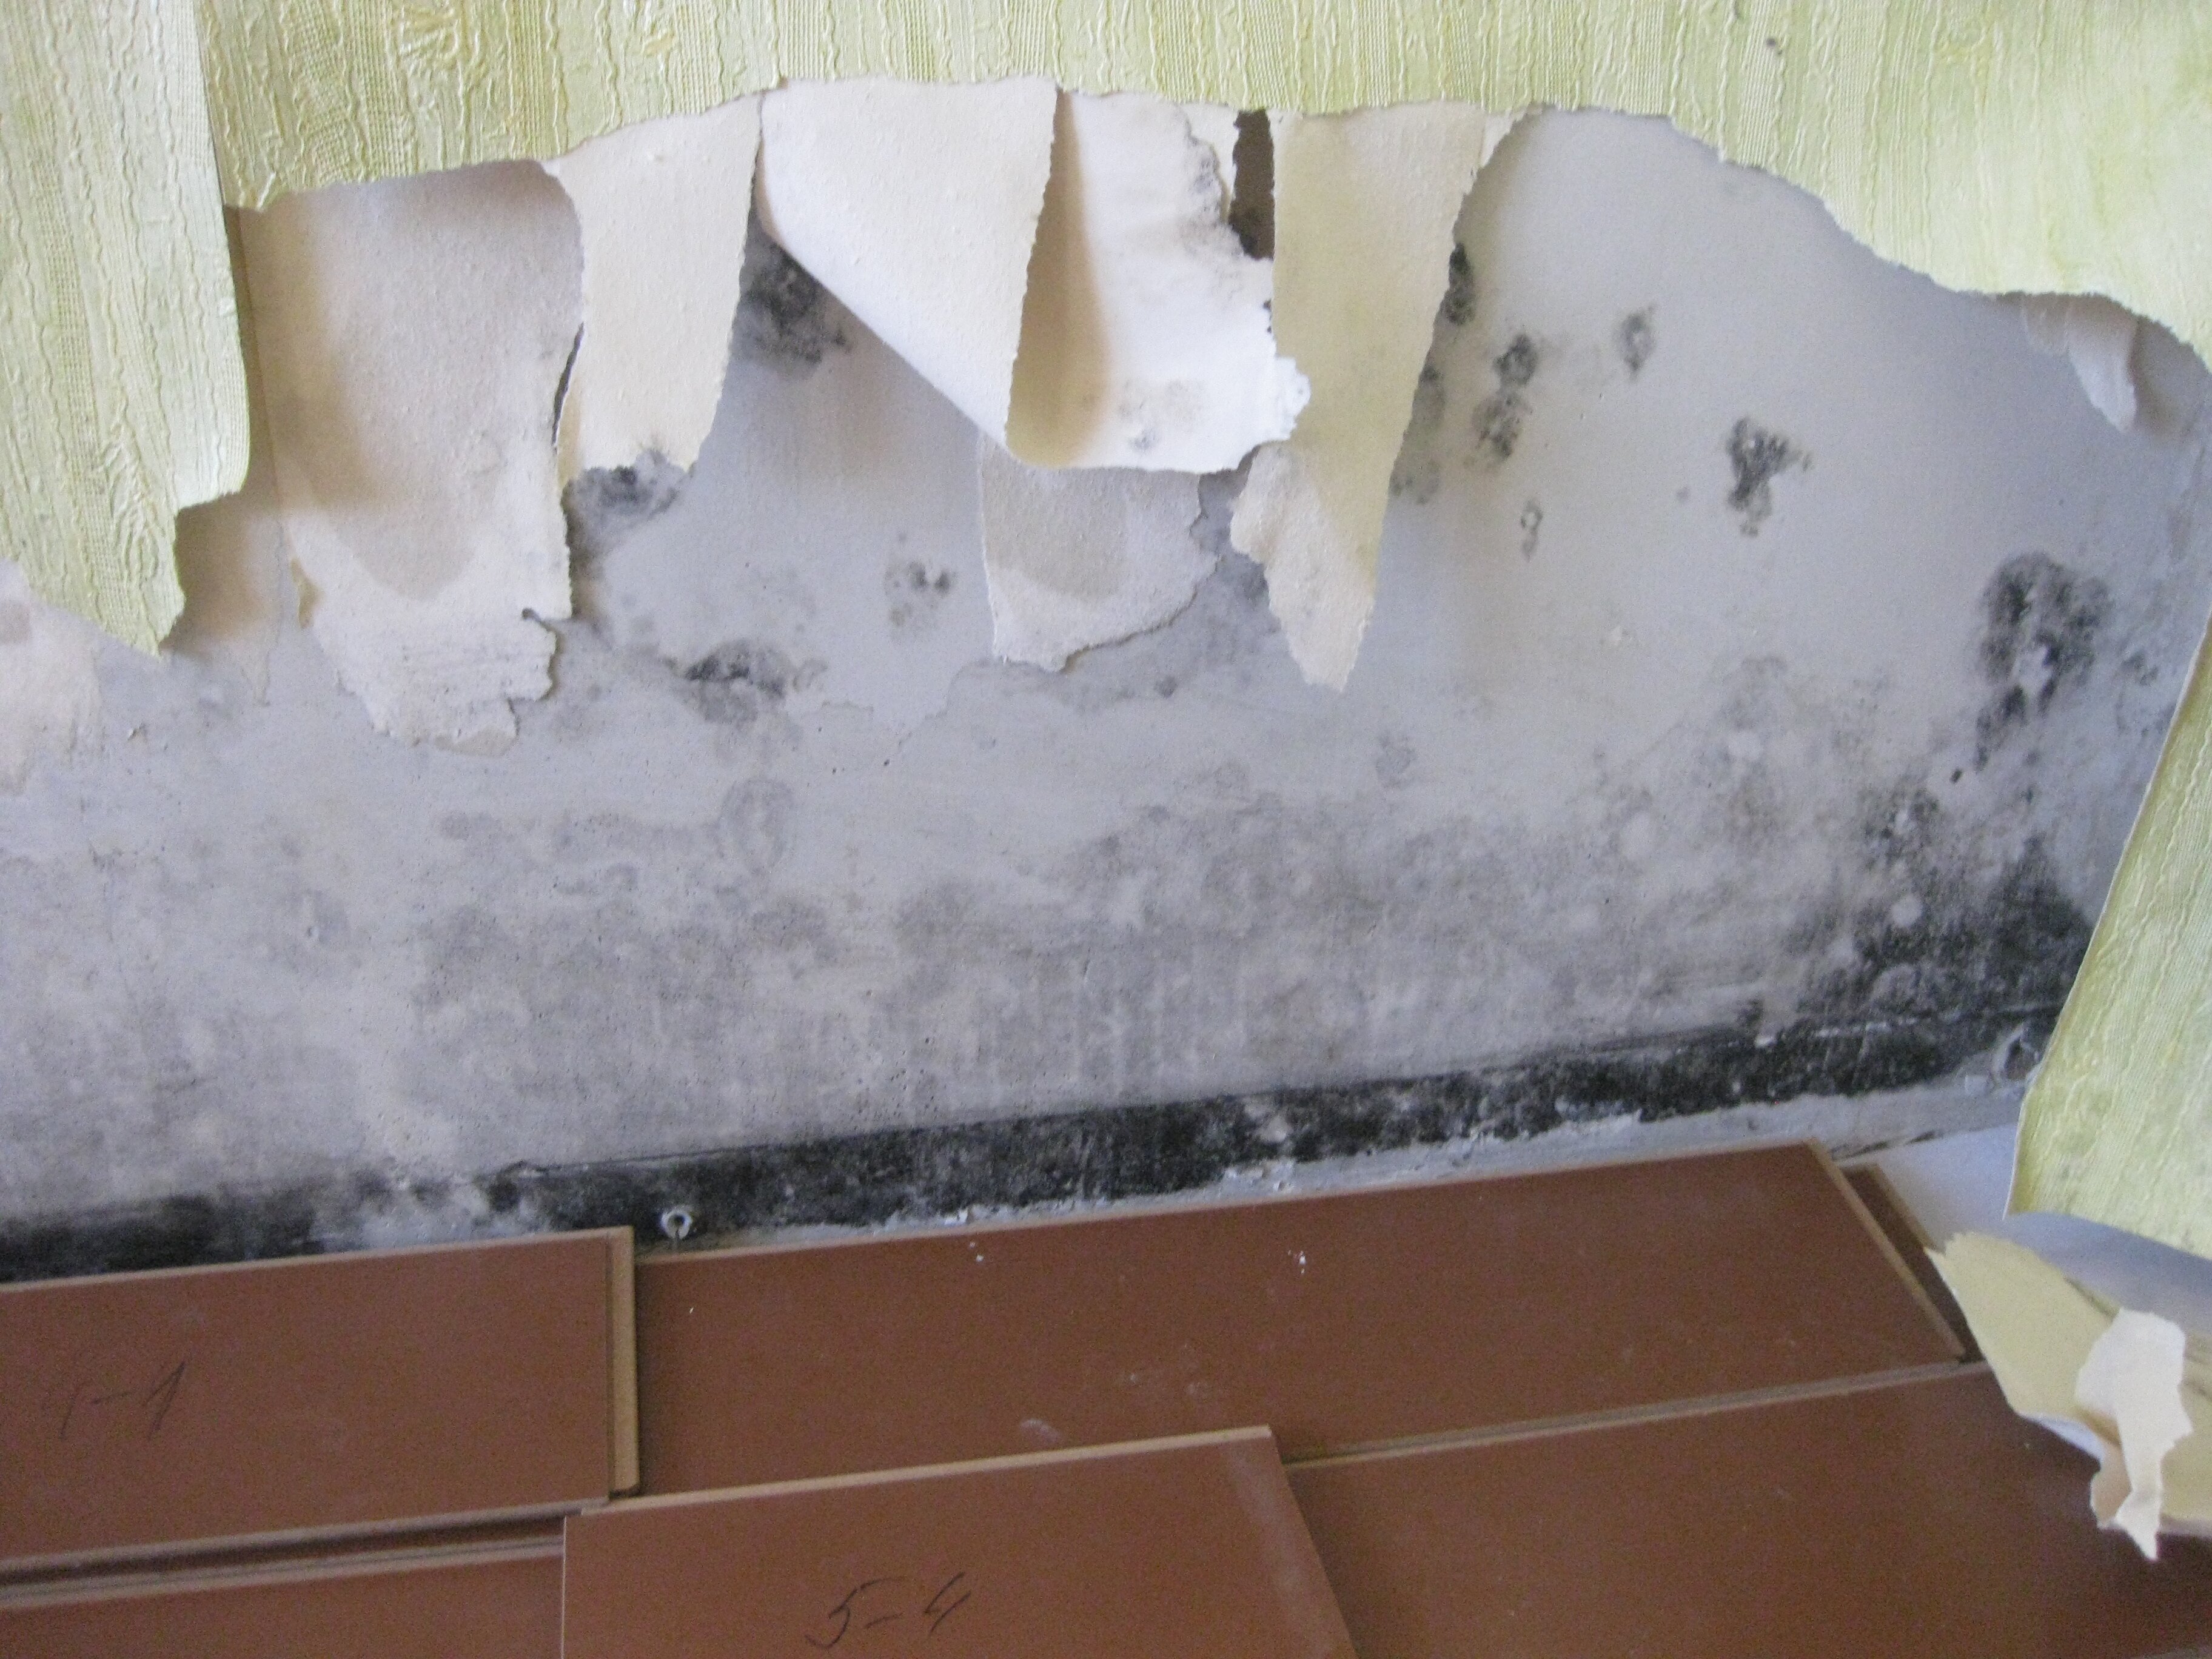
According to all building laws, insulating walls from the inside in a private house is not entirely correct, or rather, nonsense. The dew point shifts, the surface begins to get wet, and fungus develops. It is correct to insulate the outside, but what to do if this is impossible?
Disadvantages of internal thermal insulation
Insulating the walls of a private house from the inside can lead to many problems, and the appearance of common fungus is one of them. In addition, condensation vapor will at some point find its way out, soaking through the drywall and causing it to rot. wooden lining and other finishing wall coverings.
Deciding on internal insulation walls, it is important to understand what dew point is. This is the contact of warm and cold air. At this moment condensation appears. When a wall is not insulated from the inside, the dew point is located in its thickness (and this is correct according to building codes). External insulation moves it closer to the street (even better), and insulation from the inside, on the contrary, drives it into the living room. Often it appears from the inside, at the border of the wall and the insulation, or in the insulation itself. And this is fraught with the consequences described above.
According to building codes, the vapor permeability of the materials that make up the walls of a private house must be distributed in such a way that there is vapor-tight insulation inside the living space, and vapor-permeable insulation on the street side. In the middle, the vapor permeability of the material should be greater than the internal one and less than the external one.
Now let’s imagine the vapor permeability of mineral wool - a popular “breathable” insulation for interior work in a private house. Mineral wool allows steam to pass through well, while brick or concrete walls do allow it to pass through, but poorly. The result is an accumulation of moisture at the border with the insulation, a wall that is constantly getting wet and picking up moisture, and is also not insulated from the outside. Ultimately, the service life of a house insulated in this way is significantly reduced due to numerous freeze/thaw cycles.
The point of insulation is to insulate freezing walls from exposure to cold air, and this cannot be achieved by insulating from the inside. But when it’s cold in a private house, all methods are good. Let's consider popular insulation options.
Important. Be sure to correctly calculate the insulation for internal thermal insulation of walls. It is quite possible that the thickness of the walls themselves is sufficient to prevent cold air from entering the room. If this is the case, check whether the ceiling in the house is well insulated, as up to 40% of the heat can escape through it.
Insulation of walls from the inside: materials
If the insulation of the walls in the house from the inside is done correctly, but the temperature in the room is still uncomfortable, you should think about where the precious heat goes. The most likely option is the ceiling. Another thing that can speak in its favor is that the attic very often turns out to be uninsulated, not to mention the roof.
As insulation for the ceiling of a private house, it is worth considering:
- penoplex;
- mineral wool;
- expanded clay;
- ecowool;
- polyurethane foam.
In all cases, except for insulation with polyurethane foam, waterproofing is laid over attic joists cleared of dust and dirt. Insulation is placed or poured into the niches between them. Mineral wool, expanded clay and ecowool necessarily require a second layer of high-quality waterproofing. Penoplex does not need it due to its extremely low vapor permeability. You can lay a subfloor on top and arrange a room for storing necessary household equipment.
For polyurethane foam, you just need to clear the attic of debris and dust and call a professional. Once the insulation has hardened, the finished floor can be laid on top. To insulate the ceiling of a private house with ecowool, you will also need to call in the experts and pre-clean the attic. When all the niches between the joists are filled with insulation, you can start laying the subfloor from boards or plywood.

Aerated concrete slabs and/or rolled foil insulation are suitable for insulating the ceiling from the inside. Aerated concrete slabs are glued to the prepared (leveled) ceiling using foam glue. The joints between them are sealed with sealant. After the glue has dried, the insulated surface must be plastered and whitewashed, or another finishing option must be chosen.
Rolled foil insulation can be used as additional insulation on aerated concrete slabs or as self-insulation ceiling, which is already thermally insulated from the attic. This material does not require a perfectly even ceiling. It is better to purchase insulation on a self-adhesive basis. It will need to be glued to the ceiling. Then install a sheathing with a beam thickness of at least 3 centimeters. And already install the finishing coating on it, for example, suspended ceiling from plasterboard. Other options are also possible.
Internal insulation of a house is an undesirable process. It is not recommended to carry out the work yourself without consulting with specialists. They will help you calculate the required thickness of insulation for internal walls, tell you how to install it correctly and what measures to take so that the insulation from the inside does not have to be redone.